|
|
|
Porsche, and the Porsche crest are registered trademarks of Dr. Ing. h.c. F. Porsche AG.
This site is not affiliated with Porsche in any way. Its only purpose is to provide an online forum for car enthusiasts. All other trademarks are property of their respective owners. |
|
|

  |

| 914ltd |
 Aug 11 2013, 08:25 PM Aug 11 2013, 08:25 PM
Post
#1
|
|
Member  Group: Members Posts: 239 Joined: 18-April 03 From: Peoria, IL Member No.: 581 Region Association: None |
A real common 914 problem: The tabs mounted on the door post have worn and allow the new check strap to click as it reaches the next detent. A larger pin would eliminate the problem but enlarging the holes on the tabs is a problem with clearance issues. Any bright ideas? Thanks, Brad
Attached image(s) 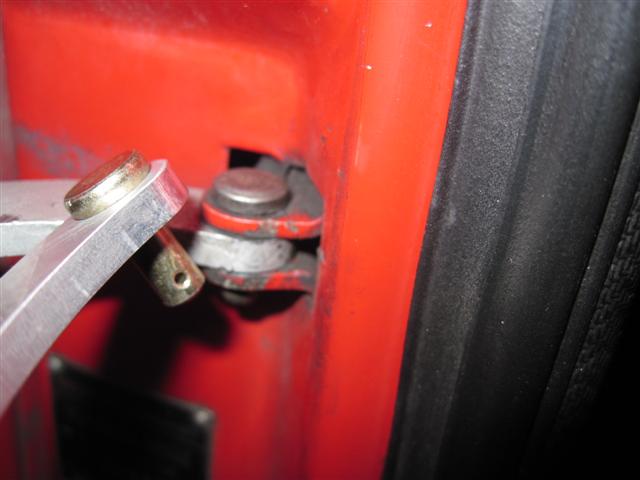
|
   |

 
|
| Dave_Darling |
Aug 11 2013, 10:05 PM
Post
#2
|
|
914 Idiot Group: Members Posts: 14,981 Joined: 9-January 03 From: Silicon Valley / Kailua-Kona Member No.: 121 Region Association: Northern California |
You need a buddy with a welder and a six-pack of beer (or other "do-me-a-favor" payment). And a good drill of the right size.
--DD |
|
|
|
| siverson |
Aug 12 2013, 12:09 AM
Post
#3
|
|
Advanced Member Group: Benefactors Posts: 2,448 Joined: 5-May 03 From: San Diego, CA Member No.: 654 Region Association: Southern California |
> The tabs mounted on the door post have worn
I've wondered about that. Is that where the clicking is coming from? Hmm... -Steve |
|
|
|
| McMark |
Aug 12 2013, 12:41 AM
Post
#4
|
|
914 Freak! Group: Retired Admin Posts: 20,179 Joined: 13-March 03 From: Grand Rapids, MI Member No.: 419 Region Association: None |
QUOTE Is that where the clicking is coming from? Hmm... Yup. |
|
|
|
| Bartlett 914 |
Aug 12 2013, 10:48 AM
Post
#5
|
|
Advanced Member Group: Members Posts: 2,214 Joined: 30-August 05 From: South Elgin IL Member No.: 4,707 Region Association: Upper MidWest |
I had the same problem with my green car. It wasn't too bad opening the hole to .250" and I used a 1/4" pin. I think I reamed it using a reamer and pliers. No room for a proper holder. 6mm =.236 vs .250 this is .007 per side. Considering it already oversize, even less.
|
|
|
|
| r_towle |
Aug 12 2013, 12:10 PM
Post
#6
|
|
Custom Member Group: Members Posts: 24,563 Joined: 9-January 03 From: Taxachusetts Member No.: 124 Region Association: North East States |
right angle die grinder with a milling bit attached, or a grinding bit.
Rich |
 |
|
| 914ltd |
Aug 18 2013, 05:42 PM
Post
#7
|
|
Member Group: Members Posts: 239 Joined: 18-April 03 From: Peoria, IL Member No.: 581 Region Association: None |
I intended to get the 1/4 ream (thanks, Mark) and report the success of the operation by now. As usual, something else has taken priority. I'll keep you posted. Thanks for your input, Brad
|
|
|
|
| partwerks |
Aug 18 2013, 09:44 PM
Post
#8
|
|
Senior Member Group: Members Posts: 1,593 Joined: 7-September 06 From: Grand Island, NE Member No.: 6,787 |
Brad,
Would clamping a piece of brass over the hole and spot welding it shut, and re drilling it to the correct size, work?? |
|
|
|
| Mike Bellis |
Aug 18 2013, 11:53 PM
Post
#9
|
|
Resident Electrician Group: Members Posts: 8,345 Joined: 22-June 09 From: Midlothian TX Member No.: 10,496 Region Association: None |
I removed the one on the drivers side. Fuch it... Stupid clicking... (IMG:style_emoticons/default/dry.gif)
|
|
|
|
| 914ltd |
Aug 19 2013, 06:22 AM
Post
#10
|
|
Member Group: Members Posts: 239 Joined: 18-April 03 From: Peoria, IL Member No.: 581 Region Association: None |
QUOTE(partwerks @ Aug 18 2013, 07:44 PM)  Brad, Would clamping a piece of brass over the hole and spot welding it shut, and re drilling it to the correct size, work?? The problem is the tabs are too close to the door post. Even a right angle drill won't work. |
|
|
|
| Firstcar |
Aug 19 2013, 07:02 AM
Post
#11
|
|
Obsessive amateur mechanic Group: Members Posts: 97 Joined: 17-March 11 From: MA -South Shore Member No.: 12,831 Region Association: North East States |
I used a short bolt with a nylon nut in place of the pin. The bolt was large enough diameter to fill the hole in the stay (1/4"?) and just long enough to secure a nylon nut underneath the tabs. Easy to install and tighten. I tightened the nut just enough to stop the stay from moving and clicking. Not stock, but works great and is reversible.
|
|
|
|
| Firstcar |
Aug 19 2013, 07:04 AM
Post
#12
|
|
Obsessive amateur mechanic Group: Members Posts: 97 Joined: 17-March 11 From: MA -South Shore Member No.: 12,831 Region Association: North East States |
QUOTE(Firstcar @ Aug 19 2013, 09:02 AM) I used a short bolt with a nylon nut in place of the pin. The bolt was large enough diameter to fill the hole in the stay (1/4"?) and just long enough to secure a nylon nut underneath the tabs. Easy to install and tighten. I tightened the nut just enough to stop the stay from moving and clicking. Not stock, but works great and is reversible. Make that a nyloc nut (damn spell check) |
|
|
|
| r_towle |
Aug 19 2013, 11:12 AM
Post
#13
|
|
Custom Member Group: Members Posts: 24,563 Joined: 9-January 03 From: Taxachusetts Member No.: 124 Region Association: North East States |
QUOTE(914ltd @ Aug 18 2013, 07:42 PM) I intended to get the 1/4 ream (thanks, Mark) and report the success of the operation by now. As usual, something else has taken priority. I'll keep you posted. Thanks for your input, Brad Is this a hand operated tool? Something like a socket wrench can be used? There is a kit for this on a 356, and a beetle, same issue really. rich |
|
|
|
| Bartlett 914 |
Aug 19 2013, 11:50 AM
Post
#14
|
|
Advanced Member Group: Members Posts: 2,214 Joined: 30-August 05 From: South Elgin IL Member No.: 4,707 Region Association: Upper MidWest |
QUOTE(r_towle @ Aug 19 2013, 12:12 PM) QUOTE(914ltd @ Aug 18 2013, 07:42 PM) I intended to get the 1/4 ream (thanks, Mark) and report the success of the operation by now. As usual, something else has taken priority. I'll keep you posted. Thanks for your input, Brad Is this a hand operated tool? Something like a socket wrench can be used? There is a kit for this on a 356, and a beetle, same issue really. rich I just used a chucking reamer I had in my shop. There really isn't a lot of room to work. I did this a long time age (The car is now scrapped). I think I used either pliers or vice grips to turn it a little at a time. The hole is already oversize so you are not talking off a lot of material. The reamer can then do the lower hole first reaming in the up direction then push through to do the top hole. I think that is how I did it. This way both are the same diameter and in line with each other. 5 to 10 min max to do it |
|
|
|
| cary |
Aug 19 2013, 09:25 PM
Post
#15
|
|
Advanced Member Group: Members Posts: 3,900 Joined: 26-January 04 From: Sherwood Oregon Member No.: 1,608 Region Association: Pacific Northwest |
I put in a brass bushing from the little drawers at Ace hardware.
Did it on my 911. |
|
|
|
| ChrisFoley |
Nov 21 2013, 04:14 PM
Post
#16
|
|
I am Tangerine Racing Group: Members Posts: 7,909 Joined: 29-January 03 From: Bolton, CT Member No.: 209 Region Association: None |
QUOTE(Bartlett 914 @ Aug 19 2013, 12:50 PM) I just used a chucking reamer I had in my shop. Like this: 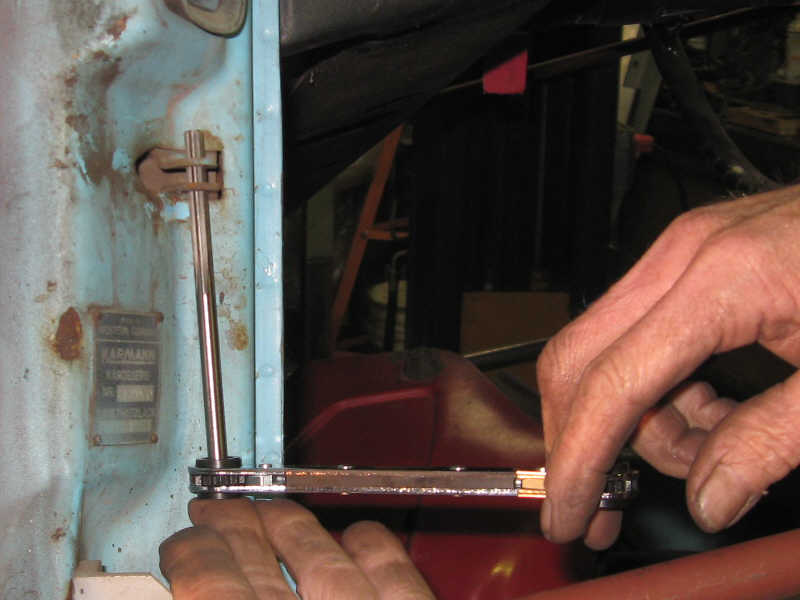 I ground a square on the end of a shortened .250" reamer to fit into the 3/16" square ratchet. Worked perfectly. We tried several 1/4" clevis pins from McMaster. The best fitting ones were bare steel unfortunately. A good choice for diy is a 1/4" bolt with long straight shank cut to length and drilled for a cotter pin. |
|
|
|
| Bartlett 914 |
Nov 21 2013, 06:59 PM
Post
#17
|
|
Advanced Member Group: Members Posts: 2,214 Joined: 30-August 05 From: South Elgin IL Member No.: 4,707 Region Association: Upper MidWest |
QUOTE(Racer Chris @ Nov 21 2013, 05:14 PM) QUOTE(Bartlett 914 @ Aug 19 2013, 12:50 PM) I just used a chucking reamer I had in my shop. Like this: I ground a square on the end of a shortened .250" reamer to fit into the 3/16" square ratchet. Worked perfectly. We tried several 1/4" clevis pins from McMaster. The best fitting ones were bare steel unfortunately. A good choice for diy is a 1/4" bolt with long straight shank cut to length and drilled for a cotter pin. (IMG:style_emoticons/default/agree.gif) The ratchet is a bit improvement. I think I just used an open end wrench |
|
|
|
|
1 User(s) are reading this topic (1 Guests and 0 Anonymous Users)
0 Members:

|
Lo-Fi Version | Time is now: 25th April 2024 - 08:48 PM |
Invision Power Board
v9.1.4 © 2024 IPS, Inc.