|
|
|
Porsche, and the Porsche crest are registered trademarks of Dr. Ing. h.c. F. Porsche AG.
This site is not affiliated with Porsche in any way. Its only purpose is to provide an online forum for car enthusiasts. All other trademarks are property of their respective owners. |
|
|


| jimkelly |
 Aug 21 2013, 10:29 AM Aug 21 2013, 10:29 AM
Post
#1
|
|
Delaware USA  Group: Members Posts: 4,969 Joined: 5-August 04 From: Delaware, USA Member No.: 2,460 Region Association: MidAtlantic Region |
my original argon valve was bent up and leaked, so I ordered a new one. it had again, different sized threads, jeez.
so I went to ace ( r towel advice) and went with barbed fitting at both ends since the new argon valve came with a 1/4 barb already. question - when you are done welding and want to purge the lines of argon, after shutting the valve on the tank, do you have to waste wire or is there a way to purge without wasting wire? also, I expected the bead to stay at 15 psi when i turned the brass valve open, but it only rises to 15 psi or what ever I set it at, when I pull the red trigger on the mig - is this normal? also - I prepped some of my old real estate signs for practice : ) jim Attached image(s) 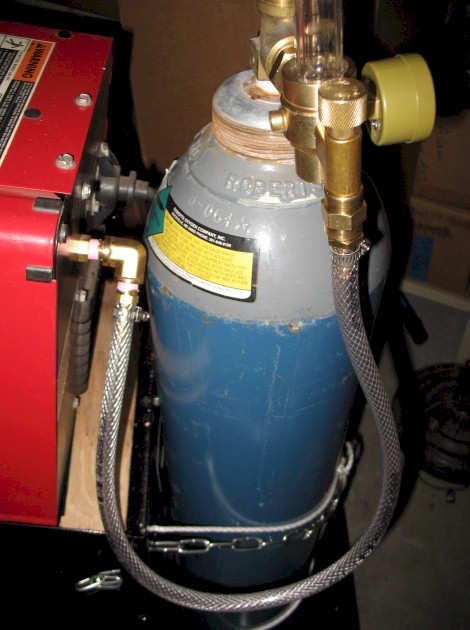 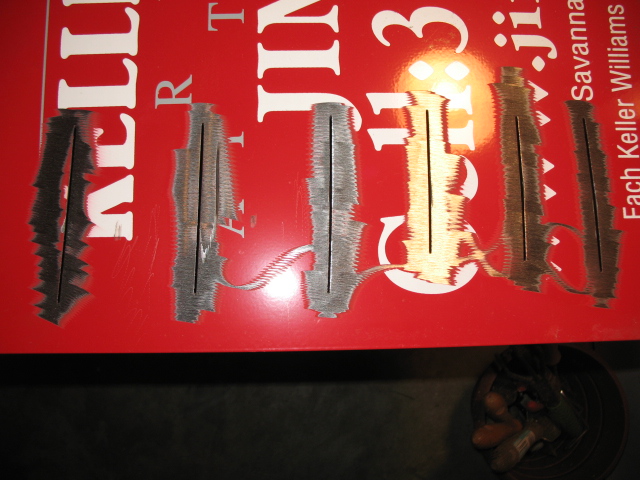 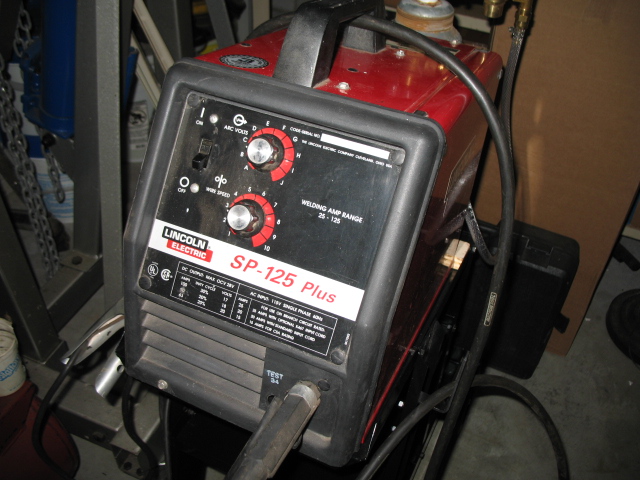
|
   |

 
|
  |
Replies(20 - 39)
| infraredcalvin |
Aug 21 2013, 07:54 PM
Post
#21
|
|
Distracted Member Group: Members Posts: 1,523 Joined: 25-August 08 From: Ladera Ranch, CA Member No.: 9,463 Region Association: Southern California |
Start on thicker metal, and start understanding what you're trying to get the feel for. You'll start to understand "the feel" then move towards thinner metal.
I'm a beginner as well, have some sheet metal practice welds that look similar, but don't worry about wasting the wire, get the big spools and practice away. Someone else may want to chime in but gass at 15 seems a little light, I think my welder likes 20. |
|
|
|
| jimkelly |
Aug 21 2013, 08:01 PM
Post
#22
|
|
Delaware USA Group: Members Posts: 4,969 Joined: 5-August 04 From: Delaware, USA Member No.: 2,460 Region Association: MidAtlantic Region |
all good and helpful comments - thanks guys!
|
|
|
|
| Elliot Cannon |
Aug 21 2013, 08:07 PM
Post
#23
|
|
914 Guru Group: Retired Members Posts: 8,487 Joined: 29-December 06 From: Paso Robles Ca. (Central coast) Member No.: 7,407 Region Association: None |
QUOTE(rick 918-S @ Aug 21 2013, 06:29 PM)  I never turn off the valve on my tank. My gauge is 30 years old and never had an issue. I have barbed fitting and clamps. Never had a leak. My tank lasts years. The difference might be, that my gauges and valves were made in Shanghai. (IMG:style_emoticons/default/av-943.gif) |
|
|
|
| speed metal army |
Aug 21 2013, 09:27 PM
Post
#24
|
|
Waiting for the rain to stop... Group: Members Posts: 1,068 Joined: 4-September 10 From: PNW Member No.: 12,137 Region Association: Canada |
Pushing is usually better..
An old fart used to tell us young fellas his philosophy on mig.. "What would you rather do?? Push your wire or pull it??" (IMG:style_emoticons/default/rolleyes.gif) Corny,but true. Practicing on uncut material is good. Laying beads, over and over. Then work on lap joints.. Tees. Outside corners etc. |
 |
|
| tomeric914 |
Aug 21 2013, 09:44 PM
Post
#25
|
|
One Lap of America in a 914! Group: Members Posts: 1,259 Joined: 25-May 08 From: Syracuse, NY Member No.: 9,101 Region Association: North East States |
.023 for 24 gauge
.030 for 12 gauge (1/8") YMMV, depending on your experience level Trying to bridge a gap with the wrong size wire right out of the gate will only frustrate the hell out of you. To do sheet metal right with minimal warpage, you need to weld a series of SHORT 1/4" length beads every 6 inches, then go back and do the same every 3 inches, then every 1-1/2 inches, etc. until the butt weld is complete. Keep the .030 in and get some 1/8" raw steel plate and practice running beads as speed metal army stated above. YEARS AGO, as a young welder just starting out, I didn't have access to a MIG. SO I got real good at welding sheet metal with a stick welder. How'd I do it? LOTS of practice. (IMG:style_emoticons/default/welder.gif) |
|
|
|
| jimkelly |
Aug 22 2013, 05:48 AM
Post
#26
|
|
Delaware USA Group: Members Posts: 4,969 Joined: 5-August 04 From: Delaware, USA Member No.: 2,460 Region Association: MidAtlantic Region |
guys - thank you all
think I better get me some- easy grind - .023 wire scottyb wrote "Thermodynamics = firepower // ESAB = spoolarc" no sense practicing on thicknesses I have no immediate intention to be working with http://www.914world.com/bbs2/index.php?sho...p;hl=easy+Grind jim |
|
|
|
| 76-914 |
Aug 22 2013, 08:30 AM
Post
#27
|
|
Repeat Offender & Resident Subaru Antagonist Group: Members Posts: 13,507 Joined: 23-January 09 From: Temecula, CA Member No.: 9,964 Region Association: Southern California |
Jim, easygrind is about 4x's what regular wire is and you won't need that until you start your exposed body work. FWIW, I do most all my welding in the garage where the wind doesn't blow and 10psi of mix is usually enough. If there is a breeze coming thru I'll boost it up to about 15psi. The copper spoon is the trick and you will burn thru a few (thinking you've managed to weld copper to steel (IMG:style_emoticons/default/av-943.gif) ) in the beginning. I don't know how our resident body experts keep a spoon in place but I use cheap magnets when my one and only pair of large C clamp pliers won't fit. One more beginner tip; clear the area of flammable materials. In the past 9 mo's I have ignited 3 shop towels right next to my head when welding. (IMG:style_emoticons/default/slap.gif) PS, get some .023". You'll need some and a small spool is only about $7.
|
|
|
|
| McMark |
Aug 22 2013, 08:54 AM
Post
#28
|
|
914 Freak! Group: Retired Admin Posts: 20,179 Joined: 13-March 03 From: Grand Rapids, MI Member No.: 419 Region Association: None |
On this sheet metal I usually don't run a bead at all. Just a series of well placed 'spots'. A real welder (IMG:style_emoticons/default/rolleyes.gif) would probably lecture me on proper technique, but it's worked well for me.
|
|
|
|
| Brian_Boss |
Aug 22 2013, 11:04 AM
Post
#29
|
|
Member Group: Members Posts: 324 Joined: 3-June 03 From: Dallas, TX Member No.: 781 |
You are starting off by trying to do one of the hardest tasks (bridging a 1/16" gap). I think your learning curve will end up faster if you start with just a bead.
I suggest: 1) Run a straight bead 4-6" across your practice piece. Try push and pull, flat, uphill and downhill. When you can make a nice bead, move on. 2) Lap joint - cut a piece off your practice piece and scab it over part of the remainder. You can also drill some holes in the cut off piece and practice plug welds. 3) Butt joint - get two piece with nice, tight fit-up. 4) When you get comfortable with the above, work on filling a gap. Hope this helps. P.S. I would grind more (probably all) paint off your workpiece. |
|
|
|
| jimkelly |
Aug 22 2013, 11:21 AM
Post
#30
|
|
Delaware USA Group: Members Posts: 4,969 Joined: 5-August 04 From: Delaware, USA Member No.: 2,460 Region Association: MidAtlantic Region |
great advice
I think I was expecting to hear much of what you guys are saying, from reading older threads on mig welding. I will keep showing my practice welds here for comment. off to harbor freight, I need a welding shirt, some nozzle grease, some welding vice grips, and I guess some regular .023 wire for now. just got back from a visit to Milton de dogfish head beer factory. lots of stainless piping, welded up really nice. i'll post some pics later (pics posted). forgot to mention the sausages and sample beer, yumm-O thanks again! jim Attached image(s)   
|
|
|
|
| jimkelly |
Aug 22 2013, 11:22 AM
Post
#31
|
|
Delaware USA Group: Members Posts: 4,969 Joined: 5-August 04 From: Delaware, USA Member No.: 2,460 Region Association: MidAtlantic Region |
got it - beads are for butts (IMG:style_emoticons/default/bootyshake.gif)
QUOTE(McMark @ Aug 22 2013, 07:54 AM) On this sheet metal I usually don't run a bead at all. Just a series of well placed 'spots'. A real welder (IMG:style_emoticons/default/rolleyes.gif) would probably lecture me on proper technique, but it's worked well for me. |
|
|
|
| relentless |
Aug 22 2013, 12:28 PM
Post
#32
|
|
Member Group: Members Posts: 350 Joined: 1-April 07 From: Oregon Member No.: 7,636 |
Jim, do a Youtube search for "Restolad" as he has a tutorial on how to weld thin sheet metal. Actually all his videos are very educational and he shows how to use the copper backing plate to keep from blowing holes in thin metal.
|
|
|
|
| ChrisFoley |
Aug 22 2013, 06:41 PM
Post
#33
|
|
I am Tangerine Racing Group: Members Posts: 7,934 Joined: 29-January 03 From: Bolton, CT Member No.: 209 Region Association: None |
QUOTE(Brian_Boss @ Aug 22 2013, 12:04 PM) You are starting off by trying to do one of the hardest tasks (bridging a 1/16" gap). I think your learning curve will end up faster if you start with just a bead. I suggest: 1) Run a straight bead 4-6" across your practice piece. Try push and pull, flat, uphill and downhill. When you can make a nice bead, move on. 2) Lap joint - cut a piece off your practice piece and scab it over part of the remainder. You can also drill some holes in the cut off piece and practice plug welds. 3) Butt joint - get two piece with nice, tight fit-up. 4) When you get comfortable with the above, work on filling a gap. Hope this helps. P.S. I would grind more (probably all) paint off your workpiece. (IMG:style_emoticons/default/agree.gif) 100% |
|
|
|
| aharder |
Aug 22 2013, 07:42 PM
Post
#34
|
|
Advanced Member Group: Members Posts: 4,405 Joined: 6-September 11 From: Dallas Texas Member No.: 13,524 Region Association: Southwest Region |
This thread makes me want to go buy a welder so I can try all the stuff I just read (IMG:style_emoticons/default/welder.gif)
|
|
|
|
| bigkensteele |
Aug 22 2013, 09:13 PM
Post
#35
|
|
Major Member Group: Members Posts: 2,197 Joined: 30-August 04 From: Cincinnati, OH Member No.: 2,660 Region Association: South East States |
I am in the process of backdating my bumpers. On the back I drilled out the spotwelds with a relatively flat-headed bit, thinking that I wouldn't go all the way through. Wrong x 8.
With probably about 30 minutes more experience than you, Jim, I started to fill the holes. The first 4 on the passenger side took me an hour and a half. The other side took me 20 minutes. Practice does pay, and I am going to get some sheet metal this weekend and take advantage of all the advice above. |
|
|
|
| Andyrew |
Aug 22 2013, 11:59 PM
Post
#36
|
|
Spooling.... Please wait Group: Members Posts: 13,376 Joined: 20-January 03 From: Riverbank, Ca Member No.: 172 Region Association: Northern California |
Jim,
I prefer .30 wire personally for most bodywork. You should be using as little gas as required to keep the weld from bubbling/sputtering. I use about 15, take it down to 10 in a super controlled environment and up to 30 in windy weather. You need to practice running lines before you start bridging gaps like the 3/32nds gap you were working on. I bridge a gap like that with either a lot of wire speed and VERY quickly(This takes a lot of talent... and practice) or with tacks. Run lines till they are solid beads that have great heat penetration. Do 10 lines 4" long, number them and post up a pic. We will help you analyze and modify your technique. |
|
|
|
| Andyrew |
Aug 23 2013, 12:03 AM
Post
#37
|
|
Spooling.... Please wait Group: Members Posts: 13,376 Joined: 20-January 03 From: Riverbank, Ca Member No.: 172 Region Association: Northern California |
Also I've never purged. I have a semi leaky system after my good welder setup got stolen and I had to build one off of a budget Lincoln 100, but I never purge. I do however shut off the valve after every short use.
|
|
|
|
| jimkelly |
Aug 23 2013, 04:27 AM
Post
#38
|
|
Delaware USA Group: Members Posts: 4,969 Joined: 5-August 04 From: Delaware, USA Member No.: 2,460 Region Association: MidAtlantic Region |
I ordered an eastwood metal gauge so I can know for sure what thickness my practice metal is. $12 shipped on ebay. should be a big help.
andyrew, I will do that bead running thing and post pics asap. Attached image(s) 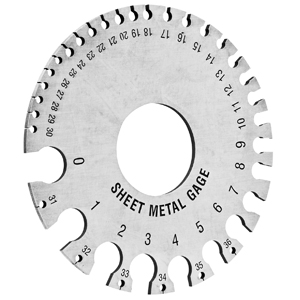
|
|
|
|
| jimkelly |
Aug 23 2013, 04:36 AM
Post
#39
|
|
Delaware USA Group: Members Posts: 4,969 Joined: 5-August 04 From: Delaware, USA Member No.: 2,460 Region Association: MidAtlantic Region |
bigken
I too am backdating bumpers and removing all engine bay tin, and have been using this spot weld tool - only a very few drill thrus with it. Attached image(s) 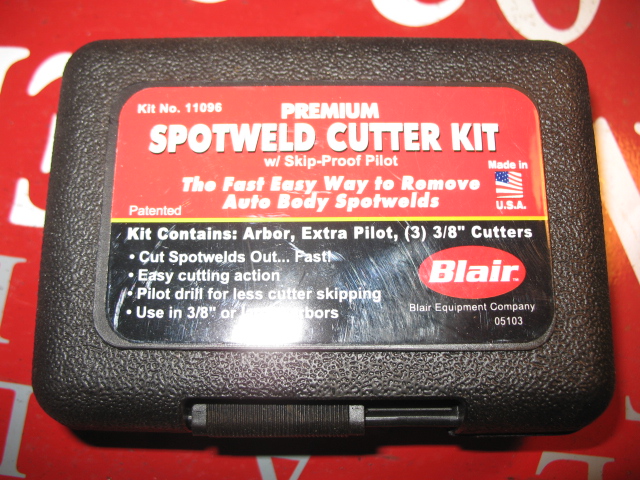   
|
|
|
|
| rick 918-S |
Aug 23 2013, 06:18 AM
Post
#40
|
|
Hey nice rack! -Celette Group: Members Posts: 20,473 Joined: 30-December 02 From: Now in Superior WI Member No.: 43 Region Association: Northstar Region |
Here's some welding stuff. Copper strip use on page 3.
http://www.914world.com/bbs2/index.php?sho...107923&st=0 And here is some info on splitting spot welds. Lots of ways to get the end result. This is just one I use. http://www.914world.com/bbs2/index.php?sho...=212470&hl= |
|
|
|
|
1 User(s) are reading this topic (1 Guests and 0 Anonymous Users)
0 Members:

|
Lo-Fi Version | Time is now: 1st June 2024 - 10:28 AM |
Invision Power Board
v9.1.4 © 2024 IPS, Inc.