|
|
|
Porsche, and the Porsche crest are registered trademarks of Dr. Ing. h.c. F. Porsche AG.
This site is not affiliated with Porsche in any way. Its only purpose is to provide an online forum for car enthusiasts. All other trademarks are property of their respective owners. |
|
|

  |

| racerbvd |
 Sep 23 2013, 09:42 PM Sep 23 2013, 09:42 PM
Post
#21
|
|
Advanced Member  Group: Members Posts: 2,381 Joined: 3-February 03 From: Sunny FL. Member No.: 226 Region Association: None |
QUOTE(OmaPossu @ Sep 22 2013, 05:54 AM)  I have asked Porsche Classic for help to have correct painting to my six. It took 3 months to have answer and it was: Please tell your 914:s VIN. And now waiting again.. I talked to the head of restoration for PC at Parade a few years back, and he wasn't sure either, Prescott Kelly some people in a German 914 club, and the answers were still confusing, 1st Porsche had an agreement with VW NOT to undercoat the 914-6s, but through VWOA, they could have them undercoated after they came into the port(and some were better than others, so there were different colors & quality of the work) . 2nd Even though the 914-6s because of the agreement with VWOA[/b] WERE NOT suppose to have undercoating, yet one National PCA concours 914 guru picked his Six up, from the port, directly off the ship, and it had undercoating, and ours also appears to have come from the factory with it. The guy who picked up his Brand New Six from the port LOST a concours because his car was undercoated (and this is when the cars were new) to another six that wasn't. Since there is no documentation from Porsche stating that they undercoated any of the Sixes, and the VWOA agreement, I was told that if I wanted to be "correct" even if my car actually came from the factory with the undercoating, not to redo it (IMG:style_emoticons/default/mad.gif) I'm posting some pix of concours cars (including the early 911 that Porsche classic did) so you can see a glimpse the bottom & fender wells.. 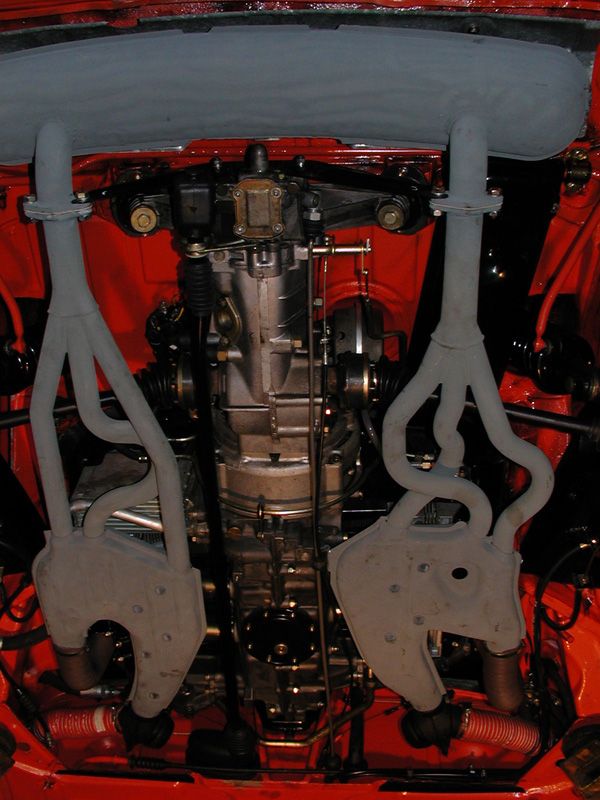  Look at the 914s in the background, notice the wheel wells.  Again, look at the wheel wells.  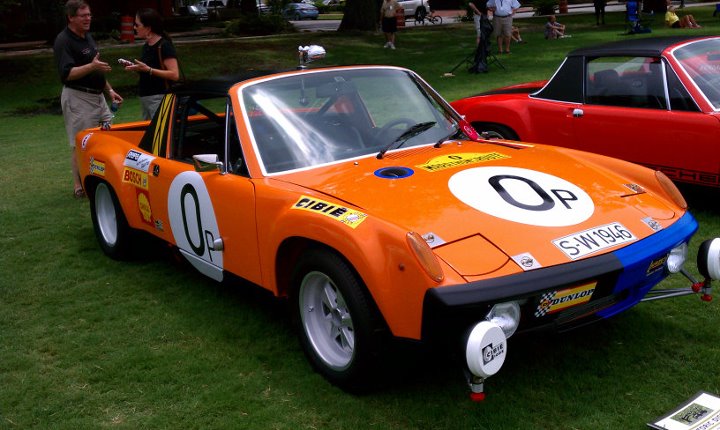 Here is a top & bottom picture of the early 911 restored by Porsche.. 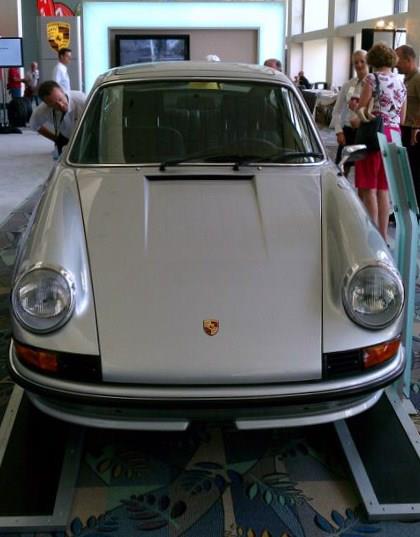 Attached image(s) 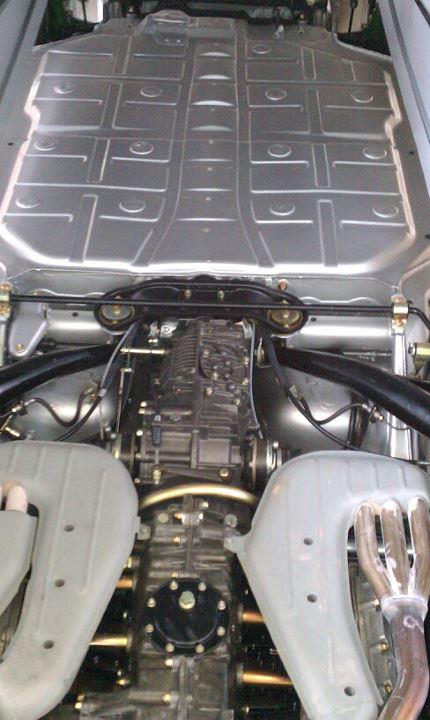
|
   |

 
|
| sixnotfour |
Sep 24 2013, 02:43 PM
Post
#22
|
|
914 Wizard Group: Members Posts: 11,274 Joined: 12-September 04 Member No.: 2,744 Region Association: NineFourteenerVille |
That is not enough proof, every six I have ever had or cut up has had the thin undercoat, per my picture of the green -6, that I am 2nd owner of.
Metallic 914-6's maybe different, because of the 2 part piant.. |
|
|
|
| racerbvd |
Sep 24 2013, 04:35 PM
Post
#23
|
|
Advanced Member Group: Members Posts: 2,381 Joined: 3-February 03 From: Sunny FL. Member No.: 226 Region Association: None |
QUOTE(sixnotfour @ Sep 24 2013, 01:43 PM) That is not enough proof, every six I have ever had or cut up has had the thin undercoat, per my picture of the green -6, that I am 2nd owner of. Metallic 914-6's maybe different, because of the 2 part piant.. Well, I researched it talking to friends what were worked for Brumos when the Sixes were new, talked to the PCA's 914 guru at length, talked to other friends who do concours Porsche restorations and raced & wrenched when the Sixes were racing IMSA, ect, ect, ect, and it is clear that our Six also came with undercoating, but talking to the PCA concours weenies (the old ones, not the boxster breed currently judging) and I posted the results and what I was told and what I was told that I needed to do if I wanted to be competitive at "Parade" level. I sure wish they told me that they recognized that some 914-6s did indeed come from Porsche (not the port, where it will would show up on the dealer paperwork and varies in color and quality, so I was told) with the undercoating, as scraping off the factory undercoating was a major PITA and having the bodywork to make the bottom look perfect is very $$$$.. If you can find concrete info (and I have been told this is the single biggest issue concerning what is "correct" on the bottom of a "Six" for decades) it would help others do the right thing & maybe save some money. I posted the question on multiple boards and still, what I posted was the most info I could find out on the subject. 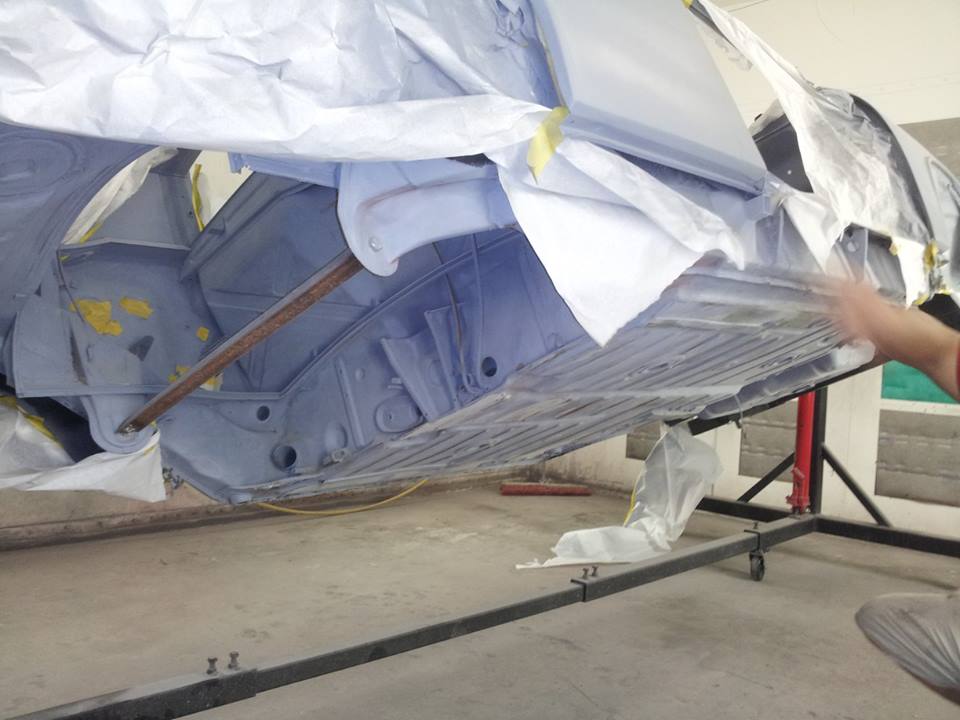 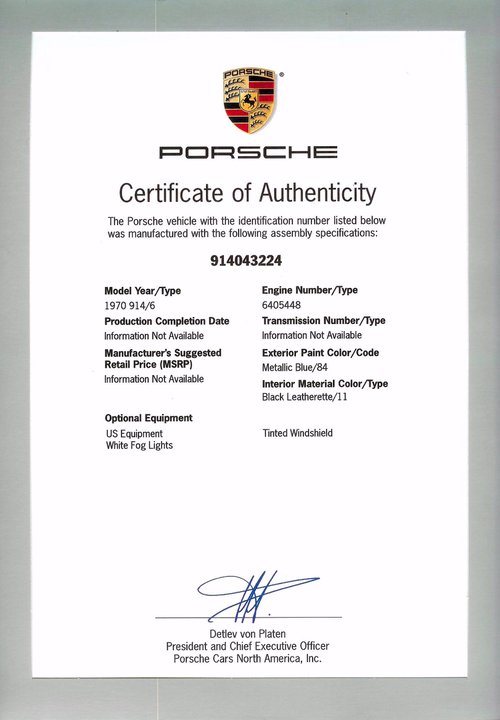 My engine (IMG:style_emoticons/default/happy11.gif) 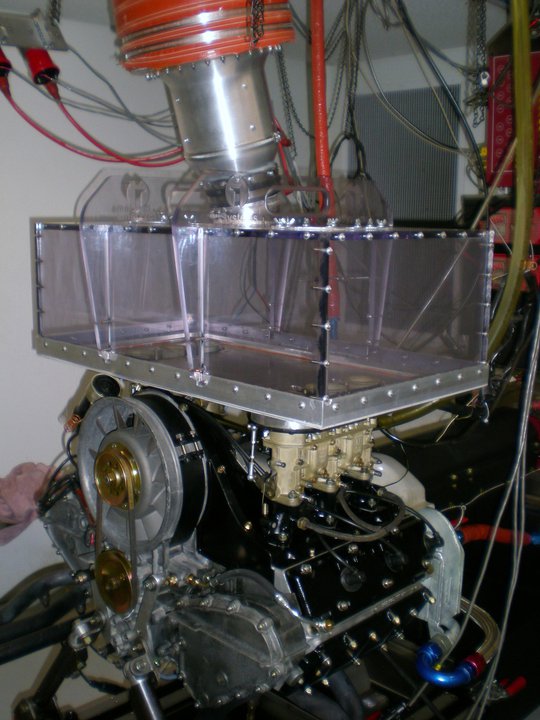 Attached image(s) 
|
|
|
|
| McMark |
Sep 25 2013, 04:44 PM
Post
#24
|
|
914 Freak! Group: Retired Admin Posts: 20,180 Joined: 13-March 03 From: Grand Rapids, MI Member No.: 419 Region Association: None |
We're talking about two things here. In my experience, four cylinder cars have paint sprayed directly on the metal on the bottom side of the car, just like a fender. On the Sixes (and early 911s) there is a layer of seam sealer (white and flexible) before the paint went on. After that some cars where undercoated after paint, which is what Byron is talking about.
|
|
|
|
| scotty b |
Sep 25 2013, 08:11 PM
Post
#25
|
|
rust free you say ? Group: Members Posts: 16,375 Joined: 7-January 05 From: richmond, Va. Member No.: 3,419 Region Association: None |
This was answered in the weenie forum so why i it here ?
FIRST 6's were done in the same factory as the 911 and had the SAME PVC undercoating the 911's did. I posted pics of this in the CW thread. I also posted many pics of the underside of Cairo's car in his build thread. His underside was one of the cleanest most original ones I have seen, even still had the factory gold overspray under the aftermarket black coating. 1 bare metal 2 grey primer 3 PVC undercoating 4 overspray from body painting Mark, I also have that gun and can't get it " just right " I just recently got the BIG gun from WURTH that is supposedly the correct one for duplicating the factory finish. I'll post results once I get time to play with it. Also, WURTH SKS has for years been the go to for factory undercoating, but recently they stopped selling it in grey and now only sell it in black (IMG:style_emoticons/default/dry.gif) I have found another brand that is in the proper grey, and will be trying it with the new gun. This stuff is also half the price of SKS and was recommended to me by a Ferrari restorer. I'll try and remember to take some pics of both tomorrow |
|
|
|
| 914forme |
Sep 25 2013, 08:25 PM
Post
#26
|
|
Times a wastin', get wrenchin'! Group: Members Posts: 3,899 Joined: 24-July 04 From: Dayton, Ohio Member No.: 2,388 Region Association: None |
QUOTE(scotty b @ Sep 25 2013, 10:11 PM) Also, WURTH SKS has for years been the go to for factory undercoating, but recently they stopped selling it in grey and now only sell it in black (IMG:style_emoticons/default/dry.gif) I have found another brand that is in the proper grey, and will be trying it with the new gun. This stuff is also half the price of SKS and was recommended to me by a Ferrari restorer. I'll try and remember to take some pics of both tomorrow Please do, I need a bunch of this for my current project and have been hoping to find SKS gray on someones shelf, yet to find it. (IMG:style_emoticons/default/headbang.gif) But if this stuff works just as well then Im in. |
|
|
|
| scotty b |
Sep 27 2013, 06:17 PM
Post
#27
|
|
rust free you say ? Group: Members Posts: 16,375 Joined: 7-January 05 From: richmond, Va. Member No.: 3,419 Region Association: None |
Gun, new coating ( I have yet to try either ) and a piece of original undercoating from a 6.
Attached image(s)  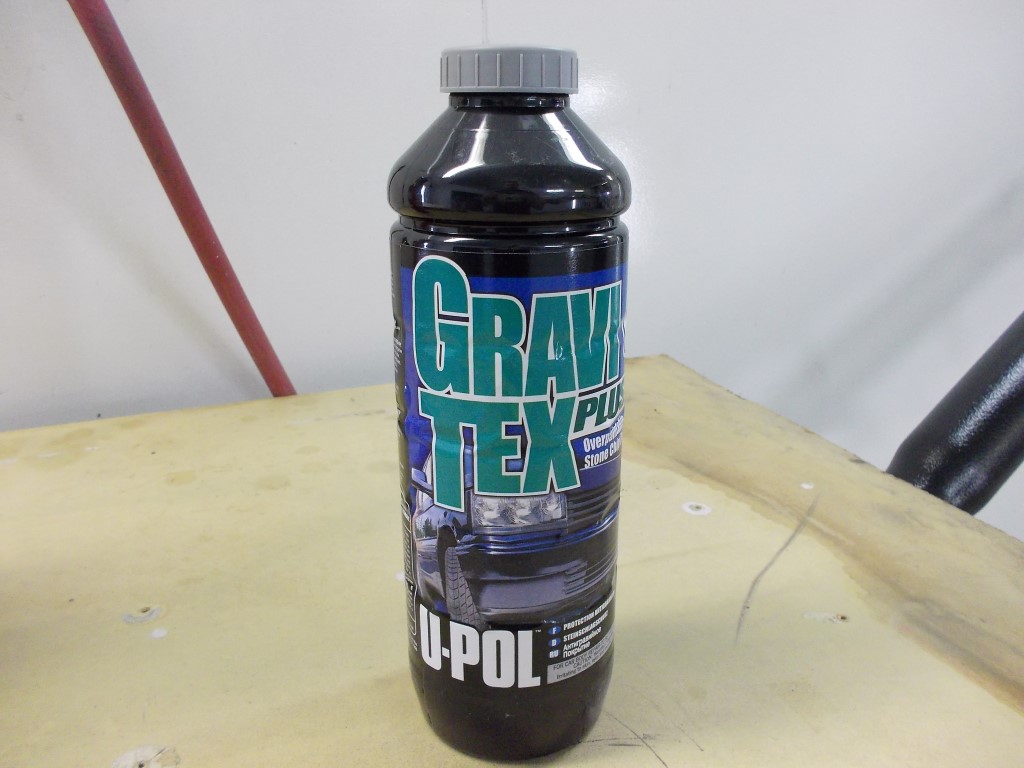 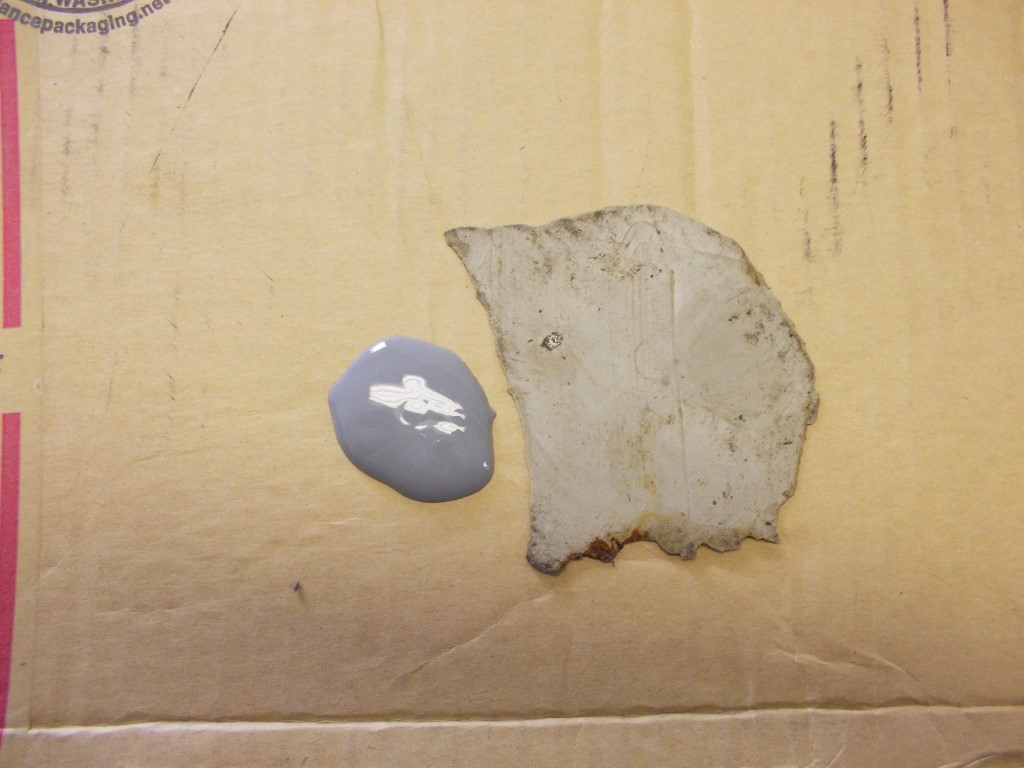 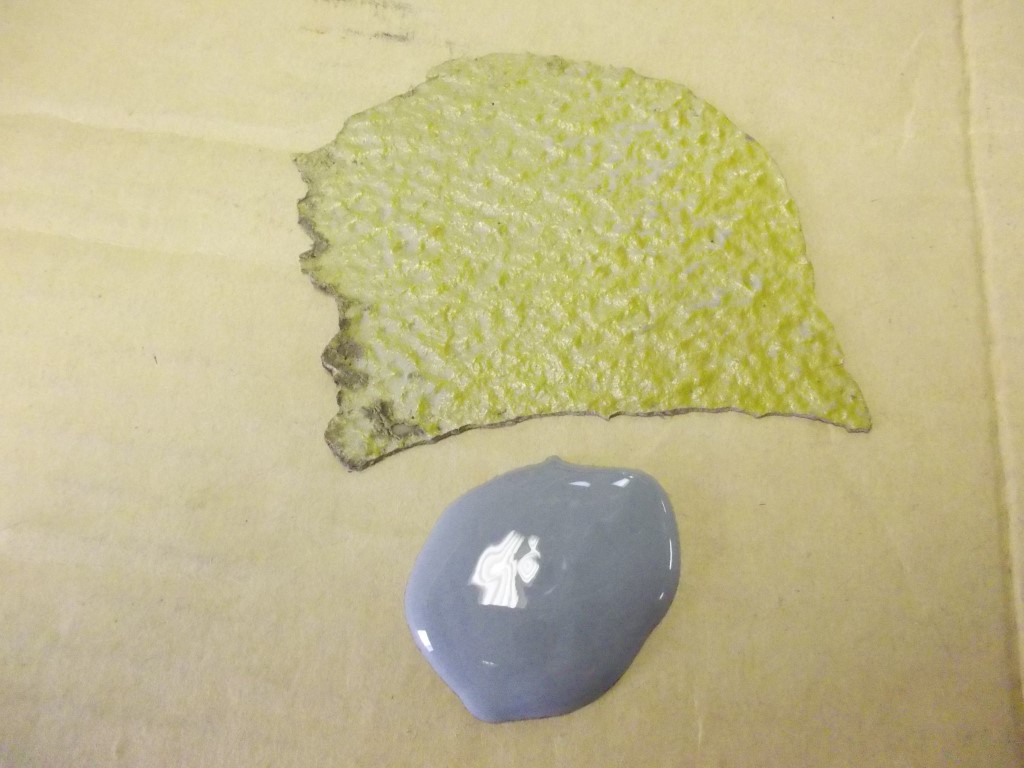
|
|
|
|
| McMark |
Sep 27 2013, 07:37 PM
Post
#28
|
|
914 Freak! Group: Retired Admin Posts: 20,180 Joined: 13-March 03 From: Grand Rapids, MI Member No.: 419 Region Association: None |
I have that gun as well. Sprayed SKS Stoneguard with it on a 911T. I was really happy with the results on that. Which actually lend credence to my theory that the seam sealer I'm trying to spray is just too thick/sticky to pebble correctly.
(IMG:http://www.914world.com/bbs2/uploads_offsite/scontent-a-sjc.xx.fbcdn.net-419-1380332255.1.jpg) |
|
|
|
| rudedude |
Sep 27 2013, 07:45 PM
Post
#29
|
|
Senior Member Group: Members Posts: 567 Joined: 1-January 05 From: minneapolis, mn Member No.: 3,387 Region Association: Upper MidWest |
That's the gun I used restoring my 1970 911S to get the correct "finish".
It took a while but looks very close. I used wurth grey before it wasn't available. My original 914/6 doesn't have quite the same finish on the floor pan that the 911 does but the fender wells are very similar and coated with black undercoat that over the years I have been able to chip away to the original paint. Looks much better that way. |
|
|
|
| scotty b |
Sep 27 2013, 08:10 PM
Post
#30
|
|
rust free you say ? Group: Members Posts: 16,375 Joined: 7-January 05 From: richmond, Va. Member No.: 3,419 Region Association: None |
QUOTE(McMark @ Sep 27 2013, 05:37 PM) I have that gun as well. Sprayed SKS Stoneguard with it on a 911T. I was really happy with the results on that. Which actually lend credence to my theory that the seam sealer I'm trying to spray is just too thick/sticky to pebble correctly. (IMG:http://www.914world.com/bbs2/uploads_offsite/scontent-a-sjc.xx.fbcdn.net-419-1380332255.1.jpg) What are you using ? I've shot both Wurth and Fusor through the other gun and couldn't get either to match. Like you said, it seems like the product is too thick for the orifice, but once you get the pressure to where it will put it out, it's near impossible to get the right texture without getting a ton of material |
|
|
|
| McMark |
Sep 27 2013, 09:30 PM
Post
#31
|
|
914 Freak! Group: Retired Admin Posts: 20,180 Joined: 13-March 03 From: Grand Rapids, MI Member No.: 419 Region Association: None |
Previously I tried:
0893228 SPRAY SEAMSEALER GREY URETHANE I just order some of this to try, although I don't expect it to act any differently. 08909230 SPRAY SEAMSEAL BEIGE RUBBER BASED |
|
|
|
| Cairo94507 |
Sep 28 2013, 07:48 AM
Post
#32
|
|
Michael Group: Members Posts: 10,677 Joined: 1-November 08 From: Auburn, CA Member No.: 9,712 Region Association: Northern California |
I hope this gets worked out soon....I am hoping that my Six is going to be getting some seam sealer and undercoating soon. (IMG:style_emoticons/default/piratenanner.gif)
|
 |
|
| Jeff Hail |
Sep 28 2013, 01:35 PM
Post
#33
|
|
Senior Member Group: Members Posts: 1,141 Joined: 3-May 07 From: LA/ CA Member No.: 7,712 |
QUOTE(McMark @ Sep 27 2013, 06:37 PM) I have that gun as well. Sprayed SKS Stoneguard with it on a 911T. I was really happy with the results on that. Which actually lend credence to my theory that the seam sealer I'm trying to spray is just too thick/sticky to pebble correctly. Trying to get that "magic" compromise that looks oem is a challenge. Agree the sprayable seam sealer is very thick. To get it to pebble you have to play with the air pressure and material volume adjustment... to the point where it actually spits and is just short of atomizing. One tip is soaking the tubes in hot water before you apply to thin them out. I agree it still wont pebble the way we want to it. The amount of material required if going the sprayable sealer route is in cases of tubes. The pic is sprayable sealer only with epoxy over it. It was done using very low pressure (spitting). 1 tube to do just an outer long gets pricy. I'm not going for originality on mine so the area applied is for preservation not accuracy. Another tip is to use a final coat of SKS over the sprayable sealer. You will get a pebble/ orange peel appearance much closer to the factory coating. I don't have a pic but it works and looks very accurate. Another thing to consider: If you paint over the coatings the appearance will lean to the side of thick orange peel texture after the base is applied (wet on texture) Attached image(s) 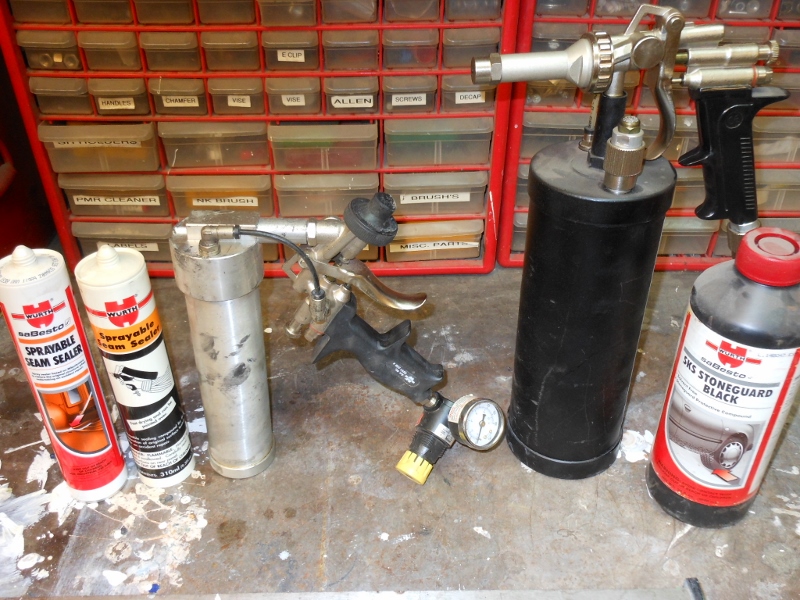 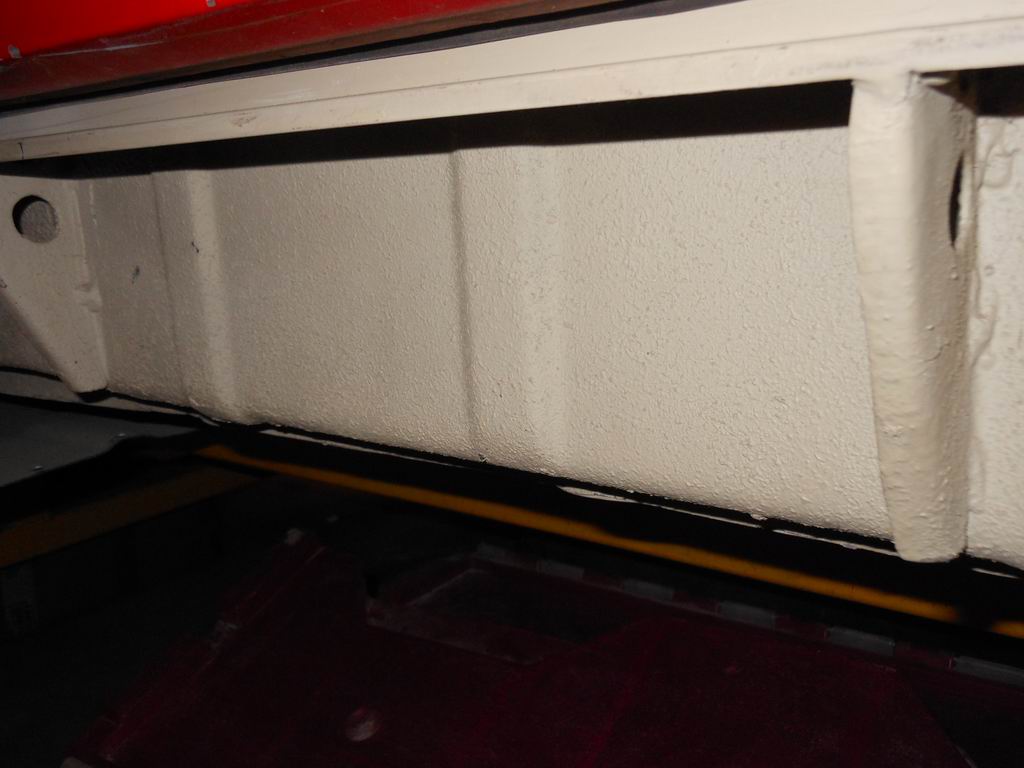
|
|
|
|
| scotty b |
Sep 28 2013, 06:16 PM
Post
#34
|
|
rust free you say ? Group: Members Posts: 16,375 Joined: 7-January 05 From: richmond, Va. Member No.: 3,419 Region Association: None |
RIGHT :
No idea what the pressure was but it was LOW. Fluid almost all the way open, ( just before getting a solid stream ). You have to get kind of of close, and move slow, but it gets the result. I will also add this gun had set long enough the old SKS had started to set up so there are some hard pieces in it. I'll also add this was on a vertical surface. Horizontal would be a bit tricky as this stuff is on the thin side and will want to droop LEFT : Higher pressure, further distance, got too smooth. Any more fluid openeing ( I think this is actually closing the orifice, despite the knob coming out ) and it gets a really small grainy pattern Attached thumbnail(s) 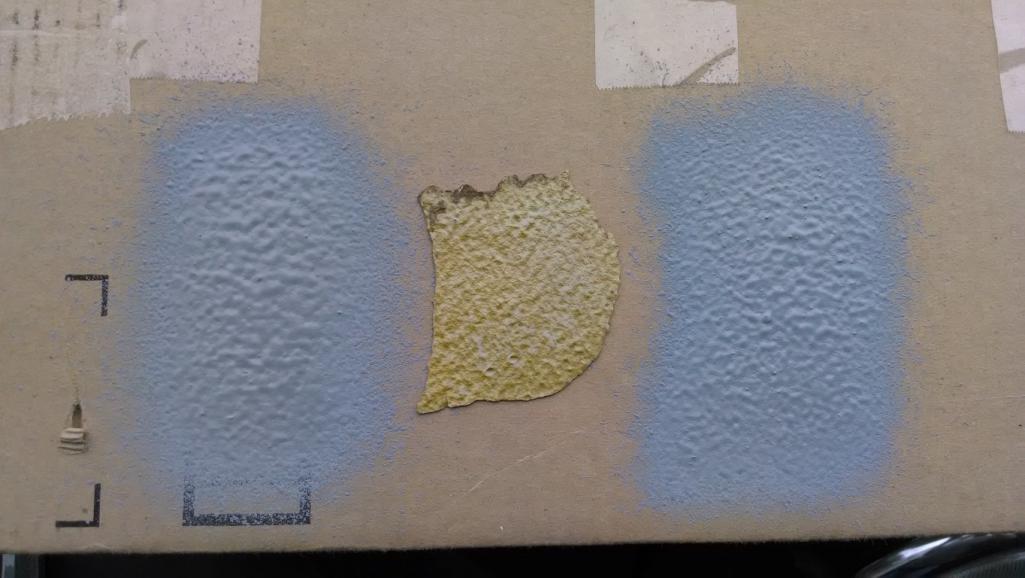 
|
|
|
|
| sixnotfour |
Sep 28 2013, 06:32 PM
Post
#35
|
|
914 Wizard Group: Members Posts: 11,274 Joined: 12-September 04 Member No.: 2,744 Region Association: NineFourteenerVille |
Nice Scat !!!
|
|
|
|
| McMark |
Sep 28 2013, 06:52 PM
Post
#36
|
|
914 Freak! Group: Retired Admin Posts: 20,180 Joined: 13-March 03 From: Grand Rapids, MI Member No.: 419 Region Association: None |
QUOTE That's my complete setup as well. (IMG:style_emoticons/default/thumb3d.gif) QUOTE Higher pressure, further distance, got too smooth. Any more fluid openeing ( I think this is actually closing the orifice, despite the knob coming out ) and it gets a really small grainy pattern That's looking pretty good. Gonna have to check that stuff out. |
|
|
|
| rick 918-S |
Sep 28 2013, 07:36 PM
Post
#37
|
|
Hey nice rack! -Celette Group: Members Posts: 21,288 Joined: 30-December 02 From: Now in Superior WI Member No.: 43 Region Association: Northstar Region |
I did a rotisserie 356 many years ago. I ended up thinning a generic brand of body Shultz with lacquer thinner to get a spray-able match through a Body Shultz gun to the factory look. I wish I could remember what brand I used.
That Wurth gun looks nice! Don't have one.=$ (IMG:style_emoticons/default/unsure.gif) |
|
|
|
| Jeff Hail |
Sep 28 2013, 08:08 PM
Post
#38
|
|
Senior Member Group: Members Posts: 1,141 Joined: 3-May 07 From: LA/ CA Member No.: 7,712 |
Scotty B's is nicer and has 10 HP more due to the red anodizing. I'm jealous!
The multi sprayer is cool because it also has the fittings and extension hoses for cavity wax. I like it due to its flexibility. Wurth makes a Shutz gun for use with the larger bottles, Waxing external panels and Stone Guard like VW does on current models. I have one but have never used it for that purpose. It does have a high output adjustable nozzle which may work better at lower pressure for that pebble peel look. Have to give it a try to see if it has other than Shutz use Attached image(s) 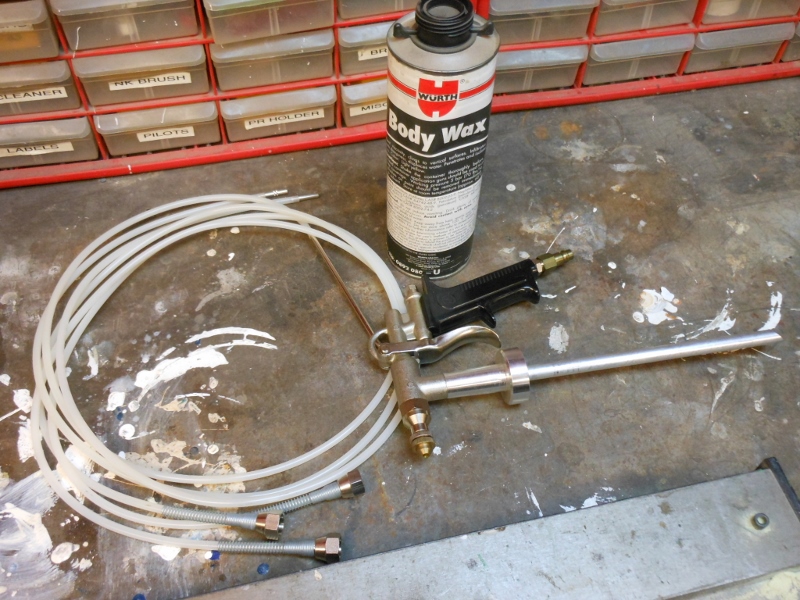
|
|
|
|
| McMark |
Sep 30 2013, 09:26 AM
Post
#39
|
|
914 Freak! Group: Retired Admin Posts: 20,180 Joined: 13-March 03 From: Grand Rapids, MI Member No.: 419 Region Association: None |
Just be sure you're done with welding before adding cavity wax. That stuff is flammable and once it ignites it's pretty hard to put out.
Not that I know... (IMG:style_emoticons/default/unsure.gif) |
|
|
|
| Jeff Hail |
Sep 30 2013, 10:17 PM
Post
#40
|
|
Senior Member Group: Members Posts: 1,141 Joined: 3-May 07 From: LA/ CA Member No.: 7,712 |
QUOTE(McMark @ Sep 30 2013, 08:26 AM) Just be sure you're done with welding before adding cavity wax. That stuff is flammable and once it ignites it's pretty hard to put out. Not that I know... (IMG:style_emoticons/default/unsure.gif) Yep -shop brew napalm candles. |
|
|
|
|
1 User(s) are reading this topic (1 Guests and 0 Anonymous Users)
0 Members:

|
Lo-Fi Version | Time is now: 23rd June 2026 - 01:31 PM |
Invision Power Board
v9.1.4 © 2026 IPS, Inc.