|
|
|
Porsche, and the Porsche crest are registered trademarks of Dr. Ing. h.c. F. Porsche AG.
This site is not affiliated with Porsche in any way. Its only purpose is to provide an online forum for car enthusiasts. All other trademarks are property of their respective owners. |
|
|

  |

| 914forme |
 Aug 7 2017, 08:45 PM Aug 7 2017, 08:45 PM
Post
#326
|
|
Times a wastin', get wrenchin'!  Group: Members Posts: 3,896 Joined: 24-July 04 From: Dayton, Ohio Member No.: 2,388 Region Association: None |
Kent im :confused:also
Just ordered cables, and the thing of it is I'll have about and extra $125 in cables alone, of course they are top notch stuff built for off shore racing boats. I will most likely use the hemi joints that came with it, but might switch out to aircraft parts if I find they get worn from road grit. Have to get it on the road first (IMG:style_emoticons/default/dry.gif) |
   |

 
|
| mepstein |
Aug 7 2017, 08:51 PM
Post
#327
|
|
914-6 GT in waiting Group: Members Posts: 19,223 Joined: 19-September 09 From: Landenberg, PA/Wilmington, DE Member No.: 10,825 Region Association: MidAtlantic Region |
QUOTE(76-914 @ Aug 7 2017, 12:35 PM)  Looks sweet. I'm surprised you haven't sold Ian's model yet! The price is right. (IMG:style_emoticons/default/beerchug.gif) (IMG:style_emoticons/default/agree.gif) and saves you so many hours vs making your own. |
|
|
|
| 914forme |
Aug 8 2017, 08:00 AM
Post
#328
|
|
Times a wastin', get wrenchin'! Group: Members Posts: 3,896 Joined: 24-July 04 From: Dayton, Ohio Member No.: 2,388 Region Association: None |
QUOTE(mepstein @ Aug 7 2017, 10:51 PM) QUOTE(76-914 @ Aug 7 2017, 12:35 PM) Looks sweet. I'm surprised you haven't sold Ian's model yet! The price is right. (IMG:style_emoticons/default/beerchug.gif) (IMG:style_emoticons/default/agree.gif) and saves you so many hours vs making your own. Time is money, but money does not equal time So I did the run down. Ian's kit was $375 new when I purchased it, plus shipping. Zero Decible is $300 for the linkage and rod ends (in your choose of colors) and then you have to purchase the cables. plus shipping. Cables can be what ever quality you choose. I tend to go with higher end stuff I hate doing work twice, even though I do it a lot. (IMG:style_emoticons/default/headbang.gif) Least expensive set of marine helm control cables I could find for this application in the quality I liked was $116.00, plus shipping. So I have exceeded the cost of Ian's very fine kit. That leaves the items for the front. MR2 shifter is the one of choice, others work. MR2 shifter costs have started to climb, as the breakers have found out that they ae in demand from us 914 guys. (IMG:style_emoticons/default/av-943.gif) We set the pulse of the economy (IMG:style_emoticons/default/av-943.gif) You tend to pay for quality I get that. One advantage I see over Ian/s kit is you can pick the quality of cable, you also have a situation that looks like the geometry might be a tad bit better. We can compare Ian's to ZDM's by letting Scott try both. That would still be subjective to Scott's feelings and the amount of time he has invested in Ian's kit, but I think he actually has two cars in his shop with Ian's kit, I have the ZDM kit on mine. We will have to see. First I have to get mine running (IMG:style_emoticons/default/headbang.gif) |
|
|
|
| 914forme |
Jul 2 2018, 02:47 PM
Post
#329
|
|
Times a wastin', get wrenchin'! Group: Members Posts: 3,896 Joined: 24-July 04 From: Dayton, Ohio Member No.: 2,388 Region Association: None |
Wow surprised I have not been hit by the slacker thread, maybe I have and just was a slacker and did not read it. (IMG:style_emoticons/default/confused24.gif)
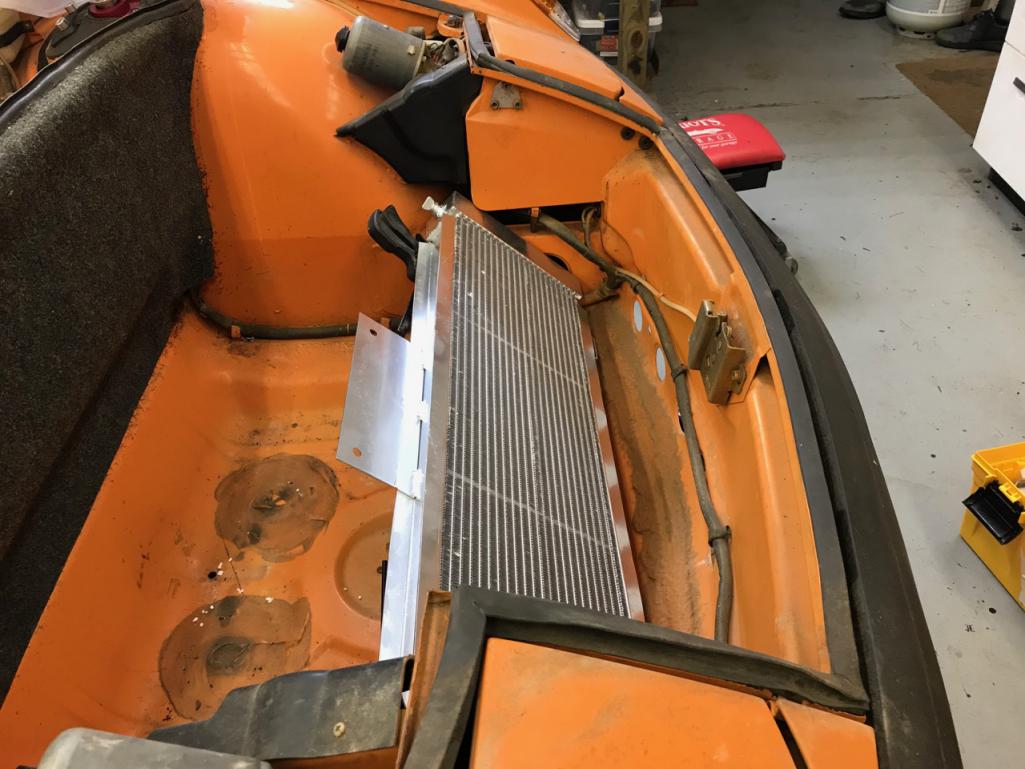
Watching Chris' great EG33 thread, I jumped off the deep end and went after a new radiator. Been looking at the Jeep Cherokee Rad, but this one seems to fit. Well it came in on a fast boat from China or on a place with the latest shipment of Samsung Tablets. Here is how if fits in the 914-6. Yeah I know wrong car but the 914 EG project is back in the shop somewhere buried I can't find it right now. (IMG:style_emoticons/default/confused24.gif) So this will have to do. (IMG:style_emoticons/default/WTF.gif) It don't fit (IMG:style_emoticons/default/headbang.gif) (IMG:style_emoticons/default/headbang.gif) (IMG:style_emoticons/default/headbang.gif) (IMG:style_emoticons/default/headbang.gif) (IMG:style_emoticons/default/headbang.gif) (IMG:style_emoticons/default/headbang.gif) 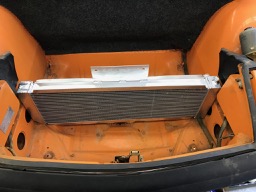 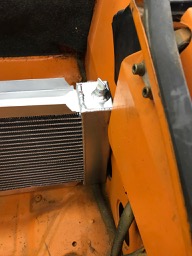 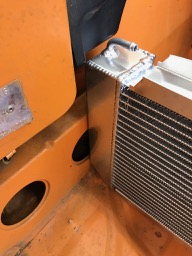 Nothing that a bit of (IMG:style_emoticons/default/sawzall-smiley.gif) (IMG:style_emoticons/default/smash.gif) (IMG:style_emoticons/default/welder.gif) can't fix. I'll just narrow down the top of the tanks to get past the head light buckets. It is only Aluminum (IMG:style_emoticons/default/wacko.gif) |
|
|
|
| Chris H. |
Jul 2 2018, 03:42 PM
Post
#330
|
|
Senior Member Group: Members Posts: 4,027 Joined: 2-January 03 From: Chicago 'burbs Member No.: 73 Region Association: Upper MidWest |
Try it angled forward at a 45 degree angle under the light buckets.
|
|
|
|
| Andyrew |
Jul 2 2018, 04:22 PM
Post
#331
|
|
Spooling.... Please wait Group: Members Posts: 13,376 Joined: 20-January 03 From: Riverbank, Ca Member No.: 172 Region Association: Northern California |
QUOTE(914forme @ Jul 2 2018, 01:47 PM) Wow surprised I have not been hit by the slacker thread, maybe I have and just was a slacker and did not read it. (IMG:style_emoticons/default/confused24.gif) Watching Chris' great EG33 thread, I jumped off the deep end and went after a new radiator. Been looking at the Jeep Cherokee Rad, but this one seems to fit. Well it came in on a fast boat from China or on a place with the latest shipment of Samsung Tablets. Here is how if fits in the 914-6. Yeah I know wrong car but the 914 EG project is back in the shop somewhere buried I can't find it right now. (IMG:style_emoticons/default/confused24.gif) So this will have to do. (IMG:style_emoticons/default/WTF.gif) It don't fit (IMG:style_emoticons/default/headbang.gif) (IMG:style_emoticons/default/headbang.gif) (IMG:style_emoticons/default/headbang.gif) (IMG:style_emoticons/default/headbang.gif) (IMG:style_emoticons/default/headbang.gif) (IMG:style_emoticons/default/headbang.gif) Nothing that a bit of (IMG:style_emoticons/default/sawzall-smiley.gif) (IMG:style_emoticons/default/smash.gif) (IMG:style_emoticons/default/welder.gif) can't fix. I'll just narrow down the top of the tanks to get past the head light buckets. It is only Aluminum (IMG:style_emoticons/default/wacko.gif) I was always curious if that one would fit! Its too bad its not a couple inches shorter.. If you can weld that up then WOW. I'd love to see the details on how your going to accomplish that! If you made it a couple rows shorter you might be able to completely fit it under the headlight buckets and then have a front trunk that could fit a spare tire and stuff! |
|
|
|
| 914forme |
Jul 2 2018, 06:37 PM
Post
#332
|
|
Times a wastin', get wrenchin'! Group: Members Posts: 3,896 Joined: 24-July 04 From: Dayton, Ohio Member No.: 2,388 Region Association: None |
QUOTE(Andyrew @ Jul 2 2018, 06:22 PM) I was always curious if that one would fit! Its too bad its not a couple inches shorter.. If you can weld that up then WOW. I'd love to see the details on how your going to accomplish that! If you made it a couple rows shorter you might be able to completely fit it under the headlight buckets and then have a front trunk that could fit a spare tire and stuff! It is just crappy Aluminum I have access to a certified welder that welded aluminum tanks for a living. If I can't make the puddle move, he can. As far as fitting under the headlight buckets, that would be very nice idea. I have thought about doing like Brant did on his race car, and moving the head lights into the turn signal buckets. But then, I had a place that would do custom Rads for UTVs but lost it. (IMG:style_emoticons/default/headbang.gif) They where in Cincinnati. The calculations came up that you would have about the same area as the SVX RAD, with more rows. You just have to keep it back behind the back edge of the headlight bucket. You can also use a curved RAD to gain a bit of surface area. Really want to be able to show the people what I am thinking. In reality I could draw it up, and 3D print it, and just say make it. In reality I could also print it on the 3D printer out of Aluminum or Titanium. Neat idea, but man I would literally burn through a ton of powder to do it. But it would work (IMG:style_emoticons/default/idea.gif) Back to buying a $55K 3D laser metal printer. Keep finding reason to purchase one of them for home shop. |
|
|
|
| 914forme |
Jul 2 2018, 08:02 PM
Post
#333
|
|
Times a wastin', get wrenchin'! Group: Members Posts: 3,896 Joined: 24-July 04 From: Dayton, Ohio Member No.: 2,388 Region Association: None |
So after Chris suggestion I ran out to the shop and flipped his idea, and I think this will work. (IMG:style_emoticons/default/piratenanner.gif)
 Then I did this nice color diagram. Green is the front cover. Blue is the transition over the top to the flat floor Pink is the floor that opens above the spare tire well. 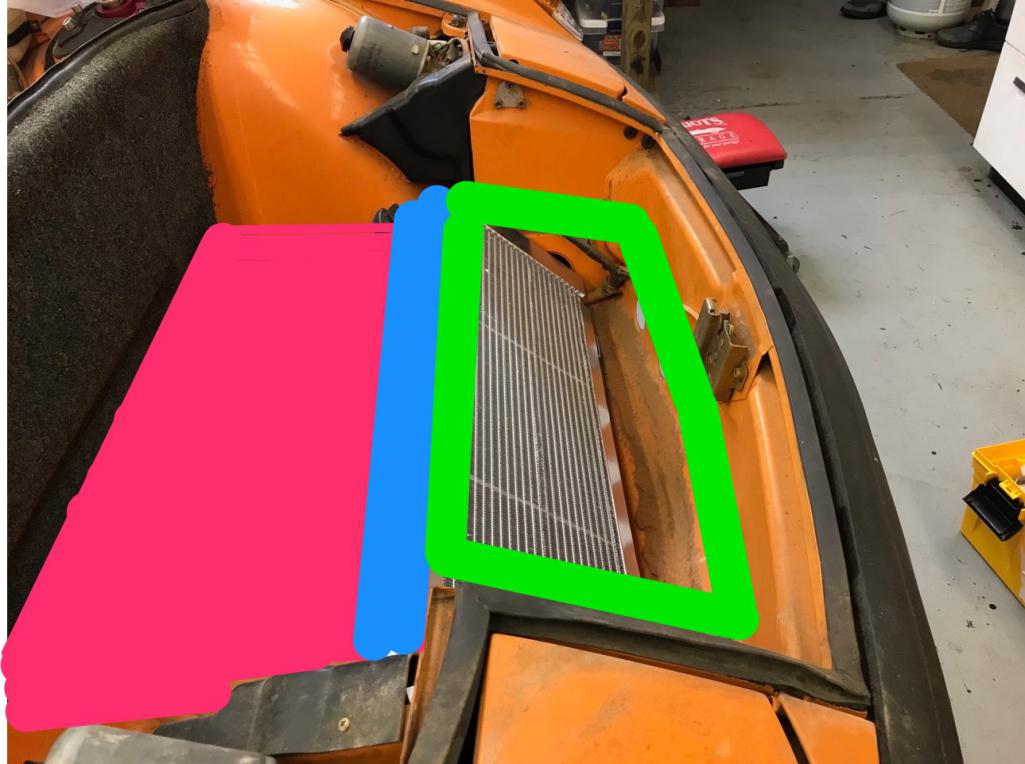 Nice artful picture there. (IMG:style_emoticons/default/lol-2.gif) So since I could not get the idea very clear I did this quick not to scale line drawing. 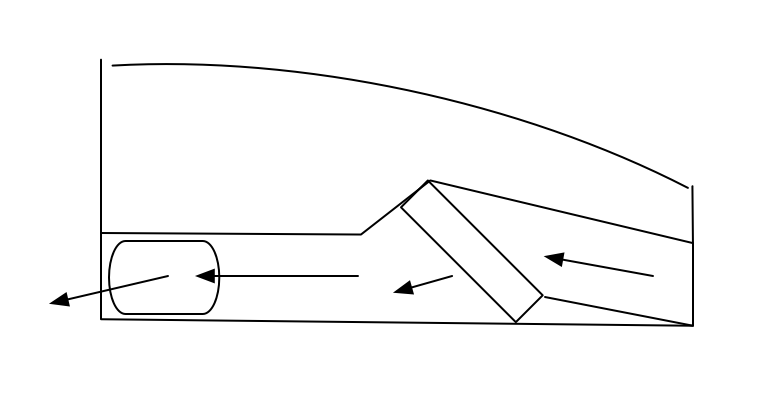 Air enters the front, goes through the radiator, down a small transition, and under the wheel board, and out the side exits I have made in the wheel wells. All ideas are unproven at this point copy them at your own risk. |
|
|
|
| worn |
Jul 2 2018, 08:09 PM
Post
#334
|
|
can't remember Group: Members Posts: 3,144 Joined: 3-June 11 From: Madison, WI Member No.: 13,152 Region Association: Upper MidWest |
Gotta love the colors! Good to see things back on track.
|
 |
|
| 76-914 |
Oct 31 2018, 11:29 AM
Post
#335
|
|
Repeat Offender & Resident Subaru Antagonist Group: Members Posts: 13,485 Joined: 23-January 09 From: Temecula, CA Member No.: 9,964 Region Association: Southern California |
(IMG:style_emoticons/default/icon_bump.gif) to get any updates! (IMG:style_emoticons/default/beerchug.gif)
|
|
|
|
| 914GTSTI |
Nov 4 2018, 09:30 AM
Post
#336
|
|
Member Group: Members Posts: 270 Joined: 16-September 07 From: Glendale AZ Member No.: 8,123 Region Association: None |
Need some help. What is the distance from the crank shaft center line to the bottom of the stock oil pan ?
Thanks |
|
|
|
| 914forme |
Nov 4 2018, 07:26 PM
Post
#337
|
|
Times a wastin', get wrenchin'! Group: Members Posts: 3,896 Joined: 24-July 04 From: Dayton, Ohio Member No.: 2,388 Region Association: None |
LOL, you think I just have these engines just sitting around. (IMG:style_emoticons/default/av-943.gif)
I will have to dig one out to get you the measurement. From some pictures I have of other builds it is around 6 2x4 high layer on the flat side. so 6' x 1.5" = 9" from crank center to bottom of the shipping skid. I will have to check for you if you need a more accurate measurement. Kent, No progress on this car, working on my father's -6 still. Dad to a turn for the worse, so I have not been working on that car for the past few months. |
|
|
|
| 914GTSTI |
Nov 4 2018, 10:45 PM
Post
#338
|
|
Member Group: Members Posts: 270 Joined: 16-September 07 From: Glendale AZ Member No.: 8,123 Region Association: None |
No,that's ok.
Thanks |
|
|
|
| Amenson |
Jan 15 2019, 12:37 PM
Post
#339
|
|
That's opposite lock!! Group: Members Posts: 645 Joined: 27-May 05 From: Dublin, OH Member No.: 4,154 Region Association: None |
QUOTE(914forme @ Nov 19 2016, 03:43 PM) Well yesterday UPS man showed up with some new goodies. Rebel Racing adjustable spring perches. And installed Need a set of helper springs and separator. (IMG:style_emoticons/default/dry.gif) Also need to lathe down the spacer again for Tangerine's Rear shock mount. The nylox section is not on the threads. Why was this spacer needed in the first place? Don't ask why I am wondering. Was in a less than engaging meeting and....squirrel. (IMG:style_emoticons/default/cat.gif) |
|
|
|
| 914forme |
Jan 15 2019, 01:36 PM
Post
#340
|
|
Times a wastin', get wrenchin'! Group: Members Posts: 3,896 Joined: 24-July 04 From: Dayton, Ohio Member No.: 2,388 Region Association: None |
[quote name='Amenson' date='Jan 15 2019, 01:37 PM' post='2681332']
[quote name='914forme' post='2424894' date='Nov 19 2016, 03:43 PM'] Well yesterday UPS man showed up with some new goodies. Rebel Racing adjustable spring perches. And installed Need a set of helper springs and separator. (IMG:style_emoticons/default/dry.gif) Also need to lathe down the spacer again for Tangerine's Rear shock mount. The nylox section is not on the threads. [/quote Why was this spacer needed in the first place? Don't ask why I am wondering. Was in a less than engaging meeting and....squirrel. (IMG:style_emoticons/default/cat.gif) [/quote] We have all had the less than engaging meetings The reason is the stock spring hat has a bell shape. Which allows the hat to move on the bearing properly where as the aftermarket one does not have that feature. The spacer allows for the hat not to bind in the raised pickup point. The spacers are just made from the stock strut topper. Easy fix, and eliminates the binding, eliminating the premature wear rate on the shock creating a failure situation. Tony “Kracker” was the first person I knew who had the issue. And Chris Foley mentioned the issue to me. You know me I love to solve problems. So this was my KISS solution. Will not be an issue unless your moving the upper rear shock location and are using a different spring hat. |
|
|
|
| Amenson |
Jan 15 2019, 03:24 PM
Post
#341
|
|
That's opposite lock!! Group: Members Posts: 645 Joined: 27-May 05 From: Dublin, OH Member No.: 4,154 Region Association: None |
QUOTE(914forme @ Jan 15 2019, 02:36 PM) QUOTE(Amenson @ Jan 15 2019, 01:37 PM) Why was this spacer needed in the first place? Don't ask why I am wondering. Was in a less than engaging meeting and....squirrel. (IMG:style_emoticons/default/cat.gif) We have all had the less than engaging meetings The reason is the stock spring hat has a bell shape. Which allows the hat to move on the bearing properly where as the aftermarket one does not have that feature. The spacer allows for the hat not to bind in the raised pickup point. The spacers are just made from the stock strut topper. Easy fix, and eliminates the binding, eliminating the premature wear rate on the shock creating a failure situation. Tony “Kracker” was the first person I knew who had the issue. And Chris Foley mentioned the issue to me. You know me I love to solve problems. So this was my KISS solution. Will not be an issue unless your moving the upper rear shock location and are using a different spring hat. After raising and lowering Grey 100 times over the weekend without having to worry about the springs coming out of the hats I decided that I needed to do something about the rear coil overs on Porsti and could potentially fix the issue by raising the mounts (it would also get rid of the last bit of rubber in the suspension). Now I have to consider the length of the spacer to see if I can keep the assembly under tension with the helper spring at full droop. Why can anything custom be simple? What is the radiator from that you are using in the latest mockup? Might be good for Marks EG. Edit: Found it going back to Chris' thread. Alpine A310! |
|
|
|
| 914forme |
Jan 15 2019, 04:16 PM
Post
#342
|
|
Times a wastin', get wrenchin'! Group: Members Posts: 3,896 Joined: 24-July 04 From: Dayton, Ohio Member No.: 2,388 Region Association: None |
In my days of racing when time on track was more important the design nirvana I just drilled a couple holes in the spring hat and zip tied the spring to the hat, and let it float on the bottom collar and shock body.
Simple never worried about them. Now I want to use proper methods, though down and dirty has its appeal |
|
|
|
| Amenson |
Jan 20 2019, 02:33 PM
Post
#343
|
|
That's opposite lock!! Group: Members Posts: 645 Joined: 27-May 05 From: Dublin, OH Member No.: 4,154 Region Association: None |
QUOTE(914forme @ Jan 15 2019, 05:16 PM) In my days of racing when time on track was more important the design nirvana I just drilled a couple holes in the spring hat and zip tied the spring to the hat, and let it float on the bottom collar and shock body. Simple never worried about them. Now I want to use proper methods, though down and dirty has its appeal I currently have zip ties and it bothers me. If the spacer is not there, will the shock rod be constrained by the Tangerine spherical mount? Based on your comment that you need to shorten the spacer to get more threads exposed for the nut, the spacer is supporting the step at the top of the rod. If the spacer sat over the shock rod I could get the maximum extension of the shock even with the spacer in place. Make any sense? |
|
|
|
| 914forme |
Jan 20 2019, 02:51 PM
Post
#344
|
|
Times a wastin', get wrenchin'! Group: Members Posts: 3,896 Joined: 24-July 04 From: Dayton, Ohio Member No.: 2,388 Region Association: None |
Yes makes loads of sense. The spacer the first time I did them, made them a bit long. 2nd time I made them to be as close to the edge as the stock hat would be. If that makes sense. One thing I forgot to take into account is that the rubber crushes on the stock setup. Spherical bearings do not have a crush factor at least not a perceivable one. I am sure if I mounted them in a fixture and then compressed everything down and toss it into the fixture and recheck the measurements. I am sure I could measure a few .0001th of an inch once compressed and the oil film and small piece of dust gets compressed. (IMG:style_emoticons/default/blink.gif)
Are you raising the upper shock mounts on POR? Oh one other thing in the consideration. These are the tall mounts, so no top in the trunk for me. On this build it will not come off with out a (IMG:style_emoticons/default/sawzall-smiley.gif) anyway. Chris' short unit might not have an issue at all. (IMG:style_emoticons/default/confused24.gif) |
|
|
|
| 914forme |
Jan 20 2019, 02:53 PM
Post
#345
|
|
Times a wastin', get wrenchin'! Group: Members Posts: 3,896 Joined: 24-July 04 From: Dayton, Ohio Member No.: 2,388 Region Association: None |
If it becomes a huge issue and I am blowing shocks, I will lower the lower pickup point on the trailing arm. That will also allow the extension of the shock to allow full travel.
The spacer and Rebel Racing Hat are the same hight as the stock shock / spring hat. Hope that helps, pictures would help also, but it is too cold to hang in the shop today. I ran out of Propane late yesterday so no heat for me today. I am working on gauges up in the house today. 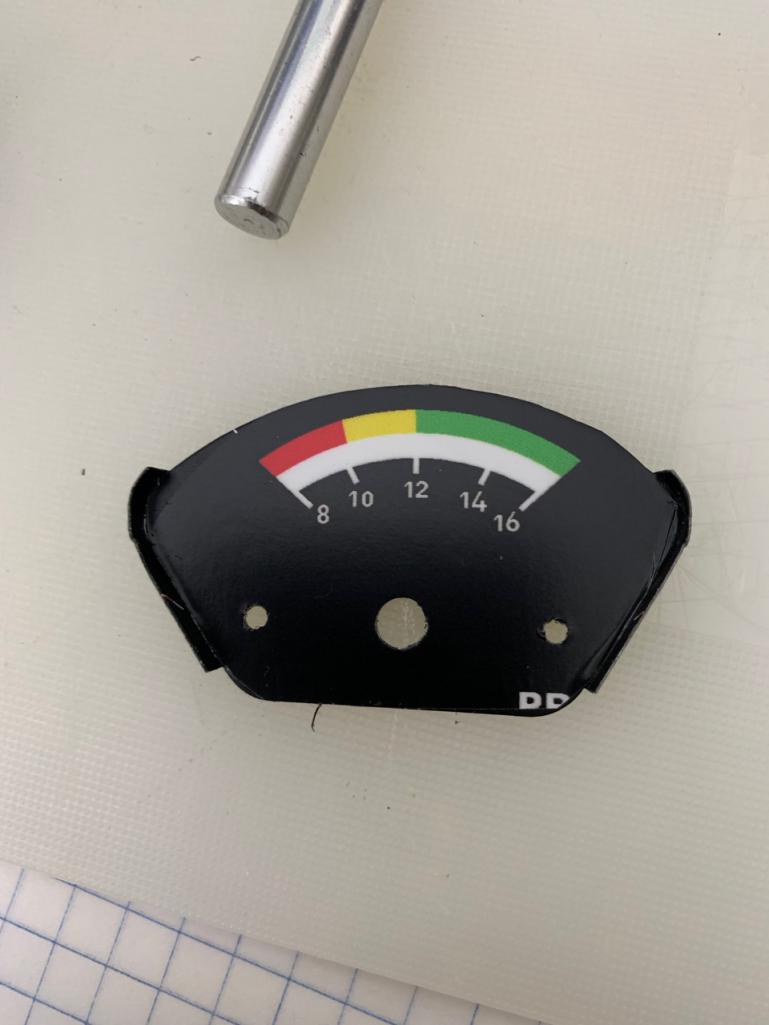 Also working on designing some new products (IMG:style_emoticons/default/shades.gif) I need a few new tools in the shop to make my designs a reality. Access too a Laser cutter would be a big plus. I am in the prototype stage right now so I can use the laser cutter in my 3D printer. But details are not quite as accurate, LOL, stuff can catch on fire when piercing holes, long lines are not an issue, as you have feed speed in your favor. Could also do this stuff with a CNC and a turret head, (IMG:style_emoticons/default/laugh.gif) I would only need 3 tools in the turret. After the last few weeks, I am realizing I need a bigger garage or a way to stack cars, or both. |
|
|
|
|
1 User(s) are reading this topic (1 Guests and 0 Anonymous Users)
0 Members:

|
Lo-Fi Version | Time is now: 20th April 2024 - 01:53 AM |
Invision Power Board
v9.1.4 © 2024 IPS, Inc.