|
|
|
Porsche, and the Porsche crest are registered trademarks of Dr. Ing. h.c. F. Porsche AG.
This site is not affiliated with Porsche in any way. Its only purpose is to provide an online forum for car enthusiasts. All other trademarks are property of their respective owners. |
|
|

  |

| boxsterfan |
 Oct 26 2013, 09:40 PM Oct 26 2013, 09:40 PM
Post
#1
|
|
914's are kewl  Group: Members Posts: 1,776 Joined: 6-June 03 From: San Ramon, CA Member No.: 791 Region Association: Northern California |
On my 74 2.0L, the rear sway bar link (drop link) is disconnected because it appears some plastic piece broke.
Where can I get this piece (circled in attached pic)? Attached image(s) 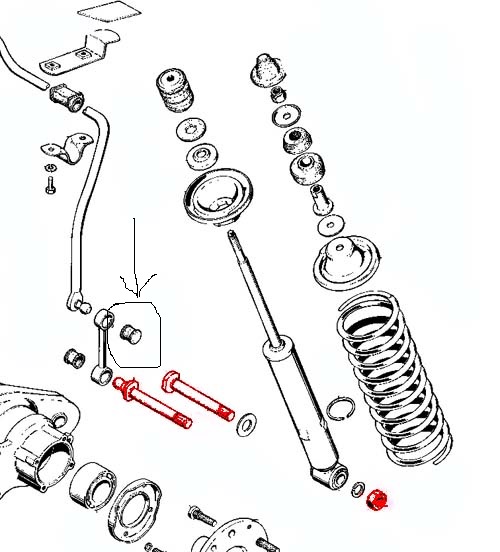
|
   |

 
|
| SLITS |
Oct 26 2013, 10:07 PM
Post
#2
|
|
"This Utah shit is HARSH!" Group: Benefactors Posts: 13,602 Joined: 22-February 04 From: SoCal Mountains ... Member No.: 1,696 Region Association: None |
www.pelicanparts.com
GPR Any number of places. Rear Drop link bushing. |
|
|
|
| rhodyguy |
Oct 27 2013, 08:15 AM
Post
#3
|
|
Chimp Sanctuary NW. Check it out. Group: Members Posts: 22,080 Joined: 2-March 03 From: Orion's Bell. The BELL! Member No.: 378 Region Association: Galt's Gulch |
buy the set. replace them all. while you're at it do the ones where the bar mounts to the trunk floor.
|
|
|
|
| ConeDodger |
Oct 27 2013, 08:40 AM
Post
#4
|
|
Apex killer! Group: Members Posts: 23,587 Joined: 31-December 04 From: Tahoe Area Member No.: 3,380 Region Association: Northern California |
And to answer the question you'll ask when they arrive from whoever you buy them from, drill or poke a hole through the center of the back side (outboard as installed), fill the cup with a good waterproof grease, use a vice or vice grip to slowly press in place.
Credit to McMark for the methodology. |
|
|
|
| boxsterfan |
Oct 27 2013, 10:15 AM
Post
#5
|
|
914's are kewl Group: Members Posts: 1,776 Joined: 6-June 03 From: San Ramon, CA Member No.: 791 Region Association: Northern California |
QUOTE(ConeDodger @ Oct 27 2013, 07:40 AM)  And to answer the question you'll ask when they arrive from whoever you buy them from, drill or poke a hole through the center of the back side (outboard as installed), fill the cup with a good waterproof grease, use a vice or vice grip to slowly press in place. Credit to McMark for the methodology. You are reading my mind. (IMG:style_emoticons/default/beerchug.gif) |
|
|
|
| dangrouche |
Oct 27 2013, 11:09 AM
Post
#6
|
|
dangrouche Group: Members Posts: 550 Joined: 1-May 04 From: San Francisco Bay Area Member No.: 2,012 Region Association: None |
another technique I used was using a camp stove in the garage with a pot of boiling water, to literally boiling the plastic cup one at time, and while leather wearing gloves, you can press fit them on the drop link without any tools, first I assembled the cups on the drop links, by boiling one of the cups at a time, pull it out of the boiling water with a pair of tongs, then you press the one cup at a time against a tabletop, (make sure you get the correct geometric relationship of the cup openings correct - visualize how the drop link appears after its installed). After you have the drop links assembled, you boil the whole assembly in the pot of water, then in the time of less than two minutes, you pull the link out of the hot water and snap them on by hand and channelocks. Also have grease ready immediatelly before you mate those cups up with the end of the sway bar and the bottom strut bolt. The preferred order is the sway bar first, then you can press onto the lower link last. You will be surprised how pliable the plastic is after its boiled. After about five minutes, it hardens itself back to the rigid plastic. I got my bushings from autohausAZ.com. part number 90134378200
good luck. I posted this technique this past year but cant find it. |
|
|
|
| ConeDodger |
Oct 27 2013, 11:55 AM
Post
#7
|
|
Apex killer! Group: Members Posts: 23,587 Joined: 31-December 04 From: Tahoe Area Member No.: 3,380 Region Association: Northern California |
QUOTE(boxsterfan @ Oct 27 2013, 08:15 AM) QUOTE(ConeDodger @ Oct 27 2013, 07:40 AM) And to answer the question you'll ask when they arrive from whoever you buy them from, drill or poke a hole through the center of the back side (outboard as installed), fill the cup with a good waterproof grease, use a vice or vice grip to slowly press in place. Credit to McMark for the methodology. You are reading my mind. (IMG:style_emoticons/default/beerchug.gif) Not a problem. I have to read Yopu's mind all the time. (IMG:style_emoticons/default/blink.gif) |
|
|
|
|
1 User(s) are reading this topic (1 Guests and 0 Anonymous Users)
0 Members:

|
Lo-Fi Version | Time is now: 16th May 2024 - 03:42 PM |
Invision Power Board
v9.1.4 © 2024 IPS, Inc.