|
|
|
Porsche, and the Porsche crest are registered trademarks of Dr. Ing. h.c. F. Porsche AG.
This site is not affiliated with Porsche in any way. Its only purpose is to provide an online forum for car enthusiasts. All other trademarks are property of their respective owners. |
|
|

  |

| bigkensteele |
 Nov 24 2013, 10:20 PM Nov 24 2013, 10:20 PM
Post
#1
|
|
Major Member  Group: Members Posts: 2,200 Joined: 30-August 04 From: Cincinnati, OH Member No.: 2,660 Region Association: South East States |
When I decided to backdate my bumpers, I wanted to have all of the answers before I started cutting stuff off and drilling holes. Using the fine search function, I was able to find all of those answers, but I had to wade through many, many threads to get them all.
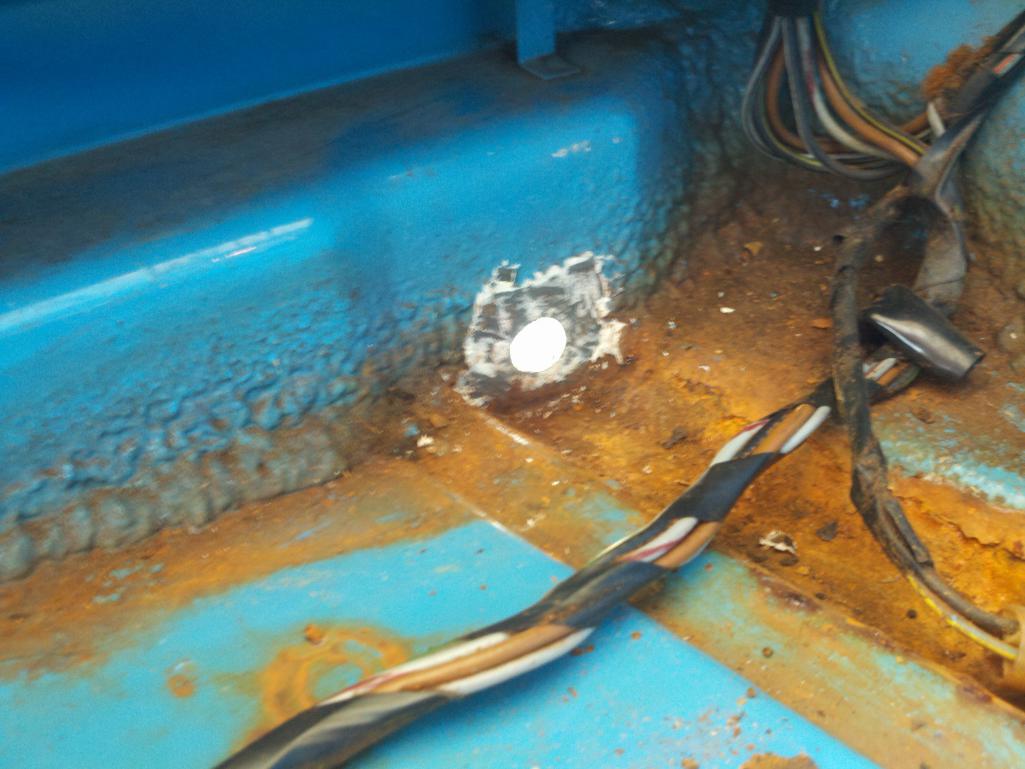
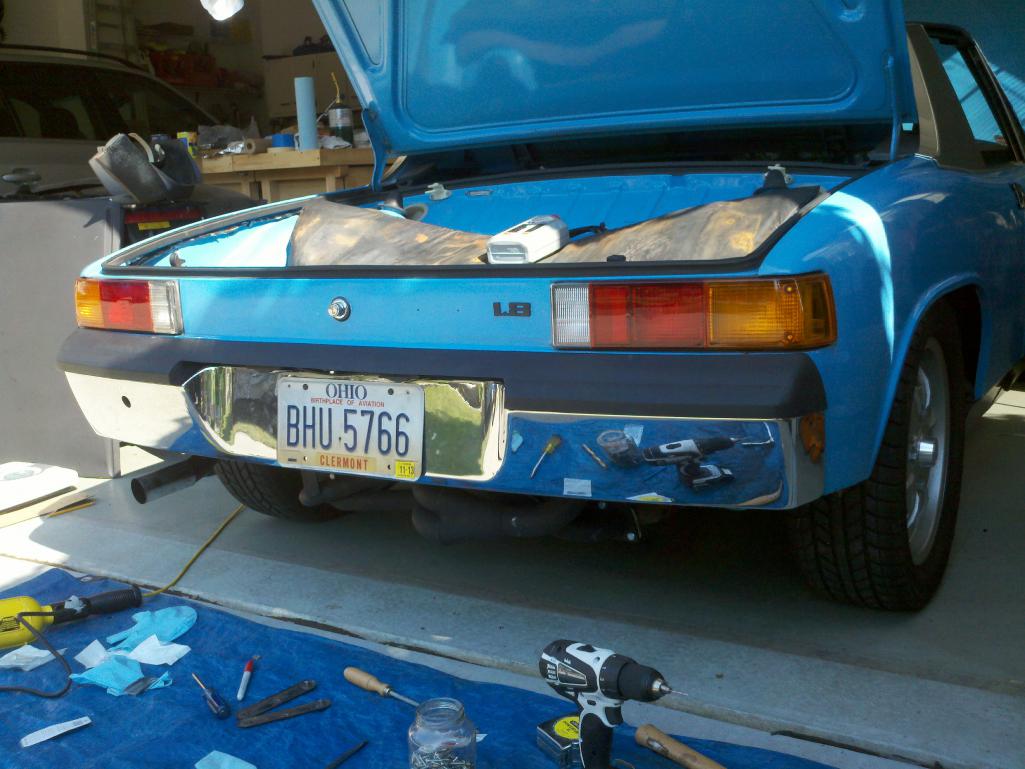
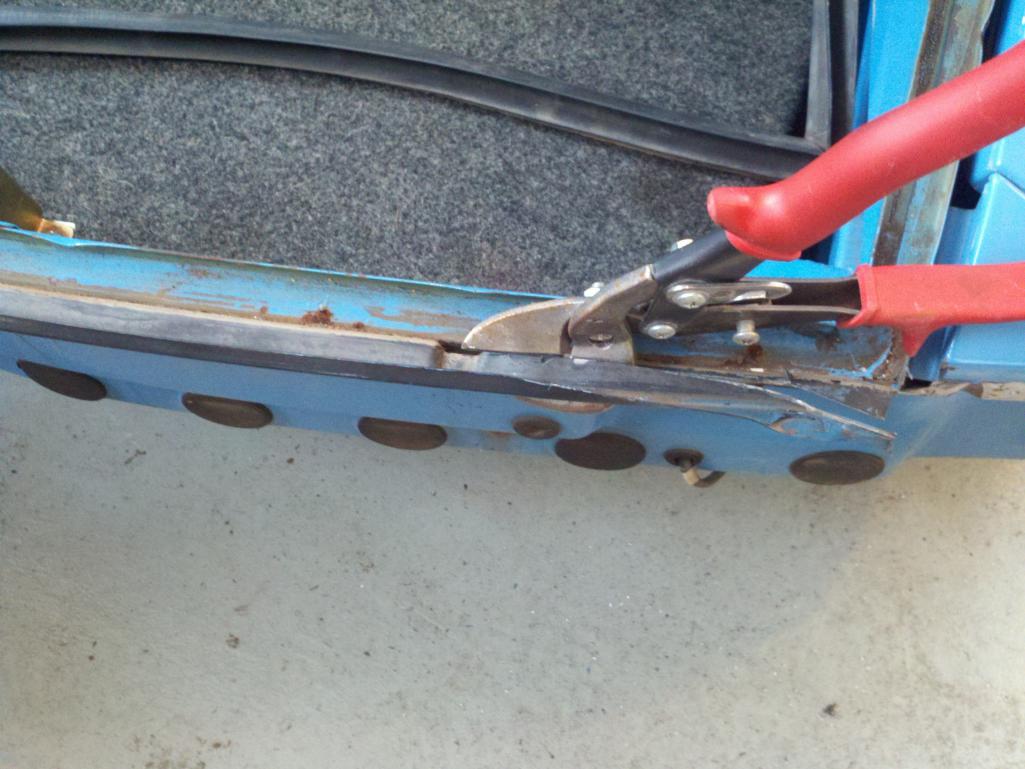
With that in mind, I decided to write one up that will contain every last bit of information needed to do the job. I can’t take credit for much, if any, if any of the information below. I got most all of it from my searches, and I will try to give credit where credit is due. I apologize up front for the crappy phone pictures – while bad, they still tell the story. While there are a few of us who like the looks of the late bumper (myself included, depending on the color of the car), there is one really good reason to go with early bumpers – weight. I have seen many figures thrown about, so I decided to weigh them both, including all mounting hardware, fog lights, grills, etc. I was quite surprised at just how much heavier the later bumpers are. Front: Early – 20 pounds, included pad, dog bones, lights, grills, and hardware Late – 46 pounds, including the shocks, and hardware (non fog light bumper) Rear: Early – 18 pounds, including pad, dog bones and hardware Late – 50 pounds, including the shocks, and hardware 38 pounds vs. 96 – 58 pounds, or roughly 3% of the entire weight of the car removed from the two places you would most want to lose it! So, let’s get started. Tools required: - safety goggles (ask me how I know how much is sucks to have metal surgically removed from your eye) -3/8 ratchet, extension and a set of metric sockets - screwdrivers – both kinds - pliers - angle grinder, grinding disk and a metal cutting wheel - mig welder if you are a hack like me - left cutting (red) tin snips if you are right handed, right cutting (green) if you are left handed - center punch - step drill bit at least 5/8 - drill - spot weld cutter - hacksaw - hammer and dolly Hardware/misc. required or recommended: - (8) 8M x 1.25 x50 bolts - (8) 8M large flat washers - (8) 8M lock washers - (8) 8M nuts - primer, body color paint, sandpaper, tape, paper, etc. - early bumpers, tops, dog bones, etc. - beer (optional) I did the rear first, for no particular reason. The first order of business is to remove the bumper. This is accomplished by first disengaging the bumper sides from the retaining rails on both sides of the car. Simply pull the bumper sides away, and they will peel right out. Next, unscrew the license plate lights and disconnect the wiring. Finally, remove the two 19mm bolts located in the holes on the underside of the bumper. The bumper should now slide right off, but remember – it weighs 50 pounds, so be prepared. I removed my valence as well. Not sure if it was necessary, but it needed some dents removed and paint anyway, so what the heck, it was only a few screws. Next, you will need to crawl under the car with a 17mm socket and remove the 3 bolts holding on each shock and work the shock out. I recommend putting the bolts back in place to keep water out. Now for the fun part. You will need to remove those retaining rails from each side of the car. They are spot-welded on in 5 or 6 spots. There are a couple of ways to do this. You can use a grinder or cutting disc to grind through the welds, or you can buy yourself a spot weld cutter to drill them out. Or if you are an idiot like me, you can attempt to use a regular drill bit and drill them out, and then weld up the resulting holes. I bought a spot weld cutter before I did the front. I forgot to take pictures of the rear, but here is one of the front – same procedure for both. 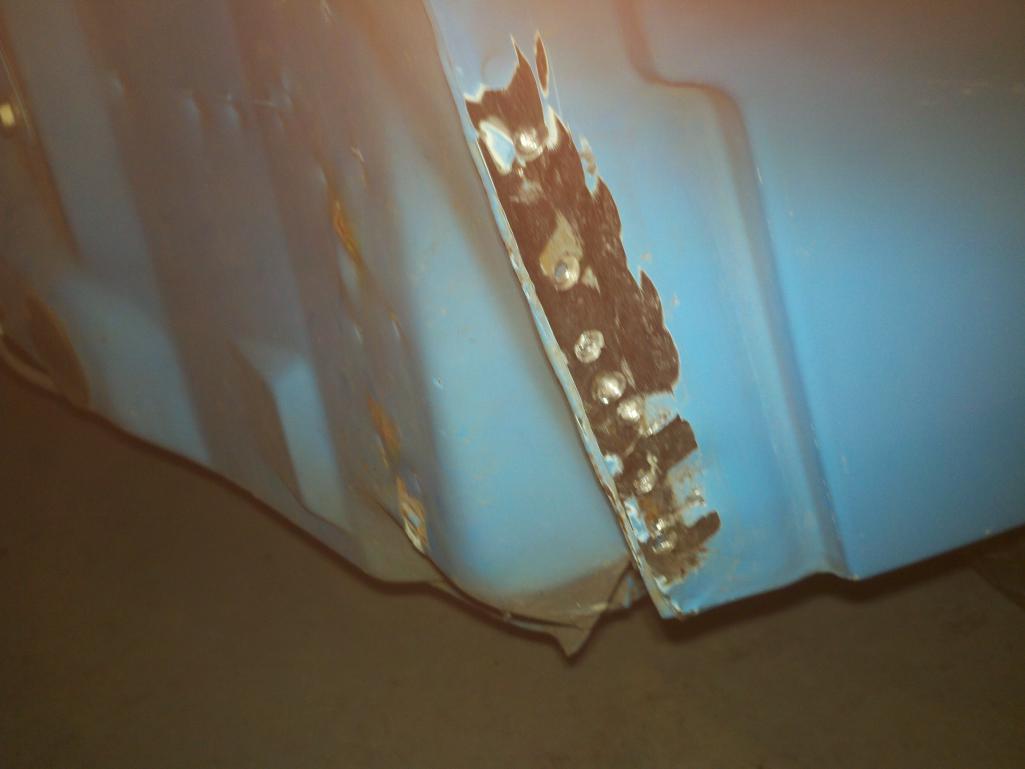 As far as the bodywork required to touch these areas up, I welded up the holes and ground it flat. I then taped off the area, primed it and used a rattle can of a fairly close blue that I found at Lowes. When the bumper is installed, these areas don’t show much, but they still needed to be painted. 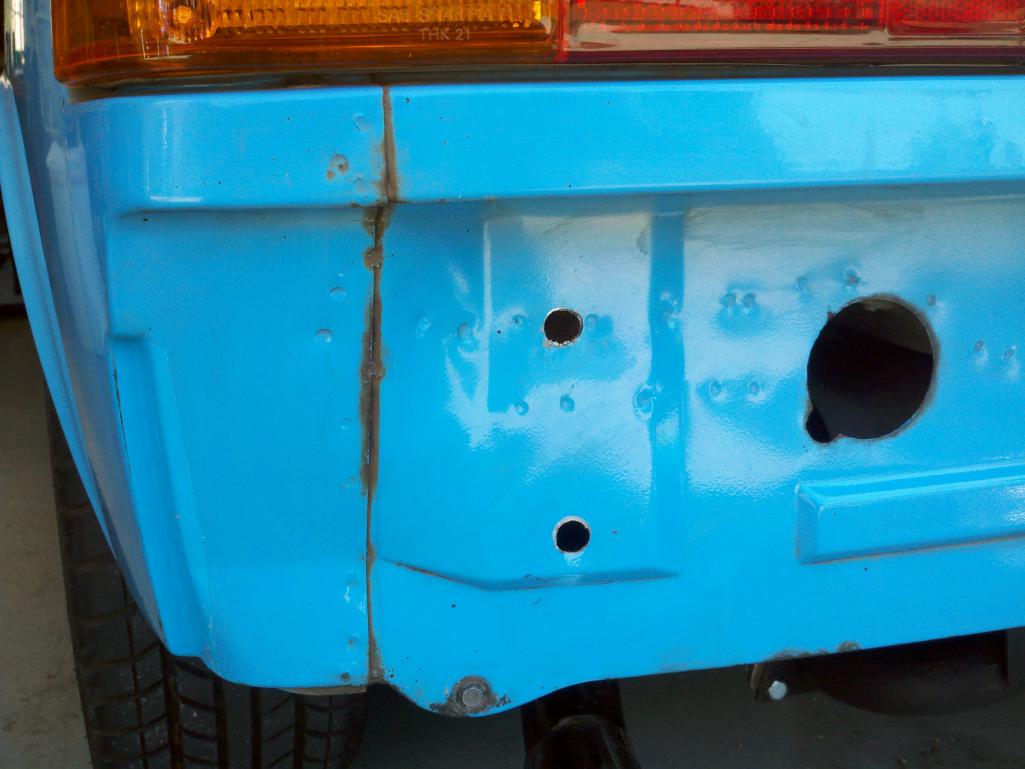 |
   |

 
|
| bigkensteele |
Nov 24 2013, 10:26 PM
Post
#2
|
|
Major Member Group: Members Posts: 2,200 Joined: 30-August 04 From: Cincinnati, OH Member No.: 2,660 Region Association: South East States |
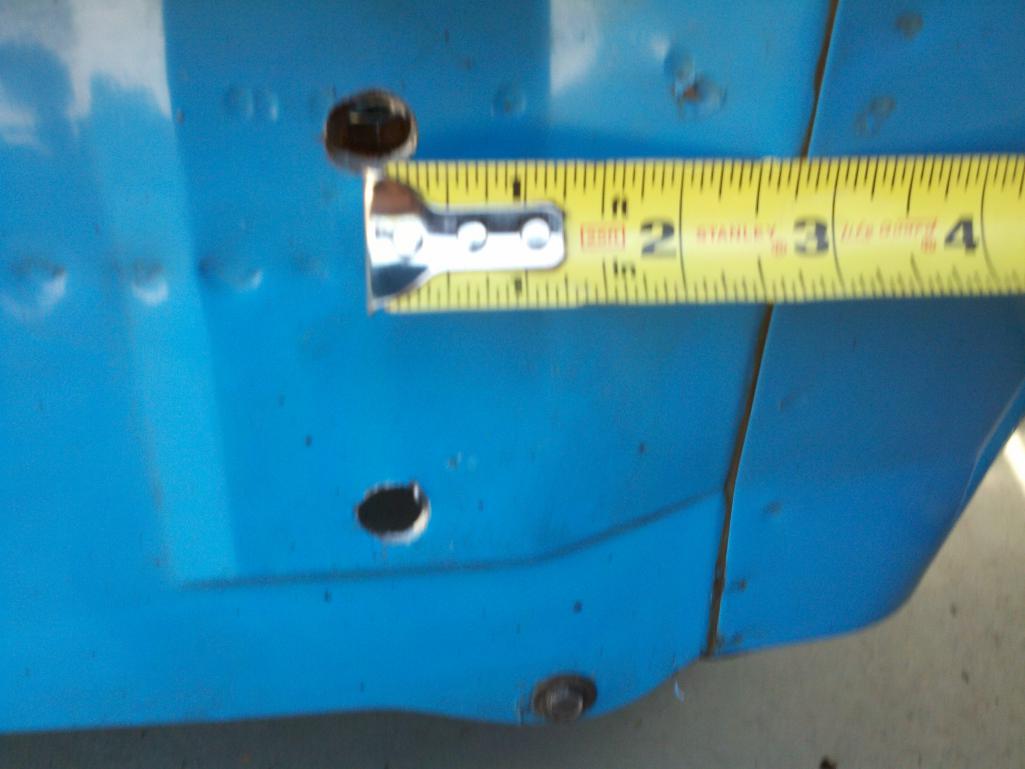
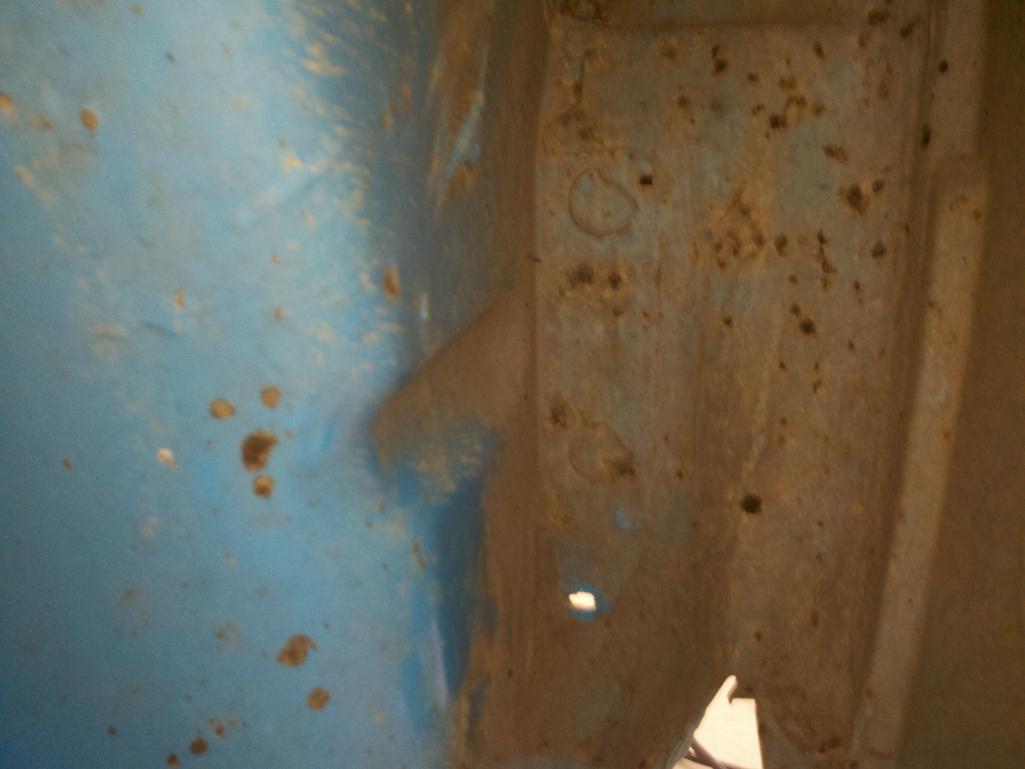
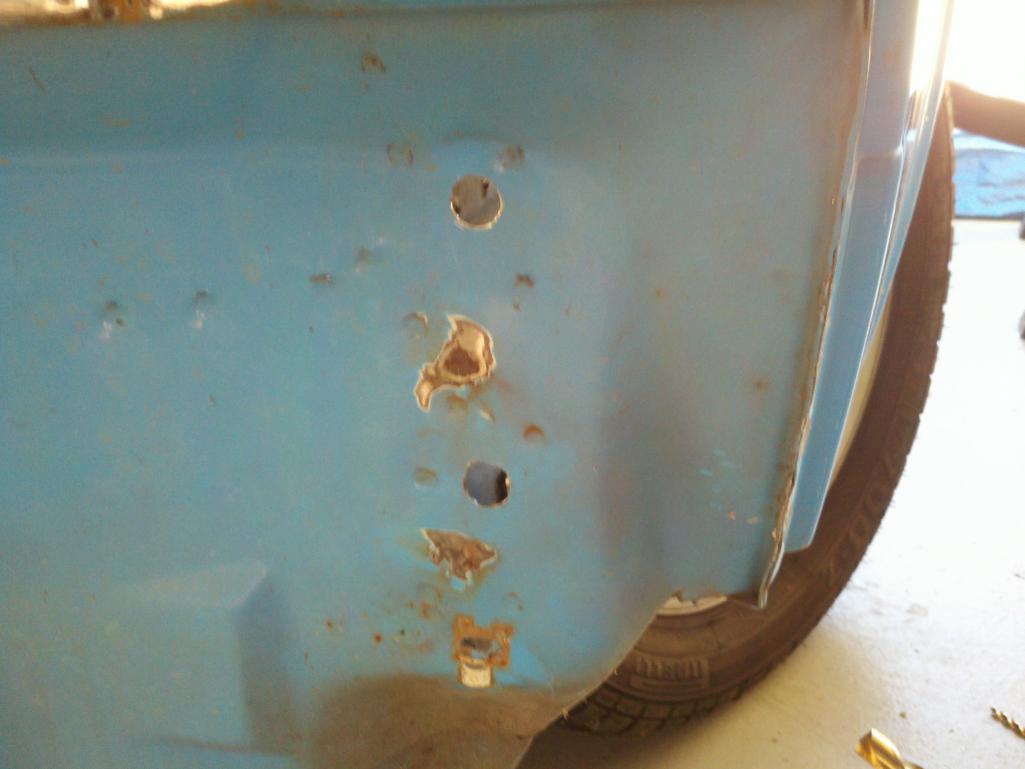
Now the part that had me nervous – where do I drill the 4 holes for the early bumper? Right where I tell you, that’s where. On each side, you will see that the rear panel has rectangles formed into it. The holes will be roughly centered in that rectangle. Mark your top hole first by measuring 2 ¾ inches horizontally from the body seam shown in the picture. The vertical mark can be made 1 3/4 inches from the ledge underneath the taillight as shown. The bottom hole is also 2 ¾ from the seam and 4 ¾ from the ledge.
 |
|
|
|
| bigkensteele |
Nov 24 2013, 10:27 PM
Post
#3
|
|
Major Member Group: Members Posts: 2,200 Joined: 30-August 04 From: Cincinnati, OH Member No.: 2,660 Region Association: South East States |
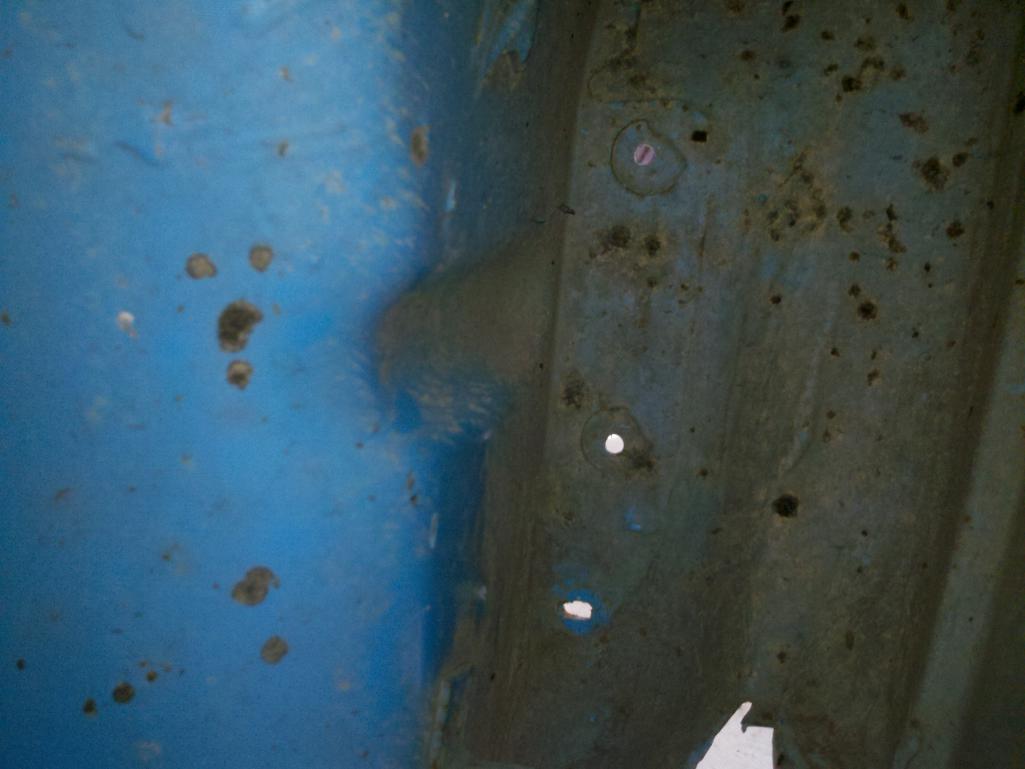
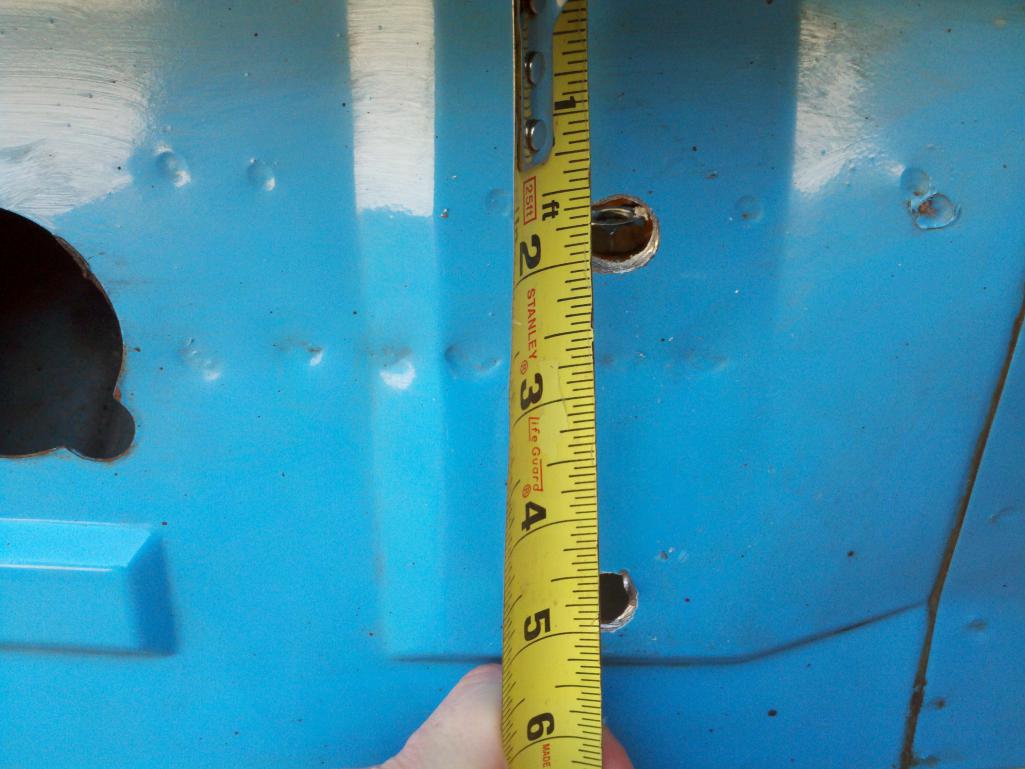 Using one of your dog bones (they are the same front and rear), verify that your marks are centered in the holes of the dog bone. If not, adjust the bottom mark accordingly. The point of no return – drill your holes. I think that the factory holes are about 5/8, but I got by with ½ on the rear. Use a punch to dimple your mark, or drill a pilot hole – either method will keep your larger bit from walking. I used a regular bit on the rear, and it tended to bind up and make for an ugly hole. On the front, I wised up and used a step bit from Harbor Freight. They turned out much nicer. |
|
|
|
| bigkensteele |
Nov 24 2013, 10:28 PM
Post
#4
|
|
Major Member Group: Members Posts: 2,200 Joined: 30-August 04 From: Cincinnati, OH Member No.: 2,660 Region Association: South East States |
This is where your top hole should be looking inside the trunk.
  |
|
|
|
| bigkensteele |
Nov 24 2013, 10:30 PM
Post
#5
|
|
Major Member Group: Members Posts: 2,200 Joined: 30-August 04 From: Cincinnati, OH Member No.: 2,660 Region Association: South East States |
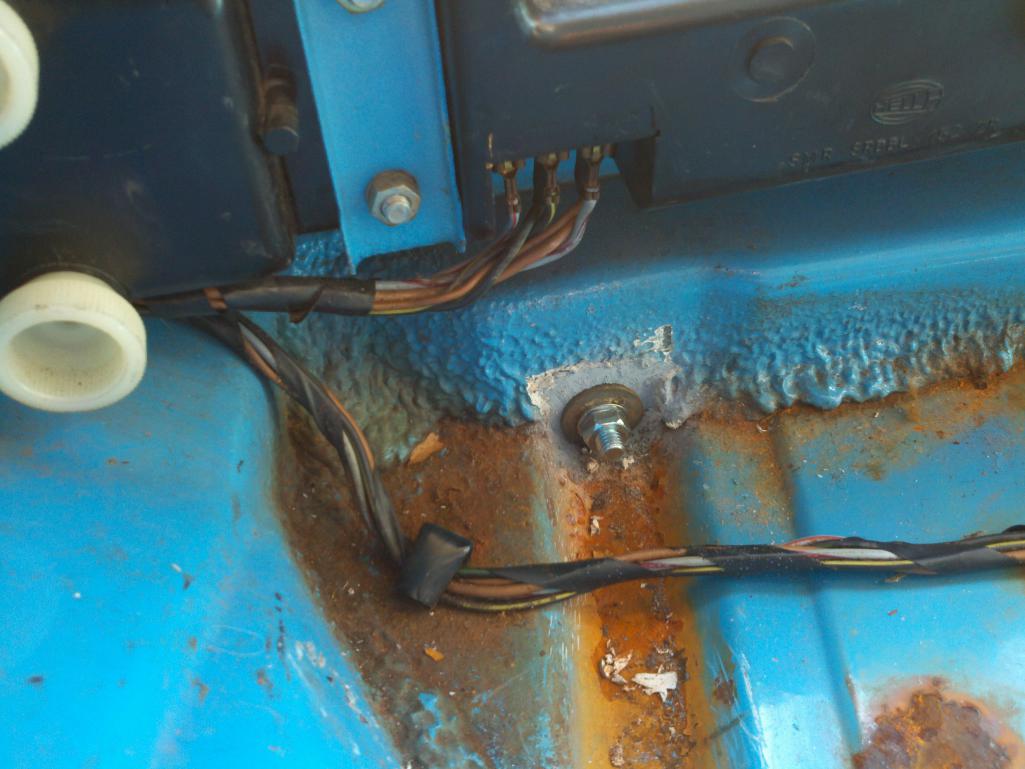
You may need to dig out some seam sealer to get a flat spot for your washers and nuts. Yes, I said nuts, not bolts, because I am about to impart more wisdom upon you (Craig at Camp914, not mine). It is much, much easier to hang the bumpers (especially if you are working alone) if you use studs and nuts, rather than bolts like the factory. I made my own by buying 8 M8 x 1.25 x 50 bolts and cutting the heads off. Screw those into the bumper, and it makes it a one person job!
I chose to prime the holes before installing the bumper. 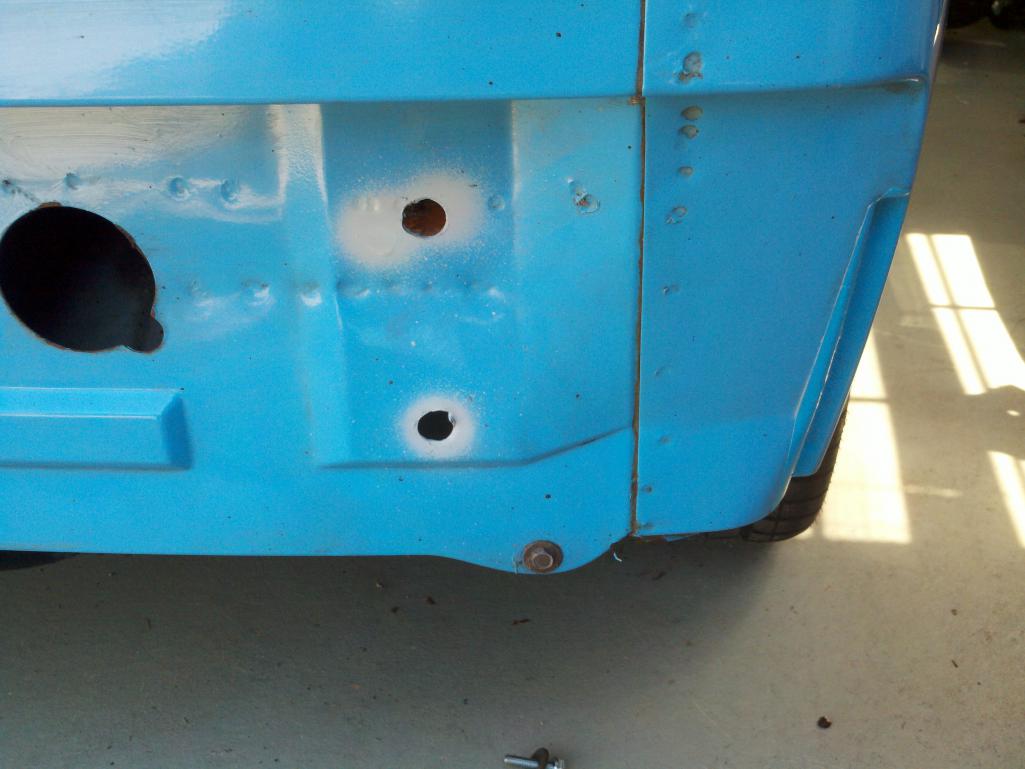 |
|
|
|
| bigkensteele |
Nov 24 2013, 10:32 PM
Post
#6
|
|
Major Member Group: Members Posts: 2,200 Joined: 30-August 04 From: Cincinnati, OH Member No.: 2,660 Region Association: South East States |
Now it is time to mount the bumper. If you haven’t already installed the bumper top, now is the time to do it. You have already installed the studs into the bumper, so now slide the dog bones down over the studs and put the thing on. Have a couple of M8 x 1.25 nuts handy to thread onto the top studs and hold it in place while you check fit, positioning, etc. I had to use a file to make my ½” holes a little bigger to give me the wiggle room that I needed, but I was pretty jazzed about how nicely it fit, given the fact that I wasn’t 100% sure that I had drilled my holes in the right place. Now, I am, and I couldn’t be happier with the results!
   |
|
|
|
| bigkensteele |
Nov 24 2013, 10:33 PM
Post
#7
|
|
Major Member Group: Members Posts: 2,200 Joined: 30-August 04 From: Cincinnati, OH Member No.: 2,660 Region Association: South East States |
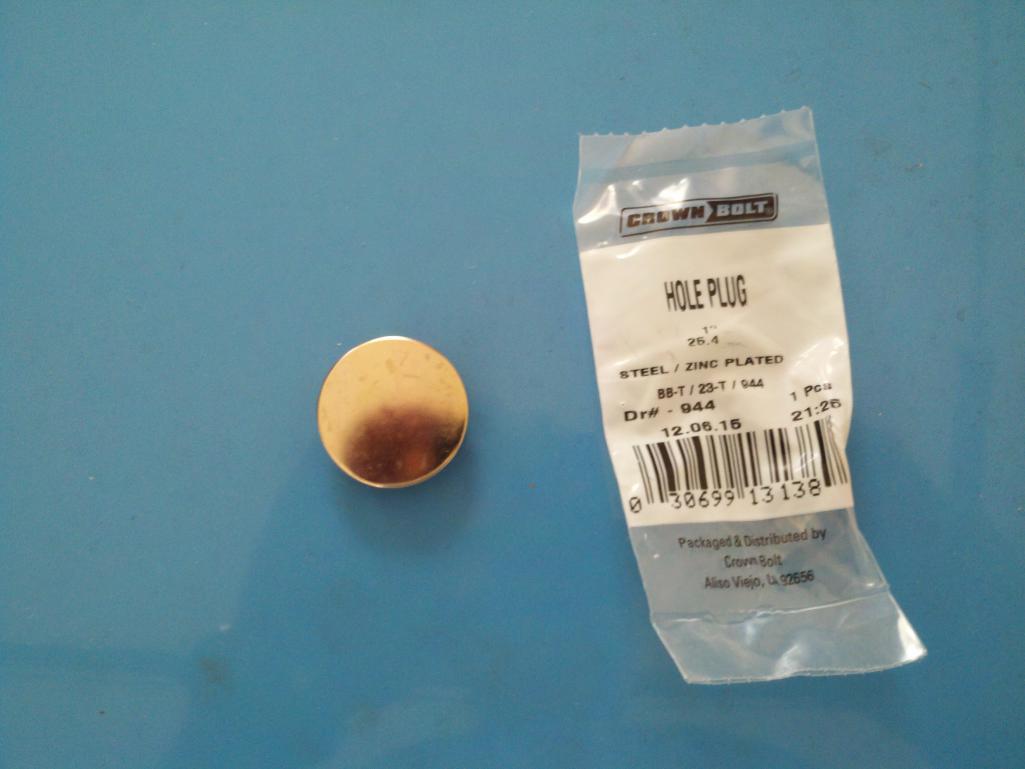
My bumper didn’t have the plug when I got it, so another trip to Lowes, and I found this 1 inch plug that fits perfectly. Zinc rather than chrome or stainless, but it looks fine.
 Remember those license plate lights? On my car the wiring was way long, and I had two too many wires (don’t recall why). So I pushed the two extra wires and all the excess back through the grommet into the trunk. Just to be safe, I put some heat shrink around the exposed spades on the extra wires. Hook up the wires, and done. |
|
|
|
| Cap'n Krusty |
Nov 24 2013, 10:34 PM
Post
#8
|
|
Cap'n Krusty Group: Members Posts: 10,794 Joined: 24-June 04 From: Santa Maria, CA Member No.: 2,246 Region Association: Central California |
Nice post. Ask the admins to put it in the classic forum. BTW, are you aware primer is NOT waterproof? Best put some real paint on there before the tinworm comes a knockin' ..............
|
|
|
|
| bigkensteele |
Nov 24 2013, 10:36 PM
Post
#9
|
|
Major Member Group: Members Posts: 2,200 Joined: 30-August 04 From: Cincinnati, OH Member No.: 2,660 Region Association: South East States |
On to the front, which provides a different challenge. On the rear, the location of the holes was my main worry. The holes are the easy part up here because they are already in place (sort of). More on that later. With the front, you get to deal with not just the side retaining rails, but also the upper support on the front that requires surgery.
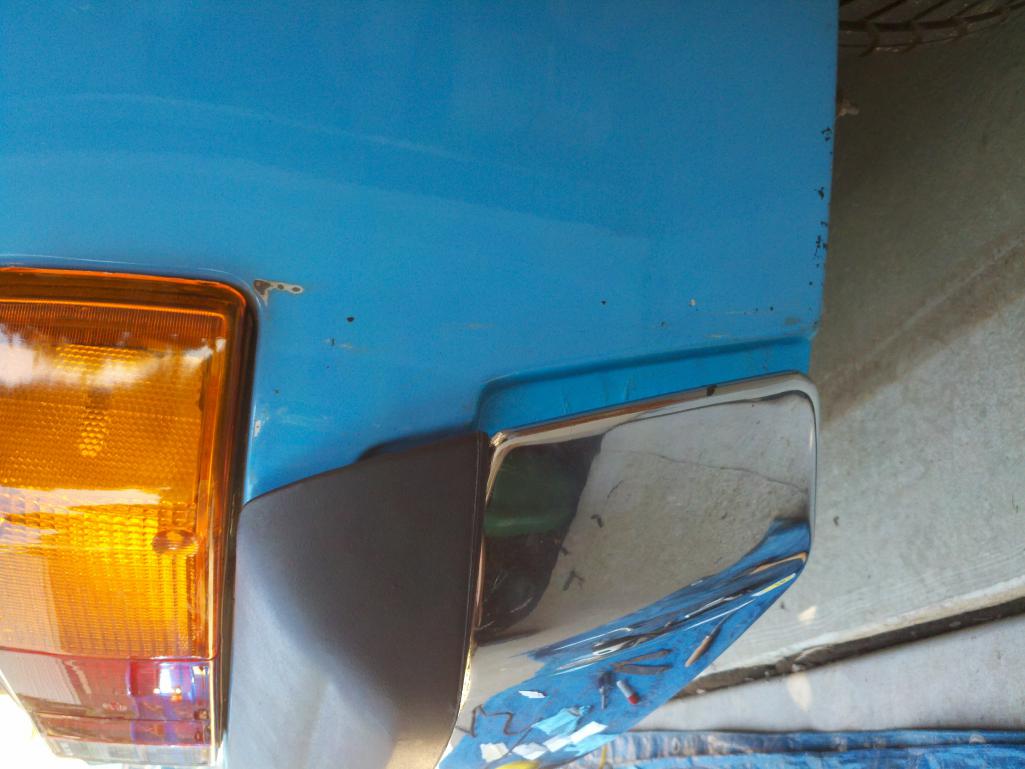
Of course, the first order of business again is to get the bumper off. Not surprisingly, this is very much the same thing you did in back. Pull the bumper sides out of the retaining rails. Use a 19mm socket to remove the bolts from the holes on the bottom of the bumper. You should now be able to slide the bumper off. Next we remove the shocks, but before they can be removed, the seal around the shock tube must be removed from the front panel. There are two 13mm bolts holding each one on. Remove the bolts and pry the rings and seals off. Here is one, along with the nifty block off plate and gasket that I made to seal the resulting holes where the shock tubes used to be. 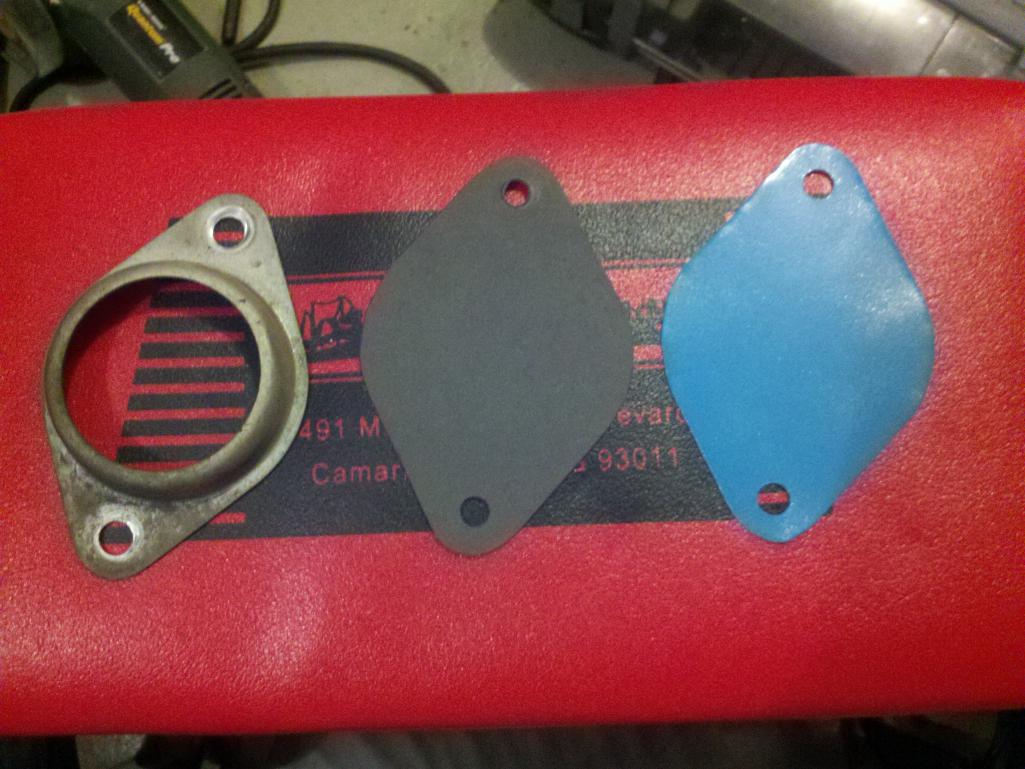 Open the trunk, and you will see the three 17mm bolts holding on the bumper shocks. You can now remove the shocks. Again, I put the bolts back in just to fill the holes. I think installed the above sheet metal plates to seal up the big holes in the front panel. Some folks weld in patches here, but I chose to just leave them as I am better at cutting sheet metal and bolting it in than I am at welding. 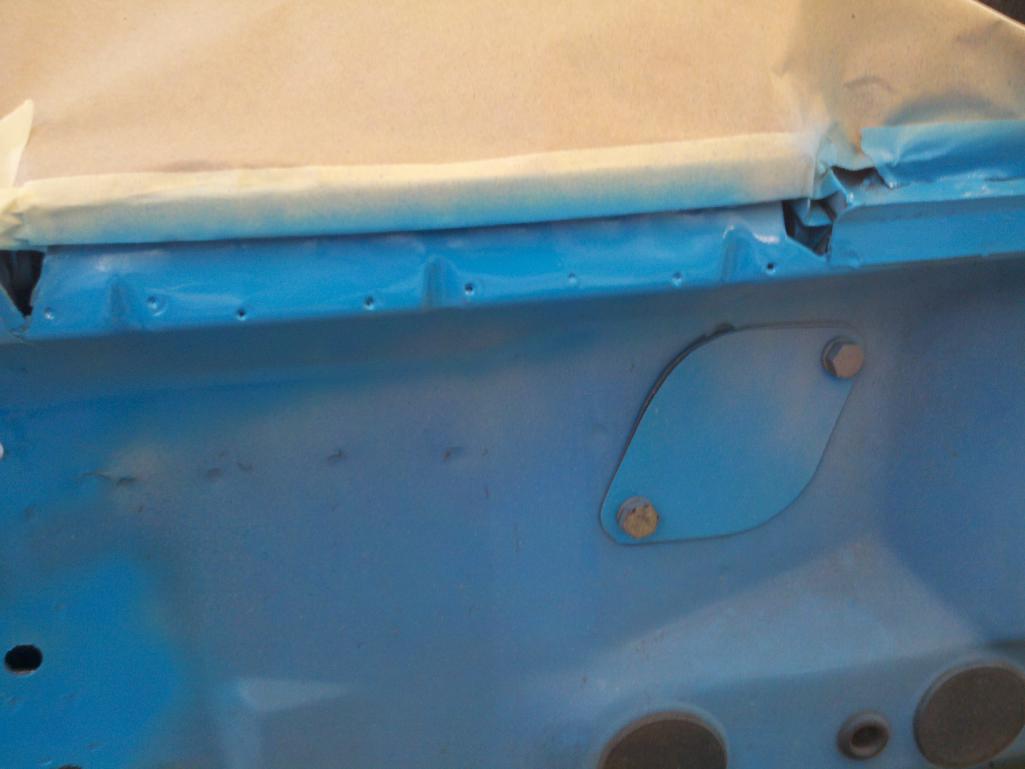 Again, I removed the valence to spruce it up, and give me more room to work. |
|
|
|
| bigkensteele |
Nov 24 2013, 10:39 PM
Post
#10
|
|
Major Member Group: Members Posts: 2,200 Joined: 30-August 04 From: Cincinnati, OH Member No.: 2,660 Region Association: South East States |
Hope you have bought that spot weld cutter by now. It is time for surgery.
Let’s start with the side rails, tabs, whatever you want to call them. Remove these in the same way you did them on the rear. I won’t go over all that again. Here is one in process. 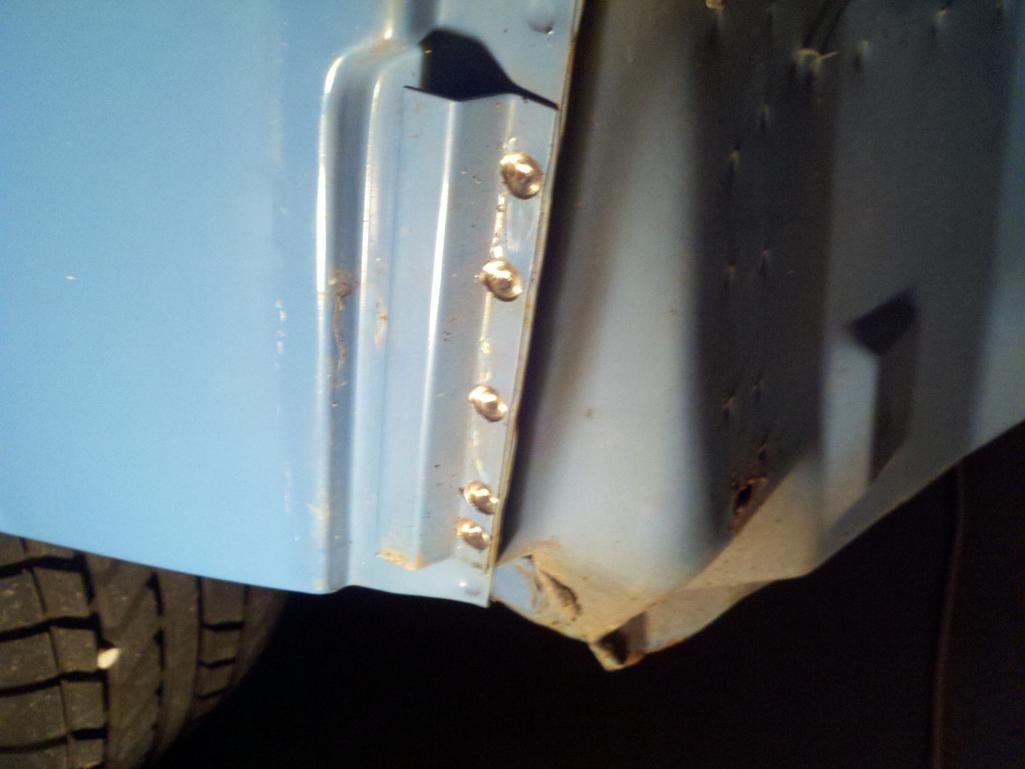 Now for the part that has never been covered all that clearly in earlier threads. You will find that there is an S shaped strip that runs all the way across from the outside edge of each headlight eyebrow. This strip is there to support the top of the late bumper rubber and is not present on early cars. Unfortunately, this strip completely interferes with the early bumper top, so it must be partially removed and the part that remains must be trimmed. This really isn’t as bad as it sounds, so lets get started. The sections underneath each headlight must be removed altogether. The section in front of the trunk must be retained so that the trunk seal will still have a channel to live in, but trimmed back so it won’t interfere with the early bumper pad. The first step is to use a hacksaw or cutting disk to cut the strip just on the outside of each corner of the trunk seal channel. Do not cut through the metal underneath. You are effectively cutting the strip that runs all the way across into three sections. The two outer sections under each eyebrow will be removed by cutting out the spot welds. 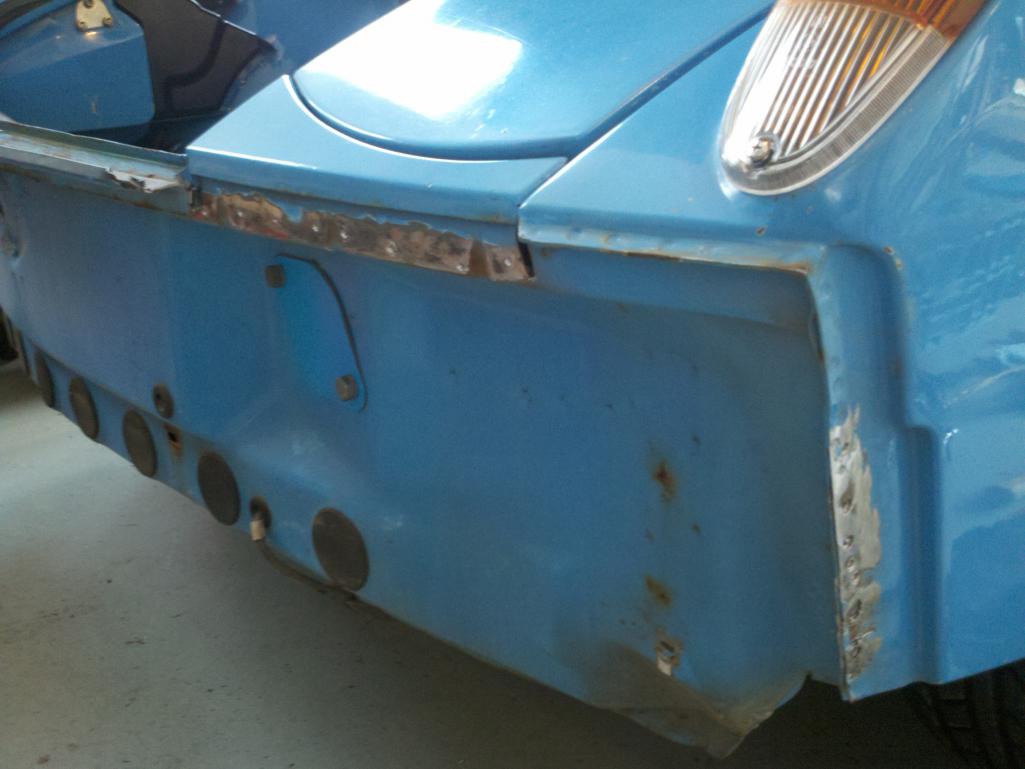 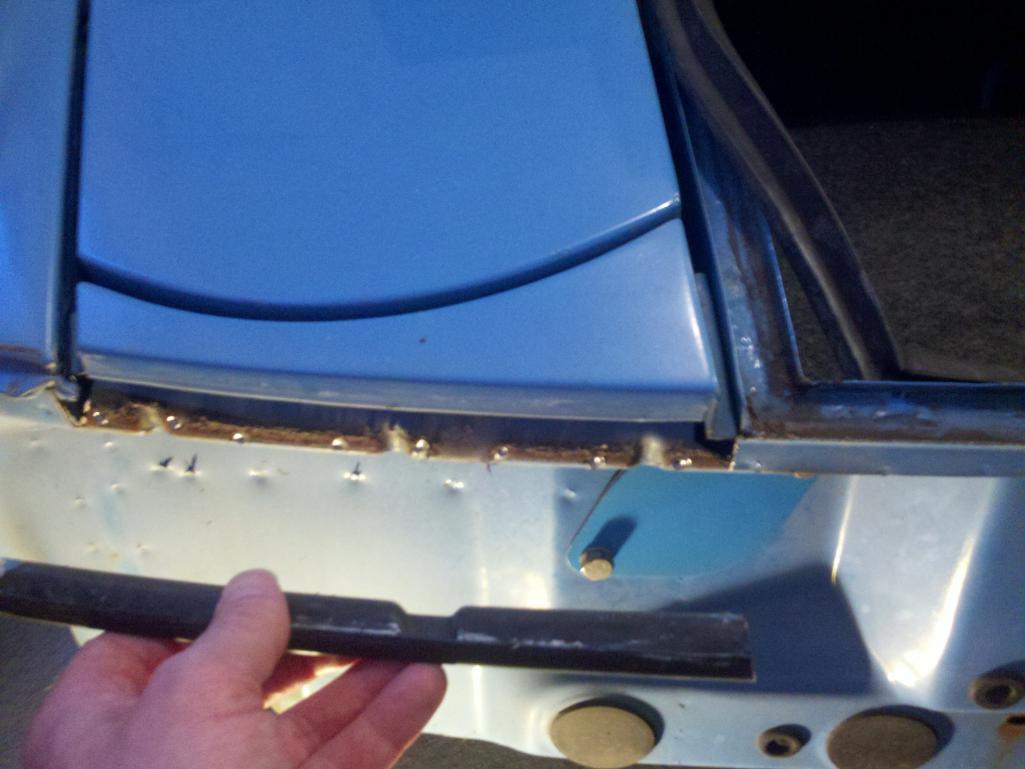 |
|
|
|
| Eric_Shea |
Nov 24 2013, 10:39 PM
Post
#11
|
|
PMB Performance Group: Admin Posts: 19,304 Joined: 3-September 03 From: Salt Lake City, UT Member No.: 1,110 Region Association: Rocky Mountains |
Excellent.
|
|
|
|
| bigkensteele |
Nov 24 2013, 10:42 PM
Post
#12
|
|
Major Member Group: Members Posts: 2,200 Joined: 30-August 04 From: Cincinnati, OH Member No.: 2,660 Region Association: South East States |
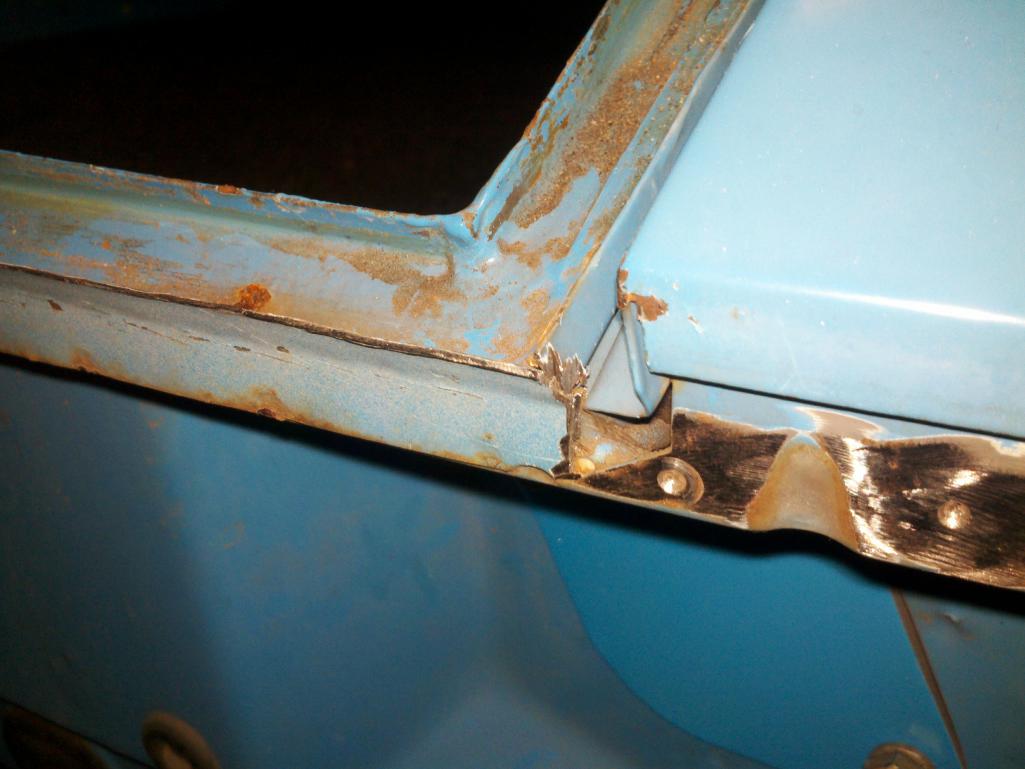
For the center section, I used tin snips to cut off the outer lip, leaving just the vertical part that will hold the trunk seal in place.
 When you are done, this is what you get. There are three drain “tubes” that I left in place. I will probably go back and cut them off because they hit the bumper top. 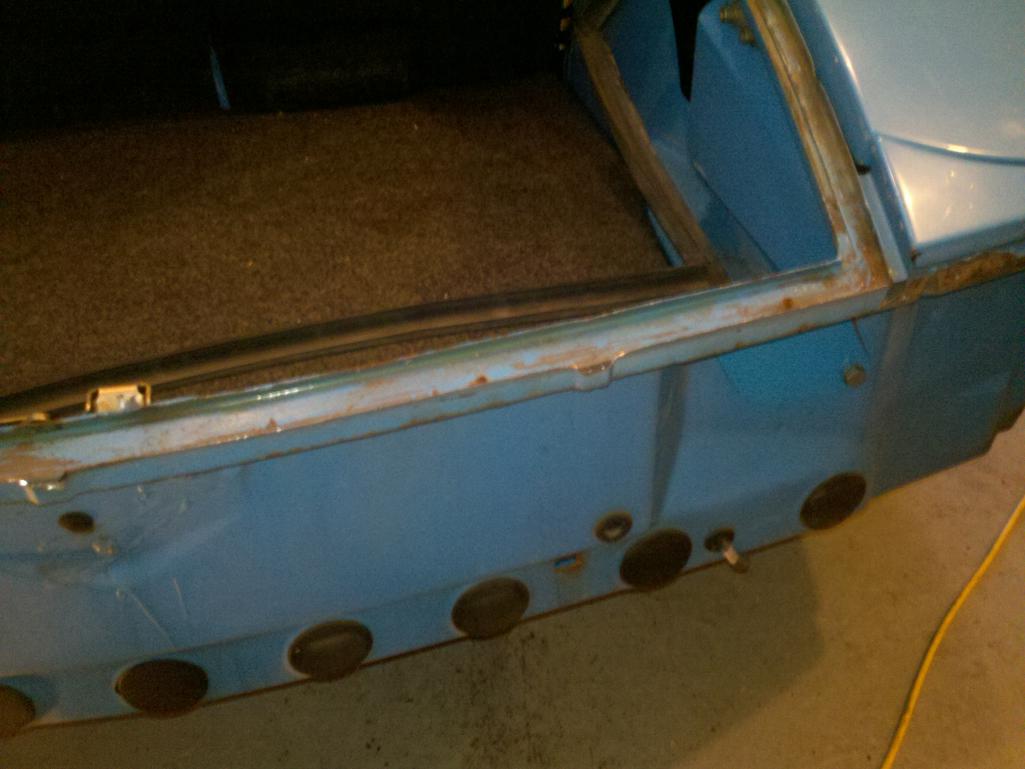 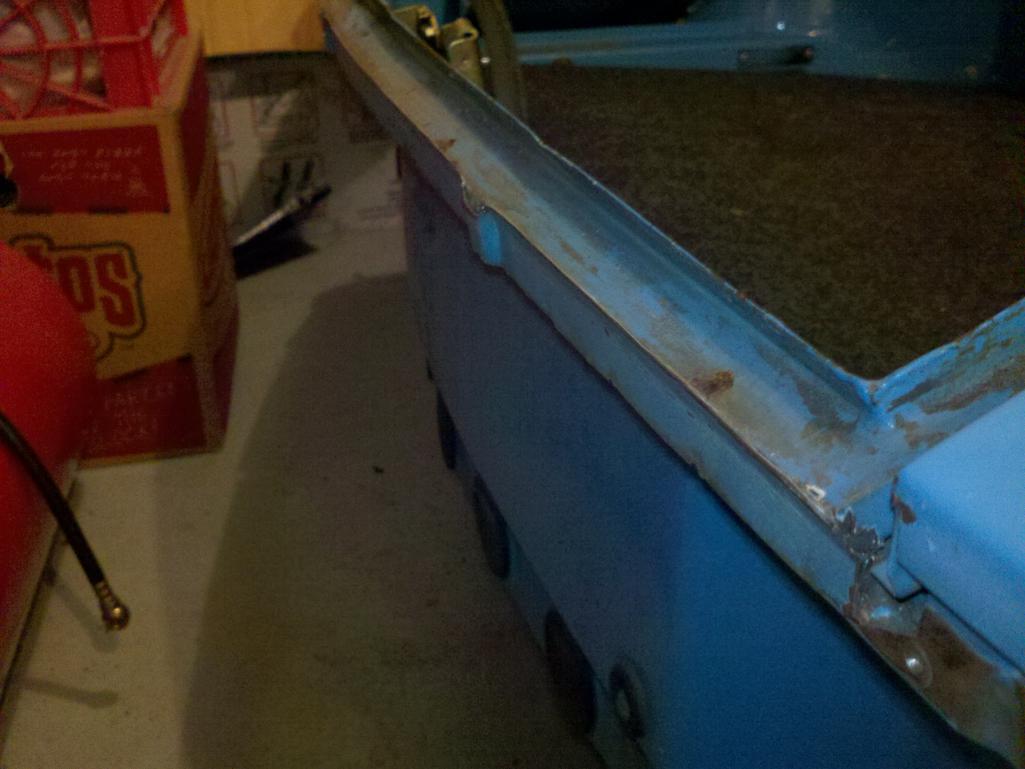 |
|
|
|
| bigkensteele |
Nov 24 2013, 10:43 PM
Post
#13
|
|
Major Member Group: Members Posts: 2,200 Joined: 30-August 04 From: Cincinnati, OH Member No.: 2,660 Region Association: South East States |
And here is the corner.
 I used a hammer and dolly to straighten the channel strip and then ground it smooth. Depending on how anal you are, this may be optional. After all that, I taped everything up, primed it and painted it. 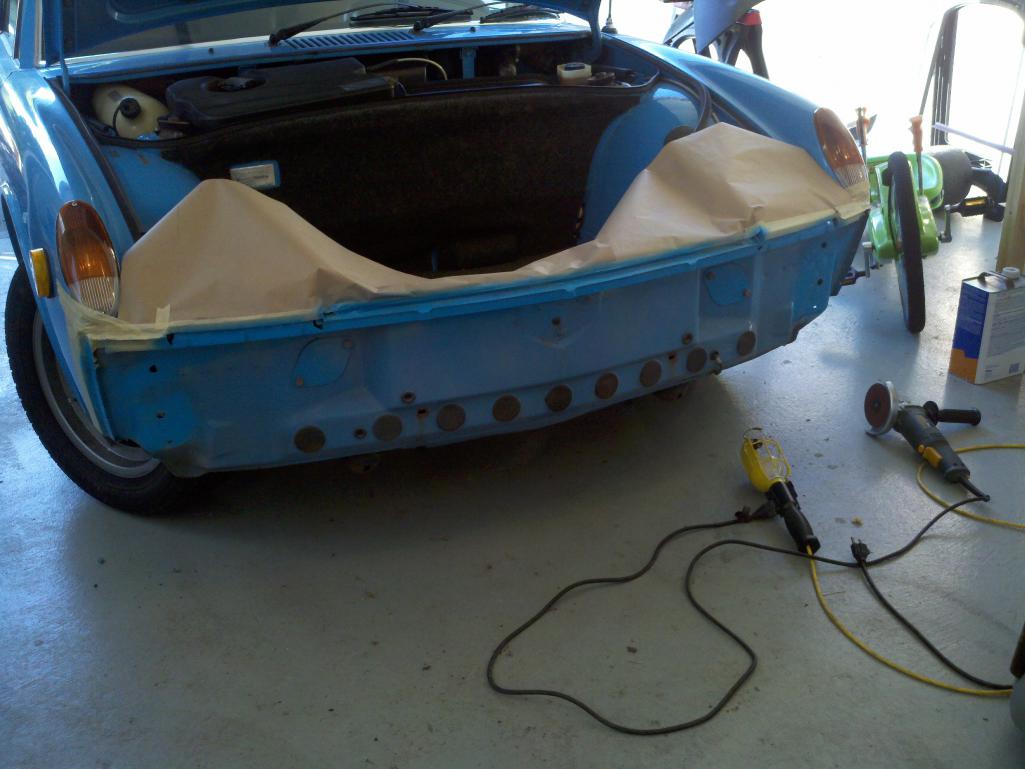 |
|
|
|
| bigkensteele |
Nov 24 2013, 10:45 PM
Post
#14
|
|
Major Member Group: Members Posts: 2,200 Joined: 30-August 04 From: Cincinnati, OH Member No.: 2,660 Region Association: South East States |
Remember how I said the holes were already there, sort of? Well they are, but you need to make them go all the way through. If you look inside the wheel well, you will see that there is a reinforcement plate with two holes that was welded in at the factory to support the early bumpers. Why they continued to put them in on late cars, I don’t know, but it works out in our favor. All we need to do is punch or drill the center of these holes and drill them out to 5/8.
  Attached thumbnail(s) 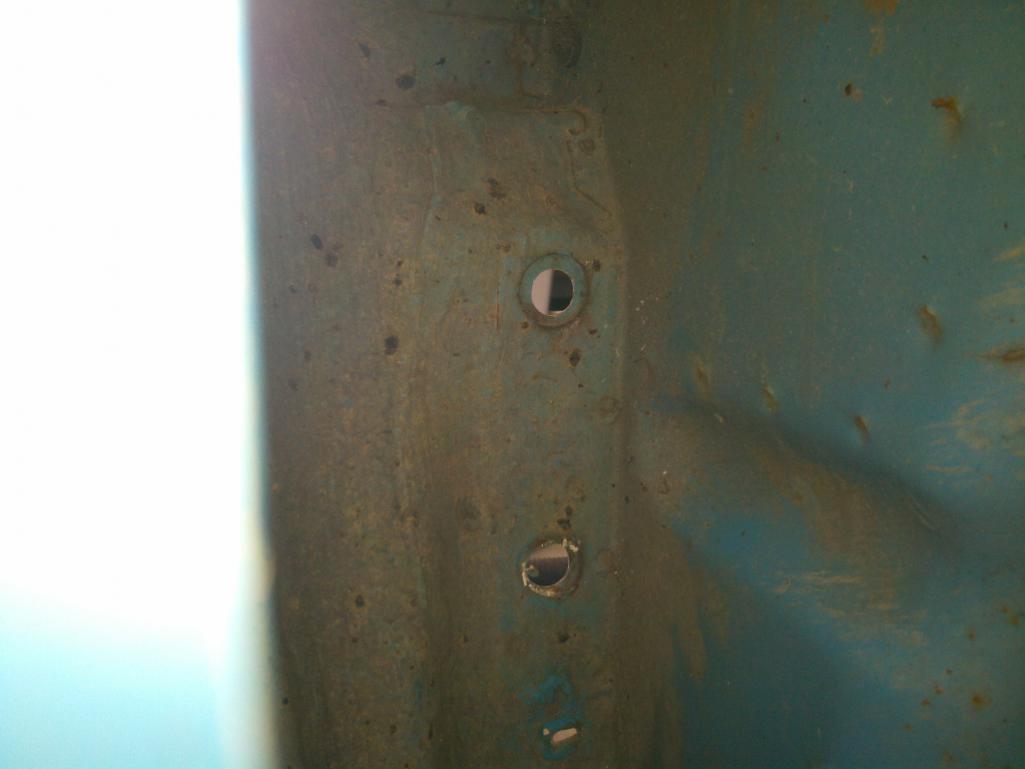
|
|
|
|
| bigkensteele |
Nov 24 2013, 10:46 PM
Post
#15
|
|
Major Member Group: Members Posts: 2,200 Joined: 30-August 04 From: Cincinnati, OH Member No.: 2,660 Region Association: South East States |
And from the outside...
 |
|
|
|
| bigkensteele |
Nov 24 2013, 10:48 PM
Post
#16
|
|
Major Member Group: Members Posts: 2,200 Joined: 30-August 04 From: Cincinnati, OH Member No.: 2,660 Region Association: South East States |
You may have noticed that I am a little out of sequence since you see me painting it in the earlier picture and the holes are already there. So sue me. No wait, don’t sue me. You could probably shop around and find a lawyer and jury that would actually award damages for something that stupid.
Anyway, after all the rails were cut off, the front strip cut and modified, prime and paint it all so it won’t rust. Now we are ready to hang the front bumper. Screw your studs in, slide the dog bones on and offer it up. It should slide on nicely. Put your washers and nuts on in the fender well loosely so you can position the bumper to where you want it, and then tighten everything down. 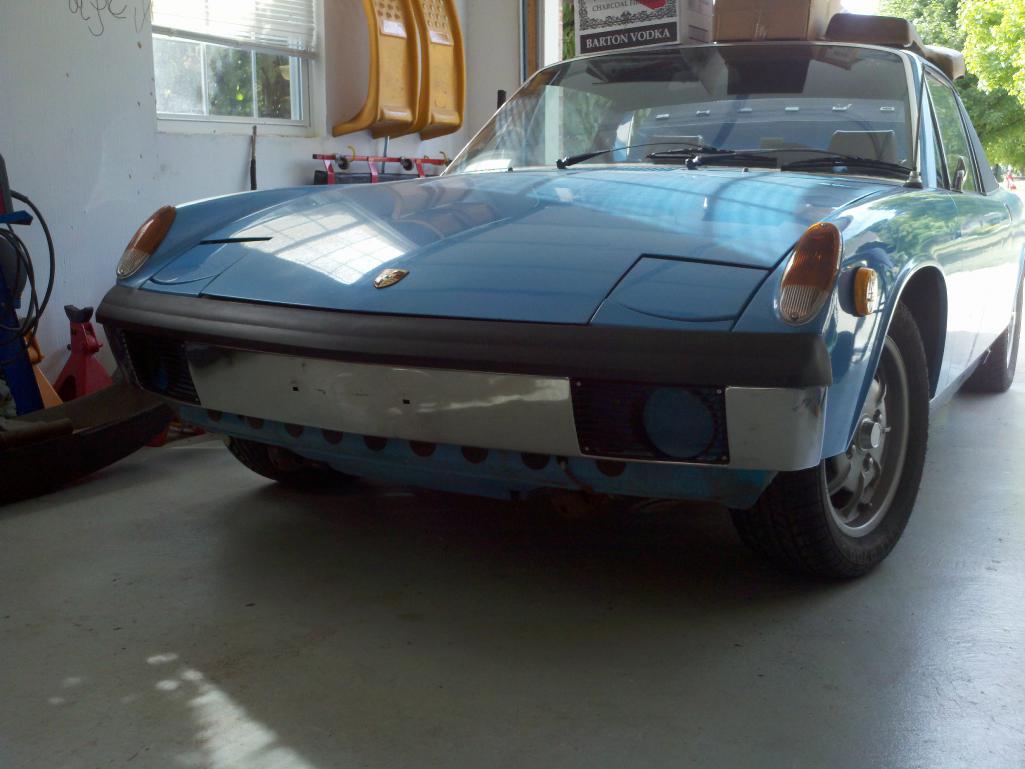 All done! Except for the fog lights. Another mod is needed for those. I am currently running non-fog grills, so I haven’t tackled this yet. The lights are mounted using a M10 x 1.50 allen bolt, but the receiver nut is not installed on the late cars, and clearly, they must be. One option is to use nutserts, which are pretty expensive because they require a special tool to install (which you will probably never use again). The option that I plan to go with is a flanged nut spot welded into place after the hole is located and drilled. I will update the thread when I have tackled this.   |
|
|
|
| Chris H. |
Nov 25 2013, 06:21 AM
Post
#17
|
|
Senior Member Group: Members Posts: 4,090 Joined: 2-January 03 From: Chicago 'burbs Member No.: 73 Region Association: Upper MidWest |
Nice work Ken!
Did my Laguna Blue car a few years ago and was amazed at the difference. The chrome bumpers really set the paint off don't they? You'll be staring at it for days. Walk to the front...walk to the back...walk to the front...walk to the back... |
|
|
|
| computers4kids |
Nov 25 2013, 09:35 AM
Post
#18
|
|
Love these little cars! Group: Members Posts: 2,443 Joined: 11-June 05 From: Port Townsend, WA Member No.: 4,253 Region Association: None |
Nice write up! If you go to a Harley Davidson shop, you can find a "chrome" plug that fits instead of the zinc one. I had posted the part number when I had backdated mine.
PS you need to a one last step to your excellent write-up...how ti get rid of those monster bumpers. I tried selling, giving away...finally a dumpster stepped forward (IMG:style_emoticons/default/piratenanner.gif) |
|
|
|
| bigkensteele |
Nov 25 2013, 09:59 AM
Post
#19
|
|
Major Member Group: Members Posts: 2,200 Joined: 30-August 04 From: Cincinnati, OH Member No.: 2,660 Region Association: South East States |
QUOTE(computers4kids @ Nov 25 2013, 07:35 AM)  Nice write up! If you go to a Harley Davidson shop, you can find a "chrome" plug that fits instead of the zinc one. I had posted the part number when I had backdated mine. PS you need to a one last step to your excellent write-up...how ti get rid of those monster bumpers. I tried selling, giving away...finally a dumpster stepped forward (IMG:style_emoticons/default/piratenanner.gif) Thanks! Not sure what will happen to the BUBs. They may go up in my garage attic, or they may find their way into a dumpster too. |
|
|
|
| boxstr |
Nov 25 2013, 11:43 AM
Post
#20
|
|
MEMBER:PACIFIC NORTHWEST REGION Group: Members Posts: 7,522 Joined: 25-December 02 From: OREGON Member No.: 12 Region Association: Pacific Northwest |
I have used the nutserts that you have pictured. Drilling a hole and then small pop rivets around the edge work great.
Not sure what special tool you are referring to? Craig at CAMP |
|
|
|
|
1 User(s) are reading this topic (1 Guests and 0 Anonymous Users)
0 Members:

|
Lo-Fi Version | Time is now: 3rd July 2026 - 05:53 PM |
Invision Power Board
v9.1.4 © 2026 IPS, Inc.