|
|
|
Porsche, and the Porsche crest are registered trademarks of Dr. Ing. h.c. F. Porsche AG.
This site is not affiliated with Porsche in any way. Its only purpose is to provide an online forum for car enthusiasts. All other trademarks are property of their respective owners. |
|
|

  |

| colingreene |
 Dec 5 2015, 10:08 PM Dec 5 2015, 10:08 PM
Post
#41
|
|
Senior Member  Group: Members Posts: 755 Joined: 17-October 13 From: Southern California Member No.: 16,526 Region Association: Southern California |
about half a inch. the up down was approx but they were too wide spaced.
The studs were a good shout, i used them. |
   |

 
|
| 914Sixer |
Dec 6 2015, 12:20 PM
Post
#42
|
|
914 Guru Group: Members Posts: 9,526 Joined: 17-January 05 From: San Angelo Texas Member No.: 3,457 Region Association: Southwest Region |
You could use the dog bones for a hole pattern with the metal inserts removed.
|
|
|
|
| Porschef |
Dec 6 2015, 01:56 PM
Post
#43
|
|
How you doin' Group: Members Posts: 2,180 Joined: 7-September 10 From: LawnGuyland Member No.: 12,152 Region Association: North East States |
Here's what I did, took all guesswork/ individual car variability out of play
http://www.914world.com/bbs2/index.php?sho...9&hl=Bumper |
|
|
|
| Steve |
Mar 17 2016, 09:51 AM
Post
#44
|
|
914 Guru Group: Members Posts: 6,059 Joined: 14-June 03 From: Laguna Niguel, CA Member No.: 822 Region Association: Southern California |
Great article. I just used it to swap out my fiberglass GT bumpers for Chrome bumpers. Looks much better. Curious...
1. What are people doing for the rear bumper top center bracket? I used an L bracket, but its too wimpy to hold the rubber up, so the center is sagging. 2. The BUB's had built in tow hook nuts. What are people doing for front and rear tow hooks? Otto's in Venice Beach installed a Tow hook nut in the front using the right shock bumper mount. PIA, but i had to cut a section out of the chrome bumper and drill a hole in it to clear the tow hook.   |
|
|
|
| flat4guy |
Apr 12 2020, 01:21 PM
Post
#45
|
|
Member Group: Members Posts: 483 Joined: 10-October 16 From: nor cal Member No.: 20,484 Region Association: Northern California |
Great article - are you able to run a front lower valance? Did not see a pic. Thanks
|
|
|
|
| DRPHIL914 |
Apr 12 2020, 07:11 PM
Post
#46
|
|
Dr. Phil Group: Members Posts: 5,956 Joined: 9-December 09 From: Kennesaw, GA Member No.: 11,106 Region Association: South East States |
QUOTE(flat4guy @ Apr 12 2020, 03:21 PM)  Great article - are you able to run a front lower valance? Did not see a pic. Thanks i maintained my stock ‘75 front valance following my update/backdate. Attached thumbnail(s) 
|
|
|
|
| r_towle |
Apr 12 2020, 10:05 PM
Post
#47
|
|
Custom Member Group: Members Posts: 24,705 Joined: 9-January 03 From: Taxachusetts Member No.: 124 Region Association: North East States |
TL;DR
I think we need another thread |
|
|
|
| mcbrems |
Jan 21 2021, 12:27 AM
Post
#48
|
|
The First Porsche was Electric! Group: Members Posts: 57 Joined: 26-April 10 From: North San Diego County, CA Member No.: 11,660 Region Association: Southern California |
QUOTE(bigkensteele @ Nov 24 2013, 09:36 PM) I think installed the above sheet metal plates to seal up the big holes in the front panel. Some folks weld in patches here, but I chose to just leave them as I am better at cutting sheet metal and bolting it in than I am at welding. A perfect fit for those shock holes is an item sold by EV West, used as a cover plate for the hole remaining in the bell housing after removing the starter from a VW/Porsche. Link here: https://www.evwest.com/catalog/product_info...dug81o4j2u54ii2 Attached thumbnail(s) 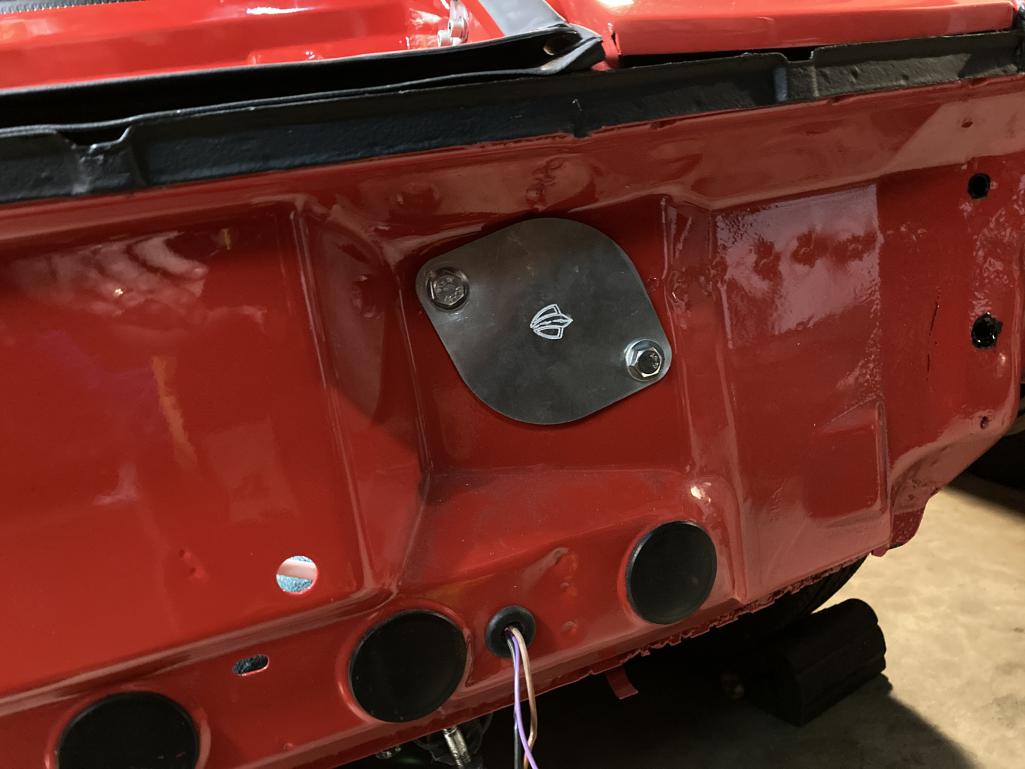
|
|
|
|
| mcbrems |
Jan 21 2021, 12:28 AM
Post
#49
|
|
The First Porsche was Electric! Group: Members Posts: 57 Joined: 26-April 10 From: North San Diego County, CA Member No.: 11,660 Region Association: Southern California |
QUOTE(mcbrems @ Jan 20 2021, 11:27 PM) QUOTE(bigkensteele @ Nov 24 2013, 09:36 PM) I think installed the above sheet metal plates to seal up the big holes in the front panel. Some folks weld in patches here, but I chose to just leave them as I am better at cutting sheet metal and bolting it in than I am at welding. A perfect fit for those shock holes is an item sold by EV West, used as a cover plate for the hole remaining in the bell housing after removing the starter from a VW/Porsche. Link here: https://www.evwest.com/catalog/product_info...dug81o4j2u54ii2 Attached image(s) 
|
|
|
|
|
1 User(s) are reading this topic (1 Guests and 0 Anonymous Users)
0 Members:

|
Lo-Fi Version | Time is now: 31st July 2026 - 11:12 PM |
Invision Power Board
v9.1.4 © 2026 IPS, Inc.