|
|
|
Porsche, and the Porsche crest are registered trademarks of Dr. Ing. h.c. F. Porsche AG.
This site is not affiliated with Porsche in any way. Its only purpose is to provide an online forum for car enthusiasts. All other trademarks are property of their respective owners. |
|
|

  |

| era vulgaris |
 Dec 10 2013, 03:39 PM Dec 10 2013, 03:39 PM
Post
#1
|
|
J is for Genius  Group: Members Posts: 982 Joined: 10-November 13 From: Raleigh, NC Member No.: 16,629 Region Association: South East States |
After replacing my oil cooler seals with the engine in the car (quite a PIA, btw!), I discovered that the source of my oil leak was that the PO had JB welded the oil pressure switch in place because of stripped threads (IMG:style_emoticons/default/mad.gif)
I cleaned it, re-JB welded it, and the leak has stopped (there's actually enough thread there to maintain an electrical contact, just not enough to hold the switch in). Now I know this isn't a permanent fix, so I'm weighing my options here. I don't have experience drilling and tapping threads, so if I went that route I'd have to pay a shop to do it, and it would likely require splitting the case to do so, right? Which at that point I may as well have the engine rebuilt, and the dollars start piling up. The other option…I found an engine a couple hours drive from me for $850. I contacted the seller and this is what he told me: It's a stock 1.8 case, stock cam, but the pistons and cylinders are 96mm instead of the 94mm stock. The engine was totally rebuilt. The rod bearings are 0.10, standard mains, standard on the cam shaft. The heads were rebuild with ground valves, new seats, guides, and springs. Engine has a few hundred miles on it, and was rebuilt a year ago. Apparently the guy was using it for his car while his 2.0 was being built up to a 2.3 so it was an "in the meantime" engine for him. I've got a 1.7 with Djet. Is there any reason why my Djet wouldn't work with the larger displacement engine? (Still new to Djet, sorry if that's a dumb question!) Do you guys think that price is pretty good? It sounds like it'd be easier to pop a new engine in rather than disassembling the engine to have it tapped for new threads. |
   |

 
|
| LotusJoe |
Dec 10 2013, 04:04 PM
Post
#2
|
|
Europa Twink Driver Group: Members Posts: 406 Joined: 30-November 09 From: Southern California Member No.: 11,085 Region Association: Southern California |
|
|
|
|
| stugray |
Dec 10 2013, 04:13 PM
Post
#3
|
|
Advanced Member Group: Members Posts: 3,824 Joined: 17-September 09 From: Longmont, CO Member No.: 10,819 Region Association: None |
Those threads go a lot deeper than the typical pressure switch threads in.
You might be able to clean the threads & JB weld in one of these: https://www.pegasusautoracing.com/productde...ls.asp?RecID=55 Then the pressure switch would thread into that. If you dont get good electrical contact after the repair, you could attach a wire & ground it. |
|
|
|
| era vulgaris |
Dec 10 2013, 05:54 PM
Post
#4
|
|
J is for Genius Group: Members Posts: 982 Joined: 10-November 13 From: Raleigh, NC Member No.: 16,629 Region Association: South East States |
QUOTE(LotusJoe @ Dec 10 2013, 05:04 PM)  Wouldn't the metal shavings from drilling it out fall into the engine? That was my concern with having to split the case to get the shavings out. QUOTE(stugray @ Dec 10 2013, 05:13 PM) Those threads go a lot deeper than the typical pressure switch threads in. You might be able to clean the threads & JB weld in one of these: https://www.pegasusautoracing.com/productde...ls.asp?RecID=55 Then the pressure switch would thread into that. If you dont get good electrical contact after the repair, you could attach a wire & ground it. Interesting. Which one of those would fit into the hole that's already there? The 10x1.0? Would the threads on that work or is it just shoving it in there and JB Welding it? At any rate I'd still have to use JB Weld. I've never had JB Weld be a successful permanent solution - I've had it last years in some instances but it always fails, especially when I've used it in situations with extremely varying temps as it would see on the engine block. |
|
|
|
| TheCabinetmaker |
Dec 10 2013, 06:34 PM
Post
#5
|
|
I drive my car everyday Group: Members Posts: 8,300 Joined: 8-May 03 From: Tulsa, Ok. Member No.: 666 |
I would drill, tap, and timesert. Shove a piece of paper towel in the hole and use grease on the drill bit, and tap. That will catch most of the shavings. Then pull the paper towel out with a pair of thermostats. If a small piece of shaving does get in the system, your not any worse off than now.
|
|
|
|
| gothspeed |
Dec 10 2013, 08:12 PM
Post
#6
|
|
Senior Member Group: Members Posts: 1,539 Joined: 3-February 09 From: SoCal Member No.: 10,019 Region Association: None |
Sounds like one of those oil pressure interfaces that got a 1/8 NPT at some point in its life .... (IMG:style_emoticons/default/popcorn[1].gif)
If you use grease to lube the tap for the thread insert, it will be a lot easier to keep track of the chips. You can use a thin hose and a wet dry vac to draw out most, if not all the chips during and the after fact. If you use grease the chips should not flow down much, just clean the tap plenty as you go along. (IMG:style_emoticons/default/smile.gif) |
|
|
|
| era vulgaris |
Dec 12 2013, 12:35 PM
Post
#7
|
|
J is for Genius Group: Members Posts: 982 Joined: 10-November 13 From: Raleigh, NC Member No.: 16,629 Region Association: South East States |
Thanks guys, I'd like to give that a try….but...
After reading through several threads on here, I'm now wholly confused about the thread size. With the timesert I'd be drilling the case for 1/8 NPT, but some people are saying the threads in the case are 10x1.0 straight thread, others are saying they're tapered on the case. And there's a general non-consensus about the thread size of the switch. Is there a definitive answer to any of this? Also, any opinions on the engine I mentioned in the original post? |
|
|
|
| gothspeed |
Dec 12 2013, 01:46 PM
Post
#8
|
|
Senior Member Group: Members Posts: 1,539 Joined: 3-February 09 From: SoCal Member No.: 10,019 Region Association: None |
What insert you will use, depends on what thread the 'fitting' is that you plan on installing into the insert. I would not worry much what it was supposed to be, if you are going to use 1/8" NPT (IMG:style_emoticons/default/popcorn[1].gif)
|
|
|
|
| LotusJoe |
Dec 12 2013, 02:08 PM
Post
#9
|
|
Europa Twink Driver Group: Members Posts: 406 Joined: 30-November 09 From: Southern California Member No.: 11,085 Region Association: Southern California |
QUOTE(era vulgaris @ Dec 12 2013, 10:35 AM) Thanks guys, I'd like to give that a try….but... After reading through several threads on here, I'm now wholly confused about the thread size. With the timesert I'd be drilling the case for 1/8 NPT, but some people are saying the threads in the case are 10x1.0 straight thread, others are saying they're tapered on the case. And there's a general non-consensus about the thread size of the switch. Is there a definitive answer to any of this? Also, any opinions on the engine I mentioned in the original post? If you use the 1/8 NPT insert, then your hole will definitely be 1/8 NPT which is the size of the paint ball hose. The VDO sensor is 1/8 NPT. 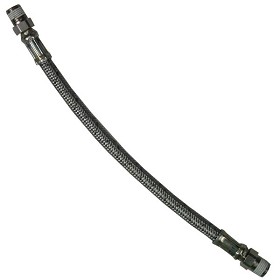 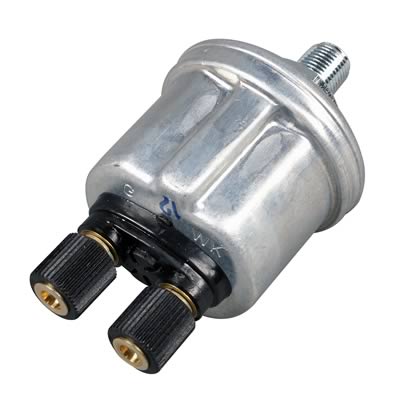 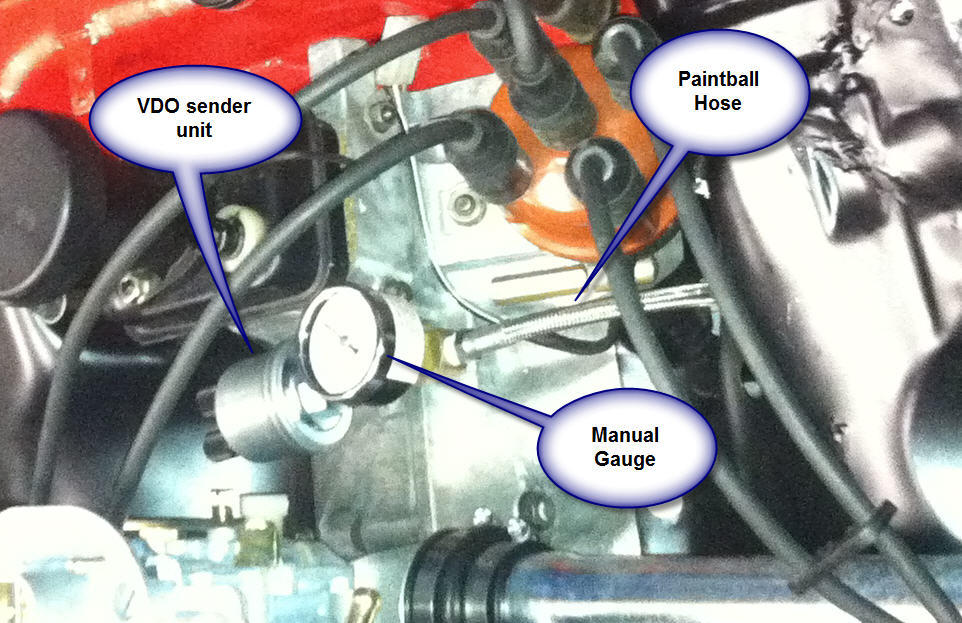 |
|
|
|
| stugray |
Dec 12 2013, 04:36 PM
Post
#10
|
|
Advanced Member Group: Members Posts: 3,824 Joined: 17-September 09 From: Longmont, CO Member No.: 10,819 Region Association: None |
I used a 10mm X 1.0 straight thread to 1/8NPT adapter like from the link I posted.
I think you could fix it that way without the JB weld, but I would have to see the damage. The adapter will thread in ~10 threads while my guess is that you only have ~3 damaged. |
|
|
|
| gothspeed |
Dec 12 2013, 05:39 PM
Post
#11
|
|
Senior Member Group: Members Posts: 1,539 Joined: 3-February 09 From: SoCal Member No.: 10,019 Region Association: None |
QUOTE(stugray @ Dec 12 2013, 02:36 PM) I used a 10mm X 1.0 straight thread to 1/8NPT adapter like from the link I posted. I think you could fix it that way without the JB weld, but I would have to see the damage. The adapter will thread in ~10 threads while my guess is that you only have ~3 damaged. +1 ...... not a bad idea! If one could clean the existing hole out and examine the extent of any thread damage ..... it may be still be usable and seal-able, with a crush washer ... (IMG:style_emoticons/default/smile.gif) |
|
|
|
| stugray |
Dec 12 2013, 06:08 PM
Post
#12
|
|
Advanced Member Group: Members Posts: 3,824 Joined: 17-September 09 From: Longmont, CO Member No.: 10,819 Region Association: None |
The brass piece you see peeking up out of the engine tin is the adapter I am talking about.
And I did use a crush washer. (IMG:http://www.914world.com/bbs2/uploads_offsite/i366.photobucket.com-10819-1367906573.1.jpg) |
|
|
|
| gothspeed |
Dec 12 2013, 06:32 PM
Post
#13
|
|
Senior Member Group: Members Posts: 1,539 Joined: 3-February 09 From: SoCal Member No.: 10,019 Region Association: None |
Looks good! ..... if the thread damage is not too bad, maybe the threads can be chased or cleaned up with a 10mm x 1.0 standard tap. Then install a setup like stugray's
(IMG:style_emoticons/default/popcorn[1].gif) |
|
|
|
| era vulgaris |
Dec 12 2013, 09:50 PM
Post
#14
|
|
J is for Genius Group: Members Posts: 982 Joined: 10-November 13 From: Raleigh, NC Member No.: 16,629 Region Association: South East States |
QUOTE(stugray @ Dec 12 2013, 05:36 PM) I used a 10mm X 1.0 straight thread to 1/8NPT adapter like from the link I posted. I think you could fix it that way without the JB weld, but I would have to see the damage. The adapter will thread in ~10 threads while my guess is that you only have ~3 damaged. Cool, I'll give that adapter a try. I don't want to undo the JB Weld I've got going on just to take a pic because it's working right now, no leaks and good electrical contact. But from what I could see before I re-JB'd it, it was only the first 2 or 3 threads that were damaged, so I think that adapter might work. As soon as that JB weld fails, I'll pop that adapter in and see how it does. Thanks for all the help! I was terrified when I found this, but you guys saved me from popping on a new engine! (IMG:style_emoticons/default/biggrin.gif) |
|
|
|
|
1 User(s) are reading this topic (1 Guests and 0 Anonymous Users)
0 Members:

|
Lo-Fi Version | Time is now: 15th May 2024 - 01:12 PM |
Invision Power Board
v9.1.4 © 2024 IPS, Inc.