|
|
|
Porsche, and the Porsche crest are registered trademarks of Dr. Ing. h.c. F. Porsche AG.
This site is not affiliated with Porsche in any way. Its only purpose is to provide an online forum for car enthusiasts. All other trademarks are property of their respective owners. |
|
|


| HalfMoon |
 Jan 13 2014, 04:45 PM Jan 13 2014, 04:45 PM
Post
#1
|
|
Senior Member  Group: Members Posts: 828 Joined: 13-November 12 From: Shenandoah Junction, WV Member No.: 15,144 Region Association: MidAtlantic Region |
Lol, this may be a bit confusing.
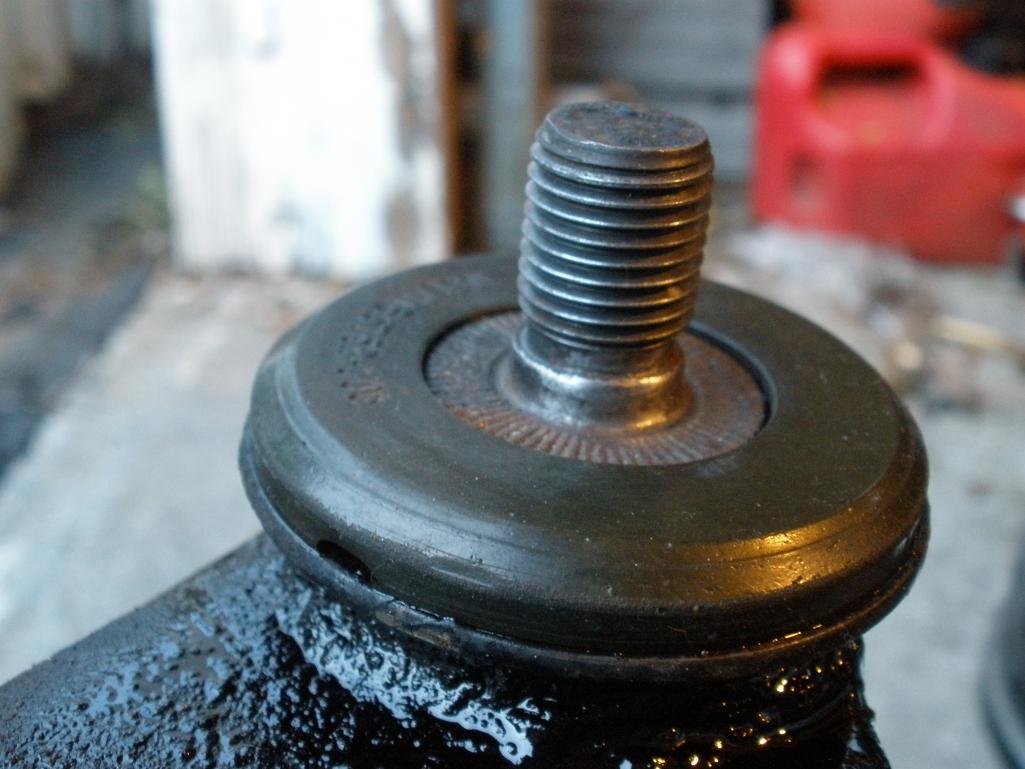
My PO told me the driver side trailing arm bushing would likely need replacement and teh inner bushing/shaft certaining had movement when rocked up on a jack. The passenger side seemed fine but I decided to pull em both off and inspect/repair (at the very least rebush em). Lot's of odd stuff upon dis-assembly and inspection. Let's start with the passenger side. No movement was detected at the bushings when rocked on a jack. Upon dis-assembley (I lucked out, noting was too difficult other than the crown nut) I did notice that it appered a previous ear repair had occured and that there was/is some "slight" ovaling of the shaft hole. But remember, there's no movement and the bushings "look" fine. Here's a picture 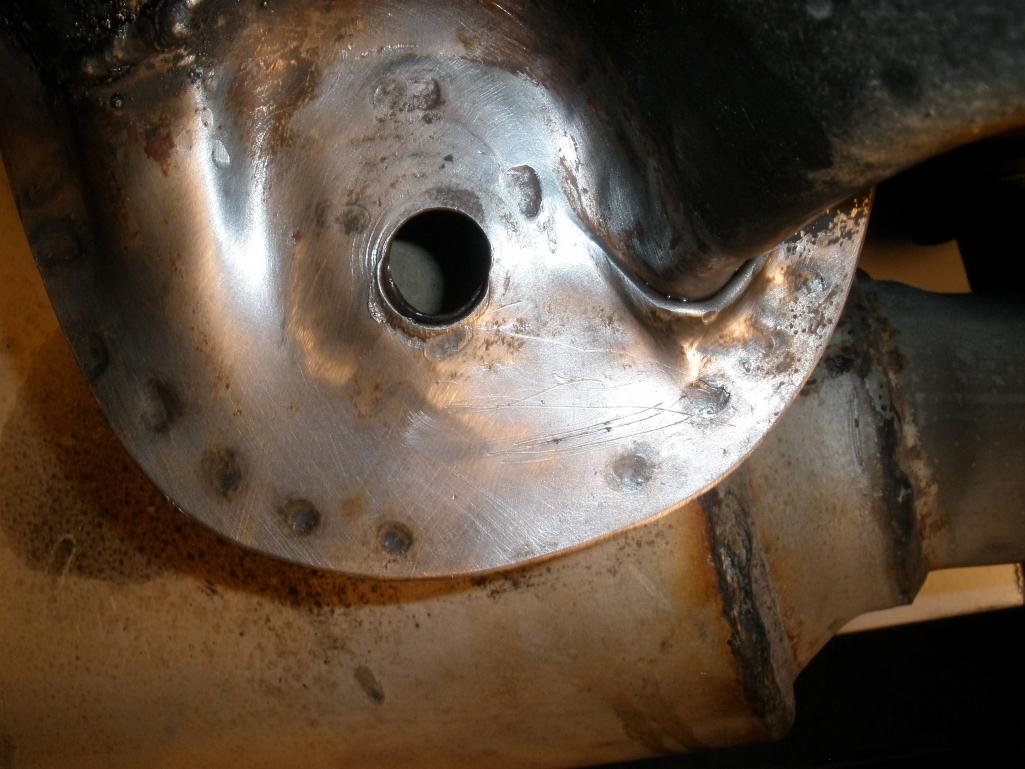 Also, a picture of the inboard end of the shaft (notice "slight" wear) 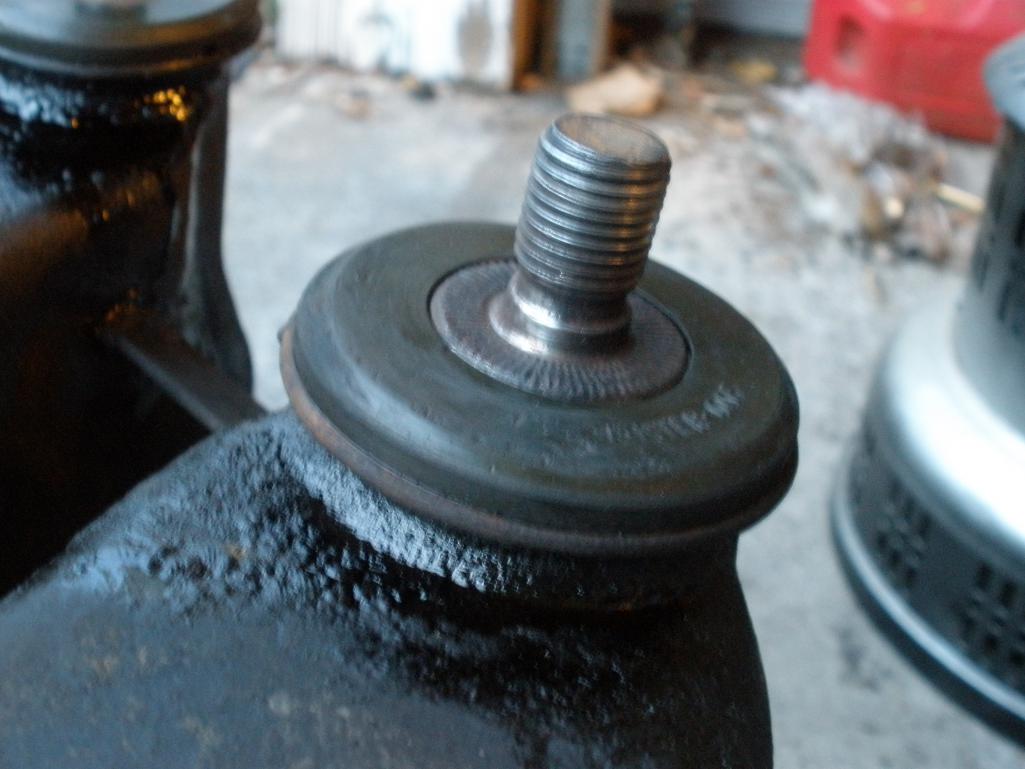 |
   |

 
|
  |
Replies(1 - 9)
| HalfMoon |
Jan 13 2014, 04:53 PM
Post
#2
|
|
Senior Member Group: Members Posts: 828 Joined: 13-November 12 From: Shenandoah Junction, WV Member No.: 15,144 Region Association: MidAtlantic Region |
The driver side training arm (the one where definite movement at the inboard bushing) is another story. Upon dis-assembly a few things were noticed. The crown nut had maybe 20 pds on it. The shock nut was a little tighter than hand tight, and the inboard bushing shaft nut had maybe 10 pds on it. Suffice to say, things were NOT properly torqued.
Upon examination of the ear I detect some "slight" ovaling (about as much as the passenger side). Notice I am holding the shaft nut with the shoulder "in". This is incorrect. Shae shoulder I beileve is supposed to point "out" (like the passenger side one that I removed) 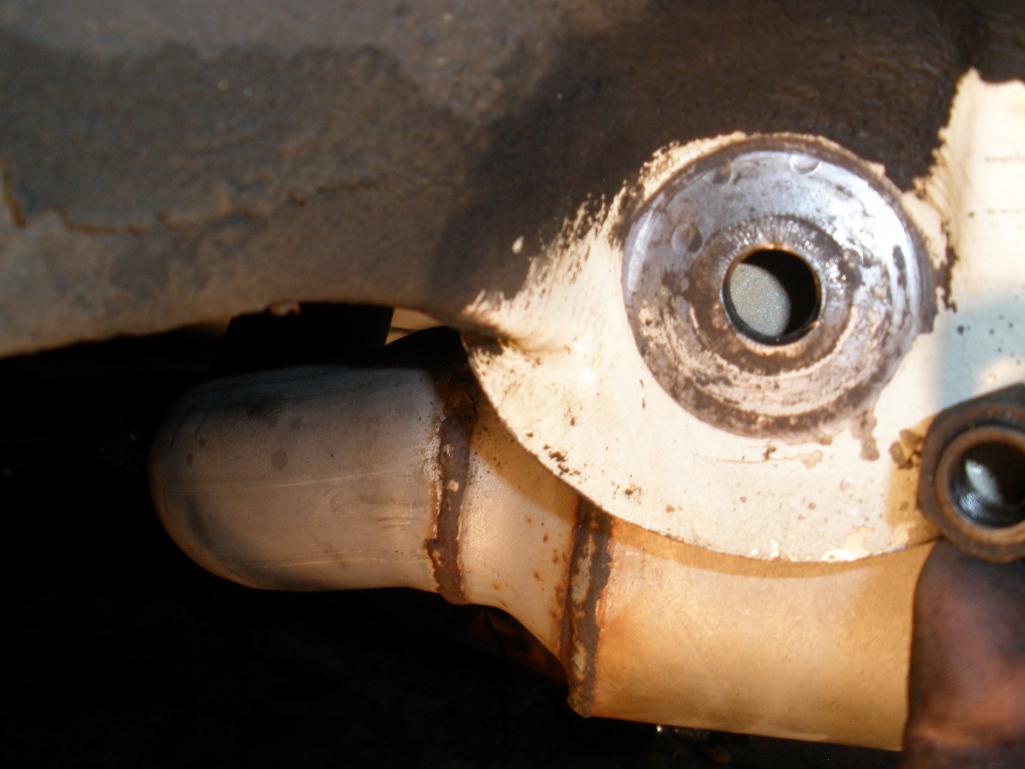 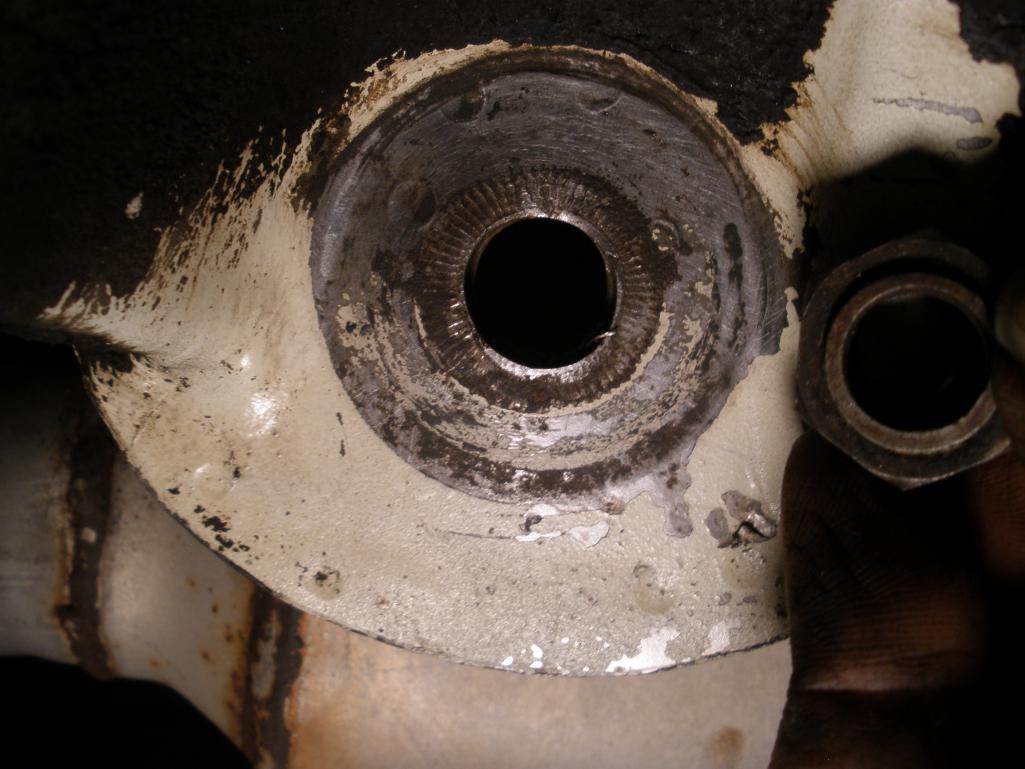 See next post of more images |
|
|
|
| HalfMoon |
Jan 13 2014, 04:58 PM
Post
#3
|
|
Senior Member Group: Members Posts: 828 Joined: 13-November 12 From: Shenandoah Junction, WV Member No.: 15,144 Region Association: MidAtlantic Region |
And here is a image of the driver side shaft shoulder (again, notice "slight" wear)
 Here's my dilema. Naturally I'd rather avoid doing ear repair. Both ears seem to have about the same amount of wear/ovaling. Both trialing arm bushing seem in decent shape visually (although I'm going to go ahead and replace them as a matter of course). I seek the experience of others. Do you think the ovaling on the driver side trailing arm would have caused the movement that could be detected on a jack, rocking the wheel (quite a good bit I might add) or do you think the lack of the shaft nut being properly torqued and the reversal of the shoulder on that nut being pointed in the wrong way is/was responsible for the slop? Sure would be good to rebush the arms put everything back togeter and torque to spec rather than do ear repair. Your thoughts? |
|
|
|
| ChrisFoley |
Jan 13 2014, 07:43 PM
Post
#4
|
|
I am Tangerine Racing Group: Members Posts: 7,925 Joined: 29-January 03 From: Bolton, CT Member No.: 209 Region Association: None |
Why not slide the shafts out of the trailing arms to test them in their mounting holes.
It should be easy to determine if they're too loose. To me it looks like the shafts weren't secured properly at some point, causing the shoulders to dig into the metal around the holes. |
|
|
|
| ThePaintedMan |
Jan 13 2014, 07:52 PM
Post
#5
|
|
Advanced Member Group: Members Posts: 3,886 Joined: 6-September 11 From: St. Petersburg, FL Member No.: 13,527 Region Association: South East States |
QUOTE(Racer Chris @ Jan 13 2014, 08:43 PM)  Why not slide the shafts out of the trailing arms to test them in their mounting holes. It should be easy to determine if they're too loose. To me it looks like the shafts weren't secured properly at some point, causing the shoulders to dig into the metal around the holes. (IMG:style_emoticons/default/agree.gif) If the bushings did not fail, and are still intact, that would be my guess as well. Either way, those holes need to be welded and drilled to the proper diameter. Depending on the condition of the pivot shafts, you might also have to source a good set of those. Racer Chris would be the guy to talk to in that case. |
|
|
|
| brant |
Jan 13 2014, 09:24 PM
Post
#6
|
|
914 Wizard Group: Members Posts: 11,624 Joined: 30-December 02 From: Colorado Member No.: 47 Region Association: Rocky Mountains |
also...
buy brand new factory lock nuts when it goes back together they need to be replaced when they are used once or twice. brant |
|
|
|
| HalfMoon |
Jan 20 2014, 03:25 PM
Post
#7
|
|
Senior Member Group: Members Posts: 828 Joined: 13-November 12 From: Shenandoah Junction, WV Member No.: 15,144 Region Association: MidAtlantic Region |
Finally warmed up enough to do some more work on the trailing arms.
Got things cleaned up, bushings and bearings pulled. Sent my pivot shafts out for replating, recieved replacemtn parts... Still need to clean out the CV's and repak em (couldn't help notice one of the sides had the bolts almost falling out) Alas, it's become evident that too much material has been worn away from both attachment points of the ears and thus will require material welded in or wholesale relpacement of the ears... Who has actually done this (repair or replacement) and can advise? I would like to hear from users who have actually DONE the work. What did you do? Did you simply weld a bead on the inside diameter (TIG, MIG, Oxy?) and once you did get some material built up, how did you shape the hole for a fit? It would be a very large drill bit wouldn't it, and how would you center it so you could get a perfect circle? Perhaps a stepped bit? Or do we simply saw the entire ear off and replace weld in a new one? If so, who supplies a part like that? Soooo, any of you that have actual HANDS ON experience with this repair, please chime in? Thanks all David |
|
|
|
| jcd914 |
Jan 20 2014, 05:26 PM
Post
#8
|
|
Advanced Member Group: Members Posts: 2,081 Joined: 7-February 08 From: Sacramento, CA Member No.: 8,684 Region Association: Northern California |
I simply welded a bead on the inside diameter (MIG) and then used a die grinder with small diameter (1/4") burr to open it up to the correct diameter.
A tapered ream will help get the hole round but perfection is not necessary. Probably your biggest problem was the loose nut. Replacement lock nut are a good investment. When properly tightened the pivot shaft bites into the suspension ear so even if the hole was larger that the thread diameter the shaft won't move. If you replace your bushings am\nd use poly bushings make sure you take time to fit them correctly, not too tight not to loose. PS: as far as I know only the passenger side suspension console is available as a replacement part, no driver side. Jim |
|
|
|
| HalfMoon |
Jan 20 2014, 05:31 PM
Post
#9
|
|
Senior Member Group: Members Posts: 828 Joined: 13-November 12 From: Shenandoah Junction, WV Member No.: 15,144 Region Association: MidAtlantic Region |
QUOTE(jcd914 @ Jan 20 2014, 06:26 PM) I simply welded a bead on the inside diameter (MIG) and then used a die grinder with small diameter (1/4") burr to open it up to the correct diameter. A tapered ream will help get the hole round but perfection is not necessary. Probably your biggest problem was the loose nut. Replacement lock nut are a good investment. When properly tightened the pivot shaft bites into the suspension ear so even if the hole was larger that the thread diameter the shaft won't move. If you replace your bushings am\nd use poly bushings make sure you take time to fit them correctly, not too tight not to loose. Jim Jim! Thanks for the advice I appreciate it. From the pictures above, do you think I can get away with not welding in some material? I tested the shafts in the holes but did not torque them down. Lots of slop. I wonder if a better test would be to insert them and torque em to spec? Perhaps new locknuts and plenty of torque can keep them in place without welding up the ears? Thoughts? |
|
|
|
| Jeffs9146 |
Jan 20 2014, 05:45 PM
Post
#10
|
|
Ski Bum Group: Members Posts: 4,062 Joined: 10-January 03 From: Discovery Bay, Ca Member No.: 128 |
QUOTE(jcd914 @ Jan 20 2014, 03:26 PM) I simply welded a bead on the inside diameter (MIG) and then used a die grinder with small diameter (1/4") burr to open it up to the correct diameter. A tapered ream will help get the hole round but perfection is not necessary. Probably your biggest problem was the loose nut. Replacement lock nut are a good investment. When properly tightened the pivot shaft bites into the suspension ear so even if the hole was larger that the thread diameter the shaft won't move. If you replace your bushings am\nd use poly bushings make sure you take time to fit them correctly, not too tight not to loose. PS: as far as I know only the passenger side suspension console is available as a replacement part, no driver side. Jim (IMG:style_emoticons/default/agree.gif) I did the same thing! It only took about 1/2 hour from begining to end! I used larger disk grinder to flatten out the weld after reaming the hole! |
|
|
|
|
1 User(s) are reading this topic (1 Guests and 0 Anonymous Users)
0 Members:

|
Lo-Fi Version | Time is now: 17th May 2024 - 09:03 PM |
Invision Power Board
v9.1.4 © 2024 IPS, Inc.