|
|
|
Porsche, and the Porsche crest are registered trademarks of Dr. Ing. h.c. F. Porsche AG.
This site is not affiliated with Porsche in any way. Its only purpose is to provide an online forum for car enthusiasts. All other trademarks are property of their respective owners. |
|
|


| Mikey914 |
 Feb 17 2014, 12:27 AM Feb 17 2014, 12:27 AM
Post
#21
|
|
The rubber man  Group: Members Posts: 12,782 Joined: 27-December 04 From: Hillsboro, OR Member No.: 3,348 Region Association: None |
First off I want to explain some of the photos. Pictures from my website have been showing up on other websites (9xauto), and I don't mind sharing info just not having what I've done show up on other commercial websites. I'm putting together an instructions for those that need it that by from my website, so it will be available on the site too.
Tool list - #2 Phillips screwdriver 10mm socket 13mm socket 6" extender for ratchet ratchet wrench 3/8? 13mm box wrench #4 standard screwdriver Wooden block and hammer Optional items to look at "while you are there" The Outer door fuzzy is difficult to access, you will be able to swap these out during this process. I do make the aluminum strips for early and late doors as well as the rollers for both Door handle isolators - If you need to swap out the seals on the door handles, this process will allow you to have more access. The door cam can be changed out at the same time. Locks can be rekeyed if needed and the door lock bushings replaced. Window rollers, both the early and late have rollers that are replaceable. The late doors have fuzzy strips that run vertical in the front and rear window guides, this is a good time to replace these too. The early door has rollers in the front track, the rear track has a plastic guide that runs up and down in the back track. The door stay is easily reached with the door panel removed. You can replace the rollers, springs, and the strap easily. The unit has a pin that holds it to the body, and 2 -10mm bolts hold the unit in. The fuzzy on the inside of the window can be replaced easily with the door panel off. Lastly the door end caps can be replaced at this time also. First off remove the door pockets, and plastic door handle cups. This will allow the door panel to be removed. Attached thumbnail(s) 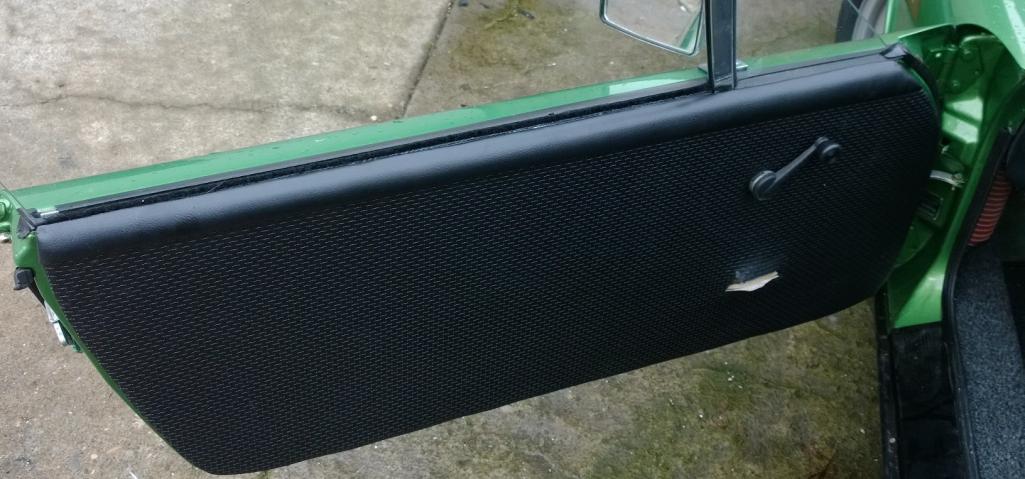
|
   |

 
|
Posts in this topic
 Mikey914 Triangle window seal installPic of late directions for both Feb 17 2014, 12:27 AM
 Mikey914 The door panel will remove easily by popping the d... Feb 17 2014, 12:36 AM Mikey914 It's time to remove the window.
The 13mm socke... Feb 17 2014, 12:39 AM Mikey914 Remove the rear armature for the window scissor me... Feb 17 2014, 12:44 AM Mikey914 I found it easier to take the window mechanism loo... Feb 17 2014, 12:49 AM Mikey914 I then removed the rear track by taking the 2 scre... Feb 17 2014, 12:53 AM Mikey914 The rear door end cap will need to be removed. Thi... Feb 17 2014, 12:58 AM Mikey914 The window will remove by rotating the front down ... Feb 17 2014, 01:05 AM Mikey914 To remove the vertical bar you will need to remove... Feb 17 2014, 01:18 AM Mikey914 To remove the vertical bar you need to use a 10mm ... Feb 17 2014, 01:33 AM Mikey914 Get the new seal ready I use soapy water to slide ... Feb 17 2014, 01:44 AM Mikey914 Install the base 1st. As soon as the bar is in, pu... Feb 17 2014, 01:49 AM Mikey914 You will need to put the center bolt back in. Push... Feb 17 2014, 01:58 AM Mikey914 Re install the aluminum track with the outer fuzzy... Feb 17 2014, 02:05 AM Mikey914 You can then install the glass the rear track is s... Feb 17 2014, 02:16 AM Mikey914 You will need to re install the 13mm bolt into the... Feb 17 2014, 02:25 AM Mikey914 Roll the window up so that you can get he rear tra... Feb 17 2014, 02:30 AM Mikey914 After this has been put in place you roll down the... Feb 17 2014, 02:35 AM Mikey914 You can install the outer scraper, cut to fit. You... Feb 17 2014, 02:41 AM Mikey914 You can then install the inner door fuzzy and the ... Feb 17 2014, 02:43 AM
Mikey914 The door panel will remove easily by popping the d... Feb 17 2014, 12:36 AM Mikey914 It's time to remove the window.
The 13mm socke... Feb 17 2014, 12:39 AM Mikey914 Remove the rear armature for the window scissor me... Feb 17 2014, 12:44 AM Mikey914 I found it easier to take the window mechanism loo... Feb 17 2014, 12:49 AM Mikey914 I then removed the rear track by taking the 2 scre... Feb 17 2014, 12:53 AM Mikey914 The rear door end cap will need to be removed. Thi... Feb 17 2014, 12:58 AM Mikey914 The window will remove by rotating the front down ... Feb 17 2014, 01:05 AM Mikey914 To remove the vertical bar you will need to remove... Feb 17 2014, 01:18 AM Mikey914 To remove the vertical bar you need to use a 10mm ... Feb 17 2014, 01:33 AM Mikey914 Get the new seal ready I use soapy water to slide ... Feb 17 2014, 01:44 AM Mikey914 Install the base 1st. As soon as the bar is in, pu... Feb 17 2014, 01:49 AM Mikey914 You will need to put the center bolt back in. Push... Feb 17 2014, 01:58 AM Mikey914 Re install the aluminum track with the outer fuzzy... Feb 17 2014, 02:05 AM Mikey914 You can then install the glass the rear track is s... Feb 17 2014, 02:16 AM Mikey914 You will need to re install the 13mm bolt into the... Feb 17 2014, 02:25 AM Mikey914 Roll the window up so that you can get he rear tra... Feb 17 2014, 02:30 AM Mikey914 After this has been put in place you roll down the... Feb 17 2014, 02:35 AM Mikey914 You can install the outer scraper, cut to fit. You... Feb 17 2014, 02:41 AM Mikey914 You can then install the inner door fuzzy and the ... Feb 17 2014, 02:43 AM
 eyecolor
You can then install the inner door fuzzy and the... Feb 18 2014, 08:45 PM Mikey914
You can then install the inner door fuzzy and th... Feb 19 2014, 12:35 AM Mikey914 The OEM version. I think my technique was easier, ... Feb 17 2014, 02:58 AM Mikey914 The early version door Feb 17 2014, 03:01 AM CptTripps ::: Can I comment yet? :::
Frickin' awesome.
... Feb 17 2014, 08:18 AM Mikey914
::: Can I comment yet? :::
Frickin' awesome.... Feb 17 2014, 08:36 AM CptTripps I def need the internal fuzzy track. I have the on... Feb 17 2014, 11:08 AM t collins I nominate for the classic thread :trophy: Feb 17 2014, 11:31 AM D1A3 :agree:
Ditto that. I've been meaning to di... Feb 17 2014, 02:28 PM abnrdo :agree: I have to do this soon. Great post and I ... Feb 17 2014, 02:31 PM larryg Great stuff Mike and timing is perfect as I'm ... Feb 17 2014, 09:03 PM Mblizzard I did not follow that. Can you come install mine? ... Feb 17 2014, 09:40 PM Mikey914 Thanks guys, figured that if I sell the parts I sh... Feb 17 2014, 10:56 PM rudedude Mark,
On the early style door the triangle seal h... Apr 16 2014, 05:28 PM BeatNavy
Mark,
On the early style door the triangle seal ... Jun 11 2016, 04:24 PM Mikey914 I don't have an early car. The part number is ... Apr 16 2014, 11:32 PM 914werke Ive found that support on later doors as well.
Iv... Apr 17 2014, 07:47 AM horizontally-opposed Seconding the motion to make this thread a classic... Sep 4 2015, 04:01 PM Mikey914 Thanks guys. Sep 4 2015, 07:56 PM Mikey914 You can cut a relief in the back of the seal or re... Jun 11 2016, 07:23 PM BeatNavy
You can cut a relief in the back of the seal or r... Jun 12 2016, 04:26 PM Mikey914
[quote name='Mikey914' post='2358138' date='Jun 1... Jul 13 2018, 09:37 AM roland914 Thanks guys for your input, Was trying to do the v... Jul 13 2018, 12:32 AM roland914 Up date Guys, took the window regulator, door glas... Jul 17 2018, 01:00 AM
eyecolor
You can then install the inner door fuzzy and the... Feb 18 2014, 08:45 PM Mikey914
You can then install the inner door fuzzy and th... Feb 19 2014, 12:35 AM Mikey914 The OEM version. I think my technique was easier, ... Feb 17 2014, 02:58 AM Mikey914 The early version door Feb 17 2014, 03:01 AM CptTripps ::: Can I comment yet? :::
Frickin' awesome.
... Feb 17 2014, 08:18 AM Mikey914
::: Can I comment yet? :::
Frickin' awesome.... Feb 17 2014, 08:36 AM CptTripps I def need the internal fuzzy track. I have the on... Feb 17 2014, 11:08 AM t collins I nominate for the classic thread :trophy: Feb 17 2014, 11:31 AM D1A3 :agree:
Ditto that. I've been meaning to di... Feb 17 2014, 02:28 PM abnrdo :agree: I have to do this soon. Great post and I ... Feb 17 2014, 02:31 PM larryg Great stuff Mike and timing is perfect as I'm ... Feb 17 2014, 09:03 PM Mblizzard I did not follow that. Can you come install mine? ... Feb 17 2014, 09:40 PM Mikey914 Thanks guys, figured that if I sell the parts I sh... Feb 17 2014, 10:56 PM rudedude Mark,
On the early style door the triangle seal h... Apr 16 2014, 05:28 PM BeatNavy
Mark,
On the early style door the triangle seal ... Jun 11 2016, 04:24 PM Mikey914 I don't have an early car. The part number is ... Apr 16 2014, 11:32 PM 914werke Ive found that support on later doors as well.
Iv... Apr 17 2014, 07:47 AM horizontally-opposed Seconding the motion to make this thread a classic... Sep 4 2015, 04:01 PM Mikey914 Thanks guys. Sep 4 2015, 07:56 PM Mikey914 You can cut a relief in the back of the seal or re... Jun 11 2016, 07:23 PM BeatNavy
You can cut a relief in the back of the seal or r... Jun 12 2016, 04:26 PM Mikey914
[quote name='Mikey914' post='2358138' date='Jun 1... Jul 13 2018, 09:37 AM roland914 Thanks guys for your input, Was trying to do the v... Jul 13 2018, 12:32 AM roland914 Up date Guys, took the window regulator, door glas... Jul 17 2018, 01:00 AM  |
1 User(s) are reading this topic (1 Guests and 0 Anonymous Users)
0 Members:

|
Lo-Fi Version | Time is now: 26th July 2026 - 10:37 PM |
Invision Power Board
v9.1.4 © 2026 IPS, Inc.