|
|

|
Porsche, and the Porsche crest are registered trademarks of Dr. Ing. h.c. F. Porsche AG.
This site is not affiliated with Porsche in any way. Its only purpose is to provide an online forum for car enthusiasts. All other trademarks are property of their respective owners. |
|
|
  |
| BeatNavy |
 Jun 12 2016, 04:26 PM Jun 12 2016, 04:26 PM
Post
#41
|
|
Certified Professional Scapegoat     Group: Members Posts: 2,955 Joined: 26-February 14 From: Easton, MD Member No.: 17,042 Region Association: MidAtlantic Region 
|
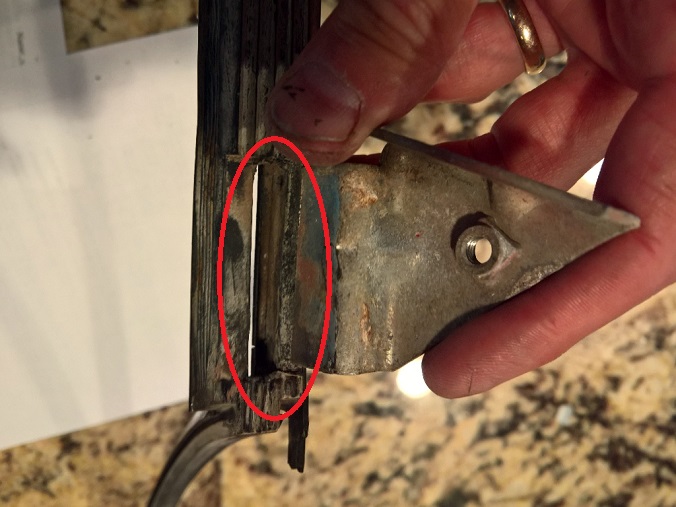
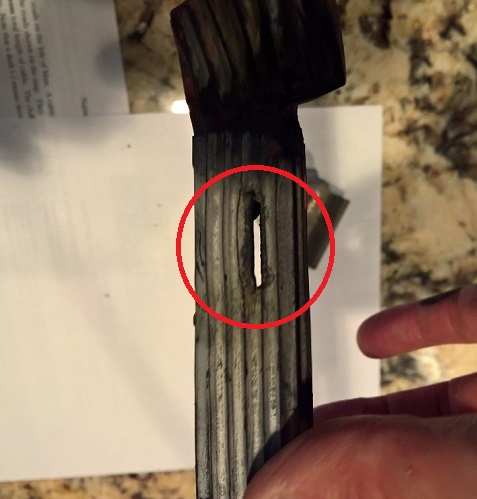
You can cut a relief in the back of the seal or remove the metal bracket. Mine are a replica of the ones currently available OEM. Thanks, Mark. Spent several frustrating hours today working on this. I initially tried to cut a relief and push the tab through the slit I made, but that didn't work particularly well. I managed to get the passenger side on, but I'm not happy with how it turned out. On the driver's side I just removed the metal brackets and installed that way. It was easier to install and turned out better, I think. Time will tell if removing those tabs will cause any issues in terms of window stability. I think I'll go back and re-do the passenger side and just use adhesive to seal up the slit I cut in the seal. Anyone with an early car should probably just remove those tabs before installing the triangle seals. These seals are very well made, and I recommend them (like all 914Rubber solutions). But just know that you'll probably have to remove the two tabs when installing these. FWIW, here's a picture of the early seal with the tab that inserts into the seal. The bottom picture is the front seal relief. If you want these old seals for reference, Mark, I'll gladly send them to you, but I'm not sure you want more tooling costs (IMG:style_emoticons/default/smile.gif)   |
| roland914 |
 Jul 13 2018, 12:32 AM Jul 13 2018, 12:32 AM
Post
#42
|
|
Newbie  Group: Members Posts: 3 Joined: 12-December 10 From: Lansdale PA Member No.: 12,478 Region Association: MidAtlantic Region |
Thanks guys for your input, Was trying to do the vent window with the window regulator and glass in its proper location, will loosen them up and try the ways suggested. Appreciate the prompt response and help....THANKS so much!!
|
| Mikey914 |
 Jul 13 2018, 09:37 AM Jul 13 2018, 09:37 AM
Post
#43
|
|
The rubber man           Group: Members Posts: 12,772 Joined: 27-December 04 From: Hillsboro, OR Member No.: 3,348 Region Association: None 
|
You can cut a relief in the back of the seal or remove the metal bracket. Mine are a replica of the ones currently available OEM. Thanks, Mark. Spent several frustrating hours today working on this. I initially tried to cut a relief and push the tab through the slit I made, but that didn't work particularly well. I managed to get the passenger side on, but I'm not happy with how it turned out. On the driver's side I just removed the metal brackets and installed that way. It was easier to install and turned out better, I think. Time will tell if removing those tabs will cause any issues in terms of window stability. I think I'll go back and re-do the passenger side and just use adhesive to seal up the slit I cut in the seal. Anyone with an early car should probably just remove those tabs before installing the triangle seals. These seals are very well made, and I recommend them (like all 914Rubber solutions). But just know that you'll probably have to remove the two tabs when installing these. FWIW, here's a picture of the early seal with the tab that inserts into the seal. The bottom picture is the front seal relief. If you want these old seals for reference, Mark, I'll gladly send them to you, but I'm not sure you want more tooling costs (IMG:style_emoticons/default/smile.gif)   I do realize that the rubber that hold the window in can be quite frustrating to install. Matt is finishing up the video for the install on these and he speaks specifically about this area and how and why you should modify this area. Sorry we have not got that together yet but it will be very clear as you can see how it promotes rust. I think this may be why they eliminated it in the later years. Mark |
| roland914 |
 Jul 17 2018, 01:00 AM Jul 17 2018, 01:00 AM
Post
#44
|
|
Newbie  Group: Members Posts: 3 Joined: 12-December 10 From: Lansdale PA Member No.: 12,478 Region Association: MidAtlantic Region |
Up date Guys, took the window regulator, door glass and rear vertical track and worked with the vertical triangle bar and glass with the new rubber together as it was pictured in these posts and got the triangle glass in snug as a bug in the forward part of the door first. Then worked with the regulator, door glass, and rails, in wrapping it up. The Saran wrap trick in holding the glass to the vertical post with the rubber was a good idea, was using rubber bands and that did not work as the rubber bands kept sliding towards the shallow end of the triange. Got the drivers side done, passenger side next to tackle.
THANKS for all your help and input!!! When I get this together will post some picturs, as this is on my bucket list! |
  |
1 User(s) are reading this topic (1 Guests and 0 Anonymous Users)
0 Members:

|
Lo-Fi Version | Time is now: 19th September 2025 - 02:58 PM |
Invision Power Board
v9.1.4 © 2025 IPS, Inc.


