|
|
|
Porsche, and the Porsche crest are registered trademarks of Dr. Ing. h.c. F. Porsche AG.
This site is not affiliated with Porsche in any way. Its only purpose is to provide an online forum for car enthusiasts. All other trademarks are property of their respective owners. |
|
|

  |

| gereed75 |
 Aug 7 2014, 06:46 PM Aug 7 2014, 06:46 PM
Post
#1
|
|
Senior Member  Group: Members Posts: 1,241 Joined: 19-March 13 From: Pittsburgh PA Member No.: 15,674 Region Association: North East States |
My front bumper top pad is pretty much a loss so thought I would try an idea for a fix that was floating around in my head. I have used this stuff on my boat and thought it had possibilities. It is super sticky adhesive, comes in black, and available at home depot maybe. If not I got this from Grainger.
Attached thumbnail(s) 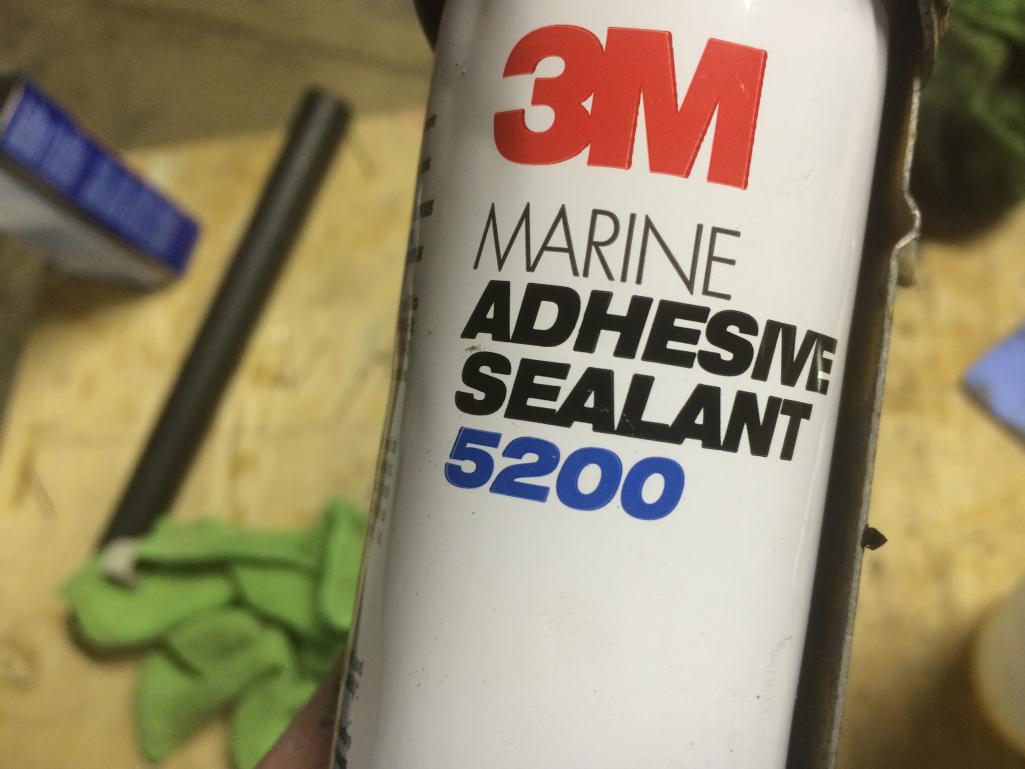
|
   |

 
|
| gereed75 |
Aug 7 2014, 06:49 PM
Post
#2
|
|
Senior Member Group: Members Posts: 1,241 Joined: 19-March 13 From: Pittsburgh PA Member No.: 15,674 Region Association: North East States |
Here is the typical bumper pad "D Chunk" failure. I cleaned it up better than this with a SS brush and some acetone down to bare metal and "clean" rubber.
Attached thumbnail(s) 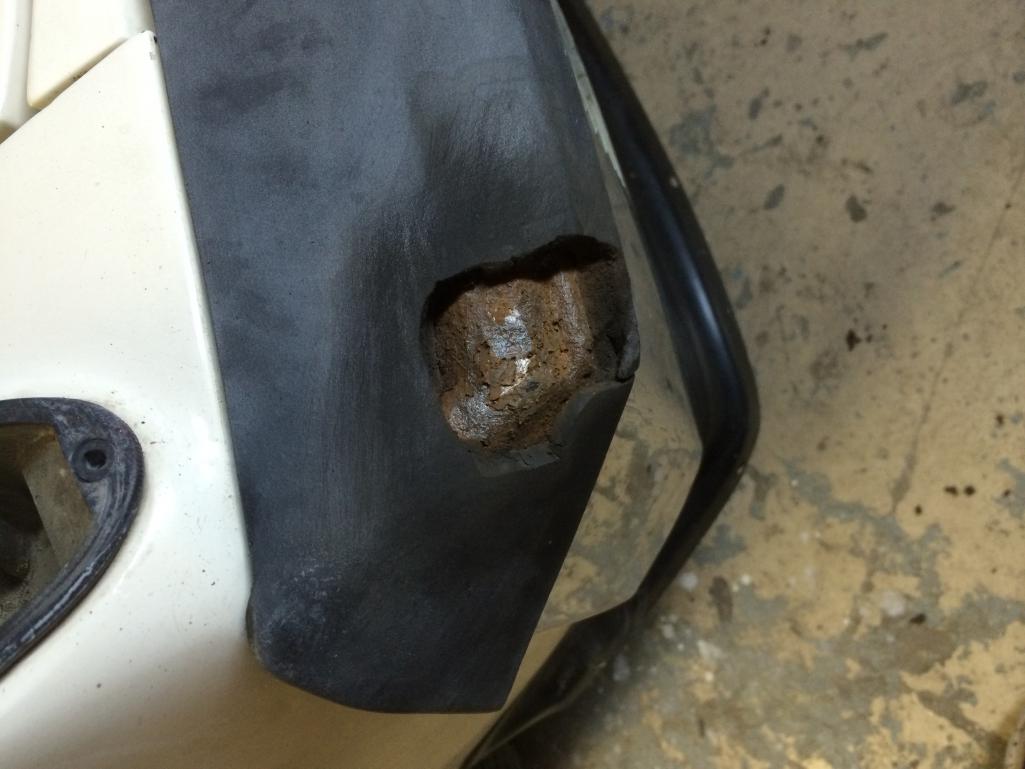
|
|
|
|
| gereed75 |
Aug 7 2014, 06:59 PM
Post
#3
|
|
Senior Member Group: Members Posts: 1,241 Joined: 19-March 13 From: Pittsburgh PA Member No.: 15,674 Region Association: North East States |
I gooped on a healthy glob of the 5200, making sure I filed the cavity. I am not a "put on thin layers" kinda guy. It does have a tendency to sag, so I unbolted the bumper and set it on a bench oriented in such a way That gravity held it in place.
I don't have any pictures of the smoothing process because this stuff sticks to everything and I did not want to get my cell phone. It does wipe off when wet using lacquer thinner. I used a soft flexible squeegee cut from a plastic binder cover. It will stick to that or any other squeegee I tried, so you must use a very very slow pulling action like spreading icing on a cake ---slow slow slow movement so it slowly spreads. If you go fast, you will just pull it out of the puddle. I was able to get it fairly into the desired shape and let it dry. I came back a day later and the skin was dry but the inside was still soft. I was afraid that it had skin cured and would never dry inside. I waited a week. After that it was completely cured through!!! There was virtually no shrinkage. This is what it looked like after about 5 minutes of sanding with 100 grit paper. It sands slowly. You almost have to "worry" it off, but it does sand. The durometer feels almost exactly like the original and there is no adhesion break at the joint. So far so good. Attached thumbnail(s) 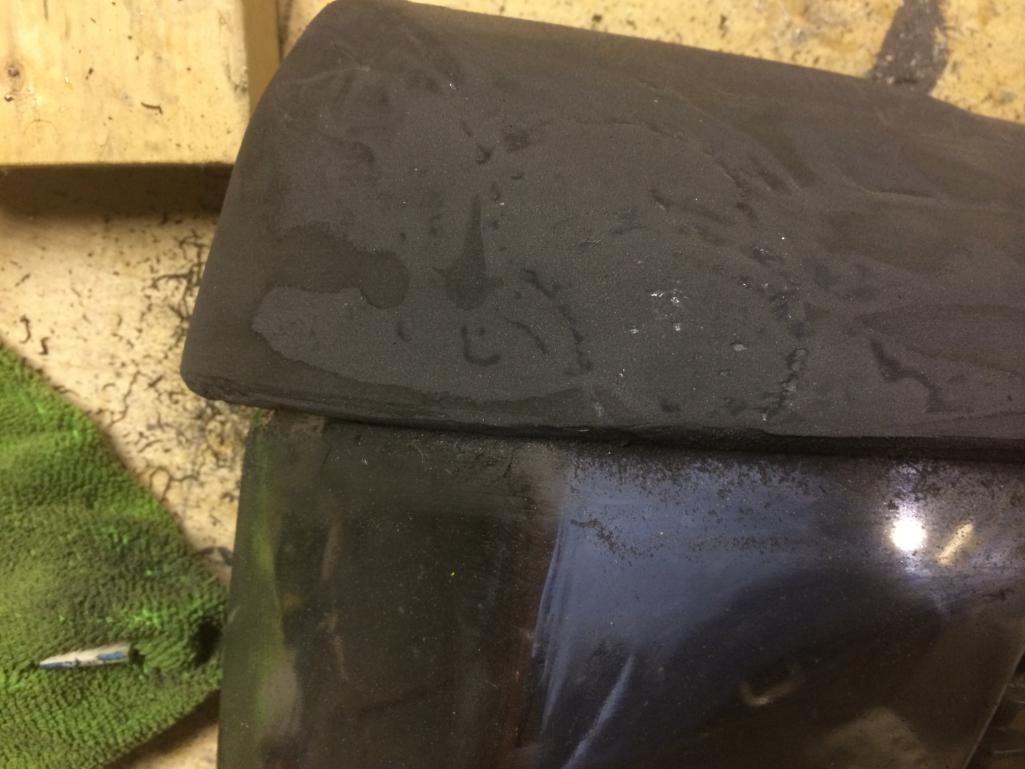
|
|
|
|
| gereed75 |
Aug 7 2014, 07:10 PM
Post
#4
|
|
Senior Member Group: Members Posts: 1,241 Joined: 19-March 13 From: Pittsburgh PA Member No.: 15,674 Region Association: North East States |
Here it is after maybe 15 minutes more sanding with 200 grit. It does not wear out the paper!!
You can see how much I removed by the debris under the bumper. Looking pretty good! Attached thumbnail(s) 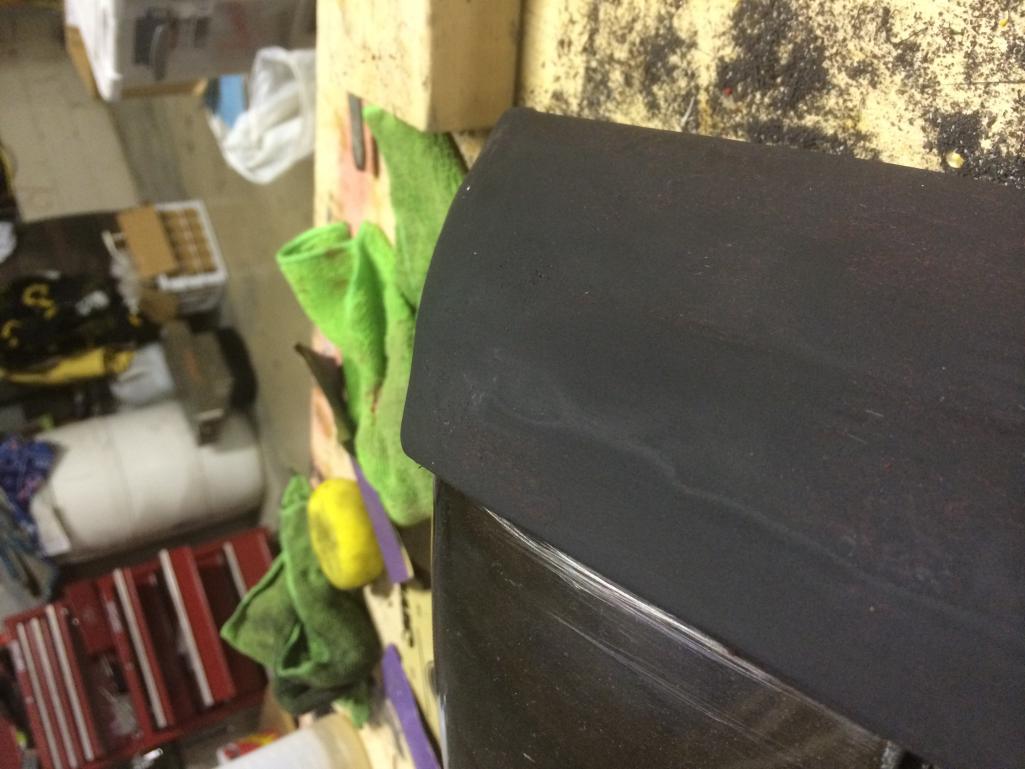
|
|
|
|
| gereed75 |
Aug 7 2014, 07:12 PM
Post
#5
|
|
Senior Member Group: Members Posts: 1,241 Joined: 19-March 13 From: Pittsburgh PA Member No.: 15,674 Region Association: North East States |
I was able to go back and smooth some of the voids/low spots with a thin layer almost like red spot putty.
Attached thumbnail(s) 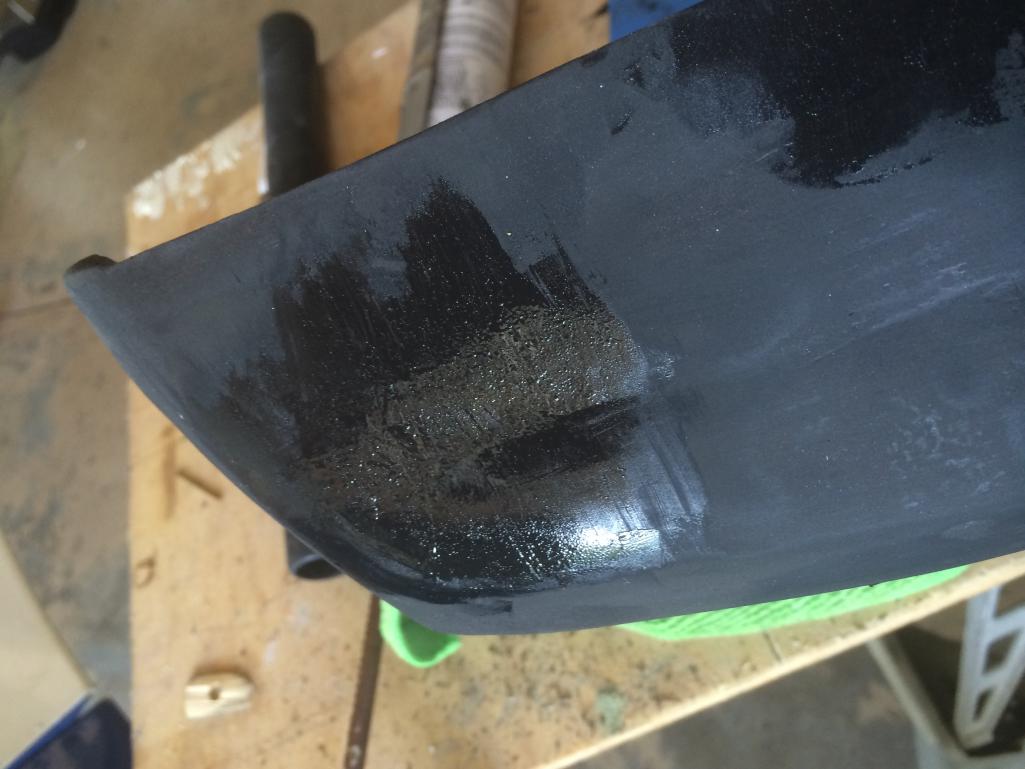
|
|
|
|
| gereed75 |
Aug 7 2014, 07:21 PM
Post
#6
|
|
Senior Member Group: Members Posts: 1,241 Joined: 19-March 13 From: Pittsburgh PA Member No.: 15,674 Region Association: North East States |
The thin top fill layer dried in a day and had perfect adhesion to the under coat. Some more sanding with 200 grit along the entire pad to blend it. Again there was no evidence of bond failure anywhere, not even in a small tear that was on the bumper.
I also patched a small chunked out spot on the sharp upper corner of the pad. Worked like a champ! Looks pretty good. There is a slight difference in the original surface texture that grabs the light at certain angles and I can see the fix because I know it is there. You would not notice it unless you looked very critically up close. Again the hardness is nearly identical to the original. There is no doubt in my mind that this would work to "set" a new anchor stud into the bumper top on the bottom attach side. This stuff has super adhesion and I know it would hold a new stud in place inserted into a rusted out cavity. Nice!!! (IMG:style_emoticons/default/piratenanner.gif) Attached thumbnail(s) 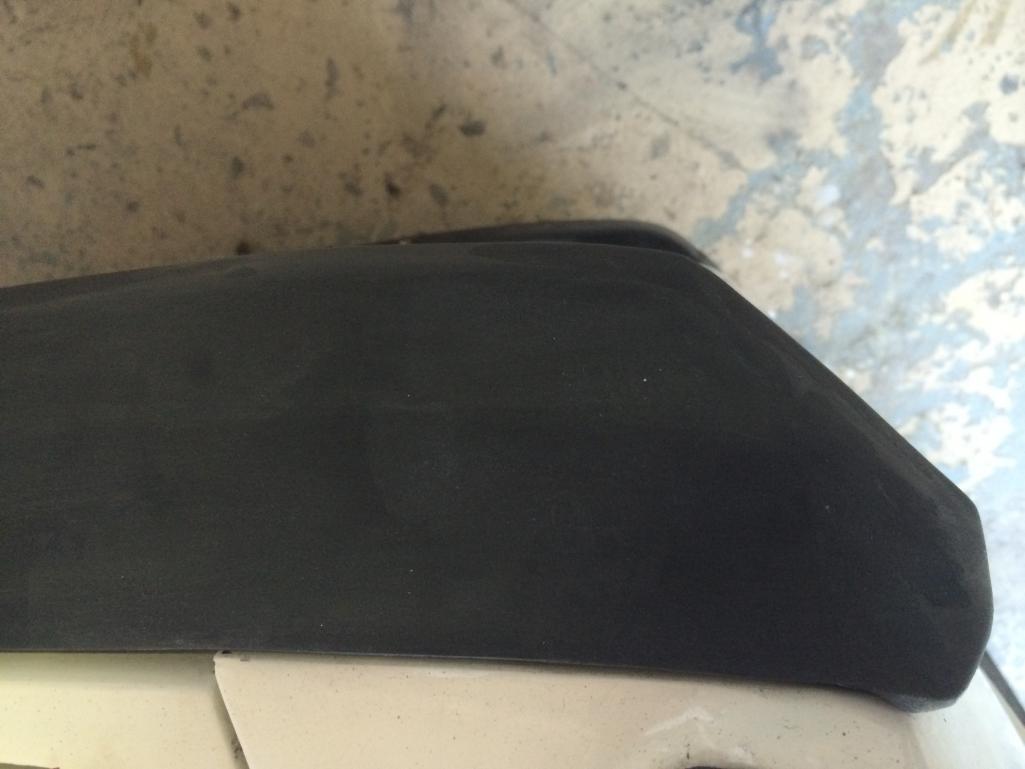
|
|
|
|
| 76-914 |
Aug 7 2014, 07:26 PM
Post
#7
|
|
Repeat Offender & Resident Subaru Antagonist Group: Members Posts: 13,493 Joined: 23-January 09 From: Temecula, CA Member No.: 9,964 Region Association: Southern California |
Cool. I hope this works and that it ISN'T like spot putty. That red spot putty (IMG:style_emoticons/default/stromberg.gif) will come back and bite you in the ass. Nice approach. Do you think one could insert a hold down stud (like OEM) in this material with success?
|
 |
|
| gereed75 |
Aug 7 2014, 07:28 PM
Post
#8
|
|
Senior Member Group: Members Posts: 1,241 Joined: 19-March 13 From: Pittsburgh PA Member No.: 15,674 Region Association: North East States |
Another "done" pix. Not sure how it will wear but this stuff is unaffected by years of exposure on boats. Wonder how it will look after application of some of the popular rubber preservatives like Armorall??
Attached thumbnail(s) 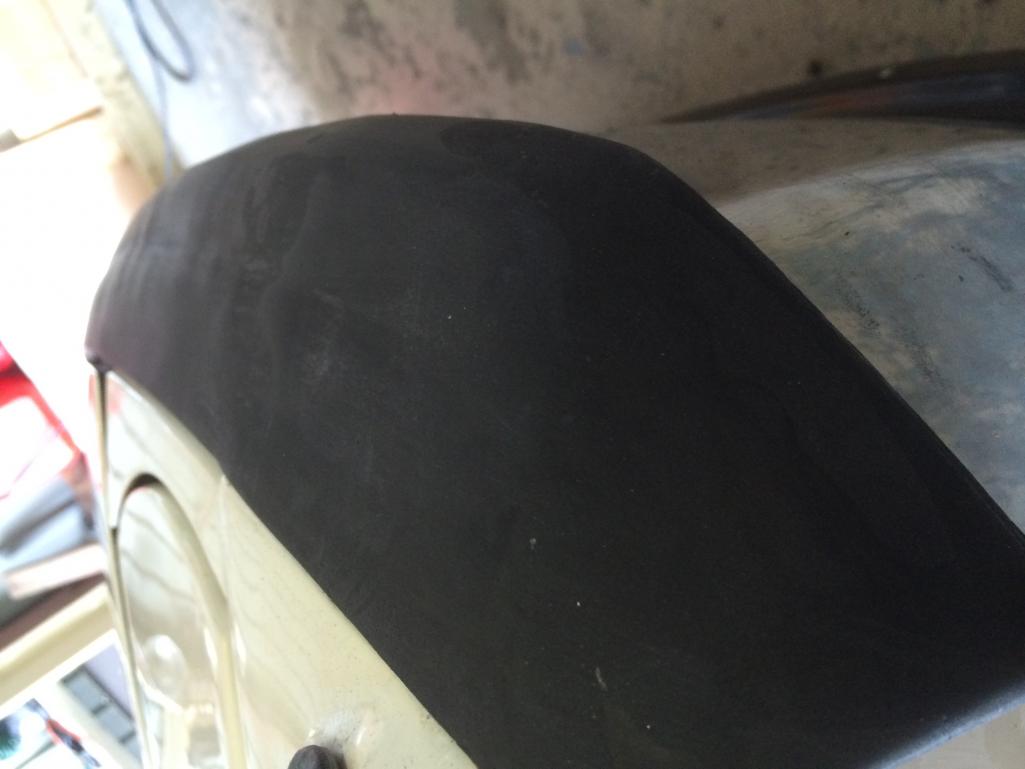
|
|
|
|
| saigon71 |
Aug 7 2014, 07:39 PM
Post
#9
|
|
Senior Member Group: Members Posts: 1,998 Joined: 1-June 09 From: Dillsburg, PA Member No.: 10,428 Region Association: MidAtlantic Region |
|
|
|
|
| Porschef |
Aug 7 2014, 08:10 PM
Post
#10
|
|
How you doin' Group: Members Posts: 2,165 Joined: 7-September 10 From: LawnGuyland Member No.: 12,152 Region Association: North East States |
5200 takes a week to cure fully, no problem there. It is incredibly tenacious once set, and wood will tear/separate before the joint when cured. Awesome stuff, plan on using the tube completely within a few days otherwise it's toast. As any urethane, it cures in the presence of moisture, and just loves sticking to your hands for a few days. Ain't gonna get near the wife like that. Use gloves.
I also used sandpaper on my front bumper top as it had something on it that wouldn't respond to any thinner or solvent. Started with 150 and worked my way up to 320. I'd go to 400. Followed that up with 3M 303. Nice ingenuity. (IMG:style_emoticons/default/beer.gif) |
|
|
|
| gereed75 |
Aug 7 2014, 08:24 PM
Post
#11
|
|
Senior Member Group: Members Posts: 1,241 Joined: 19-March 13 From: Pittsburgh PA Member No.: 15,674 Region Association: North East States |
QUOTE(Porschef @ Aug 7 2014, 10:10 PM)  5200 takes a week to cure fully, no problem there. It is incredibly tenacious once set, and wood will tear/separate before the joint when cured. Awesome stuff, plan on using the tube completely within a few days otherwise it's toast. As any urethane, it cures in the presence of moisture, and just loves sticking to your hands for a few days. Ain't gonna get near the wife like that. Use gloves. I also used sandpaper on my front bumper top as it had something on it that wouldn't respond to any thinner or solvent. Started with 150 and worked my way up to 320. I'd go to 400. Followed that up with 3M 303. Nice ingenuity. (IMG:style_emoticons/default/beer.gif) Nice tip on the 303. Thanks |
|
|
|
| euro911 |
Aug 7 2014, 08:25 PM
Post
#12
|
|
Retired & living the dream. God help me if I wake up! Group: Members Posts: 8,845 Joined: 2-December 06 From: So.Cal. & No.AZ (USA) Member No.: 7,300 Region Association: Southern California |
Awesome. There's a little chunk out of my rear bumper rubber, about the size and location as the one you repaired.
Thanks for sharing (IMG:style_emoticons/default/aktion035.gif) |
|
|
|
| Krieger |
Aug 7 2014, 08:26 PM
Post
#13
|
|
Advanced Member Group: Members Posts: 4,703 Joined: 24-May 04 From: Santa Rosa CA Member No.: 2,104 Region Association: None |
That looks great. If you had a mold you could make yourself an entirely new bumper top...
|
|
|
|
| Krieger |
Aug 7 2014, 08:26 PM
Post
#14
|
|
Advanced Member Group: Members Posts: 4,703 Joined: 24-May 04 From: Santa Rosa CA Member No.: 2,104 Region Association: None |
That looks great. If you had a mold you could make yourself an entirely new bumper top...
|
|
|
|
|
1 User(s) are reading this topic (1 Guests and 0 Anonymous Users)
0 Members:

|
Lo-Fi Version | Time is now: 28th April 2024 - 05:08 PM |
Invision Power Board
v9.1.4 © 2024 IPS, Inc.