|
|
|
Porsche, and the Porsche crest are registered trademarks of Dr. Ing. h.c. F. Porsche AG.
This site is not affiliated with Porsche in any way. Its only purpose is to provide an online forum for car enthusiasts. All other trademarks are property of their respective owners. |
|
|

  |

| Kraftwerk |
 Aug 22 2014, 02:11 PM Aug 22 2014, 02:11 PM
Post
#1
|
|
Member  Group: Members Posts: 195 Joined: 6-September 07 From: Bbbbbrroooklynnn Member No.: 8,085 |
(UPDATED with nice photo's below)
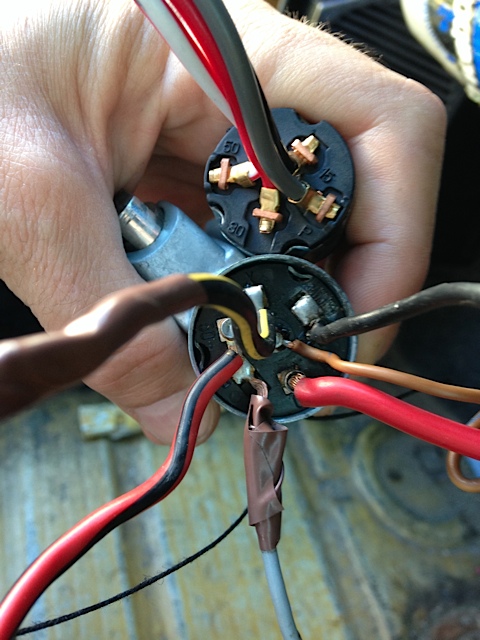
Looking find or restore the electrical end of the starter cylinder, where the black disc with the six contacts meets the copper bit has become separated. There was a tiny bit of corrosion and the switch malfunctioned. The lock and Key seem to be fine. I left the roof off and rain got in there. (doh!) So I took everything apart to investigate the switch and contacts may be okay but its hard to tell a tiny spring popped out of somewhere, the other tiny spring is still in the center. The wires have been cut and soldered twice before reaching the 20 pin connector so someone has been in there before it looked kind of scrappy so I will make clean connections. The car is a 1971, later build. Secondly I want to drive my car since it is otherwise running like a top ( Thanks to Chris and Co. at Tangerine : ) Any clues on how to hot-wire it or add a temporary switch? Here is a list of wires: 1. Red (Has a tiny burn mark on contact side) 2. Red and Black 3. gray 4. Black 5.Black and Yellow Brown ( becomes Brown w/blue stripe) thanks guys! |
   |

 
|
| Cap'n Krusty |
Aug 22 2014, 02:26 PM
Post
#2
|
|
Cap'n Krusty Group: Members Posts: 10,794 Joined: 24-June 04 From: Santa Maria, CA Member No.: 2,246 Region Association: Central California |
I would just buy a new switch. The part number is 311 905 865A, and it's readily available. Give GPR a call.
The Cap'n |
|
|
|
| Kraftwerk |
Aug 22 2014, 02:55 PM
Post
#3
|
|
Member Group: Members Posts: 195 Joined: 6-September 07 From: Bbbbbrroooklynnn Member No.: 8,085 |
Exactly what I as looking for! Thank You Cap'n
Ordered that part. Still, any clues on how to hot-wire it? Just want to hear the engine run, want to by-pass the switch to make sure that was the only thing wrong. |
|
|
|
| mikesmith |
Aug 22 2014, 11:49 PM
Post
#4
|
|
Member Group: Members Posts: 202 Joined: 5-September 13 From: SF Member No.: 16,354 Region Association: Northern California |
ASSUMING that the wires on the switch are still the original colours:
- ignore the white wire - connect the two red and the black wires all together in a bundle - touch the yellow wire to the bundle to start - disconnect the black wire to stop - separate the bundle entirely to power off |
|
|
|
| Harpo |
Aug 23 2014, 06:34 AM
Post
#5
|
|
Senior Member Group: Members Posts: 1,304 Joined: 21-August 11 From: Motor City aka Detroit Member No.: 13,469 Region Association: None |
I ran a wire from the solenoid (yellow wire) to the large post on the starter with the big red wire from the battery. Then I hooked up push button switch. A whole lot easier when trouble shooting engine stuff.
Please be carful and make sure your car is not in gear David |
|
|
|
| Kraftwerk |
Aug 23 2014, 08:57 AM
Post
#6
|
|
Member Group: Members Posts: 195 Joined: 6-September 07 From: Bbbbbrroooklynnn Member No.: 8,085 |
Thanks guys will try that later on..
|
|
|
|
| Kraftwerk |
Sep 23 2014, 11:41 AM
Post
#7
|
|
Member Group: Members Posts: 195 Joined: 6-September 07 From: Bbbbbrroooklynnn Member No.: 8,085 |
Ok so the part arrives and it has two major
Differences , at least, from the original part: It has only four wires 50 / 30 / P / 15 The original has six: 50/30/P/X/54(15/81) and brown with Blue stripe in the middle. So that might not be the End of the world if some of the wire scan be Bundle together and or ignored but the Part itself has another issue with compatability, It doesn't line up with the original part. Will post a photo or two.. |
|
|
|
| Kraftwerk |
Sep 23 2014, 11:45 AM
Post
#8
|
|
Member Group: Members Posts: 195 Joined: 6-September 07 From: Bbbbbrroooklynnn Member No.: 8,085 |
Oh yeah, and I can't hot wire the car either.
Starter turns but it will not kick over, I don't hear the fuel pump click on... |
|
|
|
| Harpo |
Sep 23 2014, 12:12 PM
Post
#9
|
|
Senior Member Group: Members Posts: 1,304 Joined: 21-August 11 From: Motor City aka Detroit Member No.: 13,469 Region Association: None |
If the starter is running but your engine is not turning over you might not have the solenoid wired properly
|
|
|
|
| Cap'n Krusty |
Sep 23 2014, 01:46 PM
Post
#10
|
|
Cap'n Krusty Group: Members Posts: 10,794 Joined: 24-June 04 From: Santa Maria, CA Member No.: 2,246 Region Association: Central California |
In order to start the car by hotwiring it, you'll need to jumper "30" and "15" (typically, red and black). Then you need to momentarily jump the yellow ("50") wire to the "30" to make the starter function. Once it's started, remove the "50" wire from the "30".
The Cap'n |
|
|
|
| Kraftwerk |
Oct 13 2014, 01:30 PM
Post
#11
|
|
Member Group: Members Posts: 195 Joined: 6-September 07 From: Bbbbbrroooklynnn Member No.: 8,085 |
 Here is the 1st issue I have with the replacement part: It has 2 LESS wires. Old one has 6 new one has 4. |
|
|
|
| Kraftwerk |
Oct 13 2014, 01:36 PM
Post
#12
|
|
Member Group: Members Posts: 195 Joined: 6-September 07 From: Bbbbbrroooklynnn Member No.: 8,085 |
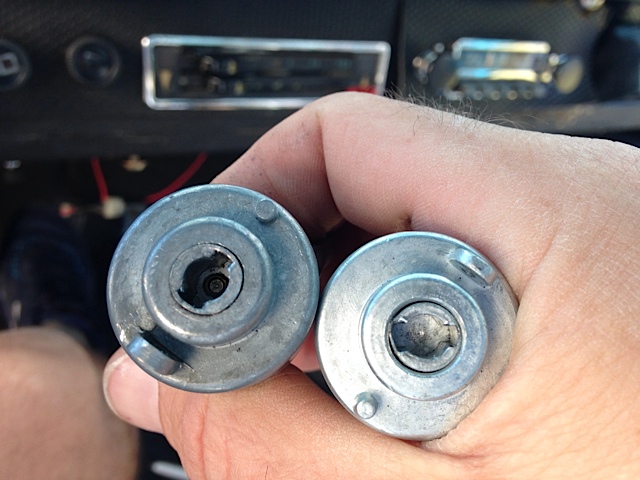 2nd issue: With the new part (on right) rotating part does not line-up in the same way as the old part. ( left ) The pin and the rotating part do not align in the lock cylinder, the new part does not "seat-in" When I attempted to install it got a bit smushed ( see photo ) Then I discovered it is wrongly aligned to the spec's old part. My car is a 1971 so it has some differences to the later years.. Might this new part might be for the 72/73-76 model years? |
|
|
|
| Kraftwerk |
Oct 13 2014, 01:45 PM
Post
#13
|
|
Member Group: Members Posts: 195 Joined: 6-September 07 From: Bbbbbrroooklynnn Member No.: 8,085 |
So that is when I got adventurous and decided just to rebuild the old part.
It has springs and all manner of small parts, one ball bearing. etc. Be careful when disassembling this part. I may have lost one spring. Is the copper plate supported by three springs there are three holds/holes for springs but only two springs. Also the copper part seems to be nicked on the edge. This is a case of reconstruction being very close to deconstruction. Tread lightly, the pot-metal is very cheap and fragile. I would love to just have a 'new' part, if anyone has one give me a shout. I cleaned everything and cobbled it back together as well as possible will try it this afternoon. Anyone ever re-build one of these? Have one to sell? Attached image(s) 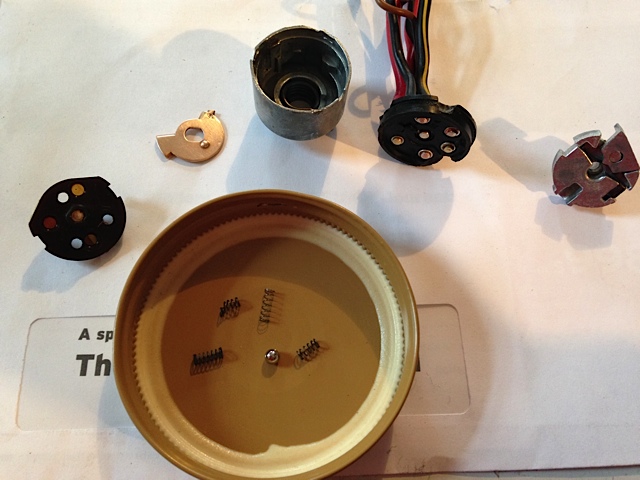
|
|
|
|
| Kraftwerk |
Oct 13 2014, 01:48 PM
Post
#14
|
|
Member Group: Members Posts: 195 Joined: 6-September 07 From: Bbbbbrroooklynnn Member No.: 8,085 |
Here is another shot of the parts inside, incase you are wondering what the hell is inside a lock-cylinder.
ps. In this photo an errant spring is pictured which is NOT and original part and was not used. ( yet ) Anyone have a diagram as to how this goes back together? I think I got it correctly but wanted to make sure.. 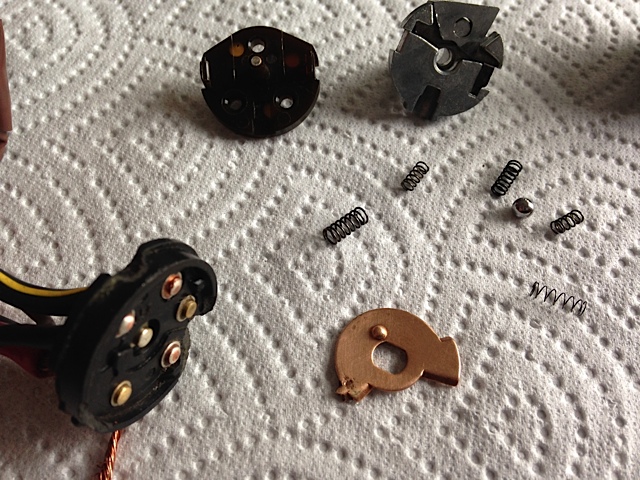 |
|
|
|
| Kraftwerk |
Oct 13 2014, 08:45 PM
Post
#15
|
|
Member Group: Members Posts: 195 Joined: 6-September 07 From: Bbbbbrroooklynnn Member No.: 8,085 |
'Rebuilt' switch still not working. Still can't get the car to start by hot-wiring it, it turns over well and fuel pump runs, ( but maybe not all together at once? ) Will check more tomorrow.
Again, with the1971-build there are differences later year cars. Anybody know anything about the six wire vs. the four wire part? |
|
|
|
|
1 User(s) are reading this topic (1 Guests and 0 Anonymous Users)
0 Members:

|
Lo-Fi Version | Time is now: 24th November 2025 - 04:45 AM |
Invision Power Board
v9.1.4 © 2025 IPS, Inc.