|
|

|
Porsche, and the Porsche crest are registered trademarks of Dr. Ing. h.c. F. Porsche AG.
This site is not affiliated with Porsche in any way. Its only purpose is to provide an online forum for car enthusiasts. All other trademarks are property of their respective owners. |
|
|
  |
| BeatNavy |
 Jan 1 2015, 07:28 PM Jan 1 2015, 07:28 PM
Post
#21
|
|
Certified Professional Scapegoat     Group: Members Posts: 2,959 Joined: 26-February 14 From: Easton, MD Member No.: 17,042 Region Association: MidAtlantic Region 
|
Excellent, thanks for the input, Scotty. I'll keep cutting, but based on your experience I'm sure you're probably right on (although I'm hoping I don't have to replace that suspension ear). I'll post more pictures hopefully this weekend and start saving up for my purchase at RD.
|
| type47 |
 Jan 3 2015, 08:01 AM Jan 3 2015, 08:01 AM
Post
#22
|
|
Viermeister     Group: Members Posts: 4,254 Joined: 7-August 03 From: Vienna, VA Member No.: 994 Region Association: MidAtlantic Region |
Incredible thread for a guy who joined 914world in Feb 2014! I am not worthy (IMG:style_emoticons/default/pray.gif)
|
| ThePaintedMan |
 Jan 3 2015, 08:20 AM Jan 3 2015, 08:20 AM
Post
#23
|
|
Advanced Member     Group: Members Posts: 3,887 Joined: 6-September 11 From: St. Petersburg, FL Member No.: 13,527 Region Association: South East States 
|
Wow, nice progress Rob! Unfortunate that you ended up with such a turd of a car. Have you learned how to remove the spot welds yet? You'll need a decent spot weld bit, or do the grind away trick that Rick does. Much better than just hacking out portions of the unibody.
Might also be worth it to go further into the body before you order pieces from RD. That car looks like it had a lot of bondo and patches on it, so there might be more rust that lurks...especially front and rear trunks. |
| BeatNavy |
 Jan 3 2015, 11:26 AM Jan 3 2015, 11:26 AM
Post
#24
|
|
Certified Professional Scapegoat     Group: Members Posts: 2,959 Joined: 26-February 14 From: Easton, MD Member No.: 17,042 Region Association: MidAtlantic Region 
|
Incredible thread for a guy who joined 914world in Feb 2014! I am not worthy (IMG:style_emoticons/default/pray.gif) Hey Jim! You are more than worthy ... and wise ...and not foolish like I probably am. We'll see what I've got myself into. (IMG:style_emoticons/default/smile.gif) Wow, nice progress Rob! Unfortunate that you ended up with such a turd of a car. Have you learned how to remove the spot welds yet? You'll need a decent spot weld bit, or do the grind away trick that Rick does. Much better than just hacking out portions of the unibody. Might also be worth it to go further into the body before you order pieces from RD. That car looks like it had a lot of bondo and patches on it, so there might be more rust that lurks...especially front and rear trunks. Hey George! No worries about the car. It's gives me challenges and plenty of opportunity to learn, which is a large part of what this effort is all about. I should have done a better pre-buy inspection, but what the hell? I'm using a spot weld removal bit, but I'm still learning my technique. It takes time. And I agree, I'm not ordering stuff until I get a better assessment of what I have to work with. Trunks do not LOOK bad, although they're heavily painted over. I'm sure PO wasn't trying to hide anything. (IMG:style_emoticons/default/dry.gif) Right now I'm working on my other teener, trying to change output shaft seals (done) and rear bearings, based on the way you documented in your thread. Back from a wrestling tournament now, and I'm trying to get the driver's side axle out, but I'm pretty sure I have to remove the starter. Ugh... |
| ThePaintedMan |
 Jan 3 2015, 11:55 AM Jan 3 2015, 11:55 AM
Post
#25
|
|
Advanced Member     Group: Members Posts: 3,887 Joined: 6-September 11 From: St. Petersburg, FL Member No.: 13,527 Region Association: South East States 
|
Yep, not a bad idea to strip the trunks as well. My PO did a better job hiding the rust in them than he did with the rockers.
Yes, you do need to remove the starter to get the axle out (or it at least makes life a lot easier.) |
| mepstein |
 Jan 3 2015, 01:30 PM Jan 3 2015, 01:30 PM
Post
#26
|
|
914-6 GT in waiting                Group: Members Posts: 20,307 Joined: 19-September 09 From: Landenberg, PA/Wilmington, DE Member No.: 10,825 Region Association: MidAtlantic Region 
|
Excellent, thanks for the input, Scotty. I'll keep cutting, but based on your experience I'm sure you're probably right on (although I'm hoping I don't have to replace that suspension ear). I'll post more pictures hopefully this weekend and start saving up for my purchase at RD. The suspension ear is one of the first things to go on these cars. battery acid and rain dripping down helped insure its early demise. the little drain hole was always plugged up and held the mixture inside against the untreated metal. 99% chance you will need a new one. Strip yours down and check. |
| BeatNavy |
 Jan 3 2015, 02:32 PM Jan 3 2015, 02:32 PM
Post
#27
|
|
Certified Professional Scapegoat     Group: Members Posts: 2,959 Joined: 26-February 14 From: Easton, MD Member No.: 17,042 Region Association: MidAtlantic Region 
|
Yes, you do need to remove the starter to get the axle out (or it at least makes life a lot easier.) Wow, I got the starter out and the bearings in. But I barely got that half-shaft out even with removing the starter, and now I can't get it back in despite negotiating it all over the underside. Do you have to disassemble the half shaft at the CV or something? This is one of the most challenging things I've had to do...until the next thing. EDIT: I'm going to start a new thread. |
| r_towle |
 Jan 3 2015, 03:47 PM Jan 3 2015, 03:47 PM
Post
#28
|
|
Custom Member                Group: Members Posts: 24,705 Joined: 9-January 03 From: Taxachusetts Member No.: 124 Region Association: North East States 
|
Not sure I am following this along, but don't put a car on a rottisierre with the enging installed.
|
| type47 |
 Jan 3 2015, 04:06 PM Jan 3 2015, 04:06 PM
Post
#29
|
|
Viermeister     Group: Members Posts: 4,254 Joined: 7-August 03 From: Vienna, VA Member No.: 994 Region Association: MidAtlantic Region |
I believe he's referring to his other daily driver 914. Seals, axles, starter stuff on the DD. Car undergoing surgery already sans drivetrain.
|
| barefoot |
 Jan 3 2015, 04:17 PM Jan 3 2015, 04:17 PM
Post
#30
|
|
Senior Member    Group: Members Posts: 1,448 Joined: 19-March 13 From: Charleston SC Member No.: 15,673 Region Association: South East States 
|
Anyway, after removing the drive axels with a gear puller and banging out the hubs, it was time to take out the rest of the trialing arm. Here’s a picture of the bolts connecting the arm to the body. There were two shims there (don’t know what size), and I know from reading here that these are important to rear wheel alignment. I imagine I did not do correctly whatever I’m supposed to do to make alignment easier upon install. Stupid question #1: is it the number (or total size) of shims present and/or the positioning of the shims that determines the alignment? when I was taking the rear trailing arms off I drilled up thru the bracket into the body structure so i could pin the exact location when re-assembling. Also noted what shims were on either side |
| BeatNavy |
 Jan 3 2015, 05:45 PM Jan 3 2015, 05:45 PM
Post
#31
|
|
Certified Professional Scapegoat     Group: Members Posts: 2,959 Joined: 26-February 14 From: Easton, MD Member No.: 17,042 Region Association: MidAtlantic Region 
|
|
| r_towle |
 Jan 3 2015, 06:40 PM Jan 3 2015, 06:40 PM
Post
#32
|
|
Custom Member                Group: Members Posts: 24,705 Joined: 9-January 03 From: Taxachusetts Member No.: 124 Region Association: North East States 
|
Makes sense considering you are a long way from worrying about bearings.
|
| BeatNavy |
 Jan 11 2015, 01:08 PM Jan 11 2015, 01:08 PM
Post
#33
|
|
Certified Professional Scapegoat     Group: Members Posts: 2,959 Joined: 26-February 14 From: Easton, MD Member No.: 17,042 Region Association: MidAtlantic Region 
|
Ok, last weekend was replacing bearings and tranny seals on my other teener – very greasy and dirty – this weekend it’s back to IOMH (in over my head) restoration and getting dusty. What better way to spend a weekend than in a cold garage cutting steel and bondo? So I put aside some time and did some more exploratory surgery. I’ll have at least three more stupid questions for anyone that can answer them as I assess and figure out how to repair:
1. The long up to the door frame 2. The suspension console and long inside engine bay 3. The hell hole itself Based on what I saw this weekend, I think the “RD shopping list” Scotty helpfully put together for me in post #20 is looking pretty accurate about now. First the long under the door. Cut away some more steel and here’s what I have (apologies for picture quality and lighting): 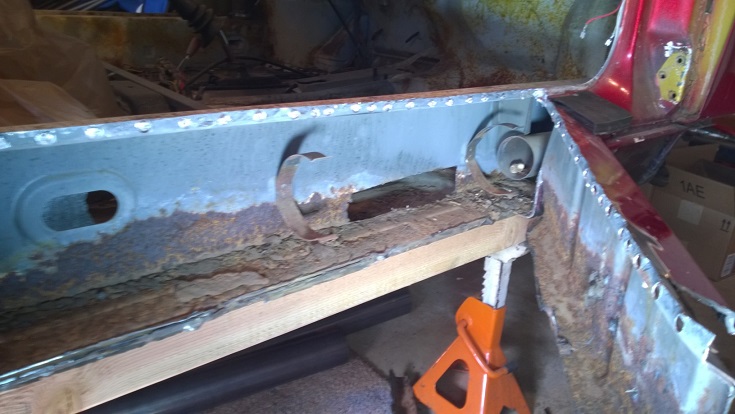 What??? Leftover mouse stuff in the heater channels?? (IMG:style_emoticons/default/new_shocked.gif) My first reactions to this are a) where did God’s little rodents live prior to the first 914? and b) is my spot-weld removing technique actually worse than my welding? Anyway, there was a fair amount of loose rust and other gunk in the longs. The lower third of the inner shell is possibly salvageable, but it gets to the question I have on this. Here are a couple of other views first: 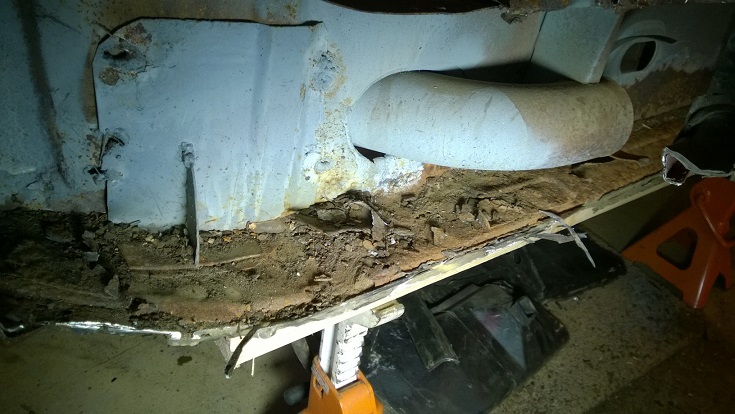 and 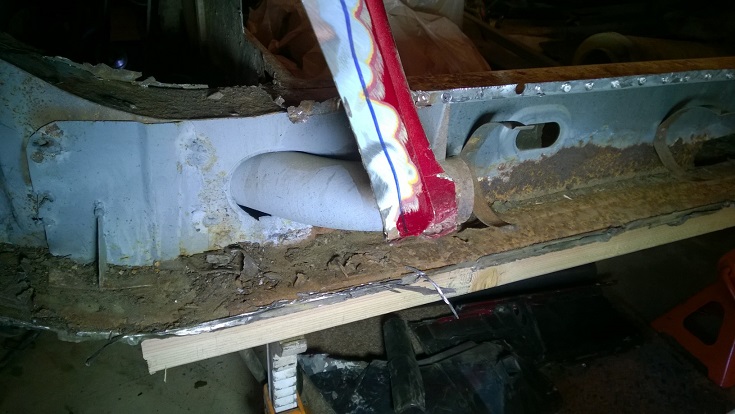 And, after some cleanup and chipping away the loose and rusted metal: 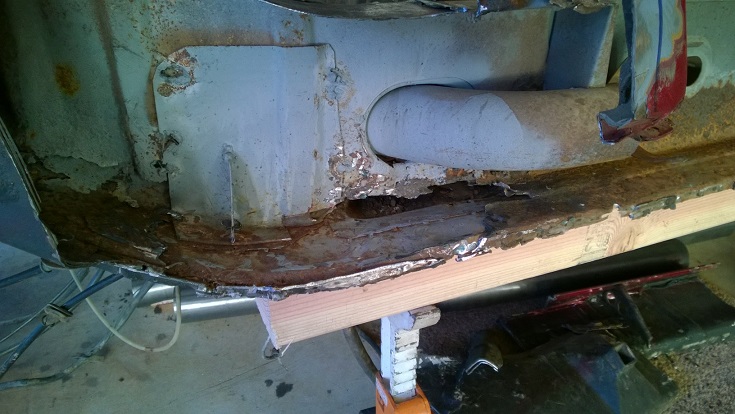 and 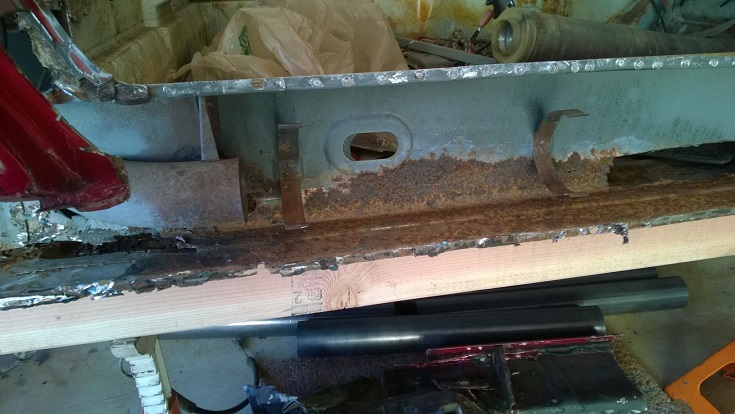 So here is first stupid question, or set of stupid questions, for today (#4 overall): What I didn’t realize is that there are two layers of steel on the horizontal section of the long. Is that correct? I’m trying to decide if that’s the way it’s built or not. But I also see what might be a seam right underneath the first bracket for the heater hose. It’s rusted so much it’s hard to tell, but maybe that’s a layer of steel from a previous PO fix. In the picture above you can see the jagged edges where I’ve torn out one layer of rusty metal up to just under the heat pipe. The lower layer doesn’t look bad. The top layer has a lot of surface rust that could probably be treated and sealed. Should I simply cut out that top layer to some point and fabricate a replacement to weld in attached to the inner shell and then marry up the outer long piece? I see how George cut the whole bottom section out and welded a horizontal section along a good portion of the long as shown here: College Budget Restoration I guess the answer may sort of depend on whether there are really two layers of metal there and whether or not one or both should be replaced. If there aren’t two layers along that long, I think I can minimize the actual fabrication and replacement required on that inner long. Oh, and the seat belt mount came out in the process. I’m not sure whether or not that can be cleaned up or not. I may have to fabricate a solution there. Right now that's not the biggest issue I have, as I'll post something on the suspension console soon... 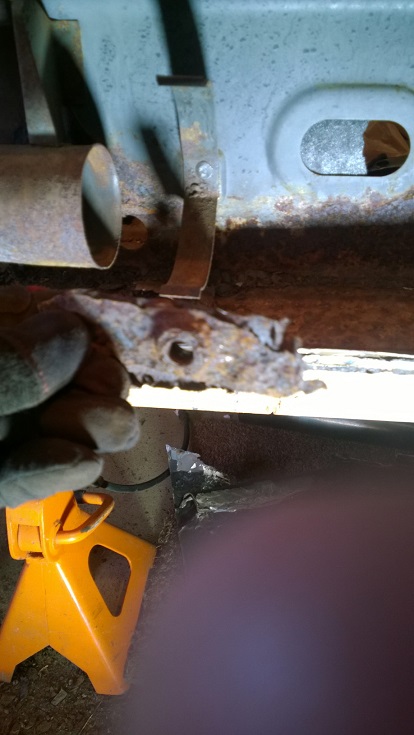 |
| boxsterfan |
 Jan 11 2015, 01:33 PM Jan 11 2015, 01:33 PM
Post
#34
|
|
914's are kewl    Group: Members Posts: 1,776 Joined: 6-June 03 From: San Ramon, CA Member No.: 791 Region Association: Northern California |
I really think you should change those jack stands out for ones that have pins in them. I don't think those "teeth" based ones are all that safe.
|
| BeatNavy |
 Jan 11 2015, 01:46 PM Jan 11 2015, 01:46 PM
Post
#35
|
|
Certified Professional Scapegoat     Group: Members Posts: 2,959 Joined: 26-February 14 From: Easton, MD Member No.: 17,042 Region Association: MidAtlantic Region 
|
I really think you should change those jack stands out for ones that have pins in them. I don't think those "teeth" based ones are all that safe. Thanks for the comment. The car is also partially supported by the rotisserie right now, so even if those gave way it shouldn't go "anywhere." Hopefully. |
| Tilly74 |
 Jan 11 2015, 02:08 PM Jan 11 2015, 02:08 PM
Post
#36
|
|
Member   Group: Members Posts: 96 Joined: 5-June 12 From: Springfield, MO Member No.: 14,522 Region Association: None |
(IMG:style_emoticons/default/smilie_pokal.gif) Great work! You inspire the rest of us to get stuff done, and your "stupid questions" make me feel less stupid so keep on asking.
And definitely use extreme caution when under any vehicle, my father-in-law, a farmer his entire life and no stranger to working on heavy machinery, is dealing with two broken ribs after being run over by a semi over the weekend. Not a typo. He was using the appropriate jack stands, blocks, and wheel chocks. One of the wheel chocks started to slide and he couldn't get out in time. Almost cost his life. I only share this to serve as a reminder to all. 914's ROCK! |
| SirAndy |
 Jan 11 2015, 02:13 PM Jan 11 2015, 02:13 PM
Post
#37
|
|
Resident German                          Group: Admin Posts: 42,386 Joined: 21-January 03 From: Oakland, Kalifornia Member No.: 179 Region Association: Northern California |
Oh, and the seat belt mount came out in the process. I’m not sure whether or not that can be cleaned up or not. I may have to fabricate a solution there. Just get a new one ... (IMG:style_emoticons/default/shades.gif) |
| BeatNavy |
 Jan 11 2015, 02:14 PM Jan 11 2015, 02:14 PM
Post
#38
|
|
Certified Professional Scapegoat     Group: Members Posts: 2,959 Joined: 26-February 14 From: Easton, MD Member No.: 17,042 Region Association: MidAtlantic Region 
|
Yikes. That's scary, and yes, you are right. I hope he's feeling better soon. Never broken a rib (I don't think), but I'm sure it's no fun. Don't worry, I have plenty of stupid questions stored up... (IMG:style_emoticons/default/smile.gif)
|
| BeatNavy |
 Jan 11 2015, 02:17 PM Jan 11 2015, 02:17 PM
Post
#39
|
|
Certified Professional Scapegoat     Group: Members Posts: 2,959 Joined: 26-February 14 From: Easton, MD Member No.: 17,042 Region Association: MidAtlantic Region 
|
Oh, and the seat belt mount came out in the process. I’m not sure whether or not that can be cleaned up or not. I may have to fabricate a solution there. Just get a new one ... (IMG:style_emoticons/default/shades.gif) Haven't seen them listed before, but if they are available it's probably the cheapest fabricated part I'll end up buying. Cool, thanks Andy. |
| SirAndy |
 Jan 11 2015, 02:44 PM Jan 11 2015, 02:44 PM
Post
#40
|
|
Resident German                          Group: Admin Posts: 42,386 Joined: 21-January 03 From: Oakland, Kalifornia Member No.: 179 Region Association: Northern California |
Haven't seen them listed before, but if they are available it's probably the cheapest fabricated part I'll end up buying. Cool, thanks Andy. Hmmm, i remember someone making those, but now i can't find them. (IMG:style_emoticons/default/idea.gif) The bolt/thread is M11 X 1.25 just in case you end up making your own ... (IMG:style_emoticons/default/smash.gif) |
  |
2 User(s) are reading this topic (2 Guests and 0 Anonymous Users)
0 Members:

|
Lo-Fi Version | Time is now: 29th December 2025 - 11:59 PM |
Invision Power Board
v9.1.4 © 2025 IPS, Inc.


