|
|
|
Porsche, and the Porsche crest are registered trademarks of Dr. Ing. h.c. F. Porsche AG.
This site is not affiliated with Porsche in any way. Its only purpose is to provide an online forum for car enthusiasts. All other trademarks are property of their respective owners. |
|
|


| BeatNavy |
 Nov 11 2014, 07:27 PM Nov 11 2014, 07:27 PM
Post
#61
|
|
Certified Professional Scapegoat  Group: Members Posts: 2,963 Joined: 26-February 14 From: Easton, MD Member No.: 17,042 Region Association: MidAtlantic Region |
Ok, here goes. I picked up this '75 last April in lower Maryland. It was advertised as a 2.0, it has a 2.0 badge on the back, and it looked pretty good from a distance (or with beer goggles).
Attached thumbnail(s) 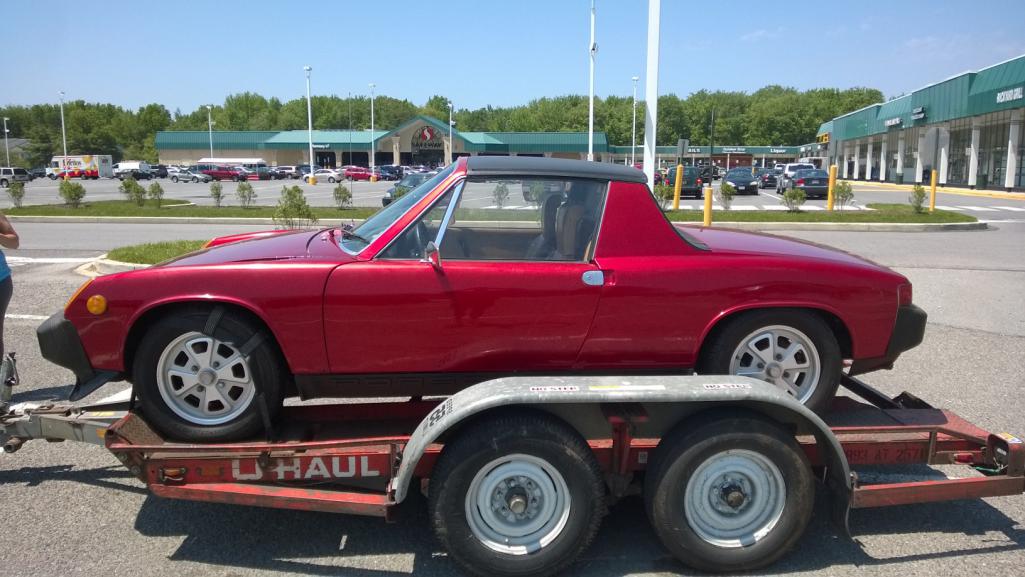
|
   |

 
|
Posts in this topic
 BeatNavy In Over My Head Restoration Nov 11 2014, 07:27 PM
 BeatNavy But when I got it home I found that it was actuall... Nov 11 2014, 07:31 PM BeatNavy Anyway, I picked up a 2.0 engine that's been b... Nov 11 2014, 07:38 PM Elliot Cannon Who did your pre-buy inspection? :poke: :D Nov 11 2014, 07:39 PM
 BeatNavy
Who did your pre-buy inspection? :poke: :D
Som... Nov 11 2014, 07:45 PM BeatNavy Now I just need to get this thing up on the rotiss... Nov 11 2014, 07:45 PM BeatNavy The rotisserie very conveniently comes with some d... Nov 11 2014, 07:54 PM ThePaintedMan Rob,
Awesome man! You've got good folks... Nov 11 2014, 08:18 PM BeatNavy
Rob,
Awesome man! You've got good folk... Nov 11 2014, 08:24 PM altitude411 Subbed to watch Rob build an awesome teener. :he... Nov 11 2014, 08:33 PM BeatNavy
Subbed to watch Rob build an awesome teener. :h... Nov 12 2014, 07:13 AM PanelBilly I'd strip the suspension off the car before tr... Nov 11 2014, 10:33 PM saigon71 A rotisserie will be a big help in bringing this o... Nov 12 2014, 06:56 AM BeatNavy Happy New Year everyone. It’s been a while sinc... Jan 1 2015, 05:29 PM barefoot Anyway, after removing the drive axels with a gear... Jan 3 2015, 04:17 PM BeatNavy Then it was time to start cutting. I’ve spent w... Jan 1 2015, 05:30 PM rhodyguy Wow. Jan 1 2015, 06:10 PM billh1963 looks like you are well into it! :sawzall: Jan 1 2015, 06:19 PM 993inNC Here comes the real fun :D Took mine five years to... Jan 1 2015, 06:49 PM BeatNavy
Here comes the real fun :D Took mine five years t... Jan 1 2015, 06:54 PM scotty b white shocks indicate KYB....toss them in the tras... Jan 1 2015, 07:15 PM BeatNavy Excellent, thanks for the input, Scotty. I'll... Jan 1 2015, 07:28 PM mepstein
Excellent, thanks for the input, Scotty. I'l... Jan 3 2015, 01:30 PM type47 Incredible thread for a guy who joined 914world in... Jan 3 2015, 08:01 AM BeatNavy
Incredible thread for a guy who joined 914world i... Jan 3 2015, 11:26 AM ThePaintedMan Wow, nice progress Rob! Unfortunate that you e... Jan 3 2015, 08:20 AM ThePaintedMan Yep, not a bad idea to strip the trunks as well. M... Jan 3 2015, 11:55 AM BeatNavy
Yes, you do need to remove the starter to get th... Jan 3 2015, 02:32 PM r_towle Not sure I am following this along, but don't ... Jan 3 2015, 03:47 PM type47 I believe he's referring to his other daily dr... Jan 3 2015, 04:06 PM BeatNavy
I believe he's referring to his other daily d... Jan 3 2015, 05:45 PM r_towle Makes sense considering you are a long way from wo... Jan 3 2015, 06:40 PM BeatNavy Ok, last weekend was replacing bearings and tranny... Jan 11 2015, 01:08 PM SirAndy Oh, and the seat belt mount came out in the proces... Jan 11 2015, 02:13 PM BeatNavy
Oh, and the seat belt mount came out in the proce... Jan 11 2015, 02:17 PM SirAndy Haven't seen them listed before, but if they a... Jan 11 2015, 02:44 PM boxsterfan I really think you should change those jack stands... Jan 11 2015, 01:33 PM BeatNavy
I really think you should change those jack stand... Jan 11 2015, 01:46 PM Tilly74 :trophy: Great work! You inspire the rest of ... Jan 11 2015, 02:08 PM BeatNavy Yikes. That's scary, and yes, you are right. ... Jan 11 2015, 02:14 PM BeatNavy As much money as I'm fixin' to spend at RD... Jan 11 2015, 02:52 PM BeatNavy Ok, I’m also taking assessment of the suspension... Jan 11 2015, 02:59 PM SirAndy what other recommendations can you provide (e.g. m... Jan 11 2015, 03:16 PM scotty b
what other recommendations can you provide (e.g. ... Jan 11 2015, 04:51 PM BeatNavy Thank you, fellas. A jig, eh? With the help of t... Jan 11 2015, 05:26 PM mepstein
Thank you, fellas. A jig, eh? With the help of ... Jan 11 2015, 06:23 PM Grump Roy,
Too bad you are not closer than 2 hours. I c... Jan 11 2015, 05:53 PM BeatNavy
Roy,
Too bad you are not closer than 2 hours. I ... Jan 11 2015, 06:42 PM scotty b
Roy,
Too bad you are not closer than 2 hours. I... Jan 11 2015, 06:45 PM Grump oops, Roy... where did Rob come from? Jan 11 2015, 05:54 PM scotty b With all the metal you'll be replacing you rea... Jan 11 2015, 06:34 PM BeatNavy Roger that. It makes sense. I guess I'm brea... Jan 11 2015, 06:51 PM BeatNavy Small update. My homework assignment was to build ... Jan 24 2015, 07:23 PM scotty b There's no easy, pleasant, fast, or fun way to... Jan 24 2015, 07:43 PM BeatNavy Thanks Scotty. My buddy has a plasma cutter - up i... Jan 24 2015, 07:52 PM cary Rob here's a pattern I found for the console t... Jan 24 2015, 11:41 PM BeatNavy
Rob here's a pattern I found for the console ... Jan 25 2015, 07:35 AM saigon71 You are tackling some serious rust!
The suspe... Jan 25 2015, 07:51 AM BeatNavy
You are tackling some serious rust!
The susp... Jan 25 2015, 04:36 PM FourBlades Its clear you have the skills to do this right... Jan 25 2015, 08:36 AM BeatNavy
Its clear you have the skills to do this right... Jan 25 2015, 04:38 PM mepstein here's a thread of scotty doing a suspension c... Jan 25 2015, 04:55 PM BeatNavy
here's a thread of scotty doing a suspension ... Jan 25 2015, 05:10 PM scotty b
here's a thread of scotty doing a suspension ... Jan 25 2015, 06:36 PM saigon71 Rob:
Here are some cross section pictures of a cu... Jan 26 2015, 06:59 PM BeatNavy Awesome, thanks Bob! I've been wrestling ... Jan 26 2015, 07:17 PM BeatNavy Small update. I didn't work last weekend (was... Feb 9 2015, 07:58 AM altitude411 Nice work. What are your thoughts on the (blair) ... Feb 9 2015, 08:18 AM BeatNavy
Nice work. What are your thoughts on the (blair)... Feb 9 2015, 08:25 AM cary Does the bottom of the upper already have a patch ... Feb 9 2015, 08:19 AM BeatNavy
Does the bottom of the upper already have a patch... Feb 9 2015, 08:27 AM BeatNavy Ok, I got the suspension console back from the str... Feb 13 2015, 06:55 PM BeatNavy I also got the wheelhouse and inner long pieces fr... Feb 13 2015, 06:56 PM scotty b IMO you really should cut out that rotted area. Yo... Feb 13 2015, 07:49 PM Cairo94507 Please take the advise of the man who knows of wha... Feb 13 2015, 09:49 PM BeatNavy
Please take the advise of the man who knows of wh... Feb 14 2015, 08:05 AM Han Solo Awesome. Go man, go! Feb 15 2015, 07:58 AM
BeatNavy
Who did your pre-buy inspection? :poke: :D
Som... Nov 11 2014, 07:45 PM BeatNavy Now I just need to get this thing up on the rotiss... Nov 11 2014, 07:45 PM BeatNavy The rotisserie very conveniently comes with some d... Nov 11 2014, 07:54 PM ThePaintedMan Rob,
Awesome man! You've got good folks... Nov 11 2014, 08:18 PM BeatNavy
Rob,
Awesome man! You've got good folk... Nov 11 2014, 08:24 PM altitude411 Subbed to watch Rob build an awesome teener. :he... Nov 11 2014, 08:33 PM BeatNavy
Subbed to watch Rob build an awesome teener. :h... Nov 12 2014, 07:13 AM PanelBilly I'd strip the suspension off the car before tr... Nov 11 2014, 10:33 PM saigon71 A rotisserie will be a big help in bringing this o... Nov 12 2014, 06:56 AM BeatNavy Happy New Year everyone. It’s been a while sinc... Jan 1 2015, 05:29 PM barefoot Anyway, after removing the drive axels with a gear... Jan 3 2015, 04:17 PM BeatNavy Then it was time to start cutting. I’ve spent w... Jan 1 2015, 05:30 PM rhodyguy Wow. Jan 1 2015, 06:10 PM billh1963 looks like you are well into it! :sawzall: Jan 1 2015, 06:19 PM 993inNC Here comes the real fun :D Took mine five years to... Jan 1 2015, 06:49 PM BeatNavy
Here comes the real fun :D Took mine five years t... Jan 1 2015, 06:54 PM scotty b white shocks indicate KYB....toss them in the tras... Jan 1 2015, 07:15 PM BeatNavy Excellent, thanks for the input, Scotty. I'll... Jan 1 2015, 07:28 PM mepstein
Excellent, thanks for the input, Scotty. I'l... Jan 3 2015, 01:30 PM type47 Incredible thread for a guy who joined 914world in... Jan 3 2015, 08:01 AM BeatNavy
Incredible thread for a guy who joined 914world i... Jan 3 2015, 11:26 AM ThePaintedMan Wow, nice progress Rob! Unfortunate that you e... Jan 3 2015, 08:20 AM ThePaintedMan Yep, not a bad idea to strip the trunks as well. M... Jan 3 2015, 11:55 AM BeatNavy
Yes, you do need to remove the starter to get th... Jan 3 2015, 02:32 PM r_towle Not sure I am following this along, but don't ... Jan 3 2015, 03:47 PM type47 I believe he's referring to his other daily dr... Jan 3 2015, 04:06 PM BeatNavy
I believe he's referring to his other daily d... Jan 3 2015, 05:45 PM r_towle Makes sense considering you are a long way from wo... Jan 3 2015, 06:40 PM BeatNavy Ok, last weekend was replacing bearings and tranny... Jan 11 2015, 01:08 PM SirAndy Oh, and the seat belt mount came out in the proces... Jan 11 2015, 02:13 PM BeatNavy
Oh, and the seat belt mount came out in the proce... Jan 11 2015, 02:17 PM SirAndy Haven't seen them listed before, but if they a... Jan 11 2015, 02:44 PM boxsterfan I really think you should change those jack stands... Jan 11 2015, 01:33 PM BeatNavy
I really think you should change those jack stand... Jan 11 2015, 01:46 PM Tilly74 :trophy: Great work! You inspire the rest of ... Jan 11 2015, 02:08 PM BeatNavy Yikes. That's scary, and yes, you are right. ... Jan 11 2015, 02:14 PM BeatNavy As much money as I'm fixin' to spend at RD... Jan 11 2015, 02:52 PM BeatNavy Ok, I’m also taking assessment of the suspension... Jan 11 2015, 02:59 PM SirAndy what other recommendations can you provide (e.g. m... Jan 11 2015, 03:16 PM scotty b
what other recommendations can you provide (e.g. ... Jan 11 2015, 04:51 PM BeatNavy Thank you, fellas. A jig, eh? With the help of t... Jan 11 2015, 05:26 PM mepstein
Thank you, fellas. A jig, eh? With the help of ... Jan 11 2015, 06:23 PM Grump Roy,
Too bad you are not closer than 2 hours. I c... Jan 11 2015, 05:53 PM BeatNavy
Roy,
Too bad you are not closer than 2 hours. I ... Jan 11 2015, 06:42 PM scotty b
Roy,
Too bad you are not closer than 2 hours. I... Jan 11 2015, 06:45 PM Grump oops, Roy... where did Rob come from? Jan 11 2015, 05:54 PM scotty b With all the metal you'll be replacing you rea... Jan 11 2015, 06:34 PM BeatNavy Roger that. It makes sense. I guess I'm brea... Jan 11 2015, 06:51 PM BeatNavy Small update. My homework assignment was to build ... Jan 24 2015, 07:23 PM scotty b There's no easy, pleasant, fast, or fun way to... Jan 24 2015, 07:43 PM BeatNavy Thanks Scotty. My buddy has a plasma cutter - up i... Jan 24 2015, 07:52 PM cary Rob here's a pattern I found for the console t... Jan 24 2015, 11:41 PM BeatNavy
Rob here's a pattern I found for the console ... Jan 25 2015, 07:35 AM saigon71 You are tackling some serious rust!
The suspe... Jan 25 2015, 07:51 AM BeatNavy
You are tackling some serious rust!
The susp... Jan 25 2015, 04:36 PM FourBlades Its clear you have the skills to do this right... Jan 25 2015, 08:36 AM BeatNavy
Its clear you have the skills to do this right... Jan 25 2015, 04:38 PM mepstein here's a thread of scotty doing a suspension c... Jan 25 2015, 04:55 PM BeatNavy
here's a thread of scotty doing a suspension ... Jan 25 2015, 05:10 PM scotty b
here's a thread of scotty doing a suspension ... Jan 25 2015, 06:36 PM saigon71 Rob:
Here are some cross section pictures of a cu... Jan 26 2015, 06:59 PM BeatNavy Awesome, thanks Bob! I've been wrestling ... Jan 26 2015, 07:17 PM BeatNavy Small update. I didn't work last weekend (was... Feb 9 2015, 07:58 AM altitude411 Nice work. What are your thoughts on the (blair) ... Feb 9 2015, 08:18 AM BeatNavy
Nice work. What are your thoughts on the (blair)... Feb 9 2015, 08:25 AM cary Does the bottom of the upper already have a patch ... Feb 9 2015, 08:19 AM BeatNavy
Does the bottom of the upper already have a patch... Feb 9 2015, 08:27 AM BeatNavy Ok, I got the suspension console back from the str... Feb 13 2015, 06:55 PM BeatNavy I also got the wheelhouse and inner long pieces fr... Feb 13 2015, 06:56 PM scotty b IMO you really should cut out that rotted area. Yo... Feb 13 2015, 07:49 PM Cairo94507 Please take the advise of the man who knows of wha... Feb 13 2015, 09:49 PM BeatNavy
Please take the advise of the man who knows of wh... Feb 14 2015, 08:05 AM Han Solo Awesome. Go man, go! Feb 15 2015, 07:58 AM  |
1 User(s) are reading this topic (1 Guests and 0 Anonymous Users)
0 Members:

|
Lo-Fi Version | Time is now: 29th May 2026 - 12:13 PM |
Invision Power Board
v9.1.4 © 2026 IPS, Inc.