|
|
|
Porsche, and the Porsche crest are registered trademarks of Dr. Ing. h.c. F. Porsche AG.
This site is not affiliated with Porsche in any way. Its only purpose is to provide an online forum for car enthusiasts. All other trademarks are property of their respective owners. |
|
|

  |

| Spoke |
 May 25 2020, 07:37 PM May 25 2020, 07:37 PM
Post
#181
|
|
Jerry  Group: Members Posts: 7,414 Joined: 29-October 04 From: Allentown, PA Member No.: 3,031 Region Association: None |
The fit is good. They look really cool although the reverse light is still a square.
Attached image(s) 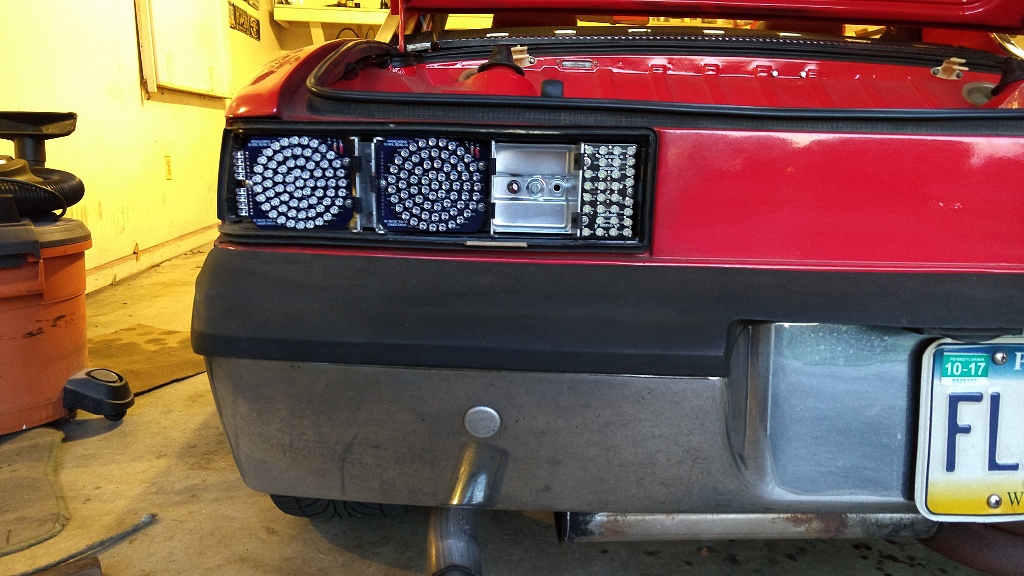 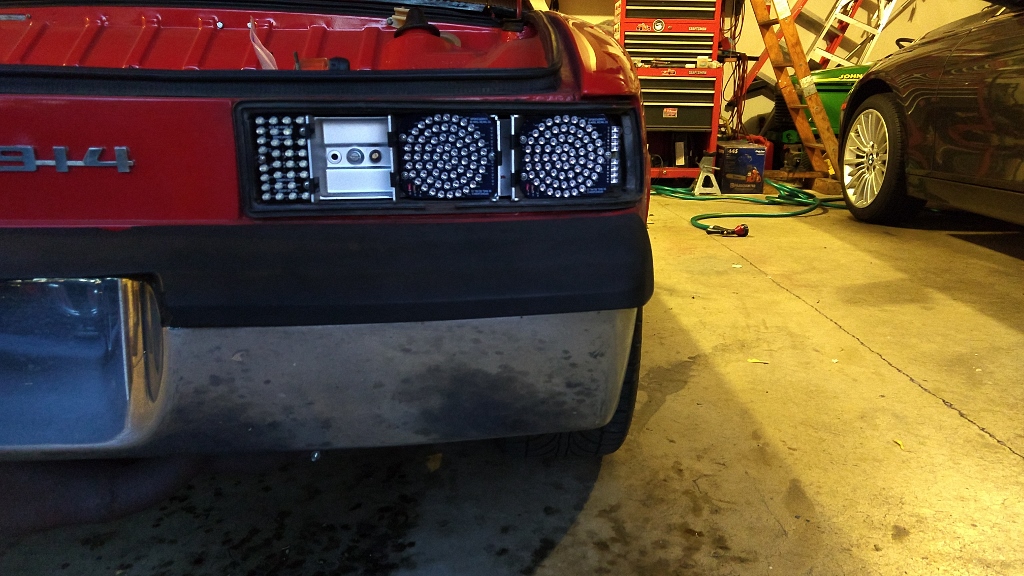
|
   |

 
|
| Spoke |
May 25 2020, 07:41 PM
Post
#182
|
|
Jerry Group: Members Posts: 7,414 Joined: 29-October 04 From: Allentown, PA Member No.: 3,031 Region Association: None |
Here's some pictures at night. The pattern is definitely round and looks great. Interestingly as well, the turnsignal lenses are amber yet the red turnsignal LEDs look the same as the brake LEDs.
The extra 20 LEDs worked out well to fill in the circle. Attached image(s)  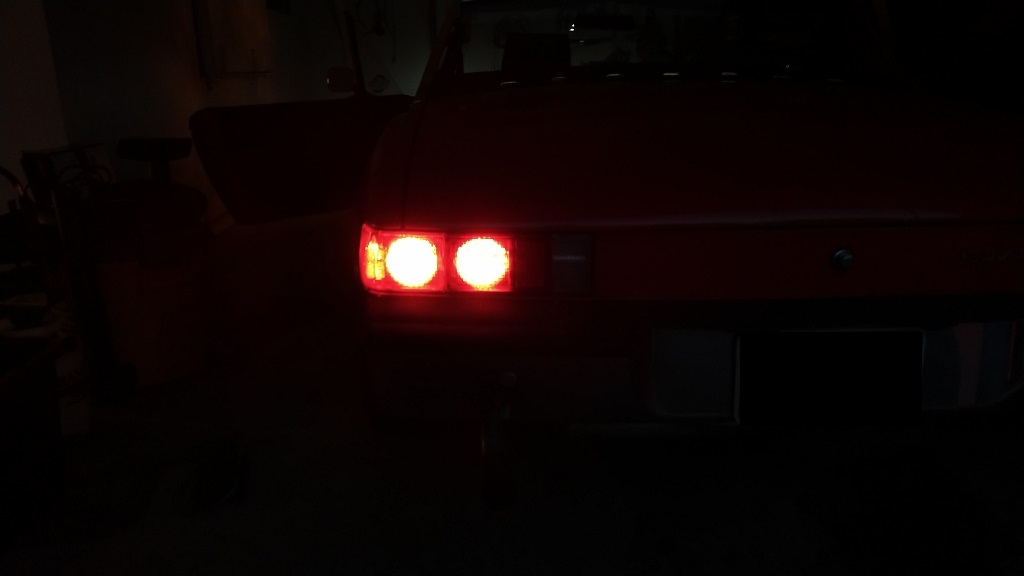 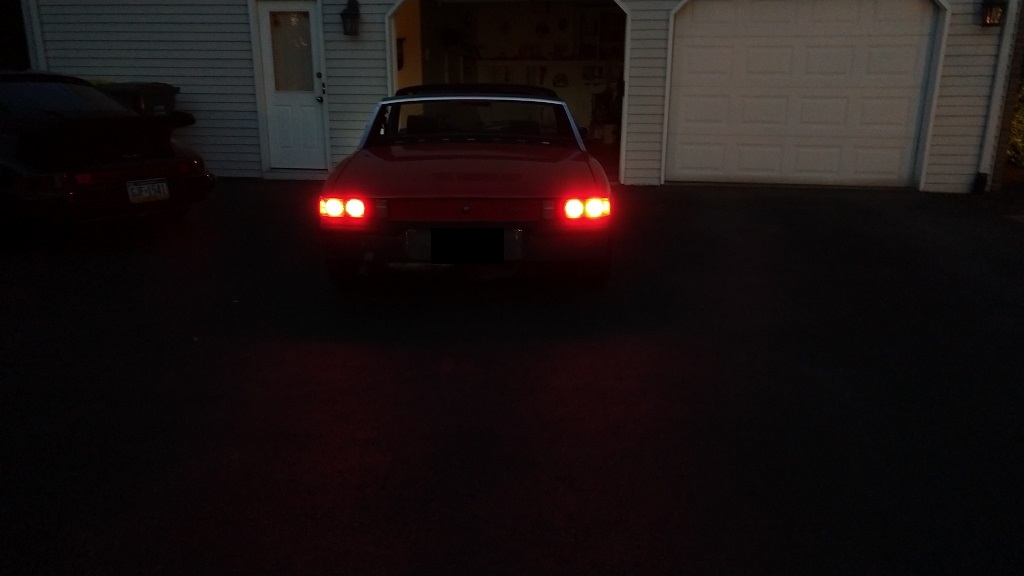 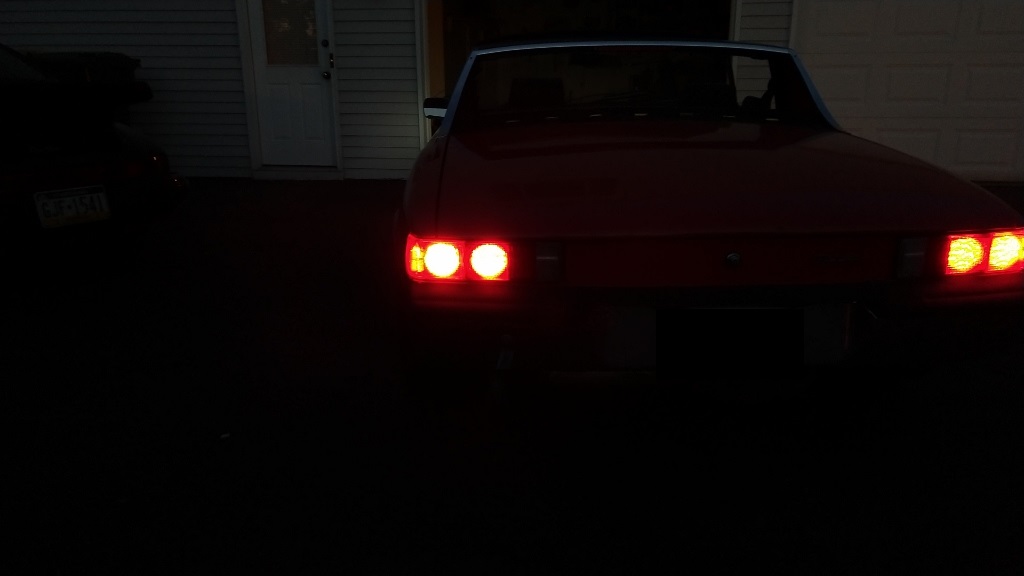 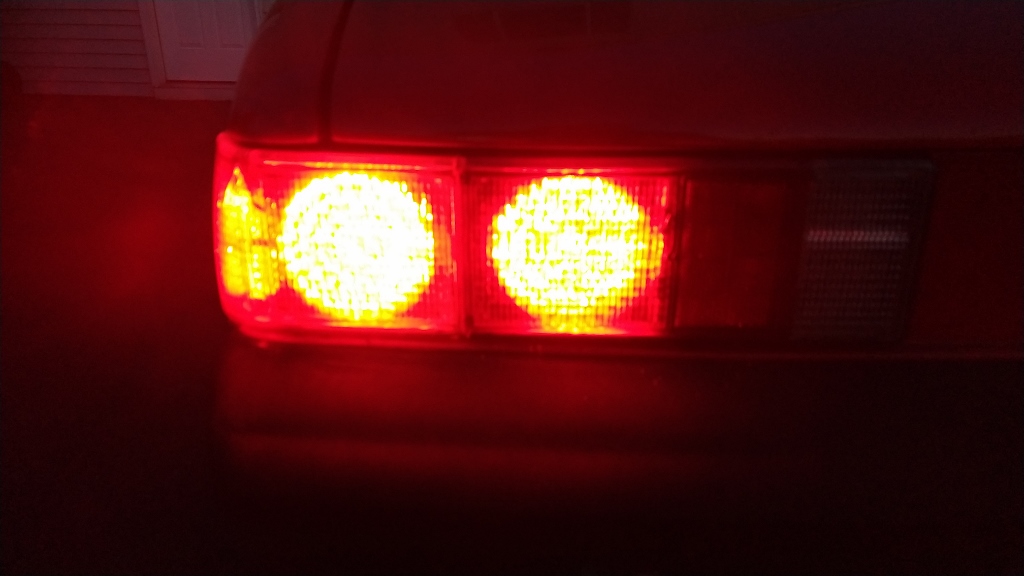
|
|
|
|
| mb911 |
May 26 2020, 04:35 PM
Post
#183
|
|
914 Guru Group: Members Posts: 7,794 Joined: 2-January 09 From: Burlington wi Member No.: 9,892 Region Association: Upper MidWest |
Very nice..
|
|
|
|
| ValcoOscar |
May 26 2020, 04:52 PM
Post
#184
|
|
Garage Life Group: Members Posts: 2,661 Joined: 19-November 13 From: SoCal Member No.: 16,669 Region Association: Southern California |
VERY Nice....
(IMG:style_emoticons/default/biggrin.gif) (IMG:style_emoticons/default/smile.gif) (IMG:style_emoticons/default/shades.gif) When will you start to offer these? @Spoke Oscar |
|
|
|
| Gatornapper |
May 26 2020, 05:59 PM
Post
#185
|
|
Senior Member Group: Members Posts: 1,290 Joined: 22-September 17 From: Woods west of Richmond, VA Member No.: 21,449 Region Association: South East States |
” I already did the grounding of the white/blue wire from the fog relay and will change the wiring so I can run the fogs as running lights.”
PLEASE tell me how to do this - been wanting to do the same. GN QUOTE(BPic @ May 12 2020, 05:33 AM)  Received my Spoke LED fogs back yesterday and they are really nice. Thanks @spoke Installation is as easy as mounting them and hooking up the wires, they come ready to use. I now have Spoke LED on all four corners, Spoke fogs, and I went 914Rubber LED bulbs for the headlights. I already did the grounding of the white/blue wire from the fog relay and will change the wiring so I can run the fogs as running lights. The pics don't do them justice since I'm not a photographer and taking pics of lights makes thing look weird but here they are and they are very bright. I'll try to get better pics and repost. So here's the thing. There are a few other options for LED out there but.... None that are the quality of Spoke LEDs and if you have questions try getting ahold of someone that knows the 914 intricacies. I sent Jerry an email on a Saturday to ask a question about an issue I was having and within 15 minutes my phone rang. He said it was easier to go over it on the phone and spent 20 minutes fixing what I screwed up and talking about 914's in general. So if you want a quality product, excellent customer service, and a fair price go with Spoke. Thanks again Jerry! Love the lights!! (IMG:style_emoticons/default/beerchug.gif) |
|
|
|
| mb911 |
May 26 2020, 06:07 PM
Post
#186
|
|
914 Guru Group: Members Posts: 7,794 Joined: 2-January 09 From: Burlington wi Member No.: 9,892 Region Association: Upper MidWest |
QUOTE(Gatornapper @ May 26 2020, 03:59 PM) ” I already did the grounding of the white/blue wire from the fog relay and will change the wiring so I can run the fogs as running lights.” PLEASE tell me how to do this - been wanting to do the same. GN QUOTE(BPic @ May 12 2020, 05:33 AM) Received my Spoke LED fogs back yesterday and they are really nice. Thanks @spoke Installation is as easy as mounting them and hooking up the wires, they come ready to use. I now have Spoke LED on all four corners, Spoke fogs, and I went 914Rubber LED bulbs for the headlights. I already did the grounding of the white/blue wire from the fog relay and will change the wiring so I can run the fogs as running lights. The pics don't do them justice since I'm not a photographer and taking pics of lights makes thing look weird but here they are and they are very bright. I'll try to get better pics and repost. So here's the thing. There are a few other options for LED out there but.... None that are the quality of Spoke LEDs and if you have questions try getting ahold of someone that knows the 914 intricacies. I sent Jerry an email on a Saturday to ask a question about an issue I was having and within 15 minutes my phone rang. He said it was easier to go over it on the phone and spent 20 minutes fixing what I screwed up and talking about 914's in general. So if you want a quality product, excellent customer service, and a fair price go with Spoke. Thanks again Jerry! Love the lights!! (IMG:style_emoticons/default/beerchug.gif) Same here. |
|
|
|
| BPic |
May 27 2020, 05:26 AM
Post
#187
|
|
Member Group: Members Posts: 344 Joined: 5-February 18 From: Miami, Florida Member No.: 21,864 Region Association: South East States |
@Gatornapper
@MB911 This is copied form some place but I don't remember where I got it. Worked great for me. I did conversion 1b and conversion 2. 914 FOGLIGHT REWIRING INSTRUCTIONS ________________________________________ Ever wish you could use your foglights without having to have your headlight on, or wish they would stay on when you switch on the highbeams? Well, this set of instructions will explain how to rewire your 914 so that you can! This set of instructions has been compiled from a variety of sources: 1. Instructions from GPR (no longer on the web as far as I know). 2. Instructions from a technical article in Porsche Panorama July '89. 3. Studying the wiring diagrams from the factory manuals (note: the wiring diagrams in the Haynes manual for '75 and '76 cars is incorrect when it comes to the fog light wiring, so do not use that diagram as a reference). DISCLAIMER: I have only done this conversion on my '74 914. These instructions may or may not be correct, and cannot account for any previous re-wires that may have been done to your electrical system. So follow these instructions at your own risk! The first step is to figure out how you want your fog lights to work. From the factory, your fog lights will only operate when the headlights are on ('70 and '71 cars can use their foglights with the running lights), and will turn off when your headlights are switched to high beams. Conversion #1 (choose 1a or 1b), will modify when you are able to use your fog lights. Conversion #2 will keep your fog lights on when using high beams. Conversion 1a: Fog lights enabled with the running lights. This option will enable you to use your fog lights anytime your running lights are on. This is my preferred method because I can just leave my fog light switch on permanently. Whenever I want just the fogs, I pull the headlight switch to the running light position, and of course, they stay on with the headlights as well. '70-'71 cars (4cyl and 6cyl) already come from the factory wired for this. Conversion 1b: Fog lights enabled with the ignition. This option will allow you to turn on the fog lights anytime the igniton is turned on. This option is best for people who want to use their fog lights as daytime running lights, or for those who simply want to use their fog lights without any other lights being on. Conversion 2: This option will enable your fog lights to stay on when the headlights are switched to high beam. This is a completely separate change from options 1a or 1b. Personally, I did not see the purpose in doing this (I very rarely use my high beams anyway). Conversion #1 Instructions. 1. Disconnect the negative side of the battery. 2. Remove the headlight switch from the dash mounted location and let it hang down below the dash. 3. Locate the following black wire w/ blue stripe: • '70-'71 914-4 and 914-6: Black wire w/ blue stripe will be plugged into the #58b terminal on the headlight switch, along with a grey wire. • '72-'73: Black wire w/ blue stripe will be plugged into the #56 terminal on the headlight switch, along with a grey wire and a red w/white striped wire. • '74-'76: Black wire w/ blue stripe will be plugged into the #56 terminal on the headlight switch, along with a red w/white striped wire. 4. Carefully cut the black wire w/ blue stripe as close to the end (spade terminal) as possible leaving no part of the wire exposed. Crimp a piggy-back spade connector to the end of this wire. A piggy back spade terminal looks like this:  5a. (do this step if you selected option 1a above): To enable your fog lights with the running lights, locate the 'K' ternimal on the headlight switch and remove the connector that is attached to it. Plug on the black wire w/ blue stripe and then piggyback the wire that was originally on the 'K' terminal. 5b. (do this step if you selected option 1b above): To enable your fog lights with the ignition, then locate the #15 ternimal on the headlight switch and remove the connector that is attached to it. Plug on the black wire w/ blue stripe and then piggyback the wire that was originally on the #15 terminal. 6. Now put the headlight switch back into place and continue on to conversion #2 if you decided to do that modification as well. Otherwise, go ahead and hook up your battery and test out your fog lights. Conversion #2 Instructions. 1. Disconnect the negative side of the battery. 2. Remove the fuse cover and remove the screws which hold the fuse block plate in place - pull down the fuse block assembly and let it hang. 3. Locate and cut the following white w/blue striped wire: • '70-'71 914/4: First, you need to locate the combination relay. I believe it is mounted on the fuse block panel. The white w/blue striped wire will be attached to the 'F' terminal on the combination relay (along with a plain white wire). Cut this wire as close to the relay as possible leaving no part of the wire exposed. • '72-'73 and 914/6: There will be two white w/blue striped wires attached at the #1 fuse on the fuse block. One of these wires goes to the high beam indicator in the tachometer, the other is for the fog light relay. You need to determine which is which (trial and error, multimeter, etc), and leave the high beam indicator wire in place. Cut the other (the one for the fog light relay) white w/blue striped wire as close to the end (spade connector) as possible leaving no part of the wire exposed. • '74-'76: The white w/blue striped wire is attached at the input side of the #1 fuse on the fuse block (input side is toward the rear of the car). Cut this wire as close to the end (spade connector) as possible leaving no part of the wire exposed. Note: There is another white w/blue striped wire attached to the output side of the #1 fuse - leave this wire alone as it is for the high beam indicator light. 4. Now you need to permanently ground this white/blue striped wire. You will notice that there is a ground connection located at the upper left side of the fuse block mount with a bunch of other brown wires held down by a 13mm nut. You may need to splice in a few inches of additional wire to reach this ground point. Crimp a solderless terminal which will fit over the ground stud onto the wire, and fasten it to the ground connection with the other wires. 5. Now put the fuse block back in place, and hook up your battery. Your fog lights should now work with the high beams! |
|
|
|
| Gatornapper |
May 28 2020, 03:22 PM
Post
#188
|
|
Senior Member Group: Members Posts: 1,290 Joined: 22-September 17 From: Woods west of Richmond, VA Member No.: 21,449 Region Association: South East States |
Thanks BP!
1b is what I’m after..... So I do both what is in 1b AND what is in 2. ‘74-‘76. 5......right? GN QUOTE(BPic @ May 27 2020, 05:26 AM) @Gatornapper @MB911 This is copied form some place but I don't remember where I got it. Worked great for me. I did conversion 1b and conversion 2. 914 FOGLIGHT REWIRING INSTRUCTIONS ________________________________________ Ever wish you could use your foglights without having to have your headlight on, or wish they would stay on when you switch on the highbeams? Well, this set of instructions will explain how to rewire your 914 so that you can! This set of instructions has been compiled from a variety of sources: 1. Instructions from GPR (no longer on the web as far as I know). 2. Instructions from a technical article in Porsche Panorama July '89. 3. Studying the wiring diagrams from the factory manuals (note: the wiring diagrams in the Haynes manual for '75 and '76 cars is incorrect when it comes to the fog light wiring, so do not use that diagram as a reference). DISCLAIMER: I have only done this conversion on my '74 914. These instructions may or may not be correct, and cannot account for any previous re-wires that may have been done to your electrical system. So follow these instructions at your own risk! The first step is to figure out how you want your fog lights to work. From the factory, your fog lights will only operate when the headlights are on ('70 and '71 cars can use their foglights with the running lights), and will turn off when your headlights are switched to high beams. Conversion #1 (choose 1a or 1b), will modify when you are able to use your fog lights. Conversion #2 will keep your fog lights on when using high beams. Conversion 1a: Fog lights enabled with the running lights. This option will enable you to use your fog lights anytime your running lights are on. This is my preferred method because I can just leave my fog light switch on permanently. Whenever I want just the fogs, I pull the headlight switch to the running light position, and of course, they stay on with the headlights as well. '70-'71 cars (4cyl and 6cyl) already come from the factory wired for this. Conversion 1b: Fog lights enabled with the ignition. This option will allow you to turn on the fog lights anytime the igniton is turned on. This option is best for people who want to use their fog lights as daytime running lights, or for those who simply want to use their fog lights without any other lights being on. Conversion 2: This option will enable your fog lights to stay on when the headlights are switched to high beam. This is a completely separate change from options 1a or 1b. Personally, I did not see the purpose in doing this (I very rarely use my high beams anyway). Conversion #1 Instructions. 1. Disconnect the negative side of the battery. 2. Remove the headlight switch from the dash mounted location and let it hang down below the dash. 3. Locate the following black wire w/ blue stripe: • '70-'71 914-4 and 914-6: Black wire w/ blue stripe will be plugged into the #58b terminal on the headlight switch, along with a grey wire. • '72-'73: Black wire w/ blue stripe will be plugged into the #56 terminal on the headlight switch, along with a grey wire and a red w/white striped wire. • '74-'76: Black wire w/ blue stripe will be plugged into the #56 terminal on the headlight switch, along with a red w/white striped wire. 4. Carefully cut the black wire w/ blue stripe as close to the end (spade terminal) as possible leaving no part of the wire exposed. Crimp a piggy-back spade connector to the end of this wire. A piggy back spade terminal looks like this: 5a. (do this step if you selected option 1a above): To enable your fog lights with the running lights, locate the 'K' ternimal on the headlight switch and remove the connector that is attached to it. Plug on the black wire w/ blue stripe and then piggyback the wire that was originally on the 'K' terminal. 5b. (do this step if you selected option 1b above): To enable your fog lights with the ignition, then locate the #15 ternimal on the headlight switch and remove the connector that is attached to it. Plug on the black wire w/ blue stripe and then piggyback the wire that was originally on the #15 terminal. 6. Now put the headlight switch back into place and continue on to conversion #2 if you decided to do that modification as well. Otherwise, go ahead and hook up your battery and test out your fog lights. Conversion #2 Instructions. 1. Disconnect the negative side of the battery. 2. Remove the fuse cover and remove the screws which hold the fuse block plate in place - pull down the fuse block assembly and let it hang. 3. Locate and cut the following white w/blue striped wire: • '70-'71 914/4: First, you need to locate the combination relay. I believe it is mounted on the fuse block panel. The white w/blue striped wire will be attached to the 'F' terminal on the combination relay (along with a plain white wire). Cut this wire as close to the relay as possible leaving no part of the wire exposed. • '72-'73 and 914/6: There will be two white w/blue striped wires attached at the #1 fuse on the fuse block. One of these wires goes to the high beam indicator in the tachometer, the other is for the fog light relay. You need to determine which is which (trial and error, multimeter, etc), and leave the high beam indicator wire in place. Cut the other (the one for the fog light relay) white w/blue striped wire as close to the end (spade connector) as possible leaving no part of the wire exposed. • '74-'76: The white w/blue striped wire is attached at the input side of the #1 fuse on the fuse block (input side is toward the rear of the car). Cut this wire as close to the end (spade connector) as possible leaving no part of the wire exposed. Note: There is another white w/blue striped wire attached to the output side of the #1 fuse - leave this wire alone as it is for the high beam indicator light. 4. Now you need to permanently ground this white/blue striped wire. You will notice that there is a ground connection located at the upper left side of the fuse block mount with a bunch of other brown wires held down by a 13mm nut. You may need to splice in a few inches of additional wire to reach this ground point. Crimp a solderless terminal which will fit over the ground stud onto the wire, and fasten it to the ground connection with the other wires. 5. Now put the fuse block back in place, and hook up your battery. Your fog lights should now work with the high beams! |
|
|
|
| BPic |
May 28 2020, 05:01 PM
Post
#189
|
|
Member Group: Members Posts: 344 Joined: 5-February 18 From: Miami, Florida Member No.: 21,864 Region Association: South East States |
@Gatornapper - That is correct. It's a fairly easy job. (IMG:style_emoticons/default/beerchug.gif)
|
|
|
|
| Spoke |
May 28 2020, 09:47 PM
Post
#190
|
|
Jerry Group: Members Posts: 7,414 Joined: 29-October 04 From: Allentown, PA Member No.: 3,031 Region Association: None |
@Gatornapper
@bdstone914 GN, Follow the thread below for rewiring the foglight. I showed how I did the rewire on my 71 as well as Bruce's rewire. Looks like the wiring changed over the 914 years but the basic idea is the same. @BPic Great write up. Many thanks. (IMG:style_emoticons/default/beerchug.gif) Rewiring Foglight |
|
|
|
| Gatornapper |
May 29 2020, 04:51 PM
Post
#191
|
|
Senior Member Group: Members Posts: 1,290 Joined: 22-September 17 From: Woods west of Richmond, VA Member No.: 21,449 Region Association: South East States |
Spoke -
Now going to read what you posted below.......Thanks! GN QUOTE(Spoke @ May 28 2020, 09:47 PM) @Gatornapper @bdstone914 GN, Follow the thread below for rewiring the foglight. I showed how I did the rewire on my 71 as well as Bruce's rewire. Looks like the wiring changed over the 914 years but the basic idea is the same. @BPic Great write up. Many thanks. (IMG:style_emoticons/default/beerchug.gif) Rewiring Foglight |
|
|
|
| Gatornapper |
May 29 2020, 05:12 PM
Post
#192
|
|
Senior Member Group: Members Posts: 1,290 Joined: 22-September 17 From: Woods west of Richmond, VA Member No.: 21,449 Region Association: South East States |
Still not seeing what I want - Fog LIghts on whenever ignition is on as running lights, bypassing both Fog Light switch (do not have, do not want) and headlight switch.
Seems to me all I need to do is cut white/blue wire and get 12+ from any ignition hot source (cigar lighter) to it/pin 86. Seal end of white/blue wire that goes to low beam fuse. Install one of my relays from 914rubber - and I’ve got my LED running light/fog lights..... Wouldn’t this work cleanly? GN QUOTE(Spoke @ May 28 2020, 09:47 PM) @Gatornapper @bdstone914 GN, Follow the thread below for rewiring the foglight. I showed how I did the rewire on my 71 as well as Bruce's rewire. Looks like the wiring changed over the 914 years but the basic idea is the same. @BPic Great write up. Many thanks. (IMG:style_emoticons/default/beerchug.gif) Rewiring Foglight |
|
|
|
| Spoke |
Aug 2 2020, 06:30 PM
Post
#193
|
|
Jerry Group: Members Posts: 7,414 Joined: 29-October 04 From: Allentown, PA Member No.: 3,031 Region Association: None |
I'm updating the Euro front turnsignals to add more white LEDs. Recently I did a brake light for an MG. It was a tiny board and I jammed 48 LEDs on to it. That got me thinking about the 914 Euro front turnsignals.
The current design has 21 white LEDs and the board is designed for both Euro with 21 white and 48 amber LEDs as well as the US configuration with all amber LEDs. I wanted to jam as many white LEDs as possible where they would all shine through the clear part of the Euro lens. The first design is V7 below with 33 white LEDs. This design is completely routed and ready for the fab house. Upon further review, I wanted to jam even more white LEDs on the board. One thing I noticed about the board and the Euro lens, was that I could see the first row of amber LEDs through the clear portion of the lens. That means I could add another row of white LEDs and they would shine through the clear part of the lens. This design is shown below as V8 and has 42 white LEDs. Twice as many as the current design. Even though the V7 design is ready for fabrication, I think I want to do the V8 design with more LEDs. Still need to do the final layout for this board. @rmital Ray, this means your front turnsignals will be delayed until I finish the layout, get the board fabricated and assembled. Sorry to make you wait but it should be well worth it. V7 - 33 White LEDs 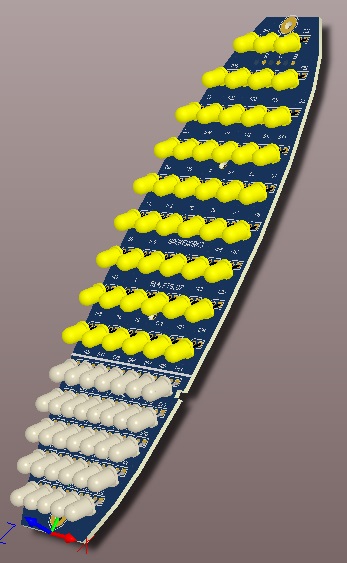 V8 - 42 White LEDs 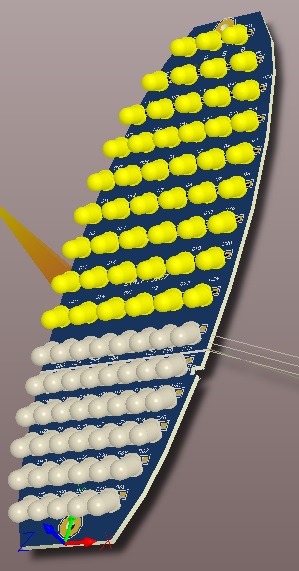 |
|
|
|
| rmital |
Aug 3 2020, 08:29 AM
Post
#194
|
|
Northeast optimist Group: Members Posts: 1,955 Joined: 12-December 05 From: Park Ridge, NJ Member No.: 5,268 |
QUOTE(Spoke @ Aug 2 2020, 08:30 PM) . @rmital Ray, this means your front turnsignals will be delayed until I finish the layout, get the board fabricated and assembled. Sorry to make you wait but it should be well worth it. no problem, no rush! thanks! |
|
|
|
| Spoke |
Feb 13 2021, 08:32 AM
Post
#195
|
|
Jerry Group: Members Posts: 7,414 Joined: 29-October 04 From: Allentown, PA Member No.: 3,031 Region Association: None |
Doing rear boards in white now. From now on, white boards will come with white clips. Thanks Pete for the suggestion.
@horizontally-opposed Attached thumbnail(s) 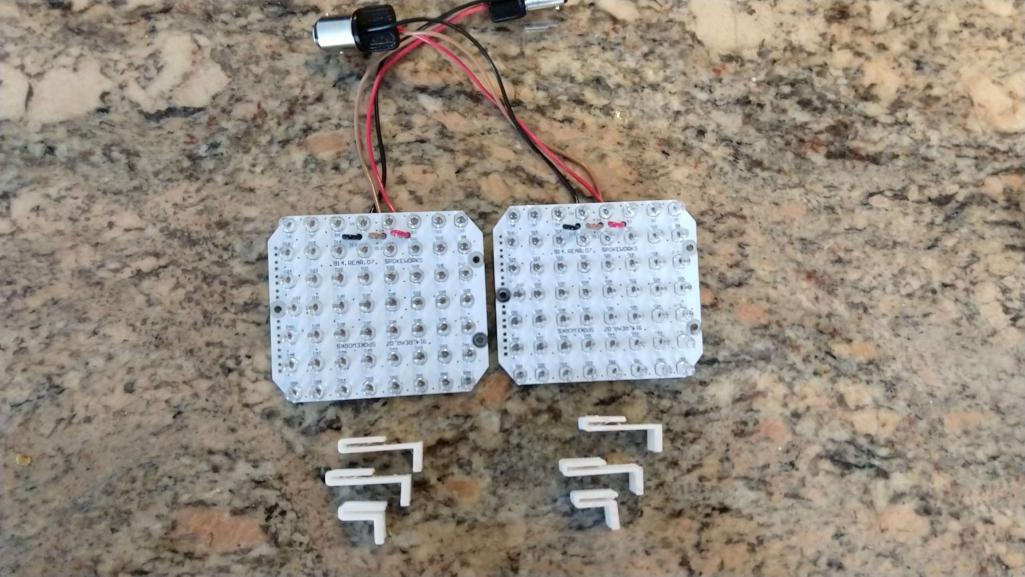 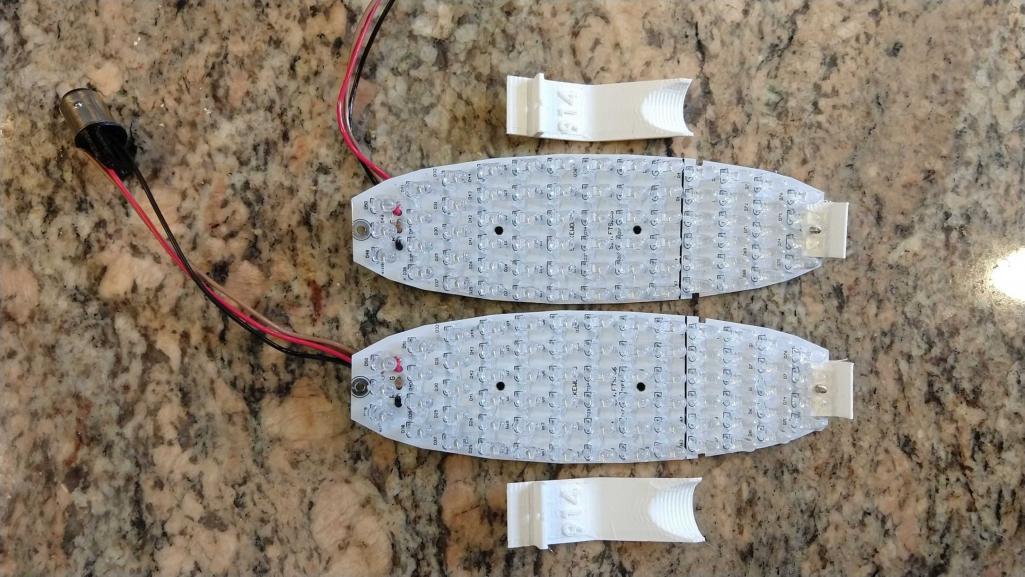
|
|
|
|
| Cairo94507 |
Feb 13 2021, 08:54 AM
Post
#196
|
|
Michael Group: Members Posts: 10,723 Joined: 1-November 08 From: Auburn, CA Member No.: 9,712 Region Association: Northern California |
(IMG:style_emoticons/default/smilie_pokal.gif) This is one of the best upgrades you can do to improve the safety of your car. I know @Spoke is also working on a way to do the foglight so it looks closer to the stock configuration (round). I am anxiously awaiting those so I can upgrade my foglights as they are wired to work as daytime running lights. (IMG:style_emoticons/default/beerchug.gif)
|
|
|
|
| horizontally-opposed |
Feb 13 2021, 11:57 AM
Post
#197
|
|
Advanced Member Group: Members Posts: 3,456 Joined: 12-May 04 From: San Francisco Member No.: 2,058 Region Association: None |
QUOTE(Cairo94507 @ Feb 13 2021, 06:54 AM) (IMG:style_emoticons/default/smilie_pokal.gif) This is one of the best upgrades you can do to improve the safety of your car. FULLY agree—and Jerry has been fabulous to deal with. We are lucky to have him as a vendor. |
|
|
|
| porsche914gt |
Feb 14 2021, 11:27 AM
Post
#198
|
|
Member Group: Members Posts: 87 Joined: 20-January 04 From: Los Angeles, CA Member No.: 1,581 Region Association: None |
sure, full set, please.
|
|
|
|
| anderssj |
Feb 14 2021, 02:43 PM
Post
#199
|
|
Dog is my copilot... Group: Members Posts: 1,795 Joined: 28-January 03 From: VA Member No.: 207 Region Association: MidAtlantic Region |
QUOTE(Spoke @ Aug 2 2020, 08:30 PM) I'm updating the Euro front turnsignals to add more white LEDs. Recently I did a brake light for an MG. It was a tiny board and I jammed 48 LEDs on to it. That got me thinking about the 914 Euro front turnsignals. The current design has 21 white LEDs and the board is designed for both Euro with 21 white and 48 amber LEDs as well as the US configuration with all amber LEDs. I wanted to jam as many white LEDs as possible where they would all shine through the clear part of the Euro lens. The first design is V7 below with 33 white LEDs. This design is completely routed and ready for the fab house. Upon further review, I wanted to jam even more white LEDs on the board. One thing I noticed about the board and the Euro lens, was that I could see the first row of amber LEDs through the clear portion of the lens. That means I could add another row of white LEDs and they would shine through the clear part of the lens. This design is shown below as V8 and has 42 white LEDs. Twice as many as the current design. Even though the V7 design is ready for fabrication, I think I want to do the V8 design with more LEDs. Still need to do the final layout for this board. @rmital Ray, this means your front turnsignals will be delayed until I finish the layout, get the board fabricated and assembled. Sorry to make you wait but it should be well worth it. V7 - 33 White LEDs V8 - 42 White LEDs Spoke, Thanks for your work on the LED lights! The brake light boards are GREAT--as the others said, they provide a huge improvement in visibility and safety. Is the latest version of the front Euro turn signals (V8 w/42 white LEDs?) available yet? I've got a tax return burning a hole in my pocket (IMG:style_emoticons/default/biggrin.gif) Thanks! Steve A- |
 |
|
| horizontally-opposed |
Feb 23 2021, 07:20 PM
Post
#200
|
|
Advanced Member Group: Members Posts: 3,456 Joined: 12-May 04 From: San Francisco Member No.: 2,058 Region Association: None |
QUOTE(Spoke @ Feb 13 2021, 06:32 AM) Doing rear boards in white now. From now on, white boards will come with white clips. Thanks Pete for the suggestion. @horizontally-opposed Just got the new white clips and tried them. Thank you for sending them! For those interested, the white boards really "hide" the LED elements on the brake boards when seen through the red lenses, which are so much less opaque than I thought. Alas, while the black clips were a bit too obvious through the red lenses, the new white clips are too. So I tried a bit of flat aluminum paint on one set of clips and "chrome" paint on the other. Bingo. After a few seconds of "work" with a can of spray paint, the LED brake boards are effectively an invisible (but massive) upgrade. Will get some pics, but many thanks to Spoke Works for a fantastic product (IMG:style_emoticons/default/beerchug.gif) |
|
|
|
|
2 User(s) are reading this topic (2 Guests and 0 Anonymous Users)
0 Members:

|
Lo-Fi Version | Time is now: 29th July 2026 - 10:18 PM |
Invision Power Board
v9.1.4 © 2026 IPS, Inc.