|
|
|
Porsche, and the Porsche crest are registered trademarks of Dr. Ing. h.c. F. Porsche AG.
This site is not affiliated with Porsche in any way. Its only purpose is to provide an online forum for car enthusiasts. All other trademarks are property of their respective owners. |
|
|

  |

| Randal |
 Jan 22 2015, 10:00 AM Jan 22 2015, 10:00 AM
Post
#1
|
|
Advanced Member  Group: Members Posts: 4,446 Joined: 29-May 03 From: Los Altos, CA Member No.: 750 |
Thinking about drilling a 3/4 inch hole through the firewall to an Accusump on the other side. The Accusump will sit facing backwards towards the cockpit firewall mounted where the seat normally goes.
Anyone ever drilled through this section. There is a black arrow where I want the hole. All advice appreciated.  BTW I'm going to cover up that higher hole where the lines used to run to the front cooler. |
   |

 
|
| ChrisFoley |
Jan 22 2015, 10:22 AM
Post
#2
|
|
I am Tangerine Racing Group: Members Posts: 8,016 Joined: 29-January 03 From: Bolton, CT Member No.: 209 Region Association: None |
You can put a bulkhead fitting through the pocket there.
That's the only location on the lower firewall where the two panels have no empty space between them. |
|
|
|
| Rob-O |
Jan 22 2015, 10:55 AM
Post
#3
|
|
Senior Member Group: Members Posts: 1,297 Joined: 5-December 03 From: Mansfield, TX Member No.: 1,419 Region Association: Southwest Region |
(IMG:style_emoticons/default/agree.gif)
What Chris said. The center of that dimple matches a dimple on the interior of the vehicle. Any other spot on the lower firewall and you have to go through two pieces of metal spaced 2.5 or so inches apart. |
|
|
|
| Steve |
Jan 22 2015, 12:11 PM
Post
#4
|
|
914 Guru Group: Members Posts: 5,982 Joined: 14-June 03 From: Laguna Niguel, CA Member No.: 822 Region Association: Southern California |
I drilled a 3/4" hole in that dimple to run the DME harness for my 3.2 motor. No issues. Plenty of room on the other side, since it's low on the firewall behind the passenger seat.
|
 |
|
| McMark |
Jan 22 2015, 12:13 PM
Post
#5
|
|
914 Freak! Group: Retired Admin Posts: 20,180 Joined: 13-March 03 From: Grand Rapids, MI Member No.: 419 Region Association: None |
To expand on what Chris said, that area is a boxes section. So where the arrow is you would have to drill through one layer of sheet metal, and then drop into the box and drill through the next layer into the cabin.
If you drill though the dimple, those two layers of metal are back to back. But there a spot welds in the dimple. I imagine this was done for structure to tie those pieces together. If you remove the spot welds and don't compensate for it (weld around the circumference of your drilled hole) you're taking that structure away. It's probably not going to affect a caged car like yours all that much, but I'm not a big fan of it. If I were doing it here, I would drill through the box section, then weld in a tube to make a sealed hole in the body. Then feed AN line through the hole and add the ends on after. |
|
|
|
| Randal |
Jan 22 2015, 12:19 PM
Post
#6
|
|
Advanced Member Group: Members Posts: 4,446 Joined: 29-May 03 From: Los Altos, CA Member No.: 750 |
QUOTE(Rob-O @ Jan 22 2015, 08:55 AM)  (IMG:style_emoticons/default/agree.gif) What Chris said. The center of that dimple matches a dimple on the interior of the vehicle. Any other spot on the lower firewall and you have to go through two pieces of metal spaced 2.5 or so inches apart. Ahhh, now I see it. Just move the Accusump over to the right, drill a hole, install a bulkhead fitting and I'm good to go. So much easier and less costly than running the lines through the old hole. Man, the stuff we go through for better weight distribution! 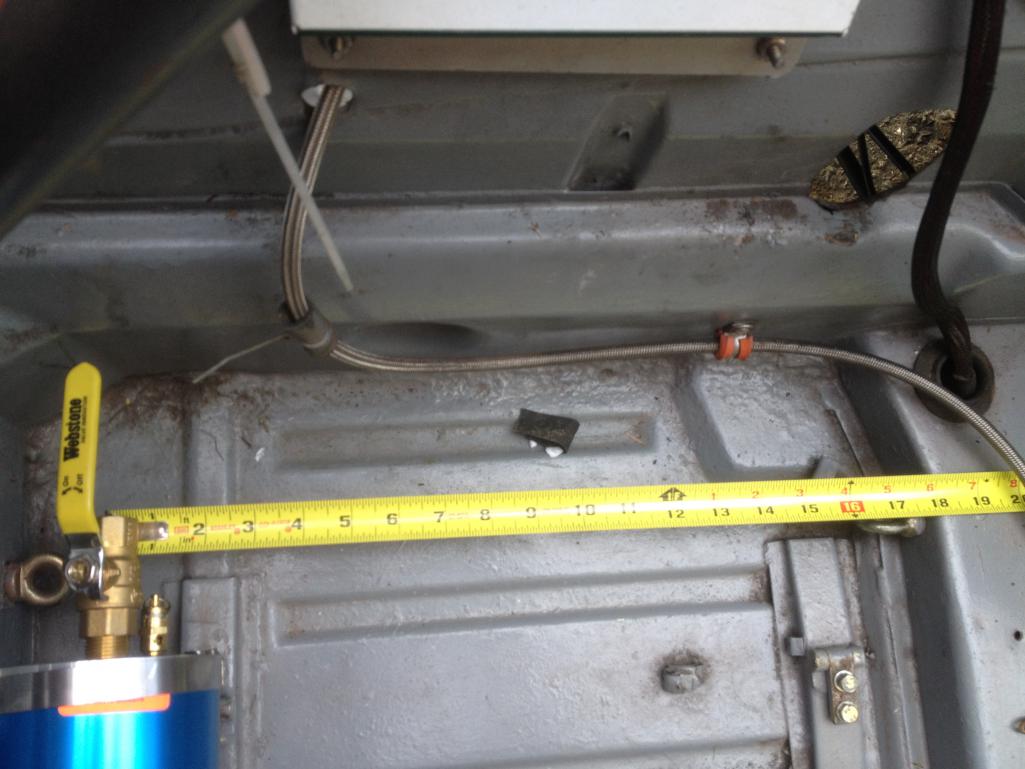 Thanks for the advice all! |
|
|
|
| Randal |
Jan 22 2015, 12:19 PM
Post
#7
|
|
Advanced Member Group: Members Posts: 4,446 Joined: 29-May 03 From: Los Altos, CA Member No.: 750 |
QUOTE(Racer Chris @ Jan 22 2015, 08:22 AM) You can put a bulkhead fitting through the pocket there. That's the only location on the lower firewall where the two panels have no empty space between them. Thank you Sir! |
|
|
|
| SirAndy |
Jan 22 2015, 12:22 PM
Post
#8
|
|
Resident German Group: Admin Posts: 42,369 Joined: 21-January 03 From: Oakland, Kalifornia Member No.: 179 Region Association: Northern California |
QUOTE(McMark @ Jan 22 2015, 10:13 AM) If I were doing it here, I would drill through the box section, then weld in a tube to make a sealed hole in the body. Then feed AN line through the hole and add the ends on after. Like so: (IMG:http://www.914world.com/bbs2/uploads/post-179-1151215319.jpg) (IMG:http://www.914world.com/bbs2/uploads/post-179-1175805981.jpg) (IMG:http://www.914world.com/bbs2/uploads/post-179-1175806021.jpg) (IMG:http://www.914world.com/bbs2/uploads/post-179-1175806054.jpg) (IMG:http://www.914world.com/bbs2/uploads/post-179-1175806091.jpg) (IMG:http://www.914world.com/bbs2/uploads/post-179-1176965977.jpg) (IMG:http://www.914world.com/bbs2/uploads/post-179-1177645190.jpg) (IMG:http://www.914world.com/bbs2/uploads/post-179-1182813892.jpg) |
|
|
|
| Kansas 914 |
Jan 22 2015, 12:54 PM
Post
#9
|
|
Advanced Member Group: Members Posts: 3,006 Joined: 1-March 03 From: Durango, Colorado Member No.: 373 Region Association: Rocky Mountains |
QUOTE(SirAndy @ Jan 22 2015, 11:22 AM) QUOTE(McMark @ Jan 22 2015, 10:13 AM) If I were doing it here, I would drill through the box section, then weld in a tube to make a sealed hole in the body. Then feed AN line through the hole and add the ends on after. Like so: Nicely done! |
|
|
|
| JRust |
Jan 22 2015, 06:03 PM
Post
#10
|
|
914 Guru Group: Members Posts: 6,317 Joined: 10-January 03 From: Albany Oregon Member No.: 129 Region Association: Pacific Northwest |
(IMG:style_emoticons/default/agree.gif) That's is effective & looks good. Nice mod Andy (IMG:style_emoticons/default/first.gif)
|
|
|
|
| Randal |
Jan 22 2015, 06:21 PM
Post
#11
|
|
Advanced Member Group: Members Posts: 4,446 Joined: 29-May 03 From: Los Altos, CA Member No.: 750 |
QUOTE(SirAndy @ Jan 22 2015, 10:22 AM) QUOTE(McMark @ Jan 22 2015, 10:13 AM) If I were doing it here, I would drill through the box section, then weld in a tube to make a sealed hole in the body. Then feed AN line through the hole and add the ends on after. Like so: Nice work Andy. What is that blue line called? Looks like it just slips on to the fittings. |
|
|
|
| ChrisFoley |
Jan 22 2015, 07:28 PM
Post
#12
|
|
I am Tangerine Racing Group: Members Posts: 8,016 Joined: 29-January 03 From: Bolton, CT Member No.: 209 Region Association: None |
Aeroquip AQP Socketless Hose
|
|
|
|
| SirAndy |
Jan 22 2015, 08:17 PM
Post
#13
|
|
Resident German Group: Admin Posts: 42,369 Joined: 21-January 03 From: Oakland, Kalifornia Member No.: 179 Region Association: Northern California |
QUOTE(Randal @ Jan 22 2015, 04:21 PM) What is that blue line called? Looks like it just slips on to the fittings. I got the hose and fittings from Pegasus Racing. Operating range: Up to 250 psi, 300 deg. F Burst pressure: 1000 psi (IMG:style_emoticons/default/shades.gif) |
|
|
|
| Randal |
Jan 22 2015, 10:21 PM
Post
#14
|
|
Advanced Member Group: Members Posts: 4,446 Joined: 29-May 03 From: Los Altos, CA Member No.: 750 |
QUOTE(Racer Chris @ Jan 22 2015, 05:28 PM) Aeroquip AQP Socketless Hose Sure looks like a lot easier to work with as compared to the SS wrapped lines. Decided to go that way, but the pliers to crimp the clamps, recommended in high temperature situations, was $80 bucks. Ouch. Oh well another interesting tool to place in the green felt. |
|
|
|
| SirAndy |
Jan 22 2015, 10:40 PM
Post
#15
|
|
Resident German Group: Admin Posts: 42,369 Joined: 21-January 03 From: Oakland, Kalifornia Member No.: 179 Region Association: Northern California |
QUOTE(Randal @ Jan 22 2015, 08:21 PM) the pliers to crimp the clamps, recommended in high temperature situations, was $80 bucks. I've been running this setup without clamps for years now, never had a problem. (IMG:style_emoticons/default/smile.gif) |
|
|
|
| Randal |
Jan 22 2015, 10:56 PM
Post
#16
|
|
Advanced Member Group: Members Posts: 4,446 Joined: 29-May 03 From: Los Altos, CA Member No.: 750 |
QUOTE(SirAndy @ Jan 22 2015, 08:40 PM) QUOTE(Randal @ Jan 22 2015, 08:21 PM) the pliers to crimp the clamps, recommended in high temperature situations, was $80 bucks. I've been running this setup without clamps for years now, never had a problem. (IMG:style_emoticons/default/smile.gif) Well you know where to borrow the special pliers now. (IMG:style_emoticons/default/biggrin.gif) |
|
|
|
| Mark Henry |
Jan 22 2015, 11:13 PM
Post
#17
|
|
that's what I do! Group: Members Posts: 20,065 Joined: 27-December 02 From: Port Hope, Ontario Member No.: 26 Region Association: Canada |
QUOTE(SirAndy @ Jan 22 2015, 09:17 PM) QUOTE(Randal @ Jan 22 2015, 04:21 PM) What is that blue line called? Looks like it just slips on to the fittings. I got the hose and fittings from Pegasus Racing. Operating range: Up to 250 psi, 300 deg. F Burst pressure: 1000 psi (IMG:style_emoticons/default/shades.gif) Isn't that Parker Pushlok hose? |
|
|
|
| Randal |
Jan 23 2015, 06:58 PM
Post
#18
|
|
Advanced Member Group: Members Posts: 4,446 Joined: 29-May 03 From: Los Altos, CA Member No.: 750 |
QUOTE(Mark Henry @ Jan 22 2015, 09:13 PM) QUOTE(SirAndy @ Jan 22 2015, 09:17 PM) QUOTE(Randal @ Jan 22 2015, 04:21 PM) What is that blue line called? Looks like it just slips on to the fittings. I got the hose and fittings from Pegasus Racing. Operating range: Up to 250 psi, 300 deg. F Burst pressure: 1000 psi (IMG:style_emoticons/default/shades.gif) Isn't that Parker Pushlok hose? As per Foley, "Aeroquip AQP Socketless Hose" I don't think it's the same, but maybe. I'll have to call the Parker guys in San Jose and find out. |
|
|
|
| SirAndy |
Jan 23 2015, 07:28 PM
Post
#19
|
|
Resident German Group: Admin Posts: 42,369 Joined: 21-January 03 From: Oakland, Kalifornia Member No.: 179 Region Association: Northern California |
QUOTE(Mark Henry @ Jan 22 2015, 09:13 PM) Isn't that Parker Pushlok hose? The Parker Pushlok is very similar: http://www.914world.com/uploads/4281_b1.pdf (IMG:style_emoticons/default/smile.gif) |
|
|
|
|
1 User(s) are reading this topic (1 Guests and 0 Anonymous Users)
0 Members:

|
Lo-Fi Version | Time is now: 7th December 2025 - 10:08 AM |
Invision Power Board
v9.1.4 © 2025 IPS, Inc.