|
|
|
Porsche, and the Porsche crest are registered trademarks of Dr. Ing. h.c. F. Porsche AG.
This site is not affiliated with Porsche in any way. Its only purpose is to provide an online forum for car enthusiasts. All other trademarks are property of their respective owners. |
|
|

  |

| altitude411 |
 May 18 2018, 09:55 PM May 18 2018, 09:55 PM
Post
#561
|
|
I drove my 6 into a tree  Group: Members Posts: 1,306 Joined: 21-September 14 From: montana Member No.: 17,932 Region Association: Rocky Mountains |
(IMG:style_emoticons/default/wub.gif) Fantastic!
|
   |

 
|
| krazykonrad |
May 22 2018, 08:53 AM
Post
#562
|
|
Senior Member Group: Members Posts: 1,180 Joined: 21-February 06 From: Canton, GA Member No.: 5,610 |
QUOTE(raynekat @ May 18 2018, 06:19 PM)  QUOTE(krazykonrad @ May 18 2018, 07:14 PM) That is a nice looking teener! Where did you get the stickers? Konrad I think I got them at Aase Sales from what I remember. Thanks! Looks like they have a strong collection of them. |
|
|
|
| raynekat |
May 22 2018, 11:17 PM
Post
#563
|
|
Advanced Member Group: Members Posts: 2,171 Joined: 30-December 14 From: Coeur d'Alene, Idaho Member No.: 18,263 Region Association: Pacific Northwest |
Time to catch up a bit....
The paint shop delivered the car to me last Friday. A glorious day for sure. It's been almost 3 years since I purchased the car. And nearly 2 years with the metal work and paint & body. Ya need some patience in deed. My twins just turned 1 year old on Friday, May 18th and my sister was in town for the festivities, so not much got done over the weekend. Add to that one of the twins was sick just before their 1 year check up today. It's been a little crazy here. But I'm just about ready to get going with my part of the assembly of this car.... Finally. From here on out...it will be a bit of a shotgun approach to getting this car back in one piece. I have to work in some assembly in between the twin's nap time and all the chores I do daily in connection with the twins. My goal is the get the entire car assembled in 1 month. Wish me luck. Then the car will get hauled over to Rothsport Racing's shop for installation of the drivetrain....2.7 MFI engine (228hp) and close ratio gearbox, plus added oil cooler, wheel alignment, completion of the brake system, etc. Dial it in! Let's go! Now is the time when all the effort in re-plating many of the items really makes it's mark. For example, the beautiful clear plated door latches. 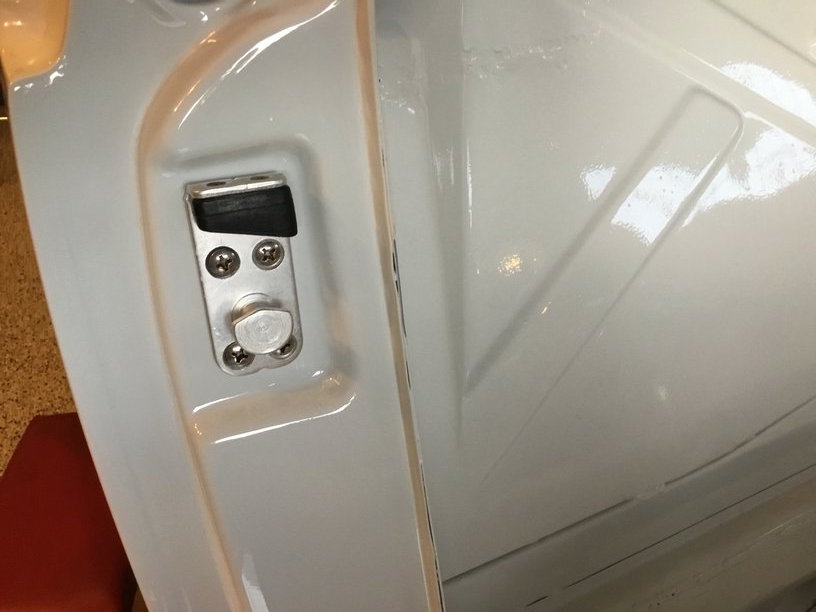 And freshly plated/powder coated front strut hardware. 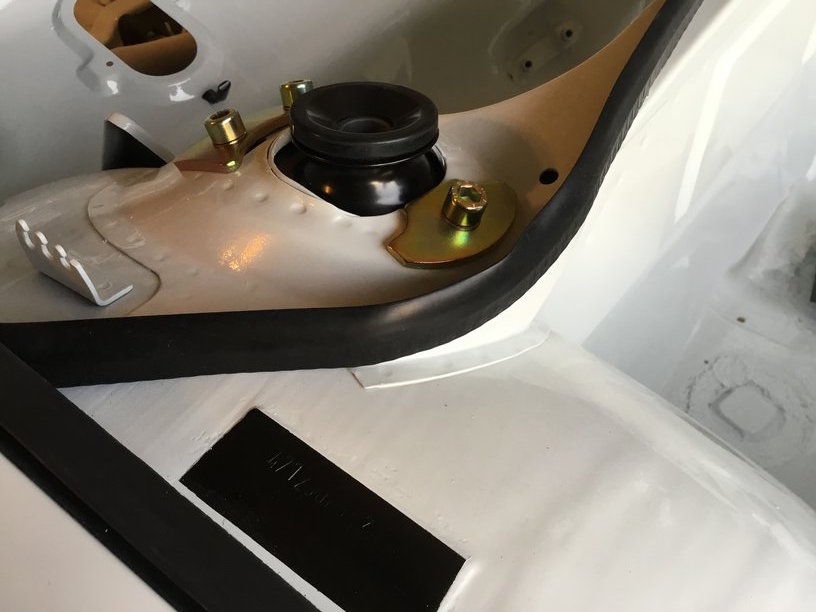 The beauty of the high priced fiberglass hoods becomes more evident in situ. They are light as heck, but will need some nifty prop rods to keep them afloat. i definitely have some ideas for this. All the rubber seals for the most part will be predominantly 914 Rubber provided. In general, I can say that most of the 914 Rubber items look great and fit great as well. 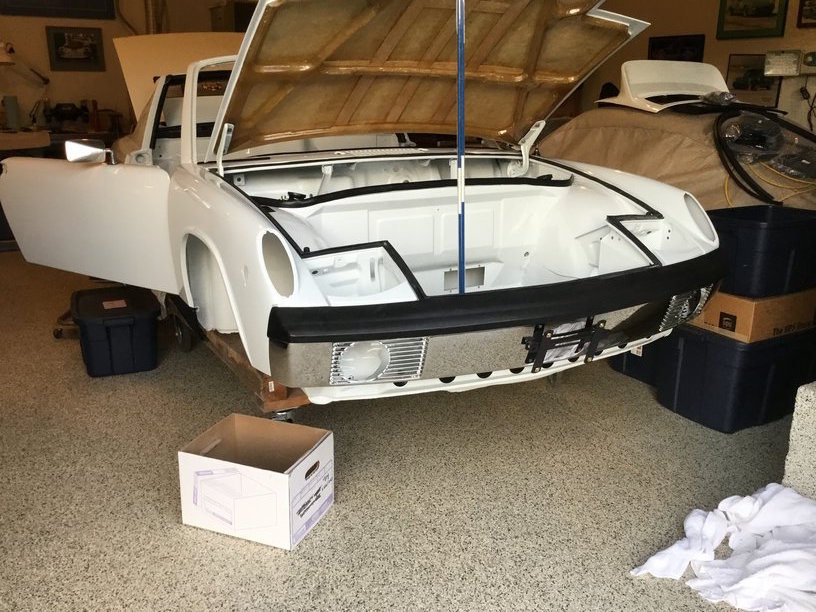 Just a peak at the carpets that will go in the car. German square weave charcoal carpets from Autobahns Interiors. Gorgeous and will really set off the interior against the stark white paint.... 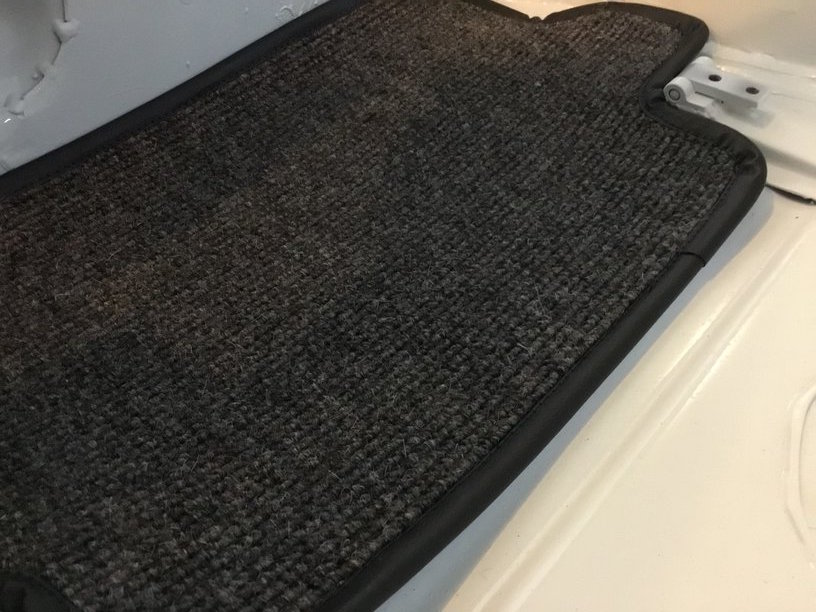 |
|
|
|
| raynekat |
May 22 2018, 11:32 PM
Post
#564
|
|
Advanced Member Group: Members Posts: 2,171 Joined: 30-December 14 From: Coeur d'Alene, Idaho Member No.: 18,263 Region Association: Pacific Northwest |
The back end of the car really makes quite a statement.
I'm going "Euro" 914 hence the badging, lighting, etc. Painted the gold 914-6 VW Porsche badge black so it would show up better against the white. Hella Euro tail light lens with Spokes LED right behind them....plus 914 Rubber gaskets. Euro rear fog light of course..... (IMG:style_emoticons/default/wink.gif) The bumper is stainless steel from Harrington. Re-using the "original" bumper tops as they were in great shape....likely not really original considering the overall shape of the car as I received it, but someone had replaced them in the past. Topped off with a Brumos license plate frame a friend of mine had given me many years ago...finally the right car to put in on. 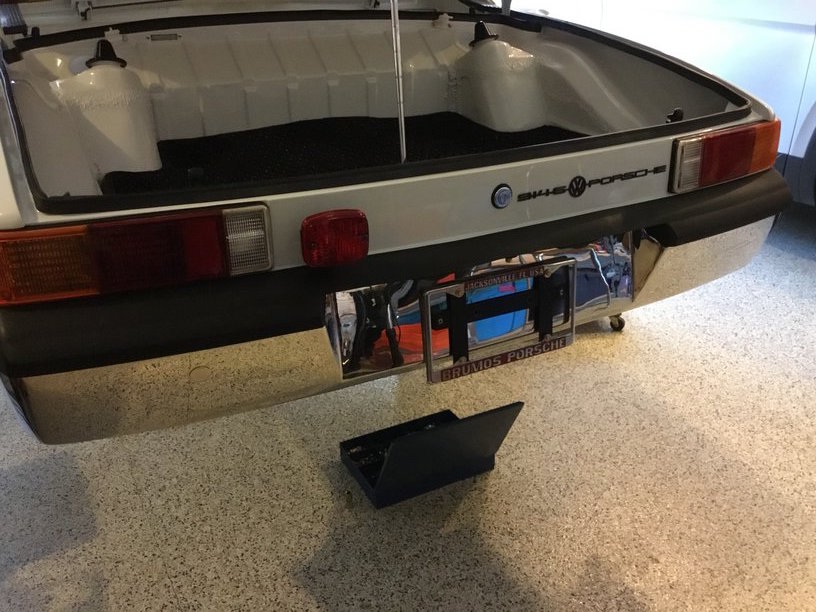 I'm using a trunk mat from Coco Mats that is black with blue specs. It's really heavy....but pretty cool looking. Not sure if I'll get matching floor mats for the cabin or not.... More on that later. Rear trunk is complete except the wiring....which is coming when my "assistant" becomes available. Along with the prop rod. A word on the rear trunk lid. It fits basically. Not great, but it gets the job done. Considered putting hood latches in the lower corners, but not sure if that fits with the build philosophy for this car. If this was a 914-6 GT replica....then no question I'd go with them. It won't be concours the fit maybe the finish. But the cool factor when you open the lids will more than make up for any cosmetic blemishes/imperfections. 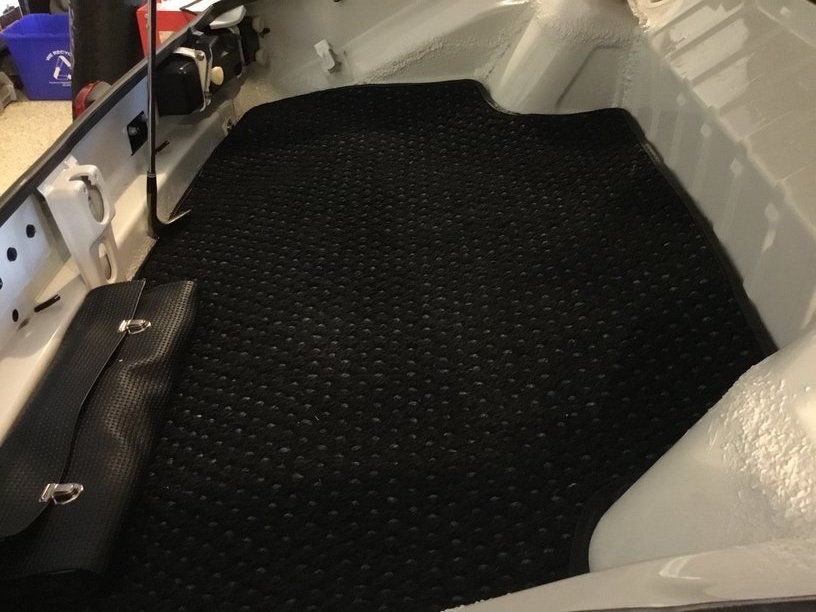 Trial fitting the brake proportioning valve and 914-6 front engine mount. Will get better pics later. These components look really nice. 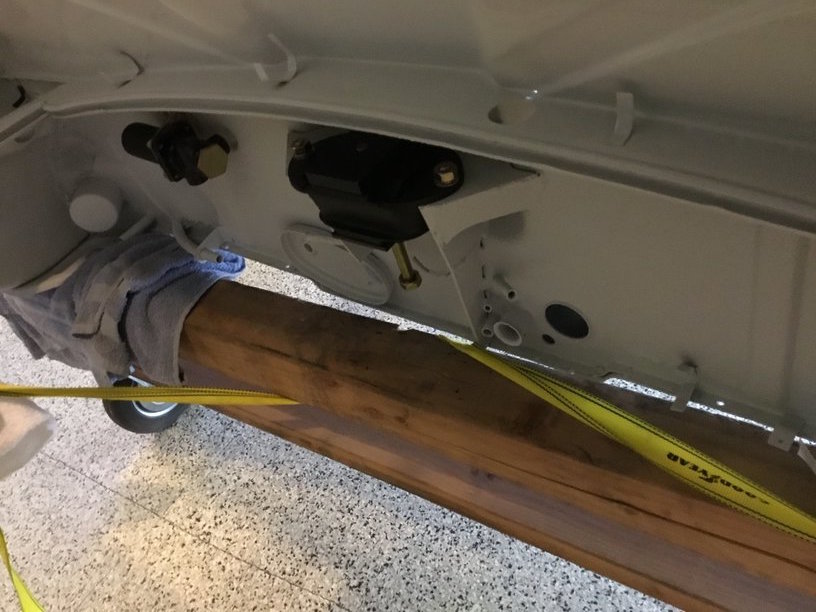 I'll try to have daily updates now as I work my way through the parts installation phase of this project. |
|
|
|
| defianty |
May 23 2018, 01:40 AM
Post
#565
|
|
Senior Member Group: Members Posts: 659 Joined: 9-August 06 From: Essex, UK Member No.: 6,621 Region Association: None |
Lovely stuff!
|
|
|
|
| Cairo94507 |
May 23 2018, 06:21 AM
Post
#566
|
|
Michael Group: Members Posts: 10,706 Joined: 1-November 08 From: Auburn, CA Member No.: 9,712 Region Association: Northern California |
|
|
|
|
| cary |
May 23 2018, 08:20 AM
Post
#567
|
|
Advanced Member Group: Members Posts: 3,900 Joined: 26-January 04 From: Sherwood Oregon Member No.: 1,608 Region Association: Pacific Northwest |
And away he goes ................
I'll try and make it to the body shop on Friday to pick up my rotisserie. |
|
|
|
| cary |
May 26 2018, 07:05 AM
Post
#568
|
|
Advanced Member Group: Members Posts: 3,900 Joined: 26-January 04 From: Sherwood Oregon Member No.: 1,608 Region Association: Pacific Northwest |
I grabbed Super In Law and we ran across town to pick up my rotisserie at Doug's body shop. Superior Auto Body. When I got there two guys jumped in and helped me load it up. (IMG:style_emoticons/default/biggrin.gif) Nice folks. Then it was off to Doug's house to see the completed paint job.
All I can say is, pictures don't do it justice.  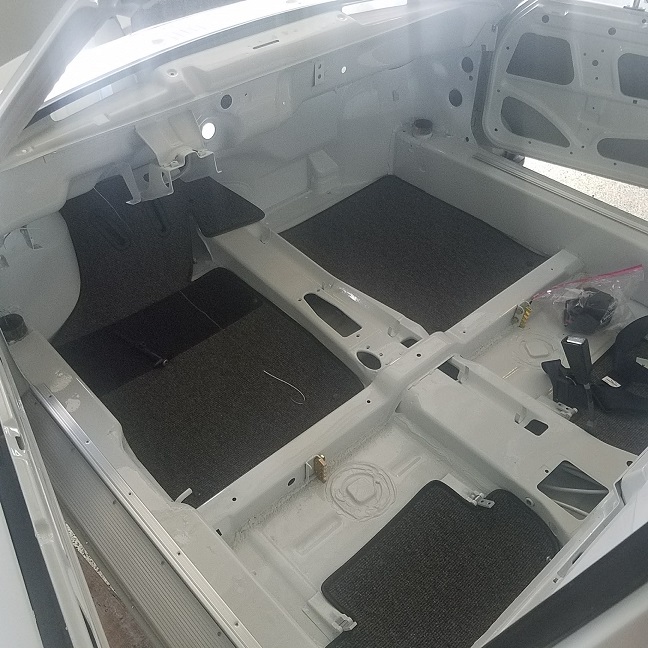 To see my metal work finished at that level ............ I'm at a loss for words. |
|
|
|
| raynekat |
Jul 4 2018, 10:44 PM
Post
#569
|
|
Advanced Member Group: Members Posts: 2,171 Joined: 30-December 14 From: Coeur d'Alene, Idaho Member No.: 18,263 Region Association: Pacific Northwest |
Well it's time to update this thread....hard to believe it's been over a month since I last posted. Two 13 month old twins will do that to you I guess.... (IMG:style_emoticons/default/tongue.gif)
Let's get going... |
|
|
|
| raynekat |
Jul 4 2018, 11:09 PM
Post
#570
|
|
Advanced Member Group: Members Posts: 2,171 Joined: 30-December 14 From: Coeur d'Alene, Idaho Member No.: 18,263 Region Association: Pacific Northwest |
Some of the new supplies/tools I needed for the job at hand.
3M high strength 90 contact adhesive - perfect for doing the targa/sail vinyl. The other adhesives just weren't up to the task in my opinion. Large high quality scissors; think these were German that I purchased on Ebay.. They'll cut through just about anything with a very nice slice....carpeting, vinyl, rubber trim and moulding, Dynomat, fuel lines. Almost anything. Roller for smoothing out the Dynomat, carpeting and vinyl. Spring clamp pliers. A necessity when removing or attaching those spring clamps on the fresh air blower box and distribution boxes. After I launched one to the moon using standard pliers and nearly put another through the side of my face, I decided it was a smart move to get the correct tool for the job. Note: I did find the one clamp one week later on the other side of the garage. 4 and 5mm hex head sockets for the rear brake calipers. 3M trim adhesive for the trim that needed a bit of help to stick here and there. Can of flat tan colored paint for painting the paper/foil heating tubes in the back of the dash to match the original factory color. 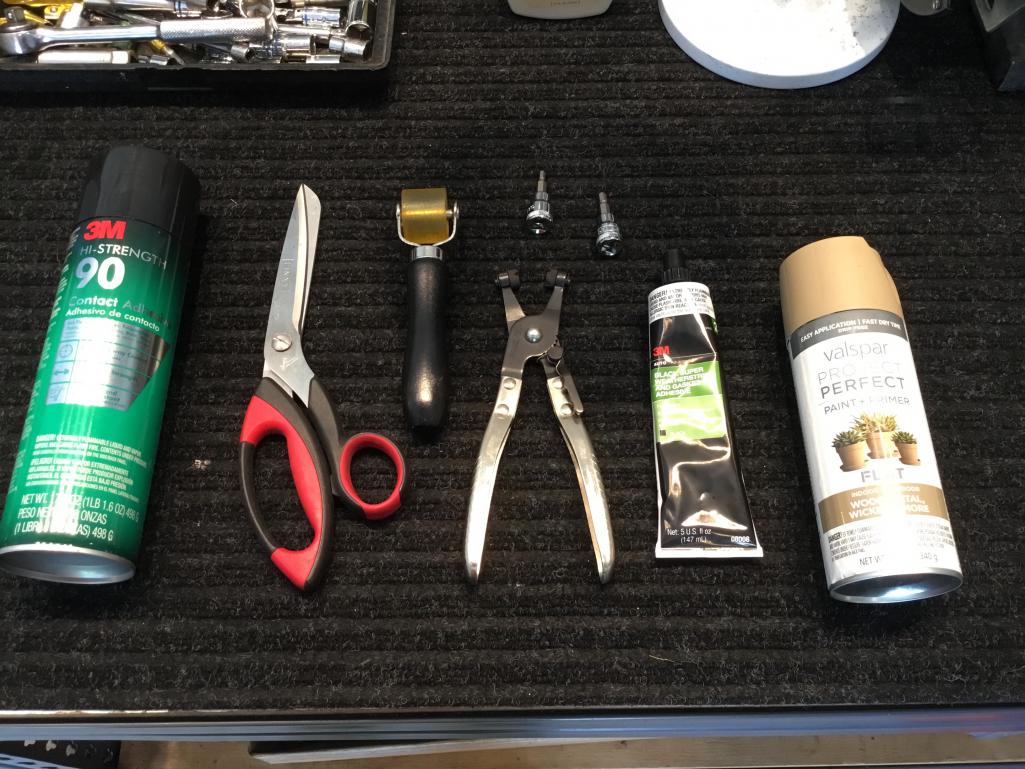 |
|
|
|
| raynekat |
Jul 4 2018, 11:15 PM
Post
#571
|
|
Advanced Member Group: Members Posts: 2,171 Joined: 30-December 14 From: Coeur d'Alene, Idaho Member No.: 18,263 Region Association: Pacific Northwest |
Best safety purchase of the project.
Found these jack stands on Ebay. They are very sturdy, easy to use, with a nice rubber pad (so you don't muck up the bottom of your car). Not cheap....something like $60-70 ea, but to me, well worth the money for peace of mind. Each stand is capable of holding something ridiculous like 6000 lbs....so total overkill in a good way. (IMG:style_emoticons/default/wink.gif) 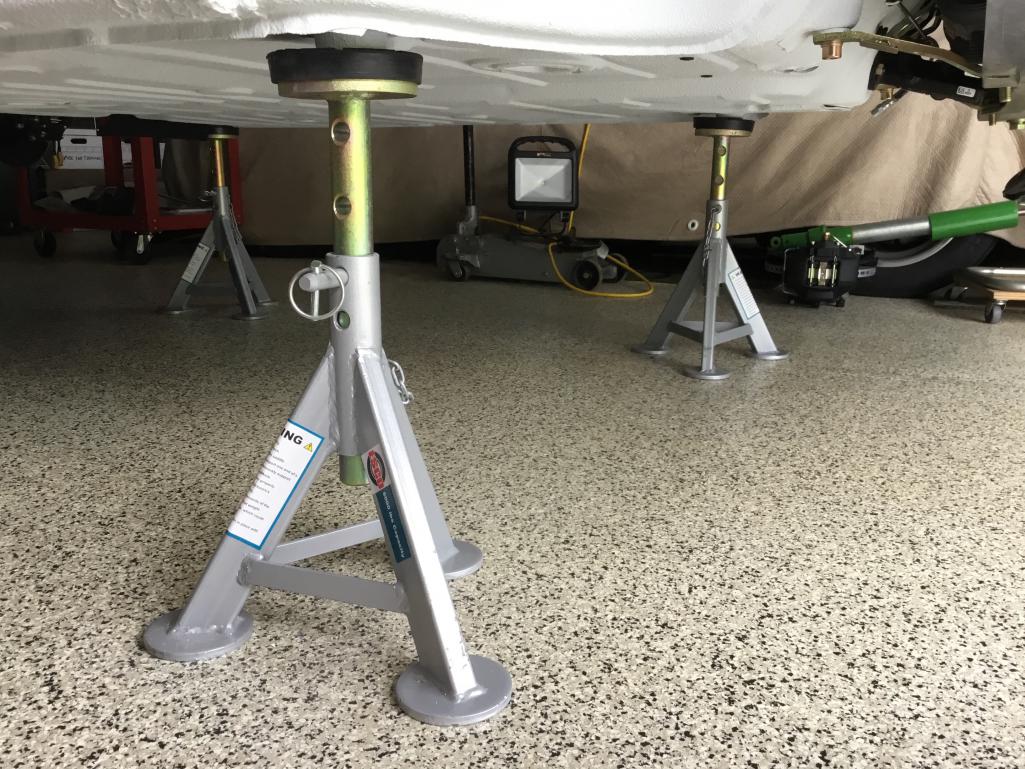 |
|
|
|
| raynekat |
Jul 4 2018, 11:18 PM
Post
#572
|
|
Advanced Member Group: Members Posts: 2,171 Joined: 30-December 14 From: Coeur d'Alene, Idaho Member No.: 18,263 Region Association: Pacific Northwest |
Always nice to have a good selection of fasteners on hand.
Some I already had. Lot's of new ones were purchased from Belmetric as well. 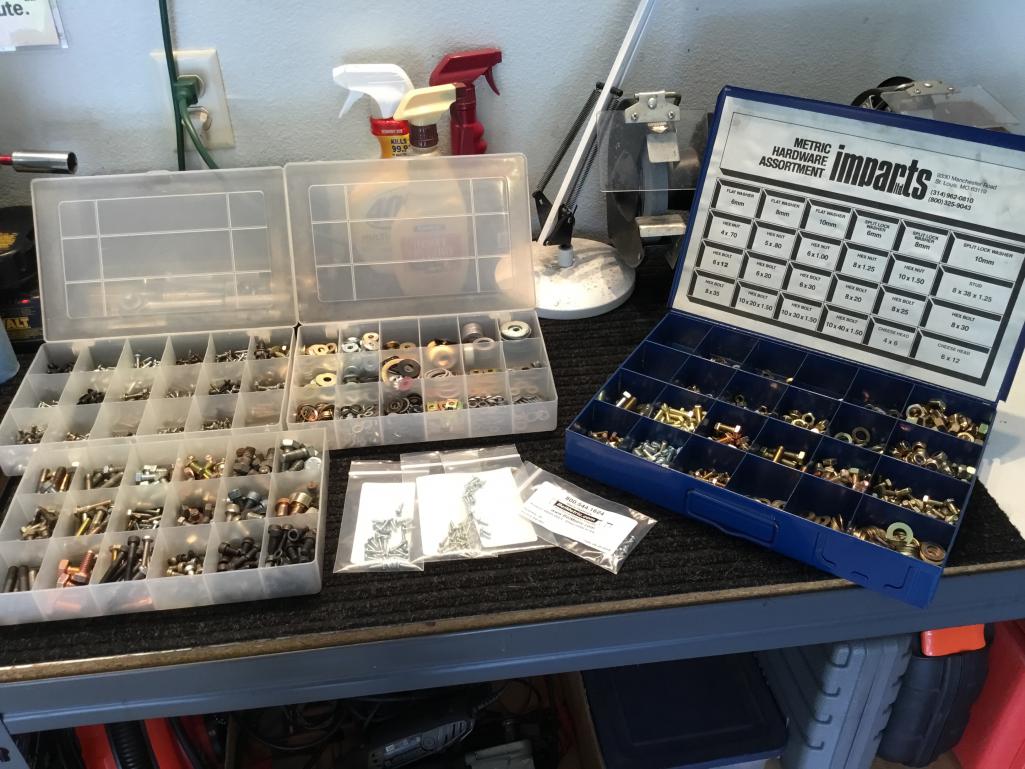 |
|
|
|
| raynekat |
Jul 4 2018, 11:24 PM
Post
#573
|
|
Advanced Member Group: Members Posts: 2,171 Joined: 30-December 14 From: Coeur d'Alene, Idaho Member No.: 18,263 Region Association: Pacific Northwest |
Money shot from underneath the car.
Love all that pristine white Raptor bedliner. 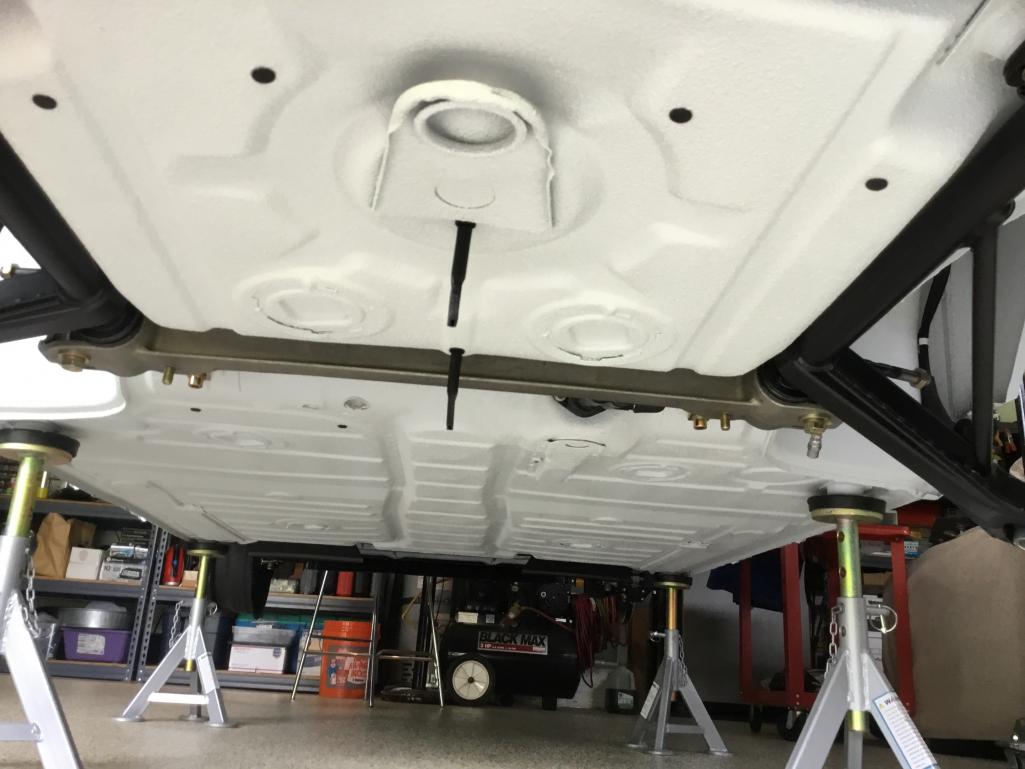 View of the front suspension cavity with the aluminum cross member bolted in place with the steering box on top. 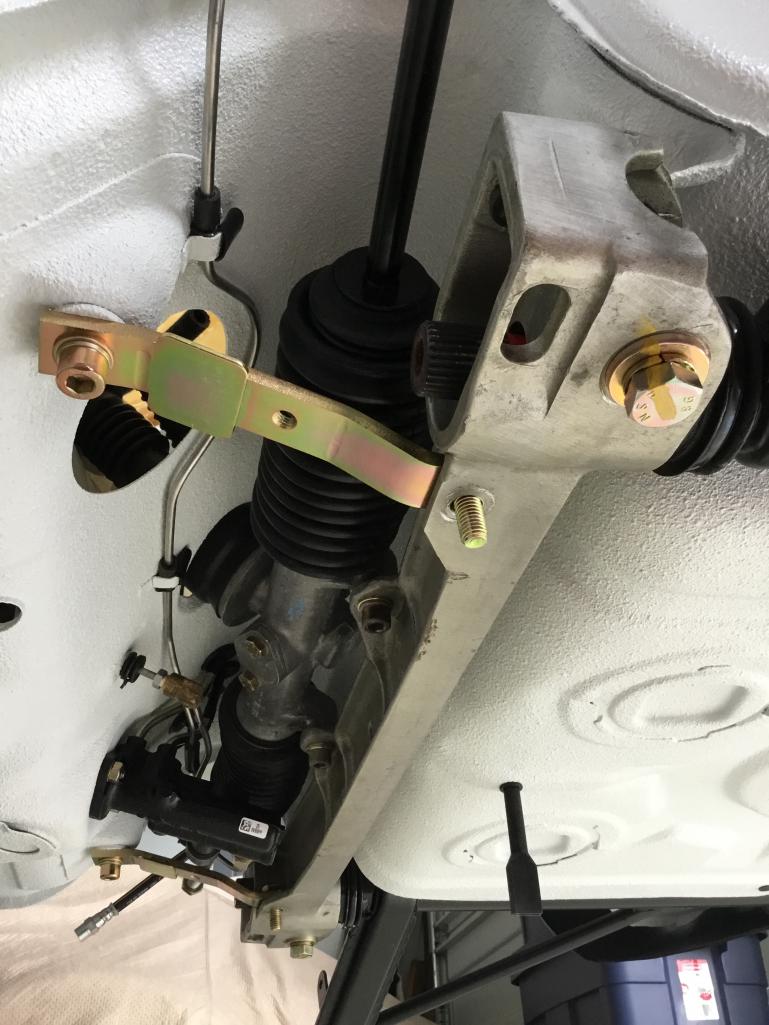 |
|
|
|
| raynekat |
Jul 4 2018, 11:28 PM
Post
#574
|
|
Advanced Member Group: Members Posts: 2,171 Joined: 30-December 14 From: Coeur d'Alene, Idaho Member No.: 18,263 Region Association: Pacific Northwest |
View of the passenger side suspension going together.
Elephant Racing front sway bar and rubber bushings in the control arm. Lemforder ball joints. Stainless steel brake lines from PMB. 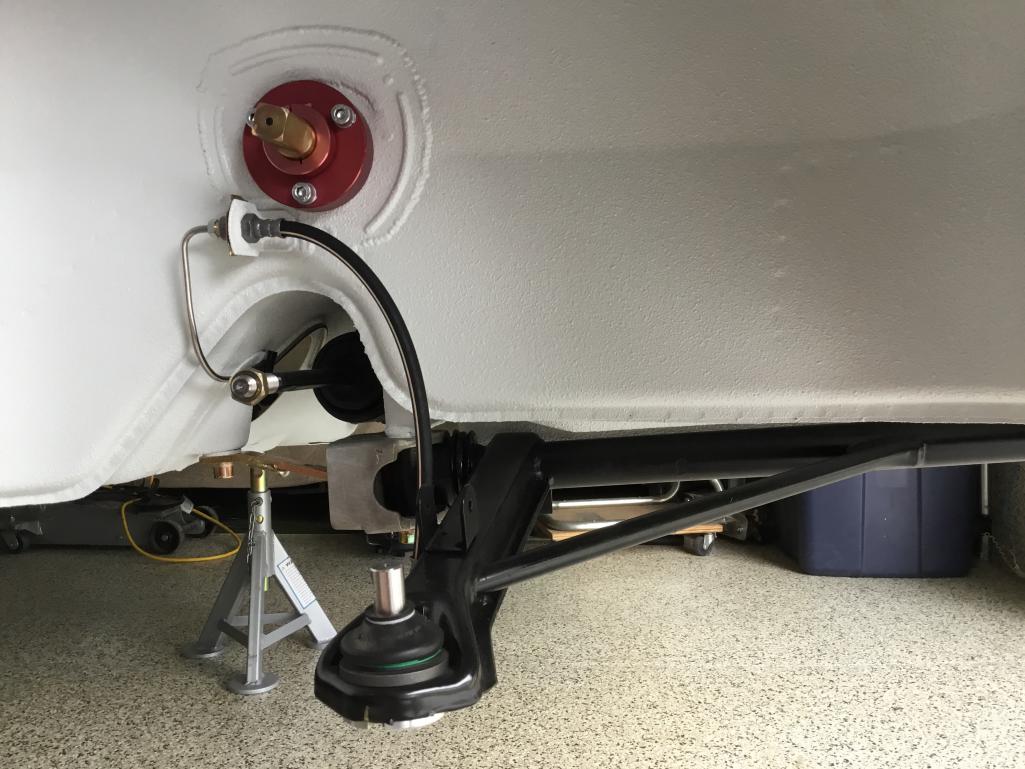 |
|
|
|
| raynekat |
Jul 4 2018, 11:31 PM
Post
#575
|
|
Advanced Member Group: Members Posts: 2,171 Joined: 30-December 14 From: Coeur d'Alene, Idaho Member No.: 18,263 Region Association: Pacific Northwest |
View of the new 19mm ATE master cylinder snuggled away in it's home....
Again, all the brake lines are new stainless steel from PMB. 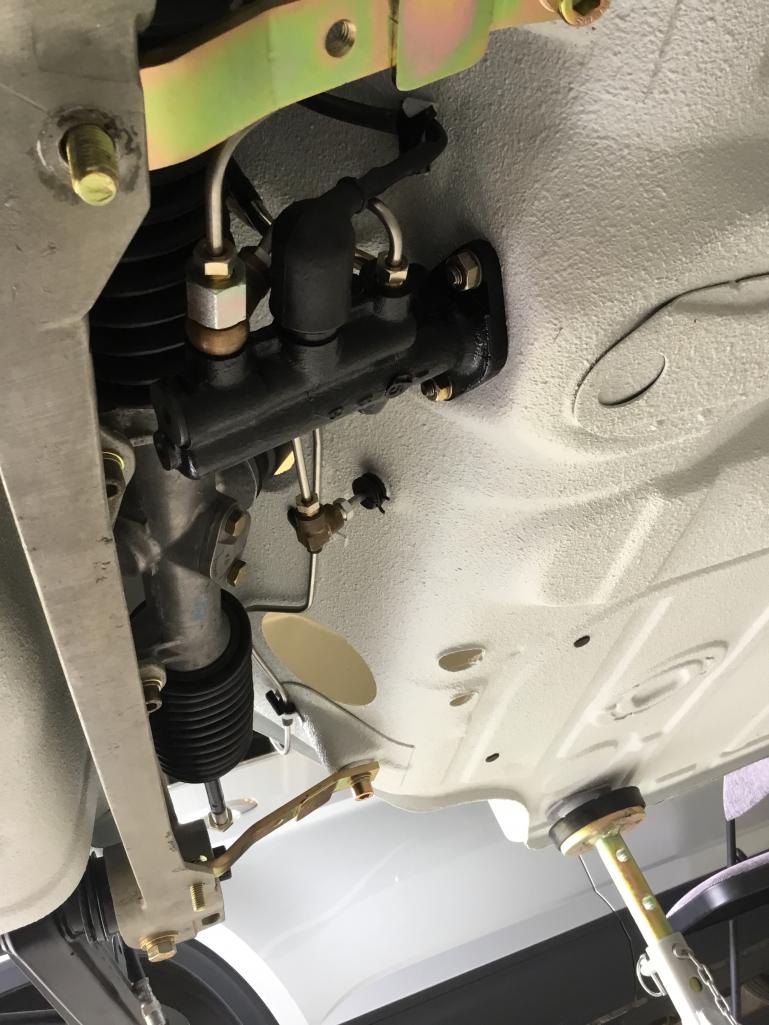 |
|
|
|
| raynekat |
Jul 4 2018, 11:36 PM
Post
#576
|
|
Advanced Member Group: Members Posts: 2,171 Joined: 30-December 14 From: Coeur d'Alene, Idaho Member No.: 18,263 Region Association: Pacific Northwest |
Front suspension completed.
Struts are RSR units from Elephant Racing with the raised spindles. Inserts are heavy duty Bilstein. Won't make use of the coil over capability at this time. We've got 19mm Sway-A-Way torsion bars in the front for now. Aluminum S calipers rebuilt with "custom" black anodizing. Only one on the block with a set of these I think. Behind you can see the rest of the front sway bar assembly along with the additional stiffening plate for where the sway bar attaches to the body. One note on the front control arms. My initial installation of the rubber bushings was not good enough as I had trouble getting them all the way on....didn't get them 100% seated. This meant the control arms would not go on the car and necessitated me removing them and reinstalling a new set of bushings. This time I used 914 Rubber's method of using the threaded rod down the middle vs some kind of Frankenstein pipe clamp that I had used before. Bushings went on all the way this time. It is very important to get them started straight and then there really aren't too many issues getting the bushings fully seated. 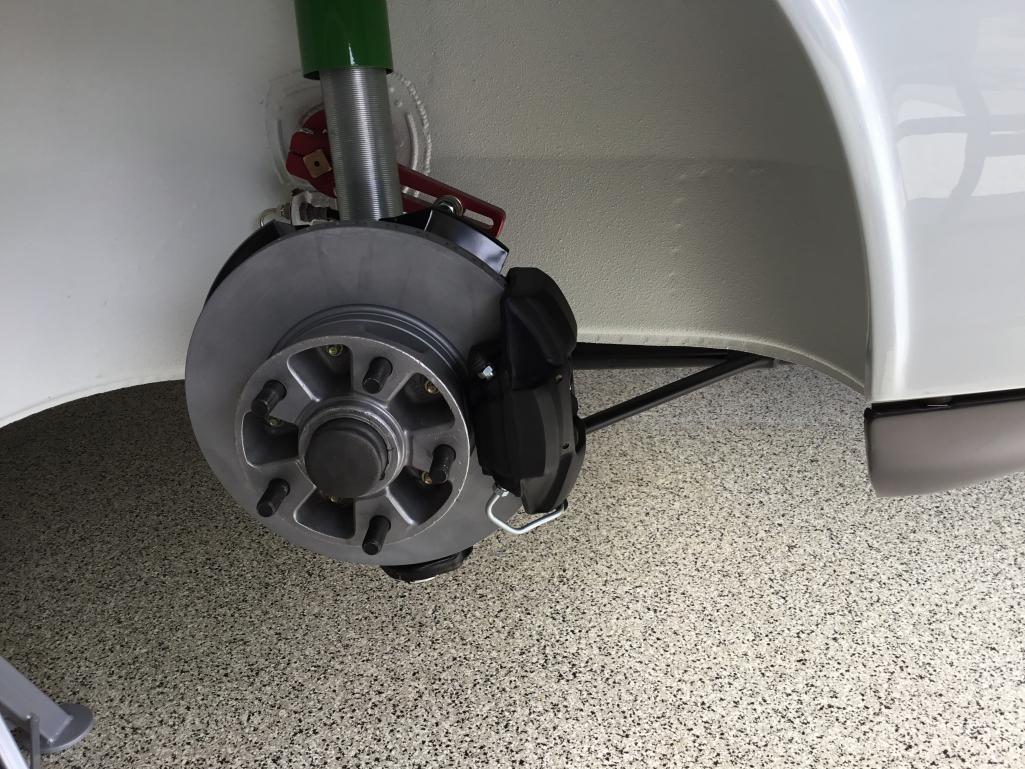 |
|
|
|
| raynekat |
Jul 4 2018, 11:40 PM
Post
#577
|
|
Advanced Member Group: Members Posts: 2,171 Joined: 30-December 14 From: Coeur d'Alene, Idaho Member No.: 18,263 Region Association: Pacific Northwest |
On the rear, we have our 914-6 GT brake setup.
Combined effort from 914 Rubber and PMB. Wasn't sure I was going to get the backing plate in there....but in the end, the correct combination of the right thickness washers did the trick. Vented brakes for the rear with PMB's black plating to match the front calipers. Behind, you can almost see the Bilstein struts/springs from Elephant Racing. I'll get better pics of those in the next day or two. 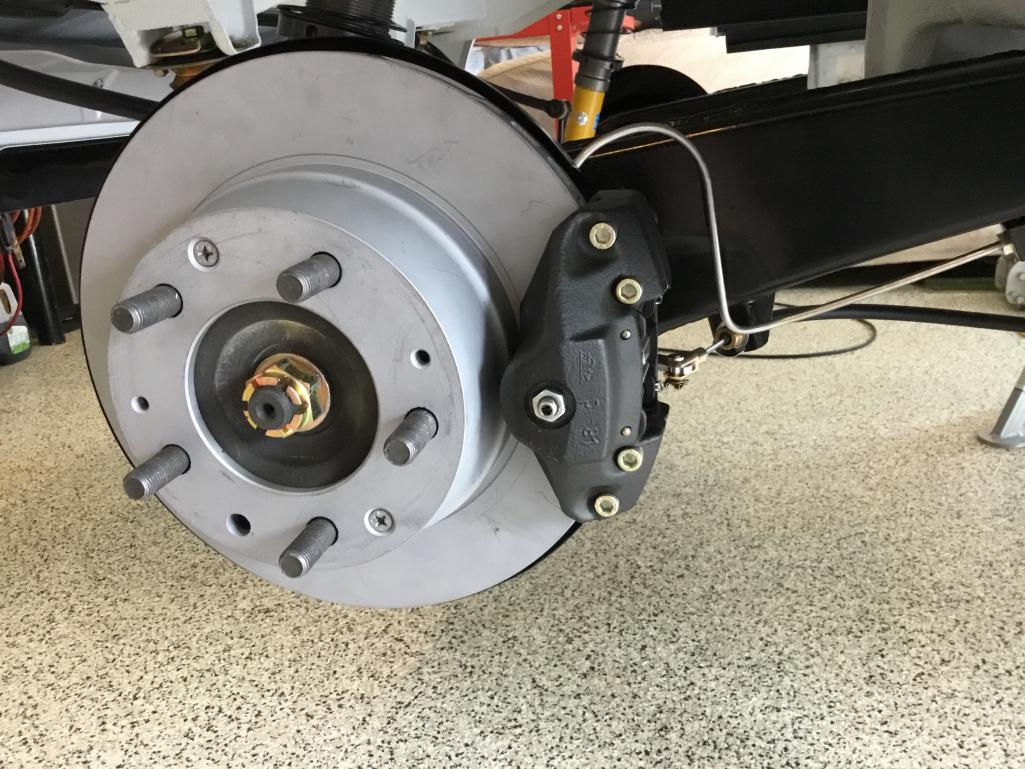 |
|
|
|
| raynekat |
Jul 4 2018, 11:45 PM
Post
#578
|
|
Advanced Member Group: Members Posts: 2,171 Joined: 30-December 14 From: Coeur d'Alene, Idaho Member No.: 18,263 Region Association: Pacific Northwest |
A job I wouldn't wish on my worst enemy....reinstalling the vapor recovery lines.
Found the correct size rubber grommets on Ebay. The existing lines were in good shape, just needed some cleaning up. New fuel hoses for the junctions. Pulled them both from the engine bay. Nearly took the hide off both hands, but somehow got them in. Royal PITA job for sure. Copious amounts of silicon spray lube was used in this job. 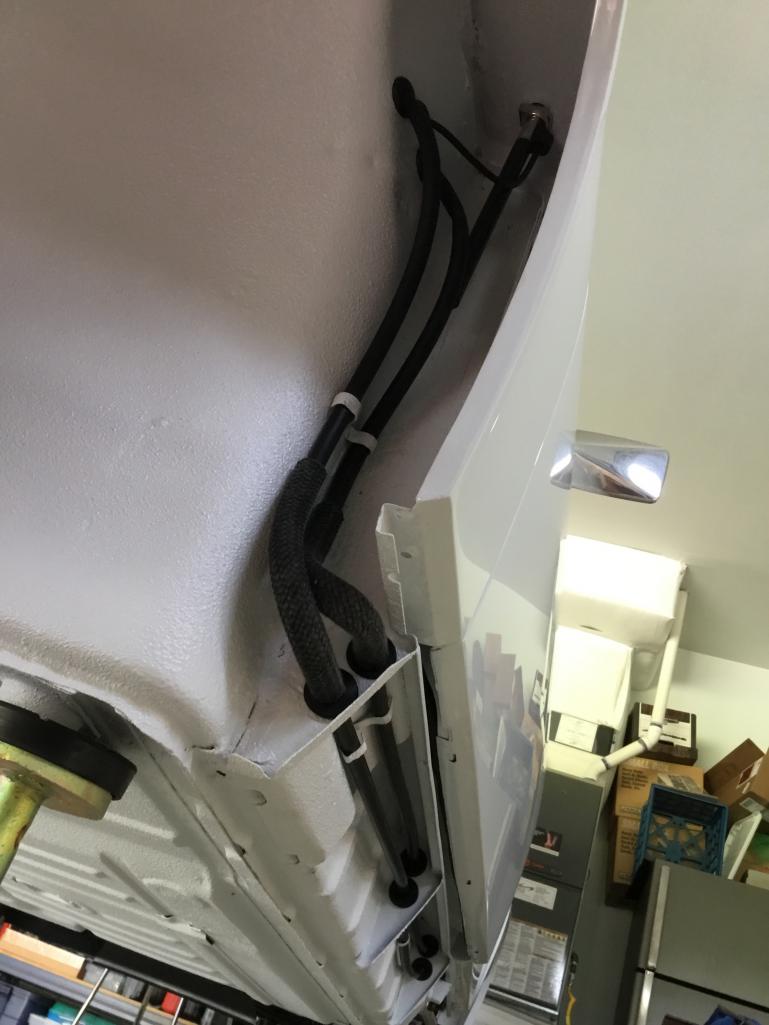 View of the passenger side rocker panel installed. I went with screws on the top instead of rivets so they could be easily removed in the near future.  |
|
|
|
| raynekat |
Jul 4 2018, 11:51 PM
Post
#579
|
|
Advanced Member Group: Members Posts: 2,171 Joined: 30-December 14 From: Coeur d'Alene, Idaho Member No.: 18,263 Region Association: Pacific Northwest |
Installation of 914 Rubber's vinyl targa/sail panel kit.
Along with all new factory trim. Still waiting for the long piece that goes along the backside from my plater guy. 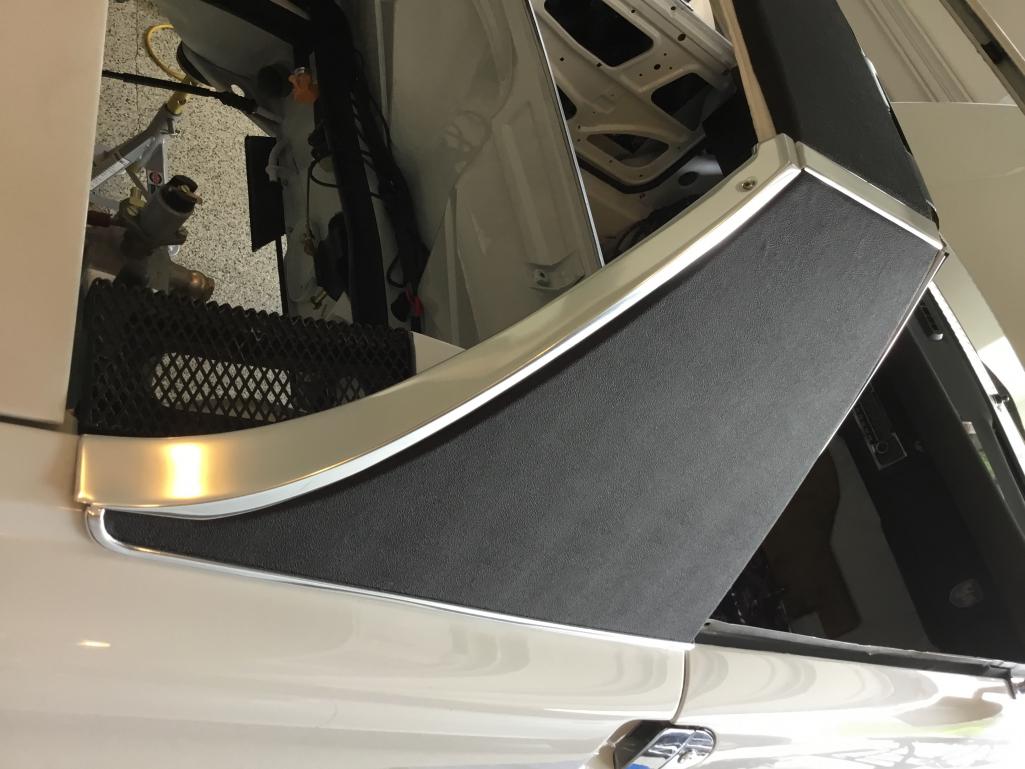 Another view. This job definitely takes a bit of pre-planning and mocking up, such that you cut the vinyl correctly. The 3M 90 contact cement really earned it's keep here. Great product. 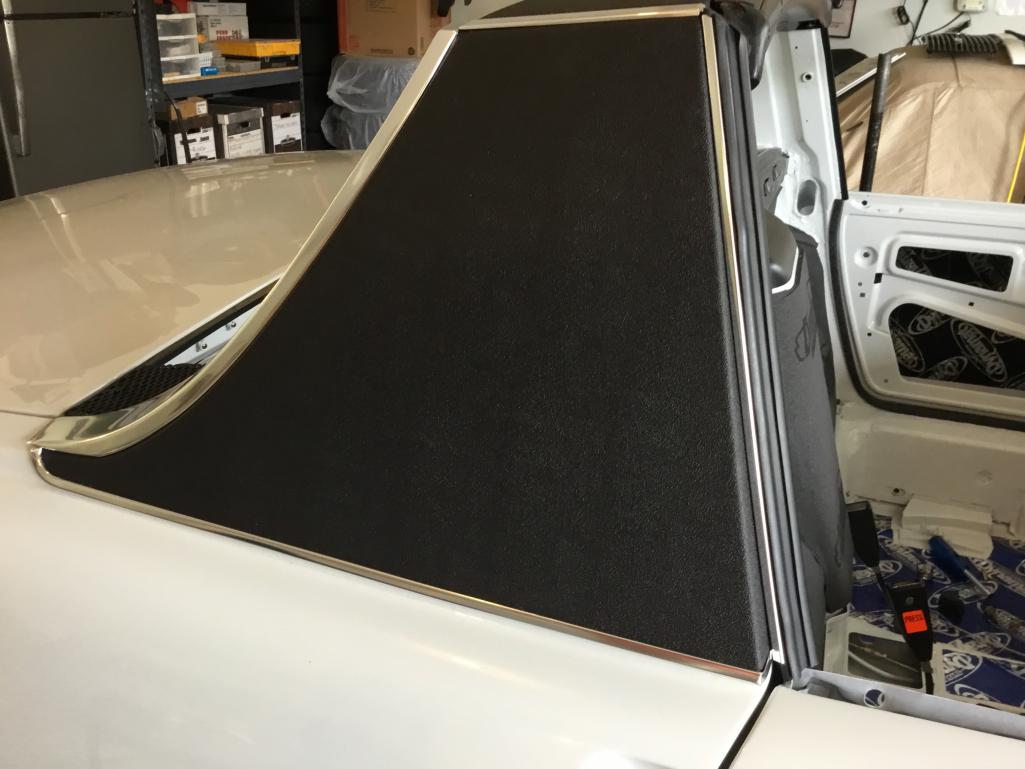 |
|
|
|
| raynekat |
Jul 4 2018, 11:57 PM
Post
#580
|
|
Advanced Member Group: Members Posts: 2,171 Joined: 30-December 14 From: Coeur d'Alene, Idaho Member No.: 18,263 Region Association: Pacific Northwest |
The only trouble I had with the targa/sail panel trim install was this little clip here....
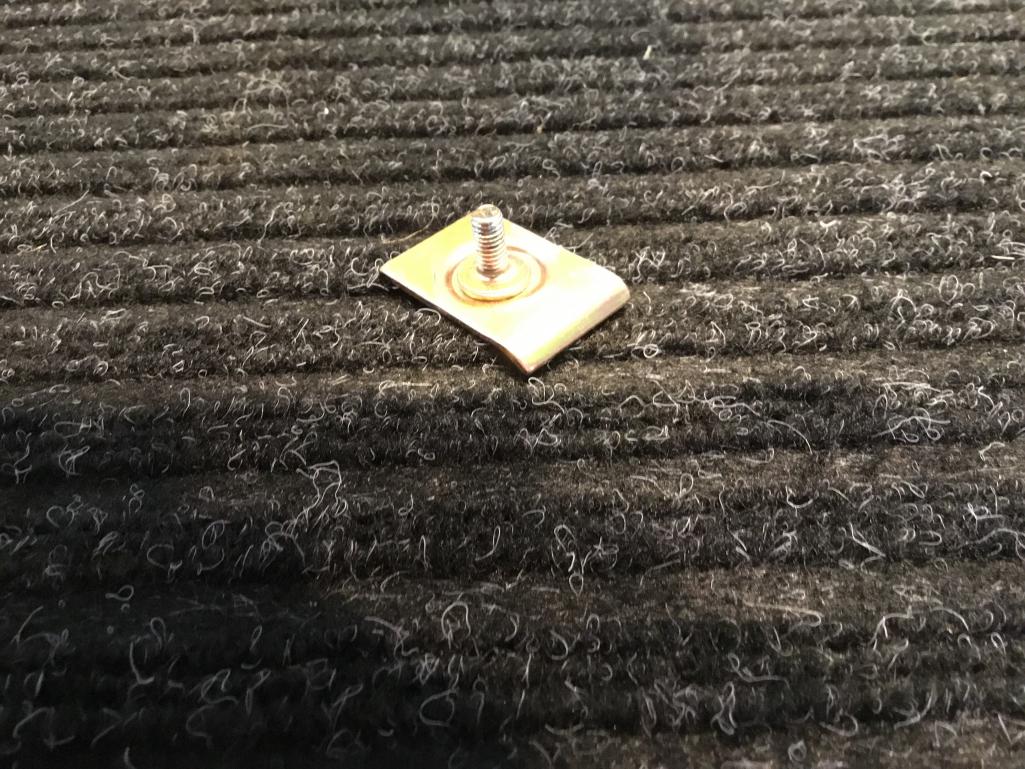 Horrid design in my opinion. Either the clip is not wide enough or the flanges on the trim piece aren't wide enough. The clip just wouldn't hold the trim well enough for my liking. So I put together my own design that was similar, but wider and with a longer stud. Grabs ahold of the trim much better and with the longer stud, easier to put on. Sorry I don't have a pic of mine, but just imagine the factory one but a bit wider. One important note for all you 914-6 guys with the oil tank. You have to install this trim before you put in the tank as the tank is completely in the way of any reasonable access to get the washer/nut on the trim clip. I needed to take out the tank anyway to install the oil line that exists the bottom of the tank....no way to tighten that guy up with the tank in the car. |
|
|
|
|
2 User(s) are reading this topic (2 Guests and 0 Anonymous Users)
0 Members:

|
Lo-Fi Version | Time is now: 18th July 2026 - 02:57 AM |
Invision Power Board
v9.1.4 © 2026 IPS, Inc.