|
|
|
Porsche, and the Porsche crest are registered trademarks of Dr. Ing. h.c. F. Porsche AG.
This site is not affiliated with Porsche in any way. Its only purpose is to provide an online forum for car enthusiasts. All other trademarks are property of their respective owners. |
|
|

  |

| 914forme |
 Sep 2 2018, 06:35 AM Sep 2 2018, 06:35 AM
Post
#661
|
|
Times a wastin', get wrenchin'!  Group: Members Posts: 3,899 Joined: 24-July 04 From: Dayton, Ohio Member No.: 2,388 Region Association: None |
Love the build, not sure why I have not been following this one. And I try to stay off the early 911S board because I do not need to feed this addiction any more than I do all ready. And you point out that thread. (IMG:style_emoticons/default/headbang.gif)
My arthritis is acting up today barely move my left wrist so it might be a good day to rest and think, and read and dream. So keep the details idea going I like it. (IMG:style_emoticons/default/aktion035.gif) BTW, do you fit in your car with a helmet on. I am roughly your size and trying to find seats for my build(s). I have to pull the bottom cushion out of the stock seat to get me down with a helmet on. |
   |

 
|
| raynekat |
Sep 2 2018, 10:31 PM
Post
#662
|
|
Advanced Member Group: Members Posts: 2,171 Joined: 30-December 14 From: Coeur d'Alene, Idaho Member No.: 18,263 Region Association: Pacific Northwest |
QUOTE(914forme @ Sep 2 2018, 05:35 AM)  Love the build, not sure why I have not been following this one. And I try to stay off the early 911S board because I do not need to feed this addiction any more than I do all ready. And you point out that thread. (IMG:style_emoticons/default/headbang.gif) My arthritis is acting up today barely move my left wrist so it might be a good day to rest and think, and read and dream. So keep the details idea going I like it. (IMG:style_emoticons/default/aktion035.gif) BTW, do you fit in your car with a helmet on. I am roughly your size and trying to find seats for my build(s). I have to pull the bottom cushion out of the stock seat to get me down with a helmet on. Have only sat in the passenger seat, but it seemed like I did have some inches of headroom. When I get the driver seat in, I'll jump in with my helmet and see what gives. I would like to autocross this car and track it occasionally, so it would be nice to do that without removing the top (especially for track days). |
|
|
|
| raynekat |
Oct 5 2018, 05:31 PM
Post
#663
|
|
Advanced Member Group: Members Posts: 2,171 Joined: 30-December 14 From: Coeur d'Alene, Idaho Member No.: 18,263 Region Association: Pacific Northwest |
Been taking a bit of a hiatus from the 914 assembly due to a number of things....
Frustration factor was getting too high with some of the aspects of the assembly. Mainly the windshield install, door and top seals. All giving me fits due to fitment issues, etc. Also life was getting a bit hectic between the 16 mo old twins, working on the yard and taking in the occasional golfing match. At least on all of those fronts things are great. The twins are doing marvelously, the major yard work is done for the year, and besides winning the fall tournament with the men's club and got my first hole-in-one. So refreshed, I'm back on the assembly of this little monster of a car. With the new lithium battery hooked up, I began slowly checking out all of the electrical system that I could without the drivetrain currently being installed. Well heck....no horns. Ran the horns directly off the battery and nada with either of them. I've got the early Hella horns that are made of bakelite and have both a high and low tone horn. 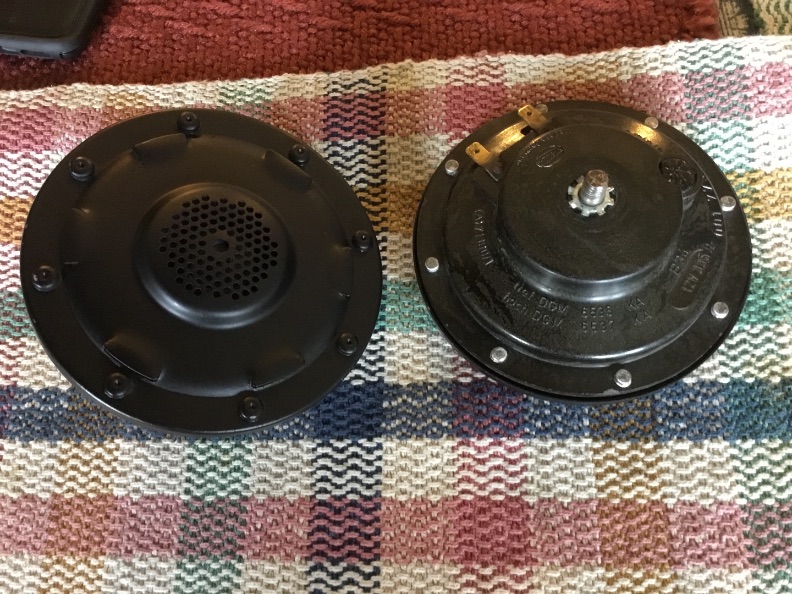 I drilled out the 8 rivets that hold the halves together and voila....the innards of an early Hella horn. Basically you have a magnetic coil and a set of points (like in your distributor). The problem with mine was the points had corroded up (or developed a skin on the contact patch) and this was preventing the electrical current from passing. When I put a multimeter across the two connections on the back, I got an open circuit. A quick clean up of the points and I could read about 2 ohms across the connections. Testing them with the battery again and we had noise. (IMG:style_emoticons/default/aktion035.gif) 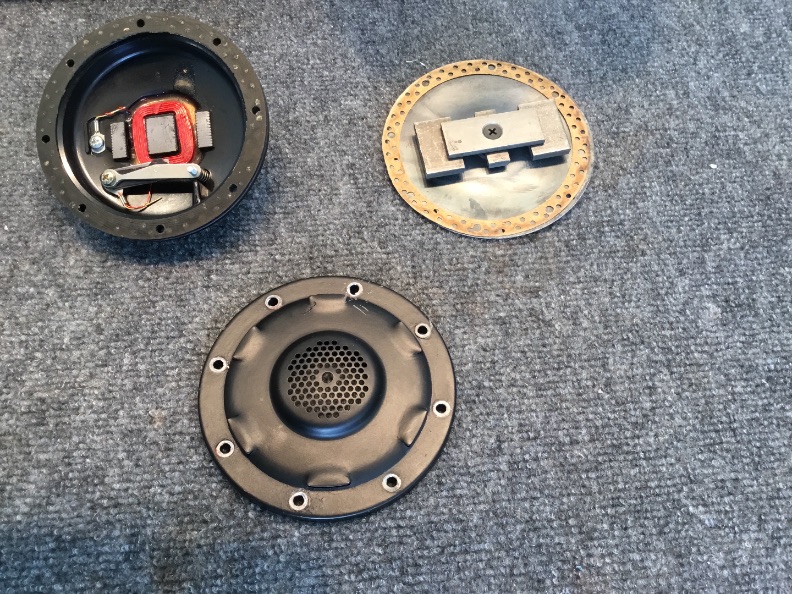 Here is a close look at where the points that usually cause the problem are located.  A quick coat of black satin paint for the front of the horns and a set of M4 screws with nylock nuts completed the assembly of the horns. And do they sound great....and mega loud. Perfect. As an added bonus, I found a couple more non-operating sets of these early horns on Ebay and TheSamba for very little money, and performed the exact same fix. Guess these contact points inside are the number one issue when these types of horns cease to function. So I've got 2 sets of backup horns for the car (will likely put one set up for sale here at 914World over the winter). |
|
|
|
| raynekat |
Oct 5 2018, 05:37 PM
Post
#664
|
|
Advanced Member Group: Members Posts: 2,171 Joined: 30-December 14 From: Coeur d'Alene, Idaho Member No.: 18,263 Region Association: Pacific Northwest |
Pic of the twins (Sadie and Derek) at about 16 months. They really are something.
 What the end result of a 145 yd hole-in-one looks like. Was nice not to need a putter on this hole.  |
|
|
|
| raynekat |
Oct 5 2018, 06:14 PM
Post
#665
|
|
Advanced Member Group: Members Posts: 2,171 Joined: 30-December 14 From: Coeur d'Alene, Idaho Member No.: 18,263 Region Association: Pacific Northwest |
Got all the lights on the rear fired up....
Went with the LED's from Spokewerks. They are simply incredible. Very bright, easy to install, run much cooler than the standard bulbs which can melt the housings if you use the wrong ones). Kind of a "no brainer" upgrade to me. Every 914 should have a set of these on the back for increased visibility. 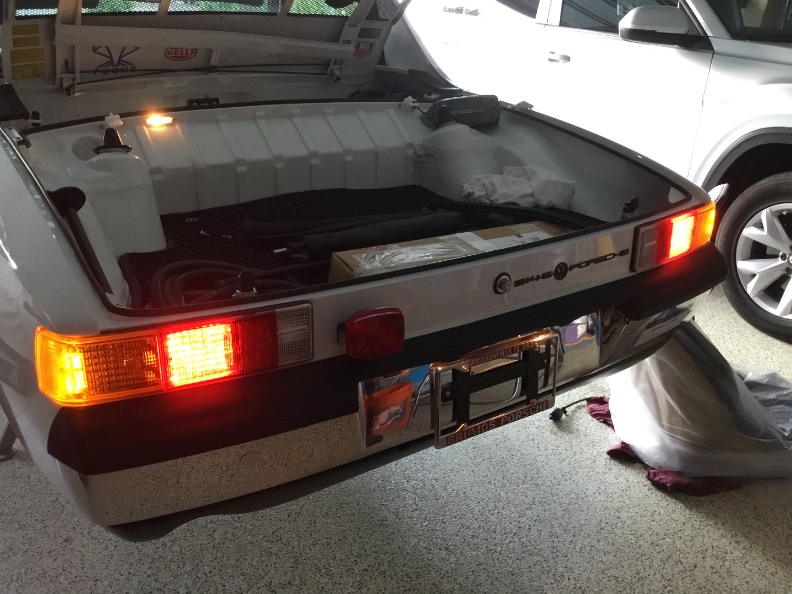 The rear fog is awesome as well. Put together this with a light a found on Ebay (black housing), factory wiring harness and the mounting bracket that was offered here on 914World. Again, another great mod/addition for increased visibility by those following you during the day or night. 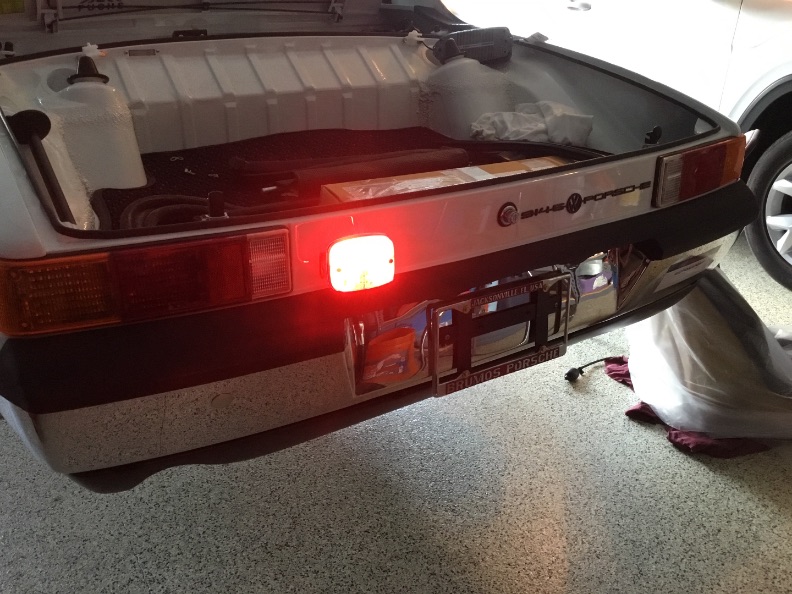 |
|
|
|
| raynekat |
Oct 5 2018, 06:25 PM
Post
#666
|
|
Advanced Member Group: Members Posts: 2,171 Joined: 30-December 14 From: Coeur d'Alene, Idaho Member No.: 18,263 Region Association: Pacific Northwest |
For the front, we are going Euro lighting as well as the rear.
The turn signals are functioning units built by Martin Baker here on this forum. I'm really liking the clear (Italian) side marker lens as it goes quite well with the Euro turn signal lens I think. 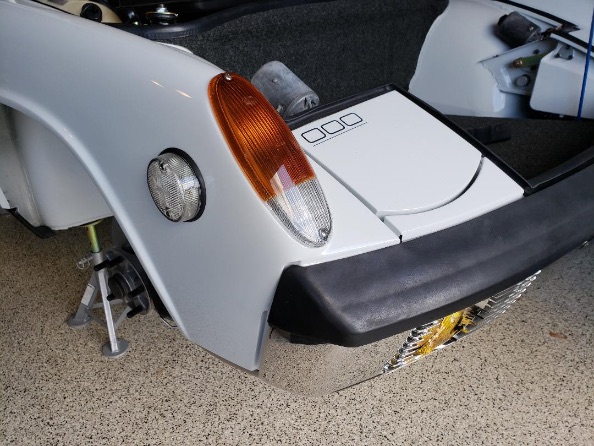 Here they are lit up. 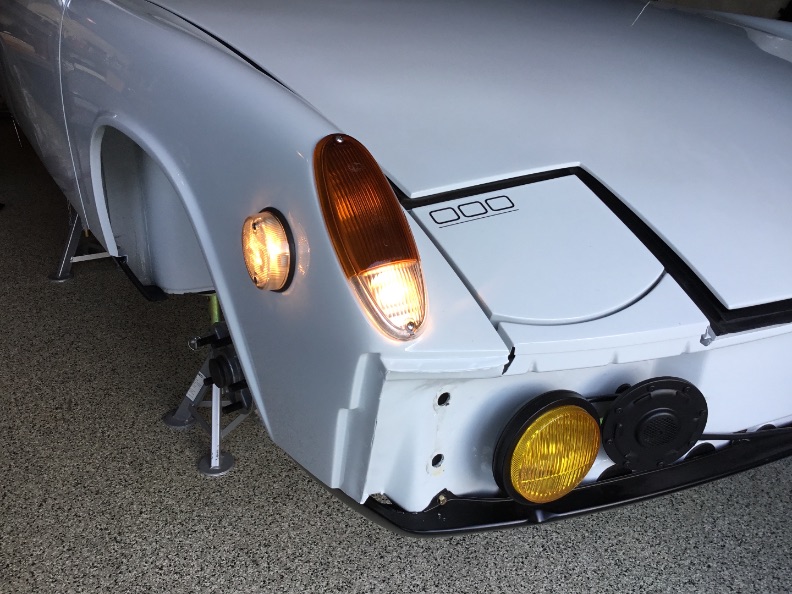 Finally, the full shebang with the headlights and yellow fogs. The fogs are factory lights. The headlights have the LED upgrade from 914Rubber. They are quite bright and very white (not yellow like most car headlights). Still working on the high beams (and indicator)....those aren't working yet. When you pull the stalk, you get the click, but the high beams don't illuminate and the blue high beam indicator is dark. I did install one of those JWest fog light modules for flashing your fogs, so perhaps I've got some wiring in the wrong place. Could be my flasher module is dead as well....although my turn signals and emergency flashers all work fine. We be troubleshooting all this. 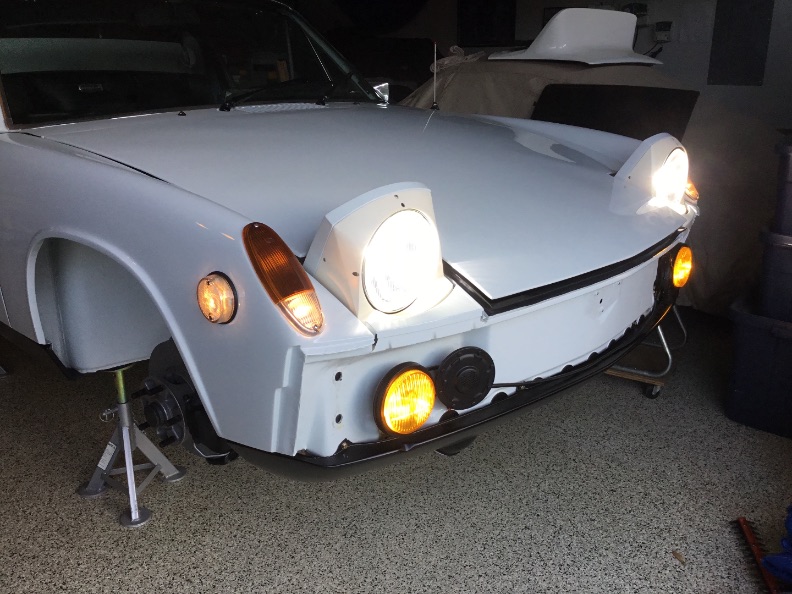 My interior lights, license plate lights and rear trunk light didn't work at first. It was all wrong polarity with the wiring. Went with an LED for the interior....very cool looking bulb for sure. 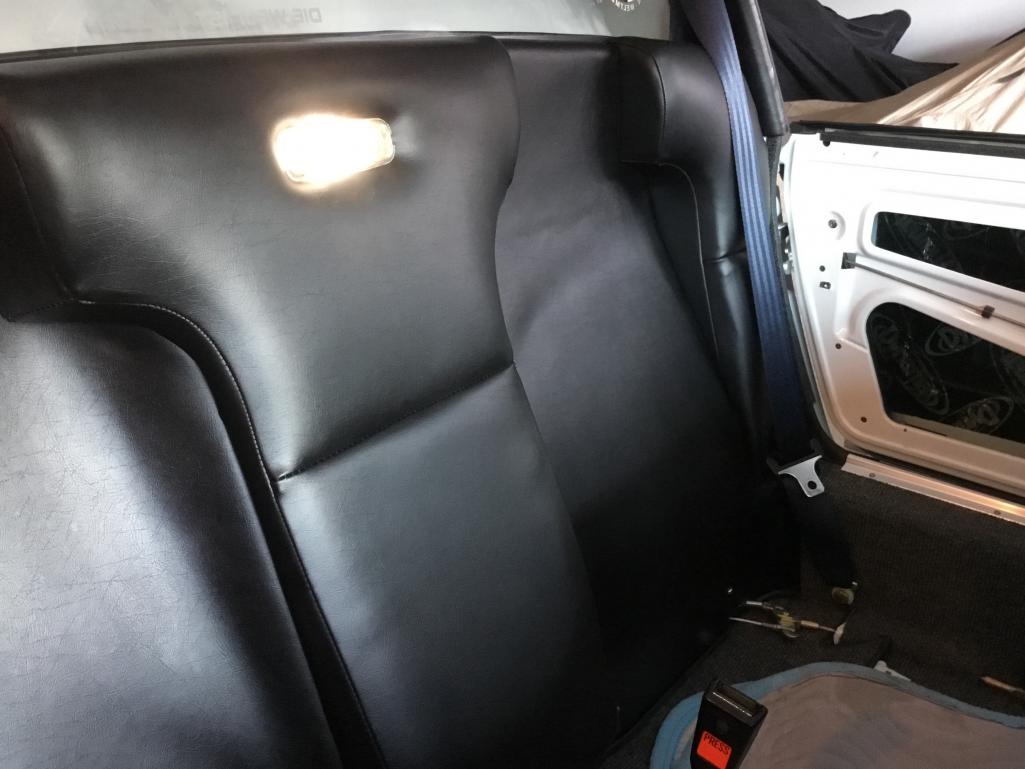 |
|
|
|
| DRPHIL914 |
Oct 5 2018, 06:35 PM
Post
#667
|
|
Dr. Phil Group: Members Posts: 5,952 Joined: 9-December 09 From: Kennesaw, GA Member No.: 11,106 Region Association: South East States |
get with Mark or Matt about the high beams not working. the first ones i got from m him didnt work on high either- its something to do with the voltage or something in the LeD controller, anyway he will send you a different set that will work.
Phil |
|
|
|
| raynekat |
Oct 5 2018, 10:54 PM
Post
#668
|
|
Advanced Member Group: Members Posts: 2,171 Joined: 30-December 14 From: Coeur d'Alene, Idaho Member No.: 18,263 Region Association: Pacific Northwest |
Couple more pics of the lighting head on.
As a side note, the alignment of the headlight door and eyebrow didn't take all that long due to the inferior fit of the fiberglass front hood....if that makes any sense or not? (IMG:style_emoticons/default/tongue.gif) 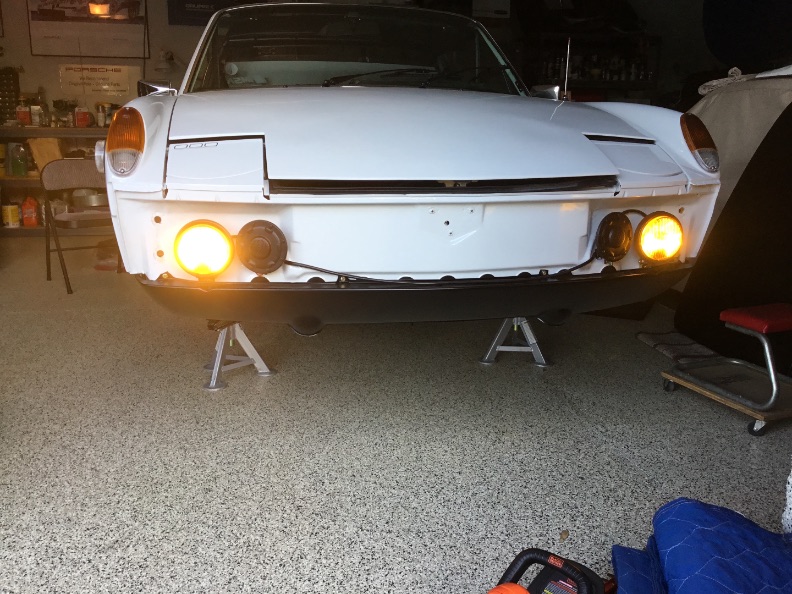 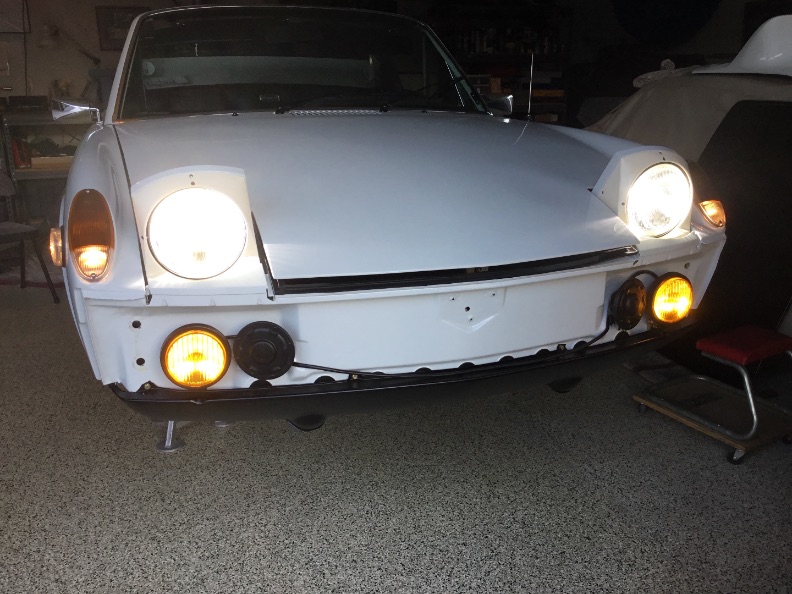 |
|
|
|
| raynekat |
Oct 6 2018, 02:39 PM
Post
#669
|
|
Advanced Member Group: Members Posts: 2,171 Joined: 30-December 14 From: Coeur d'Alene, Idaho Member No.: 18,263 Region Association: Pacific Northwest |
QUOTE(DRPHIL914 @ Oct 5 2018, 05:35 PM) get with Mark or Matt about the high beams not working. the first ones i got from m him didnt work on high either- its something to do with the voltage or something in the LeD controller, anyway he will send you a different set that will work. Phil Thanks for the heads up. Turns out that the headlight relay (111 941 583A) that handles this is not functioning. I hooked up a test light to both the low and high beam outputs, and only the low beam output lights up the test light. So this mechanical relay is obviously stuck on the low beam side. I've ordered a couple of NOS relays off the The Samba and will have them this coming week hopefully. On to the next non-functioning and last thing on my electrical checkout list.....the fresh air blower. Didn't check the motor for function when I had it all apart, so it's likely that's something is amiss with the motor. I do get power at each of the 3 speed connections on the dash switch itself, so I don't think it's the switch. I've also switched out the blower relay for one that's known to work and that didn't do anything either. Probably a bad blower motor. A good thing is that the JWest foglight upgrade seems to working fine. You can turn on the front fogs without the headlight and you can flash the foglights with the stalk on the steering column with the headlights completely off. Pretty cool upgrade and easy to install. |
|
|
|
| raynekat |
Oct 8 2018, 05:14 PM
Post
#670
|
|
Advanced Member Group: Members Posts: 2,171 Joined: 30-December 14 From: Coeur d'Alene, Idaho Member No.: 18,263 Region Association: Pacific Northwest |
Today I removed the gas tank so that I could address both the inoperative fresh air blower and the wipers that were obviously put together incorrectly by yours truly.
Guess I've been in and around all the stuff in this front trunk enough that the removal was fairly straight forward. That one nut under the dash to remove the wiper assembly is always a bugger to get to. Step one, blower investigation. Started out by putting my multimeter on the four inputs and things just didn't make much sense in what I was reading. So I figured nothing lost at this point in taking it all apart and looking deeper. 6 circular clips pried off with a screwdriver and the 2 halves of the blower assembly were apart. I had previously taken out the 2 screws that hold the blower assembly into the airbox. Now I could see how things appeared to work. Seemed to read somewhere that sometimes the contact points get corroded up and don't make very good contact preventing the electrical current front getting through. This was starting to remind me of the horns and their problem. I cleaned up the 2 sets of points that were closest to the blower connector. Then I hooked some power up to the the power in on the blower motor and grounded the other 3 speed outputs one at a time. Everything seem to be working now. So a quick re-assembly of the blower motor into the air box and another bench test to see if the fan came on all 3 speeds.....bingo, it did. Next I plugged the chassis connector into the blower assembly/airbox to see if the dash controls would achieve the same successful results. They did...up to a point. My low speed on the dash gave me mid speed on the blower and the mid speed on the dash gave me low speed with the blower. So I flip-flopped those two wires coming into the dash controls and all was finally right with the blower. Take away from all of this. Don't assume everything will work even if it looks clean on an old car that you don't know the history on. This car was basically a basket case when I received it, although from the pics it might have looked OK. I've had to replace nearly everything with new or good 2nd hand besides fixing a bunch of items like this. If I'd done this while I was assembling the car, I wouldn't be doing this now and having to remove and reinstall a lot of parts. Step two, the wiper assembly. The wipers worked fine with the two speeds, but when you turned the wipers on they would go a short distance to the left before heading off to the right to clean the windshield. I had previously pulled the wiper assembly apart so I could repaint the frame itself. Obviously when I reinstalled the wiper motor into the frame I had mis-clocked some of the linkage. On the bench I hooked the motor up to a power source and watched the linkage do it's thing. It became pretty clear that the one short linkage that actually attaches to the motor was not on correctly. Moving it a bit and tightening back the one nut brought the desired results. Now when you turn the wiper switch on, the wiper blades go directly right to clean the windshield as they should. All that's left now is reinstall the wiper motor assembly, fresh air blower box and fuel tank. One of the clips that holds the control cable onto the fresh air blower box broke so I'm waiting for some replacements to show up. After I get the above completed and the new headlight relay installed, all the electrical items have then been tested, replaced or fixed to function as they're supposed to. A note about the broken air box cable clip. This was the 3rd spring steel clip that broke on me after getting them all re-plated in yellow zinc. I've talked with the guy who does my plating and he's swears that his shop does all the correct post plating heat treating. At this point, I don't believe it. One part might have been chance....but not 3 spring steel parts. (IMG:style_emoticons/default/confused24.gif) Something is amiss with their process. Either no heat treating or not doing it soon enough after plating. I'm looking for a new plater. (IMG:style_emoticons/default/ar15.gif) Next on the to-do list it the installation of the 914Rubber main targa seal and attempt to get the doors, windows and seals all correctly aligned and fitting nice and snug. |
|
|
|
| raynekat |
Oct 15 2018, 11:02 PM
Post
#671
|
|
Advanced Member Group: Members Posts: 2,171 Joined: 30-December 14 From: Coeur d'Alene, Idaho Member No.: 18,263 Region Association: Pacific Northwest |
Knocking out some items on the punch list.
1st up....no hi beams. I'd previously taken a test light to the hi and low outlets from the combination relay that is tucked up under the dash on the fuse panel. Power from the low side but no power from the hi side. Seemed like the original relay had given up the ghost. Reading on this website about some going with an "electronic" relay vs the original mechanical relay, I still opted to replace with an OEM style mechanical relay. Luckily I found a couple of NOS relays on The Samba, so I bought two thinking at least one of them had to work and possibly I'd have a spare as well. The relays finally showed up and they looked showroom new. 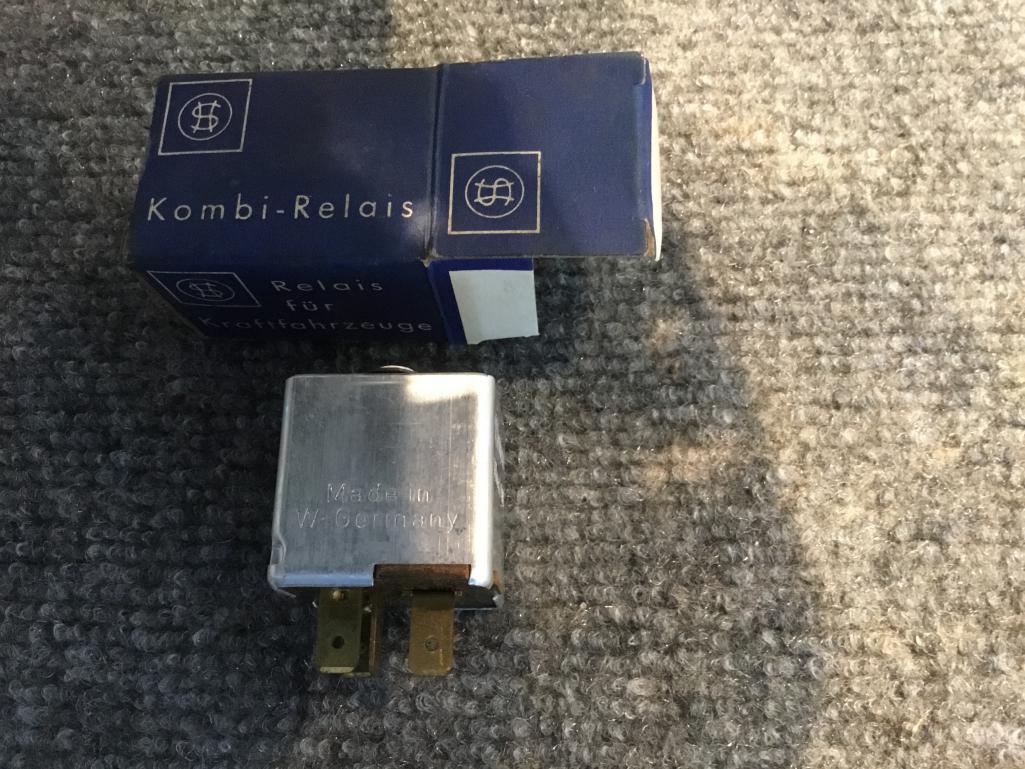 After a quick swap, out with the old and in with the new, I had hi beams again with the telltale blue light on the dash as well. The LED bulb kit from 914Rubber sure does look nice and will surely light up the road in great fashion too. 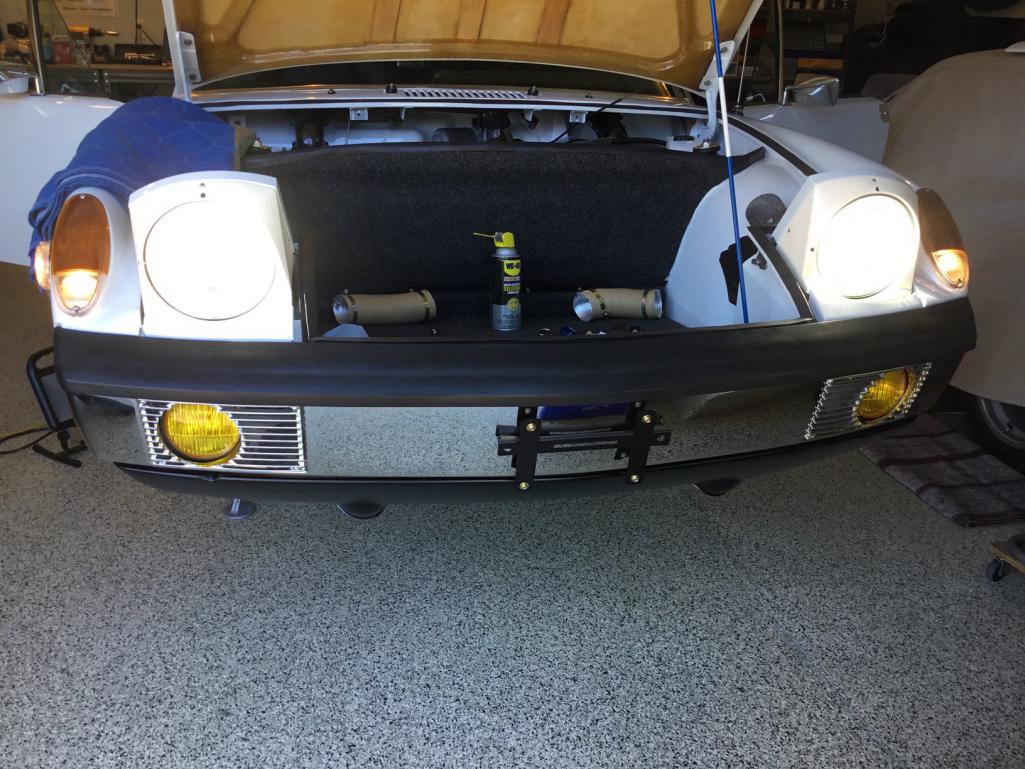 |
|
|
|
| raynekat |
Oct 15 2018, 11:15 PM
Post
#672
|
|
Advanced Member Group: Members Posts: 2,171 Joined: 30-December 14 From: Coeur d'Alene, Idaho Member No.: 18,263 Region Association: Pacific Northwest |
Next up on the punch list was reinstalling the fresh air blower after getting the motor to work on all 3 speeds.
When I previously tried to install the blower, the clip that holds the control cable broke. Arghhh So I ordered a couple more 2nd hand clips from my friends at RetroAutomotive. Ready to get the control cable hooked up and the assembly back in place. 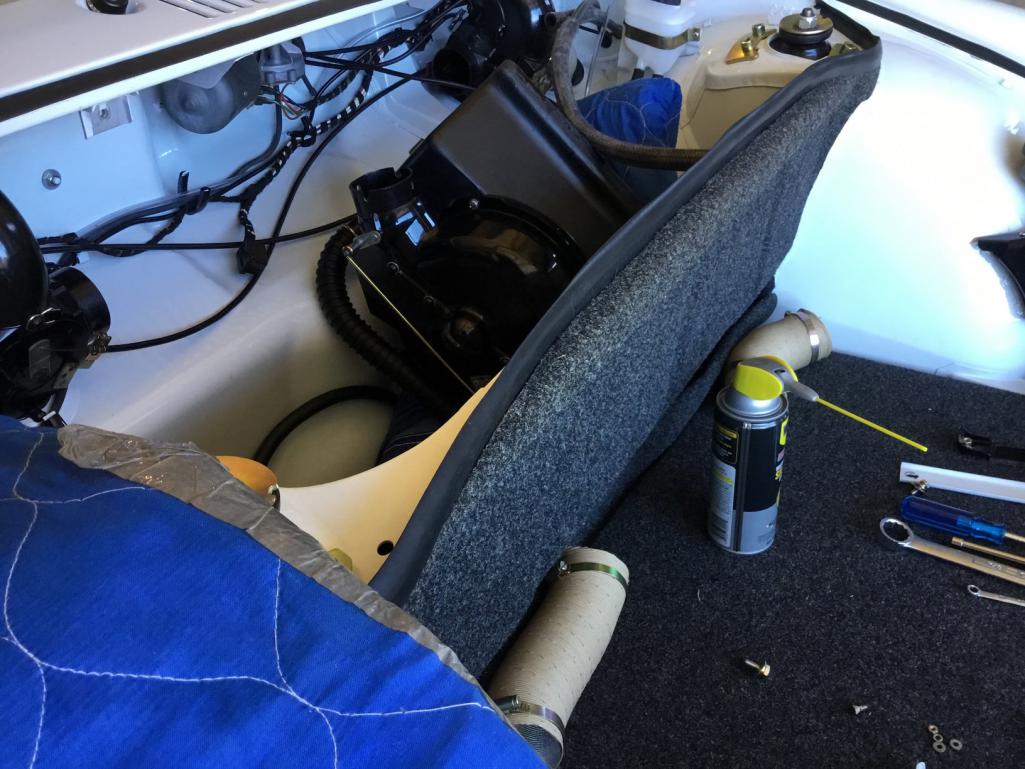 They finally arrived, so I could reinstall the blower assembly. It was just as big a PITA as the 1st time. You definitely have to install the control cable before sliding the blower assembly up into place....no way to get at that after the fact. Finally on my 3rd try the blower assembly was in place and I tightened up the two bolts that hold it in. So here we are again with the fresh air ventilation and heating system all back in place. 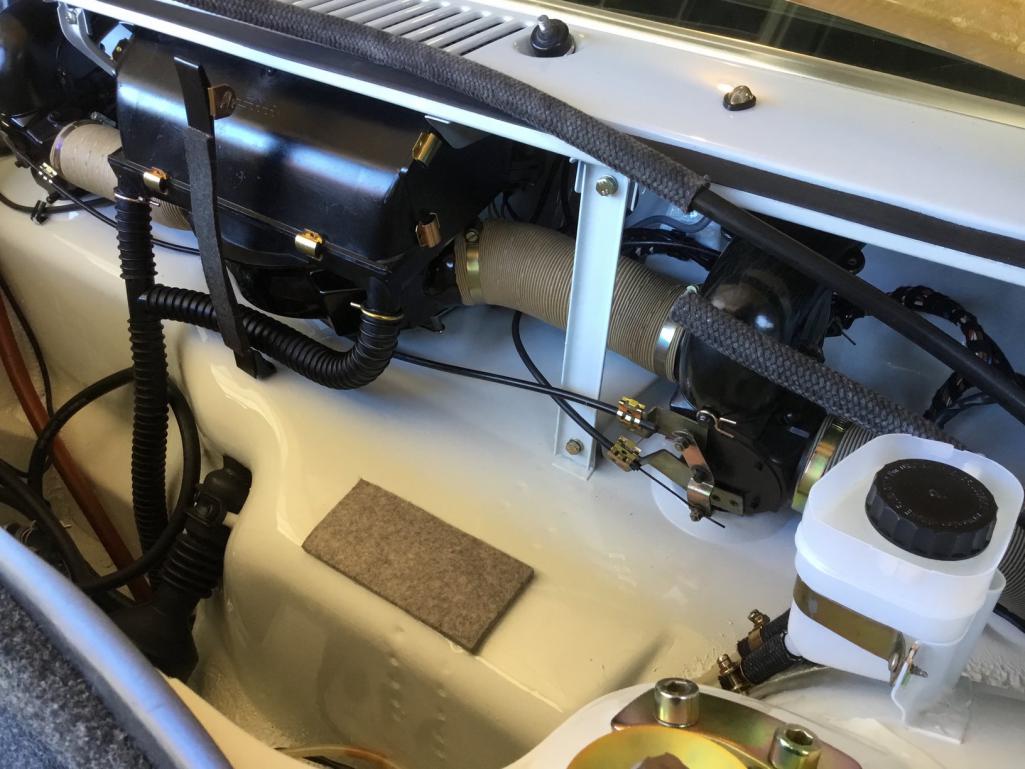 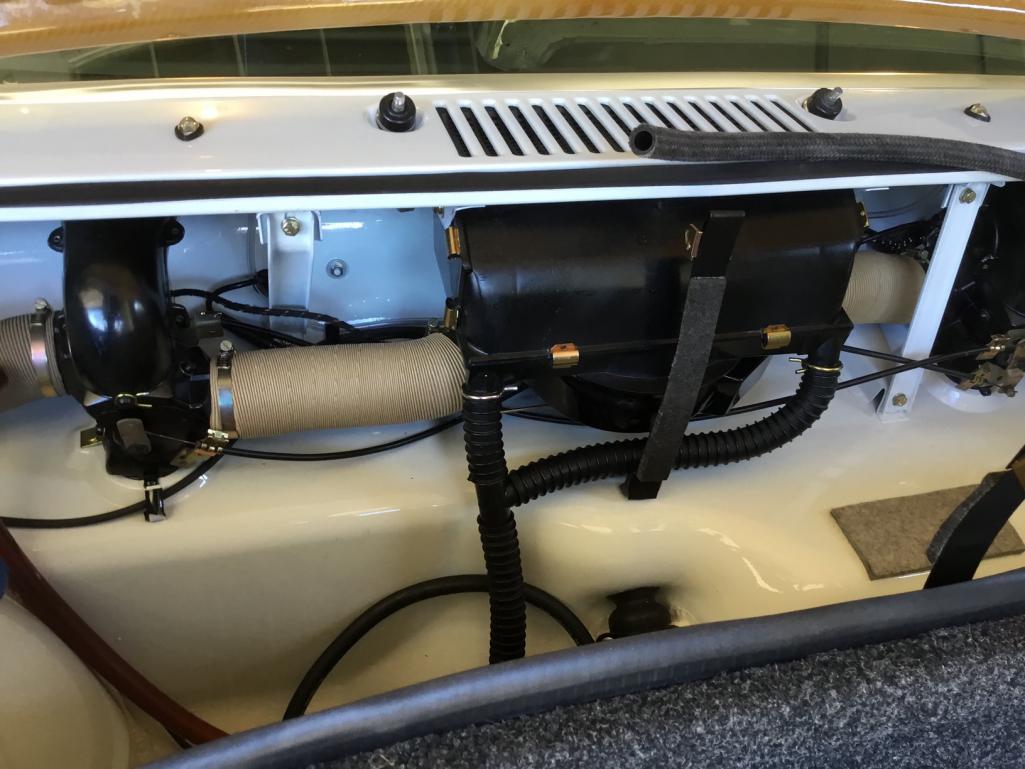 |
|
|
|
| raynekat |
Oct 15 2018, 11:20 PM
Post
#673
|
|
Advanced Member Group: Members Posts: 2,171 Joined: 30-December 14 From: Coeur d'Alene, Idaho Member No.: 18,263 Region Association: Pacific Northwest |
Next on the agenda was getting the fuel tank back in place.
Pretty straight forward. Just reattaching the two fuel lines on the bottom, setting in place and reattaching the vapor recovery system and filler neck. 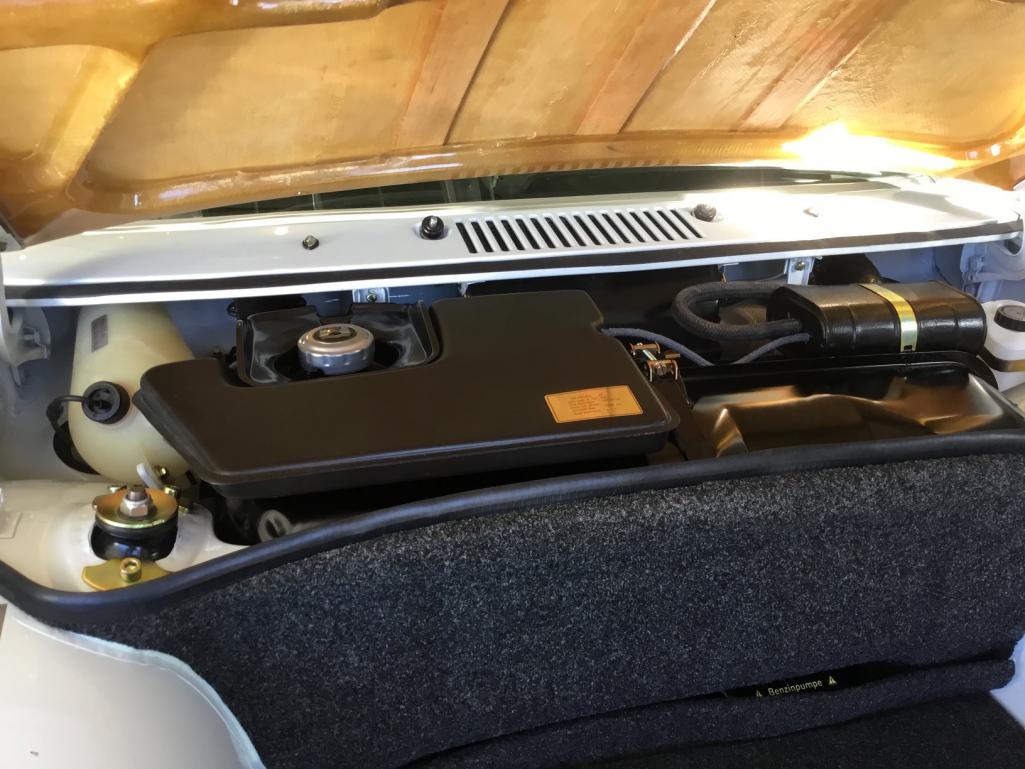 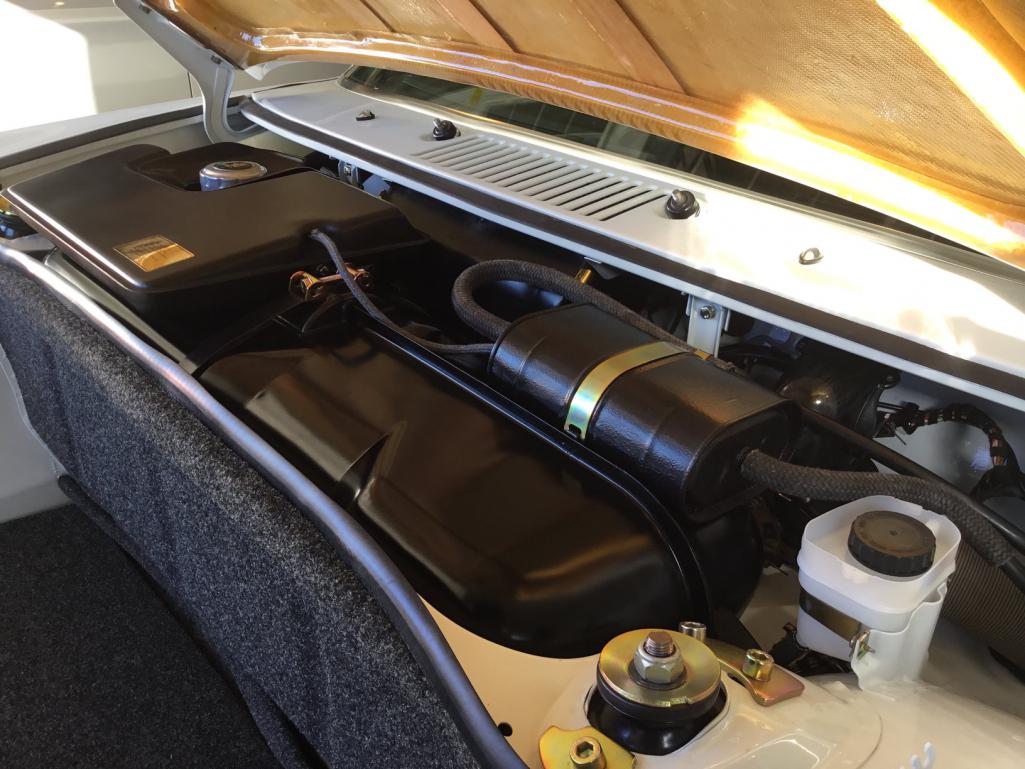 Lesson learned here was to bench test all electrical components before installing on a nearly 50 year old car that you don't have any history on (as in what was working and what wasn't). So at this point, all the electrical works on the car. The lights, wipers, horns, etc. Even checked for starter and run power back on the engine bay relay board....so we're good to go there as far as drivetrain installation goes. |
|
|
|
| raynekat |
Oct 15 2018, 11:33 PM
Post
#674
|
|
Advanced Member Group: Members Posts: 2,171 Joined: 30-December 14 From: Coeur d'Alene, Idaho Member No.: 18,263 Region Association: Pacific Northwest |
My carpets finally arrived from Autobahn Interiors.
I was never satisfied with the factory half size carpets underneath the seats, so I made some patterns, sent them to Autobahn and they put together a nice set of full length carpets for me. Finishes off the floor nicely I think. This is the same dark gray German square weave that the rest of the interior has. 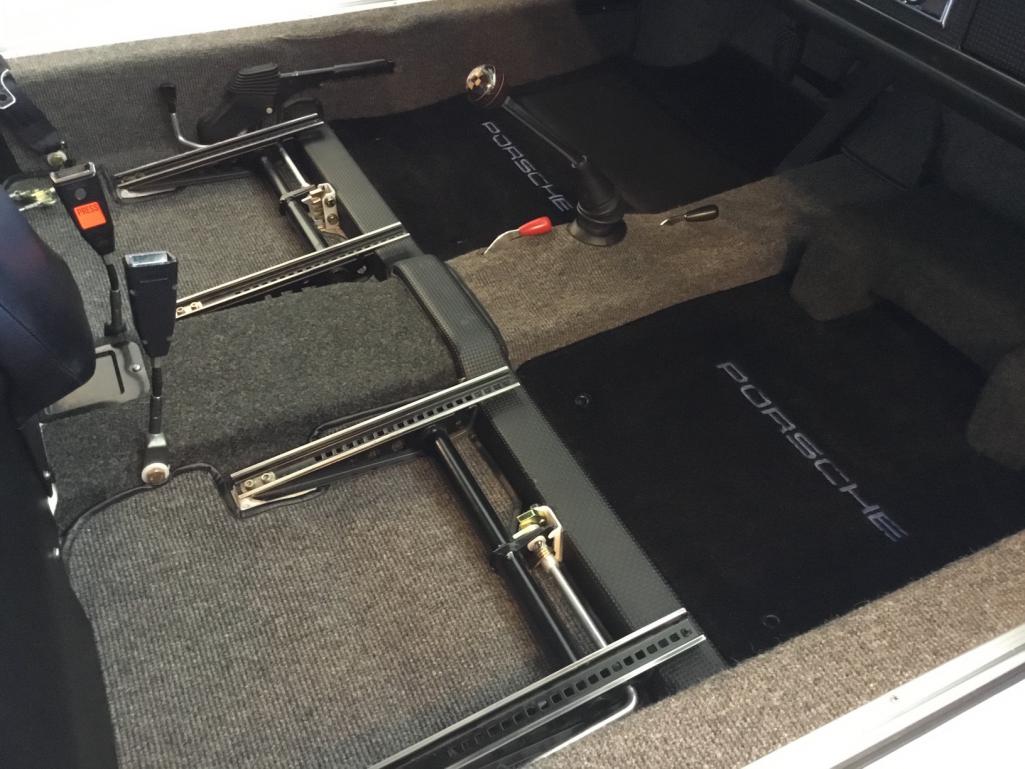 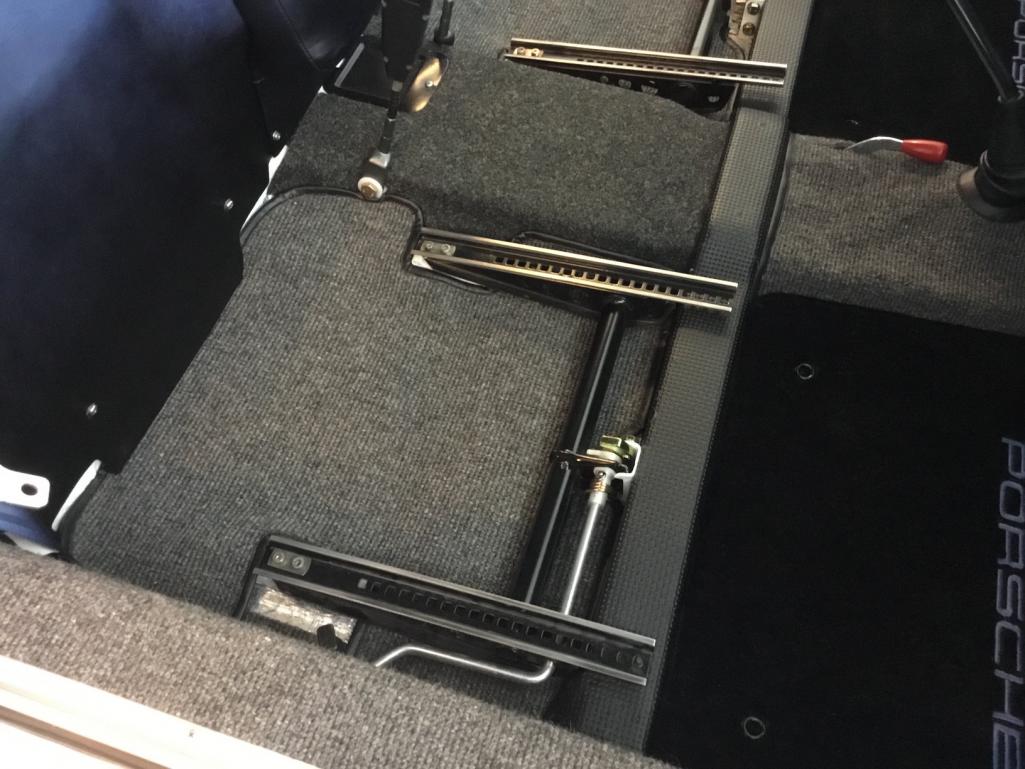 Also installed the center cushion box. 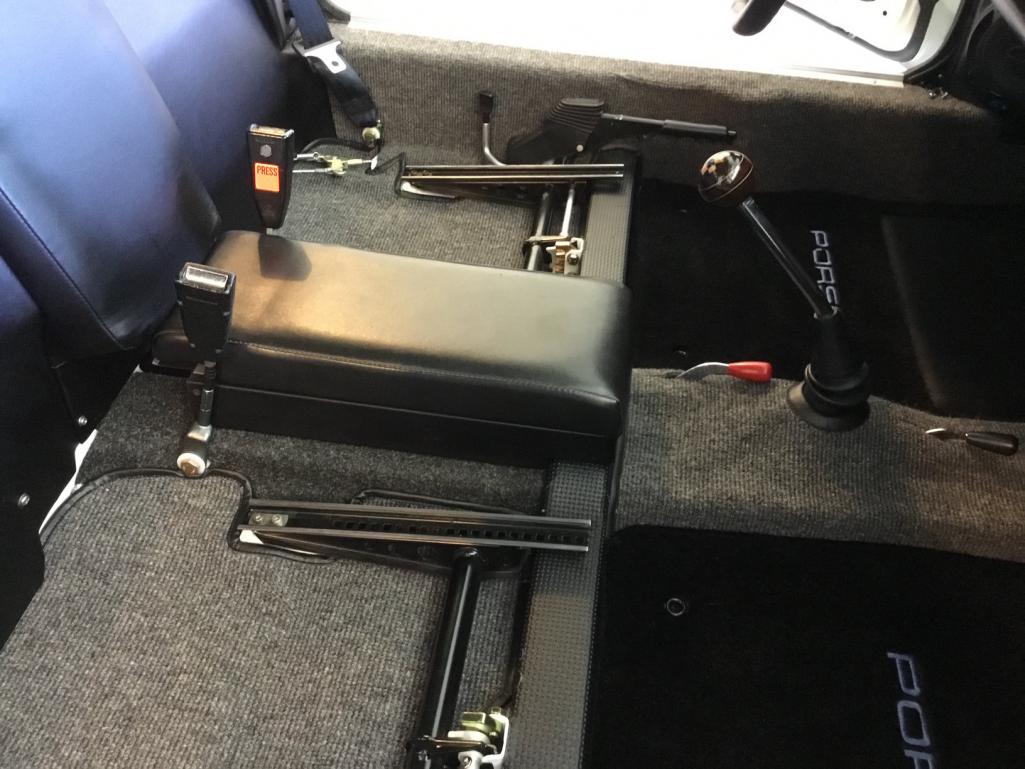 All that's left in the interior is putting in the tartan plaid sport seats. I'll wait to do that to the very end. Still need some interior access as I'll be finishing up the doors, side window and door panels. Plus the new windshield is likely coming out for a re-install as i'm not thrilled at the fitment and how the trim moulding looks at this point. |
|
|
|
| raynekat |
Oct 15 2018, 11:38 PM
Post
#675
|
|
Advanced Member Group: Members Posts: 2,171 Joined: 30-December 14 From: Coeur d'Alene, Idaho Member No.: 18,263 Region Association: Pacific Northwest |
One parting shot.
While I was under the car today, this vantage point really looked sharp to me. Nice view of the front suspension: Bilstein HD shocks with raised spindles, front Tarett sway bar, black plated Aluminum S calipers with vented rotors. Quite the eye full. The suspension is courtesy of Elephant Racing and the brakes are from PMB. 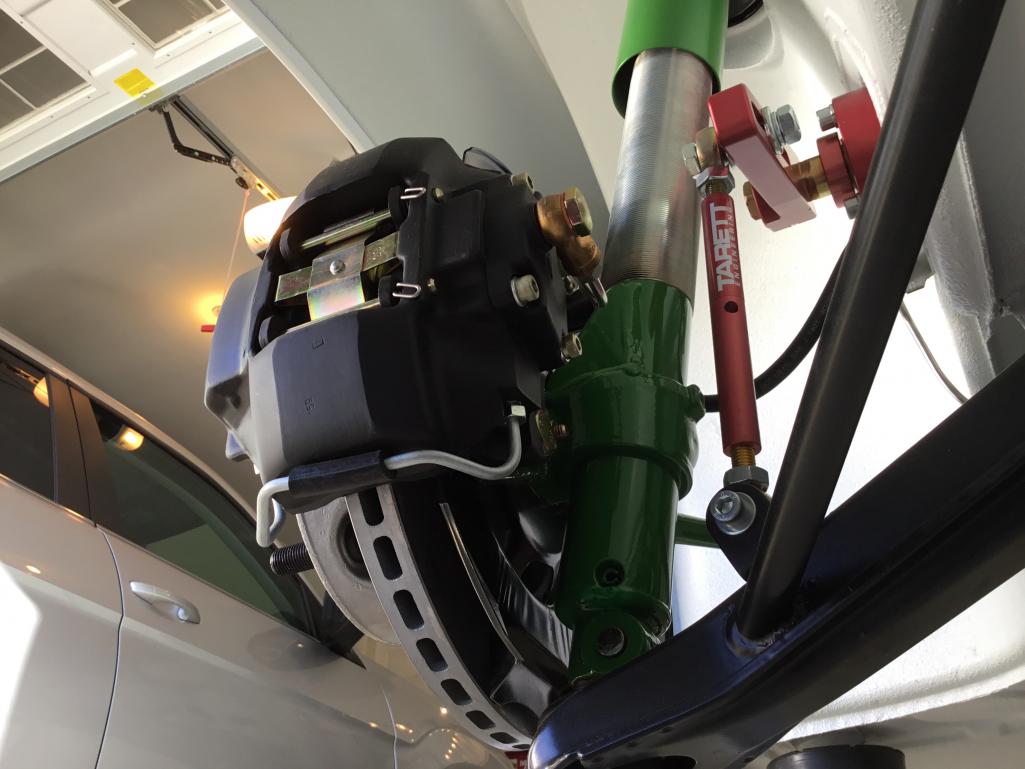 |
|
|
|
| falcor75 |
Oct 16 2018, 12:40 AM
Post
#676
|
|
Senior Member Group: Members Posts: 1,579 Joined: 22-November 12 From: Sweden Member No.: 15,176 Region Association: Scandinavia |
As far as I'm concerned this is the 914 build to beat. (IMG:style_emoticons/default/wub.gif)
|
|
|
|
| mepstein |
Oct 16 2018, 03:07 AM
Post
#677
|
|
914-6 GT in waiting Group: Members Posts: 20,819 Joined: 19-September 09 From: Landenberg, PA/Wilmington, DE Member No.: 10,825 Region Association: MidAtlantic Region |
Everything on this car is top shelf or beyond. I imagine you will be having a long talk with your insurance company to make sure you are properly covered.
|
|
|
|
| cary |
Oct 16 2018, 07:52 AM
Post
#678
|
|
Advanced Member Group: Members Posts: 3,900 Joined: 26-January 04 From: Sherwood Oregon Member No.: 1,608 Region Association: Pacific Northwest |
|
|
|
|
| raynekat |
Nov 13 2018, 11:08 AM
Post
#679
|
|
Advanced Member Group: Members Posts: 2,171 Joined: 30-December 14 From: Coeur d'Alene, Idaho Member No.: 18,263 Region Association: Pacific Northwest |
OK....round 3 for the windshield install.
This time I used the Porsche factory clips and 5/16" butyl. Windshield went in like a breeze (guess practice makes perfect). Using the smaller butyl cord vs the 3/8" I mistakenly used last time, the windshield sat down into the opening much lower. It looked promising for getting the windshield trim properly snapped in this time. I put the lower trim in 1st with the two corners attached. All the trim clips had a nice positive snap as the trim snapped into place. Next I went with the 2 sidepieces. These all go in as one unit with the center piece holding them together at the top of the windshield. Along the top of the windshield....those all snapped in easily. It was the sides that are the challenge still. Especially the first clip up from the lower corners. The corner pieces hold the trim far enough away from those 1st clips up the sides that it's tough to get those to snap in. I eventually chose to gently bend the trim in those locations such that they could more easily get into the clips. Then it was snap, snap, snap up both side and I was done. My only issue is the small corner pieces don't really wrap around the trim enough. It's easy to flatten out the little bend that's supposed to hold them onto the trim. Same with the top center connector. A nice re-design would be to add more material to where these small connector pieces wrap around the actual trim. That's a "wrap.!" What's left? My passenger side rear caliper is terminal, so I'll be getting a set of factory 914-6 calipers to replace them. I have a weeping that just won't stop and I'm suspecting that there's a casting defect that allows brake fluid to flow from the bleeder valve gallery into one of the thru bolt bores via a micro fissure or some void. While that is being resolved, I'll be finishing up the side windows with a set of new factory vent window seals. This really is an incredible jigsaw puzzle to get all this door/window/etc to line up nicely after such a major rebuild/refurb. |
|
|
|
| DRPHIL914 |
Nov 13 2018, 07:39 PM
Post
#680
|
|
Dr. Phil Group: Members Posts: 5,952 Joined: 9-December 09 From: Kennesaw, GA Member No.: 11,106 Region Association: South East States |
glad to hear you have the trim and window in . i also found we had to slight bend the trim and the trouble spots were those lower corners for sure,
they just dont fit well. so lets see a picture! |
|
|
|
|
2 User(s) are reading this topic (2 Guests and 0 Anonymous Users)
0 Members:

|
Lo-Fi Version | Time is now: 18th July 2026 - 05:04 AM |
Invision Power Board
v9.1.4 © 2026 IPS, Inc.