|
|
|
Porsche, and the Porsche crest are registered trademarks of Dr. Ing. h.c. F. Porsche AG.
This site is not affiliated with Porsche in any way. Its only purpose is to provide an online forum for car enthusiasts. All other trademarks are property of their respective owners. |
|
|

  |

| raynekat |
 Nov 23 2019, 06:04 PM Nov 23 2019, 06:04 PM
Post
#781
|
|
Advanced Member  Group: Members Posts: 2,171 Joined: 30-December 14 From: Coeur d'Alene, Idaho Member No.: 18,263 Region Association: Pacific Northwest |
Got the fuel cutoff circuit on the MFI motor operating finally today.
It took a new micro switch, a new solid state RPM transducer and some corrections to the wiring to and from the micro switch. Now with the engine running over 2000rpm, when you depress the micro switch the engine shuts off until below 1000 rpm, picks back up and hunts between about 1500 and 1000 rpm....as it should.j For the MFI engine, when you get off the throttle, the fuel should shutoff until the engine revs drop below a certain value (about 1000 rpm) and then the fuel turns back on so the engine doesn't die. Porsche did this to give better fuel economy and prevent backfiring during deacceleration. Nice to know my system is functioning as designed. MFI cars are not known for the excellent fuel economy, so every little bit helps. So another of the teething problems with an entirely new/rebuilt car solved. Next up....the charging system. Both the alternator (freshly rebuilt) and the voltage regulators (I have 3 at my disposal...2 of which are brand new Bosch) are still suspect. Let the games begin. |
   |

 
|
| raynekat |
Feb 15 2020, 03:14 PM
Post
#782
|
|
Advanced Member Group: Members Posts: 2,171 Joined: 30-December 14 From: Coeur d'Alene, Idaho Member No.: 18,263 Region Association: Pacific Northwest |
Some updates coming....
Just installed a new battery as the Lithium battery just didn't have enough Amp-hr to be a good daily driver type especially at night with the lights and wipers on. So out with the light weight (11 lbs) and in with the new (42 lbs). I purchased this AGM battery made by XS Power (model D4700) from Jegs onllne. $279.99 including shipping plus you need a set of $10 terminals. Specs: 12-Volt CA: 760 CCA: 668 Ah: 62, 2000W / 3000W Max Amps: 2900 Reserve Capacity: 110 Minutes Weight: 42.2 lbs 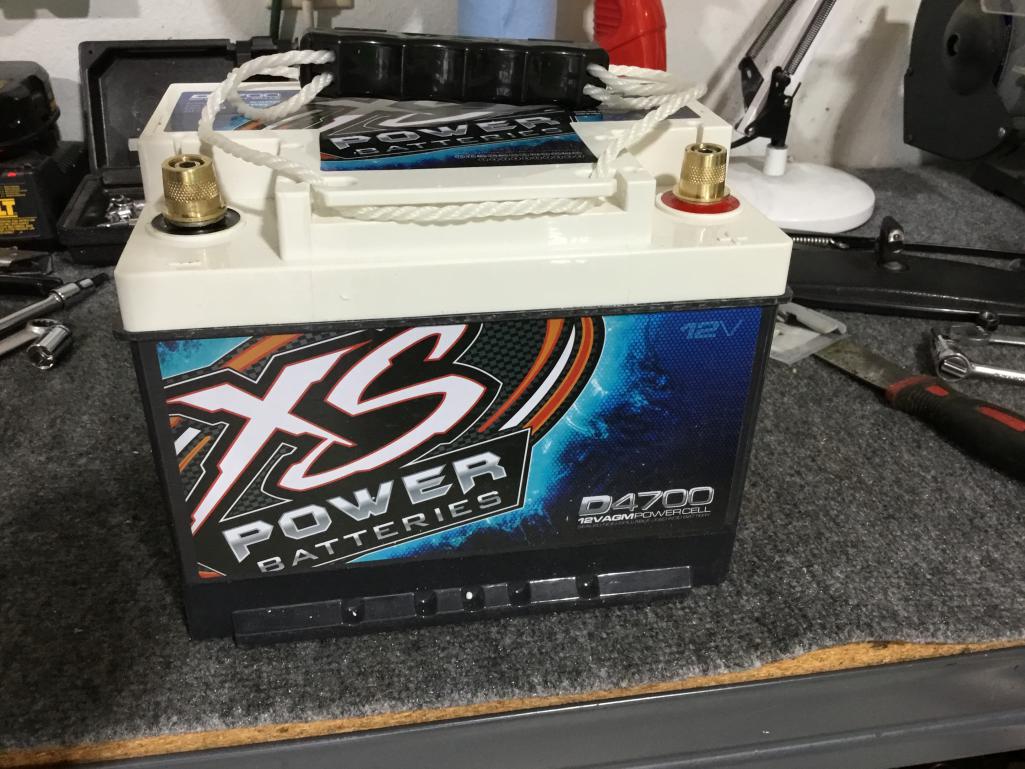 Fitment is beyond perfect. Terminals in the correct location....negative closest to the firewall. Cleats/feet on both the front and back of the battery allowing use of the factory clamp. Battery fits perfect in the stock battery tray. Like it was meant to be there.  |
|
|
|
| raynekat |
Feb 24 2020, 06:40 PM
Post
#783
|
|
Advanced Member Group: Members Posts: 2,171 Joined: 30-December 14 From: Coeur d'Alene, Idaho Member No.: 18,263 Region Association: Pacific Northwest |
Added a battery cover/rubber band from AA today.
Fits the battery perfect and helps tone down the wild graphics on some of the battery. I can live with the rest. 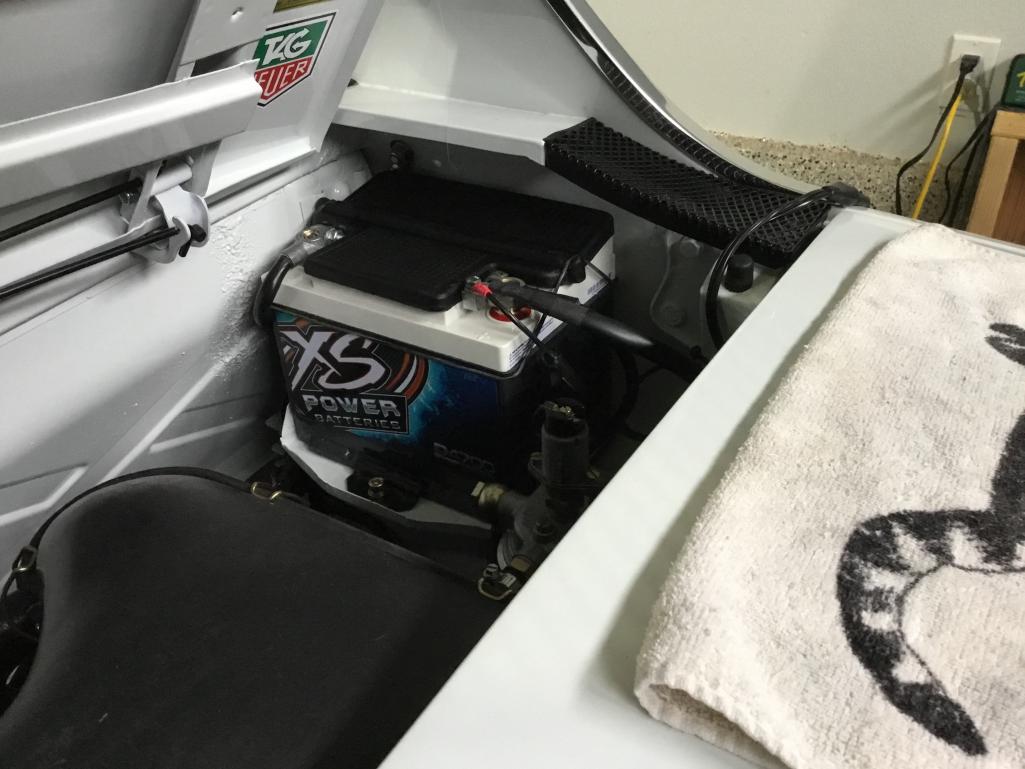 |
|
|
|
| bbrock |
Feb 24 2020, 07:53 PM
Post
#784
|
|
914 Guru Group: Members Posts: 5,269 Joined: 17-February 17 From: Montana Member No.: 20,845 Region Association: Rocky Mountains |
Wish I'd known about that battery before I bought my Optima. It's just a black wrap away from being about perfect.
|
|
|
|
| raynekat |
Feb 24 2020, 09:56 PM
Post
#785
|
|
Advanced Member Group: Members Posts: 2,171 Joined: 30-December 14 From: Coeur d'Alene, Idaho Member No.: 18,263 Region Association: Pacific Northwest |
QUOTE(bbrock @ Feb 24 2020, 05:53 PM)  Wish I'd known about that battery before I bought my Optima. It's just a black wrap away from being about perfect. I'll likely do that Brent. Maybe a titanium wrap on the front with a Bosch sticker on it. Something like this...  |
|
|
|
| raynekat |
Mar 12 2020, 09:32 PM
Post
#786
|
|
Advanced Member Group: Members Posts: 2,171 Joined: 30-December 14 From: Coeur d'Alene, Idaho Member No.: 18,263 Region Association: Pacific Northwest |
Here's the final rendition of my battery install.
Added a bit of black vinyl and a nice Ebay Bosch decal and voila.... Would fool most folks in thinking I had a real Bosch battery installed. Gotta keep them guessing. Ha 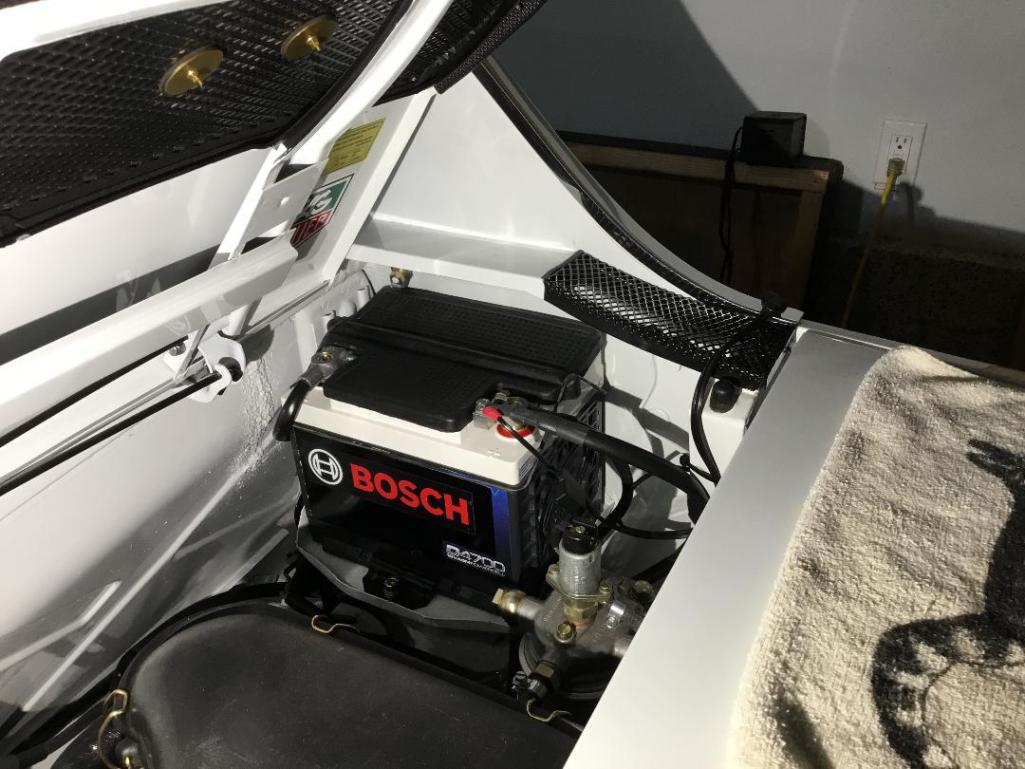 Quite a transformation from what I started with: 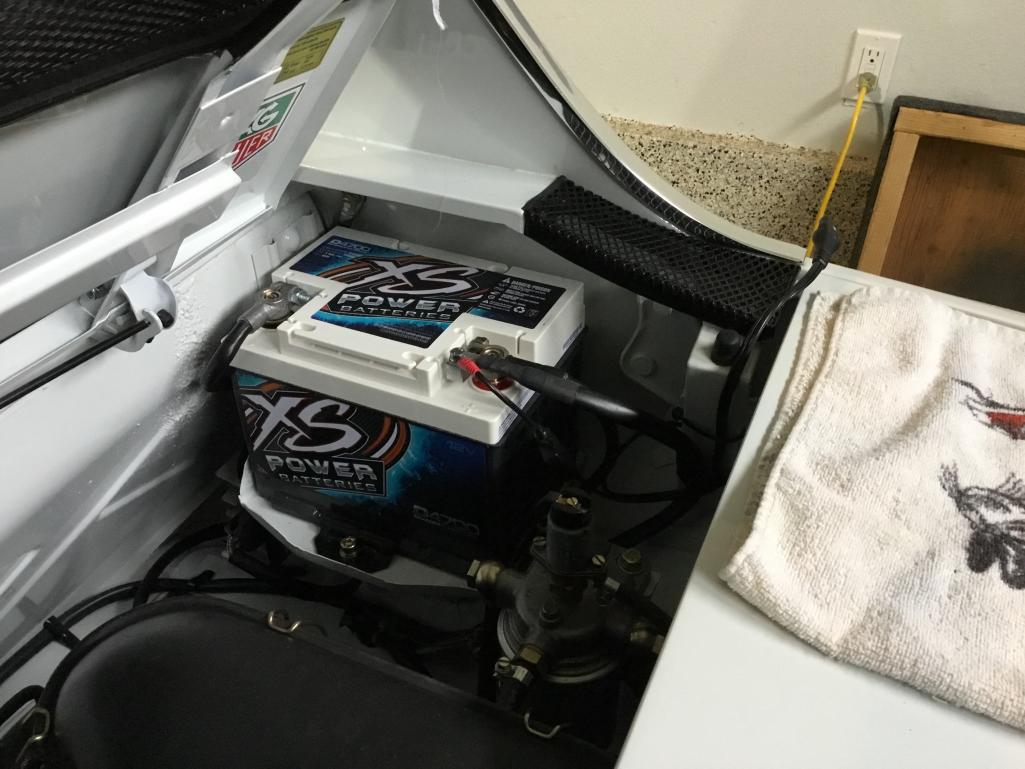 |
|
|
|
| bbrock |
Mar 12 2020, 09:35 PM
Post
#787
|
|
914 Guru Group: Members Posts: 5,269 Joined: 17-February 17 From: Montana Member No.: 20,845 Region Association: Rocky Mountains |
Who's the mad scientist now? Very cool! (IMG:style_emoticons/default/aktion035.gif)
|
|
|
|
| raynekat |
Mar 12 2020, 09:45 PM
Post
#788
|
|
Advanced Member Group: Members Posts: 2,171 Joined: 30-December 14 From: Coeur d'Alene, Idaho Member No.: 18,263 Region Association: Pacific Northwest |
QUOTE(bbrock @ Mar 12 2020, 08:35 PM) Brent.....you're a tough act to follow. I'm doing my best. (IMG:style_emoticons/default/blink.gif) |
|
|
|
| raynekat |
May 12 2020, 08:53 PM
Post
#789
|
|
Advanced Member Group: Members Posts: 2,171 Joined: 30-December 14 From: Coeur d'Alene, Idaho Member No.: 18,263 Region Association: Pacific Northwest |
Just got an email from Stefan at GTS Classics (custom seats for your Porsche).
They finally got the material in to do my center cushion....and they've knocked it out already. 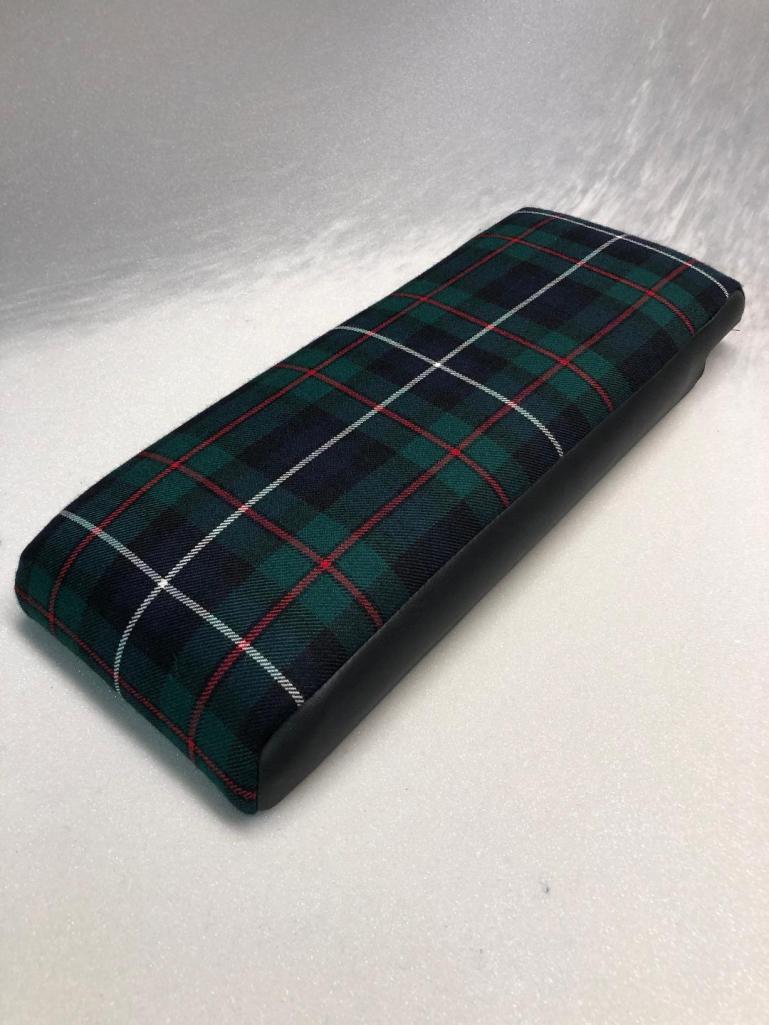 So should be shipping back to be soon for installation. Will look spiffy with my existing GTS Classics tartan seats. 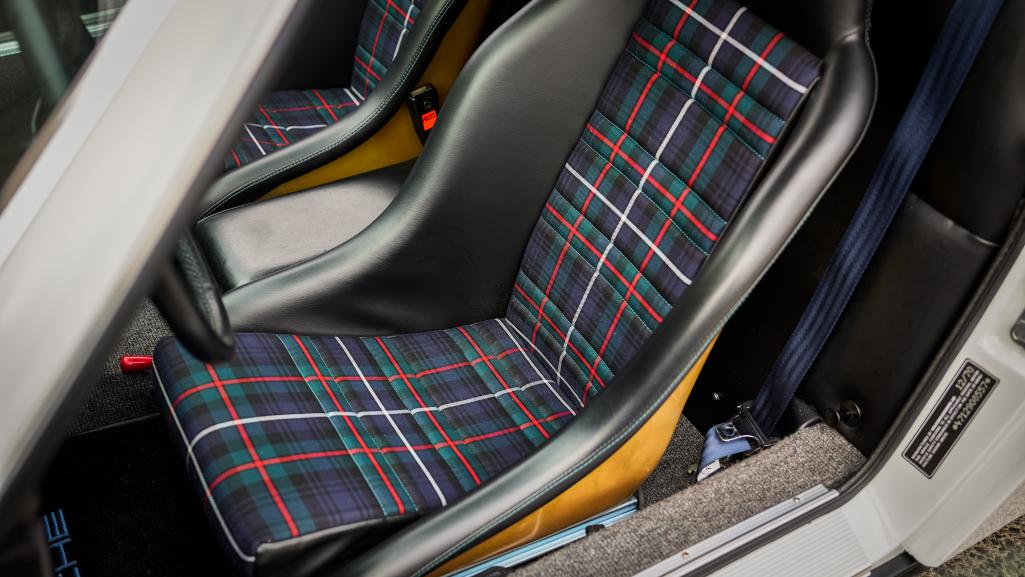 |
|
|
|
| mepstein |
May 12 2020, 09:03 PM
Post
#790
|
|
914-6 GT in waiting Group: Members Posts: 20,841 Joined: 19-September 09 From: Landenberg, PA/Wilmington, DE Member No.: 10,825 Region Association: MidAtlantic Region |
Looks very custom and perfect. (IMG:style_emoticons/default/beerchug.gif)
|
|
|
|
| raynekat |
May 17 2020, 04:55 PM
Post
#791
|
|
Advanced Member Group: Members Posts: 2,171 Joined: 30-December 14 From: Coeur d'Alene, Idaho Member No.: 18,263 Region Association: Pacific Northwest |
Short couple minute startup sound track/video of the engine.
https://www.youtube.com/watch?v=AqJSmCRrQ8s This is the engine. A 2.7 MFI RS spec engine making right at 230hp and built by Rothsport. Using a set of Ben's 1-5/8" stainless steel heat exchangers and a Dansk single outlet sport exhaust. The factory Leistritz muffler pulls the power down about 10hp. 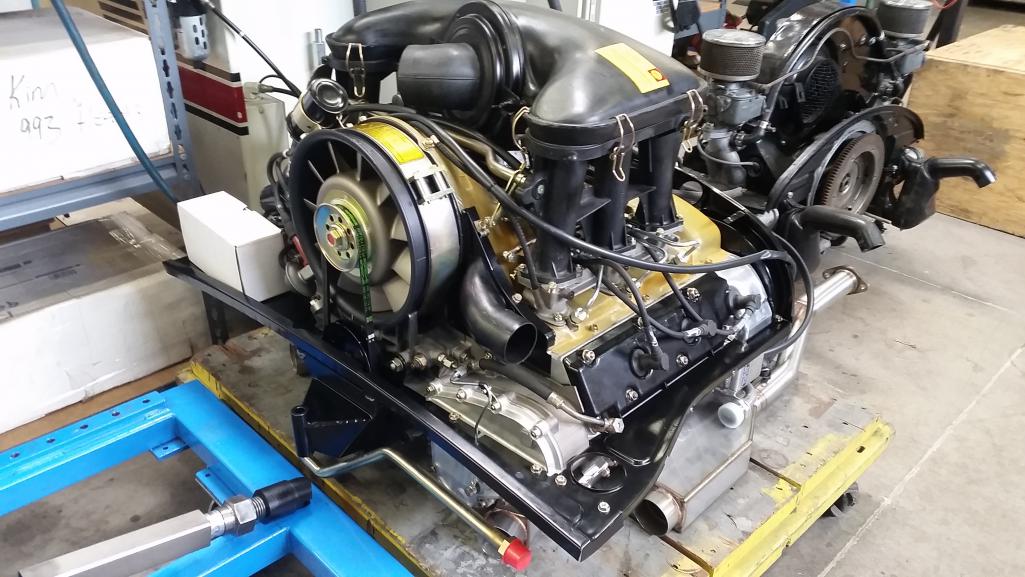 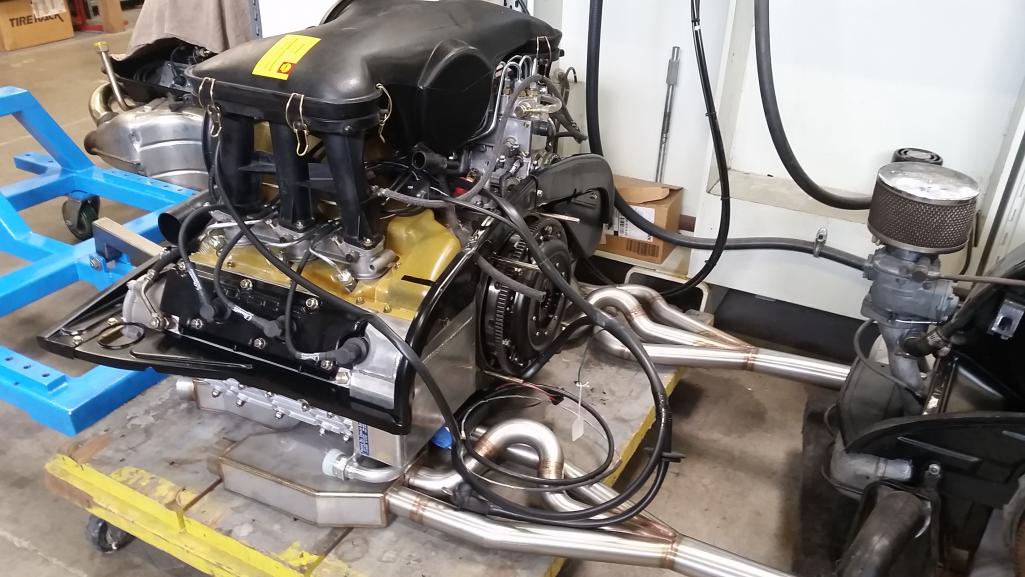 Will try to get some kind of driving video in the next few days...... |
|
|
|
| mepstein |
May 17 2020, 07:00 PM
Post
#792
|
|
914-6 GT in waiting Group: Members Posts: 20,841 Joined: 19-September 09 From: Landenberg, PA/Wilmington, DE Member No.: 10,825 Region Association: MidAtlantic Region |
QUOTE(raynekat @ May 17 2020, 06:55 PM) Short couple minute startup sound track/video of the engine. https://www.youtube.com/watch?v=AqJSmCRrQ8s This is the engine. A 2.7 MFI RS spec engine making right at 230hp and built by Rothsport. Using a set of Ben's 1-5/8" stainless steel heat exchangers and a Dansk single outlet sport exhaust. The factory Leistritz muffler pulls the power down about 10hp. Will try to get some kind of driving video in the next few days...... Beautiful (IMG:style_emoticons/default/smilie_pokal.gif) |
|
|
|
| raynekat |
Jan 31 2021, 05:42 PM
Post
#793
|
|
Advanced Member Group: Members Posts: 2,171 Joined: 30-December 14 From: Coeur d'Alene, Idaho Member No.: 18,263 Region Association: Pacific Northwest |
It's been awhile since I've put any updates.
Today began installing the 914Rubber fender liners. They come with rivets for fastening the plastic liners to the mounting brackets. It quickly became apparent that installation was going to be difficult if I used the rivets. The rivets fasten the liner to the mounting brackets and then the brackets use your rocker panel and valance sheet metal bolts to hold the liner in place. So I opted to use speed nuts that sit on the mounting brackets so that hex headed metric screws could be used instead of the rivets. Here was the hardware and bracket ready to bolt into the car. 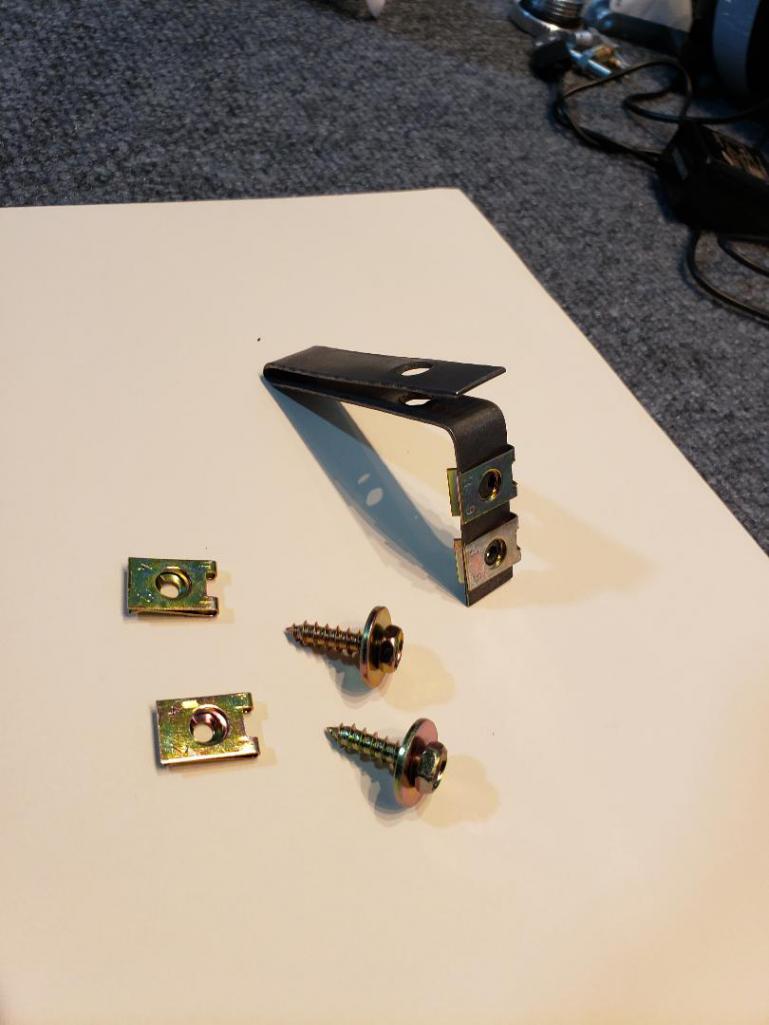 The reason I went this will become apparent pretty quickly. Here's the leading edge (front) that utilizes the valance mounting bolt. In theory you could have put this in as a unit (bracket and liner) as you actually have access to the bolt that mounts the valence. 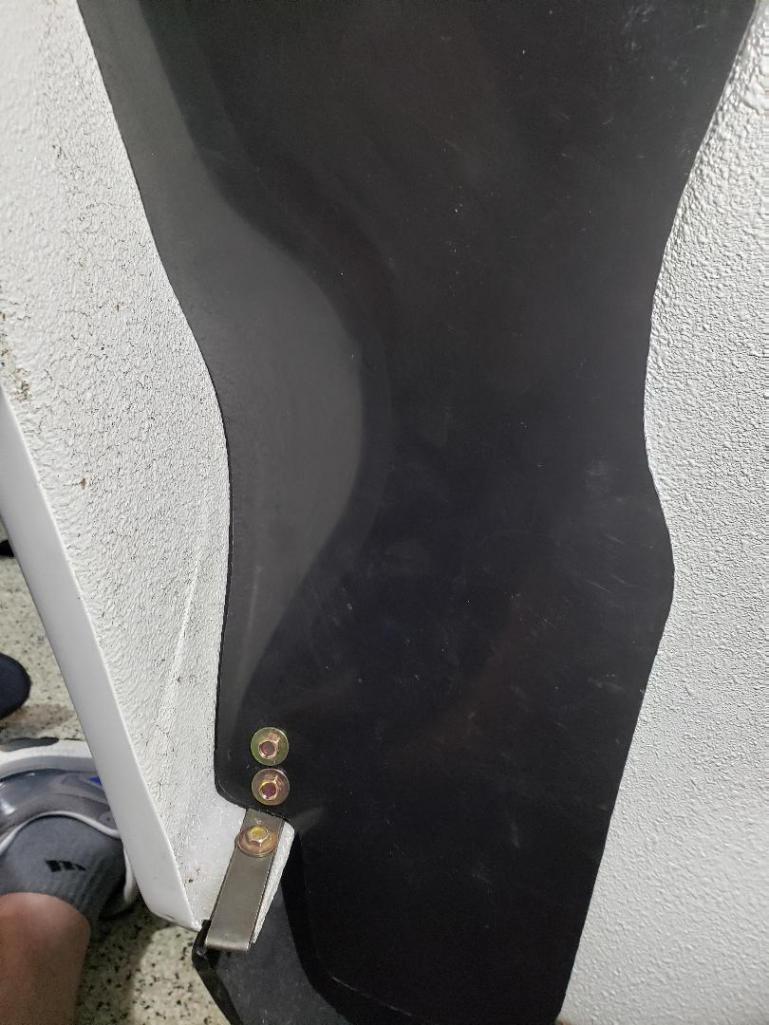 The real problem with the rivet method is mounting the trailing edge (rear) bracket that uses the rocker cover bolt. 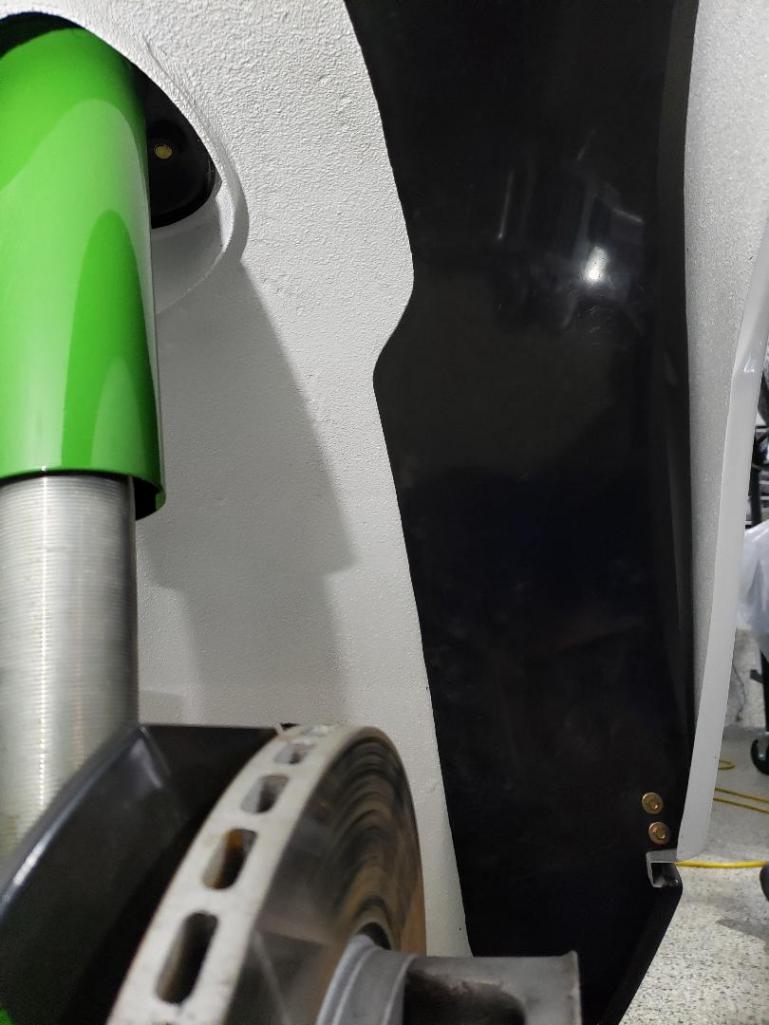 You can't access the bolt to secure the bracket to the rocker cover as it's behind the liner. So with my method you mount the bare bracket first and then fasten the liner to the bracket. Here's a better view of the finished product. No way you're getting your hand in behind the liner to tighten or loosen the bracket with the liner in place. 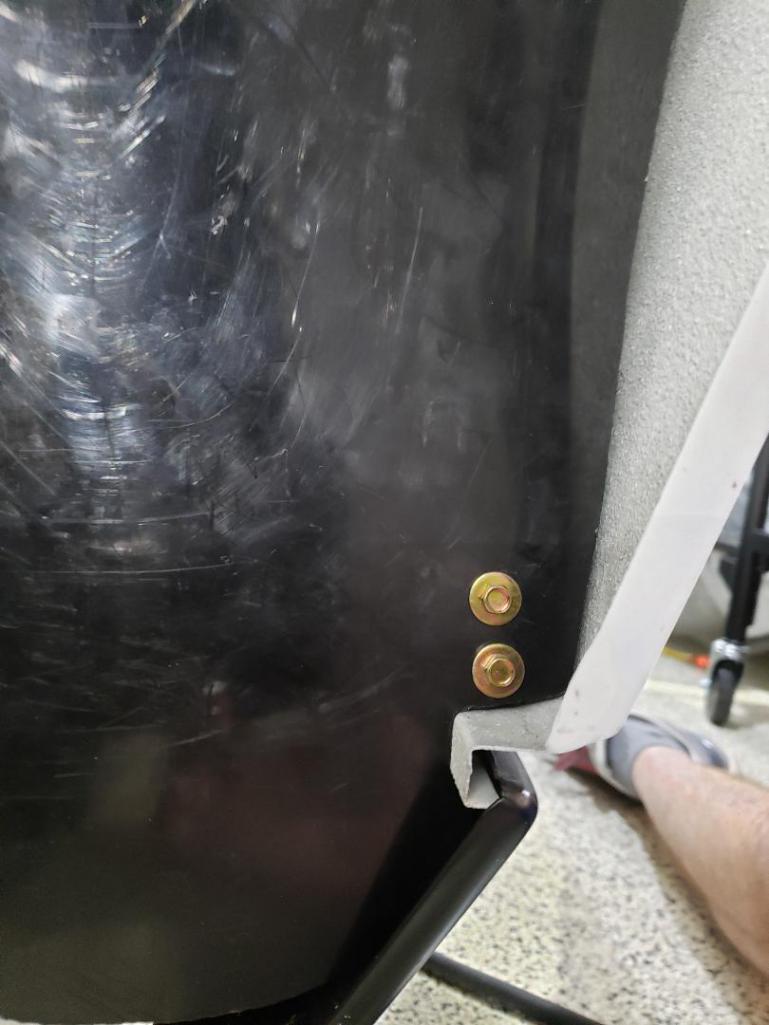 With the speed nut and hex head screws I used, you can easily take the liner off in a matter of minutes without removing the brackets at the valance and rocker panel. Inspection and cleaning is still an easy thing to accomplish. Now off to install the other three corners. Cheers (IMG:style_emoticons/default/beerchug.gif) |
|
|
|
| Cairo94507 |
Jan 31 2021, 06:15 PM
Post
#794
|
|
Michael Group: Members Posts: 10,723 Joined: 1-November 08 From: Auburn, CA Member No.: 9,712 Region Association: Northern California |
Maybe I should consider a set of those for my car? I like the clean install you did. Let us know if the other 3 were as easy as the first. (IMG:style_emoticons/default/beerchug.gif)
|
|
|
|
| bbrock |
Jan 31 2021, 06:54 PM
Post
#795
|
|
914 Guru Group: Members Posts: 5,269 Joined: 17-February 17 From: Montana Member No.: 20,845 Region Association: Rocky Mountains |
Nice work! Bookmarking for reference in case I get a set of those. I can't quite tell, does the bracket hardware replace the speed nut on the rear of the rocker cover? I ask because I'm missing one and they turn out to be kind of an oddball size.
|
|
|
|
| raynekat |
Feb 2 2021, 02:31 AM
Post
#796
|
|
Advanced Member Group: Members Posts: 2,171 Joined: 30-December 14 From: Coeur d'Alene, Idaho Member No.: 18,263 Region Association: Pacific Northwest |
QUOTE(bbrock @ Jan 31 2021, 04:54 PM) Nice work! Bookmarking for reference in case I get a set of those. I can't quite tell, does the bracket hardware replace the speed nut on the rear of the rocker cover? I ask because I'm missing one and they turn out to be kind of an oddball size. The bracket just sits on top of the flange that the rockers are mounted to. In my car, the speed nuts are on the rocker panel or valance, and i screw a hex head down through the mounting flange into the speed nut on the rocker or valance. In the below pic, you can see the two hex head screws that hold the liner to the L shape bracket. The horizontal part of the bracket just sits on the mounting flange for the rocker panel. The hex head screw pointing down goes through the bracket, then the mounting flange and finally into the speed nut that is on the top edge of the rocker panel. Hopefully that is clear as mud....or moose poop?  |
|
|
|
| raynekat |
Feb 2 2021, 02:33 AM
Post
#797
|
|
Advanced Member Group: Members Posts: 2,171 Joined: 30-December 14 From: Coeur d'Alene, Idaho Member No.: 18,263 Region Association: Pacific Northwest |
QUOTE(Cairo94507 @ Jan 31 2021, 04:15 PM) Maybe I should consider a set of those for my car? I like the clean install you did. Let us know if the other 3 were as easy as the first. (IMG:style_emoticons/default/beerchug.gif) The other front was just as easy. I ended up shortening both front liners by about 1" as they seemed too long for where they needed to sit. They were all bound up in there if that makes any sense? Also trimmed the sides of the liners facing out about 1/8-1/4" for better fitment. Definitely some custom fitting is needed for a very nice fit, but it's not too taxing. I've mocked up the rears, and they look easy and appear to fit better than the fronts. Waiting on some more installation hardware from Belmetric to install the rears. I'll post more pics and comments at that time. |
|
|
|
| raynekat |
Feb 2 2021, 09:55 PM
Post
#798
|
|
Advanced Member Group: Members Posts: 2,171 Joined: 30-December 14 From: Coeur d'Alene, Idaho Member No.: 18,263 Region Association: Pacific Northwest |
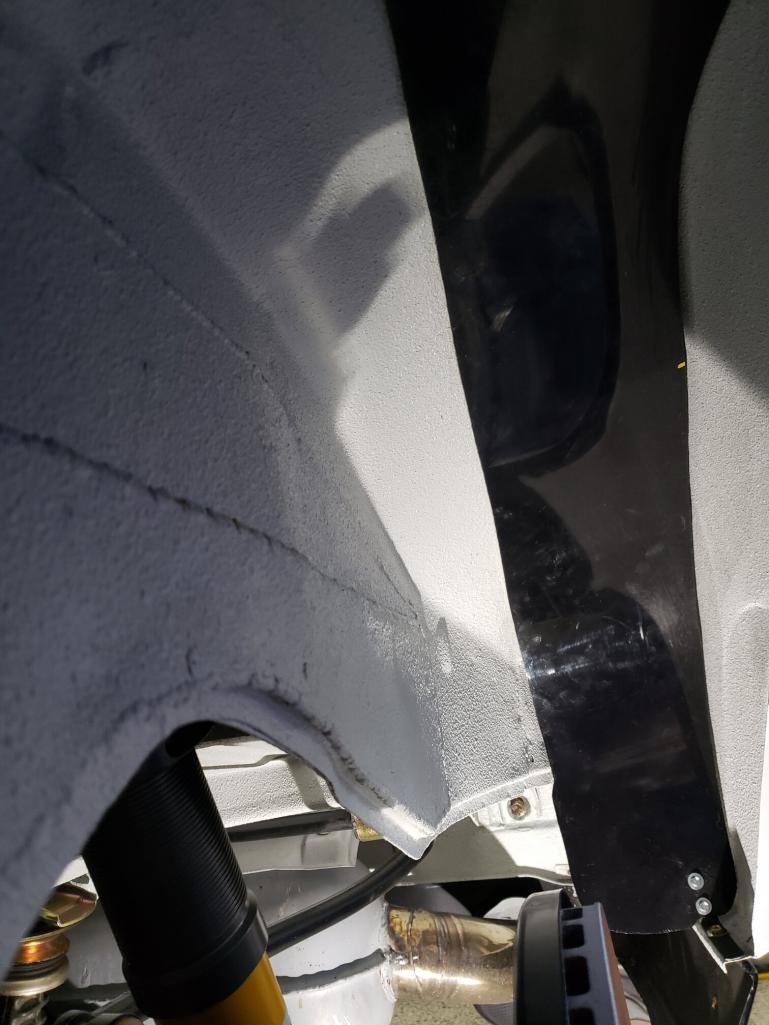
Tackled the rear liners today.
Front bracket in place: 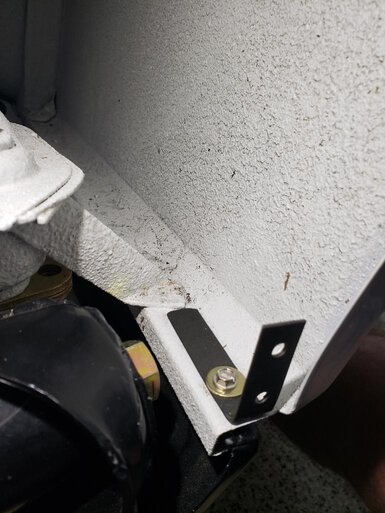 Rear bracket in place: 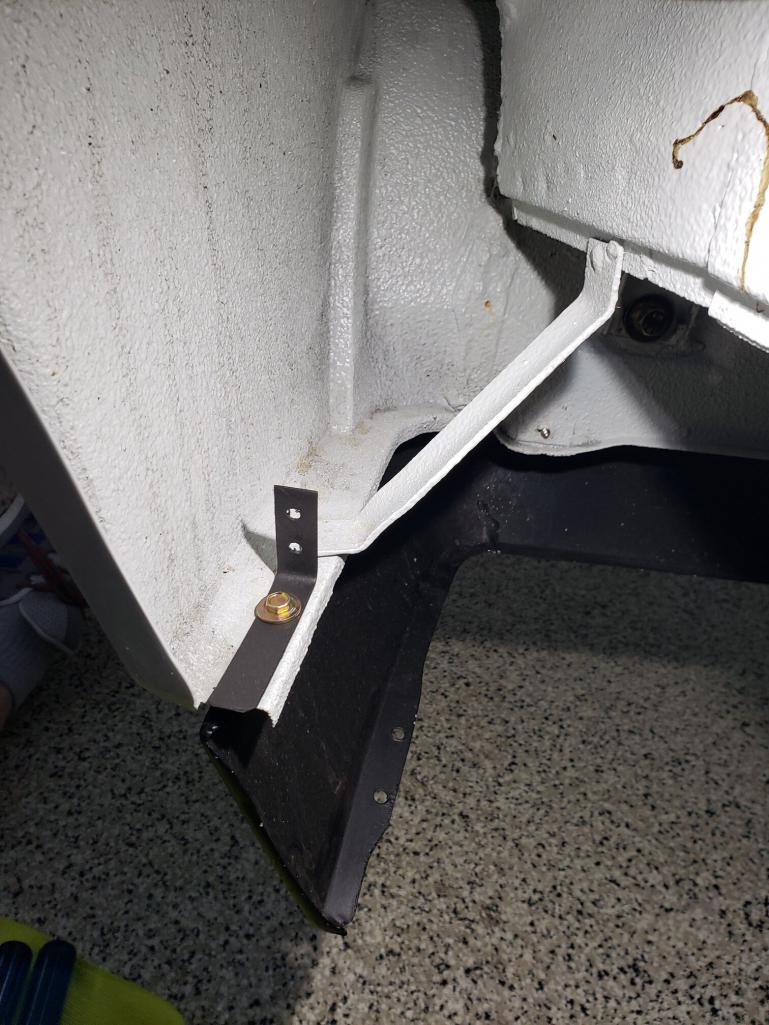 Front part of fender liner bolted to front bracket:  Rear part of fender liner bolted to rear bracket: 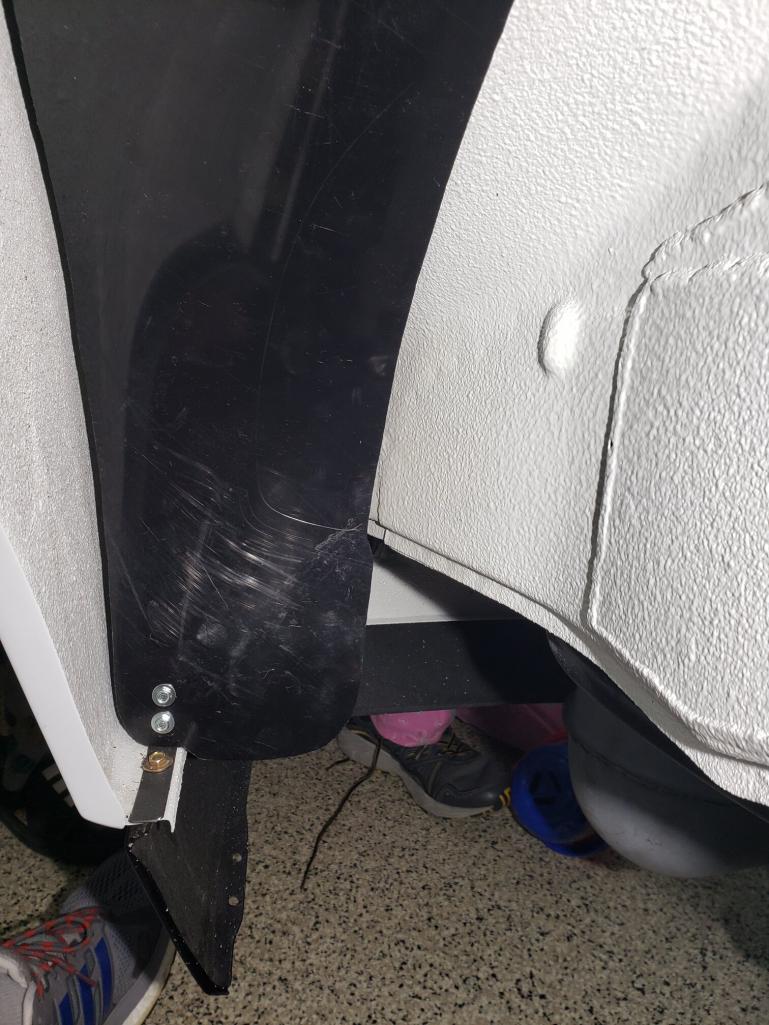 |
|
|
|
| raynekat |
Feb 2 2021, 09:59 PM
Post
#799
|
|
Advanced Member Group: Members Posts: 2,171 Joined: 30-December 14 From: Coeur d'Alene, Idaho Member No.: 18,263 Region Association: Pacific Northwest |
 In general, the 914Rubber fender liners were fairly straight forward to install. A little bit of mods to the brackets (trimming and painting) and trimming or shortening the fender liners themselves. I ditched the supplied rivets and went with my speed nut/hex head screw instead to be able to easily remove the liners in the future (for cleaning and inspection) without removing the brackets. Not an inexpensive addition to our cars at $245. But well worth it as the fender liners should keep the water, trash, mud, leaves, etc away from the rocker panels and the far recesses of the fender wells. A good preventative measure for future rust. |
|
|
|
| TRS63 |
Feb 3 2021, 03:00 AM
Post
#800
|
|
Member Group: Members Posts: 326 Joined: 14-September 20 From: Germany - Stuttgart Member No.: 24,690 Region Association: Europe |
I took the time to read all your thread..wow, what a nice work, and a dream engine joining a perfect 914. Well done!
Antoine |
|
|
|
|
1 User(s) are reading this topic (1 Guests and 0 Anonymous Users)
0 Members:

|
Lo-Fi Version | Time is now: 29th July 2026 - 04:20 PM |
Invision Power Board
v9.1.4 © 2026 IPS, Inc.