|
|
|
Porsche, and the Porsche crest are registered trademarks of Dr. Ing. h.c. F. Porsche AG.
This site is not affiliated with Porsche in any way. Its only purpose is to provide an online forum for car enthusiasts. All other trademarks are property of their respective owners. |
|
|


| raynekat |
 Feb 11 2015, 07:22 PM Feb 11 2015, 07:22 PM
Post
#81
|
|
Advanced Member  Group: Members Posts: 2,171 Joined: 30-December 14 From: Coeur d'Alene, Idaho Member No.: 18,263 Region Association: Pacific Northwest |
Bought a 71 1.7 liter today.
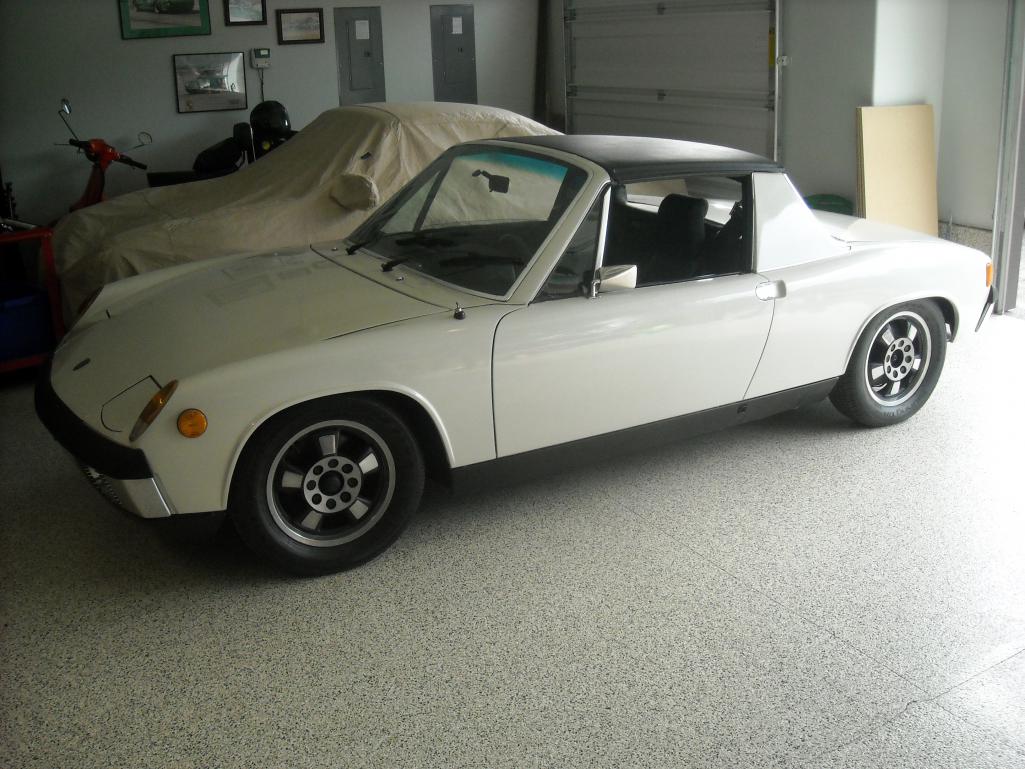 Car is in relatively good shape as far as I can tell. Likely some hell hole and rear portion of the back trunk rust repair needed, but appears to be minor. Time will tell. My current plans are to get the fuel system and FI sorted out (me). It cranks over, but doesn't start. Then go through the brakes from stem to stern (PMB). After that....drive it. The original color is light ivory, but has had a repaint in pearl white years ago. Will get the body work done and do a proper respray. I've already got a set of 15x6.5" Minilites to install. The suspension will get a good going over....likely Elephant Racing setup. Re-do the interior with a more supportive driver's seat. Refreshed gauges (Hollywood Speedo) in 356 fashion. Double wrapped RS steering wheel. GT lightwt door panels. Eventually, a bigger four will power the car. Would like to keep it all 4 cylinder for the time being. I've already got a 911 sitting in the garage that tics all the 911 boxes off. I'll keep a log of the progress here with pics. This is a big, big project.....no doubt. |
   |

 
|
Posts in this topic
 raynekat Just arrived in the garage: 1971 914-4 1.7 Feb 11 2015, 07:22 PM
 Big Len I like the pearl!! Best of luck with it. ... Feb 11 2015, 07:25 PM TargaToy Beautiful car, man! Congrats!! Feb 11 2015, 09:16 PM Cairo94507 Congratulations and it seems like you have a nice ... Feb 11 2015, 09:45 PM wndsnd Nice car!
John Feb 11 2015, 09:54 PM wndsnd :wttc: Feb 11 2015, 09:55 PM Mueller Nice...the Panasports are going to look great! Feb 11 2015, 10:44 PM cary http://members.rennlist.com/pbanders/idle.htm
Bed... Feb 11 2015, 10:45 PM PanelBilly Where'd you find the car? Looks good from here Feb 11 2015, 11:14 PM Montreal914 :wttc:
Good looking 914! For what you plan b... Feb 11 2015, 11:37 PM raynekat Well....starting looking at what I have a little c... Feb 12 2015, 10:10 PM raynekat You're seeing some of the Euro lens that came ... Feb 12 2015, 10:12 PM raynekat So far all the rubber is like Kryptonite....or may... Feb 12 2015, 10:14 PM raynekat Some more pics of the exterior.
Feb 12 2015, 10:22 PM raynekat Or interior....
Wow....it's difficult to add ... Feb 12 2015, 10:26 PM raynekat My plans are to do these instruments....
Al... Feb 12 2015, 10:28 PM
Big Len I like the pearl!! Best of luck with it. ... Feb 11 2015, 07:25 PM TargaToy Beautiful car, man! Congrats!! Feb 11 2015, 09:16 PM Cairo94507 Congratulations and it seems like you have a nice ... Feb 11 2015, 09:45 PM wndsnd Nice car!
John Feb 11 2015, 09:54 PM wndsnd :wttc: Feb 11 2015, 09:55 PM Mueller Nice...the Panasports are going to look great! Feb 11 2015, 10:44 PM cary http://members.rennlist.com/pbanders/idle.htm
Bed... Feb 11 2015, 10:45 PM PanelBilly Where'd you find the car? Looks good from here Feb 11 2015, 11:14 PM Montreal914 :wttc:
Good looking 914! For what you plan b... Feb 11 2015, 11:37 PM raynekat Well....starting looking at what I have a little c... Feb 12 2015, 10:10 PM raynekat You're seeing some of the Euro lens that came ... Feb 12 2015, 10:12 PM raynekat So far all the rubber is like Kryptonite....or may... Feb 12 2015, 10:14 PM raynekat Some more pics of the exterior.
Feb 12 2015, 10:22 PM raynekat Or interior....
Wow....it's difficult to add ... Feb 12 2015, 10:26 PM raynekat My plans are to do these instruments....
Al... Feb 12 2015, 10:28 PM mepstein
My plans are to do these instruments....
A... Jun 8 2016, 08:50 AM
mepstein
My plans are to do these instruments....
A... Jun 8 2016, 08:50 AM mepstein The early cars are my favorites. I'd like to f... Jun 8 2016, 08:56 AM raynekat And these kind of seats...
Probably go identical ... Feb 12 2015, 10:31 PM raynekat I'll do a set of the cool fiberglass/balsa woo... Feb 12 2015, 10:36 PM raynekat So I'm thinking about a narrow body GT that is... Feb 12 2015, 10:41 PM raynekat I love this car....
How close I get to it remain... Feb 12 2015, 10:43 PM jmz
I love this car....
How close I get to it remai... Jun 8 2016, 06:07 AM raynekat I've just bought these wheels....
They are Mi... Feb 12 2015, 10:51 PM raynekat Just lookin' to build a killer 4 cylinder 914 ... Feb 12 2015, 10:56 PM Archie
Just lookin' to build a killer 4 cylinder 914... Sep 5 2016, 09:56 PM jmz I love it Doug!! We're on the same p... Jun 8 2016, 05:54 AM SKL1 Gotta love '71's! Had mine since new.... Jun 8 2016, 11:26 PM jack20 I guess I'm the only reader who noticed the Ve... Jun 8 2016, 11:49 PM raynekat
I guess I'm the only reader who noticed the V... Jun 10 2016, 10:50 PM raynekat So Cary picked up my chassis this past week, and h... Jun 10 2016, 11:04 PM raynekat RE: Just arrived in the garage: 1971 914-4 1.7 Jun 10 2016, 11:05 PM raynekat So I spent most of 2015....here and there....teari... Jun 10 2016, 11:18 PM raynekat I sourced a 2.4 T MFI motor from Australia of all ... Jun 10 2016, 11:25 PM raynekat Of course, you'd have to have the mouse nest s... Jun 10 2016, 11:33 PM raynekat MFI requires a CDI unit, so I sourced a used one t... Jun 10 2016, 11:42 PM raynekat NOS lens and reflectors off of Ebay Germany with s... Jun 10 2016, 11:49 PM cary The day has finally come to start on Doug's ca... Jul 6 2016, 11:26 PM cary Plan is to work on Doug's car thru the end of ... Jul 6 2016, 11:33 PM Frankvw that replated hardware pics...a spot-the-differenc... Jul 7 2016, 12:27 AM raynekat
that replated hardware pics...a spot-the-differen... Jul 7 2016, 01:09 AM mepstein
that replated hardware pics...a spot-the-differe... Jul 7 2016, 09:41 AM Cairo94507 Excellent thread. I like what I see so far. Jul 7 2016, 06:51 AM cary I decide its time to start using the plasma cutter... Jul 7 2016, 09:17 PM cary Then on to removing the exhaust shield from the ol... Jul 7 2016, 09:41 PM cary We did extract the other hole plug. Have the templ... Jul 7 2016, 10:09 PM cary Monday AM :
Pulled out the torch cart and started... Jul 11 2016, 09:50 PM raynekat Nice job Cary.
You're developing "mad... Jul 11 2016, 10:12 PM cary Came in this am and did some more examining of the... Jul 12 2016, 10:40 PM cary Short day ...................spent the am at Roths... Jul 13 2016, 09:37 PM raynekat
I'll let Doug look for some qtr. panel patche... Jul 14 2016, 12:58 AM cary Start the day with trimming the trunk panel. Not a... Jul 15 2016, 08:33 AM cary Feel asleep while writing the post.
Early start an... Jul 15 2016, 09:06 AM cary Here's a shot of the buggered up tail light pa... Jul 15 2016, 11:23 PM raynekat Just got back my newly recovered steering wheel fr... Jul 19 2016, 08:32 PM porschetub
Just got back my newly recovered steering wheel f... Aug 6 2016, 10:09 PM raynekat Latest craziness.....
Re-flocking the glove box.
W... Jul 20 2016, 12:56 PM cary
Re-flocking the glove box.
[color=#6600CC]A busi... Jul 23 2016, 09:51 AM raynekat More fiddling today.
Tried the new Tn1-Tn2 yellow ... Jul 20 2016, 06:08 PM Cairo94507 Man you are moving right along. Terrific work.
... Jul 20 2016, 08:50 PM raynekat
Man you are moving right along. Terrific work.
... Jul 20 2016, 10:24 PM cary Here is the left inside trunk corner cut out from ... Jul 24 2016, 06:29 PM cary As I was working on the inside of the trunk. Super... Jul 24 2016, 06:37 PM raynekat Some other back burner items getting finished whil... Jul 28 2016, 06:16 PM raynekat THE AFTER:
All new plating and rivets on th... Jul 28 2016, 06:22 PM Gmanscott55 WOW... Looks fantastic. :trophy: Jul 28 2016, 07:44 PM cary Back to the task at hand.
Welded in the left insi... Jul 28 2016, 10:46 PM raynekat Last hot day today. Back to cooler temps after tha... Jul 29 2016, 09:41 AM cary Still hot ..................90 degrees when we lef... Jul 29 2016, 09:13 PM cary
While cold galvanizing was drying I sprayed down... Sep 5 2016, 09:10 PM raynekat
[quote name='cary' post='2378258' date='Jul 29 20... Sep 5 2016, 09:30 PM cary Then went after trimming down the trunk panel some... Jul 29 2016, 09:46 PM cary After extending trunk panel I'll start on the ... Jul 29 2016, 09:53 PM cary Began with cutting the right corner of the trunk p... Jul 30 2016, 11:14 PM cary The left corner needs a larger extension. But with... Jul 30 2016, 11:22 PM cary While I was expanding the trunk floor Super In Law... Aug 1 2016, 08:09 AM cary Yesterday was a short day at the shop. Time for th... Aug 6 2016, 10:00 AM cary Looks like Doug's rear qtr. panel sections and... Aug 14 2016, 06:56 AM raynekat While Cary continues on with the metal work on the... Aug 17 2016, 10:13 PM raynekat In addition, I just received back my newly rebuilt... Aug 17 2016, 10:18 PM Mr.Nobody Awesome thread so far. Really enjoying all the me... Aug 18 2016, 11:00 AM jmz Doug, can you share alternator rebuild source? bl... Aug 18 2016, 11:06 AM raynekat
Doug, can you share alternator rebuild source? b... Aug 18 2016, 06:09 PM cary Picked up the donor car this am ...............
... Aug 18 2016, 09:06 PM raynekat Just put together one of the seat bases after gett... Aug 23 2016, 12:46 AM jmz Looks like you are on your way to building another... Aug 23 2016, 08:57 AM raynekat Some of the 911 conversion parts arrived today.
Bi... Sep 22 2016, 08:17 PM mepstein
Some of the 911 conversion parts arrived today.
B... Oct 16 2016, 07:43 AM raynekat Another big batch of plating is coming back from S... Oct 5 2016, 10:31 PM Frankvw Another great Plater-Picture ! nice work Rayne... Oct 6 2016, 12:11 AM cary I hope to be back on it tomorrow.
4 corner brake w... Oct 6 2016, 08:11 AM cary Like always, I ran into a few more issues on Mark... Oct 15 2016, 09:15 PM raynekat I'm ready to go Cary..... Oct 16 2016, 12:35 AM cary We need to be thinking about the stripping, I... Oct 16 2016, 06:46 AM cary Ran to Clackamas first thing and picked up the new... Oct 20 2016, 09:25 PM cary Friday was spent prepping the parts cut out of the... Oct 22 2016, 12:08 PM cary Now where was I ? Next I was on to preparing the ... Oct 23 2016, 02:35 PM raynekat Because I'm putting a 2.4 MFI engine into the ... Oct 23 2016, 08:03 PM raynekat Next up an MFI specific fuel feed/supply pump.
Wit... Oct 23 2016, 08:05 PM raynekat From Stoddards, a new high efficiency 914-6 oil co... Oct 23 2016, 08:09 PM
mepstein The early cars are my favorites. I'd like to f... Jun 8 2016, 08:56 AM raynekat And these kind of seats...
Probably go identical ... Feb 12 2015, 10:31 PM raynekat I'll do a set of the cool fiberglass/balsa woo... Feb 12 2015, 10:36 PM raynekat So I'm thinking about a narrow body GT that is... Feb 12 2015, 10:41 PM raynekat I love this car....
How close I get to it remain... Feb 12 2015, 10:43 PM jmz
I love this car....
How close I get to it remai... Jun 8 2016, 06:07 AM raynekat I've just bought these wheels....
They are Mi... Feb 12 2015, 10:51 PM raynekat Just lookin' to build a killer 4 cylinder 914 ... Feb 12 2015, 10:56 PM Archie
Just lookin' to build a killer 4 cylinder 914... Sep 5 2016, 09:56 PM jmz I love it Doug!! We're on the same p... Jun 8 2016, 05:54 AM SKL1 Gotta love '71's! Had mine since new.... Jun 8 2016, 11:26 PM jack20 I guess I'm the only reader who noticed the Ve... Jun 8 2016, 11:49 PM raynekat
I guess I'm the only reader who noticed the V... Jun 10 2016, 10:50 PM raynekat So Cary picked up my chassis this past week, and h... Jun 10 2016, 11:04 PM raynekat RE: Just arrived in the garage: 1971 914-4 1.7 Jun 10 2016, 11:05 PM raynekat So I spent most of 2015....here and there....teari... Jun 10 2016, 11:18 PM raynekat I sourced a 2.4 T MFI motor from Australia of all ... Jun 10 2016, 11:25 PM raynekat Of course, you'd have to have the mouse nest s... Jun 10 2016, 11:33 PM raynekat MFI requires a CDI unit, so I sourced a used one t... Jun 10 2016, 11:42 PM raynekat NOS lens and reflectors off of Ebay Germany with s... Jun 10 2016, 11:49 PM cary The day has finally come to start on Doug's ca... Jul 6 2016, 11:26 PM cary Plan is to work on Doug's car thru the end of ... Jul 6 2016, 11:33 PM Frankvw that replated hardware pics...a spot-the-differenc... Jul 7 2016, 12:27 AM raynekat
that replated hardware pics...a spot-the-differen... Jul 7 2016, 01:09 AM mepstein
that replated hardware pics...a spot-the-differe... Jul 7 2016, 09:41 AM Cairo94507 Excellent thread. I like what I see so far. Jul 7 2016, 06:51 AM cary I decide its time to start using the plasma cutter... Jul 7 2016, 09:17 PM cary Then on to removing the exhaust shield from the ol... Jul 7 2016, 09:41 PM cary We did extract the other hole plug. Have the templ... Jul 7 2016, 10:09 PM cary Monday AM :
Pulled out the torch cart and started... Jul 11 2016, 09:50 PM raynekat Nice job Cary.
You're developing "mad... Jul 11 2016, 10:12 PM cary Came in this am and did some more examining of the... Jul 12 2016, 10:40 PM cary Short day ...................spent the am at Roths... Jul 13 2016, 09:37 PM raynekat
I'll let Doug look for some qtr. panel patche... Jul 14 2016, 12:58 AM cary Start the day with trimming the trunk panel. Not a... Jul 15 2016, 08:33 AM cary Feel asleep while writing the post.
Early start an... Jul 15 2016, 09:06 AM cary Here's a shot of the buggered up tail light pa... Jul 15 2016, 11:23 PM raynekat Just got back my newly recovered steering wheel fr... Jul 19 2016, 08:32 PM porschetub
Just got back my newly recovered steering wheel f... Aug 6 2016, 10:09 PM raynekat Latest craziness.....
Re-flocking the glove box.
W... Jul 20 2016, 12:56 PM cary
Re-flocking the glove box.
[color=#6600CC]A busi... Jul 23 2016, 09:51 AM raynekat More fiddling today.
Tried the new Tn1-Tn2 yellow ... Jul 20 2016, 06:08 PM Cairo94507 Man you are moving right along. Terrific work.
... Jul 20 2016, 08:50 PM raynekat
Man you are moving right along. Terrific work.
... Jul 20 2016, 10:24 PM cary Here is the left inside trunk corner cut out from ... Jul 24 2016, 06:29 PM cary As I was working on the inside of the trunk. Super... Jul 24 2016, 06:37 PM raynekat Some other back burner items getting finished whil... Jul 28 2016, 06:16 PM raynekat THE AFTER:
All new plating and rivets on th... Jul 28 2016, 06:22 PM Gmanscott55 WOW... Looks fantastic. :trophy: Jul 28 2016, 07:44 PM cary Back to the task at hand.
Welded in the left insi... Jul 28 2016, 10:46 PM raynekat Last hot day today. Back to cooler temps after tha... Jul 29 2016, 09:41 AM cary Still hot ..................90 degrees when we lef... Jul 29 2016, 09:13 PM cary
While cold galvanizing was drying I sprayed down... Sep 5 2016, 09:10 PM raynekat
[quote name='cary' post='2378258' date='Jul 29 20... Sep 5 2016, 09:30 PM cary Then went after trimming down the trunk panel some... Jul 29 2016, 09:46 PM cary After extending trunk panel I'll start on the ... Jul 29 2016, 09:53 PM cary Began with cutting the right corner of the trunk p... Jul 30 2016, 11:14 PM cary The left corner needs a larger extension. But with... Jul 30 2016, 11:22 PM cary While I was expanding the trunk floor Super In Law... Aug 1 2016, 08:09 AM cary Yesterday was a short day at the shop. Time for th... Aug 6 2016, 10:00 AM cary Looks like Doug's rear qtr. panel sections and... Aug 14 2016, 06:56 AM raynekat While Cary continues on with the metal work on the... Aug 17 2016, 10:13 PM raynekat In addition, I just received back my newly rebuilt... Aug 17 2016, 10:18 PM Mr.Nobody Awesome thread so far. Really enjoying all the me... Aug 18 2016, 11:00 AM jmz Doug, can you share alternator rebuild source? bl... Aug 18 2016, 11:06 AM raynekat
Doug, can you share alternator rebuild source? b... Aug 18 2016, 06:09 PM cary Picked up the donor car this am ...............
... Aug 18 2016, 09:06 PM raynekat Just put together one of the seat bases after gett... Aug 23 2016, 12:46 AM jmz Looks like you are on your way to building another... Aug 23 2016, 08:57 AM raynekat Some of the 911 conversion parts arrived today.
Bi... Sep 22 2016, 08:17 PM mepstein
Some of the 911 conversion parts arrived today.
B... Oct 16 2016, 07:43 AM raynekat Another big batch of plating is coming back from S... Oct 5 2016, 10:31 PM Frankvw Another great Plater-Picture ! nice work Rayne... Oct 6 2016, 12:11 AM cary I hope to be back on it tomorrow.
4 corner brake w... Oct 6 2016, 08:11 AM cary Like always, I ran into a few more issues on Mark... Oct 15 2016, 09:15 PM raynekat I'm ready to go Cary..... Oct 16 2016, 12:35 AM cary We need to be thinking about the stripping, I... Oct 16 2016, 06:46 AM cary Ran to Clackamas first thing and picked up the new... Oct 20 2016, 09:25 PM cary Friday was spent prepping the parts cut out of the... Oct 22 2016, 12:08 PM cary Now where was I ? Next I was on to preparing the ... Oct 23 2016, 02:35 PM raynekat Because I'm putting a 2.4 MFI engine into the ... Oct 23 2016, 08:03 PM raynekat Next up an MFI specific fuel feed/supply pump.
Wit... Oct 23 2016, 08:05 PM raynekat From Stoddards, a new high efficiency 914-6 oil co... Oct 23 2016, 08:09 PM  |
1 User(s) are reading this topic (1 Guests and 0 Anonymous Users)
0 Members:

|
Lo-Fi Version | Time is now: 23rd June 2026 - 09:06 PM |
Invision Power Board
v9.1.4 © 2026 IPS, Inc.