|
|
|
Porsche, and the Porsche crest are registered trademarks of Dr. Ing. h.c. F. Porsche AG.
This site is not affiliated with Porsche in any way. Its only purpose is to provide an online forum for car enthusiasts. All other trademarks are property of their respective owners. |
|
|

  |

| BeatNavy |
 Feb 16 2015, 10:39 AM Feb 16 2015, 10:39 AM
Post
#1
|
|
Certified Professional Scapegoat  Group: Members Posts: 2,924 Joined: 26-February 14 From: Easton, MD Member No.: 17,042 Region Association: MidAtlantic Region |
I have a '73 2056 engine that I had originally intended to put in my project car, but that effort is going to take some time, so my current plan is to swap the 1.7L out of my daily driver with this engine. It came with set of used (but good) SSI heat exchangers. I want to have my feces together as much as possible before doing the engine swap, and having never done the HE's before any advice is welcome. I've tried to do my homework, and here's what I think I've found (what am I missing or assuming incorrectly):
1. I don't have an engine stand. Sounds like it's best to get the engine/tranny in car and then install the HE's. 2. I need to make sure the tops of the HE's are uniform and file them with large file as needed (putting a large piece of wood across them they appear to be uniform, but I don't know what I may be missing). 3. Need install hardware, including copper rings, copper lock nuts, washers, etc. AA sells a "kit" here that I'm tempted to buy even though it doesn't look like such a great deal (IMG:style_emoticons/default/chair.gif) 4. Anneal (or not) the copper rings (sounds like there's two schools of thought on this). 5. Use anti-seize compound 6. Install and tighten to 18 Ft-Lbs and recheck and tighten (as needed) a few days later after driving. Any thoughts on any of these steps? I'm trying to go in one fell swoop from a 1.7L with tail-shift to a 2056/side-shift/Triad Exhaust. If I do this correctly it should drive (and sound) quite different.... (IMG:style_emoticons/default/driving.gif) Thanks for the help! |
   |

 
|
| Chris Pincetich |
Feb 16 2015, 10:54 AM
Post
#2
|
|
B-) Group: Members Posts: 2,082 Joined: 3-October 05 From: Point Reyes Station, CA Member No.: 4,907 Region Association: Northern California |
Great job with the research (IMG:style_emoticons/default/beerchug.gif)
McMark advises to use the small, 1/4" socket wrench so that the thin, smaller 13mm can be used. It's a tight fit on some of those nuts. I bought a wobble extension for my 3/8" socket wrench, and it is an awesome helper in lots of situations, including the tough to reach HE nuts. The HE install was the task the sent me over the edge to buy my pricy Snap-On torque wrench and the wobble extension (IMG:style_emoticons/default/beerchug.gif) |
 |
|
| BeatNavy |
Feb 16 2015, 11:05 AM
Post
#3
|
|
Certified Professional Scapegoat Group: Members Posts: 2,924 Joined: 26-February 14 From: Easton, MD Member No.: 17,042 Region Association: MidAtlantic Region |
QUOTE(Chris Pincetich @ Feb 16 2015, 11:54 AM)  Great job with the research (IMG:style_emoticons/default/beerchug.gif) McMark advises to use the small, 1/4" socket wrench so that the thin, smaller 13mm can be used. It's a tight fit on some of those nuts. I bought a wobble extension for my 3/8" socket wrench, and it is an awesome helper in lots of situations, including the tough to reach HE nuts. The HE install was the task the sent me over the edge to buy my pricy Snap-On torque wrench and the wobble extension (IMG:style_emoticons/default/beerchug.gif) Good advice, thanks Chris! It's good to have the tool available that'll keep you from going insane before you start the job. That's now on my shopping list. |
|
|
|
| ChrisFoley |
Feb 16 2015, 11:44 AM
Post
#4
|
|
I am Tangerine Racing Group: Members Posts: 7,925 Joined: 29-January 03 From: Bolton, CT Member No.: 209 Region Association: None |
QUOTE(BeatNavy @ Feb 16 2015, 11:39 AM) 6. Install and tighten to 18 Ft-Lbs and recheck and tighten (as needed) a few days later after driving. 18 ft-lbs is too much. You'll ruin the mounts on the SSI's. 14 ft-lbs is appropriate, but still may be too much for the thin SS material. |
|
|
|
| BeatNavy |
Feb 16 2015, 12:54 PM
Post
#5
|
|
Certified Professional Scapegoat Group: Members Posts: 2,924 Joined: 26-February 14 From: Easton, MD Member No.: 17,042 Region Association: MidAtlantic Region |
QUOTE(Racer Chris @ Feb 16 2015, 12:44 PM) QUOTE(BeatNavy @ Feb 16 2015, 11:39 AM) 6. Install and tighten to 18 Ft-Lbs and recheck and tighten (as needed) a few days later after driving. 18 ft-lbs is too much. You'll ruin the mounts on the SSI's. 14 ft-lbs is appropriate, but still may be too much for the thin SS material. Ahhh...ok. Thanks, Chris. I had bad info on that then. That could have been a small disaster. |
|
|
|
| rhodyguy |
Feb 16 2015, 02:45 PM
Post
#6
|
|
Chimp Sanctuary NW. Check it out. Group: Members Posts: 22,080 Joined: 2-March 03 From: Orion's Bell. The BELL! Member No.: 378 Region Association: Galt's Gulch |
Inspect the mounting ears for weld cracks. 'Paint' the top edges of the he piping with a black sharpie. Lightly pass the bastard file over both pipe edges on one he he at the same time. After the first pass see how much of the black edge is left and proceed with a light touch.
|
|
|
|
| bigkensteele |
Feb 16 2015, 03:37 PM
Post
#7
|
|
Major Member Group: Members Posts: 2,197 Joined: 30-August 04 From: Cincinnati, OH Member No.: 2,660 Region Association: South East States |
Here is another tip from McMark that helped me get rid of a bad exhaust leak.
LOOSELY mount both exchangers to the heads and then loosely mount your muffler to make sure that everything aligns properly. When you tighten the nuts on the studs, use a flashlight to make sure that you can see copper all the way around each pipe. If not, the pipe can ride on the ridge of the head around the copper gasket. This WILL cause a leak if the pipes are not solidly on the copper. |
|
|
|
| BeatNavy |
Feb 16 2015, 05:25 PM
Post
#8
|
|
Certified Professional Scapegoat Group: Members Posts: 2,924 Joined: 26-February 14 From: Easton, MD Member No.: 17,042 Region Association: MidAtlantic Region |
Thanks for the help, fellas. I took Kevin's tip about painting with a sharpie and carefully filing. One HE didn't take too long. The other took a good 20 minutes of careful filing, and it's still not perfect. Better, but not perfect.
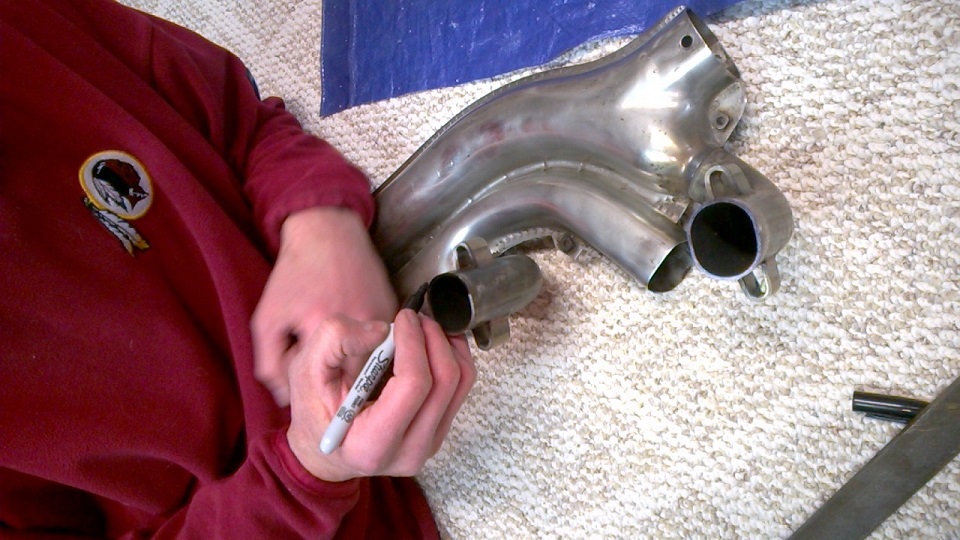 Biggest file I have... 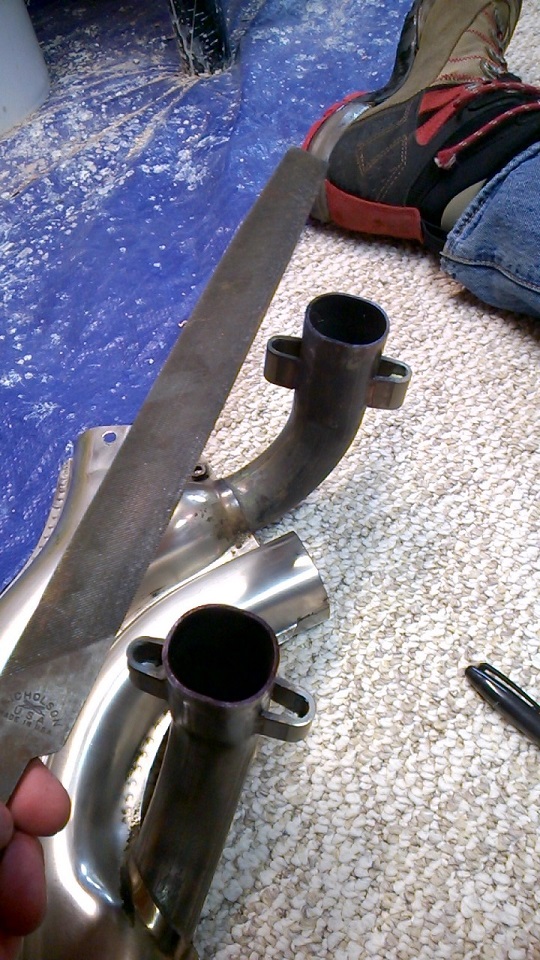 Close to done... 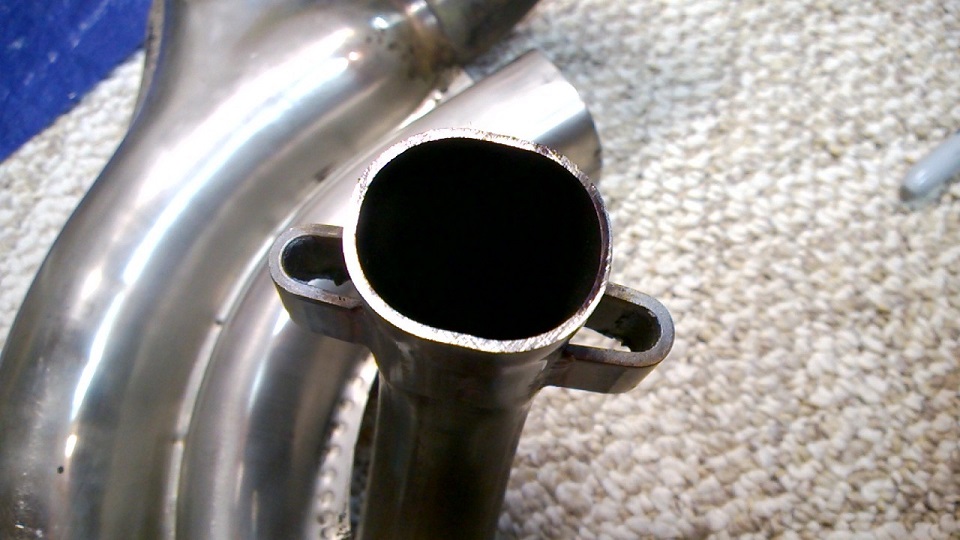 I'll get the hardware be ready when I have the rest of the pieces. Thanks again! |
|
|
|
| McMark |
Feb 16 2015, 10:41 PM
Post
#9
|
|
914 Freak! Group: Retired Admin Posts: 20,179 Joined: 13-March 03 From: Grand Rapids, MI Member No.: 419 Region Association: None |
Also DONT tighten any nuts all the way down right off the bat. These things are SUPER finicky. Tighten each nut a little at a time and pay more attention to the nuts which are close to the valve cover. Those are the ones that should seat first. Another tip is to grab the whole heat exchanger and rattle/wiggle it around between rounds of tightening. This will help the pipes seat flat. Finally, use the correct copper played flange nuts. They are self locking and use a 12mm socket instead of the 13 which gives much more breathing room for the socket.
Seems like a lot of drama for exhaust, but it's all absolutely necessary. Thanks a ton VW for such a bull-s*** exhaust setup. |
|
|
|
| BeatNavy |
Feb 17 2015, 05:43 AM
Post
#10
|
|
Certified Professional Scapegoat Group: Members Posts: 2,924 Joined: 26-February 14 From: Easton, MD Member No.: 17,042 Region Association: MidAtlantic Region |
QUOTE(McMark @ Feb 16 2015, 11:41 PM) Also DONT tighten any nuts all the way down right off the bat. These things are SUPER finicky. Tighten each nut a little at a time and pay more attention to the nuts which are close to the valve cover. Those are the ones that should seat first. Another tip is to grab the whole heat exchanger and rattle/wiggle it around between rounds of tightening. This will help the pipes seat flat. Finally, use the correct copper played flange nuts. They are self locking and use a 12mm socket instead of the 13 which gives much more breathing room for the socket. Seems like a lot of drama for exhaust, but it's all absolutely necessary. Thanks a ton VW for such a bull-s*** exhaust setup. Sweet. Finicky Exhaust + Clueless Newbie = "what could possibly go wrong???" At least I now know I need to go into this carefully. Thanks for the advice, Mark. I'll post updates once I start swapping everything out. |
|
|
|
| rgalla9146 |
Feb 17 2015, 07:32 AM
Post
#11
|
|
Advanced Member Group: Members Posts: 4,552 Joined: 23-November 05 From: Paramus NJ Member No.: 5,176 Region Association: None |
Use grease to hold the copper seals to the heads for install.
Use a flat washer on each stud to spread the load of the eight nuts. If there is leakage at the heads after taking all above precautions disconnect one spark plug wire at a time (with engine running) to locate the offending cylinder. If you have any cardiac issues have your significant other pull each wire off. |
|
|
|
| cary |
Feb 17 2015, 07:56 AM
Post
#12
|
|
Advanced Member Group: Members Posts: 3,900 Joined: 26-January 04 From: Sherwood Oregon Member No.: 1,608 Region Association: Pacific Northwest |
+1 on the annealing.
|
|
|
|
| warrenoliver |
Feb 17 2015, 09:39 PM
Post
#13
|
|
Member Group: Members Posts: 363 Joined: 11-November 06 From: McFarland, Wisconsin Member No.: 7,199 Region Association: Upper MidWest |
QUOTE(BeatNavy @ Feb 16 2015, 05:25 PM) Thanks for the help, fellas. I took Kevin's tip about painting with a sharpie and carefully filing. One HE didn't take too long. The other took a good 20 minutes of careful filing, and it's still not perfect. Better, but not perfect. Biggest file I have... Close to done... I'll get the hardware be ready when I have the rest of the pieces. Thanks again! A little advice from someone who has BTDT. Don't work on your exhaust pipes on the wife's nice white carpet. You might live to regret it. (IMG:style_emoticons/default/chair.gif) |
|
|
|
|
1 User(s) are reading this topic (1 Guests and 0 Anonymous Users)
0 Members:

|
Lo-Fi Version | Time is now: 14th May 2024 - 03:46 PM |
Invision Power Board
v9.1.4 © 2024 IPS, Inc.