|
|
|
Porsche, and the Porsche crest are registered trademarks of Dr. Ing. h.c. F. Porsche AG.
This site is not affiliated with Porsche in any way. Its only purpose is to provide an online forum for car enthusiasts. All other trademarks are property of their respective owners. |
|
|

  |

| bcheney |
 Mar 23 2015, 02:16 PM Mar 23 2015, 02:16 PM
Post
#1
|
|
Senior Member  Group: Members Posts: 1,341 Joined: 16-November 03 From: Orlando, FL Member No.: 1,348 Region Association: South East States |
Just posted this on the Bird Board...Let me know if you can help.
http://forums.pelicanparts.com/porsche-914...tml#post8543554 |
   |

 
|
| Al Meredith |
Mar 23 2015, 03:03 PM
Post
#2
|
|
Senior Member Group: Members Posts: 960 Joined: 4-November 04 From: Atlanta, ga Member No.: 3,061 |
Brian, I think the mark on the rim of the dist. should be #1 TDC . The rotor should be pointing at that mark. It is possible that the dist is in wrong. AL
|
|
|
|
| rgalla9146 |
Mar 23 2015, 03:45 PM
Post
#3
|
|
Advanced Member Group: Members Posts: 4,559 Joined: 23-November 05 From: Paramus NJ Member No.: 5,176 Region Association: None |
QUOTE(bcheney @ Mar 23 2015, 04:16 PM)  Just posted this on the Bird Board...Let me know if you can help. http://forums.pelicanparts.com/porsche-914...tml#post8543554 Just responded on the bird |
|
|
|
| SLITS |
Mar 23 2015, 04:12 PM
Post
#4
|
|
"This Utah shit is HARSH!" Group: Benefactors Posts: 13,602 Joined: 22-February 04 From: SoCal Mountains ... Member No.: 1,696 Region Association: None |
Have a compression tester? Plug the connector hose into #1, put yur finger over it to seal it and rotate the engine. When you feel pressure you know you are coming up on firing #1.
Once you've determined which mark is TDC. set the distributor so that the leading edge of the rotor is in line with the mark on the dizzy housing. My pulley has four marks ... Z1(TDC) and 5 degrees before TDC. A little more to the right are the 32-35 degree marks for advance. Oh, it's a 76 2.7L. Based on the 2nd image on Pelican, you are not on the TDC mark. The timing marks (for 6K RPM) are to the left of the mark you are aligned with. The timing marks are to the RIGHT of TDC. It looks like you should rotate the engine backwards 60 degees for TDC. |
|
|
|
| bcheney |
Mar 23 2015, 05:53 PM
Post
#5
|
|
Senior Member Group: Members Posts: 1,341 Joined: 16-November 03 From: Orlando, FL Member No.: 1,348 Region Association: South East States |
QUOTE(SLITS @ Mar 23 2015, 06:12 PM) Have a compression tester? Plug the connector hose into #1, put yur finger over it to seal it and rotate the engine. When you feel pressure you know you are coming up on firing #1. Once you've determined which mark is TDC. set the distributor so that the leading edge of the rotor is in line with the mark on the dizzy housing. My pulley has four marks ... Z1(TDC) and 5 degrees before TDC. A little more to the right are the 32-35 degree marks for advance. Oh, it's a 76 2.7L. Based on the 2nd image on Pelican, you are not on the TDC mark. The timing marks (for 6K RPM) are to the left of the mark you are aligned with. The timing marks are to the RIGHT of TDC. It looks like you should rotate the engine backwards 60 degees for TDC. OK rotated the crank back towards the drivers side and found TDC Z1 very quickly on the pulley...and looked at the flywheel opening and now I see TDC Z1 there as well. I didnt take the distributor out while doing that...now this is what the distributor looks like. I believe I need to take it out and place in the right spot...need some guidance. Look at the picture and you see that have marked it up with some colors...Is the notch in the right location or does the distributor housing need to be rotated at all? Once the housing is in the right place what color needs to line up with the notch...just not familar with this rev limiting rotor... Attached thumbnail(s)   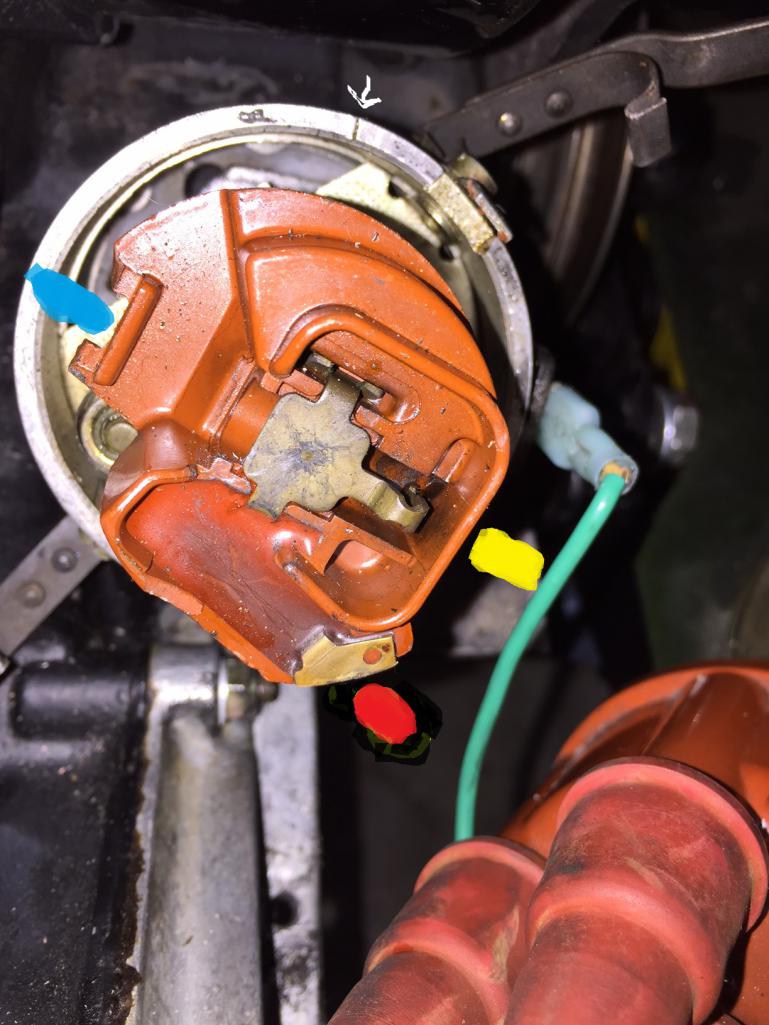 Attached image(s) 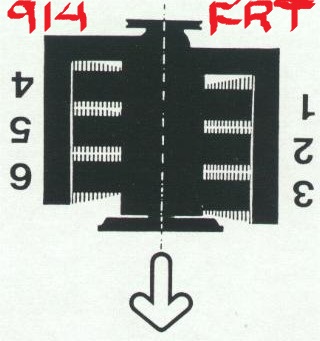
|
|
|
|
| SLITS |
Mar 23 2015, 06:17 PM
Post
#6
|
|
"This Utah shit is HARSH!" Group: Benefactors Posts: 13,602 Joined: 22-February 04 From: SoCal Mountains ... Member No.: 1,696 Region Association: None |
It appears the rotor is pointed at #4. At TDC (Z1), #1 & #4 are at TDC, but one is on compression stroke and the other is on the exhaust stroke.
You need to make sure which cylinder is on the compression (firing ) stroke. Either pull the valve covers and check which cylinder has both valves closed or rotate the engine a full 360 degees and see if the rotor lines up with the mark on the dizzy again. You MUST know that you are on the compression stroke of #1 cylinder and that is why I said to use the hose from a compression tester. |
|
|
|
| bcheney |
Mar 23 2015, 06:32 PM
Post
#7
|
|
Senior Member Group: Members Posts: 1,341 Joined: 16-November 03 From: Orlando, FL Member No.: 1,348 Region Association: South East States |
QUOTE(SLITS @ Mar 23 2015, 08:17 PM) It appears the rotor is pointed at #4. At TDC (Z1), #1 & #4 are at TDC, but one is on compression stroke and the other is on the exhaust stroke. You need to make sure which cylinder is on the compression (firing ) stroke. Either pull the valve covers and check which cylinder has both valves closed or rotate the engine a full 360 degees and see if the rotor lines up with the mark on the dizzy again. You MUST know that you are on the compression stroke of #1 cylinder and that is why I said to use the hose from a compression tester. What color point on the rotor needs to align with the mark on this dizzy Once I am sure I have it at TDC Z1? I marked the picture up Red, Blue or Yellow to make it easy to understand. |
|
|
|
| rgalla9146 |
Mar 23 2015, 06:46 PM
Post
#8
|
|
Advanced Member Group: Members Posts: 4,559 Joined: 23-November 05 From: Paramus NJ Member No.: 5,176 Region Association: None |
Hold on there !
Continue to rotate the crank one full revolution in the same direction and up to TDC again. Now check the dizzy. The brass tip should point to the notch in the rim of the dist. I think you will find that it is where it will be, or very close. Now comes the next question. Is it on the compression stroke ? This can be determined in two ways. Feel for clearance at both rockers on cyl. #1 ....or... devise a way to blow into the cylinder to verify that both valves are closed and there is near zero leakage. A compression tester hose or a leak-down hose with the schrader valve removed is good for this test. If you can just blow through it's 360 out. If you find this is the case, go another revolution to TDC, lift the dizzy and drop it in so that the tip points to the notch. Easy, peasey. |
|
|
|
| rgalla9146 |
Mar 23 2015, 06:50 PM
Post
#9
|
|
Advanced Member Group: Members Posts: 4,559 Joined: 23-November 05 From: Paramus NJ Member No.: 5,176 Region Association: None |
Doh !
Slits done covered it while I had my dinner ! Between our explanations you'll get it right. |
|
|
|
| SLITS |
Mar 23 2015, 07:18 PM
Post
#10
|
|
"This Utah shit is HARSH!" Group: Benefactors Posts: 13,602 Joined: 22-February 04 From: SoCal Mountains ... Member No.: 1,696 Region Association: None |
The rotor needs to point to your white arrow WHEN you are on the compression stroke of #1 cylinder.
|
|
|
|
| bcheney |
Mar 23 2015, 07:22 PM
Post
#11
|
|
Senior Member Group: Members Posts: 1,341 Joined: 16-November 03 From: Orlando, FL Member No.: 1,348 Region Association: South East States |
QUOTE(SLITS @ Mar 23 2015, 09:18 PM) The rotor needs to point to your white arrow WHEN you are on the compression stroke of #1 cylinder. OK I guess I am just a little dense...what point on the rotor needs to point to the white mark...I am just having a little hard time with the look of this Rev Limiter type rotor that is why I color coded it in the picture. Thanks for all the help guys. |
|
|
|
| fixer34 |
Mar 23 2015, 07:47 PM
Post
#12
|
|
Senior Member Group: Members Posts: 1,085 Joined: 16-September 14 From: Chicago area Member No.: 17,908 Region Association: Upper MidWest |
Been a while since I've done this, but if I recall..
As mentioned. the FIRST thing to do is make sure that cylinder 1 is at TDC on the compression stroke. Compression tester, blow air in, rod in spark plug hole, valve lifters, etc. However you chose, but that should also line up the Z1 timing mark with the case mark. DO NOT turn the engine from this point. The mark on the distributor is only a reference point for cylinder 1 plug wire. The cap only goes on one way to make sure this lines up. Since I'm pretty sure the distributor drive gear on the /6 is not keyed (like the VW/type 4's), the distributor can be installed pretty much in any orientation; the important part is that the brass contact on the rotor (I think you had it colored red) points directly at the mark on the distributor body. This should get you close enough to do static timing, or even start the engine and fine adjust with a light. Once the rotor and distributor body line up though, make sure the plug wire at the mark goes to cylinder 1. Then follow all the wires around the cap in firing order. As was also noted, it appears you may be at #4 TDC instead of #1. If so, turn the engine thru one full revolution. The brass contact will be closer to the distributor mark, but still not lined up. You can either rotate the distributor body, or remove it and turn the rotor shaft one tooth mark on the gear. (you will go in opposite directions-if you have to turn the distributor body counterclockwise to line them up, you need to turn the rotor shaft clockwise once you remove it. Yeah, I know it's confusing...) |
|
|
|
| SLITS |
Mar 23 2015, 08:56 PM
Post
#13
|
|
"This Utah shit is HARSH!" Group: Benefactors Posts: 13,602 Joined: 22-February 04 From: SoCal Mountains ... Member No.: 1,696 Region Association: None |
As stated before, the leading edge of the rotor ... the copper/brass part at the end (which I didn't say) needs to be lined up with the mark in the distributor body. The contact end (copper brass) is opposite the black/grey piece of metal sticking up (This is actually a ground to short the spark when the rotor designated RPM limit is reached).
Hopefully this gets you through the process. |
|
|
|
| SLITS |
Mar 24 2015, 08:45 AM
Post
#14
|
|
"This Utah shit is HARSH!" Group: Benefactors Posts: 13,602 Joined: 22-February 04 From: SoCal Mountains ... Member No.: 1,696 Region Association: None |
image of "bump rotor" attached
(IMG:http://www.914world.com/bbs2/uploads_offsite/i239.photobucket.com-1696-1427208330.1.jpg) Maybe you have solved it, but thought I would add the image. |
|
|
|
| Dave_Darling |
Mar 24 2015, 08:56 AM
Post
#15
|
|
914 Idiot Group: Members Posts: 14,990 Joined: 9-January 03 From: Silicon Valley / Kailua-Kona Member No.: 121 Region Association: Northern California |
As I said on the Bird board, the red mark--the brass on the outside of the rotor--is the contact, just as Slits has said. Additionally, your rotor has had the rev-limiting feature completely removed. If you want a limiter, you should replace the rotor.
The Pelican 911 Tech Articles will also have answers for you; check those out. (Like the 911 timing one that I linked to in your Bird board thread.) --DD |
|
|
|
| bcheney |
Mar 24 2015, 09:00 AM
Post
#16
|
|
Senior Member Group: Members Posts: 1,341 Joined: 16-November 03 From: Orlando, FL Member No.: 1,348 Region Association: South East States |
QUOTE(SLITS @ Mar 24 2015, 10:45 AM) image of "bump rotor" attached (IMG:http://www.914world.com/bbs2/uploads_offsite/i239.photobucket.com-1696-1427208330.1.jpg) Maybe you have solved it, but thought I would add the image. Ok rotated the crank towards the drivers side 360 degrees and this is what everything looks like now. Thoughts? Attached thumbnail(s) 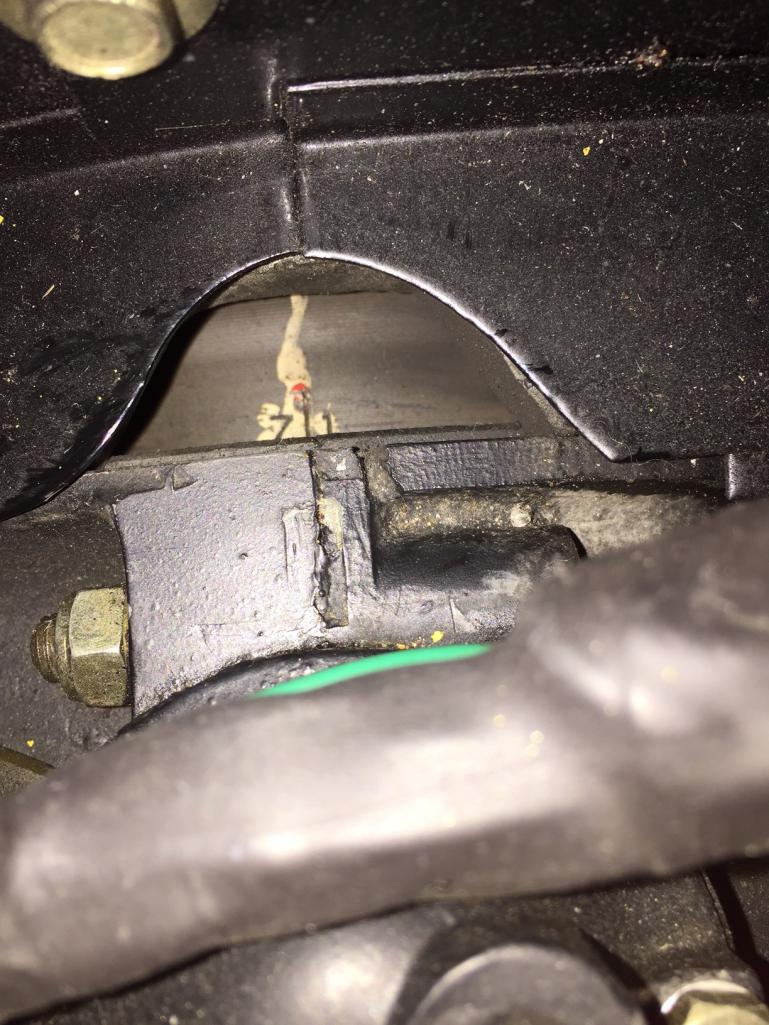 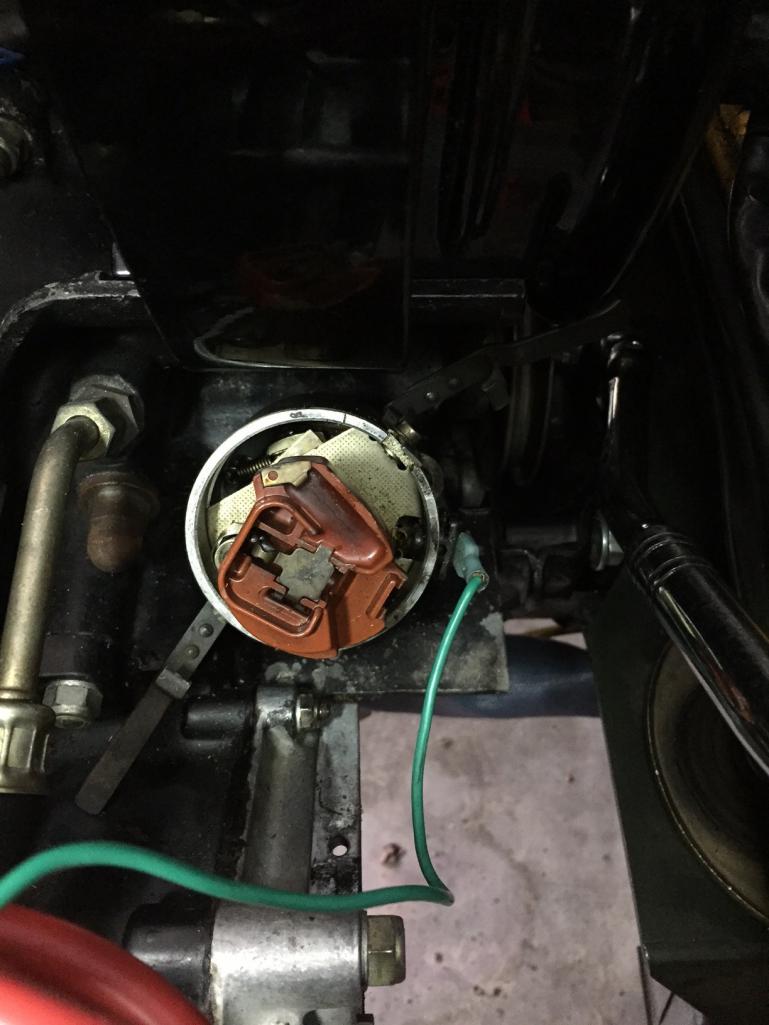
|
|
|
|
| bcheney |
Mar 24 2015, 09:04 AM
Post
#17
|
|
Senior Member Group: Members Posts: 1,341 Joined: 16-November 03 From: Orlando, FL Member No.: 1,348 Region Association: South East States |
..
Attached thumbnail(s) 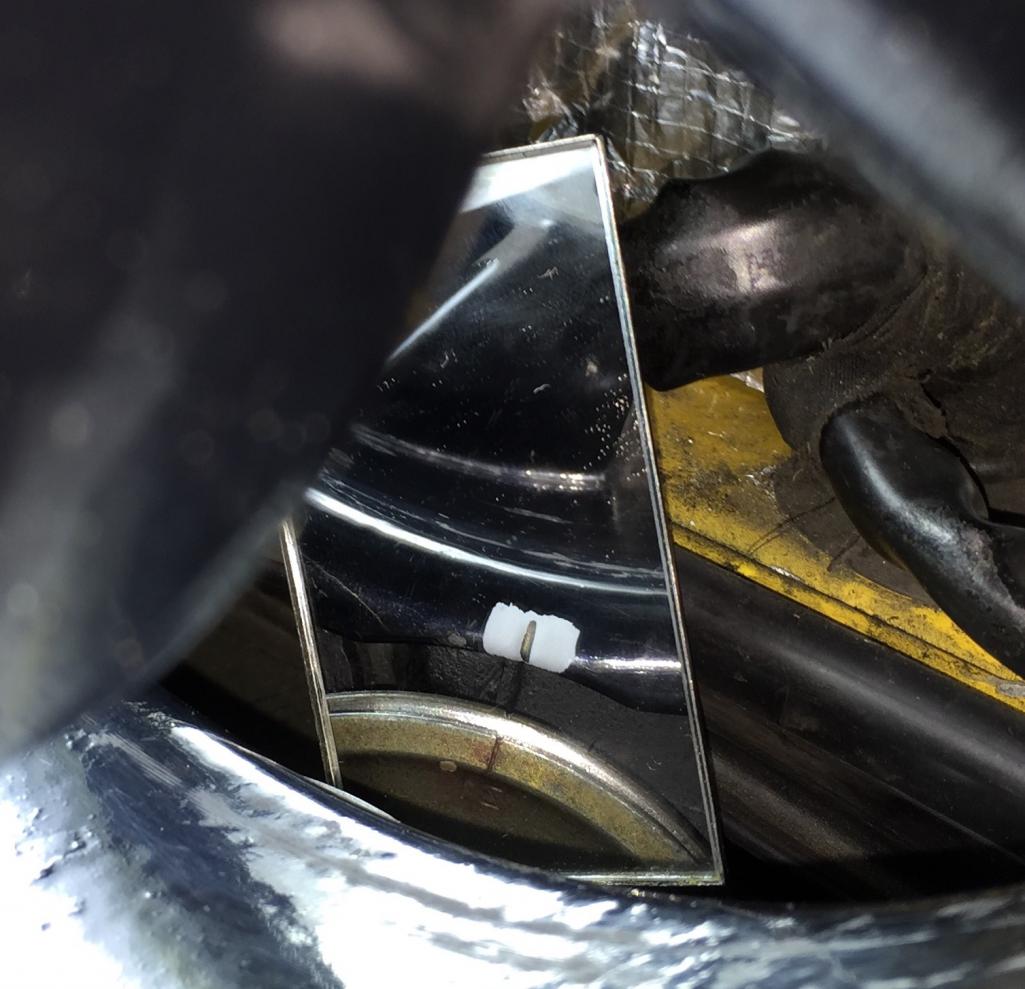
|
|
|
|
| mskala |
Mar 24 2015, 10:41 AM
Post
#18
|
|
R Group: Members Posts: 1,925 Joined: 2-January 03 From: Massachusetts Member No.: 79 Region Association: None |
I can't remember for sure, but I think what happens if you have the
distributor body out of a certain range is that it will not be able to close the holders onto the cap, from hitting one of the various metal pieces. It looks like you need to aim for the line on the distributor to be about 30 degrees more clockwise; anyway that's always worked for me. Also your rotor is as you know not in the right place. Lift the distributor almost out, until the shaft can spin freely. Line up the line as I said above, and line up the rotor a bit to the left of the line. Due to the gear shape, as you insert it the rotor will turn to the right a bit. Hopefully it lines up close to the distributor line. If not, repeat with rotor moved very slightly. Loosen the clamp and line it up for real. Check that cap can be clamped on before declaring victory. |
|
|
|
| SLITS |
Mar 24 2015, 01:41 PM
Post
#19
|
|
"This Utah shit is HARSH!" Group: Benefactors Posts: 13,602 Joined: 22-February 04 From: SoCal Mountains ... Member No.: 1,696 Region Association: None |
The dizzy needs to be rotated counter clockwise until the leading edge of the contact is in line with the mark in the distributor. This assumes you are on the compression stroke of #1 cylinder.
If you do not have enough swing in the dizzy to accomplish the task, you will have to pull the dizzy up and rotate the rotor clockwise hopefully one tooth on the drive gear and then rotate the dizzy to line up the mark. Post above says the same thing in essence. |
|
|
|
| bcheney |
Mar 24 2015, 02:50 PM
Post
#20
|
|
Senior Member Group: Members Posts: 1,341 Joined: 16-November 03 From: Orlando, FL Member No.: 1,348 Region Association: South East States |
QUOTE(SLITS @ Mar 24 2015, 03:41 PM) The dizzy needs to be rotated counter clockwise until the leading edge of the contact is in line with the mark in the distributor. This assumes you are on the compression stroke of #1 cylinder. If you do not have enough swing in the dizzy to accomplish the task, you will have to pull the dizzy up and rotate the rotor clockwise hopefully one tooth on the drive gear and then rotate the dizzy to line up the mark. Post above says the same thing in essence. Ok here is where I've ended up now after taking a long lunch! Attached thumbnail(s) 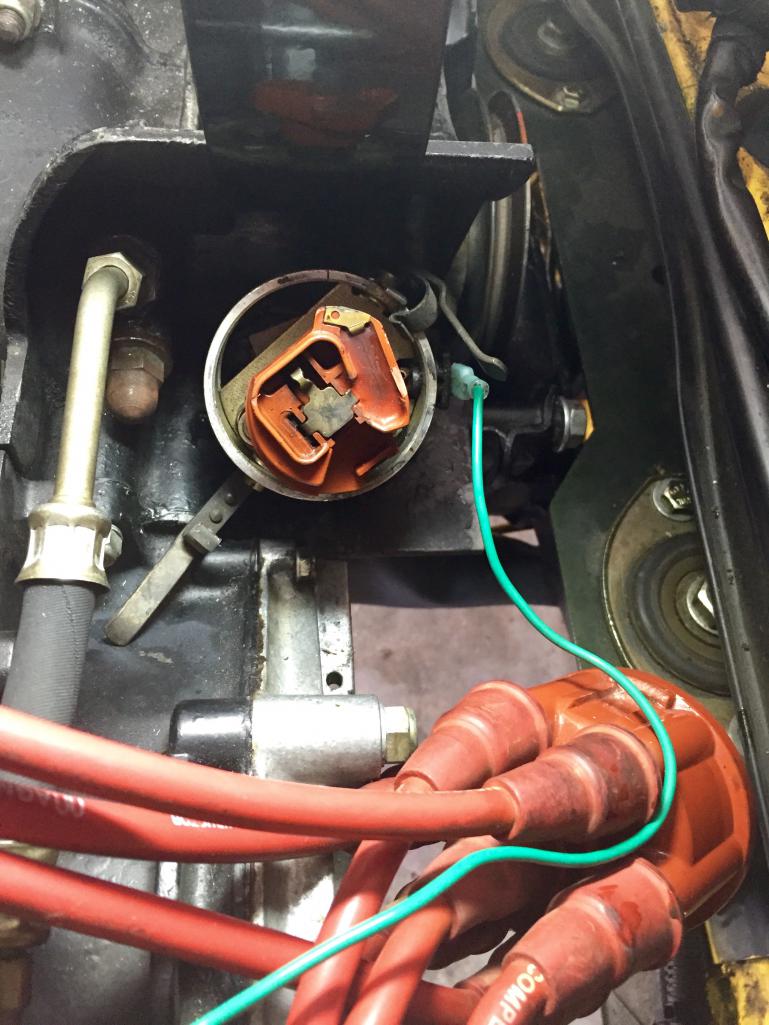
|
|
|
|
|
1 User(s) are reading this topic (1 Guests and 0 Anonymous Users)
0 Members:

|
Lo-Fi Version | Time is now: 20th May 2024 - 07:56 PM |
Invision Power Board
v9.1.4 © 2024 IPS, Inc.