|
|
|
Porsche, and the Porsche crest are registered trademarks of Dr. Ing. h.c. F. Porsche AG.
This site is not affiliated with Porsche in any way. Its only purpose is to provide an online forum for car enthusiasts. All other trademarks are property of their respective owners. |
|
|

  |

| pgollender |
 Apr 26 2015, 11:28 PM Apr 26 2015, 11:28 PM
Post
#1
|
|
Member  Group: Members Posts: 193 Joined: 5-July 11 From: Sacramento Member No.: 13,281 Region Association: Northern California |
I decided to replace the ball socket on my 1970 shifter . I didn't realize the plate springs were under so much tension. I haven't found a way to put them back.
Any body have an idea ? 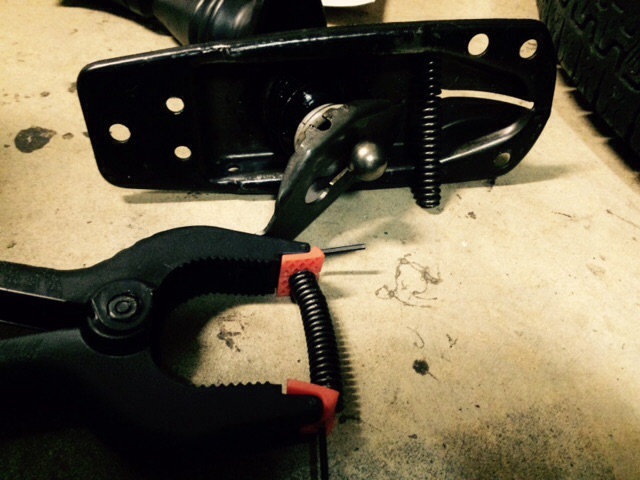 |
   |

 
|
| Old Yella |
Apr 26 2015, 11:54 PM
Post
#2
|
|
Old Yella Group: Members Posts: 158 Joined: 2-July 13 From: Canberra Australia Member No.: 16,086 Region Association: Southwest Region |
QUOTE(pgollender @ Apr 26 2015, 10:28 PM)  I decided to replace the ball socket on my 1970 shifter . I didn't realize the plate springs were under so much tension. I haven't found a way to put them back. Any body have an idea ? Yep they are a bitch. I bent a small hook on the end of stiff piece of wire. Placed the wire through one of the holes on the side of the shifter base. Placed the spring on the wire. Pulled the wire to compress the spring and get it in between the two holes in the shifter. passed a Phillips screw driver through the holes and spring whilst simultaneously cutting the hook off the wire with wire cutters. Then followed through with the retaining pin pushing the screwdriver out. Same again for the other one. You need strong fingers. It was a bitch but I have done it a few times that way now. Don't know if there is a special tool. |
|
|
|
| mepstein |
Apr 27 2015, 04:09 AM
Post
#3
|
|
914-6 GT in waiting Group: Members Posts: 19,268 Joined: 19-September 09 From: Landenberg, PA/Wilmington, DE Member No.: 10,825 Region Association: MidAtlantic Region |
Leather gloves. Safety glasses vise grips. I used a Phillips screw diver to hold the spring in then pushed it out with the pin.
|
 |
|
| jim_hoyland |
Apr 27 2015, 04:49 AM
Post
#4
|
|
Get that VIN ? Group: Members Posts: 9,287 Joined: 1-May 03 From: Sunset Beach, CA Member No.: 643 Region Association: Southern California |
There is an easy way, i recently did it. Forget exactly how but I did a seach and found a thread with the info.... (IMG:style_emoticons/default/smile.gif)
|
|
|
|
| saigon71 |
Apr 27 2015, 05:55 AM
Post
#5
|
|
Senior Member Group: Members Posts: 1,998 Joined: 1-June 09 From: Dillsburg, PA Member No.: 10,428 Region Association: MidAtlantic Region |
Oh yeah...good times with those springs!
I put one end in the housing and grabbed the other end with vice grips to compress the spring...took a couple tries, but I finally got it. As others suggested - wear safety glasses in case the spring flies! |
|
|
|
| maf914 |
Apr 27 2015, 07:03 AM
Post
#6
|
|
Not a Guru! Group: Members Posts: 3,049 Joined: 30-April 03 From: Central Florida Member No.: 632 Region Association: None |
It can be done, but what a pain! I launched those things across the garage a couple of times and had to search to find them. My fingers hurt. My hands hurt. Frustration level was very high. (IMG:style_emoticons/default/laugh.gif)
|
|
|
|
| rhodyguy |
Apr 27 2015, 07:22 AM
Post
#7
|
|
Chimp Sanctuary NW. Check it out. Group: Members Posts: 22,079 Joined: 2-March 03 From: Orion's Bell. The BELL! Member No.: 378 Region Association: Galt's Gulch |
Put one end of a spring near a hole. Push one of the pins in as far as you can. The pin should slide about a third of the way in to the spring. Put one of the clips on the pin. This will act as a stop later. The other end of the spring will be resting on the bottom of the base. The pin will keep the spring from jumping out while you wrestle the free end. Take a small metal putty knife, stick it in the free end of the spring and push the free end down into the base. The spring will bow up slightly in the middle. Push/work he pin thru the rest of the spring and hole, then install the other clip. Repeat. Done.
|
|
|
|
| bdstone914 |
Apr 27 2015, 07:22 AM
Post
#8
|
|
bdstone914 Group: Members Posts: 4,520 Joined: 8-November 03 From: Riverside CA Member No.: 1,319 |
Cap'n Krusty replied to a thread explaining to easy way.
|
|
|
|
| Brian_Boss |
Apr 27 2015, 09:55 AM
Post
#9
|
|
Member Group: Members Posts: 324 Joined: 3-June 03 From: Dallas, TX Member No.: 781 |
First off, if you are not holding the housing in a vice, you're making it significantly more difficult. If you don't have a vice, clamp it to something.
I basically do what Rhody said but I think it's easier if you use a long pin punch inside the spring in place of the pin. Once the spring is lined up, it will stay in place while you remove the punch and install the guide pin. I use a long pin punch made for brake caliper work but anything that gives you a bit more leverage to "steer" the spring into place will do. |
|
|
|
| pgollender |
Apr 28 2015, 03:18 PM
Post
#10
|
|
Member Group: Members Posts: 193 Joined: 5-July 11 From: Sacramento Member No.: 13,281 Region Association: Northern California |
Thanks everyone:
With the advice given, I found it very easy to install the springs. I documented it for future World DIYer's. A couple words first: When you install the shift guide spring and guide rings... (that is the spring that goes into the shifter housing to put tension on the shifter ball) the small conical side goes up into the housing with the smaller diameter guide on top and the larger diameter ring on the bottom. I had it reversed at first with little to no tension. That would have effectively or problematically locked me out of reverse. Also when putting in the retaining pins, the C-clips are slightly problematic because they run into the housing when you are threading the pin. Sometimes you can twist the C-clip just enough to barely clear the shifter housing when pushing them in, otherwise just take them off and install them at the end. Tools needed: Safety glasses, gloves,vise, small flat block of wood, dummy pin ( nail punch, nail, allen wrench, stiff 1" putty knife: 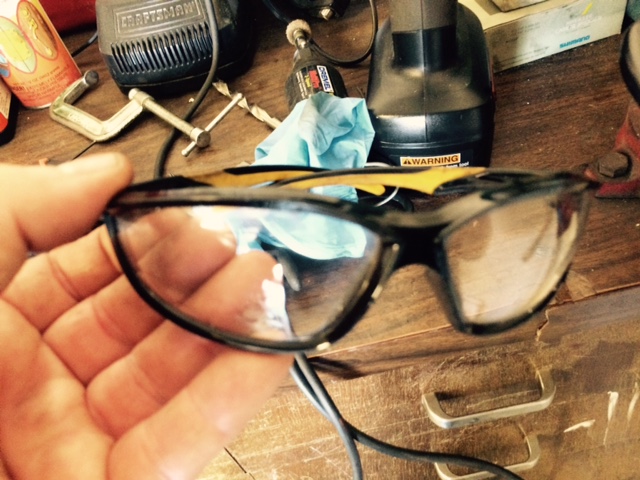 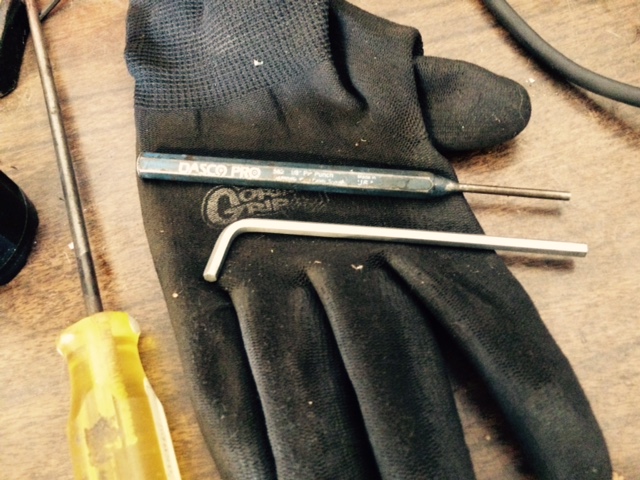 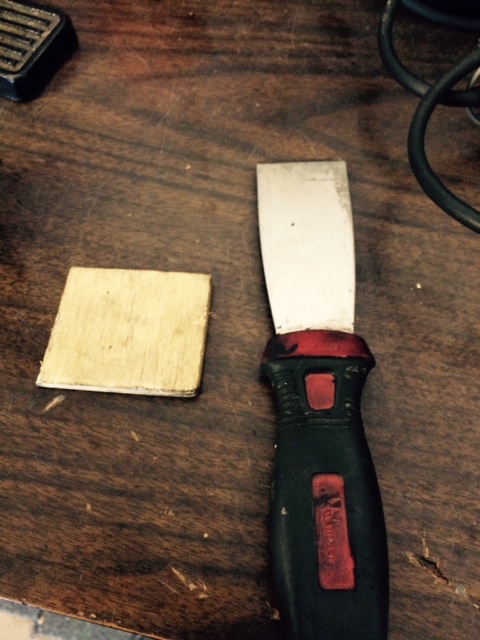 Here is the project 1/2 way done so you can see what was done and what has to be done: 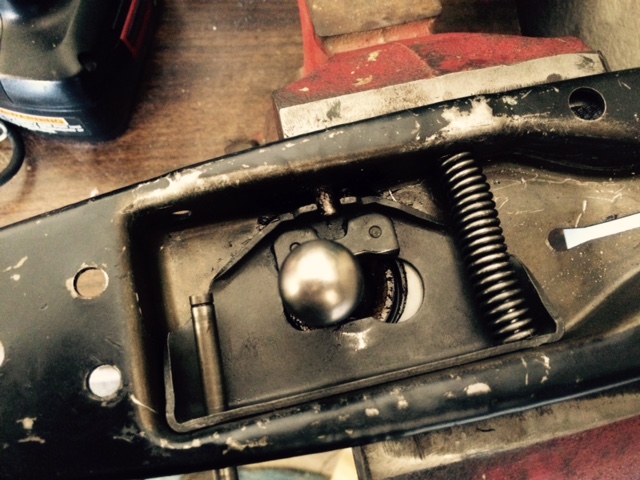 First you thread the retainer pin in: 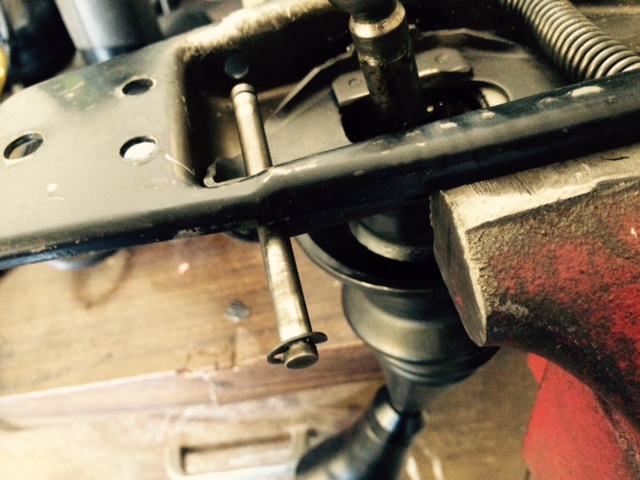 Make sure your vise doesn't block the exit hole: 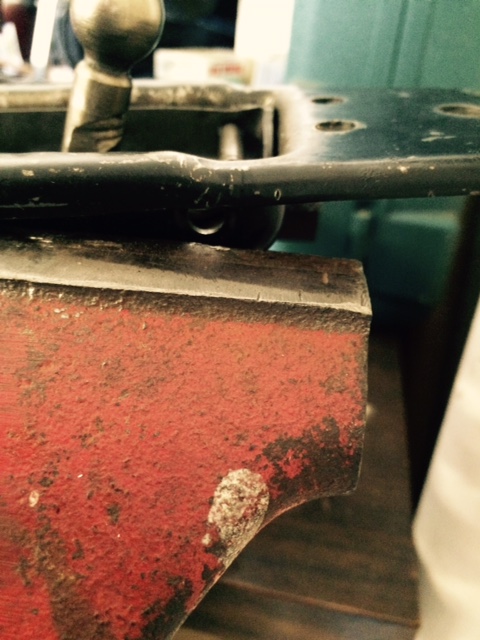 Then thread the spring: 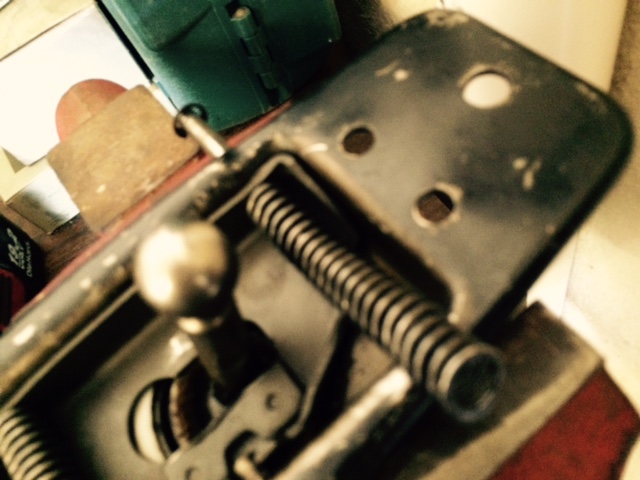 Put your block on top of the spring and jam the putty knife about three turns from the end: 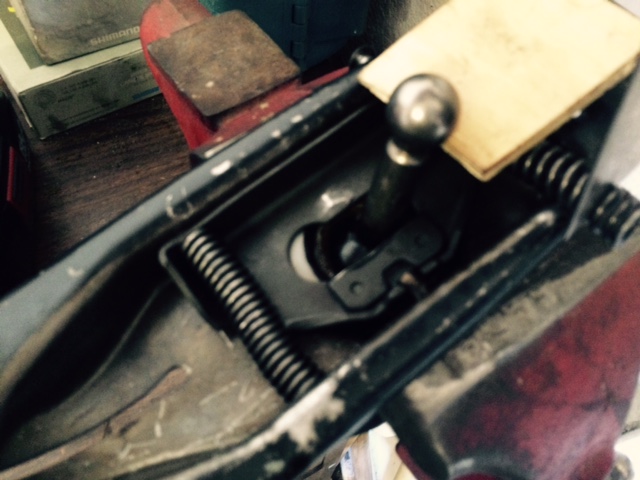 Jam away and put pressure on top of the spring while pushing the knife-spring combination into the housing: You must get the hole of the spring to co-incide with the hole in the housing to pass your dummy pin through the open side: 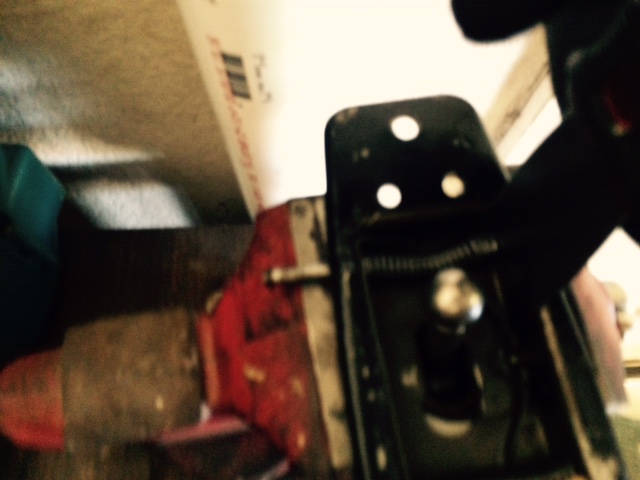 Remove putty knife slowly keeping some pressure on the block, then thread the dummy pin in the open side. It will look a little wobbly like this: 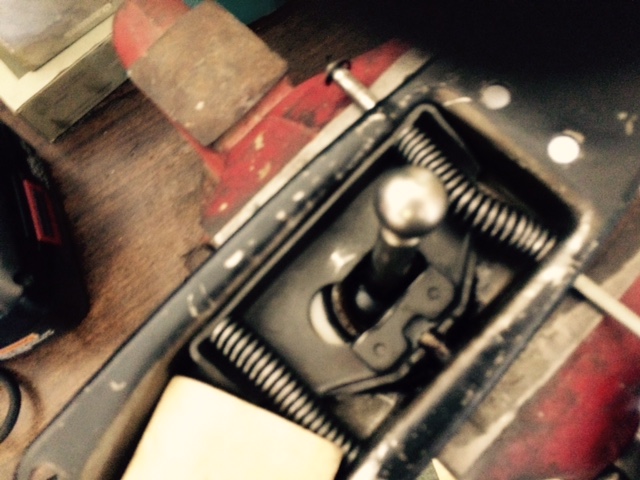 Keeping a little pressure on the block, slowly push the stock retaining pin all the way through. Obviously the spring must not be blocking the exit hole: 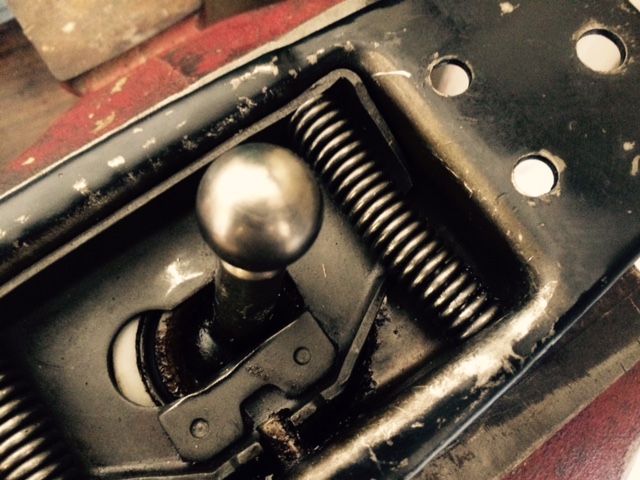 Don't forget the four C=clips: 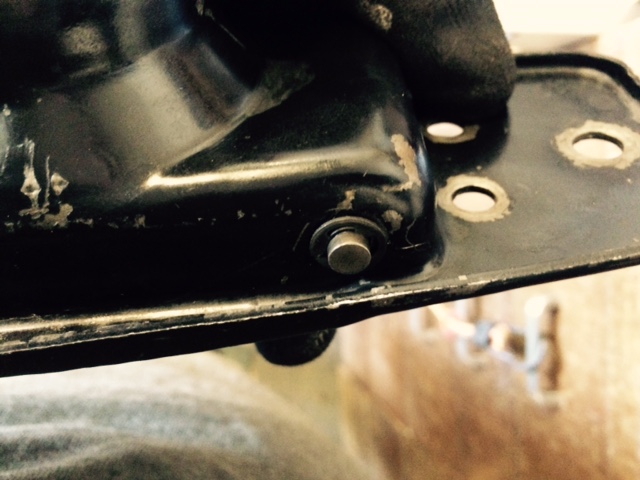 Viola!! Ready for Shifter rod docking: 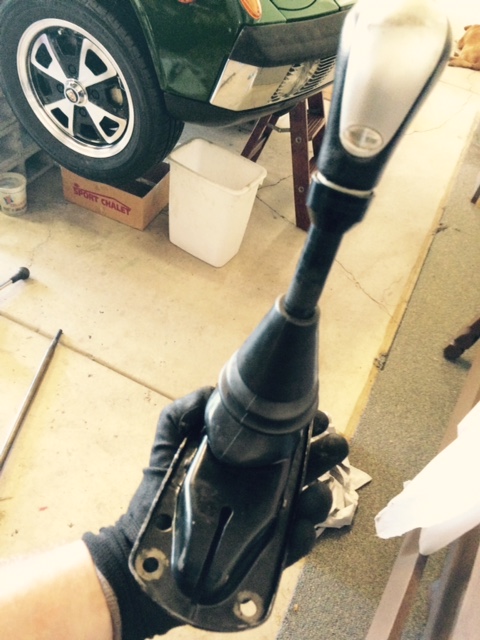 Attached image(s) 
|
|
|
|
| rhodyguy |
Apr 28 2015, 11:39 PM
Post
#11
|
|
Chimp Sanctuary NW. Check it out. Group: Members Posts: 22,079 Joined: 2-March 03 From: Orion's Bell. The BELL! Member No.: 378 Region Association: Galt's Gulch |
Well presented. The lever ball bushing are often overlooked. I hate to be a pain. The contact edge of the detention plate is pretty worn. It should be straight across the contact edge. Is the shift lever grooved at the contact point?
|
|
|
|
| rhodyguy |
Apr 29 2015, 11:51 AM
Post
#12
|
|
Chimp Sanctuary NW. Check it out. Group: Members Posts: 22,079 Joined: 2-March 03 From: Orion's Bell. The BELL! Member No.: 378 Region Association: Galt's Gulch |
this is a pretty clean detent plate. junked up springs caked to the point they don't compress adds to the 1&R engagement issues. worn plate, worn shift levers, and spent lever ball bushings just makes matters worse. i'll see if i can find a shifter that has what i consider excessive wear at the detent plate rub point. the backing plate on yours is worn to the point that the crisp line is gone and the surface is wavy. new ones are $36.75 at the bird. gpr may have them also. pn 901 424 017 00. they are common for early and late shifters.
Attached thumbnail(s)  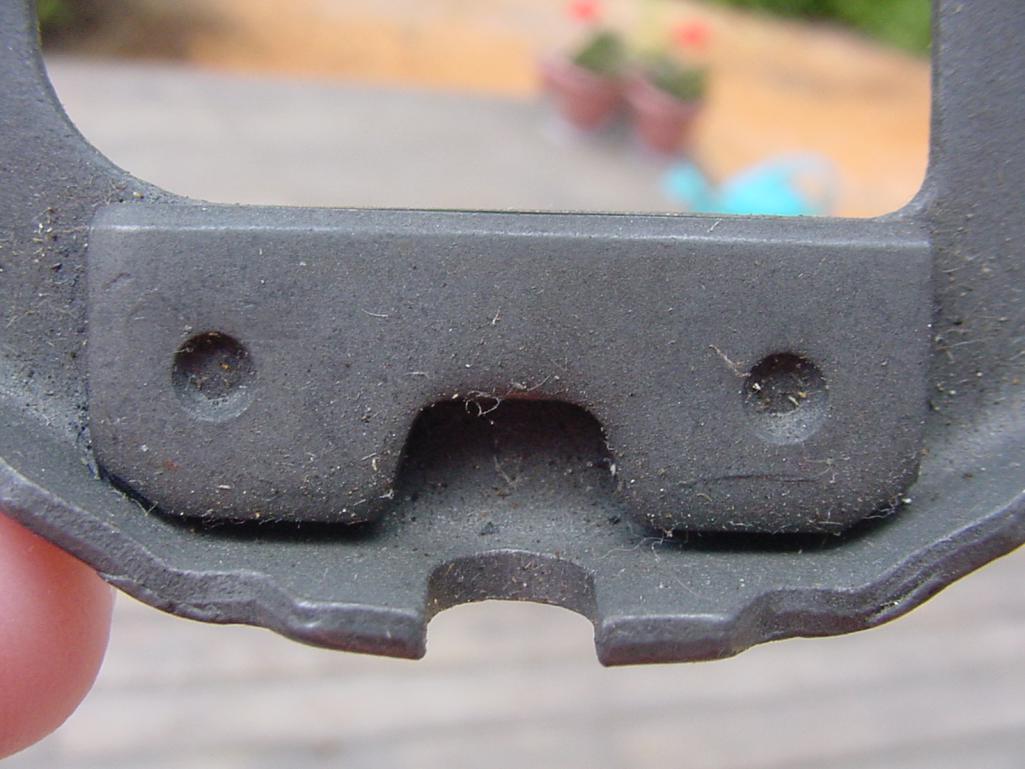 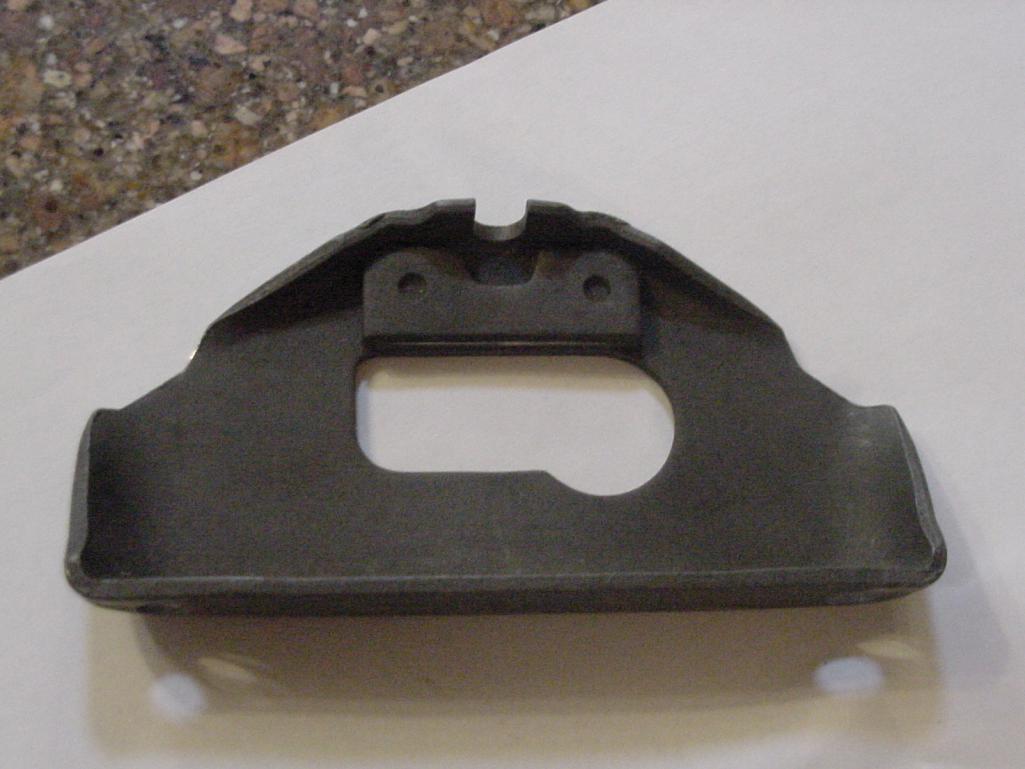 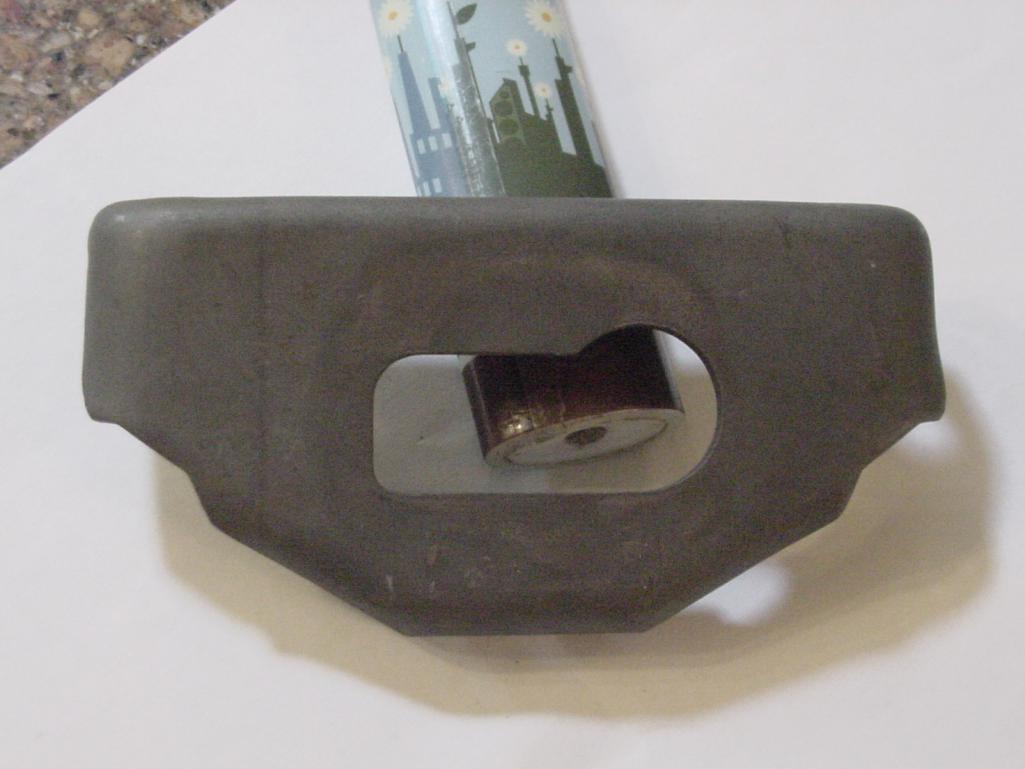 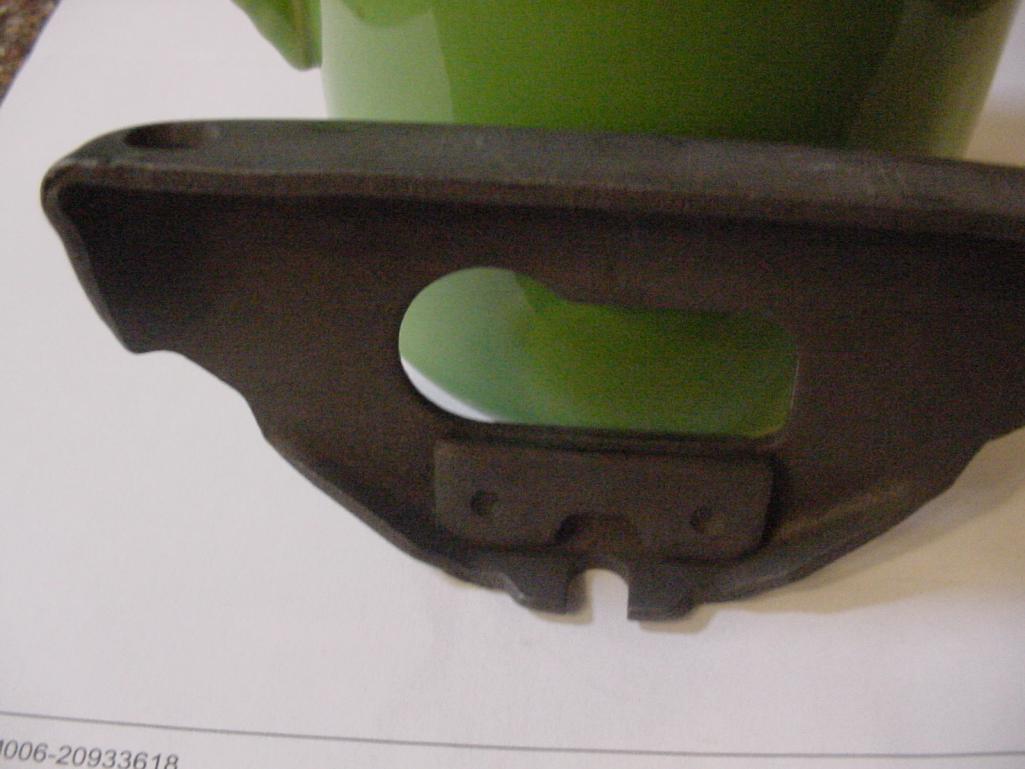
|
|
|
|
| pgollender |
Apr 29 2015, 11:40 PM
Post
#13
|
|
Member Group: Members Posts: 193 Joined: 5-July 11 From: Sacramento Member No.: 13,281 Region Association: Northern California |
QUOTE(rhodyguy @ Apr 28 2015, 10:39 PM) ....The contact edge of the detention plate is pretty worn. It should be straight across the contact edge. Is the shift lever grooved at the contact point? Rhody- Yes the shifter bar is very worn, look at the 6th frame down. Should I weld this back up and grind it smooth and round ? Also I didn't catch the worn detent plate. Not enough experience. $36 to rid as much slop sounds like a good deal. Not sure what vendor is "the bird"? Pelican parts ? |
|
|
|
| rhodyguy |
Apr 30 2015, 06:30 AM
Post
#14
|
|
Chimp Sanctuary NW. Check it out. Group: Members Posts: 22,079 Joined: 2-March 03 From: Orion's Bell. The BELL! Member No.: 378 Region Association: Galt's Gulch |
Yes, pelican. I had missed the picture showing the wear point. I would consider that excessive.
|
|
|
|
| maf914 |
Apr 30 2015, 08:04 AM
Post
#15
|
|
Not a Guru! Group: Members Posts: 3,049 Joined: 30-April 03 From: Central Florida Member No.: 632 Region Association: None |
Some what off topic, but, Weltmeister offered a kit that added two additional springs, mounted parallel to the existing springs, to increase the spring force pushing the shift lever away from the reverse-first gear gate. It was marketed to prevent engaging reverse during a first to second shift. I don't know if they still offer the kit. (IMG:style_emoticons/default/idea.gif)
|
|
|
|
| rhodyguy |
Apr 30 2015, 08:21 AM
Post
#16
|
|
Chimp Sanctuary NW. Check it out. Group: Members Posts: 22,079 Joined: 2-March 03 From: Orion's Bell. The BELL! Member No.: 378 Region Association: Galt's Gulch |
Over kill. I bought into the hype and promptly took them out. MORE spring tension can't overcome wear or tighten up the shift pattern. Fix a shifter, r&r the bushings and external issues are moot.
|
|
|
|
| malcolm2 |
Apr 30 2015, 09:51 AM
Post
#17
|
|
Advanced Member Group: Members Posts: 2,745 Joined: 31-May 11 From: Nashville Member No.: 13,139 Region Association: South East States |
Glad you did this. And has been the case with my car.... do it once to learn how. Then do it again. I have done lots of things more than once. You get done, then say, "CRAP" and do it again.
Hey, in post 10 where you can see your front wheel. I see a stack of cinder blocks. Are they holding up your car? Cinder blocks are designed to be used with the holes vertical, not horizontal. You never see a Karate guy smash a block by hitting the top of the block.... always the side. You never see a whole building built with the holes showing either. Becareful. |
|
|
|
| rhodyguy |
Apr 30 2015, 10:19 AM
Post
#18
|
|
Chimp Sanctuary NW. Check it out. Group: Members Posts: 22,079 Joined: 2-March 03 From: Orion's Bell. The BELL! Member No.: 378 Region Association: Galt's Gulch |
iirc with the spring kit as per instructions you drill 2 new holes per side so the total number of springs is 4. small holes, plan on extra bits. got tired of the bit bill. didn't solve anything. then discovered the problem was the shifter assem. then the rest of the bushings. then the roll pin. very frustrating. pre internet and i didn't know another person with a 914. live and die by the haynes. then i put in a side shifter.
|
|
|
|
| johnhora |
Apr 30 2015, 02:51 PM
Post
#19
|
|
Senior Member Group: Members Posts: 866 Joined: 7-January 03 From: Derby City KY Member No.: 107 Region Association: None |
nice write up pgollender...
I made this tool a long time ago for just this type of project....guess I should patent it eh...modified a large flat blade screw driver....gives that little extra push(compression) on the spring with out slipping 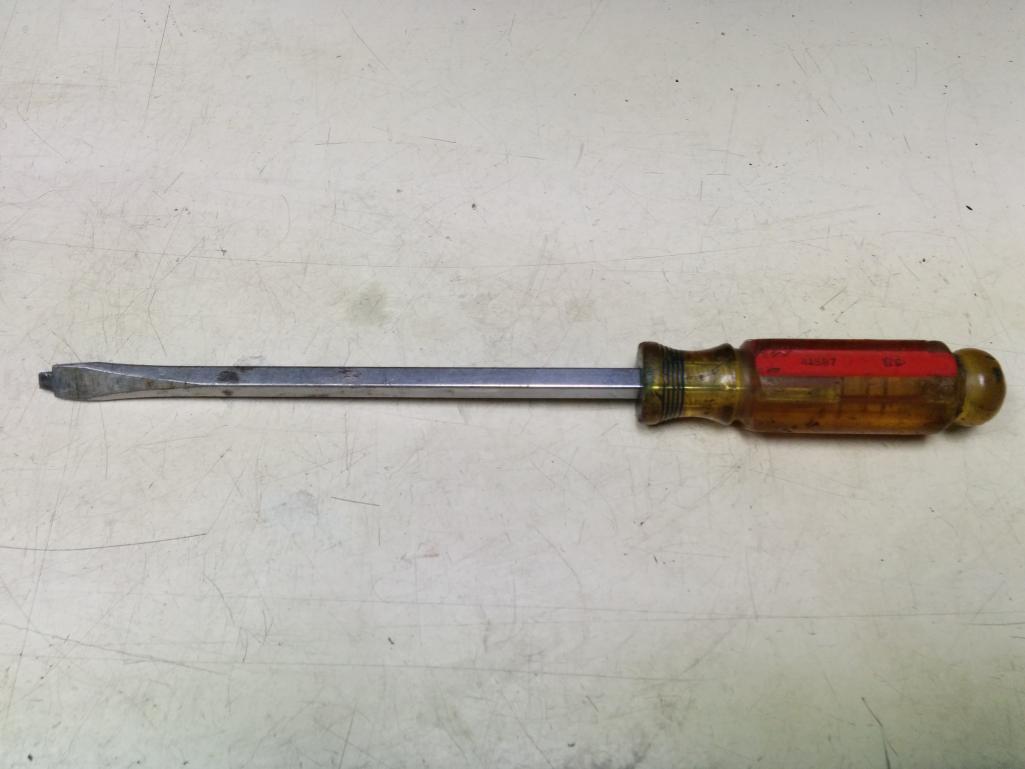 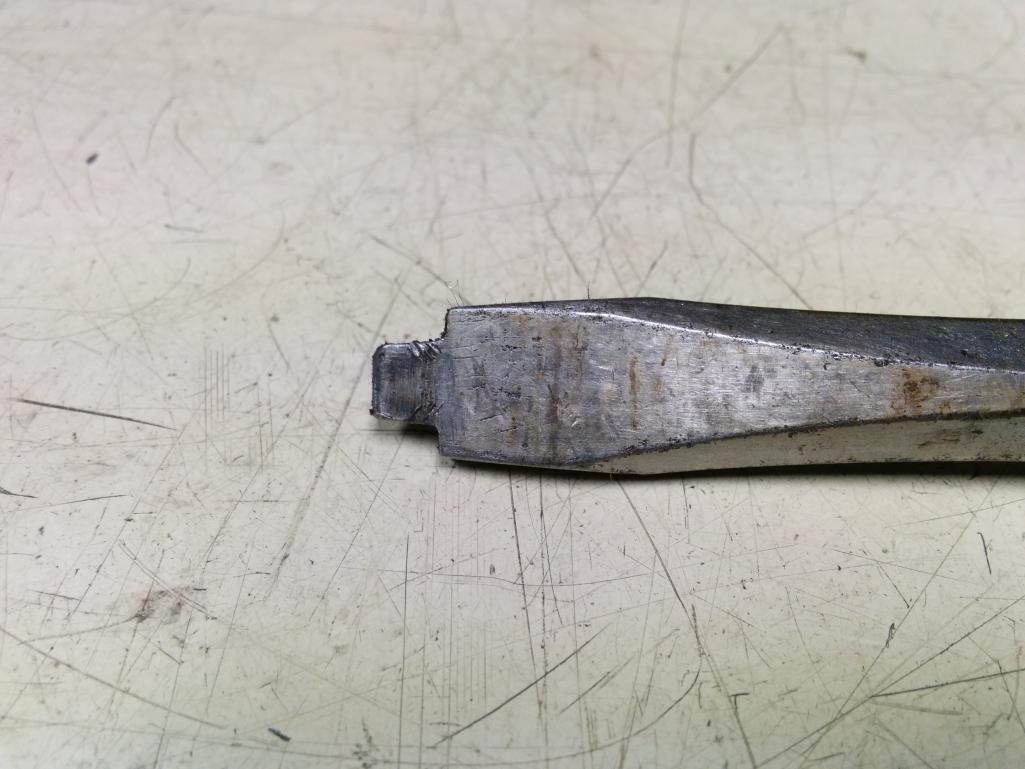 |
|
|
|
| r_towle |
Apr 30 2015, 03:02 PM
Post
#20
|
|
Custom Member Group: Members Posts: 24,574 Joined: 9-January 03 From: Taxachusetts Member No.: 124 Region Association: North East States |
QUOTE(Brian_Boss @ Apr 27 2015, 11:55 AM) First off, if you are not holding the housing in a vice, you're making it significantly more difficult. If you don't have a vice, clamp it to something. I basically do what Rhody said but I think it's easier if you use a long pin punch inside the spring in place of the pin. Once the spring is lined up, it will stay in place while you remove the punch and install the guide pin. I use a long pin punch made for brake caliper work but anything that gives you a bit more leverage to "steer" the spring into place will do. (IMG:style_emoticons/default/agree.gif) (IMG:style_emoticons/default/agree.gif) (IMG:style_emoticons/default/agree.gif) |
|
|
|
|
1 User(s) are reading this topic (1 Guests and 0 Anonymous Users)
0 Members:

|
Lo-Fi Version | Time is now: 13th May 2024 - 03:22 PM |
Invision Power Board
v9.1.4 © 2024 IPS, Inc.