|
|
|
Porsche, and the Porsche crest are registered trademarks of Dr. Ing. h.c. F. Porsche AG.
This site is not affiliated with Porsche in any way. Its only purpose is to provide an online forum for car enthusiasts. All other trademarks are property of their respective owners. |
|
|


| gabeurgelles |
 Jun 11 2015, 07:01 PM Jun 11 2015, 07:01 PM
Post
#1
|
|
Member  Group: Members Posts: 70 Joined: 2-February 15 From: Miami Member No.: 18,389 Region Association: None |
I recently purchased a 73' 914 with a Mazda 13b already swapped into it. I am the second owner of the car, previous owner was from Arizona. It has NO RUST at all and the swap was done properly. The motor mount and radiator frame were both very well done. As well as the plumbing from the radiator to the engine. The car also has an interesting exhaust system, which I found out although it looked cool, was not the right type of exhaust for the rotary. The passenger side rear brake caliper bleeder was broken. The swap was never completed and the car never drove under rotary power. The only thing left was fabricating a new shift linkage, since the old one would go right through the oil pan.
I bought the car purely for the condition of the body and wasnt really counting on a good engine or transmission but after messing around with it in the garage I got it running. I discovered the engine was streetported and in decent condition. The engine only had hours on it from the rebuild but it suffered from sitting for all that time. 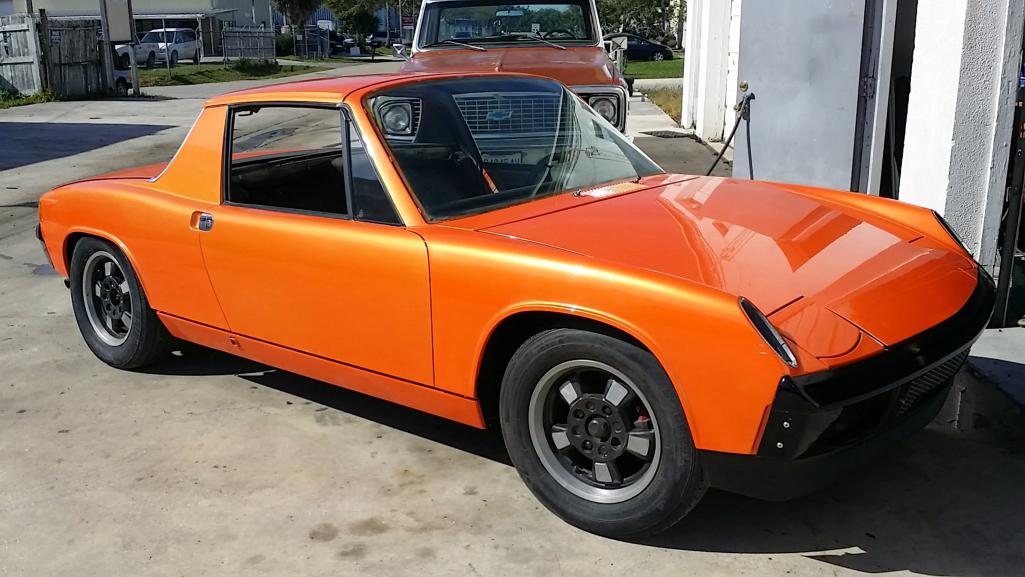 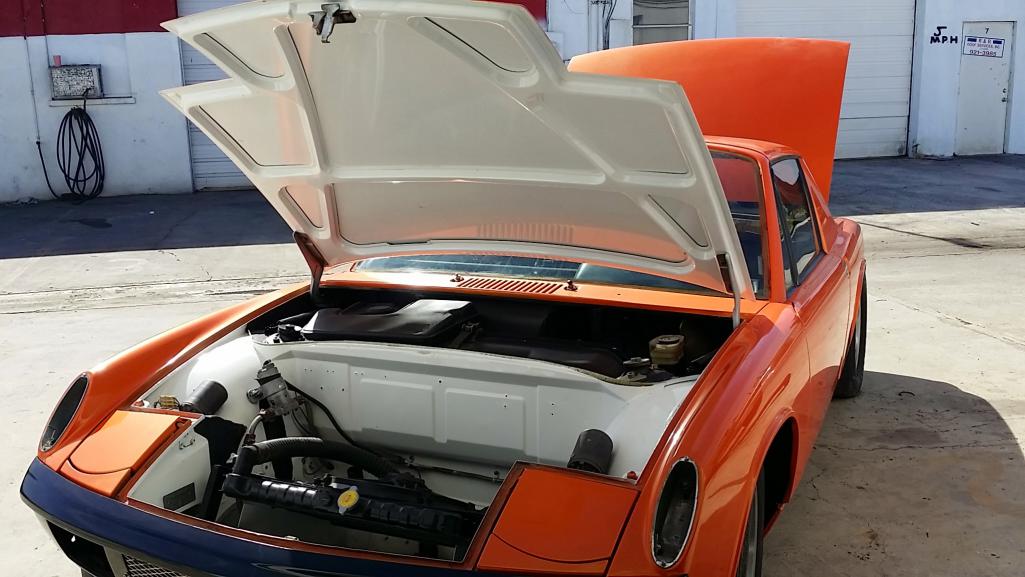 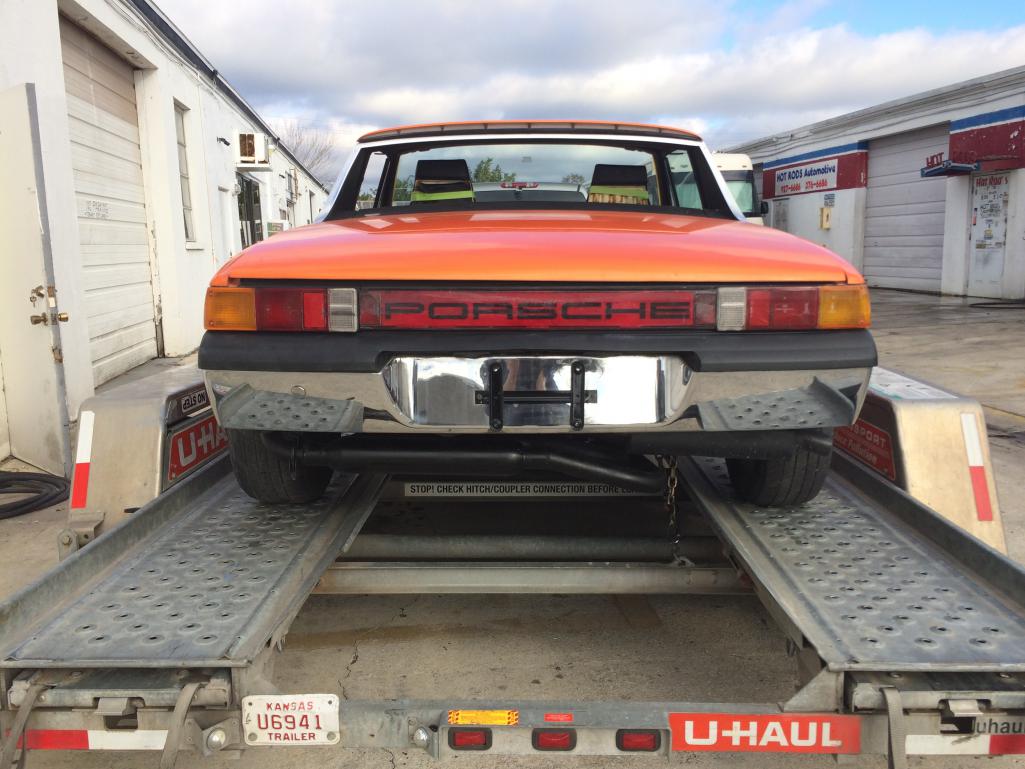 |
   |

 
|
  |
Replies
| matthepcat |
Mar 31 2016, 09:09 PM
Post
#2
|
|
Meat Popsicle Group: Members Posts: 1,462 Joined: 13-December 09 From: Saratoga CA Member No.: 11,125 Region Association: Northern California |
Do you plan to pull the whole assemblies out and do any rebuilding or replacing of brake lines, or do you want to try and just swap out struts?
|
|
|
|
| gabeurgelles |
Apr 1 2016, 04:08 AM
Post
#3
|
|
Member Group: Members Posts: 70 Joined: 2-February 15 From: Miami Member No.: 18,389 Region Association: None |
QUOTE(matthepcat @ Mar 31 2016, 11:09 PM)  Do you plan to pull the whole assemblies out and do any rebuilding or replacing of brake lines, or do you want to try and just swap out struts? I'm just replacing the struts and changing the tie rods. |
|
|
|
| matthepcat |
Apr 1 2016, 06:43 PM
Post
#4
|
|
Meat Popsicle Group: Members Posts: 1,462 Joined: 13-December 09 From: Saratoga CA Member No.: 11,125 Region Association: Northern California |
It really is a pretty straight forward process.
I would suggest ordering new ball joints, brake lines ( if they are needed) and pull the whole assembly out. Otherwise here is something i stole from another thread: The 911, 914 and some 944’s featured a rebuildable front McPherson Strut. Instead of having to replace the entire strut unit, you will be able to merely replace the strut insert that is on the inside of the strut housing. You will know that your strut is rebuildable by looking in the area where the shiny piston rod goes into the lower strut housing. On rebuildable struts, a screw on cap (gland nut) is used to hold the insert into the lower strut housing. You will know the gland nut is removable because you will likely see a few threads sticking up on the cap. 1965-83 cars used a male threaded gland nut, and 84-89 cars used a female threaded gland nut. Jack the front of the car and secure with jack stands. Remove both front wheels. Remove the top-mounting nut (inside the front hood, 22mm) and lower the shock out of the tower housing. If the shock shaft begins to spin before the 22mm nut loosens, you can hold the big washer under the nut with a pair of channel locks. This nut has a “tooth” that fits inside a groove on the shock shaft. Once you are holding this washer, you will be able to loosen and remove the 22mm nut. Some shock shafts will have a 8mm allen head end which can also be utilized to prevent the shock shaft from spinning. Once the nut is removed, reach in the wheel well and grab the upper dust cover that protects the shock shaft from dirt and grime. Pull down, this will extract the piston from the upper strut bearing. Carefully tilt the strut out past the fender lip and slide the dust cover off the shock shaft being careful to not put your brake line in too much of a bind. If you are removing a gas insert, you may need to compress the shock shaft a bit to enable you to tilt it past the fender lip. Once the dust cover is removed, pivot the shock back and push the shock shaft back up into the upper strut bearing and finger tighten the top 19mm nut. This will hold the assembly in position while we loosen the gland nut. I usually like to use a big pipe wrench or a large pair of channel locks (cheater pipe optional ;-). As you try to unscrew the gland nut the strut will want to turn. Use a small piece of 2x4 to brace the spindle to the inner fender well to keep it from turning. Now loosen the gland nut…. remember lefty loosey, righty tighty. Once the gland nut is loose, reach up and remove the 19mm nut on the top of the shock shaft. Once again, tilt the strut out past the fender lip (watch the brake line) and remove the gland nut and insert. You are now ready to install your new inserts. Remove any rust or corrosion that may be present on the threaded portion of the strut tube. Some strut housings may be full of hydraulic oil. You can either remove this oil by using paper towels to “wick” it up, or you can reuse it as a “coolant” for your insert. Another popular coolant is anti-freeze. Either will work, but remember, it won’t take much liquid because the insert will displace most of the area in the strut tube. Koni recommends 50ml of fluid, but I usually just use the dipstick method and try to get the coolant to ride about 2/3 up the side of the insert. Once your coolant level is set, slide your new insert into the strut housing. Koni supplies new male thread gland nuts for the 65-83 cars. Place some Blue Loctite on the gland nut threads and finger tighten it down. 84-89 cars utilize a female threaded gland nut. When using this type of nut, Koni has supplied a special washer that sits on top of the insert prior to installing the gland nut. This washer centers the insert in the strut housing, a job that had been performed by the male type gland nut. Position the shock rod back up into the body and once again, finger tighten the 19mm nut. You may need to place a floor jack under the A Arm to assist in moving the shock shaft up into the upper strut bearing. Use your piece of 2x4 to block the spindle and really tighten the gland nut with your pipe wrench or channel locks…. I mean REALLY tighten it. Gland nuts have been known to back off so your muscles and the Loctite will insure this doesn’t happen. Once the gland nut is tight, remove the top 22mm nut and retract the shock rod from the piston. You will need to install 2 items on the shock piston prior to installing the dust cover. First is a small plastic washer. This washer prevents the bump rubber from pulling a vacuum on the strut housing when the shock goes into full compression. Probably would never happen, but that’s what it’s for. After the plastic washer, install the bump rubber. Koni’s standard bump rubber looks kind of like a tootsie roll. The curved portion will face down. Koni’s competition bump rubber is made out of a more advanced material and is correctly installed with the angled portion facing down. If the car has been lowered you can shorten the bump rubber to regain some shock travel but you ALWAYS want to run a bump rubber. Failure to do so will destroy your shocks. Now, install the dust cover on the shock shaft and slide the piston up into the upper strut bearing. Install the new top washer and nut. Once again, the shock shaft may turn as you attempt to tighten the top nut so have your channel locks handy. Never use the adjusting tab on Koni insert as your “holding” mechanism, it WILL break off. You are now ready to reinstall the wheel/tire assembly, do the other side, and enjoy your new added level of performance! - Jason Burkett Application: 911 65-73, 911 74-89, 914 all Tools: 22mm socket, 8mm hex, Pipe Wrench, Large Channel Locks, floor jack, cheater pipe, 50ml anti-freeze Credits: Jason Burkett" QUOTE(gabeurgelles @ Apr 1 2016, 03:08 AM) QUOTE(matthepcat @ Mar 31 2016, 11:09 PM) Do you plan to pull the whole assemblies out and do any rebuilding or replacing of brake lines, or do you want to try and just swap out struts? I'm just replacing the struts and changing the tie rods. |
|
|
|
Posts in this topic
 gabeurgelles Rotary 914! Jun 11 2015, 07:01 PM
 gabeurgelles RE: Rotary 914! Jun 11 2015, 07:03 PM gabeurgelles RE: Rotary 914! Jun 11 2015, 07:04 PM db9146 I was given a ride in a 914 with a stock F.I. 13B ... Jun 11 2015, 07:10 PM 76-914 There are a couple of others here that have a rota... Jun 11 2015, 07:16 PM Rotary'14 :wttc:
Nice to have another running rotary aroun... Jun 11 2015, 07:31 PM Mueller Nice car...never driven a rotary..been stuck behin... Jun 11 2015, 07:47 PM
gabeurgelles RE: Rotary 914! Jun 11 2015, 07:03 PM gabeurgelles RE: Rotary 914! Jun 11 2015, 07:04 PM db9146 I was given a ride in a 914 with a stock F.I. 13B ... Jun 11 2015, 07:10 PM 76-914 There are a couple of others here that have a rota... Jun 11 2015, 07:16 PM Rotary'14 :wttc:
Nice to have another running rotary aroun... Jun 11 2015, 07:31 PM Mueller Nice car...never driven a rotary..been stuck behin... Jun 11 2015, 07:47 PM
 Mike Bellis
INB4 Mike Bellis :)
:unsure:
I've blown ... Jun 11 2015, 08:36 PM Andyrew
INB4 Mike Bellis :)
:unsure:
I've blown... Jun 11 2015, 11:38 PM porschetub
INB4 Mike Bellis :)
:unsure:
I've blown... Sep 2 2016, 03:16 AM Mike Bellis
[quote name='Mike Bellis' post='2197796' date='Ju... Sep 2 2016, 02:18 PM GeorgeRud My friend won the IMSA RS Championship back in the... Jun 11 2015, 09:33 PM PanelBilly How much did the car get chopped up for the conver... Jun 11 2015, 09:52 PM gabeurgelles
How much did the car get chopped up for the conve... Jun 12 2015, 02:59 PM Porschef I had an Rx7 in CA twenty something years ago, dr... Jun 12 2015, 06:16 AM gabeurgelles Since I got the car about a month ago, Ive fabrica... Jun 12 2015, 02:46 PM gabeurgelles I also had to add an oil cooler to help with the o... Jun 12 2015, 02:57 PM steuspeed Neat! :popcorn: Jun 12 2015, 03:55 PM KELTY360 :wttc:
Great color! Jun 12 2015, 06:12 PM Mike Bellis The boy has skills! :trophy: Jun 12 2015, 06:20 PM gabeurgelles So its been a while since I've updated this th... Sep 21 2015, 06:59 PM gabeurgelles I shrouded the back of the radiator so that the ai... Sep 21 2015, 07:03 PM gabeurgelles Ever since I switched over to the aluminum radiato... Sep 21 2015, 07:05 PM Stacks914 Man this thing is looking good would love a rotary... Sep 21 2015, 07:20 PM gabeurgelles On top of the radiator, I also worked on the exhau... Sep 21 2015, 07:20 PM gabeurgelles This is the finished exhaust, with the new flowmas... Sep 22 2015, 06:01 PM tscrihfield Nice handy work you got there.
Only owned one r... Sep 22 2015, 08:02 PM gabeurgelles Quick video of the new exhaust at 3/4 throttle.
K... Sep 23 2015, 05:52 PM oldschool
Quick video of the new exhaust at 3/4 throttle.
... Sep 24 2015, 09:09 AM oldschool BTW I still have a Kennedy plate and motor mount s... Sep 24 2015, 09:15 AM relentless Neat looking car! Back in the day I had a ... Sep 24 2015, 11:26 AM BillC
Neat looking car! Back in the day I had a ... Sep 24 2015, 01:55 PM gabeurgelles yeah, i bypassed the oil metering system and run p... Sep 24 2015, 04:31 PM gabeurgelles Heres a current picture of the engine bay, finally... Sep 26 2015, 08:56 PM Mike Bellis I used to run premix in mine too. I used Red Line ... Sep 26 2015, 09:46 PM gabeurgelles I have recently found what I believe to be the swa... Oct 7 2015, 07:57 PM mepstein
I have recently found what I believe to be the sw... Oct 7 2015, 08:05 PM gabeurgelles This is what I have
Can it be? Oct 7 2015, 08:04 PM gabeurgelles Been working on perfecting the exhaust system on t... Nov 18 2015, 04:21 PM gabeurgelles This is the plan for casing the h-pipe with the sh... Nov 18 2015, 04:26 PM gabeurgelles RE: Rotary 914! Nov 18 2015, 04:27 PM gabeurgelles Here is the final product!
Nov 18 2015, 04:28 PM gabeurgelles I also wanted to try out the helmholtz chamber exh... Nov 18 2015, 04:39 PM Andyrew Looks great! Do you have before and after clip... Nov 18 2015, 06:35 PM gabeurgelles Here is a clip of the new exhaust.
V3x7qZJfIeU Nov 18 2015, 07:06 PM mgp4591 With the engine running it almost sounds like a sm... Nov 18 2015, 07:07 PM gabeurgelles
With the engine running it almost sounds like a s... Nov 18 2015, 07:11 PM gabeurgelles Well, the engine came out again and this time it t... Feb 6 2016, 08:01 PM gabeurgelles PUklupMBnRc Feb 6 2016, 08:09 PM jimkelly sounds so sweet :) Feb 7 2016, 08:32 AM RickS Absolutely amazing. What a sweet ride. Did you ge... Feb 7 2016, 08:58 AM gabeurgelles
Absolutely amazing. What a sweet ride. Did you g... Feb 7 2016, 10:53 AM WLD419
Absolutely amazing. What a sweet ride. Did you ... Feb 7 2016, 01:06 PM gabeurgelles
[quote name='gabeurgelles' post='2299821' date='F... Feb 7 2016, 05:55 PM vw505 I have a 901 trans that has an adapter for a full ... Feb 7 2016, 05:31 PM tygaboy If I ever get an electric car and there's an o... Feb 7 2016, 05:54 PM gabeurgelles So now it's time for suspension, I've been... Mar 9 2016, 07:47 AM Andyrew I prefer koni yellows due to their adjustability. ... Mar 9 2016, 08:00 AM gabeurgelles
I prefer koni yellows due to their adjustability.... Mar 9 2016, 09:33 AM Andyrew Pretty common setup there to stay with the stock T... Mar 9 2016, 10:46 AM tomrev
Pretty common setup there to stay with the stock ... Mar 9 2016, 12:20 PM gabeurgelles Well this last weekend I took the car to the dyno ... Mar 17 2016, 08:01 AM Andyrew Awesome! Do you have a dyno chart? 200whp is a... Mar 17 2016, 08:12 AM gabeurgelles
Awesome! Do you have a dyno chart? 200whp is ... Mar 17 2016, 03:49 PM gabeurgelles Here is the Dyno sheet for the last three pulls
Mar 20 2016, 08:10 AM Andyrew
Here is the Dyno sheet for the last three pulls
... Mar 30 2016, 07:44 PM zambezi Great numbers and very consistent. Mar 20 2016, 10:07 AM gabeurgelles So now it's time for suspension. I ordered Kon... Mar 30 2016, 06:00 PM gabeurgelles
So now it's time for suspension. I ordered Ko... Mar 31 2016, 07:32 PM 76-914 :bump: Mar 31 2016, 08:06 AM sb914 :bump: Apr 1 2016, 05:23 AM Steve I'm running 21mm torsion bars with a 22mm fron... Apr 2 2016, 07:56 AM gabeurgelles Thank You for the instructions. The front struts w... Apr 14 2016, 06:01 PM gabeurgelles Well it's been a long time since this has been... Aug 30 2016, 08:05 AM gabeurgelles RE: Rotary 914! Aug 30 2016, 08:06 AM gabeurgelles RE: Rotary 914! Aug 30 2016, 08:07 AM Mueller Seems like EFI would solve those pesky carb proble... Aug 30 2016, 08:13 AM gabeurgelles This led to the purchase of a 48mm Weber DCOE carb... Aug 30 2016, 08:16 AM gabeurgelles So engine was rebuilt, everything was replaced and... Aug 30 2016, 08:21 AM Rotary'14
So engine was rebuilt, everything was replaced an... Aug 30 2016, 08:55 AM gabeurgelles So it was time to build an intake manifold. I star... Aug 30 2016, 08:38 AM andys
So it was time to build an intake manifold. I sta... Sep 2 2016, 02:43 PM gabeurgelles
So it was time to build an intake manifold. I st... Sep 4 2016, 04:50 PM gabeurgelles RE: Rotary 914! Aug 30 2016, 08:39 AM gabeurgelles RE: Rotary 914! Aug 30 2016, 08:40 AM gabeurgelles Well, I was able to pull it off with what I had an... Aug 30 2016, 01:25 PM gabeurgelles And here it is with the carb mounted...
Aug 30 2016, 01:26 PM gabeurgelles and on the car... some stuff has changed since th... Aug 30 2016, 01:27 PM matthepcat Interesting set-up. Looks cool.
I have a heavily ... Aug 30 2016, 01:48 PM Mueller
Interesting set-up. Looks cool.
I have a heavily... Aug 31 2016, 01:55 PM matthepcat Next time I see you at an event you can drive mine... Aug 31 2016, 03:37 PM Rotary'14 Well your manifold is done,,, Your aluminum weldi... Aug 30 2016, 02:00 PM Andyrew Great looking intake!! Aug 30 2016, 02:57 PM mbseto Awesome! Love seeing fabbed headers and manis... Aug 31 2016, 12:35 PM Mike Bellis Looks great! Only one suggestion... Add a phen... Aug 31 2016, 06:40 PM gabeurgelles
Looks great! Only one suggestion... Add a phe... Sep 1 2016, 08:09 AM ablesnead I have driven and raced against 12 a and 13 B. Rot... Sep 2 2016, 02:33 PM
Mike Bellis
INB4 Mike Bellis :)
:unsure:
I've blown ... Jun 11 2015, 08:36 PM Andyrew
INB4 Mike Bellis :)
:unsure:
I've blown... Jun 11 2015, 11:38 PM porschetub
INB4 Mike Bellis :)
:unsure:
I've blown... Sep 2 2016, 03:16 AM Mike Bellis
[quote name='Mike Bellis' post='2197796' date='Ju... Sep 2 2016, 02:18 PM GeorgeRud My friend won the IMSA RS Championship back in the... Jun 11 2015, 09:33 PM PanelBilly How much did the car get chopped up for the conver... Jun 11 2015, 09:52 PM gabeurgelles
How much did the car get chopped up for the conve... Jun 12 2015, 02:59 PM Porschef I had an Rx7 in CA twenty something years ago, dr... Jun 12 2015, 06:16 AM gabeurgelles Since I got the car about a month ago, Ive fabrica... Jun 12 2015, 02:46 PM gabeurgelles I also had to add an oil cooler to help with the o... Jun 12 2015, 02:57 PM steuspeed Neat! :popcorn: Jun 12 2015, 03:55 PM KELTY360 :wttc:
Great color! Jun 12 2015, 06:12 PM Mike Bellis The boy has skills! :trophy: Jun 12 2015, 06:20 PM gabeurgelles So its been a while since I've updated this th... Sep 21 2015, 06:59 PM gabeurgelles I shrouded the back of the radiator so that the ai... Sep 21 2015, 07:03 PM gabeurgelles Ever since I switched over to the aluminum radiato... Sep 21 2015, 07:05 PM Stacks914 Man this thing is looking good would love a rotary... Sep 21 2015, 07:20 PM gabeurgelles On top of the radiator, I also worked on the exhau... Sep 21 2015, 07:20 PM gabeurgelles This is the finished exhaust, with the new flowmas... Sep 22 2015, 06:01 PM tscrihfield Nice handy work you got there.
Only owned one r... Sep 22 2015, 08:02 PM gabeurgelles Quick video of the new exhaust at 3/4 throttle.
K... Sep 23 2015, 05:52 PM oldschool
Quick video of the new exhaust at 3/4 throttle.
... Sep 24 2015, 09:09 AM oldschool BTW I still have a Kennedy plate and motor mount s... Sep 24 2015, 09:15 AM relentless Neat looking car! Back in the day I had a ... Sep 24 2015, 11:26 AM BillC
Neat looking car! Back in the day I had a ... Sep 24 2015, 01:55 PM gabeurgelles yeah, i bypassed the oil metering system and run p... Sep 24 2015, 04:31 PM gabeurgelles Heres a current picture of the engine bay, finally... Sep 26 2015, 08:56 PM Mike Bellis I used to run premix in mine too. I used Red Line ... Sep 26 2015, 09:46 PM gabeurgelles I have recently found what I believe to be the swa... Oct 7 2015, 07:57 PM mepstein
I have recently found what I believe to be the sw... Oct 7 2015, 08:05 PM gabeurgelles This is what I have
Can it be? Oct 7 2015, 08:04 PM gabeurgelles Been working on perfecting the exhaust system on t... Nov 18 2015, 04:21 PM gabeurgelles This is the plan for casing the h-pipe with the sh... Nov 18 2015, 04:26 PM gabeurgelles RE: Rotary 914! Nov 18 2015, 04:27 PM gabeurgelles Here is the final product!
Nov 18 2015, 04:28 PM gabeurgelles I also wanted to try out the helmholtz chamber exh... Nov 18 2015, 04:39 PM Andyrew Looks great! Do you have before and after clip... Nov 18 2015, 06:35 PM gabeurgelles Here is a clip of the new exhaust.
V3x7qZJfIeU Nov 18 2015, 07:06 PM mgp4591 With the engine running it almost sounds like a sm... Nov 18 2015, 07:07 PM gabeurgelles
With the engine running it almost sounds like a s... Nov 18 2015, 07:11 PM gabeurgelles Well, the engine came out again and this time it t... Feb 6 2016, 08:01 PM gabeurgelles PUklupMBnRc Feb 6 2016, 08:09 PM jimkelly sounds so sweet :) Feb 7 2016, 08:32 AM RickS Absolutely amazing. What a sweet ride. Did you ge... Feb 7 2016, 08:58 AM gabeurgelles
Absolutely amazing. What a sweet ride. Did you g... Feb 7 2016, 10:53 AM WLD419
Absolutely amazing. What a sweet ride. Did you ... Feb 7 2016, 01:06 PM gabeurgelles
[quote name='gabeurgelles' post='2299821' date='F... Feb 7 2016, 05:55 PM vw505 I have a 901 trans that has an adapter for a full ... Feb 7 2016, 05:31 PM tygaboy If I ever get an electric car and there's an o... Feb 7 2016, 05:54 PM gabeurgelles So now it's time for suspension, I've been... Mar 9 2016, 07:47 AM Andyrew I prefer koni yellows due to their adjustability. ... Mar 9 2016, 08:00 AM gabeurgelles
I prefer koni yellows due to their adjustability.... Mar 9 2016, 09:33 AM Andyrew Pretty common setup there to stay with the stock T... Mar 9 2016, 10:46 AM tomrev
Pretty common setup there to stay with the stock ... Mar 9 2016, 12:20 PM gabeurgelles Well this last weekend I took the car to the dyno ... Mar 17 2016, 08:01 AM Andyrew Awesome! Do you have a dyno chart? 200whp is a... Mar 17 2016, 08:12 AM gabeurgelles
Awesome! Do you have a dyno chart? 200whp is ... Mar 17 2016, 03:49 PM gabeurgelles Here is the Dyno sheet for the last three pulls
Mar 20 2016, 08:10 AM Andyrew
Here is the Dyno sheet for the last three pulls
... Mar 30 2016, 07:44 PM zambezi Great numbers and very consistent. Mar 20 2016, 10:07 AM gabeurgelles So now it's time for suspension. I ordered Kon... Mar 30 2016, 06:00 PM gabeurgelles
So now it's time for suspension. I ordered Ko... Mar 31 2016, 07:32 PM 76-914 :bump: Mar 31 2016, 08:06 AM sb914 :bump: Apr 1 2016, 05:23 AM Steve I'm running 21mm torsion bars with a 22mm fron... Apr 2 2016, 07:56 AM gabeurgelles Thank You for the instructions. The front struts w... Apr 14 2016, 06:01 PM gabeurgelles Well it's been a long time since this has been... Aug 30 2016, 08:05 AM gabeurgelles RE: Rotary 914! Aug 30 2016, 08:06 AM gabeurgelles RE: Rotary 914! Aug 30 2016, 08:07 AM Mueller Seems like EFI would solve those pesky carb proble... Aug 30 2016, 08:13 AM gabeurgelles This led to the purchase of a 48mm Weber DCOE carb... Aug 30 2016, 08:16 AM gabeurgelles So engine was rebuilt, everything was replaced and... Aug 30 2016, 08:21 AM Rotary'14
So engine was rebuilt, everything was replaced an... Aug 30 2016, 08:55 AM gabeurgelles So it was time to build an intake manifold. I star... Aug 30 2016, 08:38 AM andys
So it was time to build an intake manifold. I sta... Sep 2 2016, 02:43 PM gabeurgelles
So it was time to build an intake manifold. I st... Sep 4 2016, 04:50 PM gabeurgelles RE: Rotary 914! Aug 30 2016, 08:39 AM gabeurgelles RE: Rotary 914! Aug 30 2016, 08:40 AM gabeurgelles Well, I was able to pull it off with what I had an... Aug 30 2016, 01:25 PM gabeurgelles And here it is with the carb mounted...
Aug 30 2016, 01:26 PM gabeurgelles and on the car... some stuff has changed since th... Aug 30 2016, 01:27 PM matthepcat Interesting set-up. Looks cool.
I have a heavily ... Aug 30 2016, 01:48 PM Mueller
Interesting set-up. Looks cool.
I have a heavily... Aug 31 2016, 01:55 PM matthepcat Next time I see you at an event you can drive mine... Aug 31 2016, 03:37 PM Rotary'14 Well your manifold is done,,, Your aluminum weldi... Aug 30 2016, 02:00 PM Andyrew Great looking intake!! Aug 30 2016, 02:57 PM mbseto Awesome! Love seeing fabbed headers and manis... Aug 31 2016, 12:35 PM Mike Bellis Looks great! Only one suggestion... Add a phen... Aug 31 2016, 06:40 PM gabeurgelles
Looks great! Only one suggestion... Add a phe... Sep 1 2016, 08:09 AM ablesnead I have driven and raced against 12 a and 13 B. Rot... Sep 2 2016, 02:33 PM |
3 User(s) are reading this topic (3 Guests and 0 Anonymous Users)
0 Members:

|
Lo-Fi Version | Time is now: 10th May 2024 - 04:13 AM |
Invision Power Board
v9.1.4 © 2024 IPS, Inc.