|
|
|
Porsche, and the Porsche crest are registered trademarks of Dr. Ing. h.c. F. Porsche AG.
This site is not affiliated with Porsche in any way. Its only purpose is to provide an online forum for car enthusiasts. All other trademarks are property of their respective owners. |
|
|

  |

| Andyrew |
 Mar 17 2016, 08:12 AM Mar 17 2016, 08:12 AM
Post
#61
|
|
Spooling.... Please wait  Group: Members Posts: 13,376 Joined: 20-January 03 From: Riverbank, Ca Member No.: 172 Region Association: Northern California |
Awesome! Do you have a dyno chart? 200whp is a fantastic number!
|
   |

 
|
| gabeurgelles |
Mar 17 2016, 03:49 PM
Post
#62
|
|
Member Group: Members Posts: 70 Joined: 2-February 15 From: Miami Member No.: 18,389 Region Association: None |
QUOTE(Andyrew @ Mar 17 2016, 10:12 AM)  Awesome! Do you have a dyno chart? 200whp is a fantastic number! I do have the chart but I am having an issue uploading any pictures. |
|
|
|
| gabeurgelles |
Mar 20 2016, 08:10 AM
Post
#63
|
|
Member Group: Members Posts: 70 Joined: 2-February 15 From: Miami Member No.: 18,389 Region Association: None |
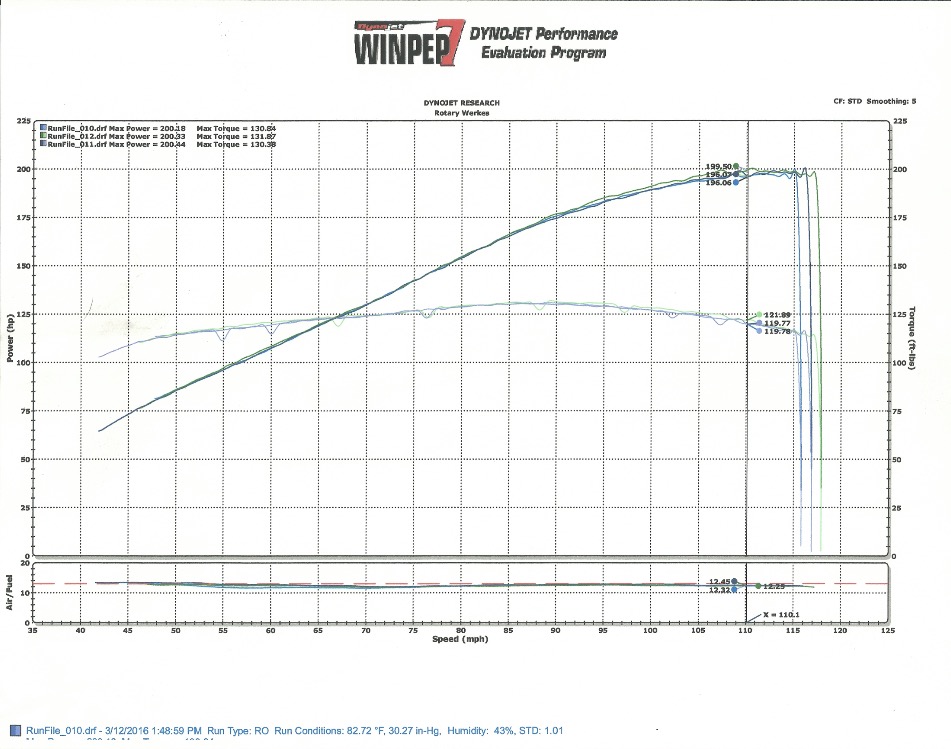
Here is the Dyno sheet for the last three pulls
 |
|
|
|
| zambezi |
Mar 20 2016, 10:07 AM
Post
#64
|
|
Senior Member Group: Members Posts: 711 Joined: 14-April 08 From: Lafayette, LA Member No.: 8,920 Region Association: South East States |
Great numbers and very consistent.
|
|
|
|
| gabeurgelles |
Mar 30 2016, 06:00 PM
Post
#65
|
|
Member Group: Members Posts: 70 Joined: 2-February 15 From: Miami Member No.: 18,389 Region Association: None |
So now it's time for suspension. I ordered Koni yellows for the front and then I'll probably end up getting the ground control kit for the rear. But looking at the front shocks, do I have touch the rubber bump stop. I know you can cut them for cars that are low and bottom out easily but is this a problem on 914s? Or is this just and easy swap of the old ones?
Planning on doing this soon so any help would be appreciated! 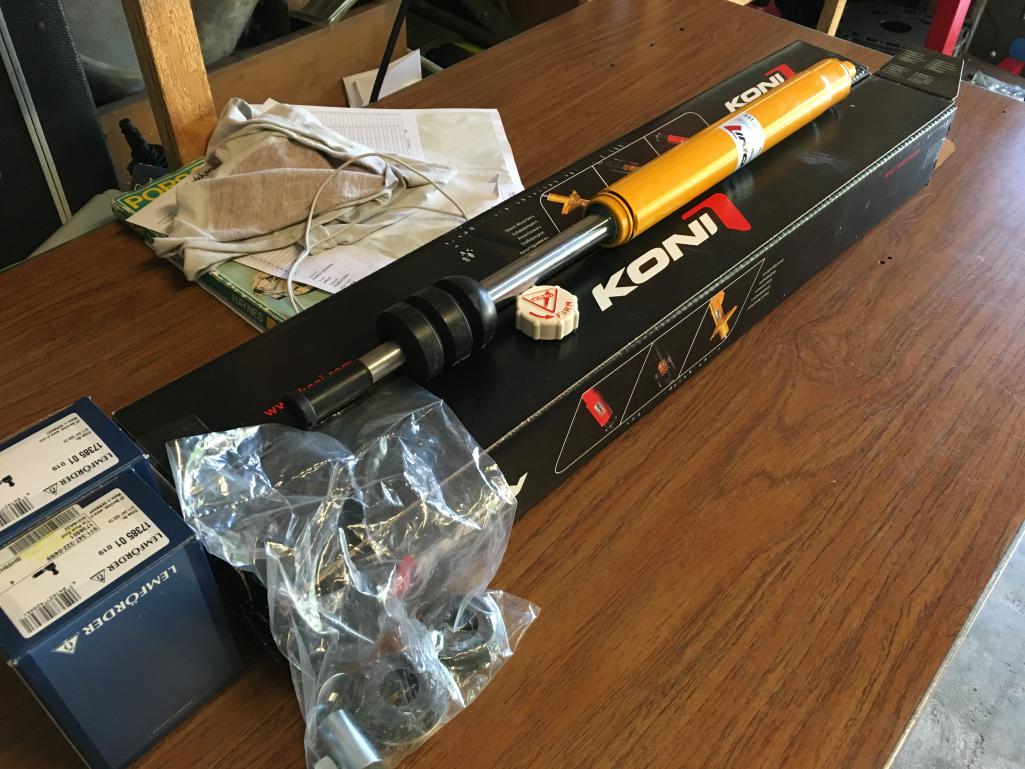 |
|
|
|
| Andyrew |
Mar 30 2016, 07:44 PM
Post
#66
|
|
Spooling.... Please wait Group: Members Posts: 13,376 Joined: 20-January 03 From: Riverbank, Ca Member No.: 172 Region Association: Northern California |
QUOTE(gabeurgelles @ Mar 20 2016, 07:10 AM) Here is the Dyno sheet for the last three pulls Wow, Thats a great chart!! Extremely flat torque curve. |
|
|
|
| 76-914 |
Mar 31 2016, 08:06 AM
Post
#67
|
|
Repeat Offender & Resident Subaru Antagonist Group: Members Posts: 13,491 Joined: 23-January 09 From: Temecula, CA Member No.: 9,964 Region Association: Southern California |
|
 |
|
| gabeurgelles |
Mar 31 2016, 07:32 PM
Post
#68
|
|
Member Group: Members Posts: 70 Joined: 2-February 15 From: Miami Member No.: 18,389 Region Association: None |
QUOTE(gabeurgelles @ Mar 30 2016, 08:00 PM) So now it's time for suspension. I ordered Koni yellows for the front and then I'll probably end up getting the ground control kit for the rear. But looking at the front shocks, do I have touch the rubber bump stop. I know you can cut them for cars that are low and bottom out easily but is this a problem on 914s? Or is this just and easy swap of the old ones? Planning on doing this soon so any help would be appreciated! Or if there is any thread already out there that details the installation process? |
|
|
|
| matthepcat |
Mar 31 2016, 09:09 PM
Post
#69
|
|
Meat Popsicle Group: Members Posts: 1,462 Joined: 13-December 09 From: Saratoga CA Member No.: 11,125 Region Association: Northern California |
Do you plan to pull the whole assemblies out and do any rebuilding or replacing of brake lines, or do you want to try and just swap out struts?
|
|
|
|
| gabeurgelles |
Apr 1 2016, 04:08 AM
Post
#70
|
|
Member Group: Members Posts: 70 Joined: 2-February 15 From: Miami Member No.: 18,389 Region Association: None |
QUOTE(matthepcat @ Mar 31 2016, 11:09 PM) Do you plan to pull the whole assemblies out and do any rebuilding or replacing of brake lines, or do you want to try and just swap out struts? I'm just replacing the struts and changing the tie rods. |
|
|
|
| sb914 |
Apr 1 2016, 05:23 AM
Post
#71
|
|
Surf Guru Group: Members Posts: 4,296 Joined: 25-November 12 From: Brookings,Oregon Member No.: 15,191 Region Association: Southern California |
|
|
|
|
| matthepcat |
Apr 1 2016, 06:43 PM
Post
#72
|
|
Meat Popsicle Group: Members Posts: 1,462 Joined: 13-December 09 From: Saratoga CA Member No.: 11,125 Region Association: Northern California |
It really is a pretty straight forward process.
I would suggest ordering new ball joints, brake lines ( if they are needed) and pull the whole assembly out. Otherwise here is something i stole from another thread: The 911, 914 and some 944’s featured a rebuildable front McPherson Strut. Instead of having to replace the entire strut unit, you will be able to merely replace the strut insert that is on the inside of the strut housing. You will know that your strut is rebuildable by looking in the area where the shiny piston rod goes into the lower strut housing. On rebuildable struts, a screw on cap (gland nut) is used to hold the insert into the lower strut housing. You will know the gland nut is removable because you will likely see a few threads sticking up on the cap. 1965-83 cars used a male threaded gland nut, and 84-89 cars used a female threaded gland nut. Jack the front of the car and secure with jack stands. Remove both front wheels. Remove the top-mounting nut (inside the front hood, 22mm) and lower the shock out of the tower housing. If the shock shaft begins to spin before the 22mm nut loosens, you can hold the big washer under the nut with a pair of channel locks. This nut has a “tooth” that fits inside a groove on the shock shaft. Once you are holding this washer, you will be able to loosen and remove the 22mm nut. Some shock shafts will have a 8mm allen head end which can also be utilized to prevent the shock shaft from spinning. Once the nut is removed, reach in the wheel well and grab the upper dust cover that protects the shock shaft from dirt and grime. Pull down, this will extract the piston from the upper strut bearing. Carefully tilt the strut out past the fender lip and slide the dust cover off the shock shaft being careful to not put your brake line in too much of a bind. If you are removing a gas insert, you may need to compress the shock shaft a bit to enable you to tilt it past the fender lip. Once the dust cover is removed, pivot the shock back and push the shock shaft back up into the upper strut bearing and finger tighten the top 19mm nut. This will hold the assembly in position while we loosen the gland nut. I usually like to use a big pipe wrench or a large pair of channel locks (cheater pipe optional ;-). As you try to unscrew the gland nut the strut will want to turn. Use a small piece of 2x4 to brace the spindle to the inner fender well to keep it from turning. Now loosen the gland nut…. remember lefty loosey, righty tighty. Once the gland nut is loose, reach up and remove the 19mm nut on the top of the shock shaft. Once again, tilt the strut out past the fender lip (watch the brake line) and remove the gland nut and insert. You are now ready to install your new inserts. Remove any rust or corrosion that may be present on the threaded portion of the strut tube. Some strut housings may be full of hydraulic oil. You can either remove this oil by using paper towels to “wick” it up, or you can reuse it as a “coolant” for your insert. Another popular coolant is anti-freeze. Either will work, but remember, it won’t take much liquid because the insert will displace most of the area in the strut tube. Koni recommends 50ml of fluid, but I usually just use the dipstick method and try to get the coolant to ride about 2/3 up the side of the insert. Once your coolant level is set, slide your new insert into the strut housing. Koni supplies new male thread gland nuts for the 65-83 cars. Place some Blue Loctite on the gland nut threads and finger tighten it down. 84-89 cars utilize a female threaded gland nut. When using this type of nut, Koni has supplied a special washer that sits on top of the insert prior to installing the gland nut. This washer centers the insert in the strut housing, a job that had been performed by the male type gland nut. Position the shock rod back up into the body and once again, finger tighten the 19mm nut. You may need to place a floor jack under the A Arm to assist in moving the shock shaft up into the upper strut bearing. Use your piece of 2x4 to block the spindle and really tighten the gland nut with your pipe wrench or channel locks…. I mean REALLY tighten it. Gland nuts have been known to back off so your muscles and the Loctite will insure this doesn’t happen. Once the gland nut is tight, remove the top 22mm nut and retract the shock rod from the piston. You will need to install 2 items on the shock piston prior to installing the dust cover. First is a small plastic washer. This washer prevents the bump rubber from pulling a vacuum on the strut housing when the shock goes into full compression. Probably would never happen, but that’s what it’s for. After the plastic washer, install the bump rubber. Koni’s standard bump rubber looks kind of like a tootsie roll. The curved portion will face down. Koni’s competition bump rubber is made out of a more advanced material and is correctly installed with the angled portion facing down. If the car has been lowered you can shorten the bump rubber to regain some shock travel but you ALWAYS want to run a bump rubber. Failure to do so will destroy your shocks. Now, install the dust cover on the shock shaft and slide the piston up into the upper strut bearing. Install the new top washer and nut. Once again, the shock shaft may turn as you attempt to tighten the top nut so have your channel locks handy. Never use the adjusting tab on Koni insert as your “holding” mechanism, it WILL break off. You are now ready to reinstall the wheel/tire assembly, do the other side, and enjoy your new added level of performance! - Jason Burkett Application: 911 65-73, 911 74-89, 914 all Tools: 22mm socket, 8mm hex, Pipe Wrench, Large Channel Locks, floor jack, cheater pipe, 50ml anti-freeze Credits: Jason Burkett" QUOTE(gabeurgelles @ Apr 1 2016, 03:08 AM) QUOTE(matthepcat @ Mar 31 2016, 11:09 PM) Do you plan to pull the whole assemblies out and do any rebuilding or replacing of brake lines, or do you want to try and just swap out struts? I'm just replacing the struts and changing the tie rods. |
|
|
|
| Steve |
Apr 2 2016, 07:56 AM
Post
#73
|
|
914 Guru Group: Members Posts: 5,570 Joined: 14-June 03 From: Orange County, CA Member No.: 822 Region Association: Southern California |
I'm running 21mm torsion bars with a 22mm front sway bar. Great for street/autocross. Been running this combo for over 20 years. Rear springs depends on how much oversteer you want. I run 140 lb rear springs, but most people like 175 or greater for autocross.
140 lb springs are nice for street and will under steer at the limit. Bigger springs are better for autocross but make the car feel every bump on the street. I'm also running Bilstein shocks front and rear. |
|
|
|
| gabeurgelles |
Apr 14 2016, 06:01 PM
Post
#74
|
|
Member Group: Members Posts: 70 Joined: 2-February 15 From: Miami Member No.: 18,389 Region Association: None |
Thank You for the instructions. The front struts went on without any major issues. The biggest issue I had was taking off the wheel bolts that the tire shop tightened. I never knew those bolts could be that tight, it broke my 3/8 ratchet, my 1/2 ratchet, and my folding tire iron!! But eventually they came off and he rest went on without an issue.
The difference that those shocks made was unbelievable. The old ones had collapsed as soon as I bought the car so I never knew what it was supposed to feel like. The rear is coming soon because I can definitely feel the back extra loose now that the font is the way it should be. |
|
|
|
| gabeurgelles |
Aug 30 2016, 08:05 AM
Post
#75
|
|
Member Group: Members Posts: 70 Joined: 2-February 15 From: Miami Member No.: 18,389 Region Association: None |
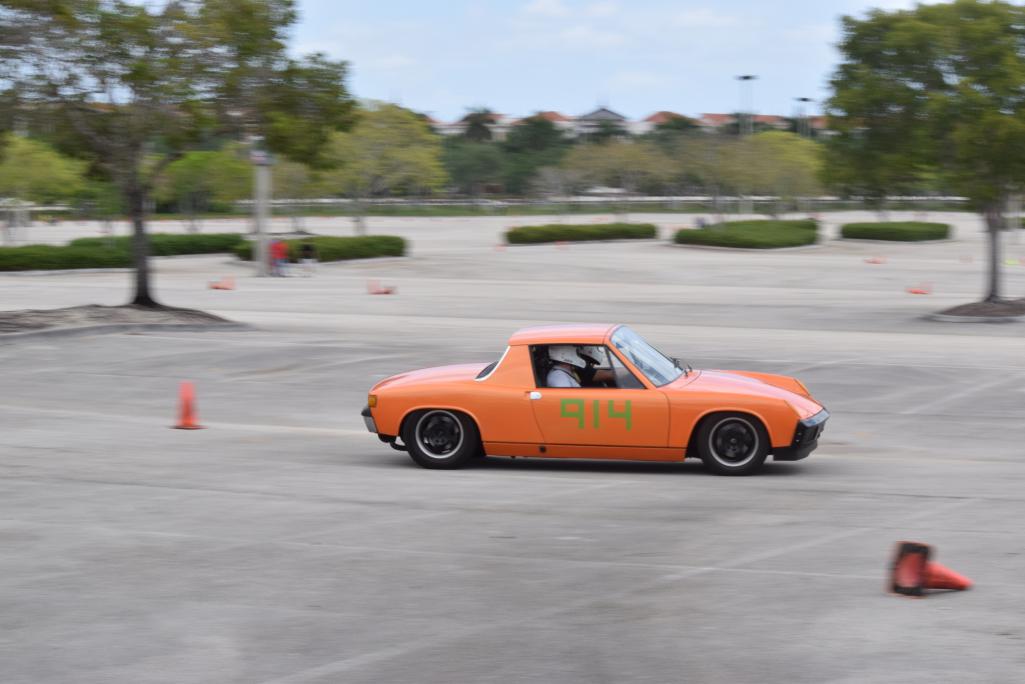
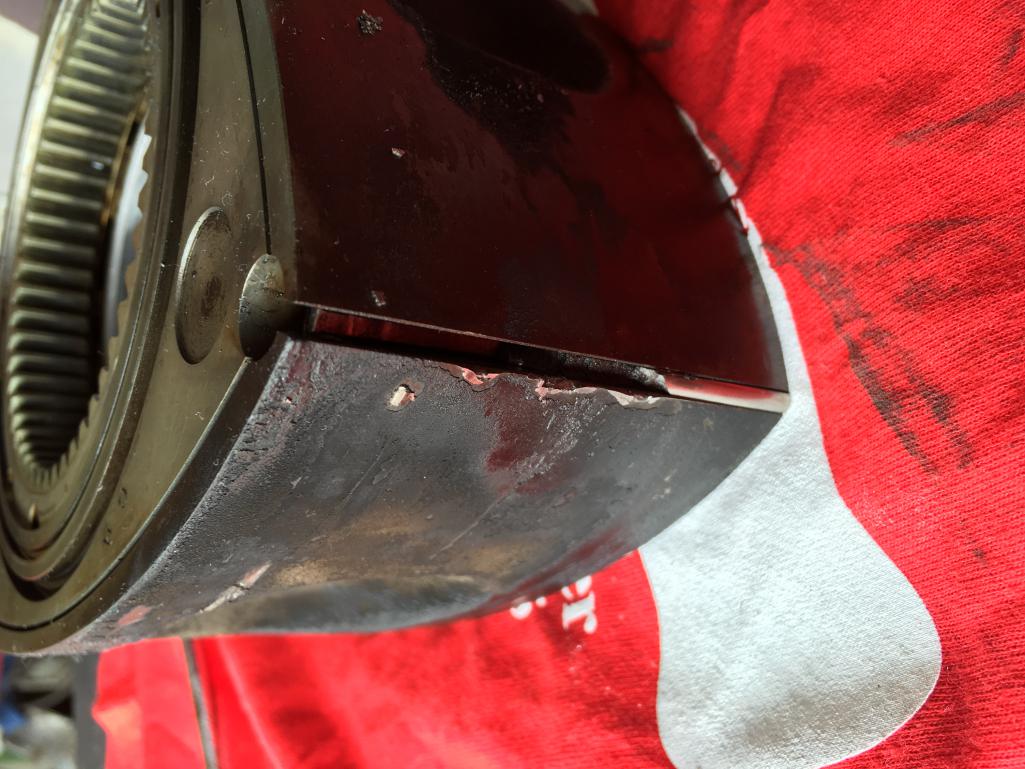
Well it's been a long time since this has been updated and so much has happened since then. I attended my first autocross with PCA and it was such a great experience. The car handled beautifully.... for the first 3 runs. On my fourth run, I was taking a turn and the Holley carb I had leaned out and I blew the motor. Apex deal was shattered and it scratched up the rotor housing badly. Had to get it towed home. As soon as he car arrived, I began the tear down and the search for parts. The Holley carb was the reason the engine blew since on the 13b it sits 90 degrees to where it should. Meaning that hard cornering sloshes the fuel in a way that leans out one rotor and floods the other. So basically I had to get another carb.
 |
|
|
|
| gabeurgelles |
Aug 30 2016, 08:06 AM
Post
#76
|
|
Member Group: Members Posts: 70 Joined: 2-February 15 From: Miami Member No.: 18,389 Region Association: None |
 |
|
|
|
| gabeurgelles |
Aug 30 2016, 08:07 AM
Post
#77
|
|
Member Group: Members Posts: 70 Joined: 2-February 15 From: Miami Member No.: 18,389 Region Association: None |
 |
|
|
|
| Mueller |
Aug 30 2016, 08:13 AM
Post
#78
|
|
914 Freak! Group: Members Posts: 17,146 Joined: 4-January 03 From: Antioch, CA Member No.: 87 Region Association: None |
Seems like EFI would solve those pesky carb problems (IMG:style_emoticons/default/smile.gif)
Bummer about the motor (IMG:style_emoticons/default/sad.gif) |
|
|
|
| gabeurgelles |
Aug 30 2016, 08:16 AM
Post
#79
|
|
Member Group: Members Posts: 70 Joined: 2-February 15 From: Miami Member No.: 18,389 Region Association: None |
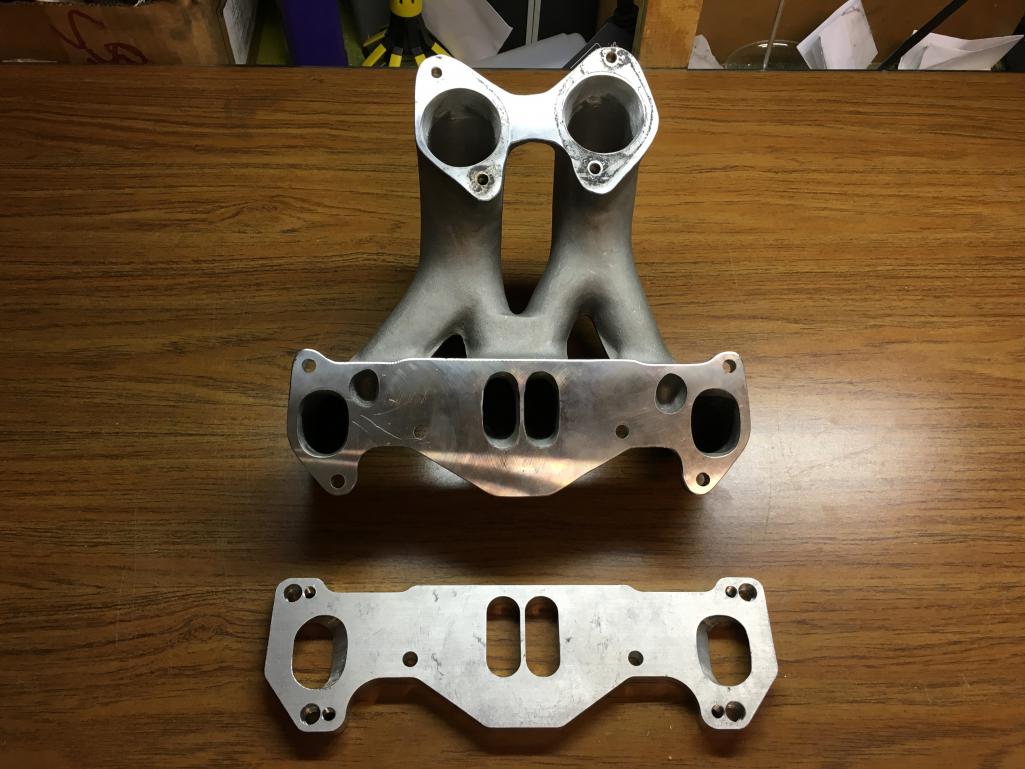
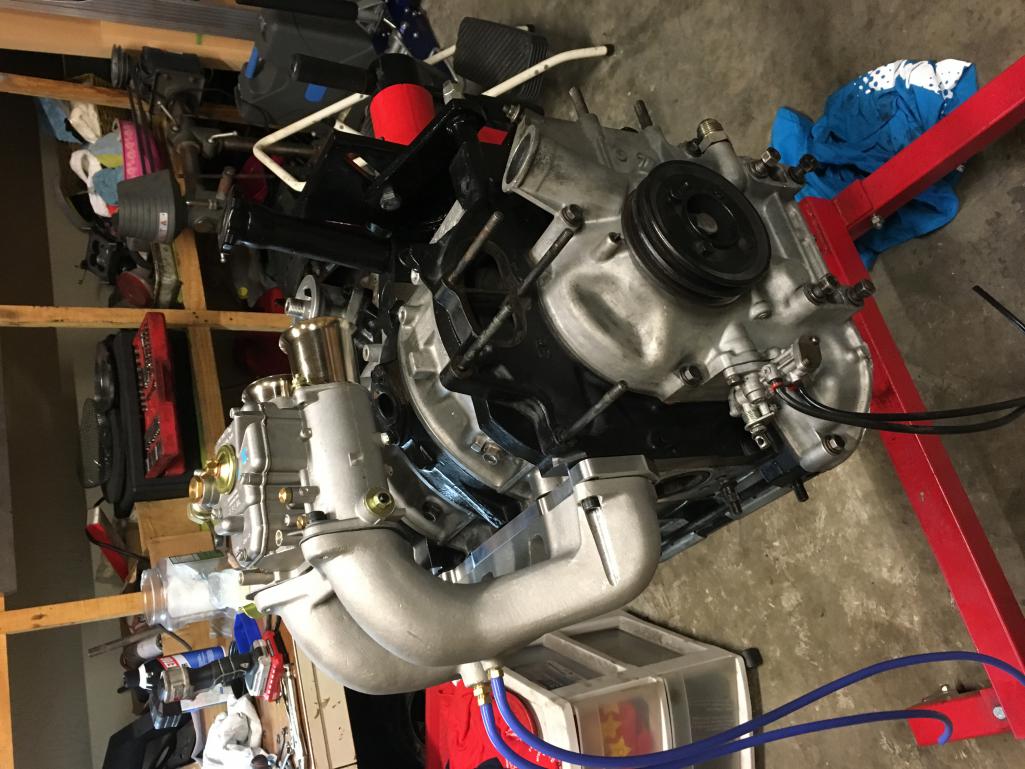
This led to the purchase of a 48mm Weber DCOE carb, manifold, and adaptor plate (since I had to get a 12a manifold). I was told this weber would drastically improve throttle response and fuel economy and that I would have no issues with leaning out on turns.
 |
|
|
|
| gabeurgelles |
Aug 30 2016, 08:21 AM
Post
#80
|
|
Member Group: Members Posts: 70 Joined: 2-February 15 From: Miami Member No.: 18,389 Region Association: None |
So engine was rebuilt, everything was replaced and new carb installed. The only issue now was that on an rx7 the engine and transmission assembly sits at a 5 degree angle but on the 914 it sits dead level. So not the weber was sitting 5 degrees tilted forward which did not allow for correct tuning. If the fuel level was set correctly for one barrel, the other would either be flooding over or starving for gas. So I had two options, either tilt the engine and transmission on the 914 or make a custom manifold that would provide better flow and perfect placement for the carb.
 |
|
|
|
|
1 User(s) are reading this topic (1 Guests and 0 Anonymous Users)
0 Members:

|
Lo-Fi Version | Time is now: 27th April 2024 - 07:41 AM |
Invision Power Board
v9.1.4 © 2024 IPS, Inc.