|
|
|
Porsche, and the Porsche crest are registered trademarks of Dr. Ing. h.c. F. Porsche AG.
This site is not affiliated with Porsche in any way. Its only purpose is to provide an online forum for car enthusiasts. All other trademarks are property of their respective owners. |
|
|

  |

| worn |
 Jun 16 2015, 01:13 PM Jun 16 2015, 01:13 PM
Post
#1
|
|
can't remember  Group: Members Posts: 3,145 Joined: 3-June 11 From: Madison, WI Member No.: 13,152 Region Association: Upper MidWest |
For my 3.2 I have made several parts myself from scratch. The engine tin, many other buyable pieces, but the one I was after has been the oil tank. For those of you who know how to tig, you can just start laughing at how easy this is and come back later. For me though, I knew how to make shapes in sheet metal, and how to weld steel, but aluminum was a new frontier. Dabbled in trying to weld with gas, and I still hope to learn. Then bought a TIG, figuring it cost a bit more than half of a complete tank with all the parts. Used a blow up of the blueprint from the factory originally from a file posted by SLITS.
But having done all the work what scared me was the prospect of the thing slumping into a pile of slag at the end. Well, oddly, I got better, not good, but better at tig welding. So it is welded up, complete with 911 filler and dipstick, and AN fittings for everything else. I now know I could have done the filter console, but I am kind glad I didn't try. Oil goes in at the original location where the pipe came from the filter at the top of the tank. There is a stainless steel screen for baffling. I am using 3 hard points with 8 mm time serts and studs for fastening. Goes into place in seconds. Of course the metal finishing isn't done. And it has to be leak tested and though clean as a whistle when I put the clams together, I will send a camera in to double check and then wash it. More later, cause I have to go. This was the big stall in getting the engine in and started. So: (IMG:style_emoticons/default/piratenanner.gif)  |
   |

 
|
| Andyrew |
Jun 16 2015, 01:23 PM
Post
#2
|
|
Spooling.... Please wait Group: Members Posts: 13,376 Joined: 20-January 03 From: Riverbank, Ca Member No.: 172 Region Association: Northern California |
I've tig'ed twice in my life. Its not easy to learn at all!
Looks like pretty decent welds to me! |
|
|
|
| Valy |
Jun 16 2015, 02:51 PM
Post
#3
|
|
Senior Member Group: Members Posts: 1,671 Joined: 6-April 10 From: Sunnyvale, CA Member No.: 11,573 Region Association: Northern California |
|
|
|
|
| worn |
Jun 16 2015, 03:42 PM
Post
#4
|
|
can't remember Group: Members Posts: 3,145 Joined: 3-June 11 From: Madison, WI Member No.: 13,152 Region Association: Upper MidWest |
QUOTE(Andyrew @ Jun 16 2015, 12:23 PM)  I've tig'ed twice in my life. Its not easy to learn at all! Looks like pretty decent welds to me! Not decent but better each time. Lots of factors, each new. My only advantage was having used a flame torch before, not just a MIG. That part will be linked with the cooler, 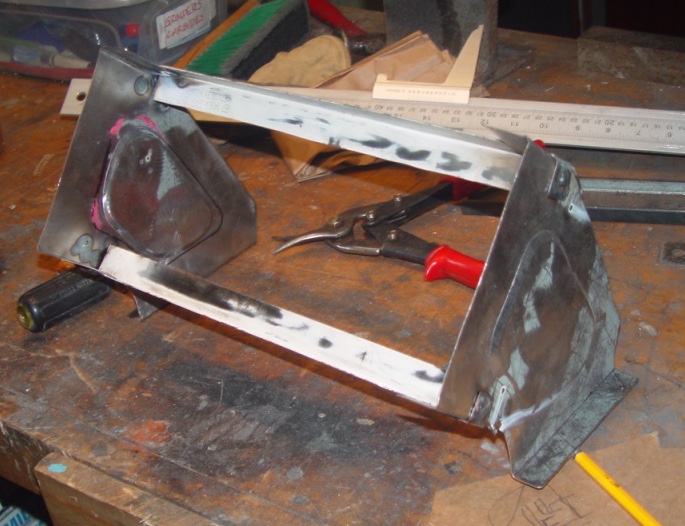 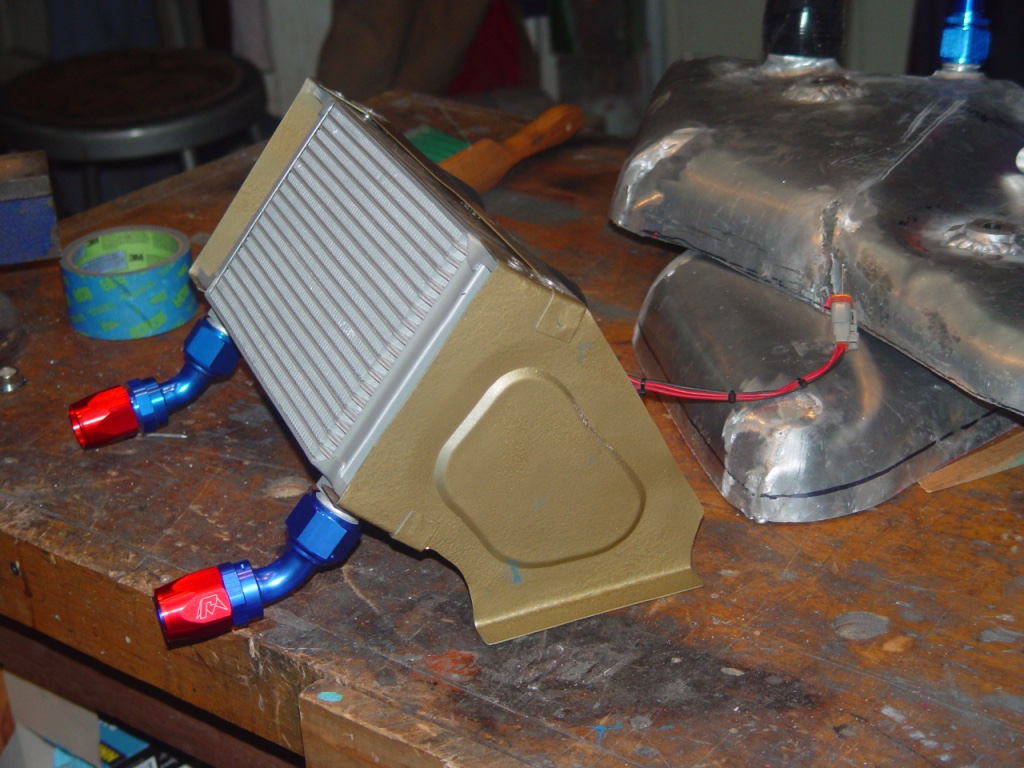 fans ex NASCAR according to ebay 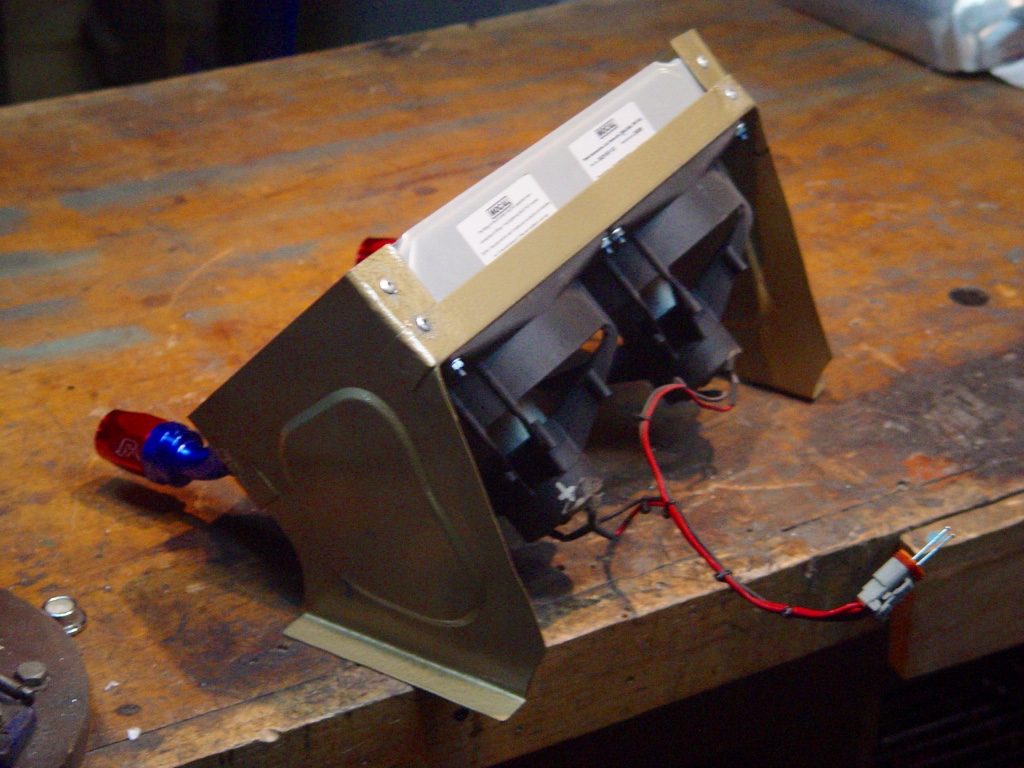 |
|
|
|
| worn |
Jun 29 2015, 11:41 AM
Post
#5
|
|
can't remember Group: Members Posts: 3,145 Joined: 3-June 11 From: Madison, WI Member No.: 13,152 Region Association: Upper MidWest |
I globbed it all over with epoxy primer used to make fish tanks in aquaculture. Already sanded off the drips and recoated it with normal automotive primer. I had it down to zero leaks, so this is insurance.
 |
|
|
|
| aircooledtechguy |
Jun 30 2015, 07:53 AM
Post
#6
|
|
The Aircooledtech Guy Group: Members Posts: 1,966 Joined: 8-November 08 From: Anacortes, WA Member No.: 9,730 Region Association: Pacific Northwest |
Congrats on the great job!!
It's exciting (and a little scary) to test new boundries, develop new skills and see if you really CAN do things the first time. What's your next trick?? (IMG:style_emoticons/default/beerchug.gif) |
|
|
|
| worn |
Jun 30 2015, 03:05 PM
Post
#7
|
|
can't remember Group: Members Posts: 3,145 Joined: 3-June 11 From: Madison, WI Member No.: 13,152 Region Association: Upper MidWest |
QUOTE(aircooledtechguy @ Jun 30 2015, 06:53 AM) Congrats on the great job!! It's exciting (and a little scary) to test new boundries, develop new skills and see if you really CAN do things the first time. What's your next trick?? (IMG:style_emoticons/default/beerchug.gif) Hopefully moving home to the PNW someday. But the obvious one is turning the key. I deleted the relay tray so the 14 pin connector made way for a few watertight Deutsch connectors from JEGs. Ticking off the to do list and it is frighteningly short before engine mount. I suppose I might do a build thread. |
|
|
|
| colingreene |
Jul 1 2015, 01:18 AM
Post
#8
|
|
Senior Member Group: Members Posts: 729 Joined: 17-October 13 From: Southern California Member No.: 16,526 Region Association: Southern California |
Do it!
|
|
|
|
| GeorgeRud |
Jul 1 2015, 06:43 AM
Post
#9
|
|
Advanced Member Group: Members Posts: 3,725 Joined: 27-July 05 From: Chicagoland Member No.: 4,482 Region Association: Upper MidWest |
I commend you on your persistence and willingness to take on such a project! Have you checked that the timeserted stud locations won't leak? There should also be some spacers to provide a bit of clearance between the tank and the inner sheet metal of the body.
|
|
|
|
|
1 User(s) are reading this topic (1 Guests and 0 Anonymous Users)
0 Members:

|
Lo-Fi Version | Time is now: 24th April 2024 - 04:00 PM |
Invision Power Board
v9.1.4 © 2024 IPS, Inc.