|
|
|
Porsche, and the Porsche crest are registered trademarks of Dr. Ing. h.c. F. Porsche AG.
This site is not affiliated with Porsche in any way. Its only purpose is to provide an online forum for car enthusiasts. All other trademarks are property of their respective owners. |
|
|


| Alphaogre |
 Jul 12 2015, 06:28 PM Jul 12 2015, 06:28 PM
Post
#1
|
|
Member  Group: Members Posts: 460 Joined: 28-May 12 From: San Diego Member No.: 14,487 Region Association: Southern California |
I spent Saturday adjusting the valves, only to have it continue to run funky. I was driving home from the Laguna Beach concourse a few weeks ago, and had some sputtering/ back firing out the carbs and loss of power. Figured the valves and some other stuff needed to get adjusted and looked at.
Anyway...we did a pressure test on 3 and 4. 4 did fine, showed 50 pounds. 3 had no pressure, we put some oil down in the piston then 3 jumped up to 75 pounds. We did not get bypass air out the exhaust or up the carb when we rolled it in gear....We did feel the air pressure coming up through the oil fill neck... When I first got the car and pulled the motor we did not strip it down all the way to the pistons, so I guess now is the time. The car is a 1970 914-4 1.7. The current set up, which was on the car when I bought it, is a dual 44 webber carb set up. Not sure how much were has been done to the heads, but when we took a look at the intake portion, it defiantly was not 40 years old. They seem to somewhat ported and were clean. I have no info on the motor, as I bought the car as a never started project, and the previous owner did the same thing from the guy before him. (IMG:style_emoticons/default/confused24.gif) So all I have is hearsay and no receipts or anything. The question now is.... do I pull the motor down to the pistons and just re do the rings and put it all back, OR time for upgrades! (IMG:style_emoticons/default/piratenanner.gif) I use the car once or twice a week to dive to work or just cruz around. I do drive with fervor, and have been starting to do some AX and Time trial stuff (strictly for fun, not competitive). I would like some more ummmmfffff but still reliable to do the longer road trips i.e. the WCR and or some vintage rallies. I know there is the great debate regarding the 1.7 core vs. 2.0 core, but I would like to retain the case, and heads if possible. Maybe use the $ on the Pistons, jugs, and cam? (IMG:style_emoticons/default/idea.gif) Any impute, point in any direction, or recommendations would be great! I would like to keep the cost to around $1000 to $1500 if possible. I would be doing the work and have a mechanic friend of mine to help, so all funds would go to parts. |
   |

 
|
  |
Replies(1 - 19)
| 76-914 |
Jul 12 2015, 08:28 PM
Post
#2
|
|
Repeat Offender & Resident Subaru Antagonist Group: Members Posts: 13,502 Joined: 23-January 09 From: Temecula, CA Member No.: 9,964 Region Association: Southern California |
Buy a used & running 1.7. Head work alone runs 1K and up. Add in machining the jugs, rings. (IMG:style_emoticons/default/idea.gif)
|
|
|
|
| jcd914 |
Jul 12 2015, 08:41 PM
Post
#3
|
|
Advanced Member Group: Members Posts: 2,081 Joined: 7-February 08 From: Sacramento, CA Member No.: 8,684 Region Association: Northern California |
1.7 is a good case to start with.
I would have the heads checked closely by someone that knows the type 4 heads. If the heads are OK then you have some options in your budget. If the heads need work they could eat your whole budget and then some. If they are 1.7 heads they will need to be cut to fit any P&Cs other than stock 1.7s. Good heads: Split the case and put all new bearings, new carb cam and a set of 96 P&Cs and you have a nice 1911cc short stroke motor. You should get a machine shop to check & measure the case, inspect and measure the rods and inspected & measure the crank (probably get it polished). Any of these inspections can uncover additional work/cost but couls save a failure later. Jim |
|
|
|
| Alphaogre |
Jul 13 2015, 10:45 AM
Post
#4
|
|
Member Group: Members Posts: 460 Joined: 28-May 12 From: San Diego Member No.: 14,487 Region Association: Southern California |
So I guess pulling the motor sooner then later to be able to look at the heads and go from there is the start...
Are there any kits for this type of concept? or will it have to be piece milled all together? So you are referring to something like in the thread below? http://www.914world.com/bbs2/index.php?sho...p;#entry1652217 |
|
|
|
| Alphaogre |
Jul 19 2015, 01:43 PM
Post
#5
|
|
Member Group: Members Posts: 460 Joined: 28-May 12 From: San Diego Member No.: 14,487 Region Association: Southern California |
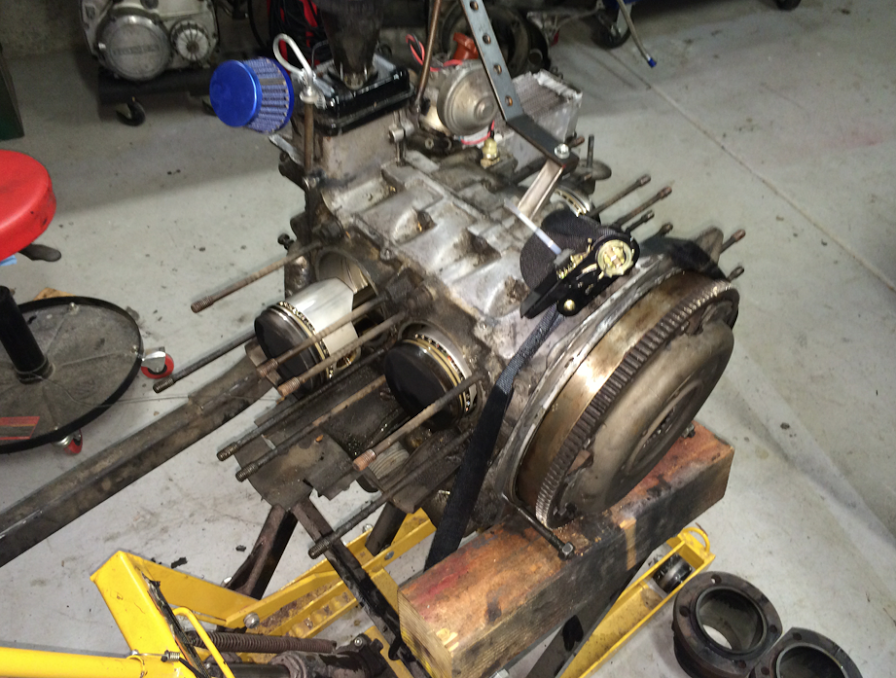
Ok, so I got the motor out and down to the heads. being that this is my first time stripping one of these motors down, I have a few questions. Also, I have no idea what has been done to the motor, so I am trying to see what is stock and what is not.
First are these indentions on the lower part of the rocker normal? looks like they were hitting somethig? They all seem to have the same markings. 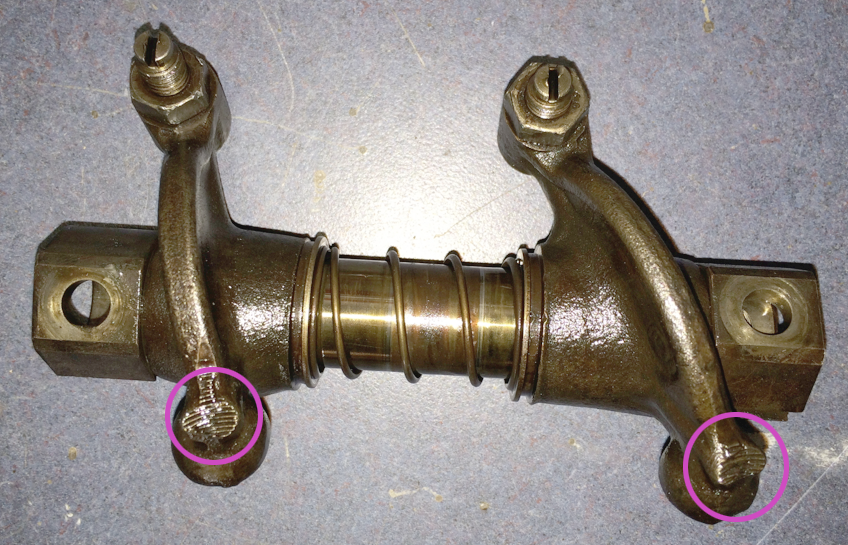 On the driver side head, there are some indentions at the base of the front push rod tubes. Any Suggestions on what caused this? will this need to be fixed?  Here is the Driver side head. I am looking to add the 96mm pistons and Jugs for a short stroke 1910. Do 1.7 heads have to be machined to accommodate the top of the jugs, or are the walls on the jugs thinner and still will seat into the heads? 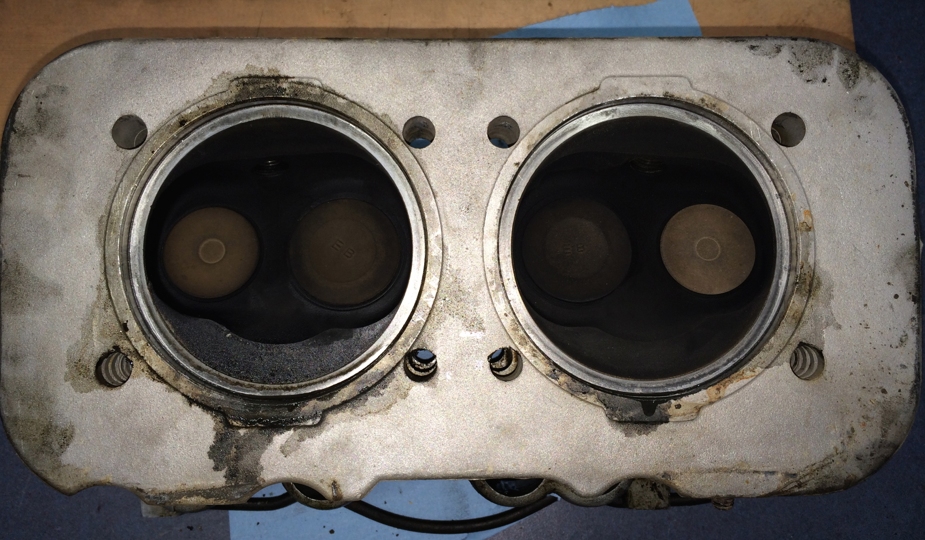 And its correlating Pistons. 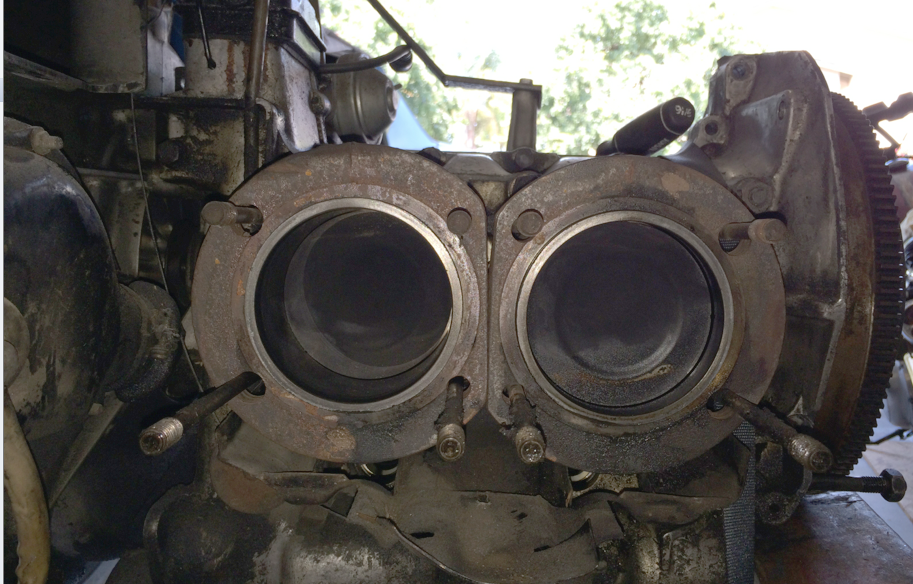 The part I got stuck on is this last part of the tins, I cant get the head off, and cant seem to get the tin off, Do I seriously have to pull the whole fan and front part of the motor to get his thing off?!?!?! (IMG:style_emoticons/default/headbang.gif) 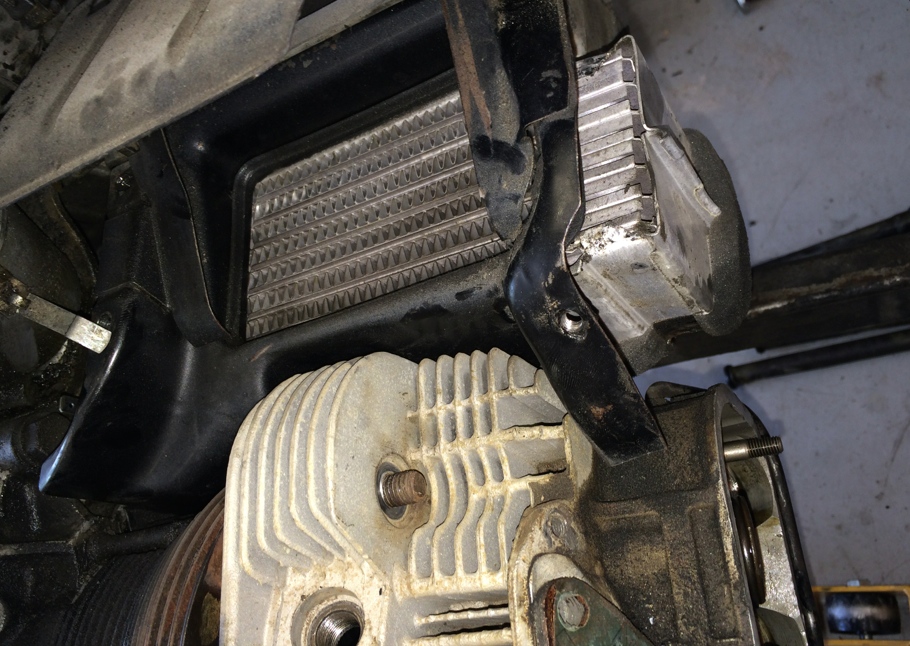 |
|
|
|
| TheCabinetmaker |
Jul 19 2015, 02:39 PM
Post
#6
|
|
I drive my car everyday Group: Members Posts: 8,300 Joined: 8-May 03 From: Tulsa, Ok. Member No.: 666 |
Absolutely. There should be a piece of tin between the head and push rod tubes that also has to be removed
|
|
|
|
| eyesright |
Jul 19 2015, 03:42 PM
Post
#7
|
|
Member Group: Members Posts: 430 Joined: 8-January 12 From: OK Member No.: 13,979 Region Association: Southwest Region |
QUOTE(The Cabinetmaker @ Jul 19 2015, 12:39 PM)  Absolutely. There should be a piece of tin between the head and push rod tubes that also has to be removed And don't be too worried about getting the fan off. The fan and washer and key come off then four bolts and the whole thing comes off easily....well pretty easily anyway. Give it a try. If you got the heads off by yourself, this part is easy! Good luck. |
|
|
|
| Alphaogre |
Jul 19 2015, 04:14 PM
Post
#8
|
|
Member Group: Members Posts: 460 Joined: 28-May 12 From: San Diego Member No.: 14,487 Region Association: Southern California |
Yea, I got the tin on the underside all removed, I guess I will look at removing the fan and going from there. I have to say, that is kid of annoying, It should just come out with the head like it does on the driver side.
|
|
|
|
| Alphaogre |
Jul 19 2015, 06:28 PM
Post
#9
|
|
Member Group: Members Posts: 460 Joined: 28-May 12 From: San Diego Member No.: 14,487 Region Association: Southern California |
So I got the front fan manifold off, 2 of the 3 fan allen bolts were stripped, so that took an hour longer then it should have....but is there any special tool or trick to holding the fan while you undo the center nut? or is that reverse threaded for any reason?
|
|
|
|
| mikedsilva |
Jul 19 2015, 07:46 PM
Post
#10
|
|
Member Group: Members Posts: 90 Joined: 23-February 15 From: Australia Member No.: 18,462 Region Association: Australia and New Zealand |
QUOTE(Alphaogre @ Jul 20 2015, 10:28 AM) So I got the front fan manifold off, 2 of the 3 fan allen bolts were stripped, so that took an hour longer then it should have....but is there any special tool or trick to holding the fan while you undo the center nut? or is that reverse threaded for any reason? When i removed my fan the other day, I used my dewalt impact... it wasnt on very tight at all.. |
|
|
|
| Valy |
Jul 19 2015, 11:27 PM
Post
#11
|
|
Senior Member Group: Members Posts: 1,675 Joined: 6-April 10 From: Sunnyvale, CA Member No.: 11,573 Region Association: Northern California |
You hold the flywheel.
|
|
|
|
| rick 918-S |
Jul 20 2015, 07:10 AM
Post
#12
|
|
Hey nice rack! -Celette Group: Members Posts: 20,459 Joined: 30-December 02 From: Now in Superior WI Member No.: 43 Region Association: Northstar Region |
Word of caution. Do not stick anything into the fan to hold it or pry on it. The fins are aluminum and very weak. 20 some years ago long before the internet I found this out the hard way...
|
|
|
|
| Alphaogre |
Jul 20 2015, 10:13 AM
Post
#13
|
|
Member Group: Members Posts: 460 Joined: 28-May 12 From: San Diego Member No.: 14,487 Region Association: Southern California |
QUOTE(rick 918-S @ Jul 20 2015, 06:10 AM) Word of caution. Do not stick anything into the fan to hold it or pry on it. The fins are aluminum and very weak. 20 some years ago long before the internet I found this out the hard way... Yea I have heard these the fans are pretty "delicate", thats why I was wondering...I am going to try and get it off tonight, so I can get the last piece of tin off, and get the heads off. Then I will actually be able to see the cylinder that we bad. |
|
|
|
| Alphaogre |
Jul 21 2015, 02:52 PM
Post
#14
|
|
Member Group: Members Posts: 460 Joined: 28-May 12 From: San Diego Member No.: 14,487 Region Association: Southern California |
Ok, I got everything Stripped down and now its time for some decision making.
 I am looking to build a short stroke 1911 motor as suggested in the previous posts. I have done a lot of research and there seems to be equal amount of conjecture regarding the two ways to do this with the 1.7 heads. With this not being a "planned" build, and looking to keep the cost down, I am looking to keep the stock case, crank, piston rods (66mm), and heads. Option 1 You get the 96mm pistons and jugs that can sleeve into the 1.7 heads, from that I understand, this would be much like a "thin wall" piston wall. (thinner then the stock 5mm piston wall. Option 2 Get the 96mm kit for a 2.0 and have the head machined to accept the increased diameter head. This seems that it might bring the tolerance between the valve area, and holes for the head bolts, to be very small. See below. 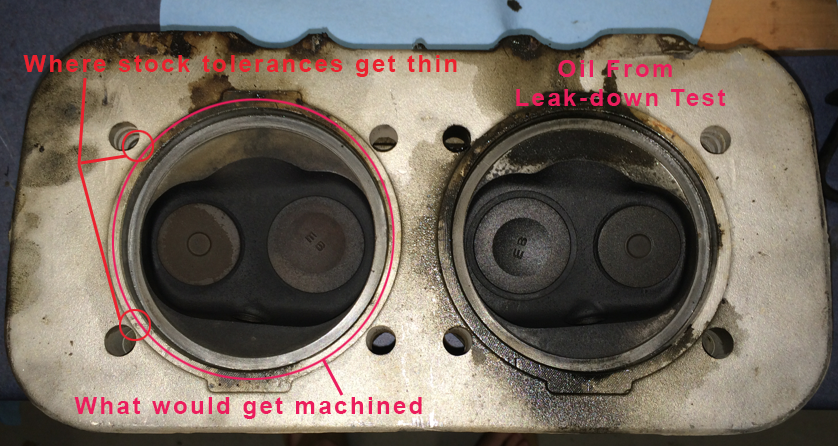 There also seems to be a lot of back and fourth about these Chinese kits. So, what would be better for reliability if you are going to machine the heads anyway. Finding used 2.0 Stock pistons and jugs (german but old)....or one of these new kits from china, have them check out, but al least everything is new. These are some of the kits I was looking at. "slip in" to 1.7 heads: https://www.drdracingheads.com/xcart/Type-4...it-slip-in.html Assemble a kit with European Motorworks: http://www.europeanmotorworks.com/vw/type-...-cylinders.html Auto Atlanta kit: http://www.autoatlanta.com/Porsche-96-Mm-B...2119807596.html "Chinese" kit from Aircooled.net: http://vwparts.aircooled.net/Piston-Cylind...vw9600t4s66.htm This was another kit option: Not sure if this is just the same stuff as Aircooled.net though http://www.kustom1warehouse.net/AA_pistons...311198069aa.htm The AA performance kit: http://aapistons.com/products/96mm-porsche...al-cylinder-set |
|
|
|
| vw505 |
Jul 21 2015, 03:20 PM
Post
#15
|
|
Member Group: Members Posts: 228 Joined: 17-April 03 From: San Antonio, TX , Navy retired Member No.: 579 Region Association: None |
I sent you a pm
|
|
|
|
| Dave_Darling |
Jul 21 2015, 05:36 PM
Post
#16
|
|
914 Idiot Group: Members Posts: 14,986 Joined: 9-January 03 From: Silicon Valley / Kailua-Kona Member No.: 121 Region Association: Northern California |
QUOTE(Alphaogre @ Jul 21 2015, 01:52 PM) Option 2 Get the 96mm kit for a 2.0 and have the head machined to accept the increased diameter head. The 2.0 one will put the pistons at a very wrong height. I forget if they'll be sticking 2.5mm out of the barrels, or if your deck height will be 2.5mm too high, but it won't be right. Get the kit for the 1.8 motors. It has the same thicker cylinders as the 2.0 kit, but the same pistons as the 1.7 kit. If you're worried about machining the heads, get some 1.8 heads. They have the same size register as the 2.0 heads. --DD |
|
|
|
| Valy |
Jul 21 2015, 06:51 PM
Post
#17
|
|
Senior Member Group: Members Posts: 1,675 Joined: 6-April 10 From: Sunnyvale, CA Member No.: 11,573 Region Association: Northern California |
QUOTE(Dave_Darling @ Jul 21 2015, 04:36 PM) QUOTE(Alphaogre @ Jul 21 2015, 01:52 PM) Option 2 Get the 96mm kit for a 2.0 and have the head machined to accept the increased diameter head. The 2.0 one will put the pistons at a very wrong height. I forget if they'll be sticking 2.5mm out of the barrels, or if your deck height will be 2.5mm too high, but it won't be right. Get the kit for the 1.8 motors. It has the same thicker cylinders as the 2.0 kit, but the same pistons as the 1.7 kit. If you're worried about machining the heads, get some 1.8 heads. They have the same size register as the 2.0 heads. --DD What he said. Regular 2L pistons will need 2.5mm spacers and longer pushrods. Just get the 96mm pistons for 66mm cranck (1.7 or 1.8L). Het good used 1.8 heads to start with. |
|
|
|
| Alphaogre |
Jul 22 2015, 11:18 AM
Post
#18
|
|
Member Group: Members Posts: 460 Joined: 28-May 12 From: San Diego Member No.: 14,487 Region Association: Southern California |
QUOTE(Dave_Darling @ Jul 21 2015, 04:36 PM) QUOTE(Alphaogre @ Jul 21 2015, 01:52 PM) Option 2 Get the 96mm kit for a 2.0 and have the head machined to accept the increased diameter head. The 2.0 one will put the pistons at a very wrong height. I forget if they'll be sticking 2.5mm out of the barrels, or if your deck height will be 2.5mm too high, but it won't be right. Get the kit for the 1.8 motors. It has the same thicker cylinders as the 2.0 kit, but the same pistons as the 1.7 kit. If you're worried about machining the heads, get some 1.8 heads. They have the same size register as the 2.0 heads. --DD Thats a good point, 2.0 pistons and jugs take it down a whole new slippery slope. |
|
|
|
| Alphaogre |
Jul 29 2015, 09:51 PM
Post
#19
|
|
Member Group: Members Posts: 460 Joined: 28-May 12 From: San Diego Member No.: 14,487 Region Association: Southern California |
Short update, after a week or so of research and trying to figure the best option. I ended up ordering a set of Keith black 96mm flat top pistons and jugs from DRD . (IMG:style_emoticons/default/piratenanner.gif)
There was no way to find forged 96mm , 66mm, 24mm pin pistons. So I went with the next best thing. They said the KB pistons are made here and have a better tolerance standard. I'm taking the heads to head flow masters in San Marcos tomorrow to get 2mm machined out. |
|
|
|
| 914_teener |
Jul 29 2015, 10:51 PM
Post
#20
|
|
914 Guru Group: Members Posts: 5,198 Joined: 31-August 08 From: So. Cal Member No.: 9,489 Region Association: Southern California |
QUOTE(Alphaogre @ Jul 29 2015, 08:51 PM) Short update, after a week or so of research and trying to figure the best option. I ended up ordering a set of Keith black 96mm flat top pistons and jugs from DRD . (IMG:style_emoticons/default/piratenanner.gif) There was no way to find forged 96mm , 66mm, 24mm pin pistons. So I went with the next best thing. They said the KB pistons are made here and have a better tolerance standard. I'm taking the heads to head flow masters in San Marcos tomorrow to get 2mm machined out. I think that's a good choice. |
|
|
|
|
1 User(s) are reading this topic (1 Guests and 0 Anonymous Users)
0 Members:

|
Lo-Fi Version | Time is now: 17th May 2024 - 01:03 AM |
Invision Power Board
v9.1.4 © 2024 IPS, Inc.