|
|
|
Porsche, and the Porsche crest are registered trademarks of Dr. Ing. h.c. F. Porsche AG.
This site is not affiliated with Porsche in any way. Its only purpose is to provide an online forum for car enthusiasts. All other trademarks are property of their respective owners. |
|
|

  |

| R_u_dd |
 Mar 27 2016, 11:01 AM Mar 27 2016, 11:01 AM
Post
#81
|
|
Member  Group: Members Posts: 154 Joined: 3-March 14 From: Grants Pass, Oregon Member No.: 17,072 Region Association: Pacific Northwest |
Painting Begins
I can't wait to post these photos. We are half-way through the painting process doing the interior first, two coats paint and two coats clear-coat. We decided on a non-stock color, a Honda Integra B97M code color. It's a pearl, which is mica rock, in the old days, it was made with fish scales, much easier to paint with the modern paint, but still shows every flaw. I am starting to see bumps I didn't know were there. Blue Color survey post Painting Notes/Tips - The guide coat is very important throughout the paint prep process. This is a thin coat of mist sprayed over the primer to create dots or texture that reveals low spots and where you've sanded. It's particularly important for wet sanding. We used 400 grit 3M paper for wet sanding and could get away with it because of the high solids in the paint. - Foam sanding blocks work very well. - Use the green masking tape. The glue withstands the chemicals in the paint better than blue. blue is ok for priming, but must be changed out for the paining. Better to use the green. - Put a little dawn dish soap in the water when wet sanding. Dawn is a great cleaner for the painting process. - Spray water down on the ground before priming and paining to remove static discharge and keep the paint from sticking to the cement. - Use lacquer thinner for solvent. - Mix hardeners exactly, but reducers are up to the painter. - Buy a small amount of test paint and spray it out with one, two, and three coats, with clear coat over the top, because the paint varies considerably with the number of coats and methods of spray. Also, photos on the internet vary widely depending on lighting conditions. - There is a face coat and side cote tone that varies between light and shadow. The difference in tones is important as you will see it in the curves of the car. - More to follow as I remember them (Feel free to add your painting tips) Pictures: Our color trials. The lower colors are a candy version that we will use for the rocker panels. (IMG:http://www.914world.com/bbs2/uploads_offsite/i1301.photobucket.com-17072-1459118682.1.jpeg) (IMG:http://www.914world.com/bbs2/uploads_offsite/i1301.photobucket.com-17072-1459098112.1.jpg) (IMG:http://www.914world.com/bbs2/uploads_offsite/i1301.photobucket.com-17072-1459098112.2.jpg) (IMG:http://www.914world.com/bbs2/uploads_offsite/i1301.photobucket.com-17072-1459098113.3.jpg) (IMG:http://www.914world.com/bbs2/uploads_offsite/i1301.photobucket.com-17072-1459098113.4.jpg) (IMG:http://www.914world.com/bbs2/uploads_offsite/i1301.photobucket.com-17072-1459098113.5.jpg) (IMG:http://www.914world.com/bbs2/uploads_offsite/i1301.photobucket.com-17072-1459098114.6.jpg) (IMG:http://www.914world.com/bbs2/uploads_offsite/i1301.photobucket.com-17072-1459098114.7.jpg) These pictures were taken before the clear coat was applied, which really makes the paint pop. |
   |

 
|
| ahycaramba |
Apr 2 2016, 11:34 PM
Post
#83
|
|
“I live my life a quarter mile at a time.” Group: Members Posts: 161 Joined: 17-March 15 From: Murrieta, California Member No.: 18,534 Region Association: Southern California |
Great progress!!! Looking good!!! How about some shots of the front bumper and air dam. (IMG:style_emoticons/default/popcorn[1].gif)
|
|
|
|
| R_u_dd |
Apr 2 2016, 11:45 PM
Post
#84
|
|
Member Group: Members Posts: 154 Joined: 3-March 14 From: Grants Pass, Oregon Member No.: 17,072 Region Association: Pacific Northwest |
QUOTE(ahycaramba @ Apr 2 2016, 10:34 PM)  Great progress!!! Looking good!!! How about some shots of the front bumper and air dam. (IMG:style_emoticons/default/popcorn[1].gif) We are going to paint the lower portion (original valence) in a candied blue black and the upper portion (custom civic part) in the voltage blue. Scott has it at his shop because he was doing some final glazing work. I can hardly wait to get it back myself. He also has the rocker panels which will be done in the candy blue black fading from dark to light with a "Porsche" negative stencil. So, I am hoping to get those back on Monday. The grate over the engine is in the candied blue black. Looks sweet. The photos don't do it justice. |
|
|
|
| whitetwinturbo |
Apr 3 2016, 01:46 PM
Post
#85
|
|
Honey, does this wing make my ass look fat? Group: Members Posts: 1,391 Joined: 22-October 11 From: Newport Beach/Kalefornya/USA Member No.: 13,704 Region Association: Southern California |
|
|
|
|
| R_u_dd |
Apr 6 2016, 10:53 PM
Post
#86
|
|
Member Group: Members Posts: 154 Joined: 3-March 14 From: Grants Pass, Oregon Member No.: 17,072 Region Association: Pacific Northwest |
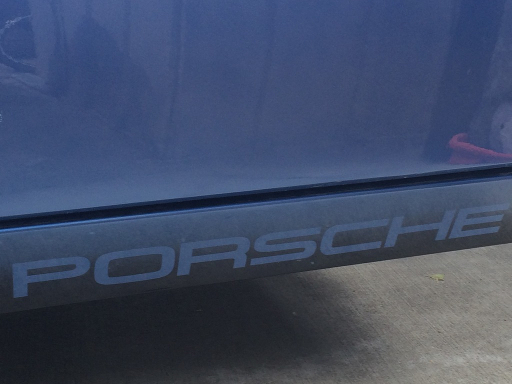
The big reveal today. Scott finished the logo. He painted this by hand with an aribrush. It's on the sail panel.
It's not a sticker believe it or not. The pictures are a little larger than life size. |
|
|
|
| whitetwinturbo |
Apr 6 2016, 11:15 PM
Post
#87
|
|
Honey, does this wing make my ass look fat? Group: Members Posts: 1,391 Joined: 22-October 11 From: Newport Beach/Kalefornya/USA Member No.: 13,704 Region Association: Southern California |
|
|
|
|
| 914forme |
Apr 7 2016, 08:43 AM
Post
#88
|
|
Times a wastin', get wrenchin'! Group: Members Posts: 3,899 Joined: 24-July 04 From: Dayton, Ohio Member No.: 2,388 Region Association: None |
QUOTE(R_u_dd @ Apr 7 2016, 12:53 AM) The big reveal today. Ho WOW that thing rocks! Love that, I would use that crest and do a 3D printed badge. Is it copyrighted? |
|
|
|
| Andyrew |
Apr 7 2016, 09:15 AM
Post
#89
|
|
Spooling.... Please wait Group: Members Posts: 13,380 Joined: 20-January 03 From: Riverbank, Ca Member No.: 172 Region Association: Northern California |
That looks great!!!
|
|
|
|
| R_u_dd |
Apr 24 2016, 11:53 PM
Post
#90
|
|
Member Group: Members Posts: 154 Joined: 3-March 14 From: Grants Pass, Oregon Member No.: 17,072 Region Association: Pacific Northwest |
The painting is almost finished. We cut and buffed this weekend. There's still some fine finishing work and small pieces, bumper and rockers to paint.
(IMG:http://www.914world.com/bbs2/uploads_offsite/i1301.photobucket.com-17072-1461563579.1.jpg) (IMG:http://www.914world.com/bbs2/uploads_offsite/i1301.photobucket.com-17072-1461563579.2.jpg) High Resolution - cell phone (IMG:http://www.914world.com/bbs2/uploads_offsite/i1301.photobucket.com-17072-1461563579.3.jpeg) (IMG:http://www.914world.com/bbs2/uploads_offsite/i1301.photobucket.com-17072-1461563579.4.jpeg) (IMG:http://www.914world.com/bbs2/uploads_offsite/i1301.photobucket.com-17072-1461563580.5.jpeg) |
|
|
|
| R_u_dd |
Apr 25 2016, 09:50 PM
Post
#91
|
|
Member Group: Members Posts: 154 Joined: 3-March 14 From: Grants Pass, Oregon Member No.: 17,072 Region Association: Pacific Northwest |
Rocker Panels (They look like a pair of skis, don't they?) Notice the fade from blue to black on the bottom? I think it is reminiscent of the original look even though it's not correct. |
|
|
|
| JRust |
Apr 25 2016, 10:07 PM
Post
#92
|
|
914 Guru Group: Members Posts: 6,317 Joined: 10-January 03 From: Albany Oregon Member No.: 129 Region Association: Pacific Northwest |
Love the blue bud. I even like the logo you made up. Not sure I like it on the sail panel. It's your car though & all that matters is you like it. You got a little work to do to have it ready for WCR. It is looking great though. Can't wait to see it in person.
|
|
|
|
| R_u_dd |
Apr 25 2016, 10:59 PM
Post
#93
|
|
Member Group: Members Posts: 154 Joined: 3-March 14 From: Grants Pass, Oregon Member No.: 17,072 Region Association: Pacific Northwest |
QUOTE(JRust @ Apr 25 2016, 09:07 PM) Love the blue bud. I even like the logo you made up. Not sure I like it on the sail panel. It's your car though & all that matters is you like it. You got a little work to do to have it ready for WCR. It is looking great though. Can't wait to see it in person. You know we thought about putting the logo behind the front wheel on the quarter panel- taped a paper copy in both locations and the logo just looked better on the sail panel. The original idea was to put the logo- a single logo only on the front hood where the badge goes, but it would have looked like two eyeballs and a nose, so that didn't work. The sail panel logo grows on you after a short while. I like the checkerboard sail panel on the blue autocross car that is out there- the inspiration for dressing up the sail panel. |
|
|
|
| JRust |
Apr 25 2016, 11:29 PM
Post
#94
|
|
914 Guru Group: Members Posts: 6,317 Joined: 10-January 03 From: Albany Oregon Member No.: 129 Region Association: Pacific Northwest |
Hey it's looking great man. I like the logo like I said. I don't think I would have put it there but who cares. It's your car & what matters is you like it. I am sure there are plenty who will love it. Now show me some pics of that suby drivetrain going in (IMG:style_emoticons/default/drooley.gif)
QUOTE(R_u_dd @ Apr 25 2016, 09:59 PM) You know we thought about putting the logo behind the front wheel on the quarter panel- taped a paper copy in both locations and the logo just looked better on the sail panel. The original idea was to put the logo- a single logo only on the front hood where the badge goes, but it would have looked like two eyeballs and a nose, so that didn't work. The sail panel logo grows on you after a short while. I like the checkerboard sail panel on the blue autocross car that is out there- the inspiration for dressing up the sail panel. |
|
|
|
| R_u_dd |
Jun 28 2016, 12:53 AM
Post
#95
|
|
Member Group: Members Posts: 154 Joined: 3-March 14 From: Grants Pass, Oregon Member No.: 17,072 Region Association: Pacific Northwest |
Progress on the Blue Porscheru over the last couple months:
Radiator Cutouts See bottom of Post #48 (IMG:http://www.914world.com/bbs2/uploads_offsite/i1301.photobucket.com-17072-1467096786.1.jpeg) Another shot of the Rocker Panels: (IMG:http://www.914world.com/bbs2/uploads_offsite/i1301.photobucket.com-17072-1467096786.2.jpeg) Seat reupholstery: Not too difficult and very rewarding: See post #71 And finally the long awaited bumper reveal. Also see post #70: (IMG:http://www.914world.com/bbs2/uploads_offsite/i1301.photobucket.com-17072-1467096786.3.jpeg) (IMG:http://www.914world.com/bbs2/uploads_offsite/i1301.photobucket.com-17072-1467096787.4.jpeg) |
|
|
|
| falcor75 |
Jun 28 2016, 01:12 AM
Post
#96
|
|
Senior Member Group: Members Posts: 1,579 Joined: 22-November 12 From: Sweden Member No.: 15,176 Region Association: Scandinavia |
That looks great, love the badge details and the choise of blue. Keep up the good work!
|
|
|
|
| 914forme |
Jun 28 2016, 09:37 AM
Post
#97
|
|
Times a wastin', get wrenchin'! Group: Members Posts: 3,899 Joined: 24-July 04 From: Dayton, Ohio Member No.: 2,388 Region Association: None |
Cars coming together nicely (IMG:style_emoticons/default/popcorn[1].gif)
|
|
|
|
| R_u_dd |
Oct 2 2016, 02:04 PM
Post
#98
|
|
Member Group: Members Posts: 154 Joined: 3-March 14 From: Grants Pass, Oregon Member No.: 17,072 Region Association: Pacific Northwest |
Gauges, Gauges and More Gauges
The original look of the gauges is great. In a concourse or restored 914 with original engine and transmission the best thing is to restore the original gauges. But for me, a Suberite, one has to use the digital speedometer rather than the cable speedo. Questions to think about: Should I rebuild the speedometer and save the faceplate and recalibrate? Should I just start over with new gauges? Which of the other gauges are usable? After a lot of web searching and pricing, what I decided to do is replace the gauges entirely with some original look VDO gauges. Here is some background material that I found while trying to make an informed decision: Everything you need to know about your model year Gauges from P 914 Forum Time For Gauges, What Should I consider, thread by Cairo94507 Gauges by timothy_nd28: How to Rebuild Gauges Using Modern Parts Gauge Lighting, This Little Light of Mine Custom Gauge Lighting, DIY kits or send them to me Upgrading the tachometer, to remove that bounce Vendors: Palo Alto Speedometer And from: (IMG:http://www.914world.com/bbs2/uploads_offsite/i1301.photobucket.com-17072-1475438687.1.png) Ideas for Dash Board Layout (Pictures from forum member cars)- Link to: Pictures of 1973 Dash and Gauges Pictures from another interior. Not sure the year. (IMG:http://www.914world.com/bbs2/uploads_offsite/i1301.photobucket.com-17072-1475438687.2.jpg) (IMG:http://www.914world.com/bbs2/uploads_offsite/i1301.photobucket.com-17072-1475438687.3.jpg) (IMG:http://www.914world.com/bbs2/uploads_offsite/i1301.photobucket.com-17072-1475438687.4.png) (IMG:http://www.914world.com/bbs2/uploads_offsite/i1301.photobucket.com-17072-1475438687.5.png) (IMG:http://www.914world.com/bbs2/uploads_offsite/i1301.photobucket.com-17072-1475438688.6.png) (IMG:http://www.914world.com/bbs2/uploads_offsite/i1301.photobucket.com-17072-1475438688.7.png) (IMG:http://www.914world.com/bbs2/uploads_offsite/i1301.photobucket.com-17072-1475438688.8.jpg) I bought a 6 gauge set of genuine VDO gauges off ebay for $280 bucks plus a clock for another $40. The small gauges are 2 1/16 inch and the two large gauges are 3 3/8". They are a bit small, but that allows them to be put into the main dashboard. I tried six gauge clusters and five gauge clusters above the steering wheel and decided on the five plus two in the ash tray area. The center console looks very nice, but in the end, I think I might feel confined in the cockpit with it there. (IMG:http://www.914world.com/bbs2/uploads_offsite/i1301.photobucket.com-17072-1475438688.9.jpg) (IMG:http://www.914world.com/bbs2/uploads_offsite/i1301.photobucket.com-17072-1475438689.10.jpg) (IMG:http://www.914world.com/bbs2/uploads_offsite/i1301.photobucket.com-17072-1475438689.11.jpg) I learned that the 2" hole cutter actually creates a larger hole when you don't use a drill press. Cutting by hand, there is just enough wobble to make the hole a bit larger. The 2 1/16 inch measurement is for the outside of the gauge. The hole needs to be 2". Since my hole was just slightly larger, I put a rubber bumper around the outside of the gauge (cut from a bicycle inner tube). Worked perfectly, and I have a snug fit now. I cut the larger holes very carefully with a jigsaw and got the fit nice and snug. (IMG:http://www.914world.com/bbs2/uploads_offsite/i1301.photobucket.com-17072-1475438689.12.jpg) I screwed the aluminum sheet metal to the back of the original to use for a template to cut the outside perimeter and mark the location of the screw holes. (IMG:http://www.914world.com/bbs2/uploads_offsite/i1301.photobucket.com-17072-1475438689.13.jpg) I saw this technique somewhere to create a pattern in the aluminum. If you make the swirls, here's a few tips. Use a drill press. Take your time. Go the same direction with your swirls. Cut half the previous circle with your bit. You can't very well redo your swirls, because it creates a different reflection. Keep your lines straight. I did mine by hand with my drill and a brass brush from a dremel kit. Seems to work fairly well, but if you look closely, my pattern is not that precise. The lines could be straighter and pattern more precise. They should all look like Japanese fans. Usually only the artist notices their own flaws. I like the swirls though. It gives the dashboard more depth and covers up the fact that the gauges are slightly off center. (IMG:http://www.914world.com/bbs2/uploads_offsite/i1301.photobucket.com-17072-1475438689.14.jpg) The board with the gauges in them. The lower part will be folded down. (IMG:http://www.914world.com/bbs2/uploads_offsite/i1301.photobucket.com-17072-1475438689.15.jpg) |
|
|
|
| veekry9 |
Oct 2 2016, 02:33 PM
Post
#99
|
|
OldMember Group: Retired Members Posts: 3,068 Joined: 17-June 13 From: TO Member No.: 16,025 Region Association: Canada |
 Very nice indeed. (IMG:style_emoticons/default/biggrin.gif) / 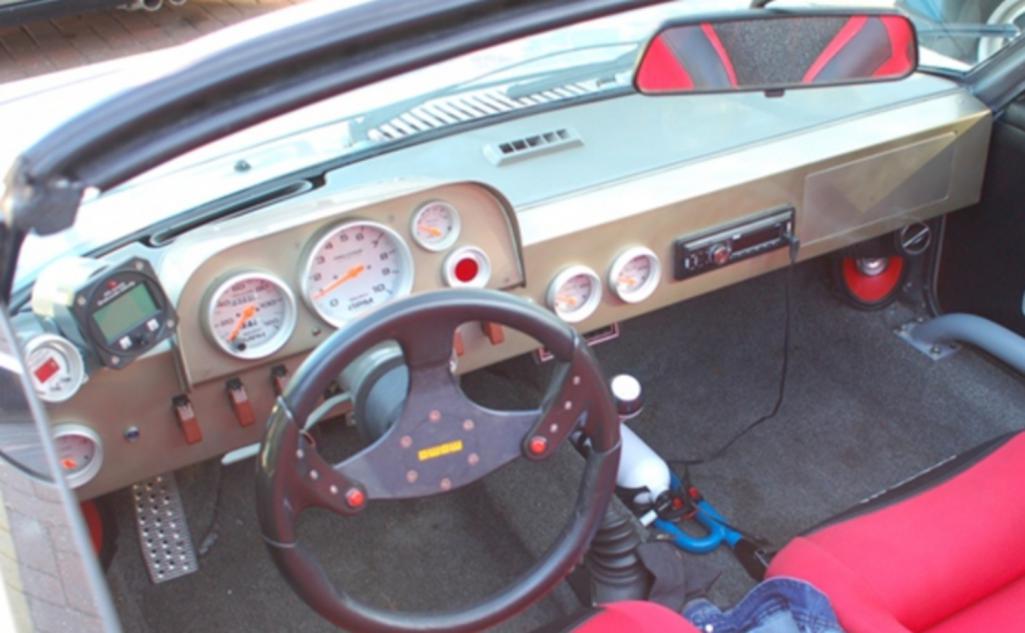 I like this treatment,tho a dark matte coating or anodizing would avoid reflections in the windscreen. Still,a nice effect,fighter jet.I worked in cnc punching and diemaking in the early '90s,mil spec enclosures. https://www.google.ca/search?q=sheet+metal+...YceCsoQ_AUIBigB https://www.google.ca/search?q=cnc+sheet+me...95zk1M9p6w0M%3A For those sheetmetal and monocoque needs,a perfectly folded and punched fabrication. Plasma cutters,lasers,waterjets too. Like sheetmetal origami. A local guy with a hobby cnc router could cut that metal in a jiffy,and at good quality. / |
|
|
|
| 76-914 |
Oct 3 2016, 07:59 AM
Post
#100
|
|
Repeat Offender & Resident Subaru Antagonist Group: Members Posts: 13,911 Joined: 23-January 09 From: Temecula, CA Member No.: 9,964 Region Association: Southern California |
QUOTE(R_u_dd @ Oct 2 2016, 01:04 PM) Gauges, Gauges and More Gauges The original look of the gauges is great. In a concourse or restored 914 with original engine and transmission the best thing is to restore the original gauges. But for me, a Suberite, one has to use the digital speedometer rather than the cable speedo. Questions to think about: Should I rebuild the speedometer and save the faceplate and recalibrate? Should I just start over with new gauges? Which of the other gauges are usable? After a lot of web searching and pricing, what I decided to do is replace the gauges entirely with some original look VDO gauges. That looks vaguely familiar. (IMG:style_emoticons/default/rolleyes.gif) |
|
|
|
|
1 User(s) are reading this topic (1 Guests and 0 Anonymous Users)
0 Members:

|
Lo-Fi Version | Time is now: 8th July 2026 - 11:07 AM |
Invision Power Board
v9.1.4 © 2026 IPS, Inc.