|
|
|
Porsche, and the Porsche crest are registered trademarks of Dr. Ing. h.c. F. Porsche AG.
This site is not affiliated with Porsche in any way. Its only purpose is to provide an online forum for car enthusiasts. All other trademarks are property of their respective owners. |
|
|


| jmitro |
 Jul 30 2015, 08:48 PM Jul 30 2015, 08:48 PM
Post
#61
|
|
Senior Member  Group: Members Posts: 713 Joined: 23-July 15 From: Oklahoma Member No.: 18,986 Region Association: None |
Hey guys, what's up?
Newbie checking in; been tinkering with & racing cars for 20 years; lots of BMWs and Porsches (944, 996, 912, 911SC). My newest project is this 74 914 1.8; picked it up for $1500US. Looks like it has factory air conditioning and option wheels. From my initial look it appears complete and almost rust free; it hasn't been registered for almost 20 years, so probably hasn't run for that long either. Cool thing is the car still has the ORIGINAL purchase invoice from Forest Lane Porsche in Dallas, Texas. EFI has been replaced by some sort of carb setup. This will be my first experience with a carb engine. Any suggestions on how to get the motor going? I need to make sure it turns by hand first. Anyhow, this board looks like a wealth of knowledge and I will be reading often. (IMG:style_emoticons/default/beerchug.gif) 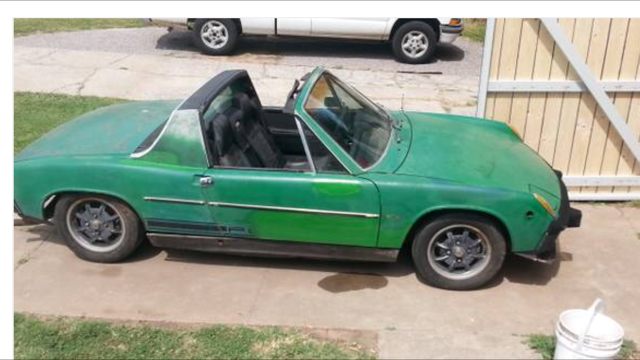 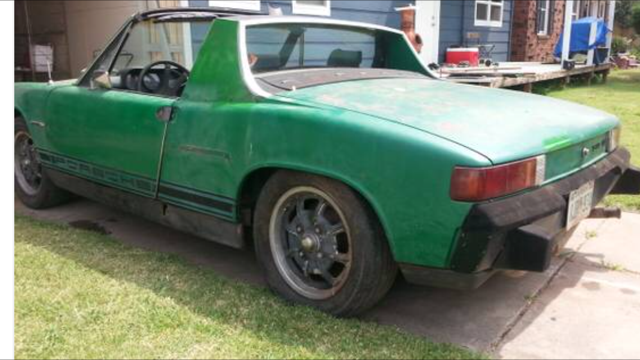 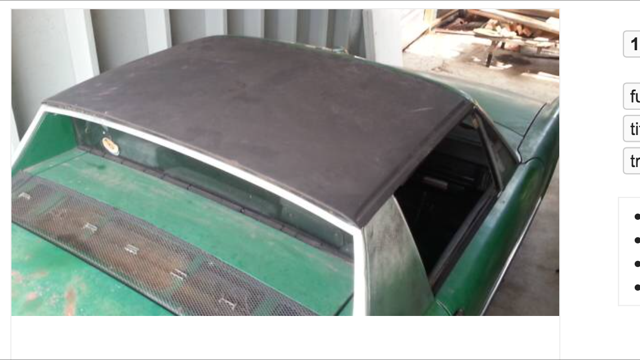  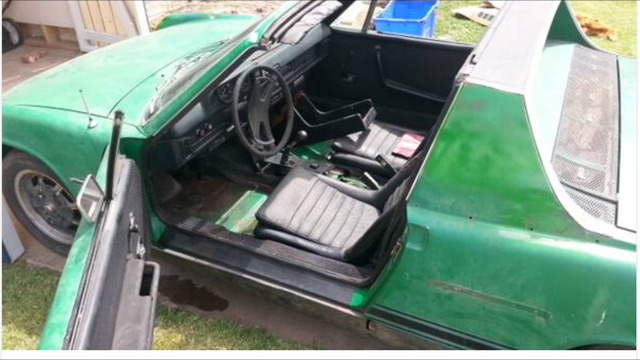 |
   |

 
|
Posts in this topic
jmitro newbie 74 1.8 project Jul 30 2015, 08:48 PM iwanta914-6 I came across that car on craigslist, should be a ... Jul 30 2015, 09:06 PM Jeff Bowlsby Engine pics please, lets see this carb.
Air condi... Jul 30 2015, 09:20 PM Chris Pincetich :wttc:
:beer2:
One option to get the engine run... Jul 31 2015, 12:26 PM jmitro Thanks guys; I'm excited about digging into it... Aug 2 2015, 08:54 AM Shadowfax :wttc: Aug 2 2015, 09:43 AM JawjaPorsche Long list:
Clean fuel tank
Replace fuel lines
Re... Aug 2 2015, 10:16 AM Spoke :agree:
:wttc:
Looks like a nice barn field f... Aug 2 2015, 10:40 AM jcd914 :wttc: Aug 2 2015, 10:44 AM rhodyguy my guess is when the fi was taken off for the sing... Aug 2 2015, 12:14 PM jmitro cool thanks for the information.
For sure, first t... Aug 2 2015, 12:56 PM rhodyguy You'll find you need a patch piece for the pas... Aug 2 2015, 01:05 PM jmitro Well the car has become a full restoration of sort... Sep 17 2015, 10:37 AM jmitro Floor pans looking pretty crusty, especially passe... Sep 17 2015, 10:40 AM jmitro Pretty dirty everywhere, indicating a long period ... Sep 17 2015, 10:53 AM jmitro More dirt, rust and neglect.
Sep 17 2015, 10:57 AM jmitro Air conditioning condensor, drier, compressor, hos... Sep 17 2015, 11:03 AM
iwanta914-6 I came across that car on craigslist, should be a ... Jul 30 2015, 09:06 PM Jeff Bowlsby Engine pics please, lets see this carb.
Air condi... Jul 30 2015, 09:20 PM Chris Pincetich :wttc:
:beer2:
One option to get the engine run... Jul 31 2015, 12:26 PM jmitro Thanks guys; I'm excited about digging into it... Aug 2 2015, 08:54 AM Shadowfax :wttc: Aug 2 2015, 09:43 AM JawjaPorsche Long list:
Clean fuel tank
Replace fuel lines
Re... Aug 2 2015, 10:16 AM Spoke :agree:
:wttc:
Looks like a nice barn field f... Aug 2 2015, 10:40 AM jcd914 :wttc: Aug 2 2015, 10:44 AM rhodyguy my guess is when the fi was taken off for the sing... Aug 2 2015, 12:14 PM jmitro cool thanks for the information.
For sure, first t... Aug 2 2015, 12:56 PM rhodyguy You'll find you need a patch piece for the pas... Aug 2 2015, 01:05 PM jmitro Well the car has become a full restoration of sort... Sep 17 2015, 10:37 AM jmitro Floor pans looking pretty crusty, especially passe... Sep 17 2015, 10:40 AM jmitro Pretty dirty everywhere, indicating a long period ... Sep 17 2015, 10:53 AM jmitro More dirt, rust and neglect.
Sep 17 2015, 10:57 AM jmitro Air conditioning condensor, drier, compressor, hos... Sep 17 2015, 11:03 AM
 Ed_F
Air conditioning condensor, drier, compressor, ho... Sep 22 2015, 03:45 PM Stacks914 Looks like a nice start! Sep 17 2015, 11:04 AM jmitro lots of rust along the rear lower firewall
Sep 17 2015, 11:07 AM jmitro RE: newbie 74 1.8 project Sep 17 2015, 11:08 AM jmitro some of the sheetmetal is in decent shape.
Pl... Sep 17 2015, 11:11 AM jmitro RE: newbie 74 1.8 project Sep 17 2015, 11:13 AM jmitro Hell hole will need some thorough inspection and p... Sep 17 2015, 11:17 AM jmitro pulled the engine and transmission
Sep 17 2015, 11:20 AM jmitro found a dead rat and lots of hornets nests; I won... Sep 17 2015, 11:37 AM jmitro Broken headlight lens and Lots of really crusty ru... Sep 17 2015, 11:39 AM jmitro Spent the last 4 weeks fabricating my own rotisser... Sep 17 2015, 11:41 AM jmitro RE: newbie 74 1.8 project Sep 17 2015, 11:41 AM Dave_Darling Do future-you a favor: Pull off the plastic caps ... Sep 17 2015, 11:47 AM Chris H. Great work on that rotisserie. So far the rust is... Sep 22 2015, 04:43 PM jmitro Like I Previously mentioned, the PO had some creat... Oct 8 2015, 01:31 PM VWTortuga336 :blink: Oct 8 2015, 07:48 PM jmitro Rocker cover removed to reveal the underlying canc... Oct 9 2015, 09:56 PM jmitro Rotisserie finally completed and the car can be ro... Oct 9 2015, 10:00 PM jmitro Passenger front fender had a rust hole at the bott... Oct 9 2015, 10:06 PM bigkensteele I have to ask - are you sure that you want to cont... Oct 9 2015, 10:33 PM jmitro
I have to ask - are you sure that you want to con... Oct 9 2015, 11:02 PM mb911
I have to ask - are you sure that you want to co... May 18 2016, 01:41 PM jmitro Past few months have been busy moving, setting up ... May 18 2016, 12:38 PM jmitro New front trunk floorpan welded in place
May 18 2016, 12:46 PM jmitro Started repairing the rusted out right front Apill... May 18 2016, 12:50 PM jmitro started working on the rear trunk floorpan:
May 18 2016, 12:52 PM jmitro RE: newbie 74 1.8 project May 18 2016, 12:54 PM jmitro Cutting the entire section out while leaving the g... May 18 2016, 12:57 PM jmitro surfaces cleaned down to bare metal in preparation... May 18 2016, 01:00 PM jmitro Here is where I stand now: about to weld in the t... May 18 2016, 01:03 PM DavidSweden I agree, working on the cars is a great distractio... May 18 2016, 02:13 PM jmitro Finally got the chassis media blasted. I was fort... May 28 2016, 11:01 AM jmitro It was interesting to find bondo on several areas ... May 28 2016, 11:06 AM jmitro Hell hole will need replacement on both sides, the... May 28 2016, 11:16 AM jmitro Strangely, I found a crack in the driver's sid... May 28 2016, 11:45 AM Claus Graf Great Job! Keep forging through! May 28 2016, 12:09 PM jmitro More progress. I cut off the rotten lower edges of... Jul 9 2016, 05:07 PM jmitro Free formed the pedestal for the Apillar, as the o... Jul 9 2016, 05:11 PM mb911 Looking good we are in similar stages. Jul 10 2016, 06:08 AM jmitro I know to most of you this may be boring but I... Jul 27 2016, 10:13 PM Cuda911 Very much enjoying your posts. I am very jealous o... Jul 27 2016, 10:22 PM jmitro Thanks Mike! Replacing the rust is not as sex... Jul 27 2016, 10:35 PM mark04usa Great project saving another one! Press on....... Jul 27 2016, 10:55 PM DirtyCossack Great work. I think the rust repair stuff is coole... Jul 28 2016, 09:26 AM mbseto
Great work. I think the rust repair stuff is cool... Jul 28 2016, 10:52 AM Dave_Darling BTW, the crack at the end of the handbrake "d... Jul 28 2016, 03:35 PM jmitro Thanks for the comments.
BTW, the crack at the e... Aug 22 2016, 07:35 PM mb911 It's kind of funny I am at a similar point wit... Jul 28 2016, 05:20 PM Dion Looks absolutely fantastic. Very nice work.
Hmm, ... Aug 24 2016, 04:15 PM jmitro Thanks Dion, I look forward to getting the body do... Aug 25 2016, 12:11 PM jmitro finally almost finished on the hell hole and entir... Aug 28 2016, 08:39 AM jmitro while working on the chassis, I'm also accumul... Oct 6 2016, 06:37 AM jmitro Getting close to finished with the rust removal an... Oct 6 2016, 06:44 AM jmitro Detail of the removal and installation of the brac... Oct 6 2016, 06:50 AM jmitro 15 months after purchasing the car, I'm finall... Nov 13 2016, 07:05 PM jmitro And finally, added the new rear floorboard half ba... Nov 13 2016, 07:09 PM jmitro And finally some detail shots of the floorpan weld... Nov 13 2016, 07:18 PM mbseto Nice progress! Stackin' dimes! Nov 14 2016, 09:24 AM jmitro Last bit of rust repair on the rollover bar:
http... Dec 3 2016, 01:49 PM jmitro At long last, the entire underside of the car is c... Dec 3 2016, 01:53 PM siverson Looks great! Dec 29 2016, 12:52 PM jmitro Seam sealer applied under the fenders. Will then c... Jan 7 2017, 09:20 AM jmitro I seam sealed pretty much every possible seam in t... Feb 13 2017, 09:34 PM jmitro And, well......I couldn't leave well enough al... Feb 13 2017, 09:38 PM jmitro YES!! Finally got some color and clearcoat... Feb 13 2017, 09:42 PM jmitro the last 5 months have been lots of bodywork; sand... Jul 29 2017, 03:17 PM jmitro more body work; new (used) passenger side door.
Af... Jul 29 2017, 03:31 PM jmitro high build primer. Several coats required to get i... Jul 29 2017, 03:33 PM jmitro And FINALLY, nearly two years to the month since b... Jul 29 2017, 03:37 PM Larmo63 Damn, that roll bar looks great. :beer2:
I sup... Jul 29 2017, 03:42 PM jmitro
Damn, that roll bar looks great. :beer2:
I su... Jul 29 2017, 04:17 PM 74ravenna Looking great! Jul 29 2017, 03:44 PM simonjb Fantastic build story ! Thanks for sharing Jul 30 2017, 09:23 PM jmitro Seems like slow progress, but a lot of work has ha... Jan 22 2018, 11:33 PM jmitro 19mm MC with grommets and rebuilt 914 rear caliper Jan 22 2018, 11:35 PM jmitro 19mm DIY raised spindle 911 struts with Bilstein i... Jan 22 2018, 11:39 PM jmitro I also managed to get the fuel tank installed with... Jan 22 2018, 11:42 PM jmitro new LED front turn signals, rear turn signals, and... Jan 22 2018, 11:44 PM jmitro LED tails Jan 22 2018, 11:45 PM pete000 Looking great ! Jan 22 2018, 11:46 PM jmitro 914 rubber lenses and seals Jan 22 2018, 11:47 PM jmitro The fun part is putting all the new parts back on... Jan 22 2018, 11:58 PM jmitro Rear brakes Jan 22 2018, 11:59 PM
Ed_F
Air conditioning condensor, drier, compressor, ho... Sep 22 2015, 03:45 PM Stacks914 Looks like a nice start! Sep 17 2015, 11:04 AM jmitro lots of rust along the rear lower firewall
Sep 17 2015, 11:07 AM jmitro RE: newbie 74 1.8 project Sep 17 2015, 11:08 AM jmitro some of the sheetmetal is in decent shape.
Pl... Sep 17 2015, 11:11 AM jmitro RE: newbie 74 1.8 project Sep 17 2015, 11:13 AM jmitro Hell hole will need some thorough inspection and p... Sep 17 2015, 11:17 AM jmitro pulled the engine and transmission
Sep 17 2015, 11:20 AM jmitro found a dead rat and lots of hornets nests; I won... Sep 17 2015, 11:37 AM jmitro Broken headlight lens and Lots of really crusty ru... Sep 17 2015, 11:39 AM jmitro Spent the last 4 weeks fabricating my own rotisser... Sep 17 2015, 11:41 AM jmitro RE: newbie 74 1.8 project Sep 17 2015, 11:41 AM Dave_Darling Do future-you a favor: Pull off the plastic caps ... Sep 17 2015, 11:47 AM Chris H. Great work on that rotisserie. So far the rust is... Sep 22 2015, 04:43 PM jmitro Like I Previously mentioned, the PO had some creat... Oct 8 2015, 01:31 PM VWTortuga336 :blink: Oct 8 2015, 07:48 PM jmitro Rocker cover removed to reveal the underlying canc... Oct 9 2015, 09:56 PM jmitro Rotisserie finally completed and the car can be ro... Oct 9 2015, 10:00 PM jmitro Passenger front fender had a rust hole at the bott... Oct 9 2015, 10:06 PM bigkensteele I have to ask - are you sure that you want to cont... Oct 9 2015, 10:33 PM jmitro
I have to ask - are you sure that you want to con... Oct 9 2015, 11:02 PM mb911
I have to ask - are you sure that you want to co... May 18 2016, 01:41 PM jmitro Past few months have been busy moving, setting up ... May 18 2016, 12:38 PM jmitro New front trunk floorpan welded in place
May 18 2016, 12:46 PM jmitro Started repairing the rusted out right front Apill... May 18 2016, 12:50 PM jmitro started working on the rear trunk floorpan:
May 18 2016, 12:52 PM jmitro RE: newbie 74 1.8 project May 18 2016, 12:54 PM jmitro Cutting the entire section out while leaving the g... May 18 2016, 12:57 PM jmitro surfaces cleaned down to bare metal in preparation... May 18 2016, 01:00 PM jmitro Here is where I stand now: about to weld in the t... May 18 2016, 01:03 PM DavidSweden I agree, working on the cars is a great distractio... May 18 2016, 02:13 PM jmitro Finally got the chassis media blasted. I was fort... May 28 2016, 11:01 AM jmitro It was interesting to find bondo on several areas ... May 28 2016, 11:06 AM jmitro Hell hole will need replacement on both sides, the... May 28 2016, 11:16 AM jmitro Strangely, I found a crack in the driver's sid... May 28 2016, 11:45 AM Claus Graf Great Job! Keep forging through! May 28 2016, 12:09 PM jmitro More progress. I cut off the rotten lower edges of... Jul 9 2016, 05:07 PM jmitro Free formed the pedestal for the Apillar, as the o... Jul 9 2016, 05:11 PM mb911 Looking good we are in similar stages. Jul 10 2016, 06:08 AM jmitro I know to most of you this may be boring but I... Jul 27 2016, 10:13 PM Cuda911 Very much enjoying your posts. I am very jealous o... Jul 27 2016, 10:22 PM jmitro Thanks Mike! Replacing the rust is not as sex... Jul 27 2016, 10:35 PM mark04usa Great project saving another one! Press on....... Jul 27 2016, 10:55 PM DirtyCossack Great work. I think the rust repair stuff is coole... Jul 28 2016, 09:26 AM mbseto
Great work. I think the rust repair stuff is cool... Jul 28 2016, 10:52 AM Dave_Darling BTW, the crack at the end of the handbrake "d... Jul 28 2016, 03:35 PM jmitro Thanks for the comments.
BTW, the crack at the e... Aug 22 2016, 07:35 PM mb911 It's kind of funny I am at a similar point wit... Jul 28 2016, 05:20 PM Dion Looks absolutely fantastic. Very nice work.
Hmm, ... Aug 24 2016, 04:15 PM jmitro Thanks Dion, I look forward to getting the body do... Aug 25 2016, 12:11 PM jmitro finally almost finished on the hell hole and entir... Aug 28 2016, 08:39 AM jmitro while working on the chassis, I'm also accumul... Oct 6 2016, 06:37 AM jmitro Getting close to finished with the rust removal an... Oct 6 2016, 06:44 AM jmitro Detail of the removal and installation of the brac... Oct 6 2016, 06:50 AM jmitro 15 months after purchasing the car, I'm finall... Nov 13 2016, 07:05 PM jmitro And finally, added the new rear floorboard half ba... Nov 13 2016, 07:09 PM jmitro And finally some detail shots of the floorpan weld... Nov 13 2016, 07:18 PM mbseto Nice progress! Stackin' dimes! Nov 14 2016, 09:24 AM jmitro Last bit of rust repair on the rollover bar:
http... Dec 3 2016, 01:49 PM jmitro At long last, the entire underside of the car is c... Dec 3 2016, 01:53 PM siverson Looks great! Dec 29 2016, 12:52 PM jmitro Seam sealer applied under the fenders. Will then c... Jan 7 2017, 09:20 AM jmitro I seam sealed pretty much every possible seam in t... Feb 13 2017, 09:34 PM jmitro And, well......I couldn't leave well enough al... Feb 13 2017, 09:38 PM jmitro YES!! Finally got some color and clearcoat... Feb 13 2017, 09:42 PM jmitro the last 5 months have been lots of bodywork; sand... Jul 29 2017, 03:17 PM jmitro more body work; new (used) passenger side door.
Af... Jul 29 2017, 03:31 PM jmitro high build primer. Several coats required to get i... Jul 29 2017, 03:33 PM jmitro And FINALLY, nearly two years to the month since b... Jul 29 2017, 03:37 PM Larmo63 Damn, that roll bar looks great. :beer2:
I sup... Jul 29 2017, 03:42 PM jmitro
Damn, that roll bar looks great. :beer2:
I su... Jul 29 2017, 04:17 PM 74ravenna Looking great! Jul 29 2017, 03:44 PM simonjb Fantastic build story ! Thanks for sharing Jul 30 2017, 09:23 PM jmitro Seems like slow progress, but a lot of work has ha... Jan 22 2018, 11:33 PM jmitro 19mm MC with grommets and rebuilt 914 rear caliper Jan 22 2018, 11:35 PM jmitro 19mm DIY raised spindle 911 struts with Bilstein i... Jan 22 2018, 11:39 PM jmitro I also managed to get the fuel tank installed with... Jan 22 2018, 11:42 PM jmitro new LED front turn signals, rear turn signals, and... Jan 22 2018, 11:44 PM jmitro LED tails Jan 22 2018, 11:45 PM pete000 Looking great ! Jan 22 2018, 11:46 PM jmitro 914 rubber lenses and seals Jan 22 2018, 11:47 PM jmitro The fun part is putting all the new parts back on... Jan 22 2018, 11:58 PM jmitro Rear brakes Jan 22 2018, 11:59 PM  |
1 User(s) are reading this topic (1 Guests and 0 Anonymous Users)
0 Members:

|
Lo-Fi Version | Time is now: 30th June 2026 - 06:12 PM |
Invision Power Board
v9.1.4 © 2026 IPS, Inc.