|
|
|
Porsche, and the Porsche crest are registered trademarks of Dr. Ing. h.c. F. Porsche AG.
This site is not affiliated with Porsche in any way. Its only purpose is to provide an online forum for car enthusiasts. All other trademarks are property of their respective owners. |
|
|

  |

| db9146 |
 Oct 2 2015, 05:30 PM Oct 2 2015, 05:30 PM
Post
#1
|
|
Senior Member  Group: Members Posts: 953 Joined: 21-December 04 From: Atlanta, GA Member No.: 3,315 Region Association: None |
Guys,
I have multiple electrical add-ons that came on the -6 I'm now considering removing: Aiwa stereo and amp Derringer VS8300 alarm system voltmeter driving/mileage computer remote trunk release fuel pump oil pressure bypass power windows power mirrors The PO was an electrical engineer but his "wiring skills" are questionable. I lowered the fuse panel today afraid of what I would find and saw this: 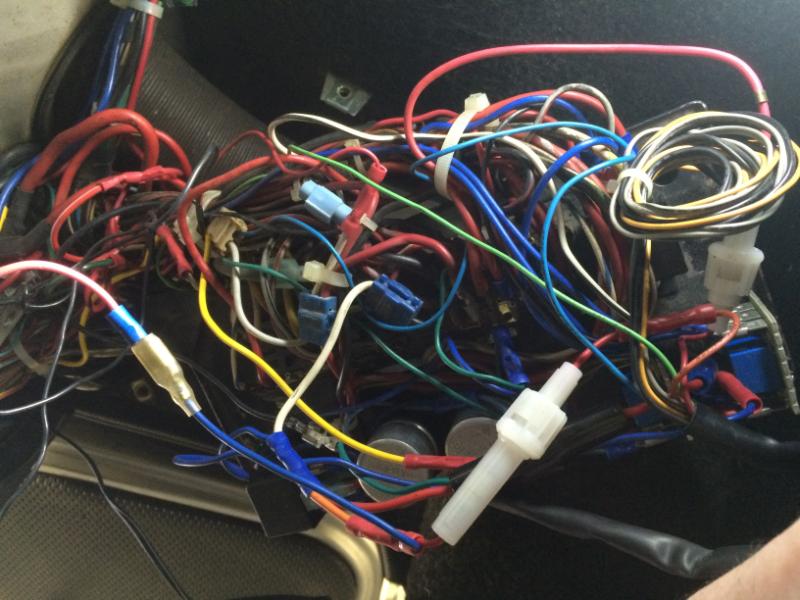 I am no wiring genius and looking at this mess is quite daunting! The problem is that all of this was installed back in the mid-80s and there is so little documentation of the mods included in the records I have. And even looking at the installation instructions for the alarm, I can see that the wire colors included in the instructions don't line up with the way the alarm was wired. The alarm is tied into the starting circuit so I'm concerned that I might disable the car and have a tough time getting it running again. I through about checking with a local alarm / stereo installation shop but I'm not sure if they could handle it without full documentation. The only way I know how to do this is to take pics and notes before I undo each wire and start with the simplest add-on first. Any other recommendations / thoughts? |
   |

 
|
| bfrymire |
Oct 2 2015, 05:39 PM
Post
#2
|
|
Salsaholic Group: Members Posts: 590 Joined: 1-August 04 From: Sunnyvale, CA Member No.: 2,431 Region Association: Northern California |
First response: Run away!
But, that is not much help. So, I would slow take it apart and document. Cut all the tire wraps and get the wire spread out enough to follow the wires. I like to use a label maker and tag the wires as you identify them. I also have a note pad next to me and draw a schematic. Using a multimeter can help. And an electrical engineer here also. My wiring skills are so-so. (IMG:style_emoticons/default/smile.gif) -- brett |
|
|
|
| whitetwinturbo |
Oct 2 2015, 06:13 PM
Post
#3
|
|
Honey, does this wing make my ass look fat? Group: Members Posts: 1,391 Joined: 22-October 11 From: Newport Beach/Kalefornya/USA Member No.: 13,704 Region Association: Southern California |
(IMG:style_emoticons/default/w00t.gif) ...use digital camera every time something is cut or unwrapped. Start with the easy stuff ... like elec windows...
|
|
|
|
| aircooledtechguy |
Oct 2 2015, 06:14 PM
Post
#4
|
|
The Aircooledtech Guy Group: Members Posts: 1,966 Joined: 8-November 08 From: Anacortes, WA Member No.: 9,730 Region Association: Pacific Northwest |
I hate to say it, but that looks like the typical run-of-the-mill "professional" install skills of any stereo shop. The biggest hacks in the professional automotive world have got to be your average stereo shop installer. You wouldn't believe some of the foolish ways those knuckleheads wire things in.
If I were you, remove each component one wire at a time. It looks like they used liberal use of those pinch-type splices that come in your typical aftermarket electronics box. I would begin at the stereo head unit and one-by-one, trace each wire through the mess and remove it where it's spliced in. Careful use of dykes can remove those splices without damaging the original wire (more than it already is) and make any wire repairs as you go. Don't look at the whole job. Break it down into individual components with their associated wires and it won't be so daunting of a task. |
|
|
|
| rgalla9146 |
Oct 2 2015, 06:30 PM
Post
#5
|
|
Advanced Member Group: Members Posts: 4,554 Joined: 23-November 05 From: Paramus NJ Member No.: 5,176 Region Association: None |
As already said, work from the accessory component toward the harness.
Typically, accessories have brightly colored wire with no tracers. OE wires (other than red + and brown (ground) have tracers. All those bright color plastic things are aftermarket connectors. Most will be obvious. Good luck. |
|
|
|
| 914Sixer |
Oct 2 2015, 06:34 PM
Post
#6
|
|
914 Guru Group: Members Posts: 8,882 Joined: 17-January 05 From: San Angelo Texas Member No.: 3,457 Region Association: Southwest Region |
Vendor in Holland or Germany is making reproduction harnesses. Not cheap but ?
|
|
|
|
| db9146 |
Oct 2 2015, 06:58 PM
Post
#7
|
|
Senior Member Group: Members Posts: 953 Joined: 21-December 04 From: Atlanta, GA Member No.: 3,315 Region Association: None |
Couple more:
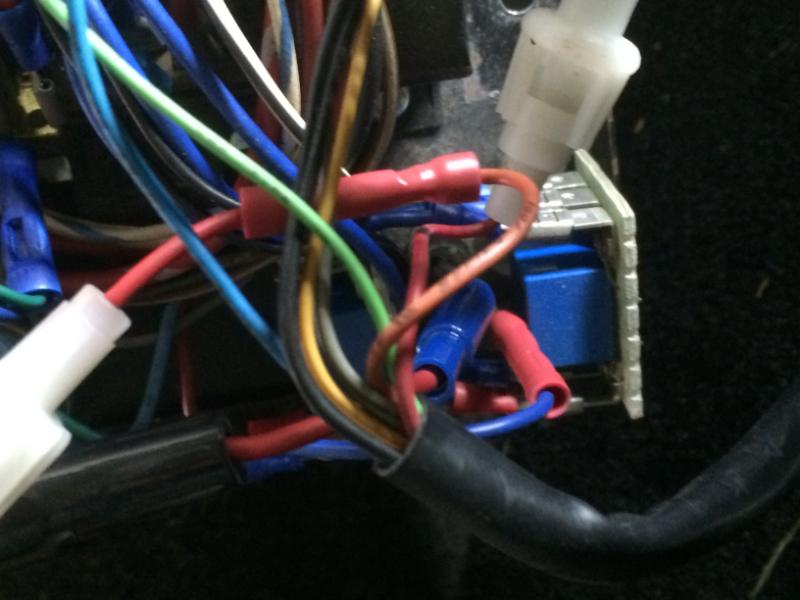 Some sort of connection block plus he added a power block under the dash just above the fuse panel 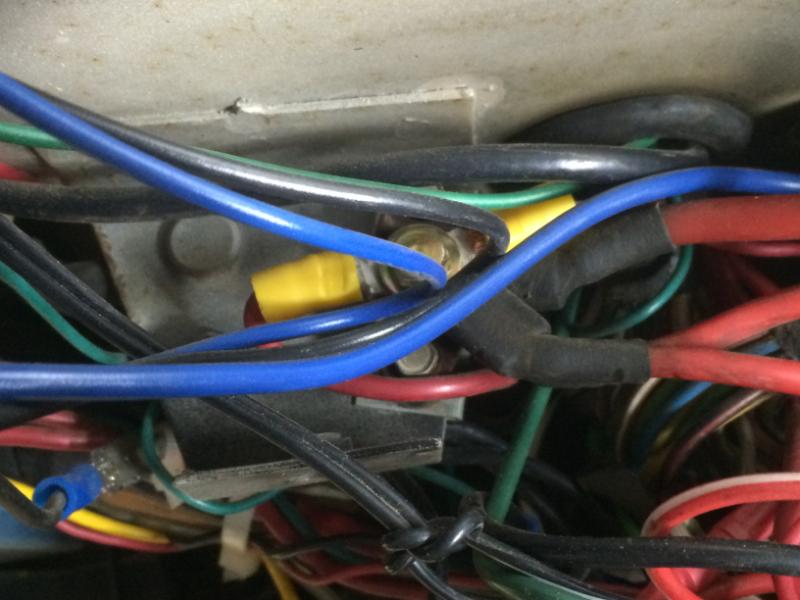 Yea, the only way I know to do it is the same way you eat an elephant but it seems like a daunting task right now. I'm going to wade into it slowly tomorrow, starting with the simplest item and do all of the documentation as suggested. |
|
|
|
| mepstein |
Oct 2 2015, 08:47 PM
Post
#8
|
|
914-6 GT in waiting Group: Members Posts: 19,272 Joined: 19-September 09 From: Landenberg, PA/Wilmington, DE Member No.: 10,825 Region Association: MidAtlantic Region |
Kroon makes a 914-6 harness. pricey but perfect.
|
 |
|
| r_towle |
Oct 3 2015, 08:00 AM
Post
#9
|
|
Custom Member Group: Members Posts: 24,574 Joined: 9-January 03 From: Taxachusetts Member No.: 124 Region Association: North East States |
Remove the stereo and amp first.
It may remove quite a bit of the extra wires. |
|
|
|
| toolguy |
Oct 3 2015, 08:32 AM
Post
#10
|
|
Senior Member Group: Members Posts: 1,268 Joined: 2-April 11 From: San Diego / El Cajon Member No.: 12,889 Region Association: Southern California |
That 'added power block' under the dash is standard on six's and early cars. . It's fed directly from the battery and not fused. |
|
|
|
| Mark Henry |
Oct 3 2015, 08:36 AM
Post
#11
|
|
that's what I do! Group: Members Posts: 20,065 Joined: 27-December 02 From: Port Hope, Ontario Member No.: 26 Region Association: Canada |
I absolutly hate wiring nightmares, even perfect factory wiring is borderline IMO. That's why I never cut a factory wire, ever, only exception is undoing hack work by others.
Problem with all those add-ons is every wire goes in different directions,making it hard to do a neat install. Stereo shops don't care, the boss wants the job done quick and cheap so a hack is inevitable. |
|
|
|
| Spoke |
Oct 3 2015, 10:32 AM
Post
#12
|
|
Jerry Group: Members Posts: 6,978 Joined: 29-October 04 From: Allentown, PA Member No.: 3,031 Region Association: None |
QUOTE(aircooledtechguy @ Oct 2 2015, 08:14 PM)  Don't look at the whole job. Break it down into individual components with their associated wires and it won't be so daunting of a task. (IMG:style_emoticons/default/agree.gif) Don't mess with any wires not associated with your job at hand. This is how one gets over their head with wiring. In other words, if it ain't broke, don't fix it. Your wiring doesn't look that bad to me. I don't look at the curlicues of wires as much as I look at the connections. The connections look pretty solid. Electrons don't care how many turns they take to get to their destination. |
|
|
|
| jimkelly |
Oct 3 2015, 10:52 AM
Post
#13
|
|
Delaware USA Group: Members Posts: 4,969 Joined: 5-August 04 From: Delaware, USA Member No.: 2,460 Region Association: MidAtlantic Region |
disconnect battery first - neg and then pos - (IMG:style_emoticons/default/wacko.gif)
|
|
|
|
| cpavlenko |
Oct 3 2015, 12:53 PM
Post
#14
|
|
Member Group: Members Posts: 489 Joined: 19-April 12 From: North Arizona Member No.: 14,400 Region Association: Southwest Region |
QUOTE(r_towle @ Oct 3 2015, 07:00 AM) Remove the stereo and amp first. It may remove quite a bit of the extra wires. (IMG:style_emoticons/default/agree.gif) |
|
|
|
| Chris914n6 |
Oct 3 2015, 02:11 PM
Post
#15
|
|
Jackstands are my life. Group: Members Posts: 3,320 Joined: 14-March 03 From: Las Vegas, NV Member No.: 431 Region Association: Southwest Region |
Looks like he tied all the hot wires to 1 or 2 fuses.
Start at the thing you want to remove and work back to the fusebox. Stereo would only be 3 wires at the fusebox: battery hot, key hot, amp battery hot. The rest go different places or ground. |
|
|
|
| aircooledtechguy |
Oct 3 2015, 02:54 PM
Post
#16
|
|
The Aircooledtech Guy Group: Members Posts: 1,966 Joined: 8-November 08 From: Anacortes, WA Member No.: 9,730 Region Association: Pacific Northwest |
In my experience the alarm is going to have the most wires and be the most insidious to remove. The order I would remove things is:
1. Windows 2. Stereo head unit 3. Amp w/ speakers 4. Alarm and all associated switches/sensors (these absolutely make a mess out of a car). Start at the component and remove one wire at a time doing any repair necessary to the OEM wiring as you go. Slow and methodical is the ONLY way to assure you don't tune your car to a halt. And of course, as Jim Kelly suggested: DISCONNECT the battery negative, then positive before doing ANYTHING. Once you let that magic smoke out, you can't get it back in again!! (IMG:style_emoticons/default/biggrin.gif) |
|
|
|
| iankarr |
Oct 3 2015, 04:50 PM
Post
#17
|
|
The wrencher formerly known as Cuddy_K Group: Members Posts: 2,473 Joined: 22-May 15 From: Heber City, UT Member No.: 18,749 Region Association: Intermountain Region |
Cut the blue wire. No! The red! tick tick tick tick.....
|
|
|
|
| draganc |
Oct 5 2015, 08:23 PM
Post
#18
|
|
Senior Member Group: Members Posts: 725 Joined: 2-November 09 From: central new jersey Member No.: 11,000 Region Association: North East States |
I hate such PO wiring "art", which I have faced many times on cars and bikes before.
Basically You have two options here: Either you do it yourself - with the learning and pain expiriance or You pay someone to fix that mess, which doesn't necessarily mean it will be done the right way. These cars are not overly complicated, hence I would suggest the first option. Look up car electric/wiring books at Amazon for some basics. It's very straight forward. Get a good wiring diagram, study the circuits and fix one problem at only. You have plenty of knowledge here and great group of guys willing to help. |
|
|
|
| Mike Bellis |
Oct 5 2015, 08:35 PM
Post
#19
|
|
Resident Electrician Group: Members Posts: 8,345 Joined: 22-June 09 From: Midlothian TX Member No.: 10,496 Region Association: None |
Looks simple to me...
I have been in the trade for 30 years. I have found that Engineers ( no offence to the EE's) care more about the A-B connection and pay little attention to how it looks. Neat wiring is easy to troubleshoot. Spaghetti is... well you know... Don't look too bad. You may have to reverse engineer some of his creative connections. |
|
|
|
| db9146 |
Dec 11 2015, 08:58 PM
Post
#20
|
|
Senior Member Group: Members Posts: 953 Joined: 21-December 04 From: Atlanta, GA Member No.: 3,315 Region Association: None |
Well, it took a while and at times over the last several weeks, it wasn't the top priority but I can say that I was successful!!! (IMG:style_emoticons/default/piratenanner.gif)
My biggest concern was the alarm system since it was tied into the ignition with a disable circuit but I got through that. Then, after removing the funky Awia stereo and amp installation, I reworked the Radio Shack Realistic speaker housings and retrofitted them with some vintage ADS200i speakers. (IMG:style_emoticons/default/drooley.gif) I thought I was going to need an amp to drive them from the period correct Blaupunkt AM/FM I had refurbished but it turned out that the system actually sounded better w/o it. So, the dash is cleaned up, the alarm is gone, the old stereo and amp are replaced, the old and slow electric window motors are out and I've removed about 18 lbs. of junk!!! (IMG:style_emoticons/default/smilie_pokal.gif) 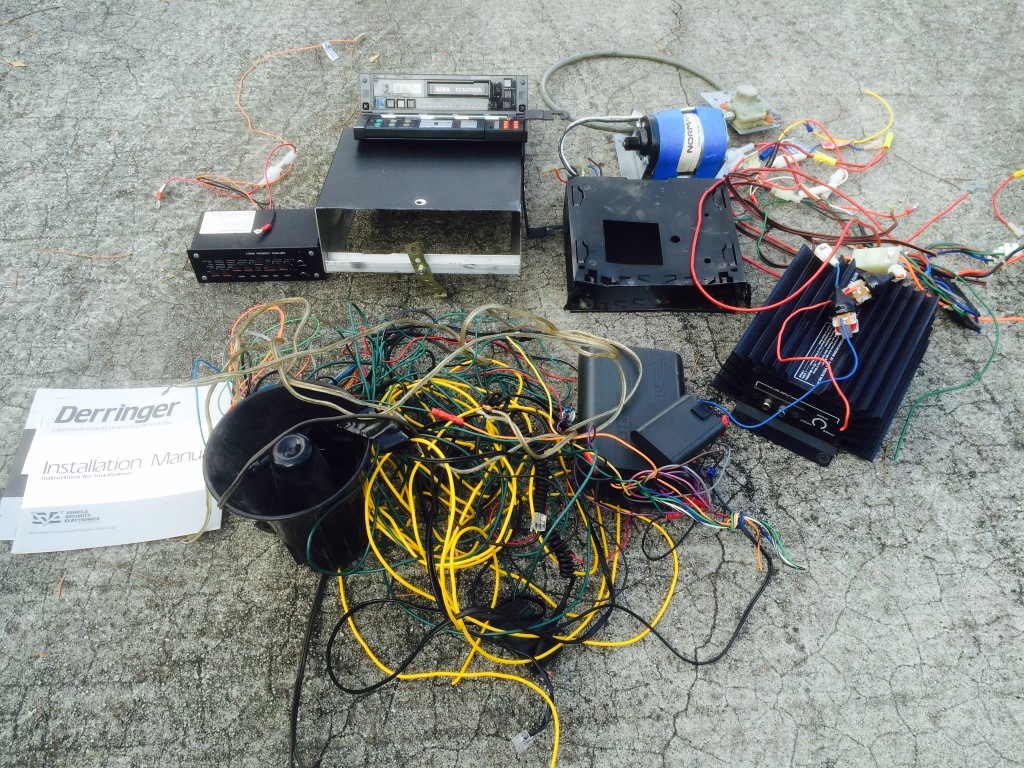 And I put in some new carpet while I was at it. |
|
|
|
|
1 User(s) are reading this topic (1 Guests and 0 Anonymous Users)
0 Members:

|
Lo-Fi Version | Time is now: 17th May 2024 - 07:41 PM |
Invision Power Board
v9.1.4 © 2024 IPS, Inc.