|
|
|
Porsche, and the Porsche crest are registered trademarks of Dr. Ing. h.c. F. Porsche AG.
This site is not affiliated with Porsche in any way. Its only purpose is to provide an online forum for car enthusiasts. All other trademarks are property of their respective owners. |
|
|

  |

| budk |
 Dec 1 2015, 05:16 AM Dec 1 2015, 05:16 AM
Post
#21
|
|
Yes! It's a Bumblebee!  Group: Members Posts: 685 Joined: 24-July 10 From: Jasper, TN Member No.: 11,970 Region Association: MidAtlantic Region |
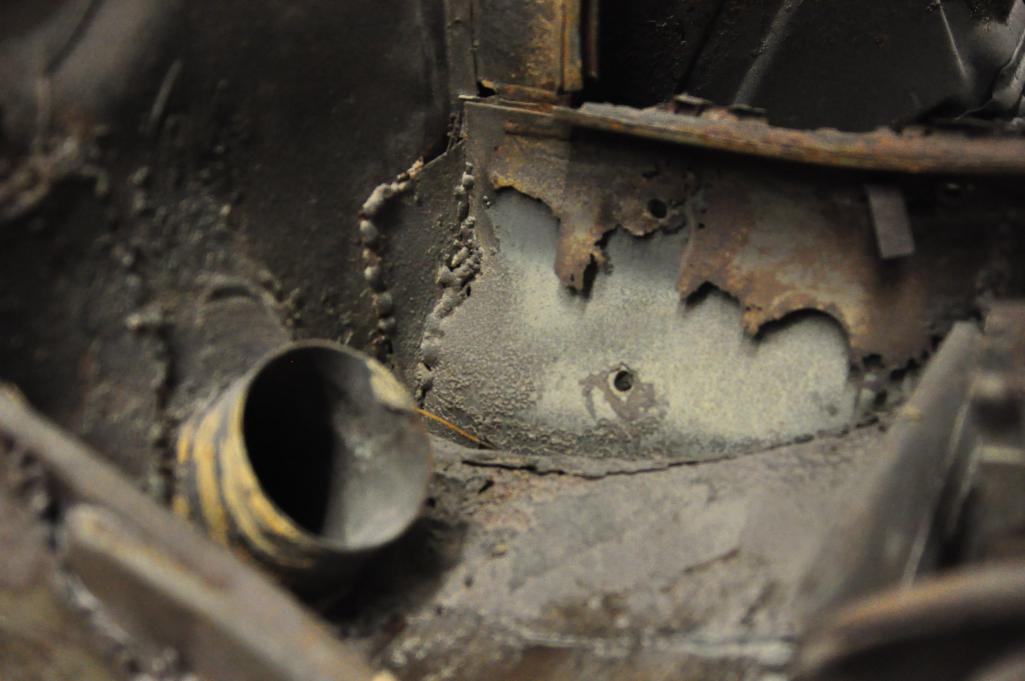
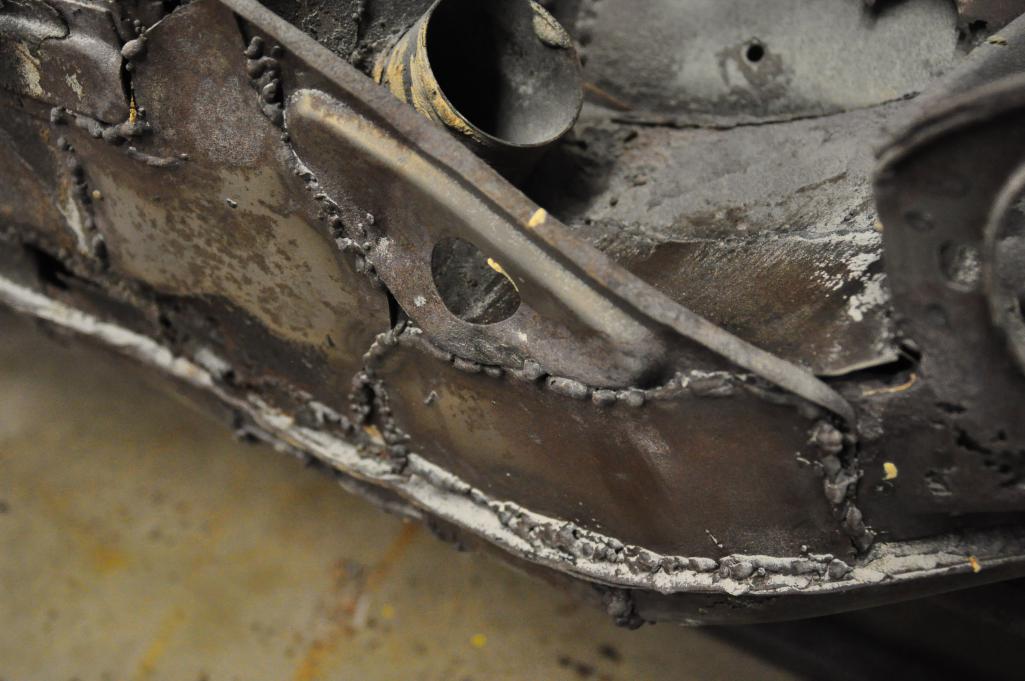
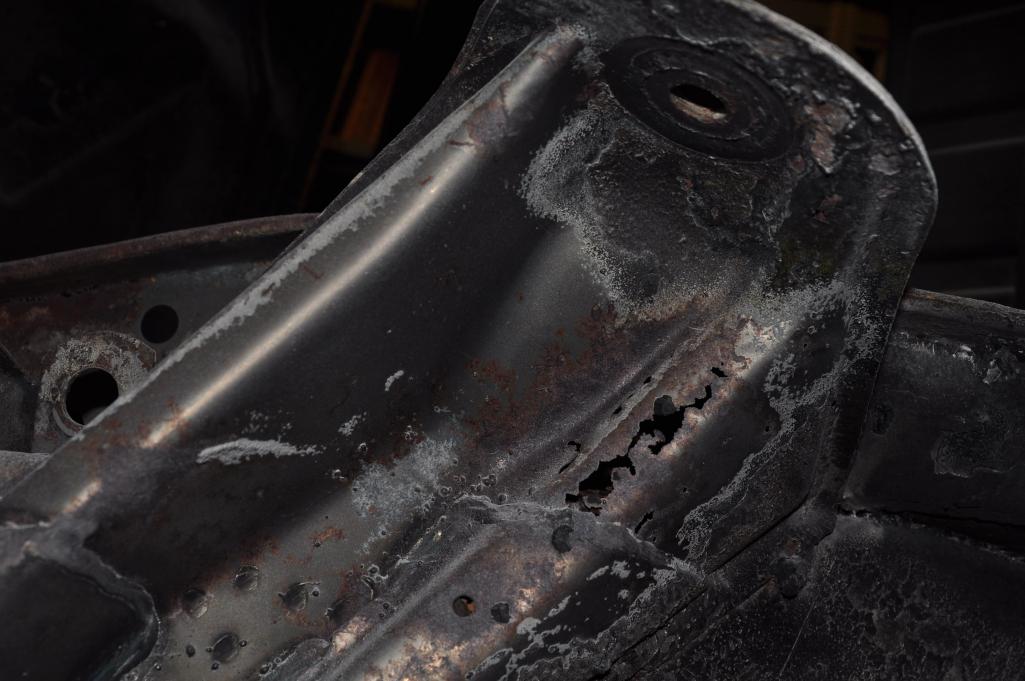
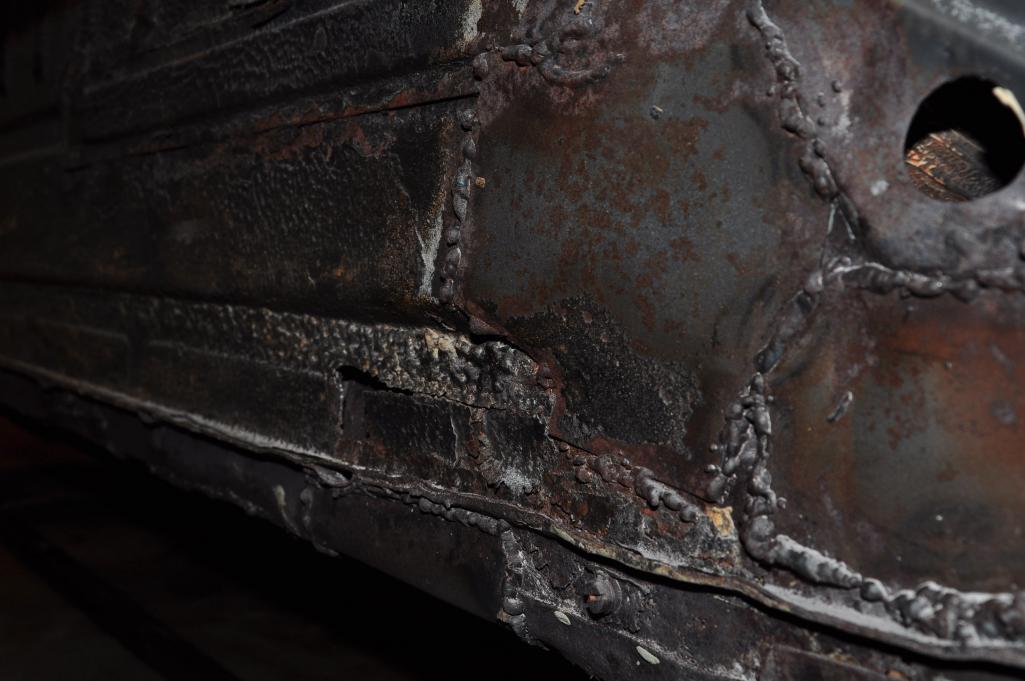
Car was soda blasted the first week of November. I had the guy concentrate on removing the yellow paint and cleaning all the area’s that I knew were bad and wanted to get a better look. Some parts of the car like the floor are likely to be replaced so I only had the edges of those panels blasted but didn’t waste time (and money) thoroughly cleaning all the panels.
    [attachmentid=529 [attachmentid=529772] I’m waiting for a sheet of 18ga to get here, hopefully this week. Also expect to be ordering RD parts this week. Attached thumbnail(s) 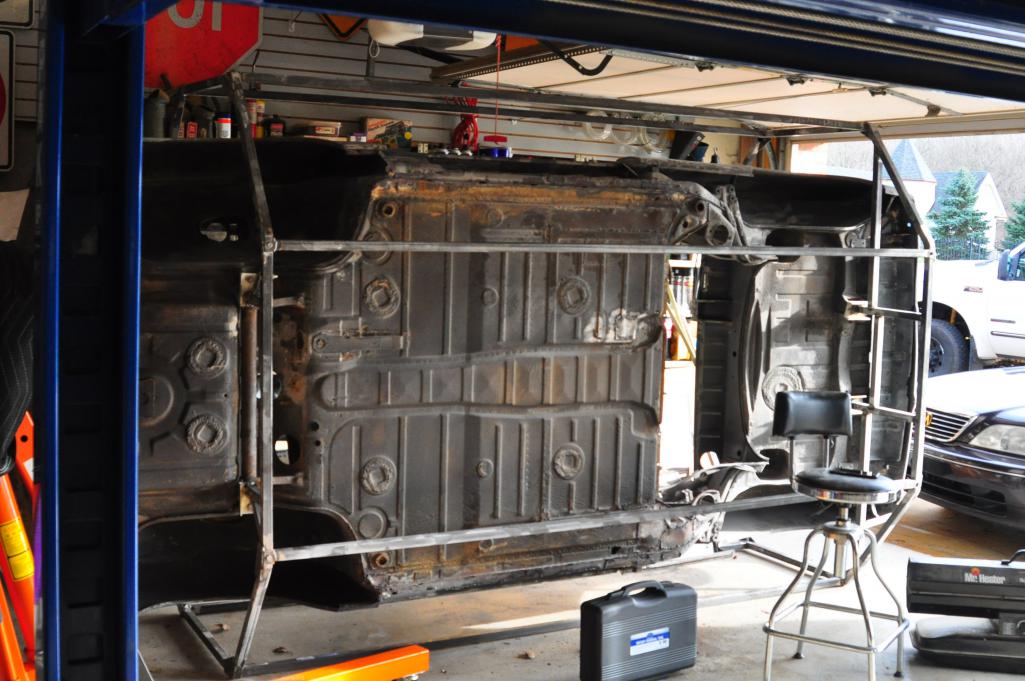
|
   |

 
|
| budk |
Dec 1 2015, 05:27 AM
Post
#22
|
|
Yes! It's a Bumblebee! Group: Members Posts: 685 Joined: 24-July 10 From: Jasper, TN Member No.: 11,970 Region Association: MidAtlantic Region |
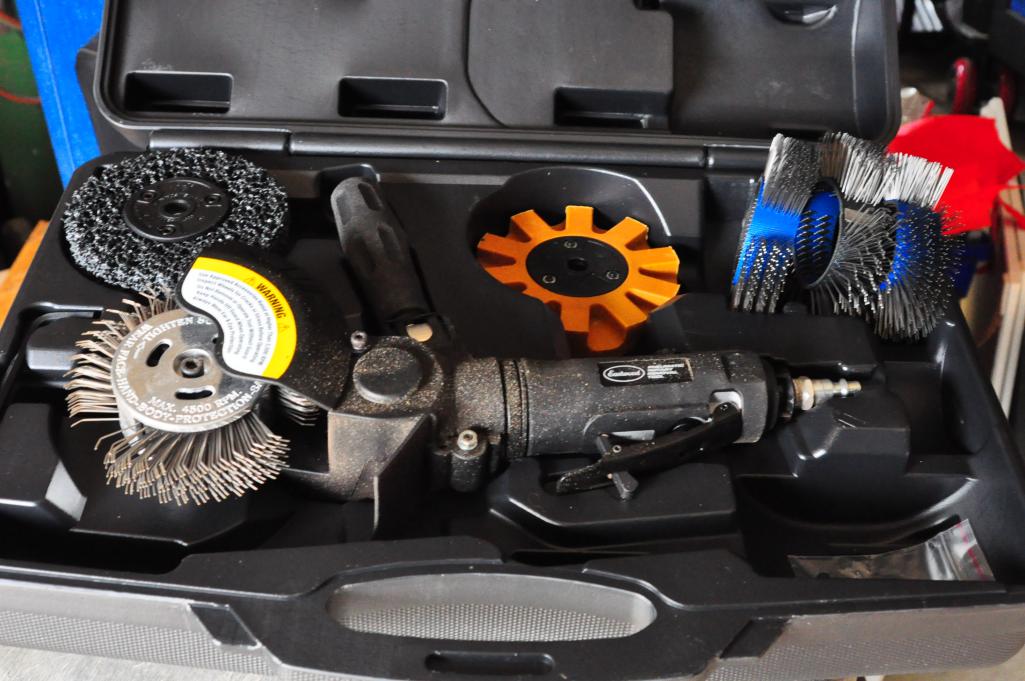
All in all the soda blasting revealed that there are more areas to be addressed than I had hoped. Luckily, it’s only metal. Fortunately, Christmas came early in the form of this amazing tool.
 |
|
|
|
| budk |
Dec 5 2015, 07:22 AM
Post
#23
|
|
Yes! It's a Bumblebee! Group: Members Posts: 685 Joined: 24-July 10 From: Jasper, TN Member No.: 11,970 Region Association: MidAtlantic Region |
Just a (IMG:style_emoticons/default/thumb3d.gif) to the guys at Restoration Design. I placed an order Thursday morning, had some issues getting the credit card to go through because of my fat-fingers. They called me about and it took until 11:30AM until we got it all straightened out. Amazingly, the parts were waiting for me when I got home from work on Friday!
Outstanding service and the parts look amazing. (IMG:style_emoticons/default/smilie_pokal.gif) Thanks guys! |
|
|
|
| mepstein |
Dec 5 2015, 07:57 AM
Post
#24
|
|
914-6 GT in waiting Group: Members Posts: 20,682 Joined: 19-September 09 From: Landenberg, PA/Wilmington, DE Member No.: 10,825 Region Association: MidAtlantic Region |
QUOTE(budk @ Dec 1 2015, 06:27 AM)  All in all the soda blasting revealed that there are more areas to be addressed than I had hoped. Luckily, it’s only metal. Fortunately, Christmas came early in the form of this amazing tool. What is this tool called? |
 |
|
| budk |
Dec 5 2015, 08:50 AM
Post
#25
|
|
Yes! It's a Bumblebee! Group: Members Posts: 685 Joined: 24-July 10 From: Jasper, TN Member No.: 11,970 Region Association: MidAtlantic Region |
QUOTE(mepstein @ Dec 5 2015, 08:57 AM) QUOTE(budk @ Dec 1 2015, 06:27 AM) All in all the soda blasting revealed that there are more areas to be addressed than I had hoped. Luckily, it’s only metal. Fortunately, Christmas came early in the form of this amazing tool. What is this tool called? Eastwood Pneumatic Rotary Removal Tool Rotary tool It's not cheap (it was just on sale for $250 I think), but it pays for itself given how well it works. It's a huge timesaver. |
|
|
|
| mepstein |
Dec 5 2015, 09:02 AM
Post
#26
|
|
914-6 GT in waiting Group: Members Posts: 20,682 Joined: 19-September 09 From: Landenberg, PA/Wilmington, DE Member No.: 10,825 Region Association: MidAtlantic Region |
QUOTE(budk @ Dec 5 2015, 09:50 AM) QUOTE(mepstein @ Dec 5 2015, 08:57 AM) QUOTE(budk @ Dec 1 2015, 06:27 AM) All in all the soda blasting revealed that there are more areas to be addressed than I had hoped. Luckily, it’s only metal. Fortunately, Christmas came early in the form of this amazing tool. What is this tool called? Eastwood Pneumatic Rotary Removal Tool Rotary tool It's not cheap (it was just on sale for $250 I think), but it pays for itself given how well it works. It's a huge timesaver. Have you used it on the car? The video wasn't too impressive but if you say real world is good, I believe you. |
|
|
|
| budk |
Dec 5 2015, 04:27 PM
Post
#27
|
|
Yes! It's a Bumblebee! Group: Members Posts: 685 Joined: 24-July 10 From: Jasper, TN Member No.: 11,970 Region Association: MidAtlantic Region |
QUOTE(mepstein @ Dec 5 2015, 10:02 AM) QUOTE(budk @ Dec 5 2015, 09:50 AM) QUOTE(mepstein @ Dec 5 2015, 08:57 AM) QUOTE(budk @ Dec 1 2015, 06:27 AM) All in all the soda blasting revealed that there are more areas to be addressed than I had hoped. Luckily, it’s only metal. Fortunately, Christmas came early in the form of this amazing tool. What is this tool called? Eastwood Pneumatic Rotary Removal Tool Rotary tool It's not cheap (it was just on sale for $250 I think), but it pays for itself given how well it works. It's a huge timesaver. Have you used it on the car? The video wasn't too impressive but if you say real world is good, I believe you. I used it enough to see if it works and it worked great in my test. I've seen it labeled as a Wurth Master - Jeff Hail references it in his Bring out the Dead thread. I've seen it mentioned in a couple other of threads which is why I bought it. |
|
|
|
| budk |
Dec 31 2015, 01:44 PM
Post
#28
|
|
Yes! It's a Bumblebee! Group: Members Posts: 685 Joined: 24-July 10 From: Jasper, TN Member No.: 11,970 Region Association: MidAtlantic Region |
Time for an update. I have to say that keeping this thread updated is more of a challenge and a lot more work than I would have expected. Hats off to those of you who write detailed and informative threads, particularly those step by step how-to threads.
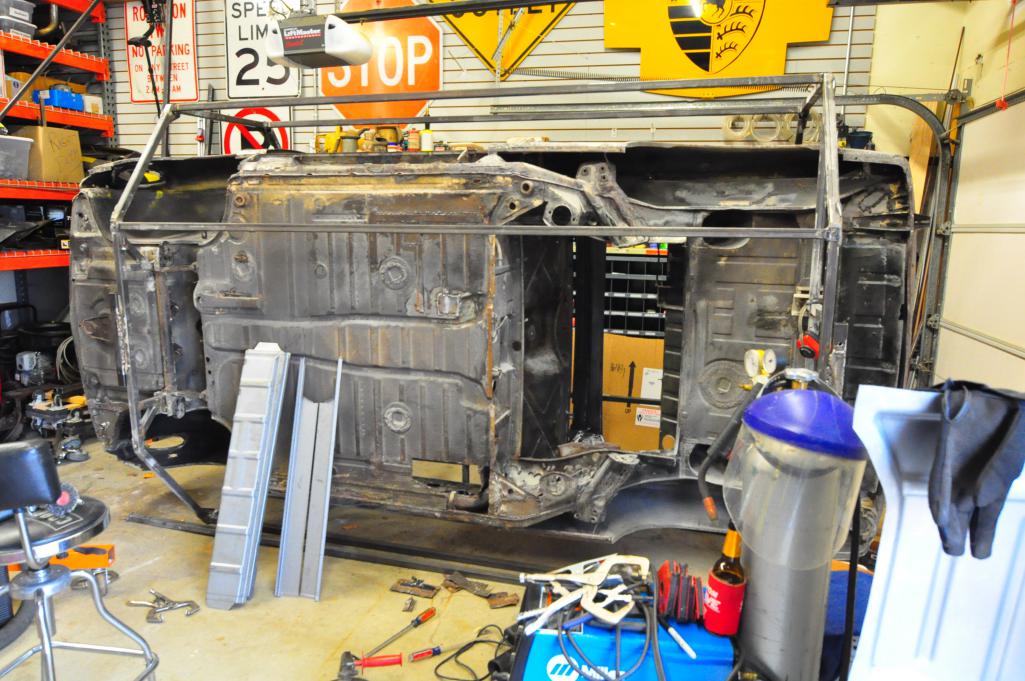
I spent most of the month working on determining what parts to replace, which ones to buy and which ones to make. I received a nice shipment from Restoration Design and I have another order in with them and with Pelican and both of those should be here next week. I’m confident that next month’s report will show significant progress as my plan has been to start patching in January. 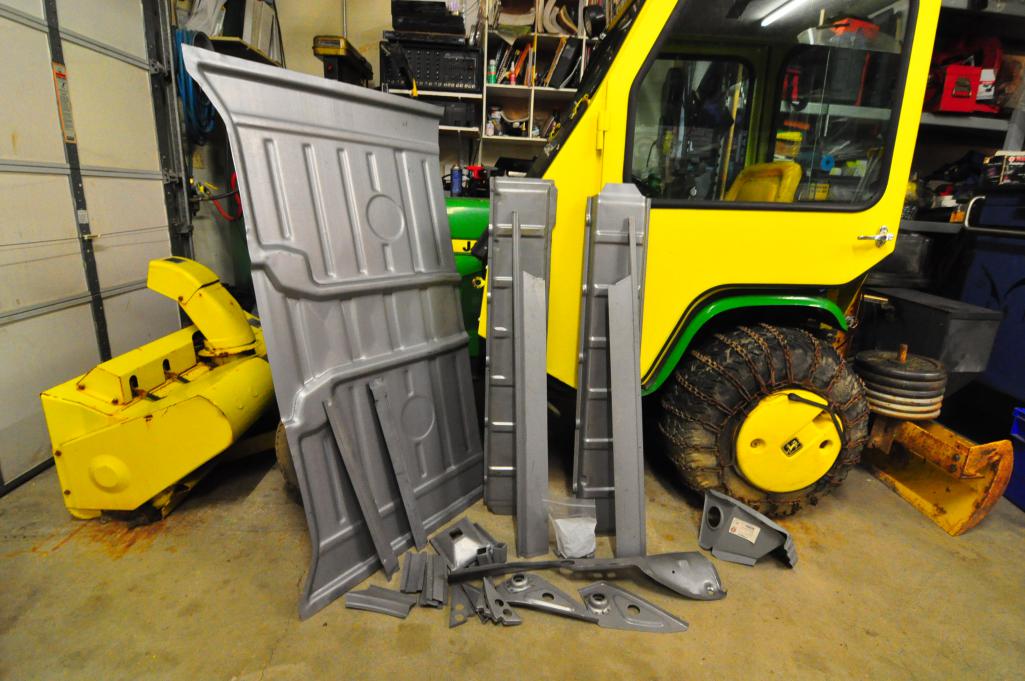 Speaking of patching, I counted over 30 patches on this car that were done (and done poorly) by the previous owner(s). Every one of those will need to redone or replaced by new panels. So, as far as what challenges were encountered I would have to say that getting the car soda-blasted revealed a lot more body work problems than I, or anyone else who looked at this car, expected to find. 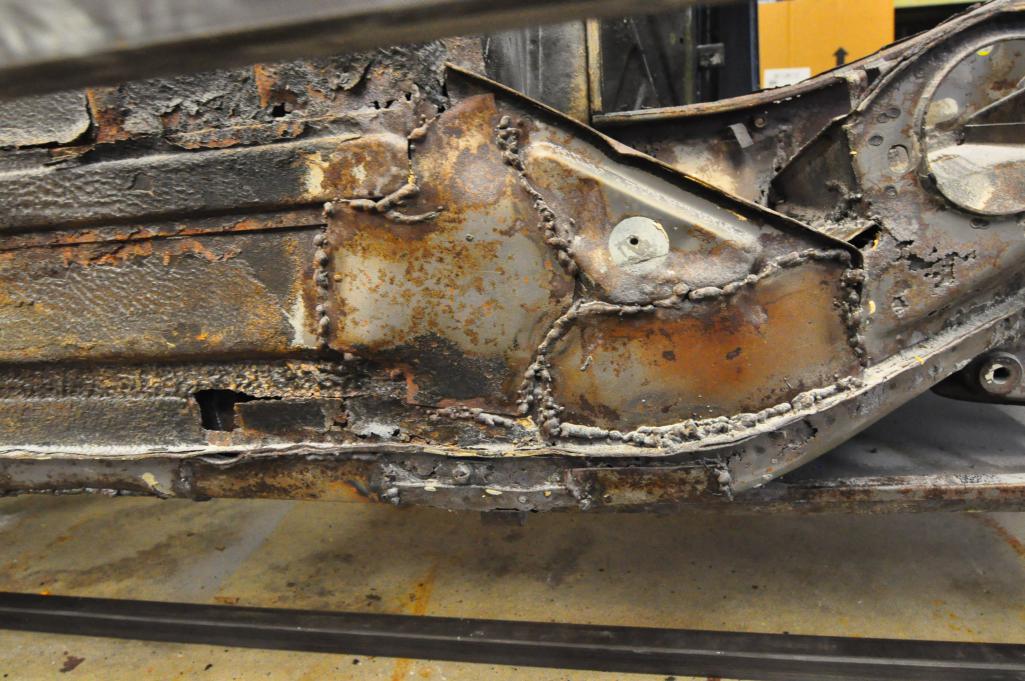 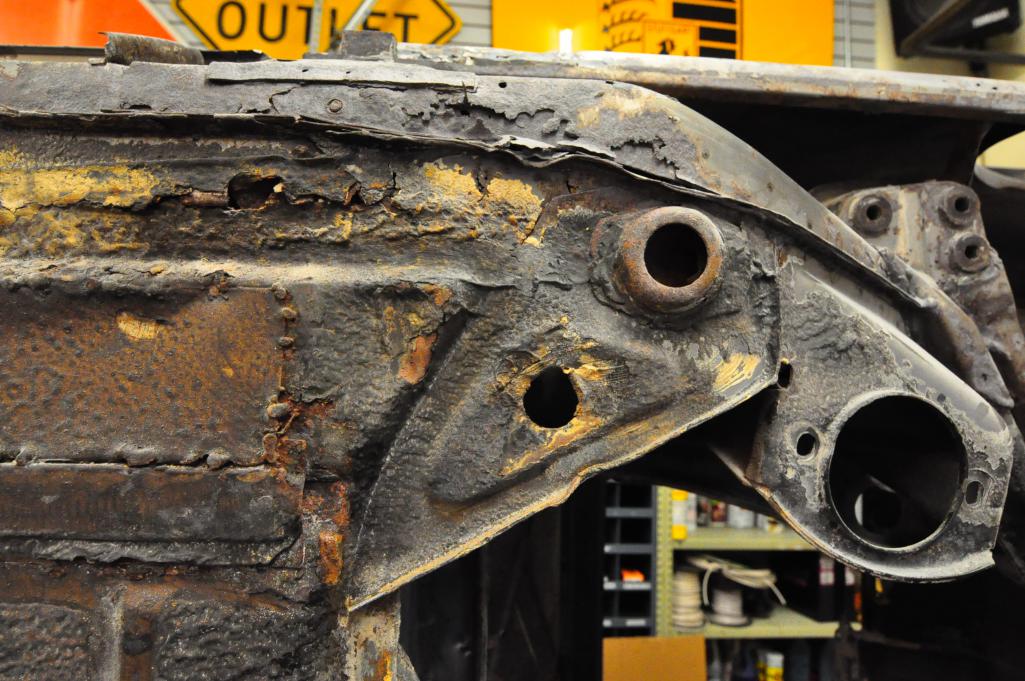 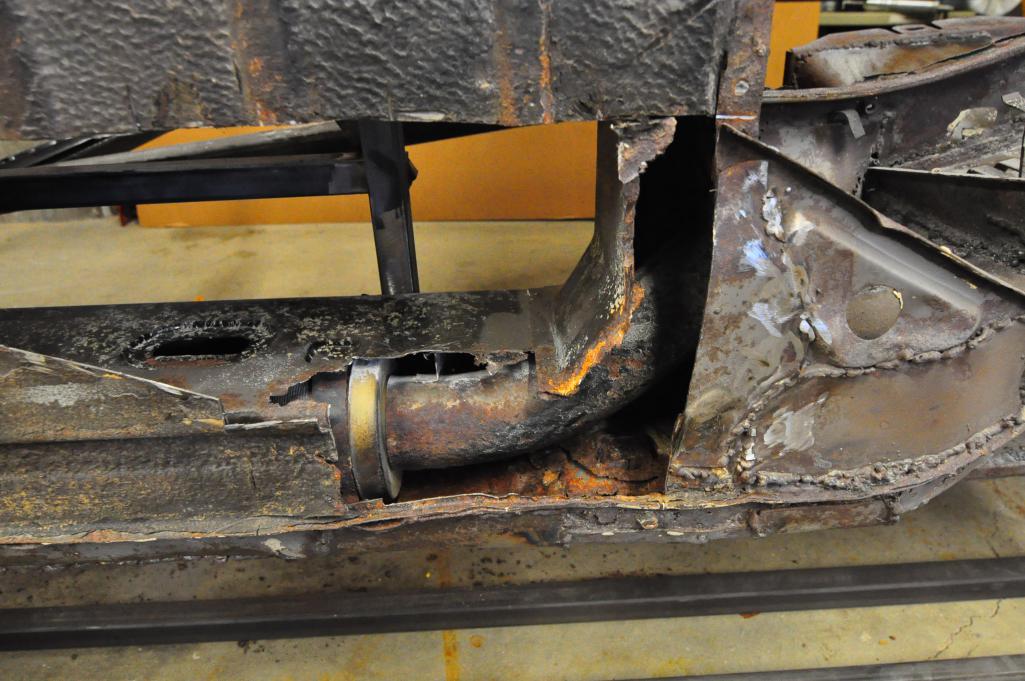 |
|
|
|
| budk |
Dec 31 2015, 01:47 PM
Post
#29
|
|
Yes! It's a Bumblebee! Group: Members Posts: 685 Joined: 24-July 10 From: Jasper, TN Member No.: 11,970 Region Association: MidAtlantic Region |
 I decided to layout my wire harness on some plywood in my basement. I plan to check every wire and replace as needed, clean every connector and rewrap the harness as needed. If I get ambitious, I might label every wire so that it will be easier to install it when that time comes. As bad as the body is, the harness is not much better. Lots of wires that have multiple splices in them, wires that have damaged insulation and wires that appear to go nowhere. I don’t know how much I will work on this in the coming months since it is a low priority task, but the goal will to have the harness done by the time the car is ready to paint. 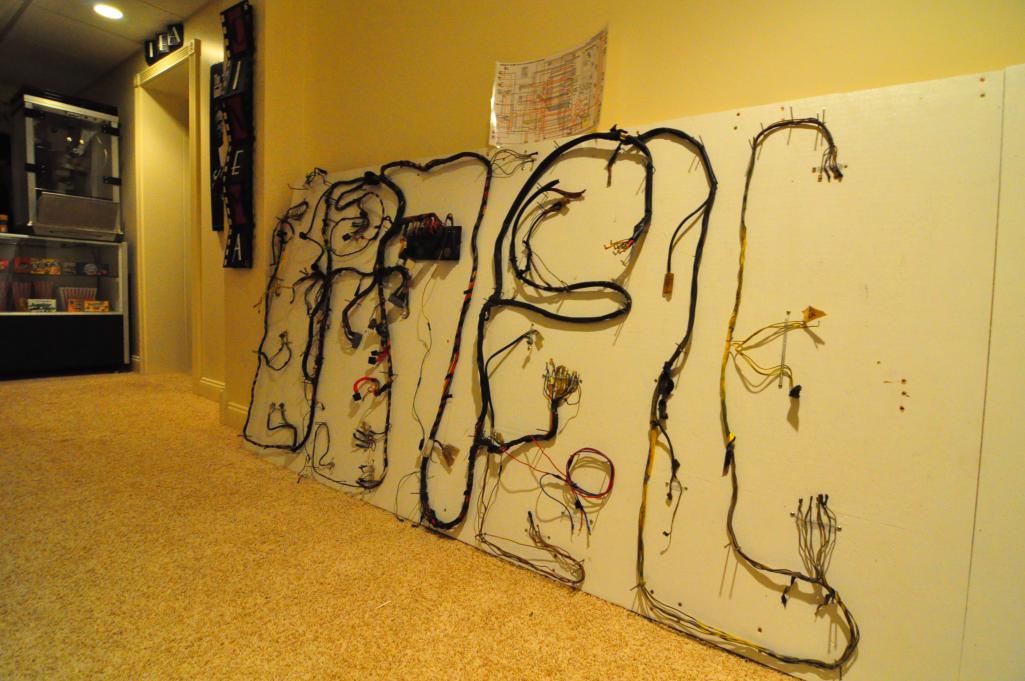 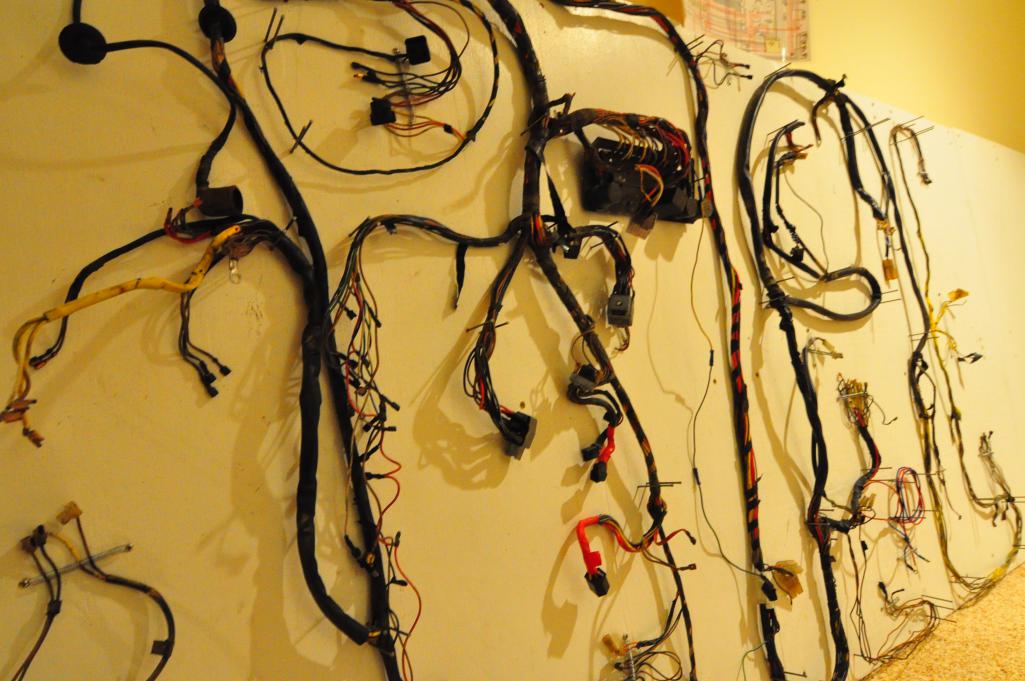 |
|
|
|
| budk |
Jan 11 2016, 02:49 PM
Post
#30
|
|
Yes! It's a Bumblebee! Group: Members Posts: 685 Joined: 24-July 10 From: Jasper, TN Member No.: 11,970 Region Association: MidAtlantic Region |
Someone else posted that it's harder to fix someone else's mistakes than to work on a unmolested POS. Well, I agree. I spend more time trying to figure out how the pieces go together and whether something was modified by the PO.
If this car wasn't a LE I would scrap the tub and buy a roller.  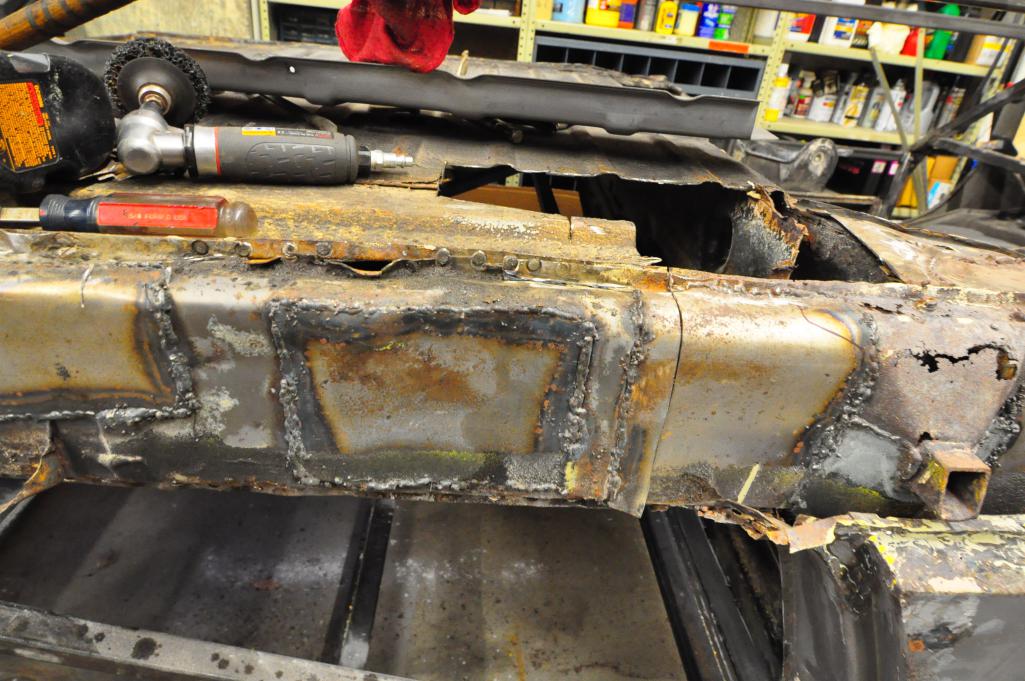 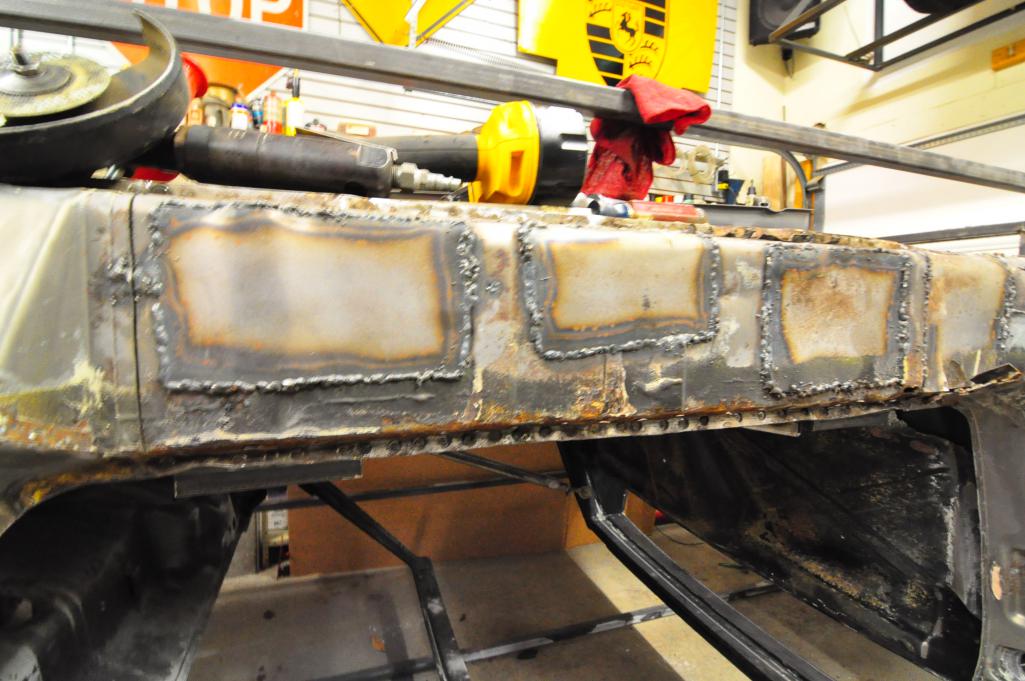 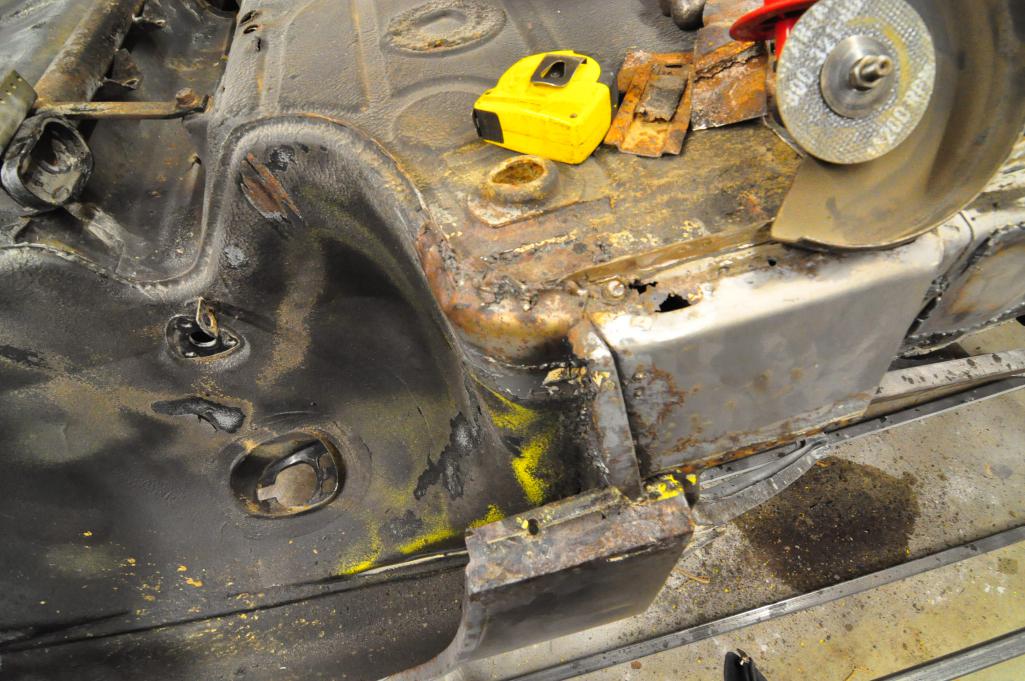 I spent a good bit of time drilling out spot welds but then I realized I was spending time drilling out the welds on parts that I was going to replace anyway. so out came the electric grinder but as soon as I touched the rocker with the cutoff wheel the wheel exploded. I was wearing a full face shield so no damage there but it hit my left hand so hard I was afraid to look at it. Hurt like hell but nothing broken and only a few cuts, luckily it missed a vein. I learned to wear gloves as well as the full face shield. I also learned to use my pneumatic grinder which has a much better speed control. I wore out the only cutoff wheel for the pneumatic grinder I have so I am done for today. I'll buy more wheels tomorrow and will finally get the inner rocker panel off the car. |
|
|
|
| Andyrew |
Jan 11 2016, 04:10 PM
Post
#31
|
|
Spooling.... Please wait Group: Members Posts: 13,380 Joined: 20-January 03 From: Riverbank, Ca Member No.: 172 Region Association: Northern California |
Replace your cut off wheels before they get down that far, Dont put much pressure on the wheel, let the RPM do the action.
Are those welds on the longs yours or the PO? I always wear welding gloves when I use cut off wheel. They offer the most protection. |
|
|
|
| budk |
Jan 11 2016, 05:36 PM
Post
#32
|
|
Yes! It's a Bumblebee! Group: Members Posts: 685 Joined: 24-July 10 From: Jasper, TN Member No.: 11,970 Region Association: MidAtlantic Region |
QUOTE(Andyrew @ Jan 11 2016, 05:10 PM) Replace your cut off wheels before they get down that far, Dont put much pressure on the wheel, let the RPM do the action. Are those welds on the longs yours or the PO? I always wear welding gloves when I use cut off wheel. They offer the most protection. Those are NOT MY WELDS! I would not make welds like that and if I did I wouldn't show them to anyone! Look at the rest of my thread to see examples of the poor welds done by the previous PO's. Sadly those welds are some of the better ones that were done on this car. I didn't put any pressure on the wheel. The grinder was moved around a lot and I assume the wheel got a chip in it. I know better now, but the pneumatic grinder is so much easier to use I don't think I'll have any other problems. |
|
|
|
| Andyrew |
Jan 11 2016, 05:42 PM
Post
#33
|
|
Spooling.... Please wait Group: Members Posts: 13,380 Joined: 20-January 03 From: Riverbank, Ca Member No.: 172 Region Association: Northern California |
I have found that the fastest way to destroy a cut off wheel was to use it like a grinder. Do not put pressure on the face of the cut off wheel, If you dont have another go out and grab a $25 harbor freight electric grinder and put your grinding wheel on that.
I have two grinders, a harbor freight I have had for 10 years and a Makita that was my Grandpa's. One is set up for my cutoff wheel and one with my flap wheel for grinding.. I find I go through far less consumables this way and my time is spent better. I typically leave both plugged in while I am working and readily switch back and forth. |
|
|
|
| budk |
Jan 11 2016, 06:29 PM
Post
#34
|
|
Yes! It's a Bumblebee! Group: Members Posts: 685 Joined: 24-July 10 From: Jasper, TN Member No.: 11,970 Region Association: MidAtlantic Region |
QUOTE(Andyrew @ Jan 11 2016, 06:42 PM) I have found that the fastest way to destroy a cut off wheel was to use it like a grinder. Do not put pressure on the face of the cut off wheel, If you dont have another go out and grab a $25 harbor freight electric grinder and put your grinding wheel on that. I have two grinders, a harbor freight I have had for 10 years and a Makita that was my Grandpa's. One is set up for my cutoff wheel and one with my flap wheel for grinding.. I find I go through far less consumables this way and my time is spent better. I typically leave both plugged in while I am working and readily switch back and forth. I have 2 electric grinders, one that had a cutoff wheel and one with a flap type grinding disc. I think the disc was damaged over the course of moving stuff around. I'm not worried about it. I would not be stupid enough to try and use it as a grinding wheel.... I'm not sure why anyone would try to do that. My pneumatic grinder with a cut off wheel is much easier to use. I should have been using it all along. |
|
|
|
| krazykonrad |
Jan 11 2016, 09:32 PM
Post
#35
|
|
Senior Member Group: Members Posts: 1,174 Joined: 21-February 06 From: Canton, GA Member No.: 5,610 |
I guess its not original, but that yellow reverse-bumblebee paint scheme is pretty sharp.
Looks like a great build. I'm looking forward to following along. (IMG:style_emoticons/default/popcorn[1].gif) Konrad |
|
|
|
| rick 918-S |
Jan 31 2016, 11:38 PM
Post
#36
|
|
Hey nice rack! -Celette Group: Members Posts: 21,264 Joined: 30-December 02 From: Now in Superior WI Member No.: 43 Region Association: Northstar Region |
Wow, just like a Cracker Jack box. There's a surprise in every package. The car will be much improved when your done. (IMG:style_emoticons/default/welder.gif)
|
|
|
|
| budk |
Feb 1 2016, 03:20 PM
Post
#37
|
|
Yes! It's a Bumblebee! Group: Members Posts: 685 Joined: 24-July 10 From: Jasper, TN Member No.: 11,970 Region Association: MidAtlantic Region |
Adding a January update.
Not much progress this month. I had hopes of working on it all winter by heating my garage with a combination of kerosene and propane heaters but then I read the posts of the problems causes by using combustion type heaters in a sealed space. I am mostly concerned about rust so I have decided to only use electric heat in the garage but given some of the low temps we had even that wasn't possible. I'll only be able to work on it on mild weather days - I just don't have enough electric heat to make it comfortable nor do I want a ridiculous electric bill. I did start cleaning some of the contacts on my wiring harness. I'm trying a few different methods, mostly vinegar and salt to clean and water/baking soda to neutralize afterwards. I had some success with although I think I wtill try the vinegar/salt solution in an ultrasonic cleaner. That should give the same results only more quickly. All in all the harness isn't that bad. There are a few pieces that will need to be replaced and a lot of it will need to be re-wrapped but it's not as bad as I had thought. I did get some more metal pieces to add to the to-do pile. Other than that, no real progress this month. Pics will be added <here> soon. |
|
|
|
| JeffBowlsby |
Feb 1 2016, 08:52 PM
Post
#38
|
|
914 Wiring Harnesses & Beekeeper Group: Members Posts: 9,248 Joined: 7-January 03 From: San Ramon CA Member No.: 104 Region Association: None |
QUOTE(budk @ Feb 1 2016, 01:20 PM) I did start cleaning some of the contacts on my wiring harness. Get some DeOxit spray Bud...its the cats meow for electrical contacts. |
|
|
|
| budk |
Feb 2 2016, 09:49 AM
Post
#39
|
|
Yes! It's a Bumblebee! Group: Members Posts: 685 Joined: 24-July 10 From: Jasper, TN Member No.: 11,970 Region Association: MidAtlantic Region |
QUOTE(Jeff Bowlsby @ Feb 1 2016, 09:52 PM) QUOTE(budk @ Feb 1 2016, 01:20 PM) I did start cleaning some of the contacts on my wiring harness. Get some DeOxit spray Bud...its the cats meow for electrical contacts. For cleaning or for protection? Either way, thanks for the tip! |
|
|
|
| PlantMan |
Feb 3 2016, 02:53 PM
Post
#40
|
|
Member Group: Members Posts: 462 Joined: 14-May 14 From: Mission Viejo Member No.: 17,352 Region Association: Southern California |
QUOTE(budk @ Dec 31 2015, 11:47 AM) I decided to layout my wire harness on some plywood in my basement. I plan to check every wire and replace as needed, clean every connector and rewrap the harness as needed. If I get ambitious, I might label every wire so that it will be easier to install it when that time comes. As bad as the body is, the harness is not much better. Lots of wires that have multiple splices in them, wires that have damaged insulation and wires that appear to go nowhere. I don’t know how much I will work on this in the coming months since it is a low priority task, but the goal will to have the harness done by the time the car is ready to paint. Just catching-up on some threads. Great idea with the wiring harness!!! |
|
|
|
|
1 User(s) are reading this topic (1 Guests and 0 Anonymous Users)
0 Members:

|
Lo-Fi Version | Time is now: 10th May 2026 - 10:32 AM |
Invision Power Board
v9.1.4 © 2026 IPS, Inc.