|
|
|
Porsche, and the Porsche crest are registered trademarks of Dr. Ing. h.c. F. Porsche AG.
This site is not affiliated with Porsche in any way. Its only purpose is to provide an online forum for car enthusiasts. All other trademarks are property of their respective owners. |
|
|

  |

| MichiganMat |
 Jan 31 2016, 10:32 PM Jan 31 2016, 10:32 PM
Post
#21
|
|
Member  Group: Members Posts: 115 Joined: 14-June 06 From: San Jose, CA Member No.: 6,222 Region Association: Northern California |
Today I worked on dropping the drivers floor pan down by 1 inch. Cut along the outside of the pan, made a few bends in the metal brake, and welded a 1" strip of 16ga around the perimeter. The goal is to get the driver seat nice and low, Im 6'1", need to get my helmet away from the top of the roof and below the roll cage. I've seen this done on a few of the Patrick Motorsports builds, seems like a well-known mod. I still need to figure out how to mount the seat brackets to the pan and decide if I'll use sliders or not. A few questions left to be answered...
I also started thinking about how to build the custom tunnel / shifter console. I have a few ideas but Im going to need more steel and welding gas. I'll likely start in on it next weekend after gathering parts. Its tough to fit anything without the seat mounted in :/ I need to pick up used shifter (seems like people are using Toyota MR2, I wonder if there are other options?) and a pedal cluster (thinking Tilton or Wilwood at the moment). 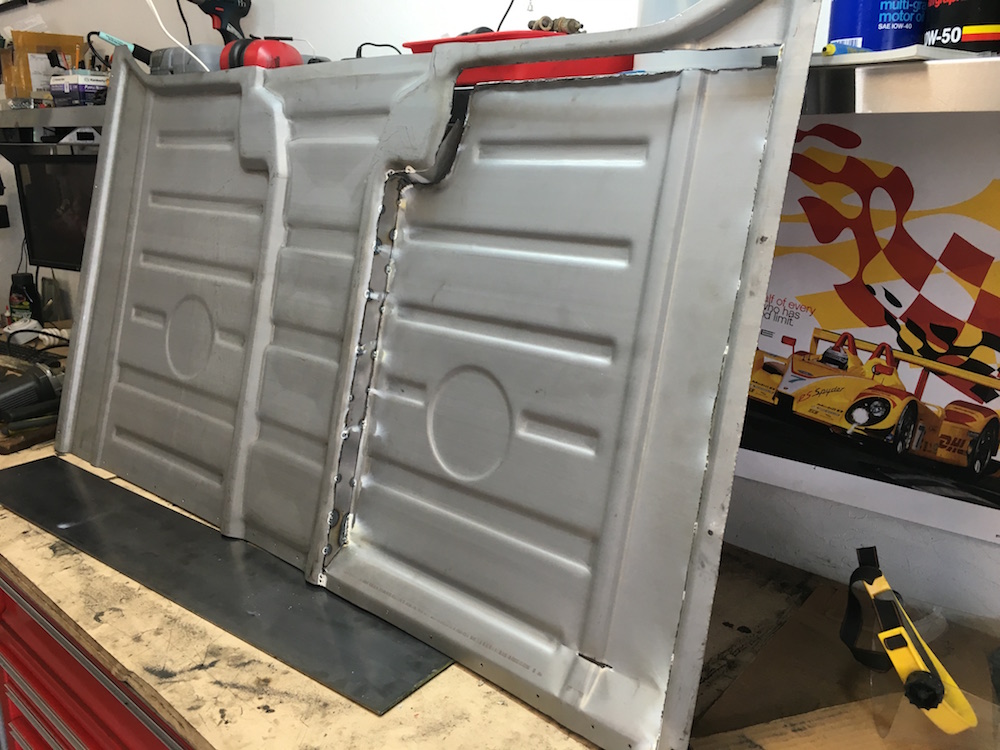 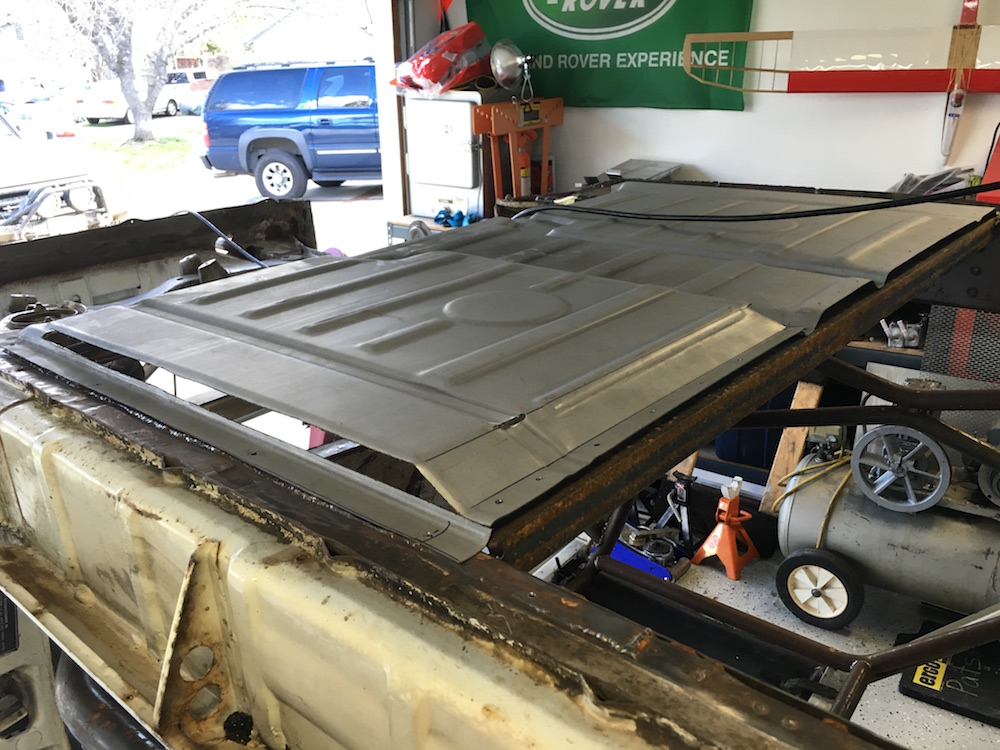 |
   |

 
|
| rick 918-S |
Jan 31 2016, 10:43 PM
Post
#22
|
|
Hey nice rack! -Celette Group: Members Posts: 21,288 Joined: 30-December 02 From: Now in Superior WI Member No.: 43 Region Association: Northstar Region |
Like the dropped pan!
|
|
|
|
| MichiganMat |
Feb 2 2016, 09:03 AM
Post
#23
|
|
Member Group: Members Posts: 115 Joined: 14-June 06 From: San Jose, CA Member No.: 6,222 Region Association: Northern California |
Ok, question for you guys: how aligned should the seat be with the steering wheel? haha, i kid.
I started lining up the seat last night and noticed the only way I could get a proper alignment of the seat + wheel is to move the seat towards the center so much so that its no longer sitting in the stock areas of the floorpan. This seems like a bug. Is this a common thing? You can see in the pics that I've got the seat lined up nice and straight, but then look at where the brackets are sitting. Im already planning to make my own custom tunnel / shift console, so its not a big deal to me to mod the pan. I just want to know if Im headed down the right road here. Is this correct? Thoughts? 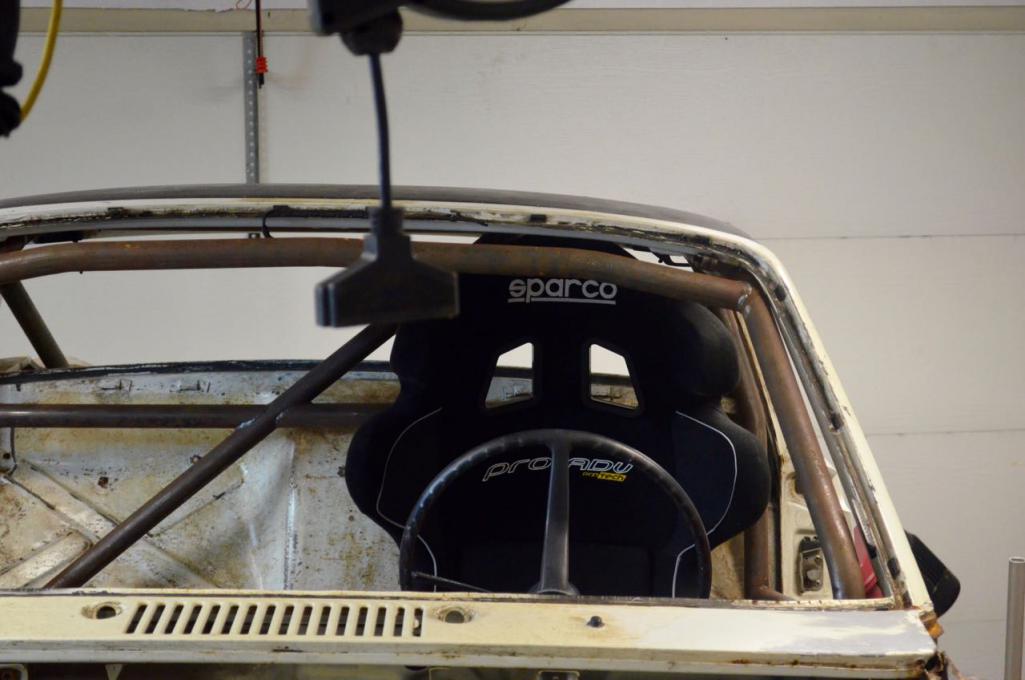 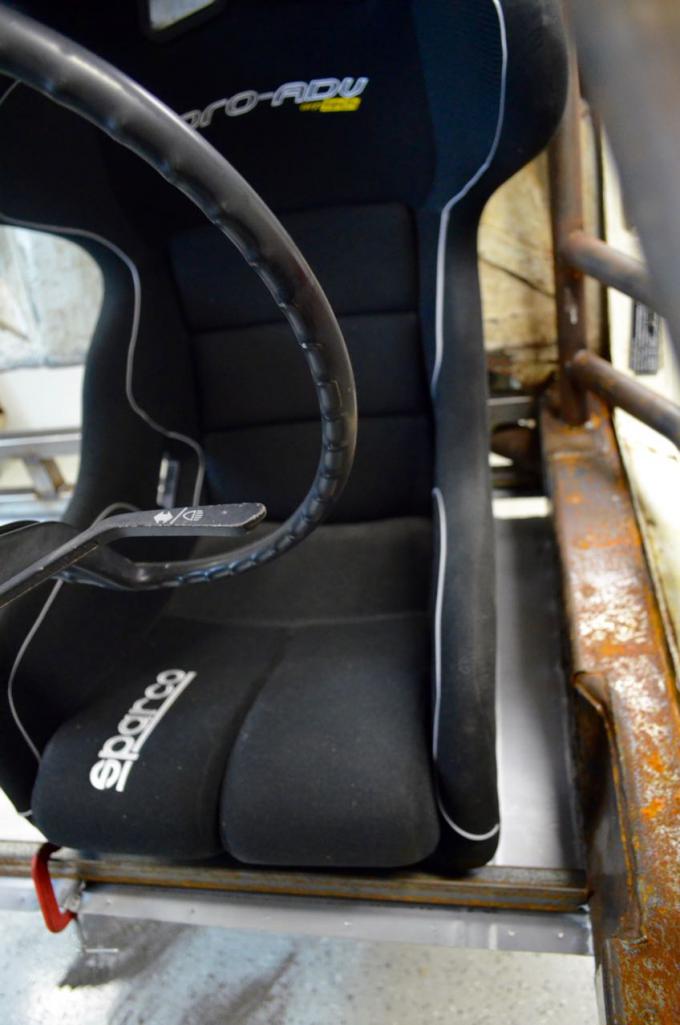  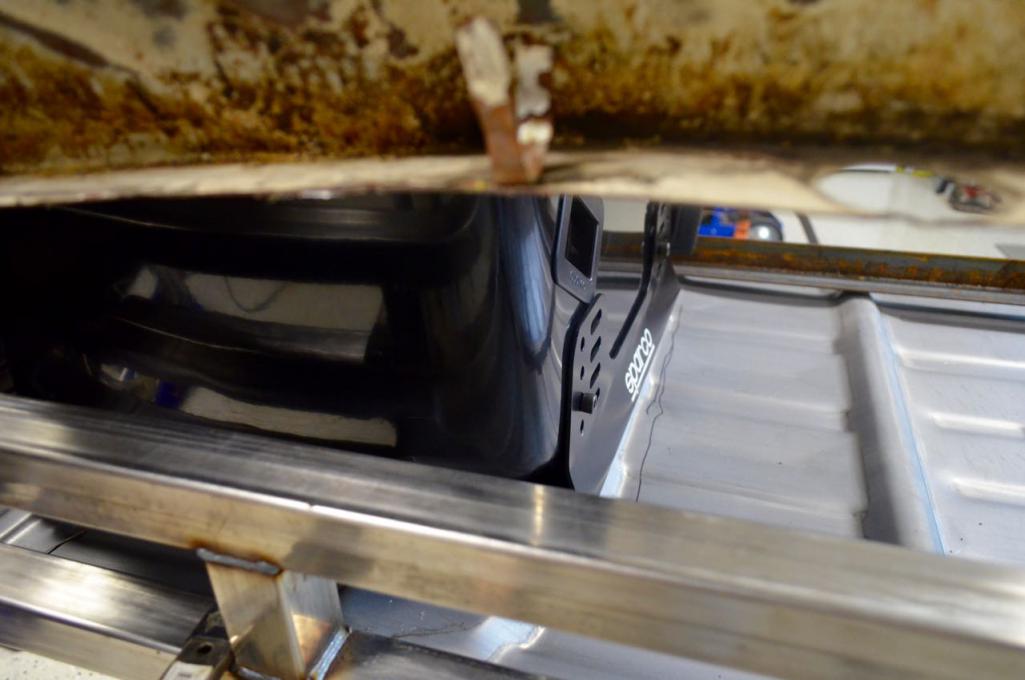 |
|
|
|
| siverson |
Feb 2 2016, 10:53 AM
Post
#24
|
|
Advanced Member Group: Benefactors Posts: 2,464 Joined: 5-May 03 From: San Diego, CA Member No.: 654 Region Association: Southern California |
Neat build. I can double check, but I don't think the seat, steering wheels, and pedals line up well on a stock 914. I know the pedals don't for certain.
I think I just got used to it after 25+ years. (IMG:style_emoticons/default/smile.gif) -Steve |
|
|
|
| MichiganMat |
Feb 8 2016, 08:54 PM
Post
#25
|
|
Member Group: Members Posts: 115 Joined: 14-June 06 From: San Jose, CA Member No.: 6,222 Region Association: Northern California |
Another productive weekend!
I was able to get a bit more work done on the floorpan. I really had to cut out and drop a huge section to get the seat to line up, I really had no idea that the alignment was this bad in these cars. Oh well, the cuts are made, need to get in there and patch it all up, reinforce the lowered areas, and mount the seat sliders. Feels like good progress though. I also did a bit of work on the rear suspension points. The inner points got a bit of reinforcement and I'll be adding a heim-joint connector from the dog-ear to the firewall soon. The reinforcements are not quite finished, I'll take some pics when its ready. Oh, and I also fab'd up the outer rear suspension console adjusters / supports / etc. That was a neat job to do, and I really feel I saved myself a ton of money and trouble by doing it myself. Don't mind the surface rust (its ugly, I know), its all going away when I get the chassis media blasted. Finally, the motor and trans arrived. Its a big dirty lump, but its here and its ready to go in. Excited! 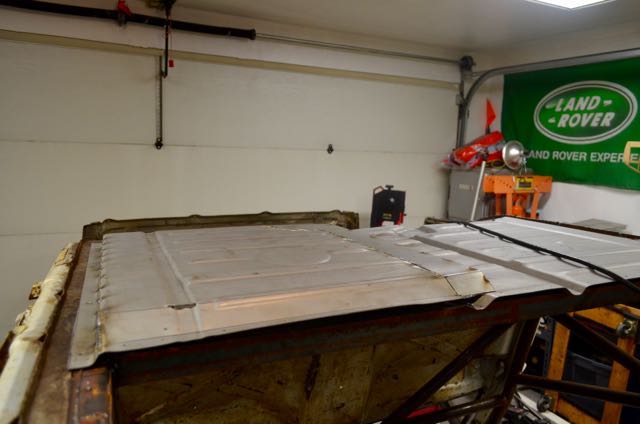 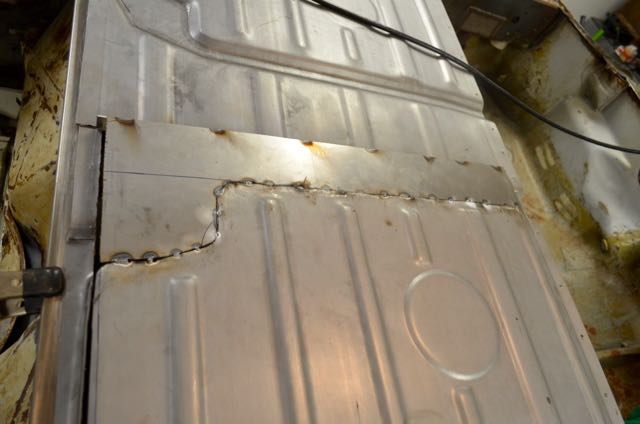 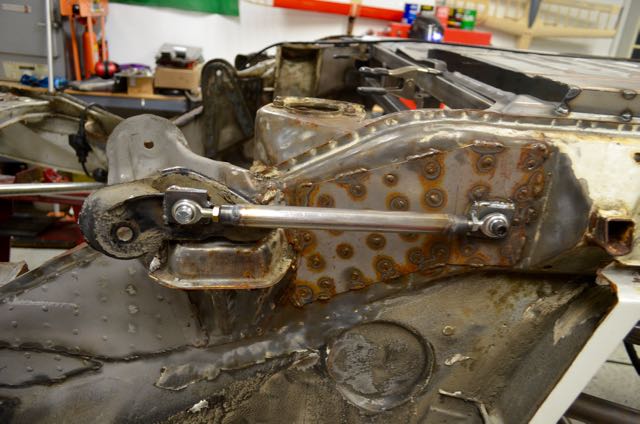 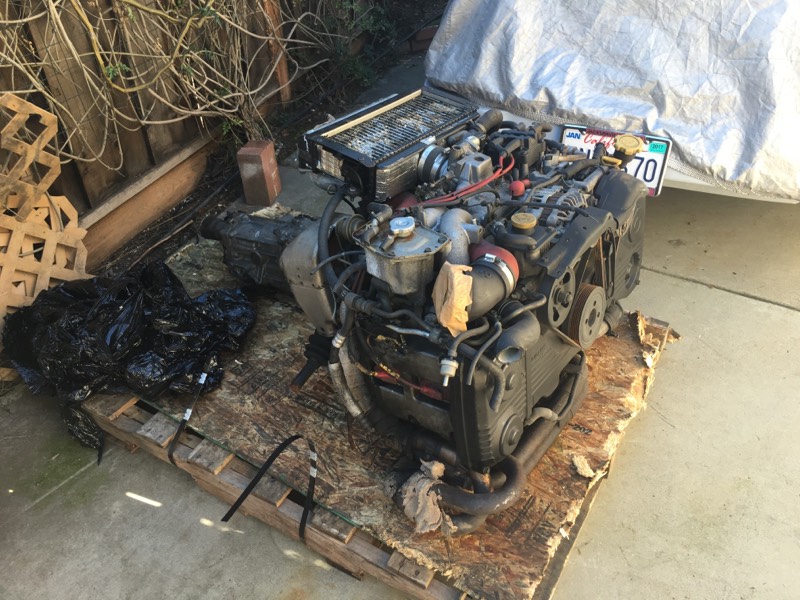 |
|
|
|
| MichiganMat |
Feb 15 2016, 11:05 PM
Post
#26
|
|
Member Group: Members Posts: 115 Joined: 14-June 06 From: San Jose, CA Member No.: 6,222 Region Association: Northern California |
Made a bunch more progress in the last few days:
• Finished welding up the floorpan drop • Fab'd and welded in the seat rails where the sliders will attach. • Welded in the floorpan cross bracing and center tunnel • Welded in seatbelt attachment points on center tunnel and chassis • Broke down the engine/trans, put the engine on the stand • Cut the backing plates needed to tie the rollcage into the front struts, will weld in tomorrow. No pics yet. The engine is looking like it was driven pretty hard. The clutch is showing wear and the non-stock exhaust, plug wires, and silicone lead me to believe it was somebody young and reckless, heh. Im sure its fine, but its not quite what I was hoping for when I hit "buy now" on eBay. So, next steps are: - I need to buy a pedal cluster (likely Wilwood) before I can finish the floorpan and weld it in. - Planning to tie in the roll cage to the front struts tomorrow - I have one of the dog-ears reinforced, need to do the other, and then Im going to build heim-joint connectors to the lower firewall. - My brother is bringing the fiberglass body in 2 weeks, so trying to get all this prep work done before it arrives. Should have the body mounted by the end of the month! 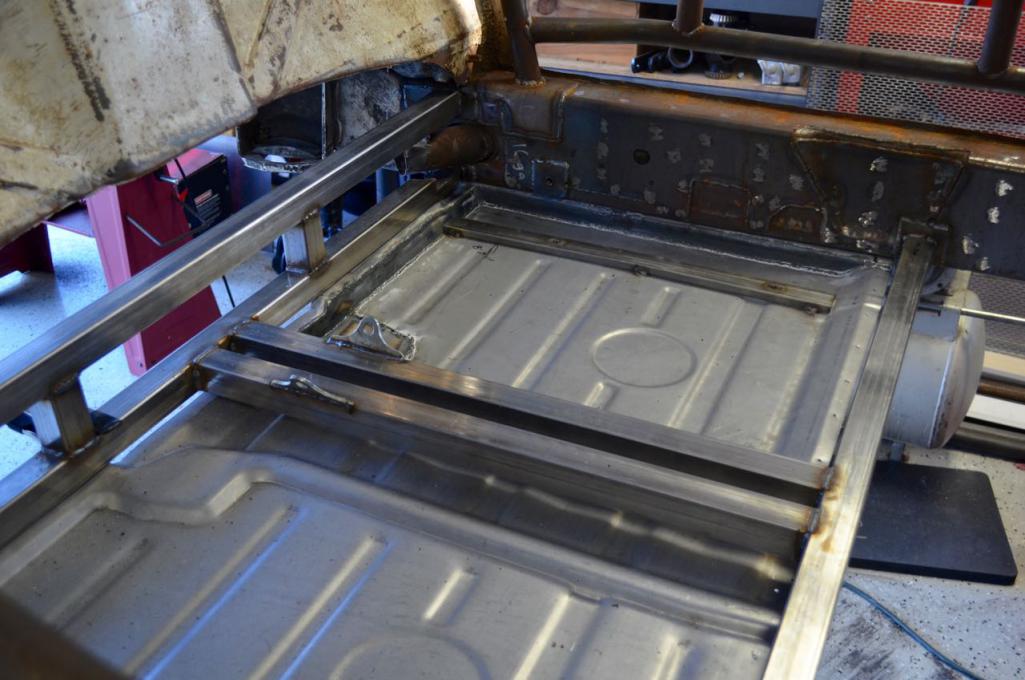 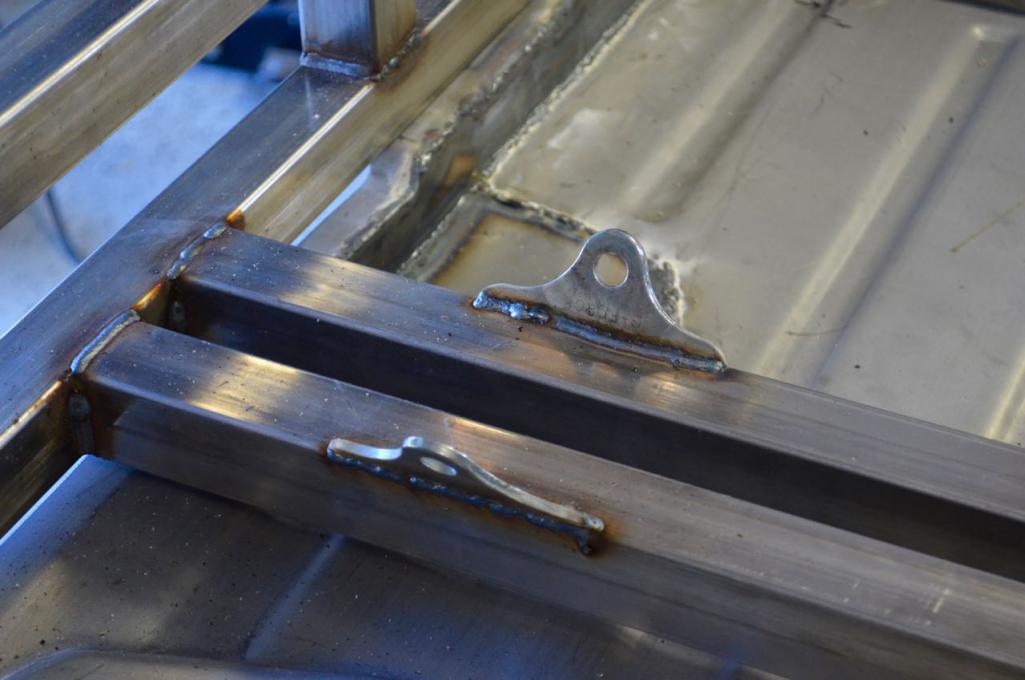 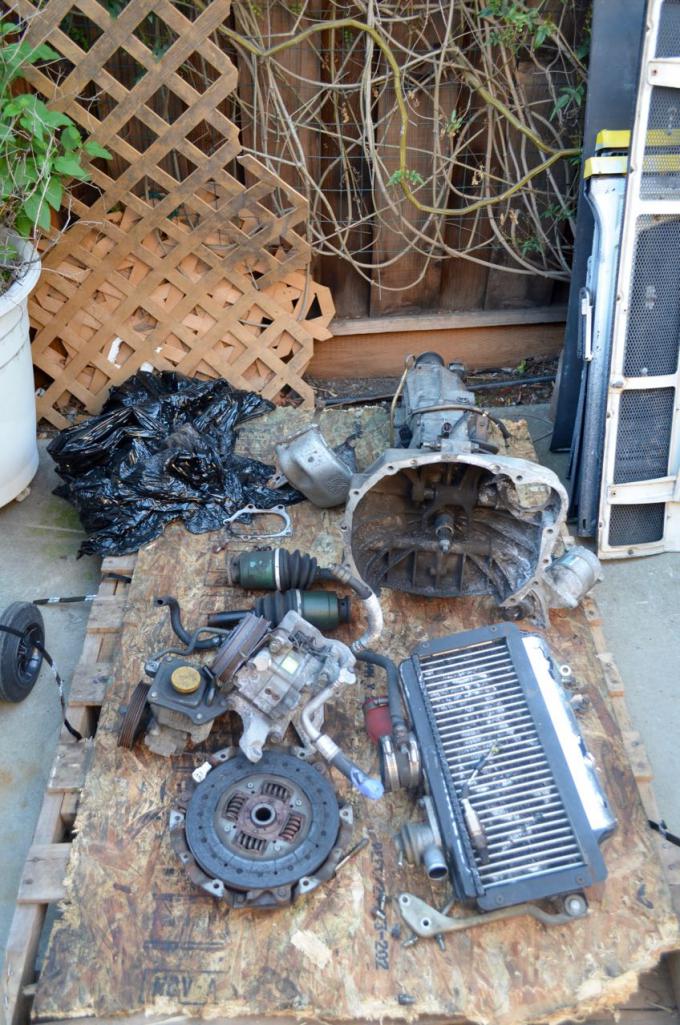 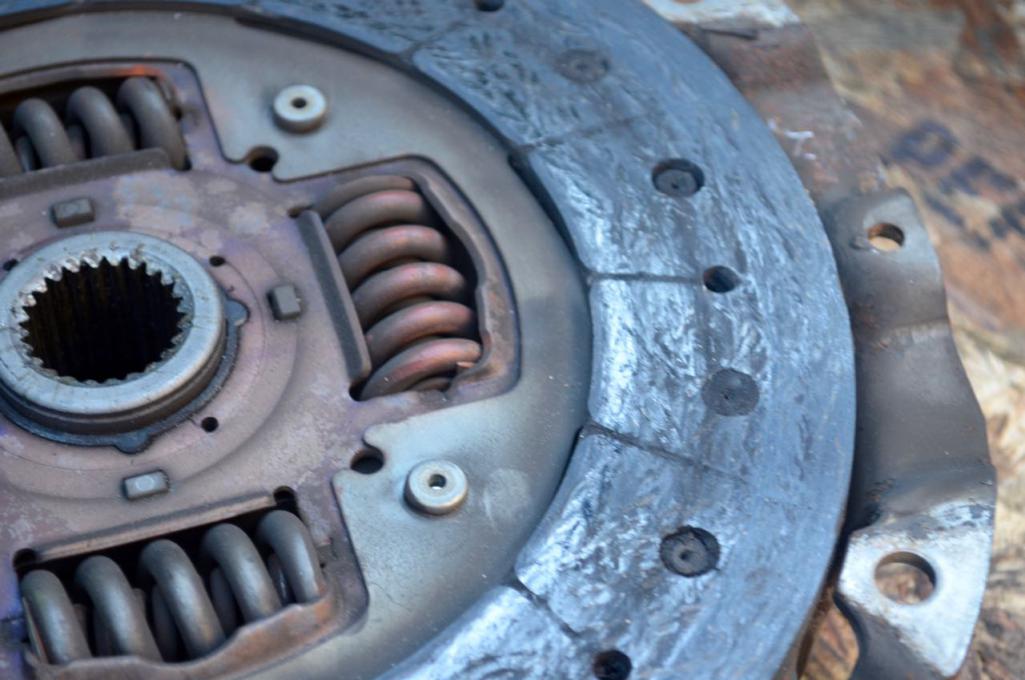 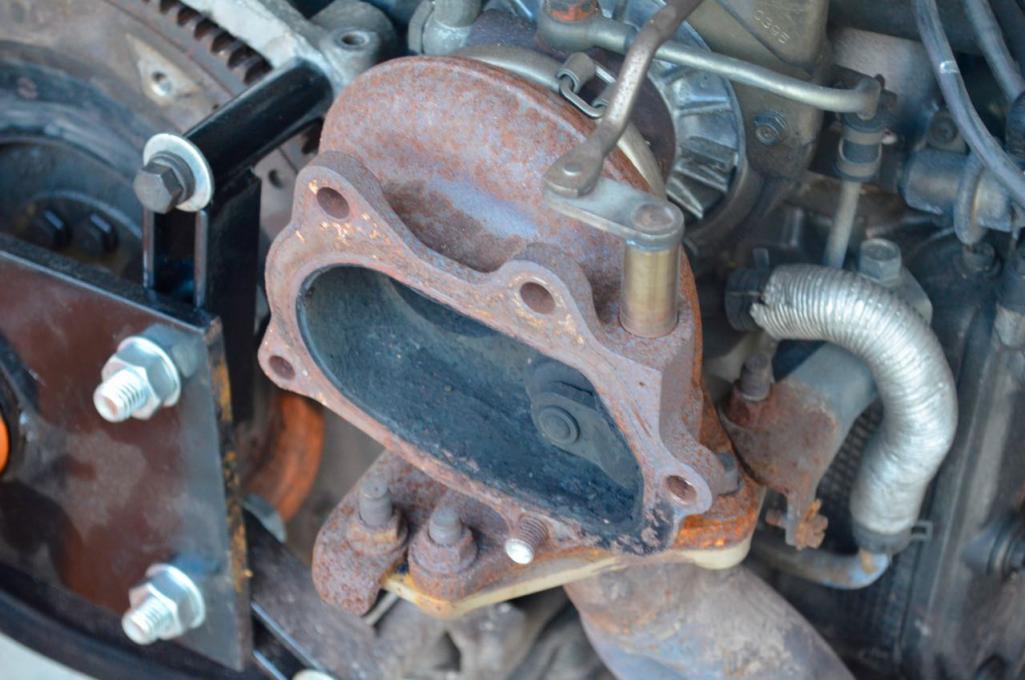 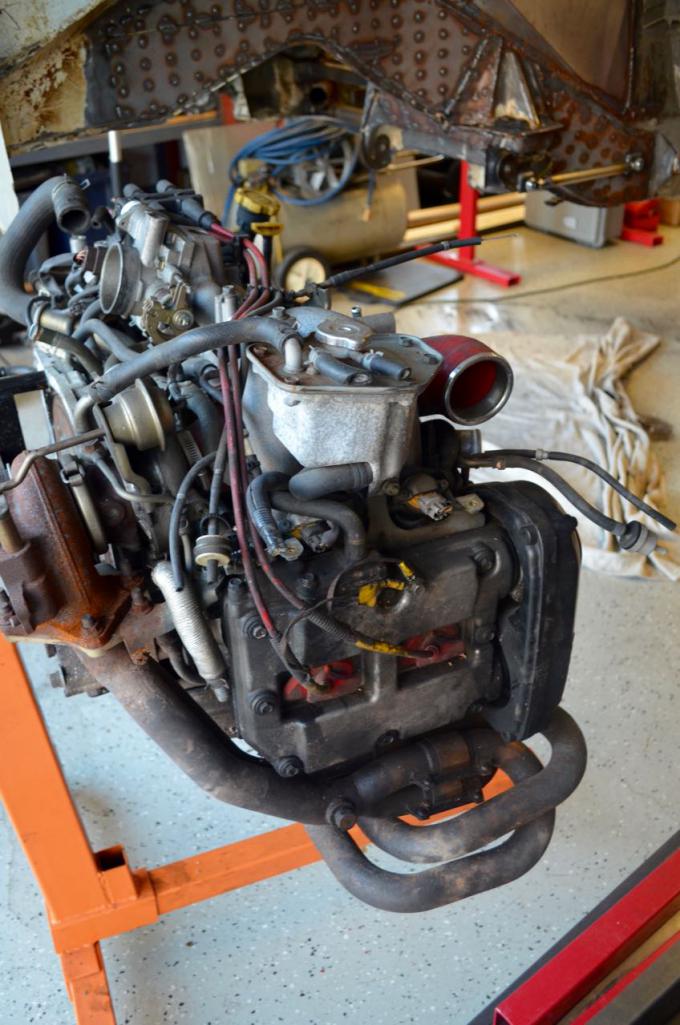 |
|
|
|
| Andyrew |
Feb 16 2016, 12:37 AM
Post
#27
|
|
Spooling.... Please wait Group: Members Posts: 13,380 Joined: 20-January 03 From: Riverbank, Ca Member No.: 172 Region Association: Northern California |
Great looking progress! What are you going to do for the intercooler?
|
|
|
|
| 76-914 |
Feb 16 2016, 09:13 AM
Post
#28
|
|
Repeat Offender & Resident Subaru Antagonist Group: Members Posts: 13,902 Joined: 23-January 09 From: Temecula, CA Member No.: 9,964 Region Association: Southern California |
"The engine is looking like it was driven pretty hard. The clutch is showing wear and the non-stock exhaust, plug wires, and silicone lead me to believe it was somebody young and reckless, heh. Im sure its fine, but its not quite what I was hoping for when I hit "buy now" on eBay."
This was the reason I went with a 6. That being said, if there are issues it will probably be with the center differential. But you'll be trashing the diff anyway. (IMG:style_emoticons/default/beerchug.gif) |
|
|
|
| MichiganMat |
Feb 21 2016, 09:45 PM
Post
#29
|
|
Member Group: Members Posts: 115 Joined: 14-June 06 From: San Jose, CA Member No.: 6,222 Region Association: Northern California |
The next challenge: how to plumb the radiator.
Im struggling here. Im looking over the various approaches here on 914World.com and Im trying to reconcile longevity, complexity, and cost. The last time I built one of these systems I used all aluminum piping, not long runs of hose, and I built them into protected places that would never fail. So our options are: - under the floorpan - along the rocker panels - inside the longitudinals in the heater ducts - inside the the cabin, either along the longs or down the middle of the center tunnel. Materials: - gold-stripe radiator hose - aluminum tubing with silicone connections I really don't feel comfortable running lines under the floorpan of the car where they can get hit or cut by road debris. Id prefer to run along the rockers, but I don't see how to do cleanly. I've seen many different methods of running hose inside the heater ducts of the longs, but that feels like too much hose over too long of a distance. Id like to run mostly aluminum tubing, but I cant' see way to run it along the longs inside the cabin. The seatbelt mounts on the passenger on both sides will conflict. So Im at a bit of an impasse here. Im even thinking of how to put the radiator not at the front of the car but back in the trunk or in the engine compartment (some builds have done that too!). I dunno, I just want to make it last, but the locations and materials are just not friendly at the moment. There has to be a solution in there someplace... |
|
|
|
| 76-914 |
Feb 21 2016, 10:31 PM
Post
#30
|
|
Repeat Offender & Resident Subaru Antagonist Group: Members Posts: 13,902 Joined: 23-January 09 From: Temecula, CA Member No.: 9,964 Region Association: Southern California |
Someone on here ran 1.25" SS bent to follow the channels of the floor pan and reported an exposure of 1". That's about equal to the OEM air deflectors. Down the rocker panels you'll have to turn into the cabin or wheel well.
|
|
|
|
| mgp4591 |
Feb 22 2016, 12:07 AM
Post
#31
|
|
914 Guru Group: Members Posts: 5,958 Joined: 1-August 12 From: Salt Lake City Ut Member No.: 14,748 Region Association: Intermountain Region |
Mount it at an angle in the trunk with ducting under the car coming out of the top before your rear spoiler or ducted out between the taillights. Hose run is shorter, you retain the frunk and possibly part of the trunk too if isolated properly. You will have more weight in the rear though which may (but not totally) negate the benefits of a mid engined car...
|
|
|
|
| 914forme |
Feb 22 2016, 12:34 PM
Post
#32
|
|
Times a wastin', get wrenchin'! Group: Members Posts: 3,899 Joined: 24-July 04 From: Dayton, Ohio Member No.: 2,388 Region Association: None |
QUOTE(MichiganMat @ Feb 21 2016, 10:45 PM)  The next challenge: how to plumb the radiator. Im struggling here. Id like to run mostly aluminum tubing, but I cant' see way to run it along the longs inside the cabin. The seatbelt mounts on the passenger on both sides will conflict. Do it like a Buel, run it through the frames, Porsche also did the same thing on the 917. In your case, add some DOM and run it that way. More of a joke than a solution BTW, But I have thought about it. One of the first documented sub conversion did it right down the tunnel with copper pipe. 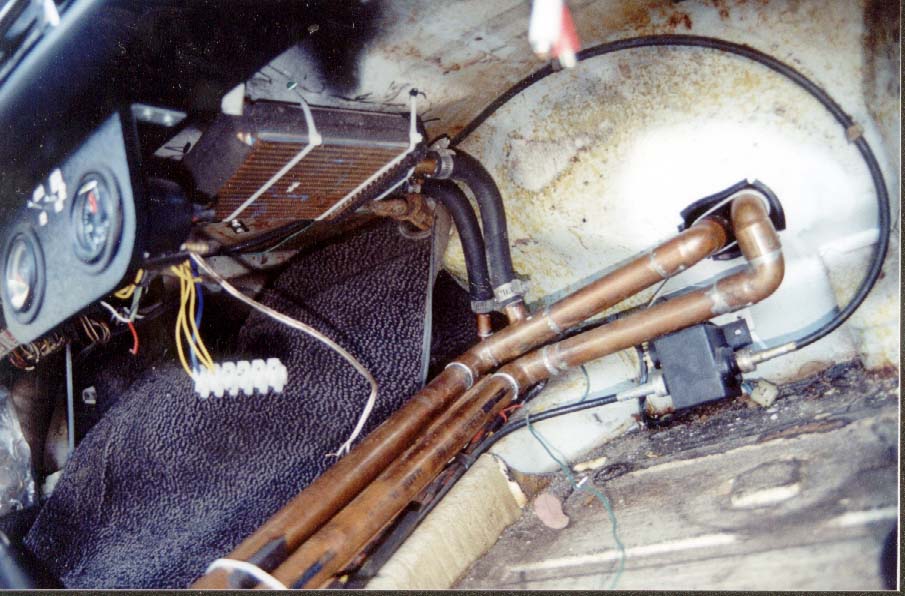 Might not be the way you would go, but it has been done. Here is what You have to look at. What has been done. The Alien has racked up many miles, Rick used hard lines under the car. Renegade Hybrids have racked up many a mile on their V8 conversions same idea, but they use green stripe under the car. But I am with you, when I look at the floor pan, and the dents I have, I think Norfolkingwaypal, but proven designs are what they are. I have thought about moving everything under the car, fuel lines, brake lines, coolant, etc. Maybe add a couple of beams to make it a little more protected. None of my modern cars have any lines fuel, brake, or other lines on the inside. Only thing in the cabin are electrical harnesses. Doubt I solved your problem. (IMG:style_emoticons/default/stirthepot.gif) |
|
|
|
| mgp4591 |
Feb 22 2016, 01:19 PM
Post
#33
|
|
914 Guru Group: Members Posts: 5,958 Joined: 1-August 12 From: Salt Lake City Ut Member No.: 14,748 Region Association: Intermountain Region |
QUOTE(914forme @ Feb 22 2016, 11:34 AM) QUOTE(MichiganMat @ Feb 21 2016, 10:45 PM) The next challenge: how to plumb the radiator. Im struggling here. Id like to run mostly aluminum tubing, but I cant' see way to run it along the longs inside the cabin. The seatbelt mounts on the passenger on both sides will conflict. Do it like a Buel, run it through the frames, Porsche also did the same thing on the 917. In your case, add some DOM and run it that way. More of a joke than a solution BTW, But I have thought about it. One of the first documented sub conversion did it right down the tunnel with copper pipe. Might not be the way you would go, but it has been done. Here is what You have to look at. What has been done. The Alien has racked up many miles, Rick used hard lines under the car. Renegade Hybrids have racked up many a mile on their V8 conversions same idea, but they use green stripe under the car. But I am with you, when I look at the floor pan, and the dents I have, I think Norfolkingwaypal, but proven designs are what they are. I have thought about moving everything under the car, fuel lines, brake lines, coolant, etc. Maybe add a couple of beams to make it a little more protected. None of my modern cars have any lines fuel, brake, or other lines on the inside. Only thing in the cabin are electrical harnesses. Doubt I solved your problem. (IMG:style_emoticons/default/stirthepot.gif) It would be good to hear (and see!) how you ran your fluid lines outside the cabin... (IMG:style_emoticons/default/popcorn[1].gif) |
|
|
|
| MichiganMat |
Feb 27 2016, 06:42 PM
Post
#34
|
|
Member Group: Members Posts: 115 Joined: 14-June 06 From: San Jose, CA Member No.: 6,222 Region Association: Northern California |
Had a couple of good nights of work lately:
- Tied the cage into the front suspension points, its now an official 8-pt cage - Working on gusseting the cage in a few places, no pics at the moment - Purchased the fiberglass body parts from Rennspeed.com - Did some more work on the floorpan, need to purchase pedal set before I can do more - Worked on reinforcing the dog-ears, still in progress - Found a solution for plumbing the engine coolant up to the front trunk, cut the holes in the longs to route the green-stripe hose I plan to use. - Fit the engine lid today, made it go around the roll cage - Bought an MR2 shifter, haven't started mounting it yet. - Researched lexan windshield options, parts needed for the engine, suspension options, vents for the hood, and a bit more. The research takes the longest, just of forum time, eBay, Craigslist, and of course 914World.com I need to pick up the pedal cluster and the radiator before I can do much more. Once I have the pedals, I can get them mounted firmly to the pan, then the pans can both be welded in. Then I can mount the seat and the shifter. Once thats done, the car can be shipped out to the media-blaster for cleaning and paint. Then its all just fitting the panels, putting it down on the suspension, installing the engine, and we're in business. 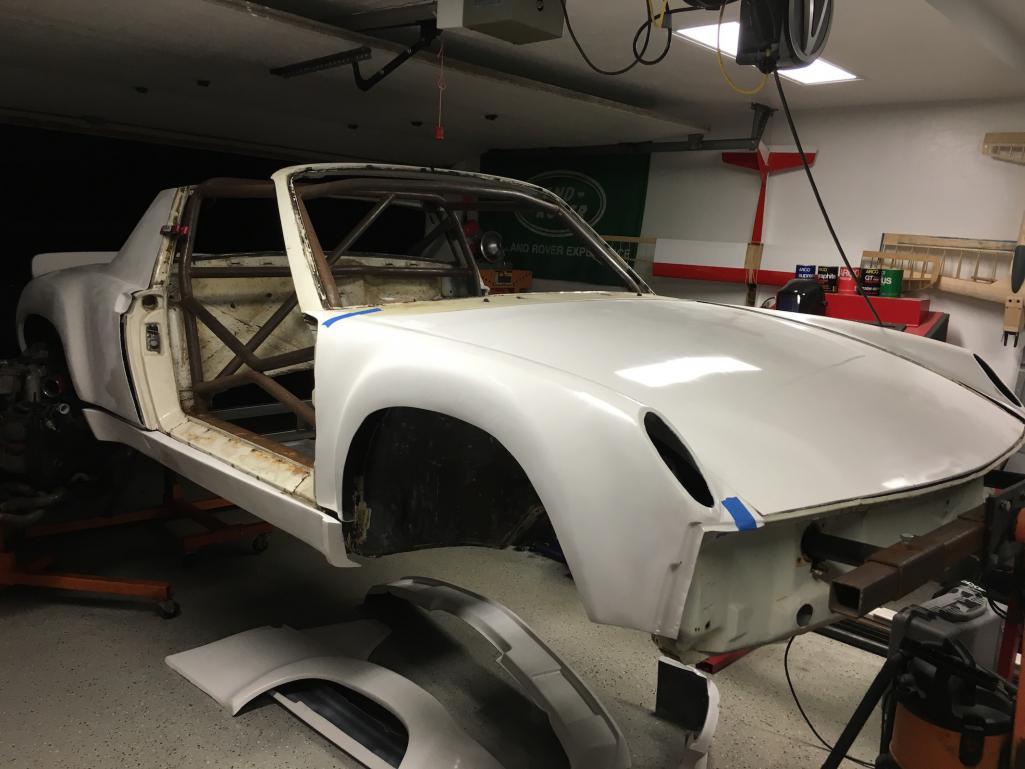 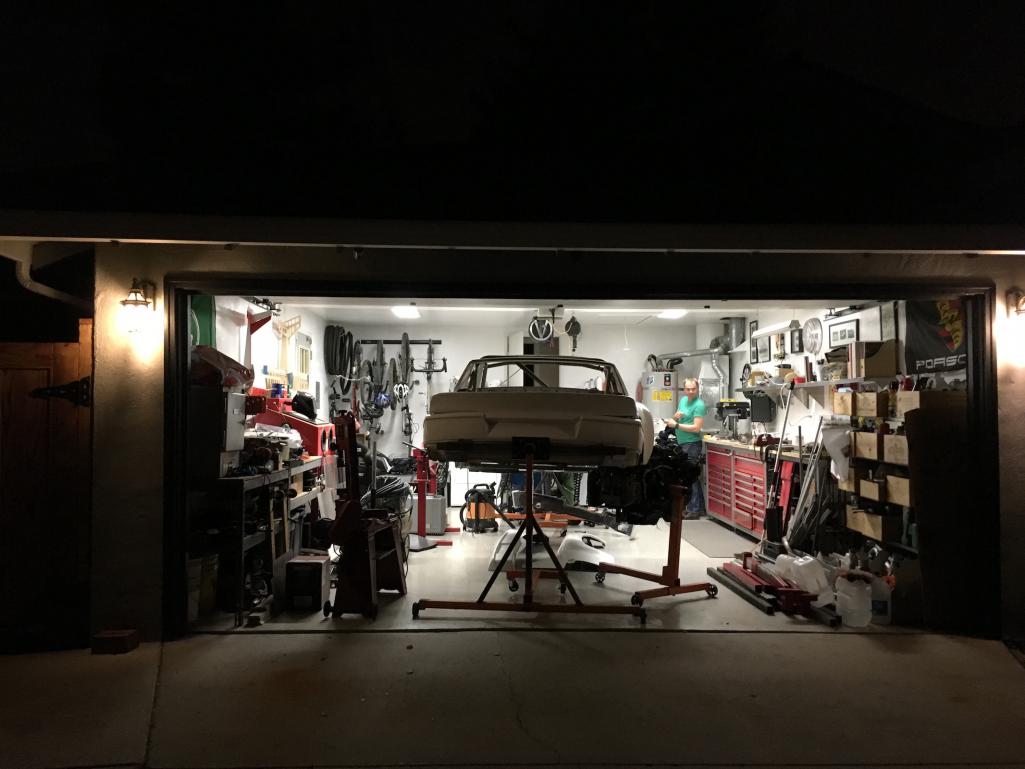 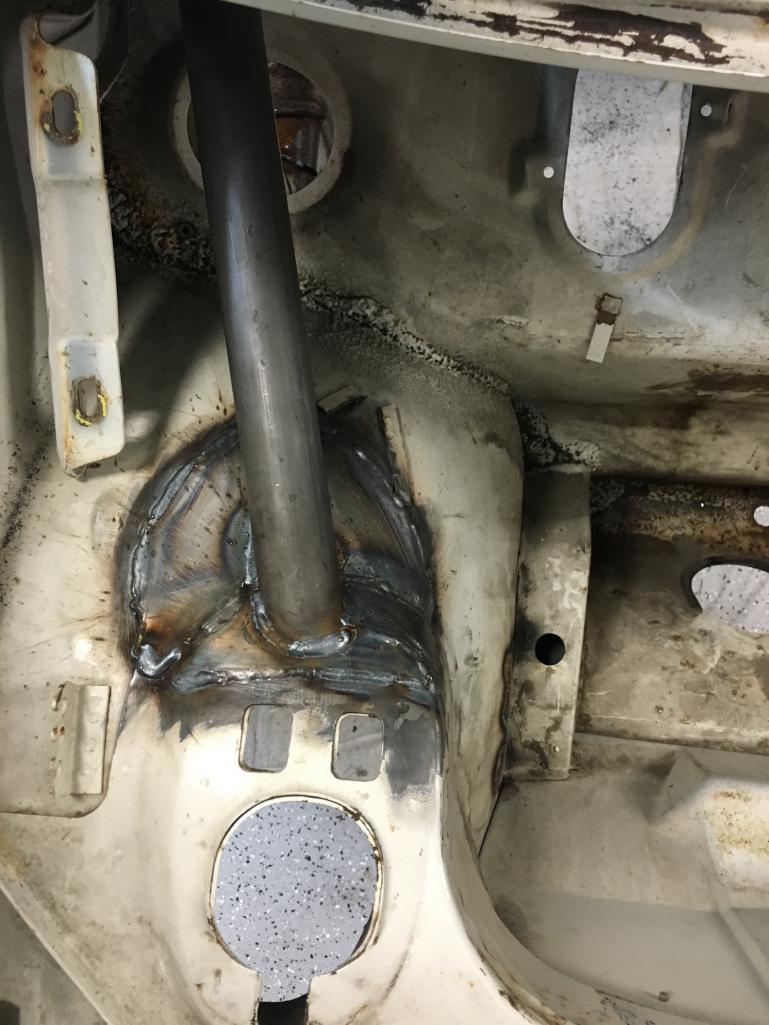 |
|
|
|
| 914forme |
Feb 29 2016, 04:35 AM
Post
#35
|
|
Times a wastin', get wrenchin'! Group: Members Posts: 3,899 Joined: 24-July 04 From: Dayton, Ohio Member No.: 2,388 Region Association: None |
Nice progress (IMG:style_emoticons/default/beer.gif)
Radiator the current darling of 914 world seems to be the Ebay Toyata Celica GT with shroud and fans, I think t is ~$150 I being different and having to cut my own path IE the harder way went Griffen and now get to build everything. For the pedals I went Wilwood and used Titon M/Cs 5/8" for clutch, 3/4" for the brakes. I am currently running 1988 911 Calipers. They are heavy SOBs so I will most likely go Wildwood there also. Here is the point to that above, the Tilton M/C are pretty short, almost as short as the Howe racing, more sizes. Not sure how tall you are, but you loose at least 2" if you keep everything inside the cabin. If you redo the pedal wall, you run into items on suspension tie in. Trying to figure my way around this one. The Tilton's also exit out the back, the howe's are angle up. Other items of note, don't forget about your Intercooler. Most here have hound they get heat soaked when sitting still. And most go for Air to Water Intercoolers. That means two extra lines going forward. Another Rad up front, and a pump and box. But it is the best way to go. You can also do an ice box if you wanted to, for that extra bit of cooling. Keep up the great work here! |
|
|
|
| MichiganMat |
Feb 29 2016, 11:34 AM
Post
#36
|
|
Member Group: Members Posts: 115 Joined: 14-June 06 From: San Jose, CA Member No.: 6,222 Region Association: Northern California |
QUOTE(914forme @ Feb 29 2016, 02:35 AM) Nice progress (IMG:style_emoticons/default/beer.gif) Radiator the current darling of 914 world seems to be the Ebay Toyata Celica GT with shroud and fans, I think t is ~$150 I being different and having to cut my own path IE the harder way went Griffen and now get to build everything. For the pedals I went Wilwood and used Titon M/Cs 5/8" for clutch, 3/4" for the brakes. I am currently running 1988 911 Calipers. They are heavy SOBs so I will most likely go Wildwood there also. Here is the point to that above, the Tilton M/C are pretty short, almost as short as the Howe racing, more sizes. Not sure how tall you are, but you loose at least 2" if you keep everything inside the cabin. If you redo the pedal wall, you run into items on suspension tie in. Trying to figure my way around this one. The Tilton's also exit out the back, the howe's are angle up. Other items of note, don't forget about your Intercooler. Most here have hound they get heat soaked when sitting still. And most go for Air to Water Intercoolers. That means two extra lines going forward. Another Rad up front, and a pump and box. But it is the best way to go. You can also do an ice box if you wanted to, for that extra bit of cooling. Keep up the great work here! Thank you, its been an interesting journey so far. Its fun that we're all building together, loving the progress from the other threads. Radiator: thats great info, thank you, i'll check them out. Pedals: Also, great to know. I am really kind of concerned about pedal travel / feel and total size of the cluster. I haven't pulled the trigger on anything yet, but any advice on it would be welcomed. Im 6 feet tall and would prefer to not lose any space in the cabin. Cutting out the pedal wall would not be my first choice either. Tilton (I think) makes a cluster where the masters effectively sit under the heels of your feet, so those may be an option, but I know nothing about the feel of the travel on those things. Intercool: {sigh}. Yeah. On our 912-STi build we tucked a huge intercooler under the ducktail and put a full-time fan on it which worked pretty well, but there are plenty of disadvantages. Not sure what I'll do yet, need to do more research. Are air-to-water ICs as efficient as air-only ICs? Thanks a bunch - Mat |
|
|
|
| 914forme |
Feb 29 2016, 12:19 PM
Post
#37
|
|
Times a wastin', get wrenchin'! Group: Members Posts: 3,899 Joined: 24-July 04 From: Dayton, Ohio Member No.: 2,388 Region Association: None |
I'll let the people who build a good system let you know
Following lifted from Frozen Boost.com "Is Water to Air for me? A Water to Air Intercooler setup is similar in principle to a traditional air to air setup, except that there is water passing through the core of the intercooler instead of air which is responsible for drawing the heat out of the intake air. There are many benefits of using a water to air intercooler setup. Water to air means incredibly low pressure drop. Pressure drop on a standard water to air intercooler core is only .05 PSI. That's not a typo, pressure drop on a water to air intercooler setup is up to 20 times less than a comparably performing air to air setup. Water to air means better engine cooling. Many people who try to road race with a front mount intercooler have overheating problems because the air going to the radiator has to pass through the hot intercooler first. With a water to air setup, you have far more flexible options. The core will probably be in the engine bay, and the radiator can be mounted in the trunk, under the car, or in some applications a radiator is not even needed. Water to air means better throttle response. Instead of the horrible mess of pipes that is normally associated with an air to air intercooler, a water to air intercooler can be mounted in the engine bay, directly between the turbo outlet and the throttle body. A shorter intake route with fewer bends is beneficial in every way. Water to air means no heat soak. A water to air intercooler setup circulates water through the core even when the car is not moving. This is especially useful during drag racing, when the core temperature raises significantly during a pass, and then the car sits still for several minutes waiting for the next pass. Water to air means extreme auto-x racing advantage. You can add ice to your reservoir, if so equipped, which will drop your intake temperature BELOW ambient. Of course, the ice melts, which is why this is so good for auto-x racing. Water to air means Mid Engine No Problem. Every modified mid or rear engine turbo vehicle should have a water to air intercooler setup. It is not practical to have a front mounted air to air setup in these applications, but you can have a water to air intercooler in the back of the vehicle and the radiator in the front, providing greater cooling than an air to air setup." I'll let you decide (IMG:style_emoticons/default/happy11.gif) |
|
|
|
| MichiganMat |
Mar 28 2016, 09:32 PM
Post
#38
|
|
Member Group: Members Posts: 115 Joined: 14-June 06 From: San Jose, CA Member No.: 6,222 Region Association: Northern California |
Bought a radiator!
The eBay Celica Gt radiator that was suggested to me is a *perfect* fit. Mounting was easy enough: Bend metal, drill hole, weld in, repeat. The feet are welded in, the top tabs are backed by riv-nuts 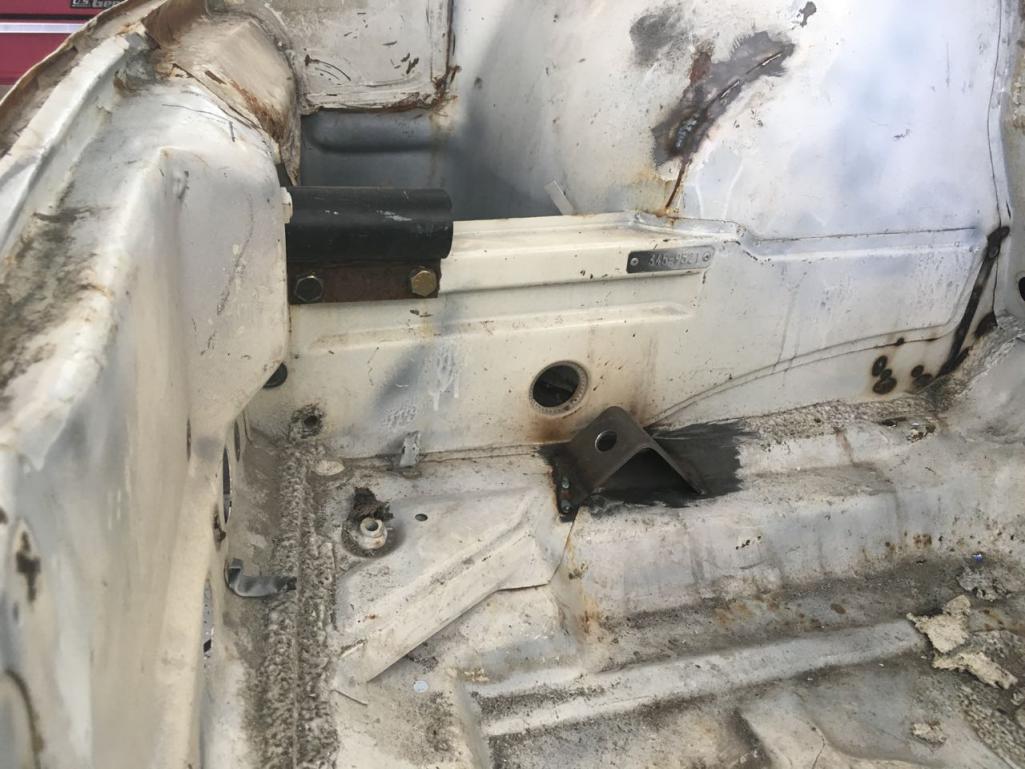 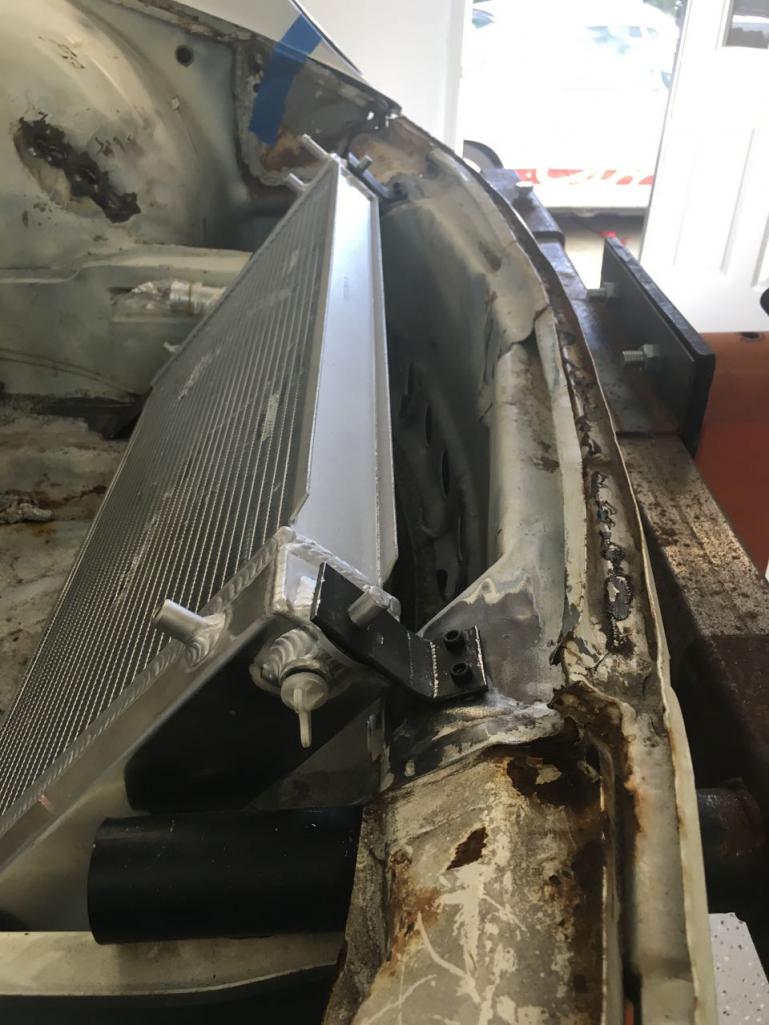 Also got around to mounting the new hood. The latches are basic eBay models, super affordable, nothing special. I really like the look of them though, they look like business. Getting them all squared up on the hood was probably the hardest part, welding the backing plates wasn't too bad. 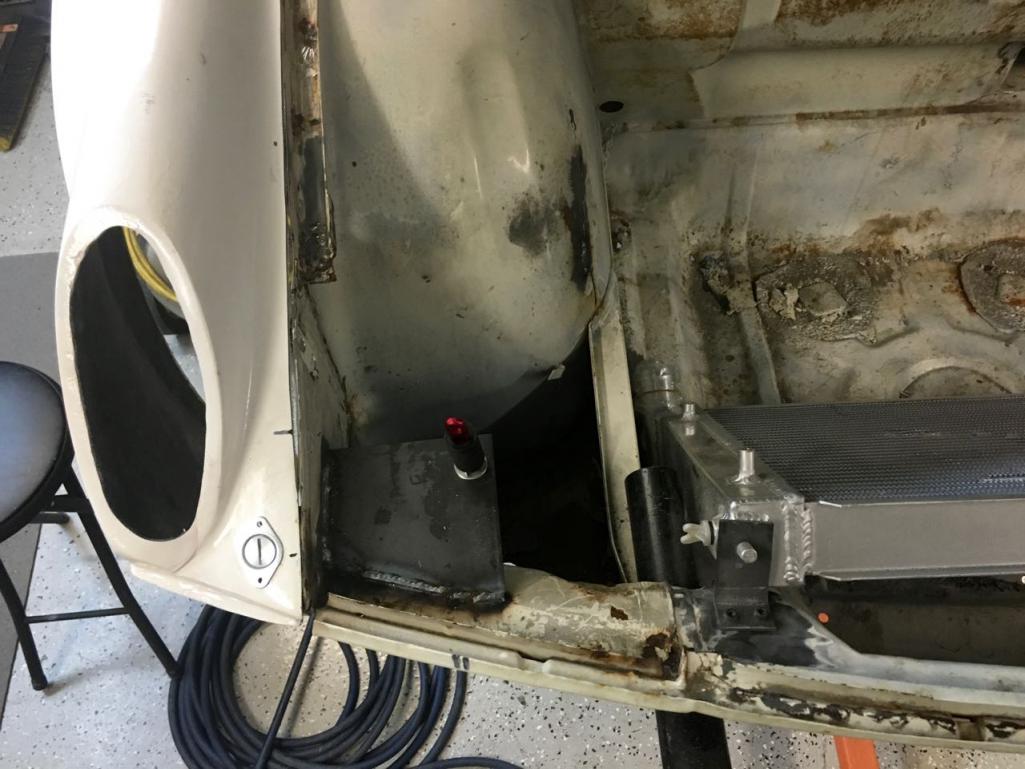 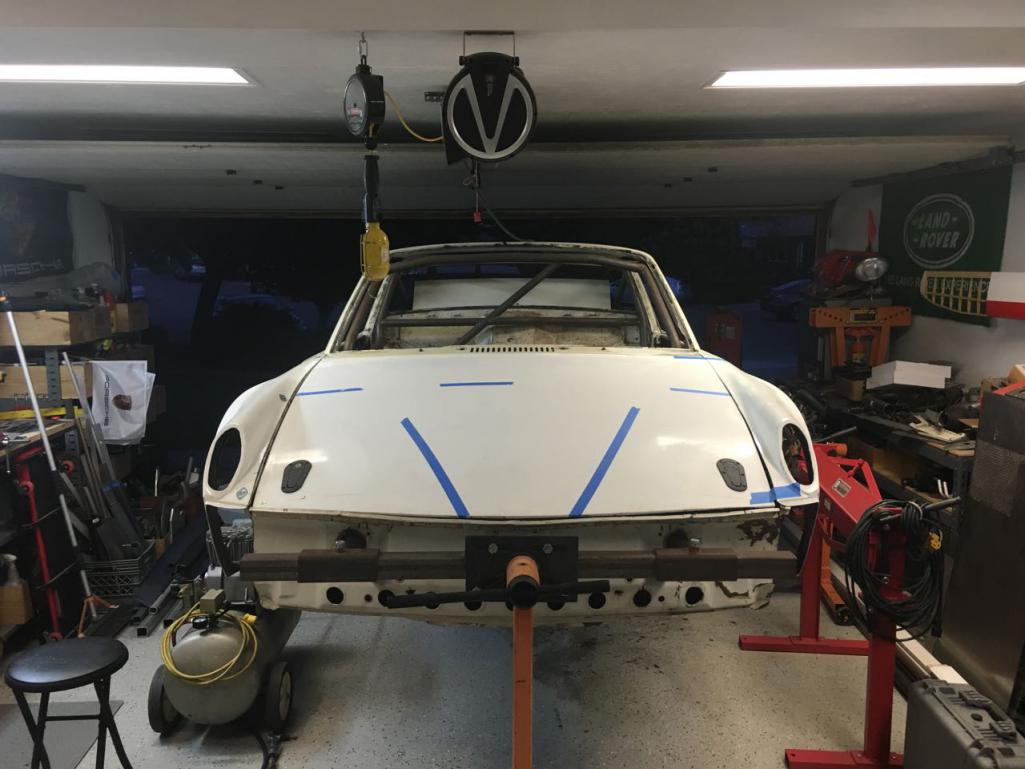 My friend Alex gave me all his parts to build the rotisserie that the 914 is on right now. He needed one to put his Z project on, and he refused to ask me to take the 914 off the stand, so we bought a whole new set of parts and built another one. The new red one is so much better than the orange one my car is on, its got probably $100 worth of casters on it, its so easy to move around. He's happy, so Im happy. 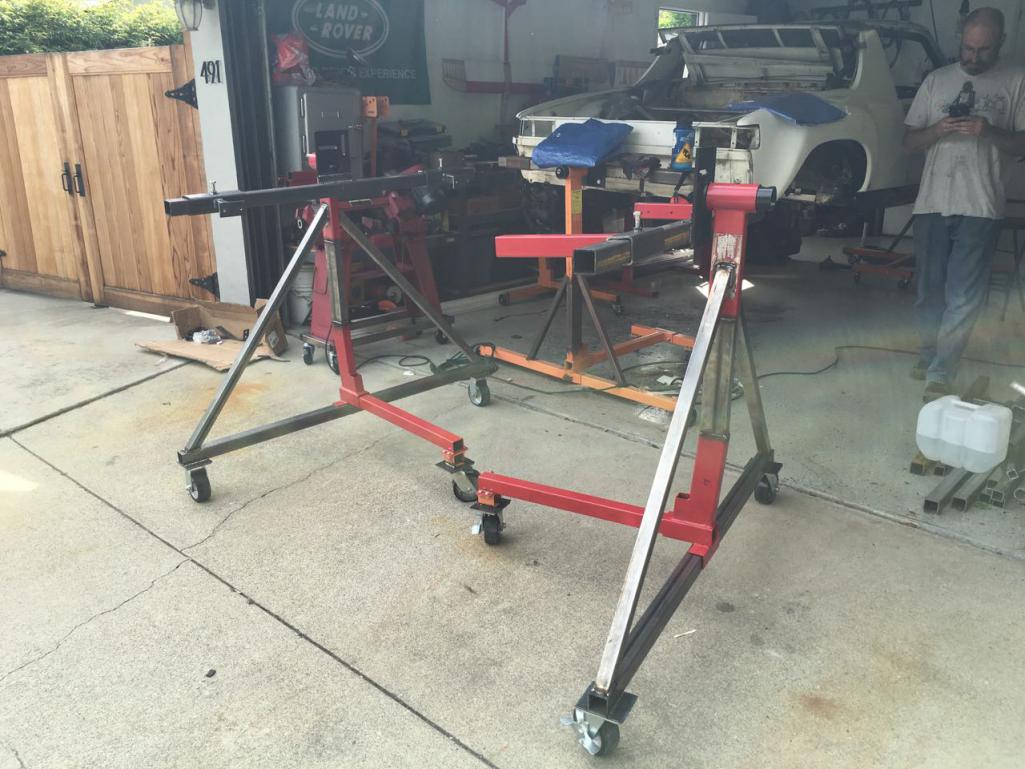 I was also able to get the passenger side body work /mostly/ done. The fender and quarter are 95% mounted up and I've started in on the drivers side. I need to take more pictures, not taking nearly enough. So yeah, next update will be all the driver-side bodywork, then I'll probably cut the hood open and route the radiator cooling out of it. I'll probably work up some aluminum shrouding, something simple to keep the water out of the tub when washing the car. It'll take some time but I think it'll be worth it. Then the rear trunk, going to use J-West mounts and the same black racing latches. Eventually tail-lights too, I plan to make my own. Ughs, bodywork takes so long... |
|
|
|
| MichiganMat |
Apr 2 2016, 04:06 PM
Post
#39
|
|
Member Group: Members Posts: 115 Joined: 14-June 06 From: San Jose, CA Member No.: 6,222 Region Association: Northern California |
Open a hole.
Close a hole. Man, that lower lip is going to need all kinds of fab work to get right. Its just mocked up for now. JWest trunk mount kit arrived today too, so trunk can be mounted up. 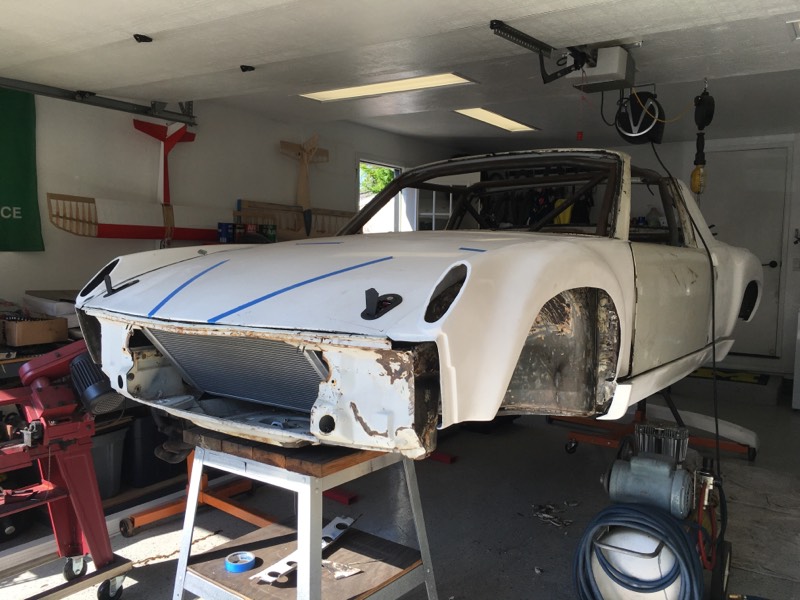 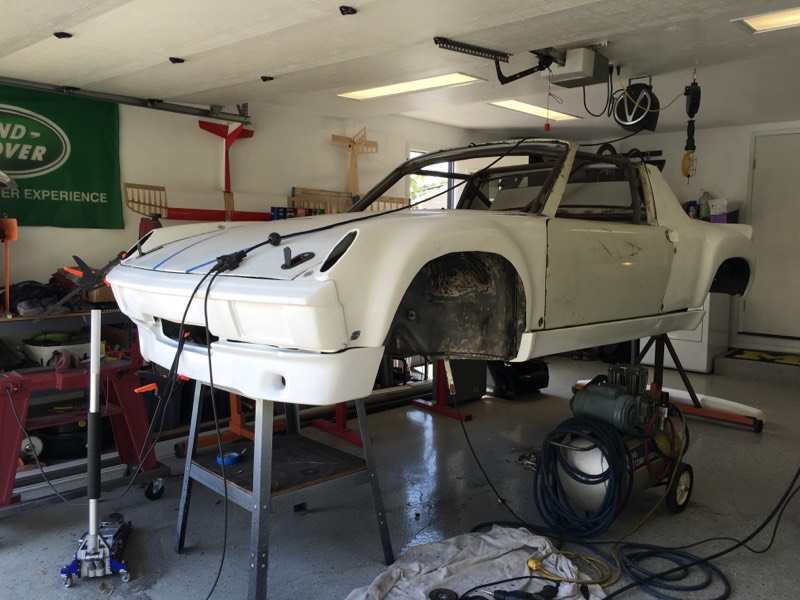 |
|
|
|
| MichiganMat |
Apr 11 2016, 10:25 PM
Post
#40
|
|
Member Group: Members Posts: 115 Joined: 14-June 06 From: San Jose, CA Member No.: 6,222 Region Association: Northern California |
Busy couple of days!
Bought a WRX fuel sender/filter/pump and modified it to work in the 914 tank. Cut and bent the lower portion downwards to fit well and pull from the lowest portion of the tank. Modified the internals of the tank, pulled out some baffles, and welded up the bottom. Installed an aluminum inner ring and then riv-nut'd that in to give support to the tank area. Bought a fuel filler neck, more on that later... Next up was the air outlet through the hood. Cut a nice big hole and fab'ed up as best I could an outlet vent. I need to work on my aluminum welding, I've done better work :/ But it'll do for now. I plan to finish it in black paint and mount externally. It'll be industrial looking, and functional. I was also able to get the front lower lip mounted, the drivers rocker, and the rear trunk hood pins all attached. Pics aren't too sexy so maybe I'll skip 'em for now. Next up: fuel filler neck install on the tank and through the hood, put the rotisserie back on the front of the car, fit and mount the rear bumper, reinforce the drivers-side dog-ear, and buy a bunch more parts, haha 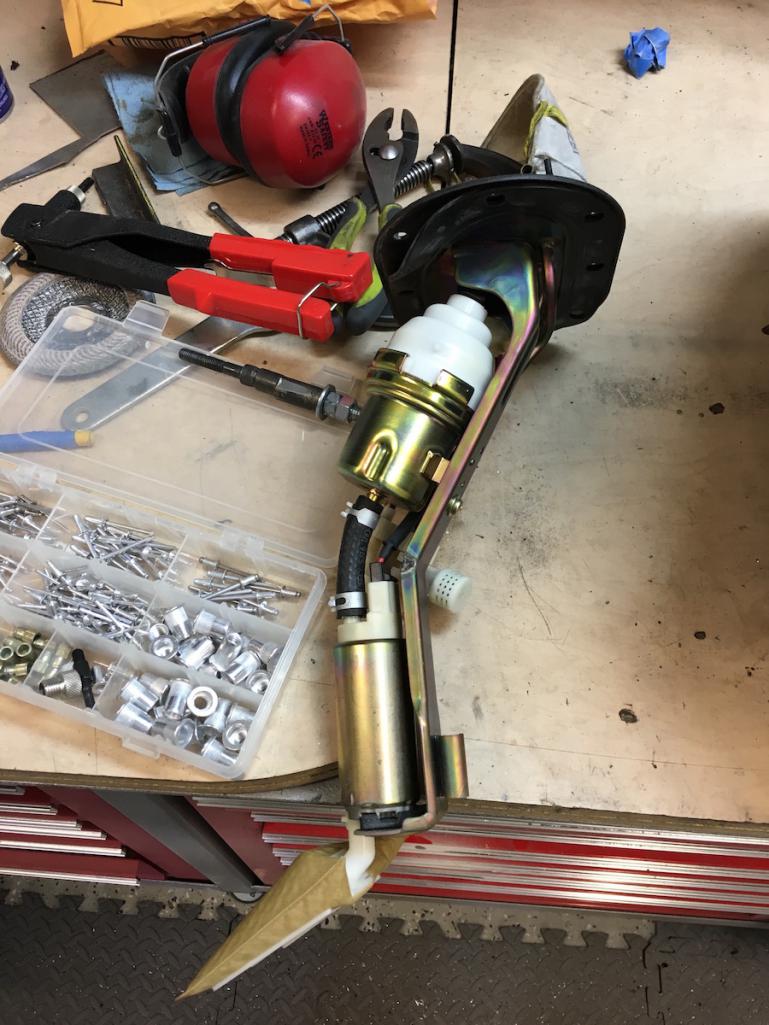 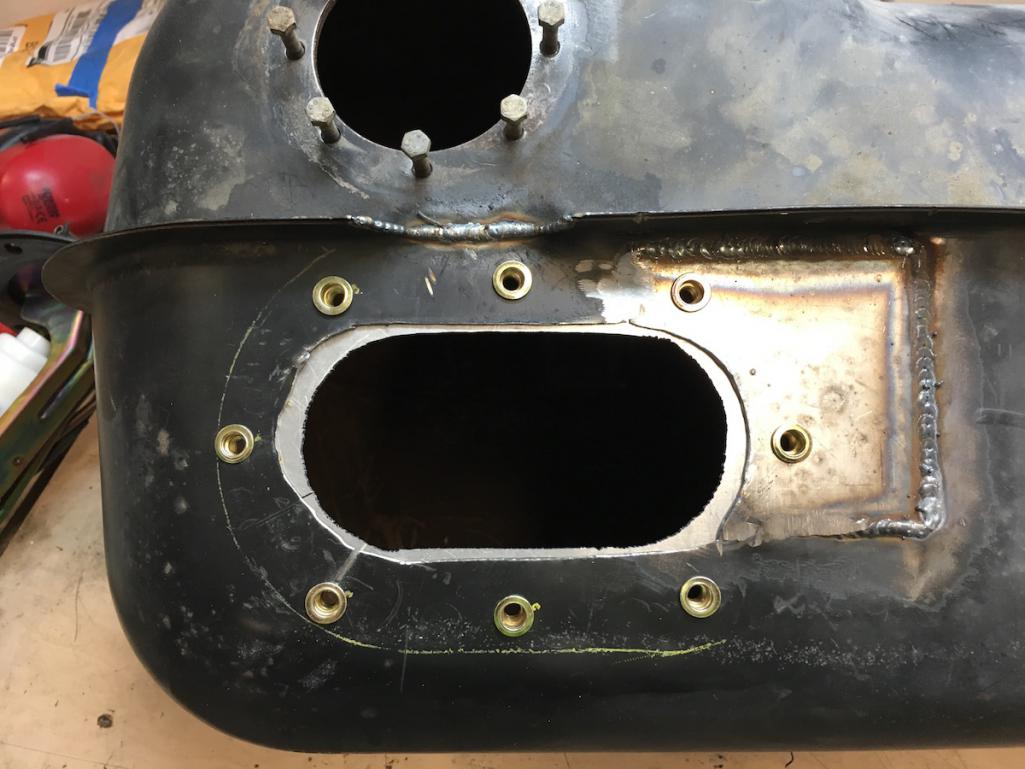 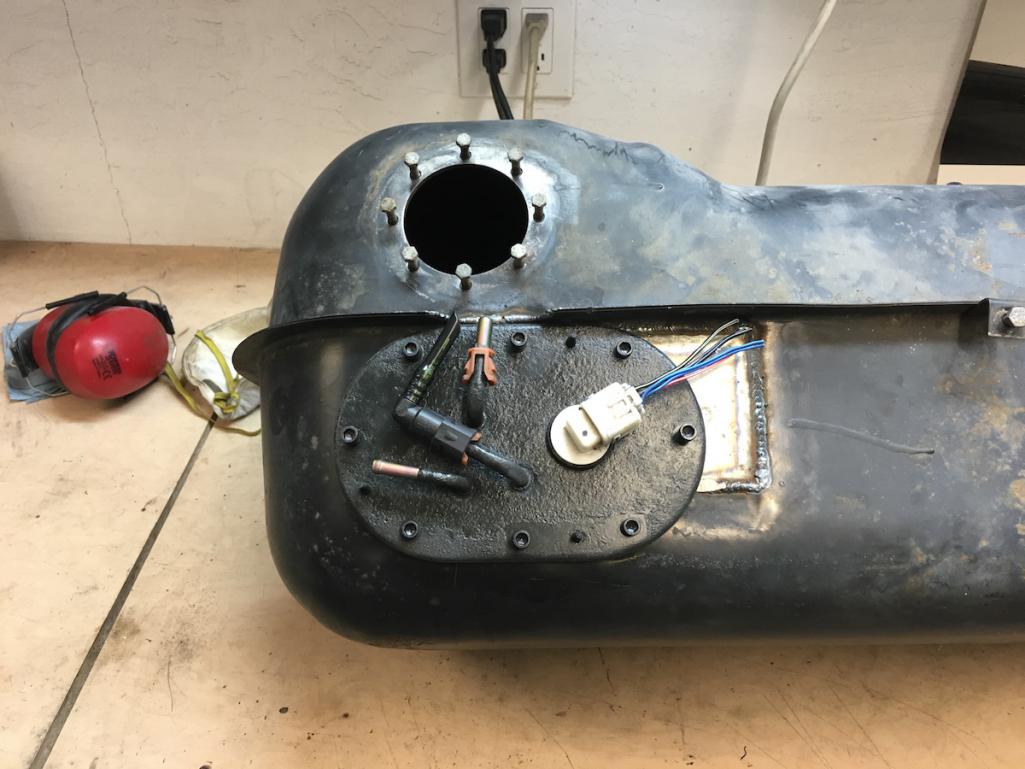 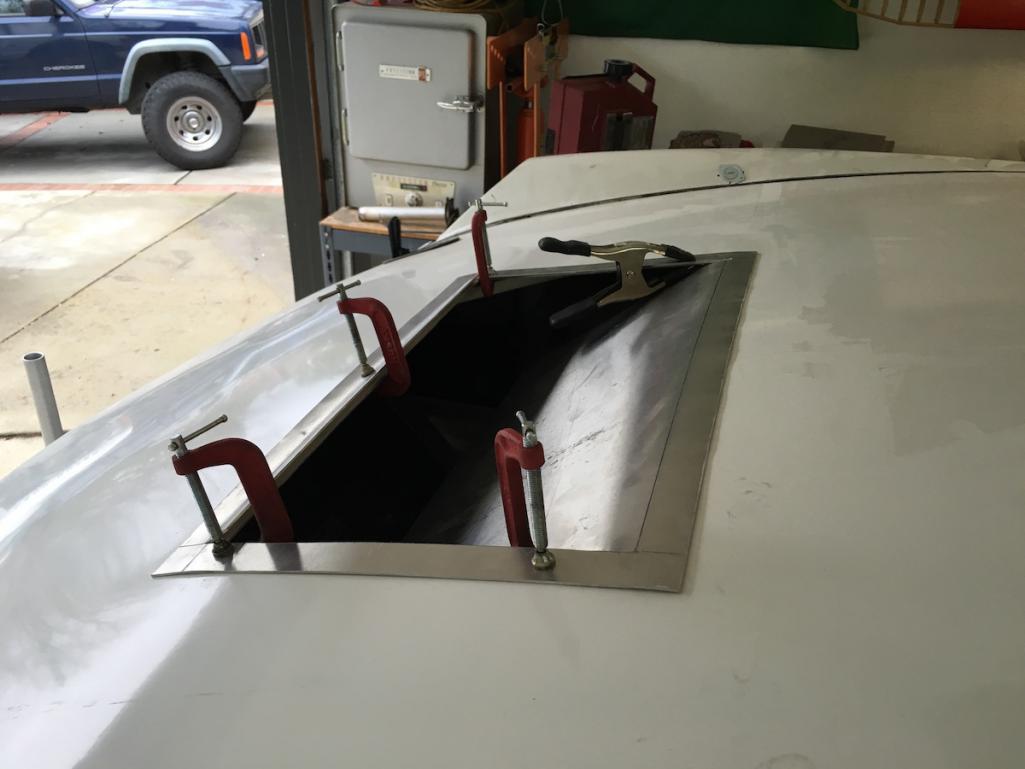 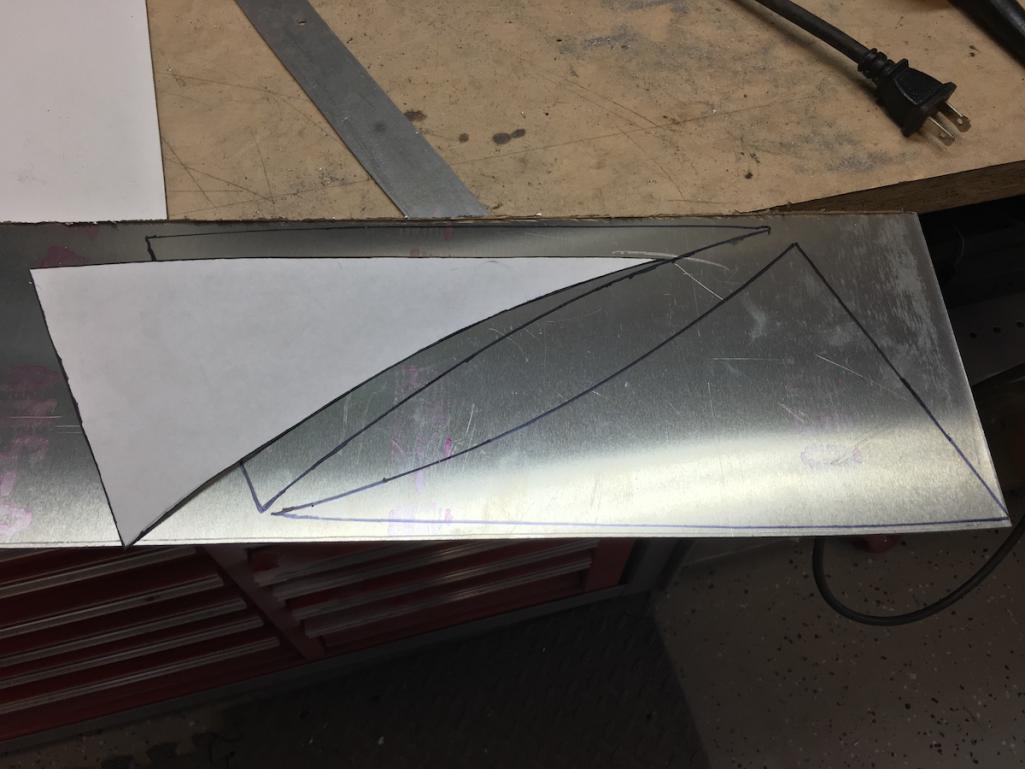 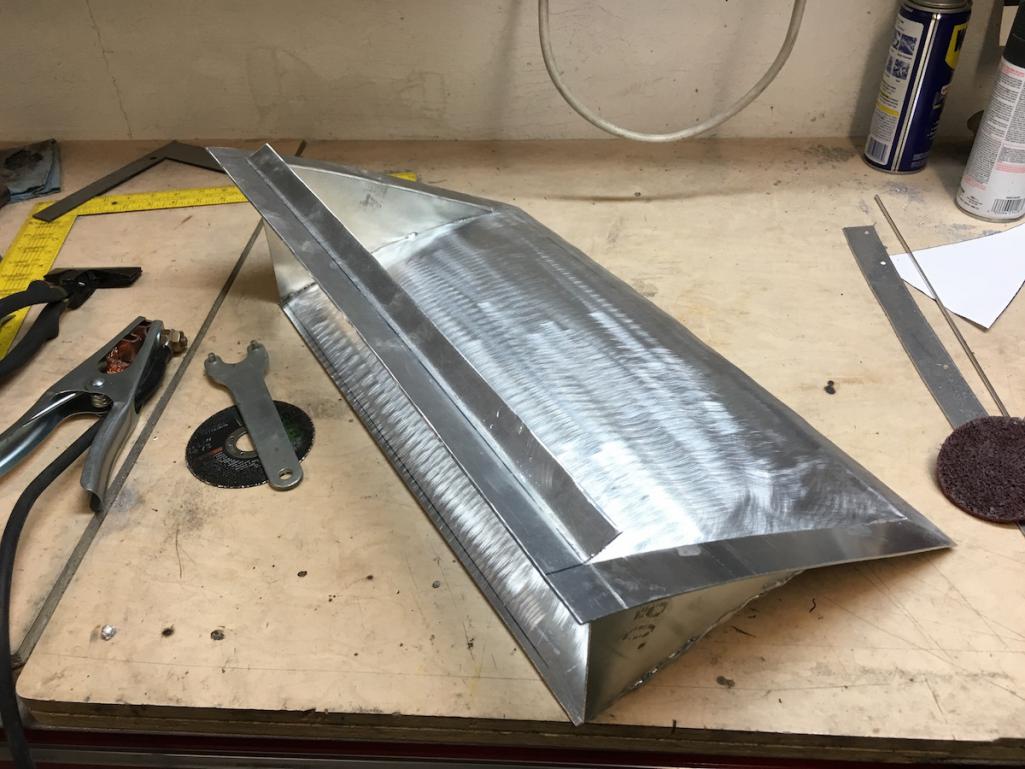 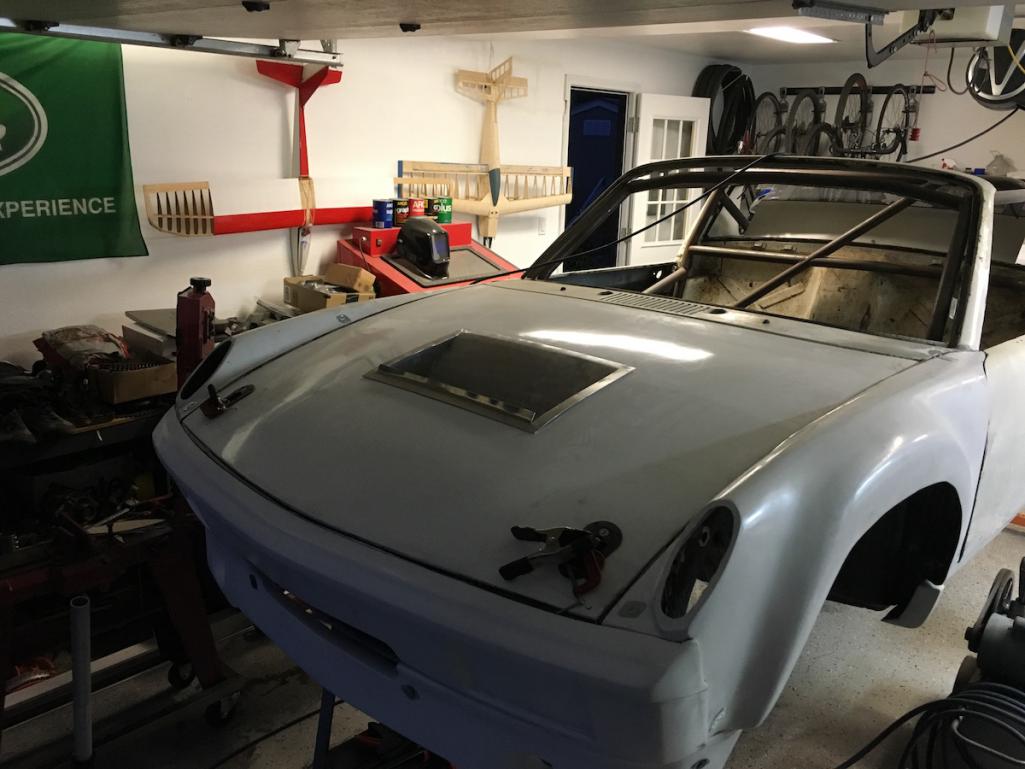 |
|
|
|
|
7 User(s) are reading this topic (7 Guests and 0 Anonymous Users)
0 Members:

|
Lo-Fi Version | Time is now: 23rd June 2026 - 01:08 PM |
Invision Power Board
v9.1.4 © 2026 IPS, Inc.