|
|
|
Porsche, and the Porsche crest are registered trademarks of Dr. Ing. h.c. F. Porsche AG.
This site is not affiliated with Porsche in any way. Its only purpose is to provide an online forum for car enthusiasts. All other trademarks are property of their respective owners. |
|
|


| MichiganMat |
 Oct 7 2015, 02:41 PM Oct 7 2015, 02:41 PM
Post
#61
|
|
Member  Group: Members Posts: 115 Joined: 14-June 06 From: San Jose, CA Member No.: 6,222 Region Association: Northern California |
Hey er'body, Im MichiganMat from San Jose and Im building a 914.
Backstory: This summer I had the pleasure of picking up a '75 914 chassis here in San Jose for a mere $300. It came with with virtually nothing: no driveline, no interior, no pedals, etc. Stripped, but solid, with minimal overhead and cost. I've been building 911s for many years now and had an extra set of wheels and 911 front struts in my shed, so I thought hey, lets do this. My brother and I are just finishing up putting an STi motor into our '67 912 too, so with that project wrapping up Im ready to jump into another. The Plan: Well, I got the car for cheap, and I've already got a perfectly good '75 911S to daily/rally/etc with, so the plan is to build a stripped down 914 racer for AX and track fun. The car will be getting: - Tangerine Racing rollcage, tied to 8pts, with nascar door-bars - Rennspeed fiberglass body (fenders f&r, hood, trunk, and both bumpers) - Mad Dog chassis reinforcement kit and hell-hole repair - Resto-Design floorpans, seat areas dropped by 2", with custom tunnel - Tilton pedals - 5 lug conversion - 16x7 Fuchs all the way around with 2nd option of 15x7ATE's with canti slicks - /likely/ wrx drivetrain, but Im exploring my options... Where sits today: I picked up the car in May and I've since then I've put it on a home-built rotisserie, cut the pans, tunnel, trunk, headlight buckets, and front fenders out of it, and fixed the hell-hole area. The pans were totally rotted, the battery tray was nonexistent, the fenders on all 4 corners had damage. Pretty easy to make the decision to start fresh, haha. Today, most of the chassis kit is installed but I can't finish it until the roll-cage is put in. Tangerine is almost done with the cage so it'll be another week or so until I see it. In the meantime, the plan is to clean up the wheel-wells, fix the rust in the longs, put in the trunk cross-sections, and primer the reinforcements. Then I'll get to work on the tunnel, mod'ing the pans, installing the fiberglass, etc. Anyways, hello, nice to meet you guys, and Im looking forward to the challenge! 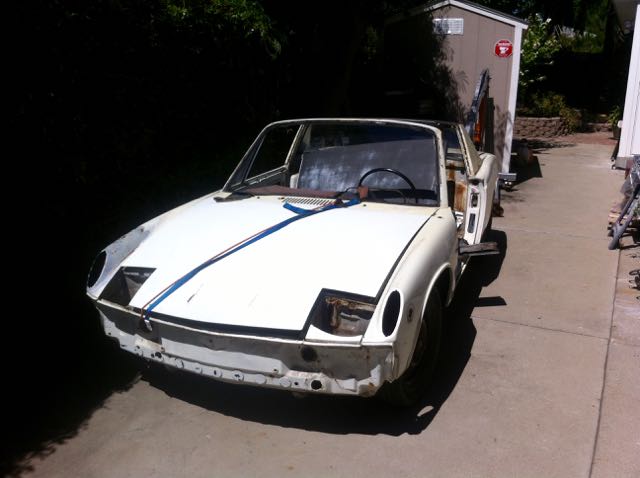 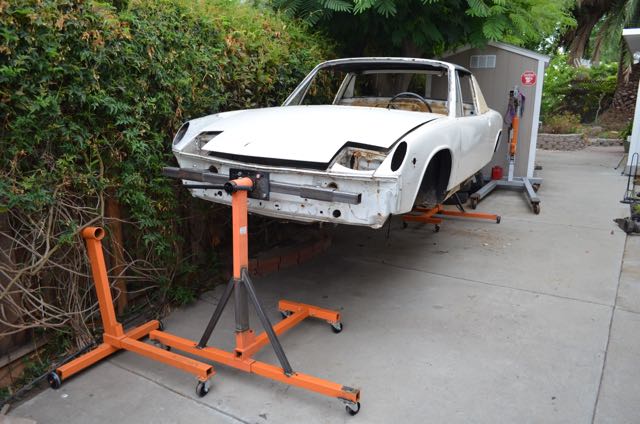 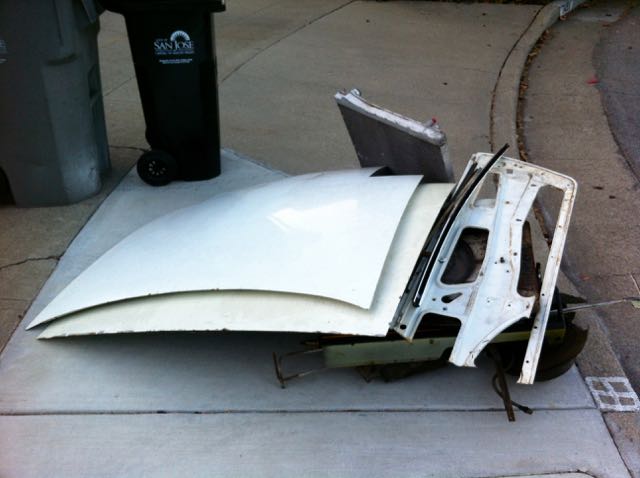 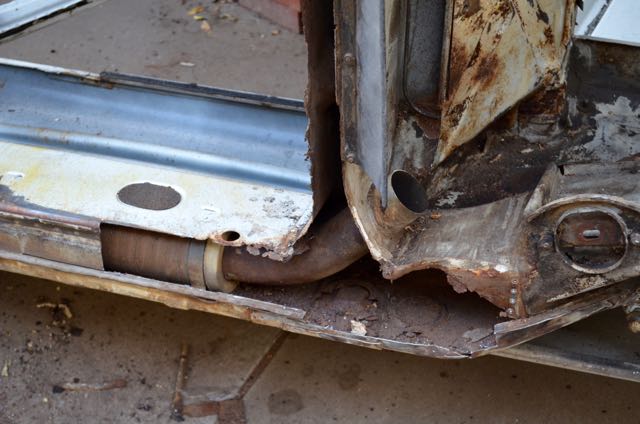 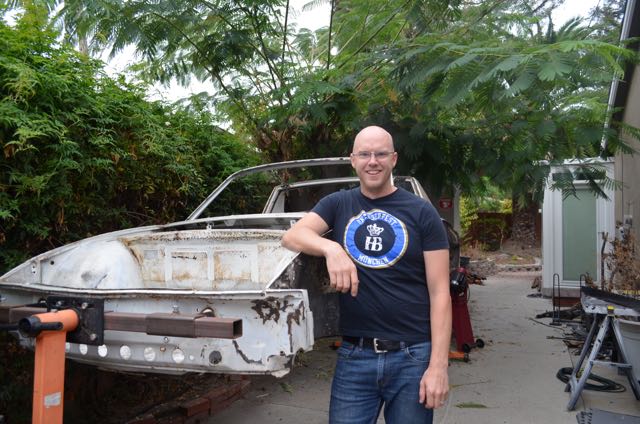 |
   |

 
|
Posts in this topic
MichiganMat BUILD-OFF CHALLENGE: MichiganMat Oct 7 2015, 02:41 PM mikedsilva awesome!
Now let's see that 912 with the ... Oct 7 2015, 03:05 PM
mikedsilva awesome!
Now let's see that 912 with the ... Oct 7 2015, 03:05 PM
 MichiganMat
awesome!
Now let's see that 912 with the... Oct 7 2015, 03:39 PM 914forme Wow :wttc:
And I would add to your list if it w... Oct 7 2015, 05:31 PM matthepcat That 912 is fuch'n awesome. I want to come see... Oct 7 2015, 05:51 PM RobW :agree:
:wttc: :wttc: :wttc: Oct 8 2015, 01:01 AM MichiganMat Made some good progress recently:
- Welded in moun... Oct 15 2015, 09:25 PM ThePaintedMan Cool build(s). I know you're still in mock-up ... Oct 15 2015, 09:41 PM MichiganMat
Cool build(s). I know you're still in mock-up... Oct 15 2015, 10:58 PM Racer Chris
Question for you: concerning the chassis kit, i... Oct 16 2015, 05:03 AM mgp4591 Looking forward to more of this build! You... Oct 22 2015, 02:47 AM 914forme Did not see it listed, what motor are you planning... Oct 22 2015, 02:55 PM MichiganMat Finally was able to get some time on the project t... Nov 2 2015, 10:41 PM Andyrew Great looking progress! Nov 2 2015, 10:59 PM 914forme Reason I asked what engine your running, if it was... Nov 3 2015, 08:39 PM Mueller Awesome progress....terrible use of the word ... Nov 3 2015, 10:47 PM MichiganMat Its been a long time since my last post, the holid... Jan 16 2016, 03:37 PM MichiganMat Brought the chassis into the garage, she's fin... Jan 26 2016, 02:49 PM 914forme Unless you tie in the roof, you are only gusseting... Jan 27 2016, 06:33 AM MichiganMat Bought the motor and trans this past week. EJ205T... Jan 31 2016, 12:33 PM MichiganMat Today I worked on dropping the drivers floor pan d... Jan 31 2016, 10:32 PM rick 918-S Like the dropped pan! Jan 31 2016, 10:43 PM MichiganMat Ok, question for you guys: how aligned should the ... Feb 2 2016, 09:03 AM siverson Neat build. I can double check, but I don't th... Feb 2 2016, 10:53 AM MichiganMat Another productive weekend!
I was able to get... Feb 8 2016, 08:54 PM MichiganMat Made a bunch more progress in the last few days:
... Feb 15 2016, 11:05 PM Andyrew Great looking progress! What are you going to ... Feb 16 2016, 12:37 AM 76-914 "The engine is looking like it was driven pre... Feb 16 2016, 09:13 AM MichiganMat The next challenge: how to plumb the radiator.
I... Feb 21 2016, 09:45 PM 914forme
The next challenge: how to plumb the radiator.
... Feb 22 2016, 12:34 PM mgp4591
[quote name='MichiganMat' post='2306177' date='Fe... Feb 22 2016, 01:19 PM 76-914 Someone on here ran 1.25" SS bent to follow t... Feb 21 2016, 10:31 PM mgp4591 Mount it at an angle in the trunk with ducting und... Feb 22 2016, 12:07 AM MichiganMat Had a couple of good nights of work lately:
- Tied... Feb 27 2016, 06:42 PM 914forme Nice progress :beer1:
Radiator the current darl... Feb 29 2016, 04:35 AM MichiganMat
Nice progress :beer1:
Radiator the current dar... Feb 29 2016, 11:34 AM 914forme I'll let the people who build a good system le... Feb 29 2016, 12:19 PM MichiganMat Bought a radiator!
The eBay Celica Gt radiator... Mar 28 2016, 09:32 PM MichiganMat Open a hole.
Close a hole.
Man, that lower lip is... Apr 2 2016, 04:06 PM MichiganMat Busy couple of days!
Bought a WRX fuel sender... Apr 11 2016, 10:25 PM tazz9924
Busy couple of days!
Bought a WRX fuel sende... Nov 18 2018, 03:40 PM MichiganMat
Late to the party but im curious if you have duct... Nov 26 2018, 03:42 PM 914forme That is looking very nice. Like the hood opening,... Apr 12 2016, 05:13 AM MichiganMat
That is looking very nice. Like the hood opening... Apr 12 2016, 09:25 AM falcor75 Be very carefull with those noname hood pins. A fr... Apr 12 2016, 06:22 AM MichiganMat I know its been a bit of radio-silence on my end, ... Jun 2 2016, 05:16 PM Mueller Neat gas tank filler mod! Jun 2 2016, 06:05 PM MichiganMat Where have I been lately?
Weeellllll.... not work... Aug 10 2016, 08:39 AM MichiganMat Picked the suspension pieces from the powder-coate... Aug 11 2016, 08:21 AM MichiganMat Some good progress lately, chassis is ready to go ... Sep 13 2016, 08:49 AM MichiganMat Well, the Build-Off Challenge is over but work con... Sep 27 2016, 10:59 AM trojanhorsepower Looks good! Sep 27 2016, 03:25 PM MichiganMat So, I ordered the wrong color paint from TCPGlobal... Oct 9 2016, 10:12 AM altitude411 I like it! Nice work!
How was it loading... Oct 9 2016, 10:50 AM MichiganMat
I like it! Nice work!
How was it loadin... Oct 9 2016, 01:05 PM MichiganMat Sometimes you just have to say "screw it... Oct 24 2016, 10:47 AM matthepcat Will be worth the risk in the end for the learning... Oct 25 2016, 12:39 AM mgp4591 I love the Wimbledon White - I'm looking at do... Oct 25 2016, 01:24 AM MichiganMat Put some paint on the 914 chassis:
- front trunk
-... Nov 7 2016, 01:03 PM Andyrew Paint looks good!!! Always happy with ... Nov 7 2016, 01:24 PM trojanhorsepower Hi Matt, looks good!
Did you burn the bushings... Nov 7 2016, 08:04 PM Curbandgutter Love what you did to your lower firewall. Good Jo... Nov 8 2016, 03:12 PM MichiganMat Big update: Wiring.
About a month ago I was able... Dec 23 2016, 10:59 PM 76-914 If you need an excuse to drink, this is it. Good j... Dec 24 2016, 10:23 AM MichiganMat Mounted all the wiring to an aluminum panel which ... Dec 24 2016, 04:30 PM MichiganMat BIG NEWS: The car is on the ground.
Im trying to... Mar 19 2017, 10:27 PM Dion Seeing 914Dave's harness out of the car and ju... Mar 20 2017, 05:27 AM Chris H. Wow that thing looks GREAT!!!! Ni... Mar 20 2017, 08:23 PM MichiganMat Had a busy weekend with the 914.
Built the engine+... Mar 27 2017, 03:57 PM tygaboy That's looking great! Curious about the cu... Mar 27 2017, 04:41 PM MichiganMat
That's looking great! Curious about the c... Mar 27 2017, 07:29 PM MichiganMat Mocked up the location of the IC, yanked the drive... Mar 28 2017, 01:15 AM MichiganMat Its been a busy couple of months since my last upd... Aug 14 2017, 09:38 PM mgp4591 Those are some serious LEDs.... are you gonna blin... Aug 15 2017, 02:16 AM MichiganMat First start!
0sIbpQJs0ck
But she is smokey:
... Dec 17 2017, 10:48 PM MichiganMat Painting the doors took forever, but I finally got... Dec 17 2017, 10:53 PM Mueller Congrats on the firing up the engine...sounds grea... Dec 17 2017, 11:50 PM Amenson Congratulations! Sounds rowdy, ready to party... Dec 18 2017, 07:53 AM Cairo94507 Jesus - that engine sounds beautiful. :beer2: Dec 18 2017, 07:55 AM matthepcat I would love to come see your car, and live in San... Dec 18 2017, 11:32 AM MichiganMat Time for an update!
Been busy with a few thin... Apr 12 2018, 02:07 PM Mueller Cool adapter you are building for the communicatio... Apr 12 2018, 04:30 PM MichiganMat Video updates of the SSM-to-CAN Arduino project... May 8 2018, 02:15 PM MichiganMat Made a few changes recently:
• Added a front to... Aug 27 2018, 03:03 PM Mueller Cars looking great.
What advantage does the racec... Aug 27 2018, 04:28 PM MichiganMat
Cars looking great.
What advantage does the race... Aug 27 2018, 08:21 PM MichiganMat It lives.
First track day for the car is in the b... Nov 18 2018, 12:01 AM ConeDodger P
It lives.
First track day for the car is in the... Nov 18 2018, 09:11 AM raynekat Car looks and sounds great.
Yeah, get that handlin... Nov 18 2018, 12:34 AM MichiganMat Heres a pic of the car in the paddock @ Sonoma. S... Nov 18 2018, 08:53 AM 914forme Great to see the car get out on the track, that is... Nov 18 2018, 09:50 AM MichiganMat • Rear: 250lb Swift springs over new Bilstein s... Nov 18 2018, 11:27 AM 914forme :WTF: Add a front sway bar NOW!!!... Nov 18 2018, 02:00 PM MichiganMat
:WTF: Add a front sway bar NOW!!!... Nov 18 2018, 02:03 PM mepstein
:WTF: Add a front sway bar NOW!!!... Nov 18 2018, 02:11 PM 914forme I missed the lowered car part, it is fine to lower... Nov 18 2018, 02:14 PM 914forme I think your close on the spring rates.
Stock wit... Nov 18 2018, 02:23 PM FourBlades Great project, love the look of the car. :Qarl:
... Nov 22 2018, 01:33 PM Andyrew Your setup sounds exactly like mine and your exper... Nov 26 2018, 09:00 AM MichiganMat
Your setup sounds exactly like mine and your expe... Nov 26 2018, 03:45 PM
MichiganMat
awesome!
Now let's see that 912 with the... Oct 7 2015, 03:39 PM 914forme Wow :wttc:
And I would add to your list if it w... Oct 7 2015, 05:31 PM matthepcat That 912 is fuch'n awesome. I want to come see... Oct 7 2015, 05:51 PM RobW :agree:
:wttc: :wttc: :wttc: Oct 8 2015, 01:01 AM MichiganMat Made some good progress recently:
- Welded in moun... Oct 15 2015, 09:25 PM ThePaintedMan Cool build(s). I know you're still in mock-up ... Oct 15 2015, 09:41 PM MichiganMat
Cool build(s). I know you're still in mock-up... Oct 15 2015, 10:58 PM Racer Chris
Question for you: concerning the chassis kit, i... Oct 16 2015, 05:03 AM mgp4591 Looking forward to more of this build! You... Oct 22 2015, 02:47 AM 914forme Did not see it listed, what motor are you planning... Oct 22 2015, 02:55 PM MichiganMat Finally was able to get some time on the project t... Nov 2 2015, 10:41 PM Andyrew Great looking progress! Nov 2 2015, 10:59 PM 914forme Reason I asked what engine your running, if it was... Nov 3 2015, 08:39 PM Mueller Awesome progress....terrible use of the word ... Nov 3 2015, 10:47 PM MichiganMat Its been a long time since my last post, the holid... Jan 16 2016, 03:37 PM MichiganMat Brought the chassis into the garage, she's fin... Jan 26 2016, 02:49 PM 914forme Unless you tie in the roof, you are only gusseting... Jan 27 2016, 06:33 AM MichiganMat Bought the motor and trans this past week. EJ205T... Jan 31 2016, 12:33 PM MichiganMat Today I worked on dropping the drivers floor pan d... Jan 31 2016, 10:32 PM rick 918-S Like the dropped pan! Jan 31 2016, 10:43 PM MichiganMat Ok, question for you guys: how aligned should the ... Feb 2 2016, 09:03 AM siverson Neat build. I can double check, but I don't th... Feb 2 2016, 10:53 AM MichiganMat Another productive weekend!
I was able to get... Feb 8 2016, 08:54 PM MichiganMat Made a bunch more progress in the last few days:
... Feb 15 2016, 11:05 PM Andyrew Great looking progress! What are you going to ... Feb 16 2016, 12:37 AM 76-914 "The engine is looking like it was driven pre... Feb 16 2016, 09:13 AM MichiganMat The next challenge: how to plumb the radiator.
I... Feb 21 2016, 09:45 PM 914forme
The next challenge: how to plumb the radiator.
... Feb 22 2016, 12:34 PM mgp4591
[quote name='MichiganMat' post='2306177' date='Fe... Feb 22 2016, 01:19 PM 76-914 Someone on here ran 1.25" SS bent to follow t... Feb 21 2016, 10:31 PM mgp4591 Mount it at an angle in the trunk with ducting und... Feb 22 2016, 12:07 AM MichiganMat Had a couple of good nights of work lately:
- Tied... Feb 27 2016, 06:42 PM 914forme Nice progress :beer1:
Radiator the current darl... Feb 29 2016, 04:35 AM MichiganMat
Nice progress :beer1:
Radiator the current dar... Feb 29 2016, 11:34 AM 914forme I'll let the people who build a good system le... Feb 29 2016, 12:19 PM MichiganMat Bought a radiator!
The eBay Celica Gt radiator... Mar 28 2016, 09:32 PM MichiganMat Open a hole.
Close a hole.
Man, that lower lip is... Apr 2 2016, 04:06 PM MichiganMat Busy couple of days!
Bought a WRX fuel sender... Apr 11 2016, 10:25 PM tazz9924
Busy couple of days!
Bought a WRX fuel sende... Nov 18 2018, 03:40 PM MichiganMat
Late to the party but im curious if you have duct... Nov 26 2018, 03:42 PM 914forme That is looking very nice. Like the hood opening,... Apr 12 2016, 05:13 AM MichiganMat
That is looking very nice. Like the hood opening... Apr 12 2016, 09:25 AM falcor75 Be very carefull with those noname hood pins. A fr... Apr 12 2016, 06:22 AM MichiganMat I know its been a bit of radio-silence on my end, ... Jun 2 2016, 05:16 PM Mueller Neat gas tank filler mod! Jun 2 2016, 06:05 PM MichiganMat Where have I been lately?
Weeellllll.... not work... Aug 10 2016, 08:39 AM MichiganMat Picked the suspension pieces from the powder-coate... Aug 11 2016, 08:21 AM MichiganMat Some good progress lately, chassis is ready to go ... Sep 13 2016, 08:49 AM MichiganMat Well, the Build-Off Challenge is over but work con... Sep 27 2016, 10:59 AM trojanhorsepower Looks good! Sep 27 2016, 03:25 PM MichiganMat So, I ordered the wrong color paint from TCPGlobal... Oct 9 2016, 10:12 AM altitude411 I like it! Nice work!
How was it loading... Oct 9 2016, 10:50 AM MichiganMat
I like it! Nice work!
How was it loadin... Oct 9 2016, 01:05 PM MichiganMat Sometimes you just have to say "screw it... Oct 24 2016, 10:47 AM matthepcat Will be worth the risk in the end for the learning... Oct 25 2016, 12:39 AM mgp4591 I love the Wimbledon White - I'm looking at do... Oct 25 2016, 01:24 AM MichiganMat Put some paint on the 914 chassis:
- front trunk
-... Nov 7 2016, 01:03 PM Andyrew Paint looks good!!! Always happy with ... Nov 7 2016, 01:24 PM trojanhorsepower Hi Matt, looks good!
Did you burn the bushings... Nov 7 2016, 08:04 PM Curbandgutter Love what you did to your lower firewall. Good Jo... Nov 8 2016, 03:12 PM MichiganMat Big update: Wiring.
About a month ago I was able... Dec 23 2016, 10:59 PM 76-914 If you need an excuse to drink, this is it. Good j... Dec 24 2016, 10:23 AM MichiganMat Mounted all the wiring to an aluminum panel which ... Dec 24 2016, 04:30 PM MichiganMat BIG NEWS: The car is on the ground.
Im trying to... Mar 19 2017, 10:27 PM Dion Seeing 914Dave's harness out of the car and ju... Mar 20 2017, 05:27 AM Chris H. Wow that thing looks GREAT!!!! Ni... Mar 20 2017, 08:23 PM MichiganMat Had a busy weekend with the 914.
Built the engine+... Mar 27 2017, 03:57 PM tygaboy That's looking great! Curious about the cu... Mar 27 2017, 04:41 PM MichiganMat
That's looking great! Curious about the c... Mar 27 2017, 07:29 PM MichiganMat Mocked up the location of the IC, yanked the drive... Mar 28 2017, 01:15 AM MichiganMat Its been a busy couple of months since my last upd... Aug 14 2017, 09:38 PM mgp4591 Those are some serious LEDs.... are you gonna blin... Aug 15 2017, 02:16 AM MichiganMat First start!
0sIbpQJs0ck
But she is smokey:
... Dec 17 2017, 10:48 PM MichiganMat Painting the doors took forever, but I finally got... Dec 17 2017, 10:53 PM Mueller Congrats on the firing up the engine...sounds grea... Dec 17 2017, 11:50 PM Amenson Congratulations! Sounds rowdy, ready to party... Dec 18 2017, 07:53 AM Cairo94507 Jesus - that engine sounds beautiful. :beer2: Dec 18 2017, 07:55 AM matthepcat I would love to come see your car, and live in San... Dec 18 2017, 11:32 AM MichiganMat Time for an update!
Been busy with a few thin... Apr 12 2018, 02:07 PM Mueller Cool adapter you are building for the communicatio... Apr 12 2018, 04:30 PM MichiganMat Video updates of the SSM-to-CAN Arduino project... May 8 2018, 02:15 PM MichiganMat Made a few changes recently:
• Added a front to... Aug 27 2018, 03:03 PM Mueller Cars looking great.
What advantage does the racec... Aug 27 2018, 04:28 PM MichiganMat
Cars looking great.
What advantage does the race... Aug 27 2018, 08:21 PM MichiganMat It lives.
First track day for the car is in the b... Nov 18 2018, 12:01 AM ConeDodger P
It lives.
First track day for the car is in the... Nov 18 2018, 09:11 AM raynekat Car looks and sounds great.
Yeah, get that handlin... Nov 18 2018, 12:34 AM MichiganMat Heres a pic of the car in the paddock @ Sonoma. S... Nov 18 2018, 08:53 AM 914forme Great to see the car get out on the track, that is... Nov 18 2018, 09:50 AM MichiganMat • Rear: 250lb Swift springs over new Bilstein s... Nov 18 2018, 11:27 AM 914forme :WTF: Add a front sway bar NOW!!!... Nov 18 2018, 02:00 PM MichiganMat
:WTF: Add a front sway bar NOW!!!... Nov 18 2018, 02:03 PM mepstein
:WTF: Add a front sway bar NOW!!!... Nov 18 2018, 02:11 PM 914forme I missed the lowered car part, it is fine to lower... Nov 18 2018, 02:14 PM 914forme I think your close on the spring rates.
Stock wit... Nov 18 2018, 02:23 PM FourBlades Great project, love the look of the car. :Qarl:
... Nov 22 2018, 01:33 PM Andyrew Your setup sounds exactly like mine and your exper... Nov 26 2018, 09:00 AM MichiganMat
Your setup sounds exactly like mine and your expe... Nov 26 2018, 03:45 PM  |
7 User(s) are reading this topic (7 Guests and 0 Anonymous Users)
0 Members:

|
Lo-Fi Version | Time is now: 23rd June 2026 - 01:07 PM |
Invision Power Board
v9.1.4 © 2026 IPS, Inc.