|
|
|
Porsche, and the Porsche crest are registered trademarks of Dr. Ing. h.c. F. Porsche AG.
This site is not affiliated with Porsche in any way. Its only purpose is to provide an online forum for car enthusiasts. All other trademarks are property of their respective owners. |
|
|


| Luke M |
 Oct 23 2015, 12:26 PM Oct 23 2015, 12:26 PM
Post
#101
|
|
Senior Member  Group: Members Posts: 1,504 Joined: 8-February 05 From: WNY Member No.: 3,574 Region Association: North East States |
Well it's gotten to be that time finally. I've been collecting parts to do the repair on my 914-6 and now the work starts. The main issue is the hell hole/inner engine long, inner pass long, pass inner rocker panels are rusted out. The last part I was trying to source seams to be NLA. I sourced most of the parts from the good guys at Restoration Design. I received my order today for the last batch of things. Based on a few threads that I've looked over the outer shell to the inner engine long is currently not being made by RD. A few guys have made their own which looks like a real pain in the rear to do. I laid out all the new metal to see how things lined up. By the looks of things it will need some fine tuning to mate things properly. Before I start cutting into the chassis I'll build a few braces to keep things true.
Time for the pics... Attached image(s)  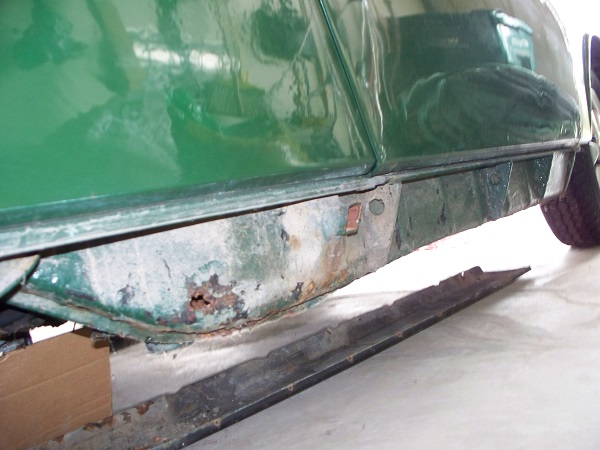 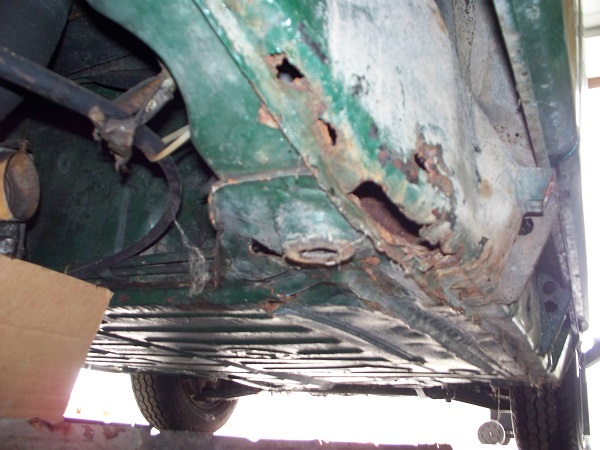 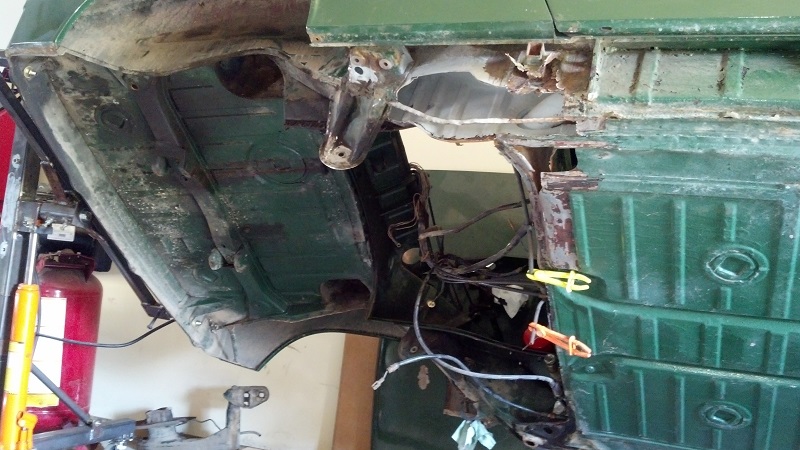 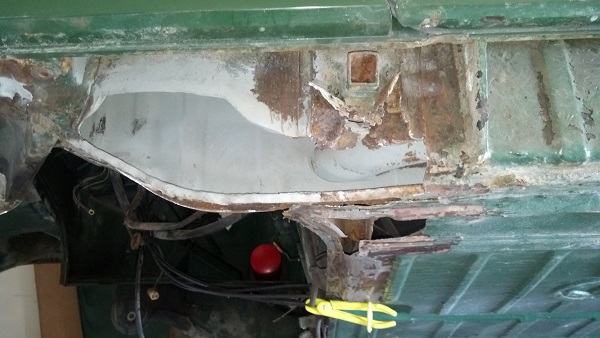  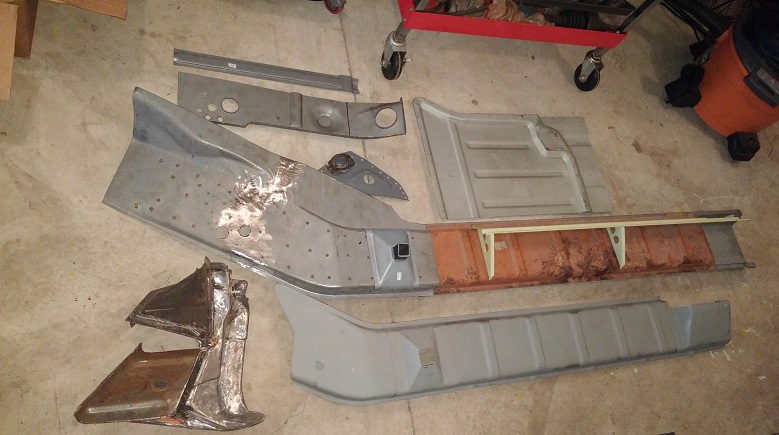 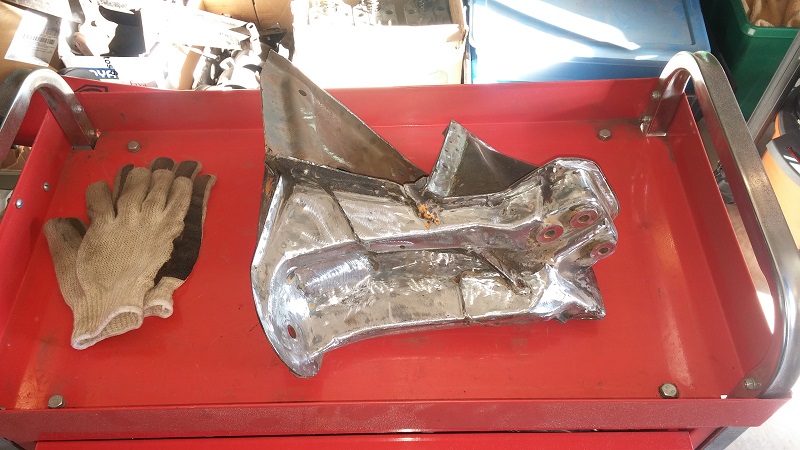 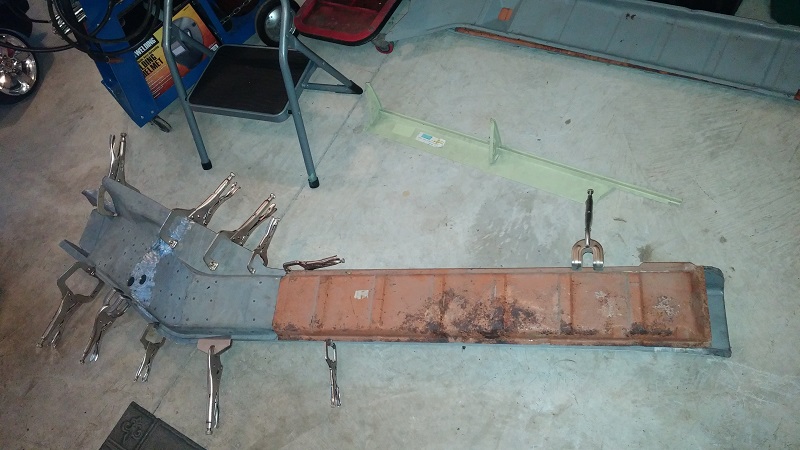 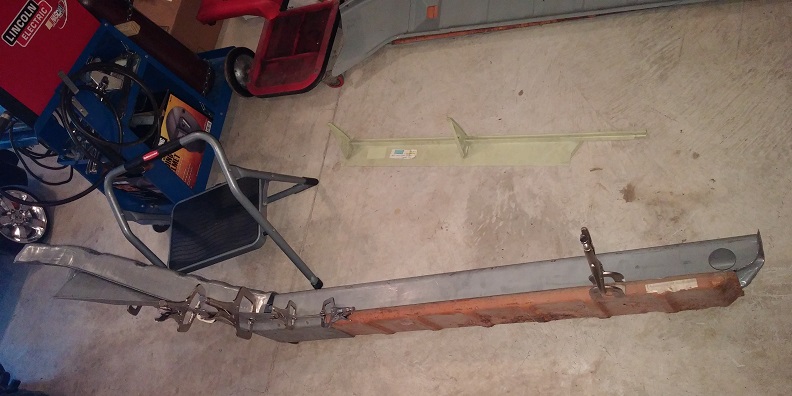 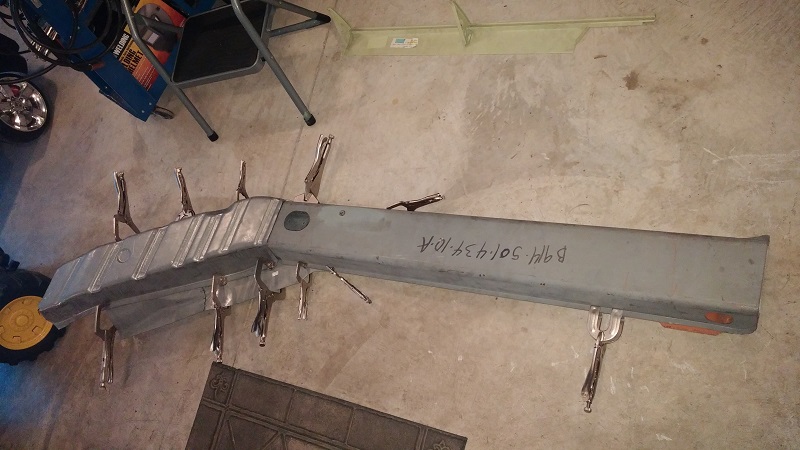 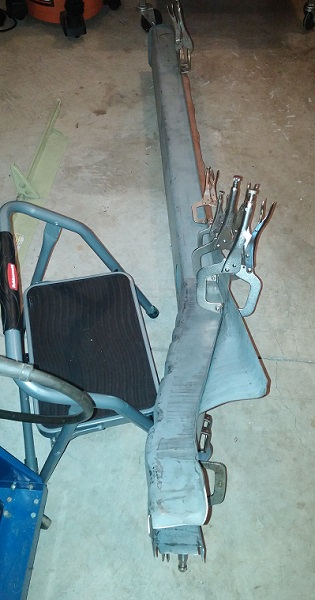 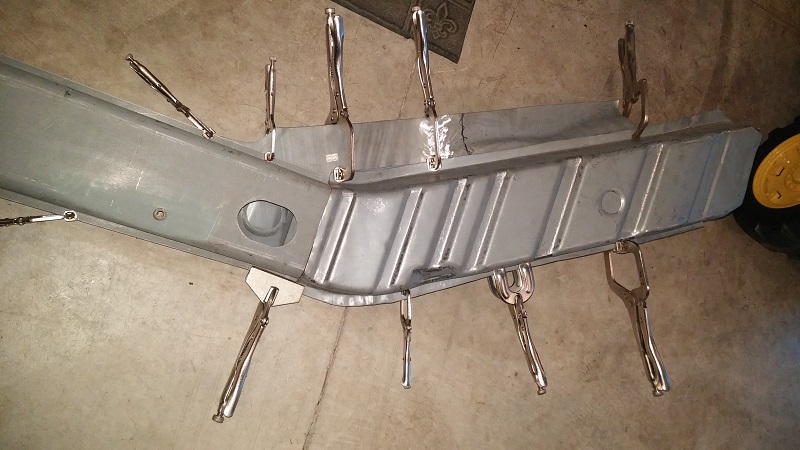 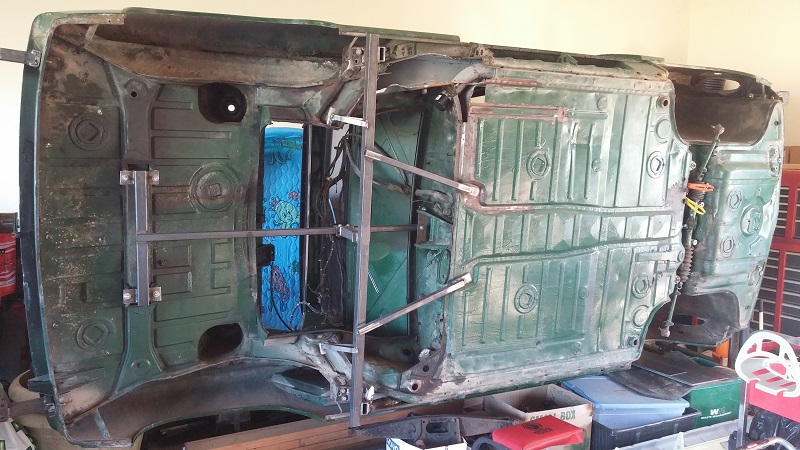 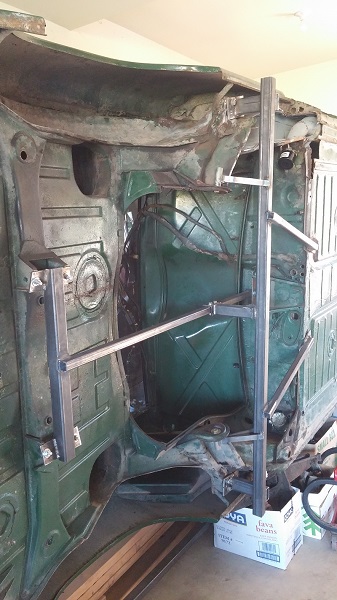 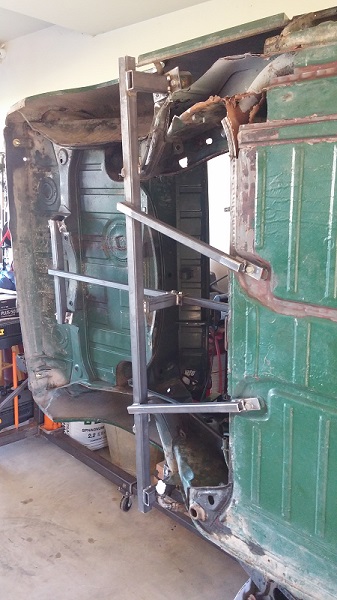
|
   |

 
|
Posts in this topic
Luke M Just another Factory 6 being fixed up Oct 23 2015, 12:26 PM stevegm :headbanger: :popcorn: Oct 23 2015, 02:14 PM wndsnd Is that the car that Kirk sold? Oct 23 2015, 02:20 PM
 Luke M
Is that the car that Kirk sold?
Nope.. I've... Oct 23 2015, 03:20 PM Mueller Good luck...I hope mine isn't as bad once I st... Oct 23 2015, 02:36 PM Cairo94507 Excellent. It looks like you have matters well in... Oct 23 2015, 03:05 PM wndsnd Big project for sure, but the fact that it is on a... Oct 23 2015, 03:31 PM rick 918-S Nice. :popcorn: Oct 23 2015, 03:41 PM Kansas 914 Worth saving for sure.
:popcorn: Oct 23 2015, 03:53 PM Krieger Yea! Oct 23 2015, 05:10 PM Luke M Well after nearly three years of searching for a N... Feb 20 2018, 11:12 AM bbrock Yeah Man! :headbanger: A lot of work, but als... Feb 20 2018, 11:32 AM rgalla9146 Hey Luke
Excellent !
Now's the t... Feb 20 2018, 02:37 PM Luke M
Hey Luke
Excellent !
Now's the ... Feb 20 2018, 07:17 PM bigkensteele Why did you decide not to use everything you piece... Feb 20 2018, 05:30 PM Luke M
Why did you decide not to use everything you piec... Feb 20 2018, 07:16 PM Luke M Look what showed up today... :Qarl:
I'll be ... Feb 21 2018, 12:29 PM rhodyguy WOW! Platinum. Feb 21 2018, 12:37 PM mepstein :beer2: Feb 21 2018, 12:38 PM David Billo Wow, did that come all welded together like that a... Feb 21 2018, 04:34 PM Luke M
Wow, did that come all welded together like that ... Feb 21 2018, 07:22 PM bbrock That's awesome! :beer1: I'm trying not... Feb 21 2018, 06:21 PM Luke M Fabricating the interior brace which is now done. ... Jul 14 2018, 05:38 PM rgalla9146 Great work !
Good to see progress.
P... Jul 15 2018, 06:24 PM Luke M Started to check the door gaps and adjusting them.... Jul 16 2018, 11:33 AM rgalla9146
Started to check the door gaps and adjusting them... Jul 24 2018, 02:56 PM mb911 I will have to tackle this shortly. I am not sure... Jul 16 2018, 03:23 PM Superhawk996
I will have to tackle this shortly. I am not sur... Nov 24 2019, 09:46 AM Luke M I got started on the lower bracing and found a lit... Jul 23 2018, 01:44 PM Perry Kiehl I've seen a lot of cars where the front door g... Jul 24 2018, 03:27 PM rgalla9146
I've seen a lot of cars where the front door ... Jul 24 2018, 09:04 PM Luke M
I've seen a lot of cars where the front door... Jul 25 2018, 09:32 AM ottox914 That looks like a ton of work, but the right work ... Jul 24 2018, 09:09 PM Luke M Getting there... drivers side is now done.
I nee... Aug 2 2018, 03:29 PM Luke M Well it has been awhile since I updated this..
Ch... Sep 29 2019, 08:59 AM raynekat
Kroon wire harness co. sent me an email that my n... May 19 2020, 09:01 PM sixnotfour Great buy on the Perry Black Hawk... :sawzall: :w... Sep 29 2019, 10:53 AM ClayPerrine Looking at this thread has me in Awe. I can do en... Sep 30 2019, 06:30 AM Cairo94507 Just incredible skills. :beer2: Sep 30 2019, 06:50 AM Luke M Finally got the bench under the 6. This weekend we... Nov 21 2019, 07:58 AM Cairo94507 :beer2: :popcorn: Nov 21 2019, 08:22 AM rgalla9146 Holy Cow !
I think this car will be very s... Nov 21 2019, 04:45 PM Luke M
Holy Cow !
I think this car will be very ... Nov 22 2019, 12:51 PM IronHillRestorations :Qarl: :Qarl: :first: :Qarl: :Qarl: Nov 22 2019, 08:35 AM Jamie It never ceases to amaze me seeing the skills and ... Nov 22 2019, 02:36 PM Tdskip Fantastic - thanks for all of the updates. Nov 24 2019, 08:00 AM mb911 I have seen allot of cars with welded edges.. Nov 24 2019, 10:18 AM Luke M Got all the fixtures attached between the chassis ... Dec 5 2019, 12:43 PM Cairo94507 That, in and of itself, is impressive. :beer2: Dec 5 2019, 02:07 PM Luke M With this covid thing going around it has set my p... Apr 26 2020, 04:22 PM porschetub Top overhaul or full build ?,will be a quick car w... Apr 26 2020, 05:04 PM Luke M
Top overhaul or full build ?,will be a quick car ... Apr 26 2020, 05:45 PM Luke M Started the tear down on the 3.2. I'm gonna re... May 1 2020, 09:16 AM Mark Henry For the Supertec head studs you'll need a thre... May 1 2020, 10:49 AM mepstein I removed studs from about 25 engine cases when I ... May 1 2020, 11:31 AM Luke M Got the head studs all off without any issues..
G... May 2 2020, 02:47 PM Cairo94507 Luke - I am loving that transaxle :wub: May 2 2020, 04:26 PM rgalla9146 Looking good Luke
Make hay while the sun shine... May 2 2020, 06:58 PM Luke M I split the case today.. Main bearings looked good... May 3 2020, 01:19 PM Luke M I received my converted 915/916 Bott trans back fr... May 19 2020, 01:35 PM gms Nice addition to the build
:trophy: May 19 2020, 01:58 PM Luke M It's a nice wire harness for sure but there ma... May 20 2020, 08:11 AM Gint It's a nice wire harness for sure but there ma... Oct 11 2020, 11:39 AM Luke M
It's a nice wire harness for sure but there m... Oct 11 2020, 05:22 PM gerakroo
It's a nice wire harness for sure but there m... Oct 19 2020, 12:49 PM Luke M
[quote name='Luke M' post='2817163' date='May 20 ... Oct 20 2020, 09:34 AM gerakroo
[quote name='Luke M' post='2817163' date='May 20... Oct 21 2020, 12:32 AM IronHillRestorations Pretty sure RD harness is much less May 20 2020, 01:03 PM gerakroo
Pretty sure RD harness is much less
How much le... Oct 19 2020, 12:58 PM IronHillRestorations
Pretty sure RD harness is much less
How much l... Oct 20 2020, 11:18 AM bigkensteele Are you sending the machine work to Ollies? May 20 2020, 07:12 PM Luke M
Are you sending the machine work to Ollies?
Ma... May 20 2020, 08:20 PM Luke M Well after months of waiting (thanks to covid) I f... Jul 14 2020, 05:33 PM sixnotfour
Well after months of waiting (thanks to covid) I ... Jul 14 2020, 10:44 PM rgalla9146
Well after months of waiting (thanks to covid) I ... Jul 15 2020, 05:25 AM Luke M
Well after months of waiting (thanks to covid) I... Jul 15 2020, 07:28 AM IronHillRestorations
Well after months of waiting (thanks to covid) I ... Jul 15 2020, 05:41 AM mepstein What type of blasting are you having done? Jul 14 2020, 06:54 PM peteyd Our chassis harness sells separately from our engi... Oct 21 2020, 06:42 AM Luke M Getting the case ready to assemble. I have all the... Oct 24 2020, 01:45 PM altitude411
Anyone know why Porsche went with the oval lock... Oct 24 2020, 03:35 PM Luke M Back at it here... I had to put the engine build o... Jan 23 2021, 08:27 AM Luke M Work on mating fixtures to bench.. Jan 23 2021, 08:30 AM Luke M Right A-arm mount issue to be addressed. 5-8 mm up... Jan 23 2021, 08:38 AM Cairo94507 Very nice table. This is going to be a nice Six. ... Jan 23 2021, 09:10 AM Luke M Front end fixtures are done. I need to rework the ... Jan 24 2021, 06:56 AM Luke M Got some new tools... I need to wrap up these rear... Jan 25 2021, 10:51 AM Luke M Targa to windshield frame brace is in and got the ... Jan 26 2021, 10:11 AM Root_Werks What a great project! This is some serious ti... Jan 27 2021, 10:32 AM Cairo94507 Love seeing them stripped down and restored to liv... Jan 27 2021, 01:40 PM Luke M The chassis is now locked down on the fixtures and... Jan 27 2021, 08:10 PM watsonrx13 You sir are insane and a true craftsman. Jan 28 2021, 04:36 PM Luke M Did a rough cutout of the right long. Now to cut a... Jan 28 2021, 06:47 PM djway WOW
Tools are the best ...... Jan 28 2021, 10:58 PM Luke M I spent all of Friday afternoon drilling out spot ... Jan 30 2021, 07:11 AM mate914
I spent all of Friday afternoon drilling out spot... Jan 30 2021, 07:56 AM rgalla9146 Luke you certainly don't shy away from hard wo... Jan 30 2021, 08:20 AM Luke M Hi Rory,
Working away for sure. I'd like the ... Jan 30 2021, 12:02 PM IronHillRestorations :Qarl: Jan 30 2021, 05:25 PM BillC Very cool!
I'd love to have a frame bench... Jan 30 2021, 05:36 PM
Luke M
Is that the car that Kirk sold?
Nope.. I've... Oct 23 2015, 03:20 PM Mueller Good luck...I hope mine isn't as bad once I st... Oct 23 2015, 02:36 PM Cairo94507 Excellent. It looks like you have matters well in... Oct 23 2015, 03:05 PM wndsnd Big project for sure, but the fact that it is on a... Oct 23 2015, 03:31 PM rick 918-S Nice. :popcorn: Oct 23 2015, 03:41 PM Kansas 914 Worth saving for sure.
:popcorn: Oct 23 2015, 03:53 PM Krieger Yea! Oct 23 2015, 05:10 PM Luke M Well after nearly three years of searching for a N... Feb 20 2018, 11:12 AM bbrock Yeah Man! :headbanger: A lot of work, but als... Feb 20 2018, 11:32 AM rgalla9146 Hey Luke
Excellent !
Now's the t... Feb 20 2018, 02:37 PM Luke M
Hey Luke
Excellent !
Now's the ... Feb 20 2018, 07:17 PM bigkensteele Why did you decide not to use everything you piece... Feb 20 2018, 05:30 PM Luke M
Why did you decide not to use everything you piec... Feb 20 2018, 07:16 PM Luke M Look what showed up today... :Qarl:
I'll be ... Feb 21 2018, 12:29 PM rhodyguy WOW! Platinum. Feb 21 2018, 12:37 PM mepstein :beer2: Feb 21 2018, 12:38 PM David Billo Wow, did that come all welded together like that a... Feb 21 2018, 04:34 PM Luke M
Wow, did that come all welded together like that ... Feb 21 2018, 07:22 PM bbrock That's awesome! :beer1: I'm trying not... Feb 21 2018, 06:21 PM Luke M Fabricating the interior brace which is now done. ... Jul 14 2018, 05:38 PM rgalla9146 Great work !
Good to see progress.
P... Jul 15 2018, 06:24 PM Luke M Started to check the door gaps and adjusting them.... Jul 16 2018, 11:33 AM rgalla9146
Started to check the door gaps and adjusting them... Jul 24 2018, 02:56 PM mb911 I will have to tackle this shortly. I am not sure... Jul 16 2018, 03:23 PM Superhawk996
I will have to tackle this shortly. I am not sur... Nov 24 2019, 09:46 AM Luke M I got started on the lower bracing and found a lit... Jul 23 2018, 01:44 PM Perry Kiehl I've seen a lot of cars where the front door g... Jul 24 2018, 03:27 PM rgalla9146
I've seen a lot of cars where the front door ... Jul 24 2018, 09:04 PM Luke M
I've seen a lot of cars where the front door... Jul 25 2018, 09:32 AM ottox914 That looks like a ton of work, but the right work ... Jul 24 2018, 09:09 PM Luke M Getting there... drivers side is now done.
I nee... Aug 2 2018, 03:29 PM Luke M Well it has been awhile since I updated this..
Ch... Sep 29 2019, 08:59 AM raynekat
Kroon wire harness co. sent me an email that my n... May 19 2020, 09:01 PM sixnotfour Great buy on the Perry Black Hawk... :sawzall: :w... Sep 29 2019, 10:53 AM ClayPerrine Looking at this thread has me in Awe. I can do en... Sep 30 2019, 06:30 AM Cairo94507 Just incredible skills. :beer2: Sep 30 2019, 06:50 AM Luke M Finally got the bench under the 6. This weekend we... Nov 21 2019, 07:58 AM Cairo94507 :beer2: :popcorn: Nov 21 2019, 08:22 AM rgalla9146 Holy Cow !
I think this car will be very s... Nov 21 2019, 04:45 PM Luke M
Holy Cow !
I think this car will be very ... Nov 22 2019, 12:51 PM IronHillRestorations :Qarl: :Qarl: :first: :Qarl: :Qarl: Nov 22 2019, 08:35 AM Jamie It never ceases to amaze me seeing the skills and ... Nov 22 2019, 02:36 PM Tdskip Fantastic - thanks for all of the updates. Nov 24 2019, 08:00 AM mb911 I have seen allot of cars with welded edges.. Nov 24 2019, 10:18 AM Luke M Got all the fixtures attached between the chassis ... Dec 5 2019, 12:43 PM Cairo94507 That, in and of itself, is impressive. :beer2: Dec 5 2019, 02:07 PM Luke M With this covid thing going around it has set my p... Apr 26 2020, 04:22 PM porschetub Top overhaul or full build ?,will be a quick car w... Apr 26 2020, 05:04 PM Luke M
Top overhaul or full build ?,will be a quick car ... Apr 26 2020, 05:45 PM Luke M Started the tear down on the 3.2. I'm gonna re... May 1 2020, 09:16 AM Mark Henry For the Supertec head studs you'll need a thre... May 1 2020, 10:49 AM mepstein I removed studs from about 25 engine cases when I ... May 1 2020, 11:31 AM Luke M Got the head studs all off without any issues..
G... May 2 2020, 02:47 PM Cairo94507 Luke - I am loving that transaxle :wub: May 2 2020, 04:26 PM rgalla9146 Looking good Luke
Make hay while the sun shine... May 2 2020, 06:58 PM Luke M I split the case today.. Main bearings looked good... May 3 2020, 01:19 PM Luke M I received my converted 915/916 Bott trans back fr... May 19 2020, 01:35 PM gms Nice addition to the build
:trophy: May 19 2020, 01:58 PM Luke M It's a nice wire harness for sure but there ma... May 20 2020, 08:11 AM Gint It's a nice wire harness for sure but there ma... Oct 11 2020, 11:39 AM Luke M
It's a nice wire harness for sure but there m... Oct 11 2020, 05:22 PM gerakroo
It's a nice wire harness for sure but there m... Oct 19 2020, 12:49 PM Luke M
[quote name='Luke M' post='2817163' date='May 20 ... Oct 20 2020, 09:34 AM gerakroo
[quote name='Luke M' post='2817163' date='May 20... Oct 21 2020, 12:32 AM IronHillRestorations Pretty sure RD harness is much less May 20 2020, 01:03 PM gerakroo
Pretty sure RD harness is much less
How much le... Oct 19 2020, 12:58 PM IronHillRestorations
Pretty sure RD harness is much less
How much l... Oct 20 2020, 11:18 AM bigkensteele Are you sending the machine work to Ollies? May 20 2020, 07:12 PM Luke M
Are you sending the machine work to Ollies?
Ma... May 20 2020, 08:20 PM Luke M Well after months of waiting (thanks to covid) I f... Jul 14 2020, 05:33 PM sixnotfour
Well after months of waiting (thanks to covid) I ... Jul 14 2020, 10:44 PM rgalla9146
Well after months of waiting (thanks to covid) I ... Jul 15 2020, 05:25 AM Luke M
Well after months of waiting (thanks to covid) I... Jul 15 2020, 07:28 AM IronHillRestorations
Well after months of waiting (thanks to covid) I ... Jul 15 2020, 05:41 AM mepstein What type of blasting are you having done? Jul 14 2020, 06:54 PM peteyd Our chassis harness sells separately from our engi... Oct 21 2020, 06:42 AM Luke M Getting the case ready to assemble. I have all the... Oct 24 2020, 01:45 PM altitude411
Anyone know why Porsche went with the oval lock... Oct 24 2020, 03:35 PM Luke M Back at it here... I had to put the engine build o... Jan 23 2021, 08:27 AM Luke M Work on mating fixtures to bench.. Jan 23 2021, 08:30 AM Luke M Right A-arm mount issue to be addressed. 5-8 mm up... Jan 23 2021, 08:38 AM Cairo94507 Very nice table. This is going to be a nice Six. ... Jan 23 2021, 09:10 AM Luke M Front end fixtures are done. I need to rework the ... Jan 24 2021, 06:56 AM Luke M Got some new tools... I need to wrap up these rear... Jan 25 2021, 10:51 AM Luke M Targa to windshield frame brace is in and got the ... Jan 26 2021, 10:11 AM Root_Werks What a great project! This is some serious ti... Jan 27 2021, 10:32 AM Cairo94507 Love seeing them stripped down and restored to liv... Jan 27 2021, 01:40 PM Luke M The chassis is now locked down on the fixtures and... Jan 27 2021, 08:10 PM watsonrx13 You sir are insane and a true craftsman. Jan 28 2021, 04:36 PM Luke M Did a rough cutout of the right long. Now to cut a... Jan 28 2021, 06:47 PM djway WOW
Tools are the best ...... Jan 28 2021, 10:58 PM Luke M I spent all of Friday afternoon drilling out spot ... Jan 30 2021, 07:11 AM mate914
I spent all of Friday afternoon drilling out spot... Jan 30 2021, 07:56 AM rgalla9146 Luke you certainly don't shy away from hard wo... Jan 30 2021, 08:20 AM Luke M Hi Rory,
Working away for sure. I'd like the ... Jan 30 2021, 12:02 PM IronHillRestorations :Qarl: Jan 30 2021, 05:25 PM BillC Very cool!
I'd love to have a frame bench... Jan 30 2021, 05:36 PM  |
5 User(s) are reading this topic (5 Guests and 0 Anonymous Users)
0 Members:

|
Lo-Fi Version | Time is now: 4th May 2026 - 05:54 AM |
Invision Power Board
v9.1.4 © 2026 IPS, Inc.