|
|
|
Porsche, and the Porsche crest are registered trademarks of Dr. Ing. h.c. F. Porsche AG.
This site is not affiliated with Porsche in any way. Its only purpose is to provide an online forum for car enthusiasts. All other trademarks are property of their respective owners. |
|
|

  |

| sixnotfour |
 Feb 28 2026, 06:56 PM Feb 28 2026, 06:56 PM
Post
#261
|
|
914 Wizard  Group: Members Posts: 11,296 Joined: 12-September 04 Member No.: 2,744 Region Association: NineFourteenerVille |
QUOTE I've been looking for some AN-12 ORB to metric 30mm adapters but having a hard time finding one. These would replace the AN fittings on the T-stat. I'd like to keep everything plumbed in metric. Anyone have a source that I maybe missing ? I went through the same thing with a Peterson oil tank and I ran Porsche lines that flow better than AN-12... here is some pics.. Basically buy -12 male with 30x1.5 and cut the taper off ,,and I borred mine to .750... while I was wtf.. I made the welded one, to move forward.. I found the -12an male - 30mm x1.5 Colse Out $4 a piece..and modified em.. the taper isn't per Porsche ..does seem to seal and be tight.. or you could shorten em and cut correct taper....Im tired.. Attached image(s) 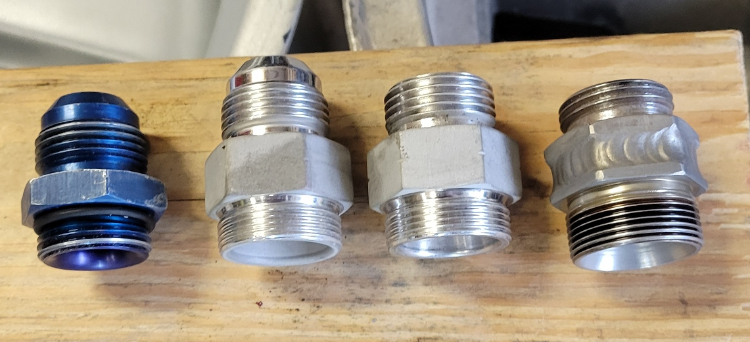 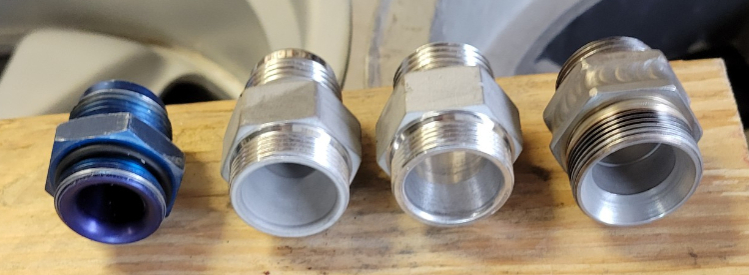  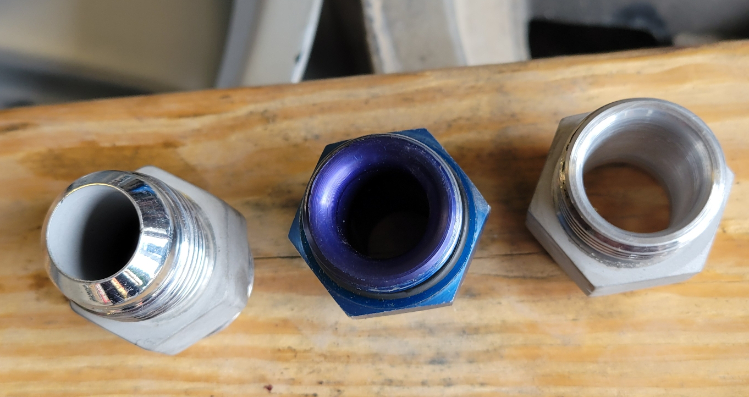 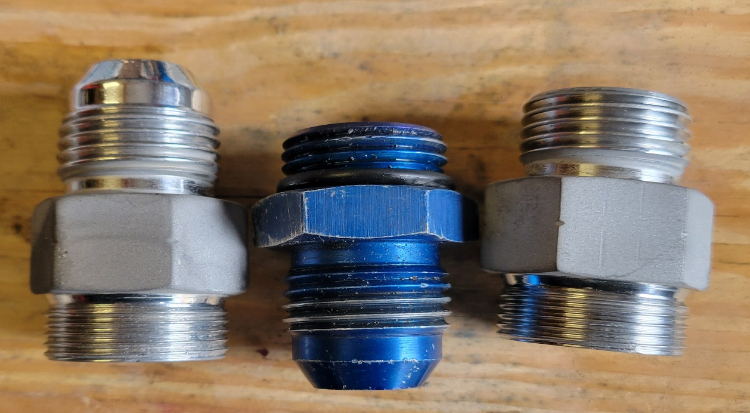
|
   |

 
|
| Luke M |
Feb 28 2026, 07:05 PM
Post
#262
|
|
Senior Member Group: Members Posts: 1,564 Joined: 8-February 05 From: WNY Member No.: 3,574 Region Association: North East States |
QUOTE(sixnotfour @ Feb 28 2026, 05:56 PM)  QUOTE I've been looking for some AN-12 ORB to metric 30mm adapters but having a hard time finding one. These would replace the AN fittings on the T-stat. I'd like to keep everything plumbed in metric. Anyone have a source that I maybe missing ? I went through the same thing with a Peterson oil tank and I ran Porsche lines that flow better than AN-12... here is some pics.. Basically buy -12 male with 30x1.5 and cut the taper off ,,and I borred mine to .750... while I was wtf.. I made the welded one, to move forward.. I found the -12an male - 30mm x1.5 Colse Out $4 a piece..and modified em.. the taper isn't per Porsche ..does seem to seal and be tight.. or you could shorten em and cut correct taper....Im tired.. Thanks for the info. I found a guy over on Pelican that can make me some new fittings. He has it on his job list to do for me. |
|
|
|
| sixnotfour |
Feb 28 2026, 07:15 PM
Post
#263
|
|
914 Wizard Group: Members Posts: 11,296 Joined: 12-September 04 Member No.: 2,744 Region Association: NineFourteenerVille |
QUOTE(Luke M @ Feb 28 2026, 06:05 PM) QUOTE(sixnotfour @ Feb 28 2026, 05:56 PM) QUOTE I've been looking for some AN-12 ORB to metric 30mm adapters but having a hard time finding one. These would replace the AN fittings on the T-stat. I'd like to keep everything plumbed in metric. Anyone have a source that I maybe missing ? I went through the same thing with a Peterson oil tank and I ran Porsche lines that flow better than AN-12... here is some pics.. Basically buy -12 male with 30x1.5 and cut the taper off ,,and I borred mine to .750... while I was wtf.. I made the welded one, to move forward.. I found the -12an male - 30mm x1.5 Colse Out $4 a piece..and modified em.. the taper isn't per Porsche ..does seem to seal and be tight.. or you could shorten em and cut correct taper....Im tired.. Thanks for the info. I found a guy over on Pelican that can make me some new fittings. He has it on his job list to do for me. ya I couldn't waite.. but when he comes through lmk .. |
|
|
|
| Luke M |
Feb 28 2026, 07:18 PM
Post
#264
|
|
Senior Member Group: Members Posts: 1,564 Joined: 8-February 05 From: WNY Member No.: 3,574 Region Association: North East States |
Removed the front fender, and door post. Figured this was gonna be the easiest way out of this whole mess vs making and fitting patches. I'll need to fab up a lower patch for the inner fender and get it welded in. First a whole lot of drilling and grinding spot welds. (IMG:style_emoticons/default/wacko.gif)
Attached image(s) 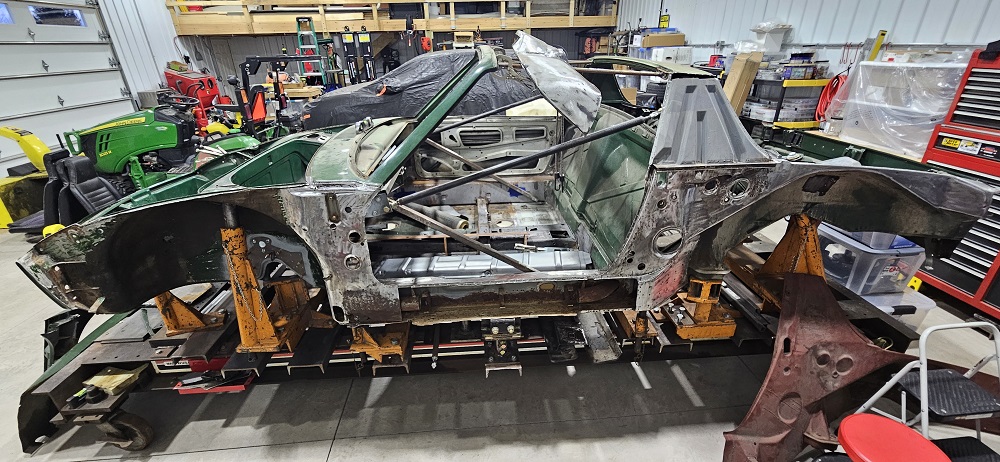 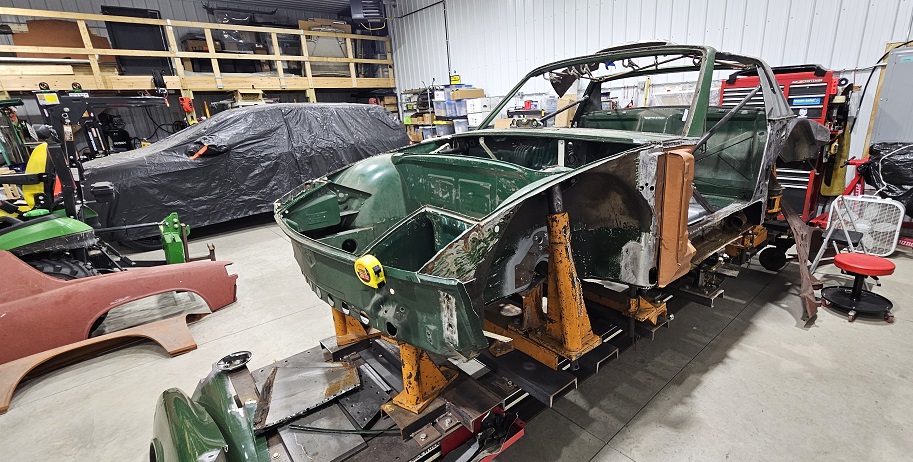 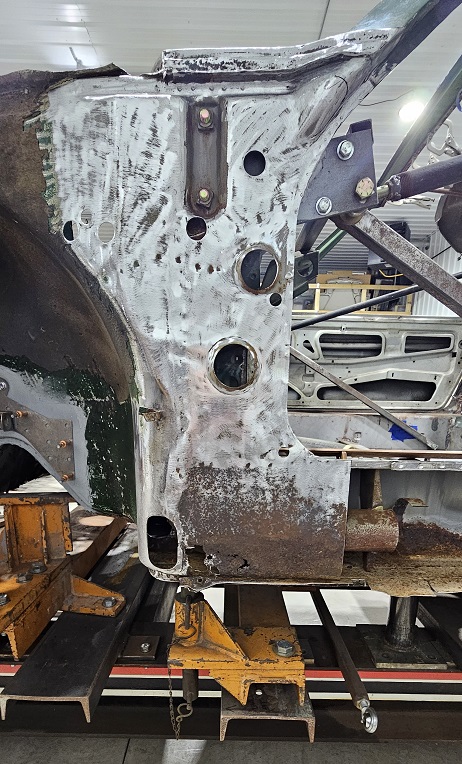 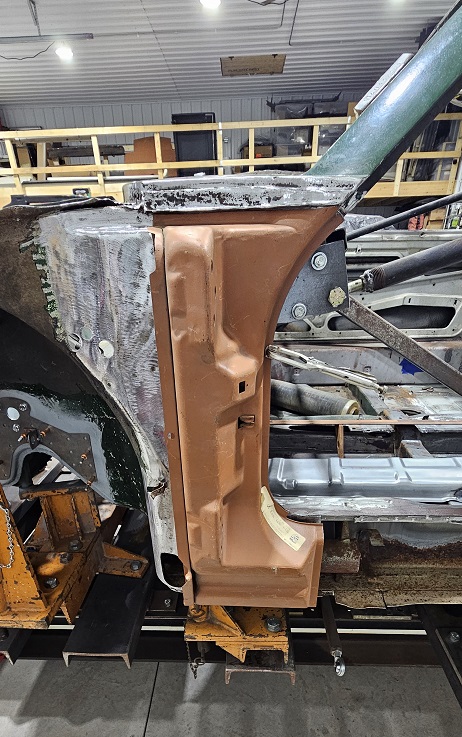 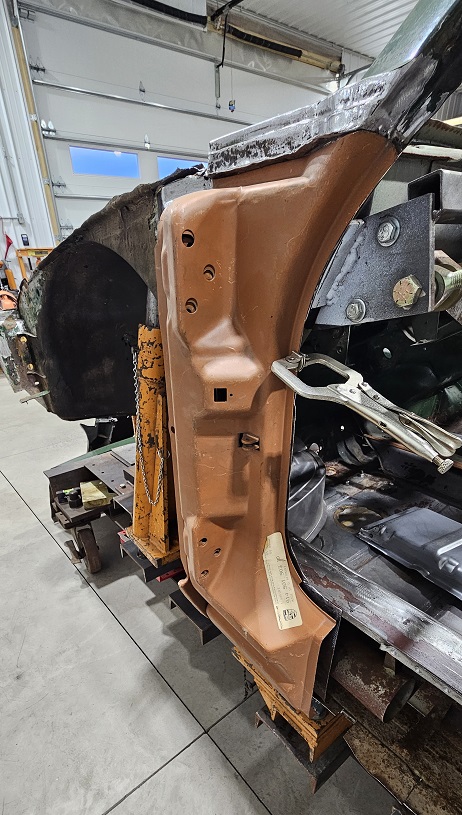
|
|
|
|
| mepstein |
Feb 28 2026, 07:49 PM
Post
#265
|
|
914-6 GT in waiting Group: Members Posts: 20,842 Joined: 19-September 09 From: Landenberg, PA/Wilmington, DE Member No.: 10,825 Region Association: MidAtlantic Region |
After metalwork is done, Blast or chemical dip & e-coat or something else? Just curious.
|
|
|
|
| Luke M |
Mar 1 2026, 08:05 AM
Post
#266
|
|
Senior Member Group: Members Posts: 1,564 Joined: 8-February 05 From: WNY Member No.: 3,574 Region Association: North East States |
QUOTE(mepstein @ Feb 28 2026, 06:49 PM) After metalwork is done, Blast or chemical dip & e-coat or something else? Just curious. Hi Mark, I'm planning on having the chassis blasted then epoxy painted. I'm thinking that I'll have that done prior to installing any of the fenders/Q-panels. From there I'll fix anything that may come up from blasting, seam seal, then may have the lower section of the chassis sprayed with undercoating or bed liner of sorts. My brother used bed liner on his chassis and it seamed to come out pretty good. After all that whatever the paint guy does which I think is some type of primer/sealer, paint, then clear. I'd have to reach out to him and ask but he's a snowbird and in the south til April/May. He sold his collision shop here and does a few paint jobs a year on the side now. I just need to be all done with my end of the work before I can get on his schedule. When I saw him last fall he already had two cars booked and usually does between four to six and then he's done for the year. I need to get to it and knock this work out as fast as I can. I'd like to be ready for paint by late summer or early fall if all possible. I don't see that being too difficult to accomplish as long as I don't hit any major snags along the way. I have some family stuff going on today but plan on doing a few more things later this afternoon. |
|
|
|
| rick 918-S |
Mar 1 2026, 08:25 AM
Post
#267
|
|
Hey nice rack! -Celette Group: Members Posts: 21,314 Joined: 30-December 02 From: Now in Superior WI Member No.: 43 Region Association: Northstar Region |
I am not sure what you have planned but I would suggest building the car from the fixed panels forward. In other words, back of the car to the front. Once the quarter panels are fitted whether attached with Clecos, drill screws or welded, you will have an easier time aligning the hinge post to ensure a height and alignment to the quarter panel for the gap. Just my 5 cents. (IMG:style_emoticons/default/assimilate.gif)
|
|
|
|
| Luke M |
Mar 1 2026, 09:32 AM
Post
#268
|
|
Senior Member Group: Members Posts: 1,564 Joined: 8-February 05 From: WNY Member No.: 3,574 Region Association: North East States |
QUOTE(rick 918-S @ Mar 1 2026, 07:25 AM) I am not sure what you have planned but I would suggest building the car from the fixed panels forward. In other words, back of the car to the front. Once the quarter panels are fitted whether attached with Clecos, drill screws or welded, you will have an easier time aligning the hinge post to ensure a height and alignment to the quarter panel for the gap. Just my 5 cents. (IMG:style_emoticons/default/assimilate.gif) Hi Rick, I struggled doing that part when I installed the pass side long and post. I have a plan in mind going forward. All panels will go on temperately then get removed again. Just like you said to make sure all the gaps are good. Oh and thanks for the pic of the triangle. I thought that's what you meant. So, I'm running Ben's SS oil lines down the drivers side and I'll need to trim the triangles off anyways. I may just not butcher this NOS part and get a RD part for this side. I'll test fit things then decide. RD isn't too far from me so usually have the parts in hand within four days. What I messed up on was not adding the RD frame stiffener on the pass side when I originally did that side. I plan on adding that to the drivers side once I have everything set in place. I thought about adding the Mad Dog inner stiffener kit but I like the RD version better. |
|
|
|
| Luke M |
Mar 2 2026, 06:25 PM
Post
#269
|
|
Senior Member Group: Members Posts: 1,564 Joined: 8-February 05 From: WNY Member No.: 3,574 Region Association: North East States |
Got a few things done over the weekend and today. Mainly lots of drilling spot welds and grinding surfaces flat. I test fitted some panels which had to be adjusted but fit well now. Threw on the rear Q-panel.... Just for you Rick (IMG:style_emoticons/default/poke.gif)
Attached image(s) 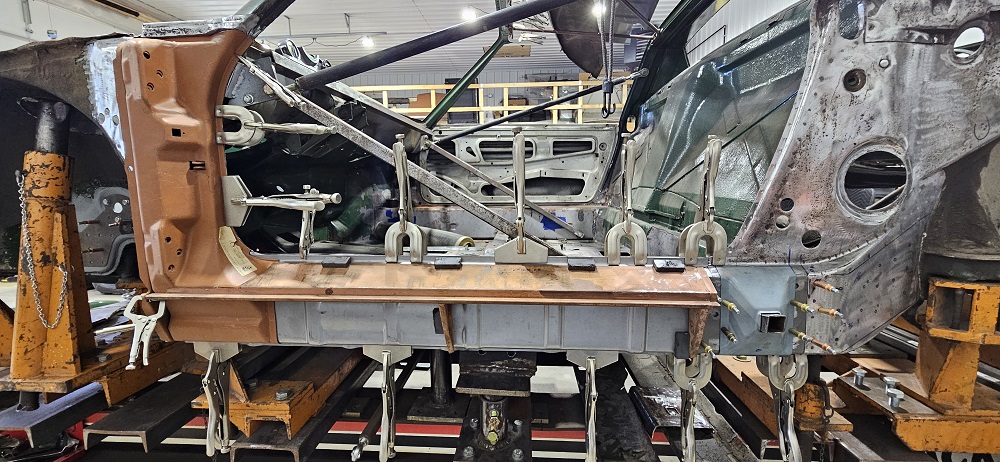 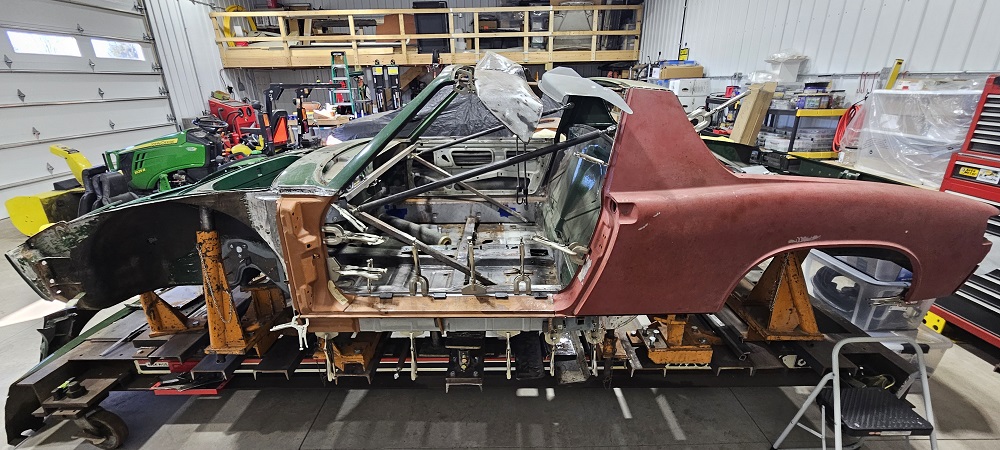
|
|
|
|
| rick 918-S |
Mar 2 2026, 08:55 PM
Post
#270
|
|
Hey nice rack! -Celette Group: Members Posts: 21,314 Joined: 30-December 02 From: Now in Superior WI Member No.: 43 Region Association: Northstar Region |
Hey man, how do you eat an Elephant? (IMG:style_emoticons/default/sawzall-smiley.gif) (IMG:style_emoticons/default/smash.gif) (IMG:style_emoticons/default/welder.gif) (IMG:style_emoticons/default/popcorn[1].gif)
|
|
|
|
| Root_Werks |
Mar 3 2026, 10:17 AM
Post
#271
|
|
Village Idiot Group: Members Posts: 9,037 Joined: 25-May 04 From: About 15NM from Canada Member No.: 2,105 Region Association: Pacific Northwest |
Love seeing another 914 VIN being saved. Looking good!
(IMG:style_emoticons/default/smash.gif) (IMG:style_emoticons/default/welder.gif) |
|
|
|
| 930cabman |
Mar 3 2026, 10:56 AM
Post
#272
|
|
Advanced Member Group: Members Posts: 4,773 Joined: 12-November 20 From: Buffalo Member No.: 24,877 Region Association: North East States |
QUOTE(rick 918-S @ Mar 2 2026, 09:55 PM) Hey man, how do you eat an Elephant? (IMG:style_emoticons/default/sawzall-smiley.gif) (IMG:style_emoticons/default/smash.gif) (IMG:style_emoticons/default/welder.gif) (IMG:style_emoticons/default/popcorn[1].gif) moving a pebble at a time we must really love the #&%@* from these projects Keep it going Luke, the end is out there somewhere and looking great along the way |
|
|
|
| Montreal914 |
Mar 3 2026, 04:01 PM
Post
#273
|
|
Advanced Member Group: Members Posts: 2,179 Joined: 8-August 10 From: Claremont, CA Member No.: 12,023 Region Association: Southern California |
Definitely love this!
Man, the fixtures! (IMG:style_emoticons/default/drooley.gif) |
 |
|
| Luke M |
Mar 3 2026, 05:29 PM
Post
#274
|
|
Senior Member Group: Members Posts: 1,564 Joined: 8-February 05 From: WNY Member No.: 3,574 Region Association: North East States |
QUOTE(Montreal914 @ Mar 3 2026, 03:01 PM) If it wasn't for these fixtures and bench there's no way I would've attempted all this work on my own. I would've had to farm out that portion of the repairs. Having the correct tools and knowledge is key in any major repairs. It's still taking forever to complete but slowly getting there. I'm gonna try and see if I can blast the rust off the inner long then spray some epoxy/east wood frame sealer inside. I'm going to try my best to see if I can close things up by end of next week. |
|
|
|
| Luke M |
Mar 4 2026, 05:01 PM
Post
#275
|
|
Senior Member Group: Members Posts: 1,564 Joined: 8-February 05 From: WNY Member No.: 3,574 Region Association: North East States |
Did a little cleaning up and tested fitted the front fenders and rear q-panels. So far everything seams to be lining up just fine. I need to dig out the drivers door and prep that to test fit. I also need to install the NOS front lid which is kinda hard to do on my own but otherwise it looks like a 914 again. (IMG:style_emoticons/default/biggrin.gif)
Attached image(s) 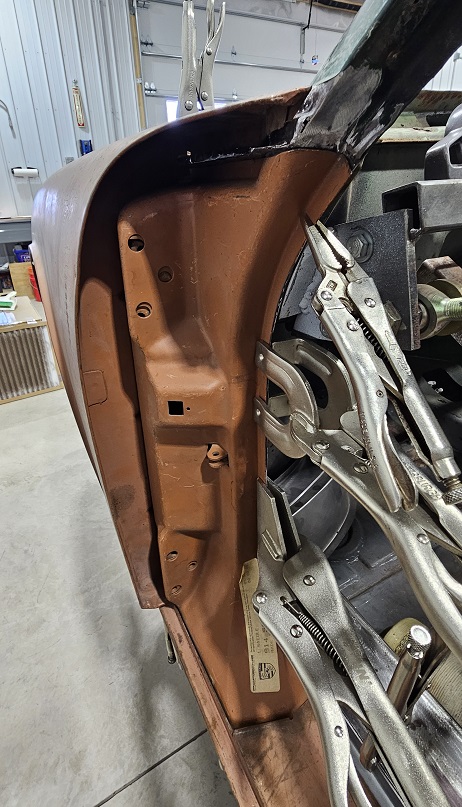 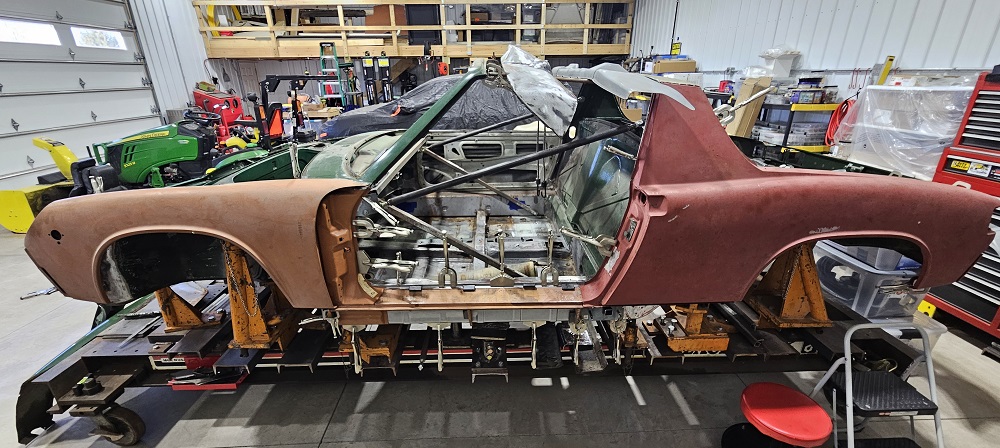 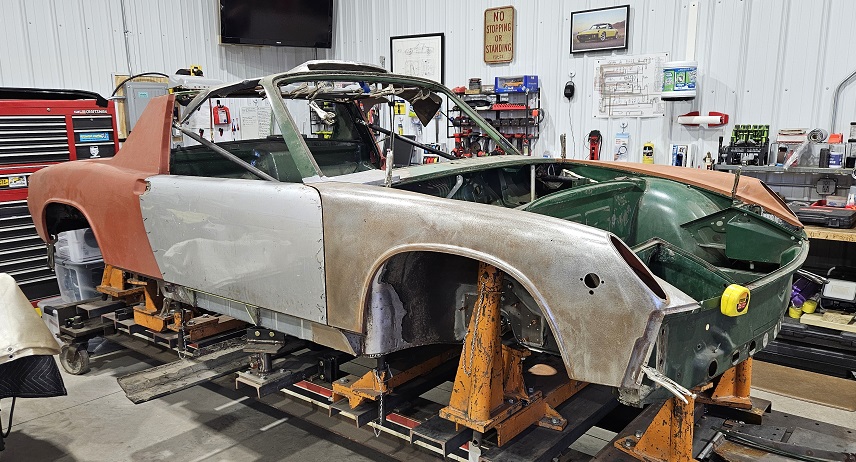
|
|
|
|
| DennisV |
Mar 4 2026, 05:20 PM
Post
#276
|
|
Senior Member Group: Members Posts: 987 Joined: 8-August 20 From: Santa Rosa, CA Member No.: 24,575 Region Association: Northern California |
QUOTE(Luke M @ Mar 4 2026, 03:01 PM) Great progress Luke. (IMG:style_emoticons/default/smilie_pokal.gif) |
|
|
|
| Luke M |
Mar 5 2026, 03:38 PM
Post
#277
|
|
Senior Member Group: Members Posts: 1,564 Joined: 8-February 05 From: WNY Member No.: 3,574 Region Association: North East States |
Removed the targa reinforcement panel and cleaned up the underside. Just prepping this area so when the NOS panel shows up I can install it. I tried to sand blast the inner long and man did it start to make a huge mess . I just stopped and decided that I need to do this part outside. The weather here is still hit or miss so I'll have to wait until a nice sunny/dry day is in the forecast. I can drag the bench out and give it another try and see how that goes. Unless someone has another idea on how to get rid of the rust inside the long.
Attached image(s) 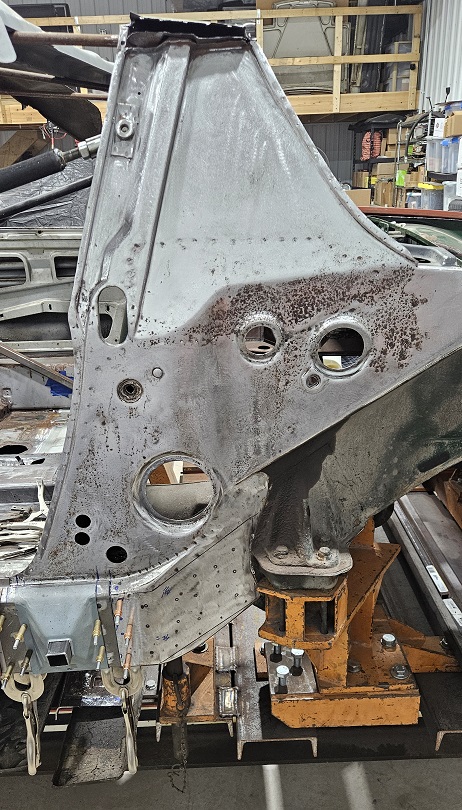
|
|
|
|
| Montreal914 |
Mar 5 2026, 06:52 PM
Post
#278
|
|
Advanced Member Group: Members Posts: 2,179 Joined: 8-August 10 From: Claremont, CA Member No.: 12,023 Region Association: Southern California |
I spayed citric acid using a sprinkler head and a small amazon water fountain submersible pump. Then I neutralize it with baking soda/water.
My acid mixture is mild so the progress happens over the course of 24-48 hours. The difficult part can be the manage the fluid path and get it back in the bin. I use a blue tarp contraption. It worked ok on the driver’s side. I plan on doing it on the passenger side soon. I also use it to de-rust individual parts. I have pictures in my thread. I can check my acid/water ratio in my notes later if you want. (IMG:style_emoticons/default/stirthepot.gif) |
|
|
|
| ctc911ctc |
Mar 6 2026, 01:41 PM
Post
#279
|
|
Senior Member Group: Members Posts: 1,349 Joined: 9-June 18 From: boston Member No.: 22,206 Region Association: North East States |
McGiver dialed to 11! Yea, this i got to see; link? QUOTE(Montreal914 @ Mar 5 2026, 07:52 PM) I spayed citric acid using a sprinkler head and a small amazon water fountain submersible pump. Then I neutralize it with baking soda/water. My acid mixture is mild so the progress happens over the course of 24-48 hours. The difficult part can be the manage the fluid path and get it back in the bin. I use a blue tarp contraption. It worked ok on the driver’s side. I plan on doing it on the passenger side soon. I also use it to de-rust individual parts. I have pictures in my thread. I can check my acid/water ratio in my notes later if you want. (IMG:style_emoticons/default/stirthepot.gif) |
|
|
|
| Luke M |
Mar 6 2026, 04:56 PM
Post
#280
|
|
Senior Member Group: Members Posts: 1,564 Joined: 8-February 05 From: WNY Member No.: 3,574 Region Association: North East States |
I looked at the inner long and inner fender a little better today. It looks like there's rust under the inner support sections. You can see the wavy sections which is rust pushing the brace up. I poked around a little and there's several spots that need attention. So can anyone guess what's next on my never ending to do list. (IMG:style_emoticons/default/headbang.gif)
Attached image(s) 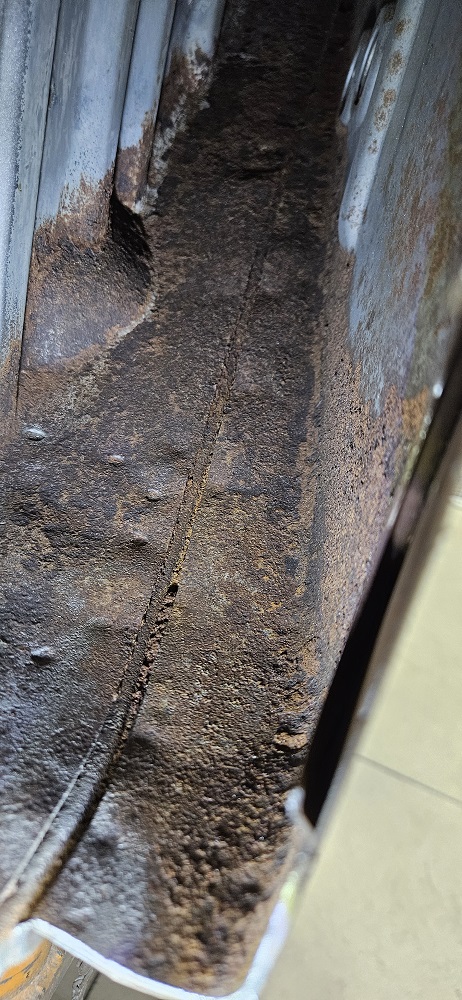  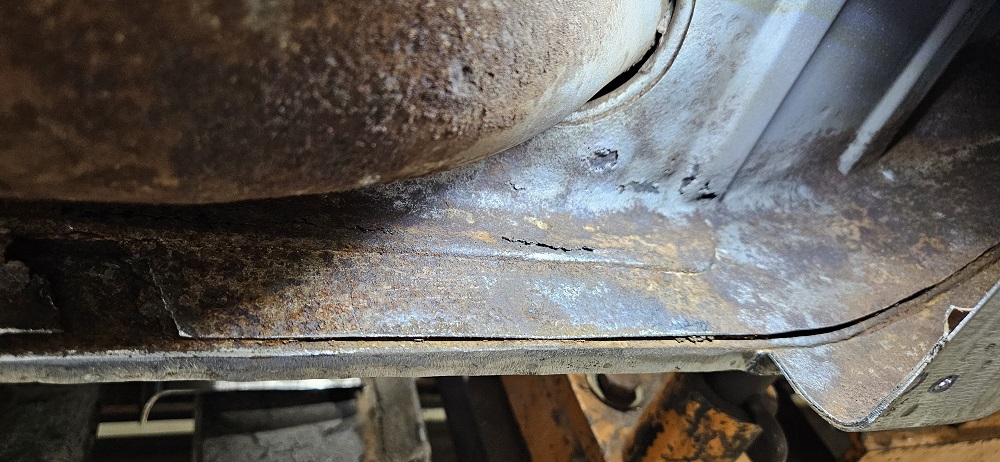 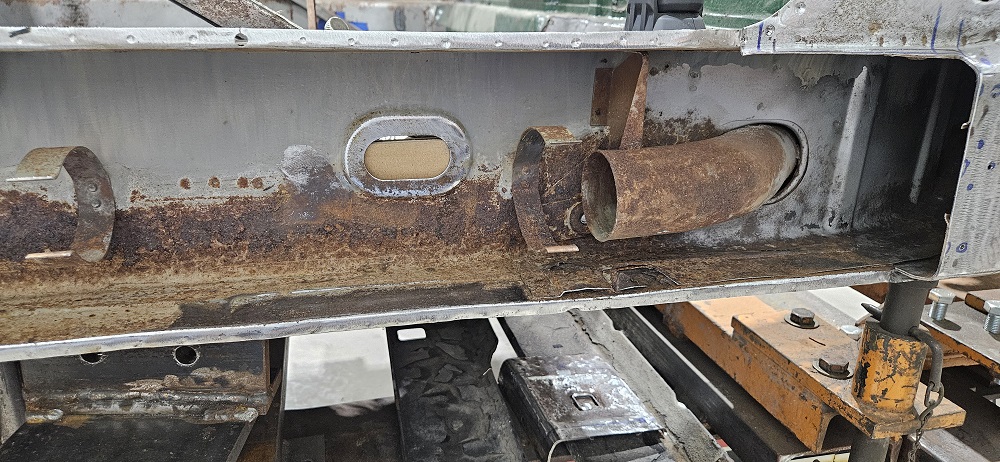 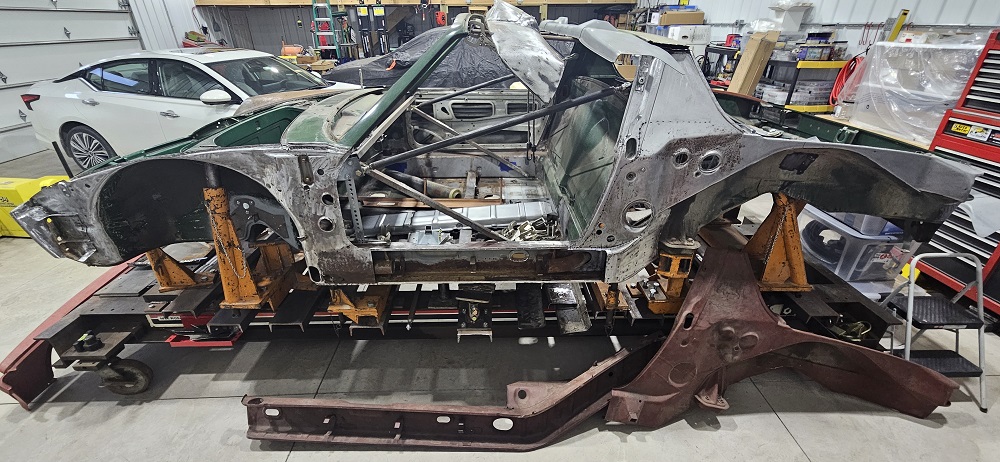
|
|
|
|
|
2 User(s) are reading this topic (2 Guests and 0 Anonymous Users)
0 Members:

|
Lo-Fi Version | Time is now: 31st July 2026 - 07:52 PM |
Invision Power Board
v9.1.4 © 2026 IPS, Inc.