|
|
|
Porsche, and the Porsche crest are registered trademarks of Dr. Ing. h.c. F. Porsche AG.
This site is not affiliated with Porsche in any way. Its only purpose is to provide an online forum for car enthusiasts. All other trademarks are property of their respective owners. |
|
|

  |

| Luke M |
 Mar 19 2026, 04:34 AM Mar 19 2026, 04:34 AM
Post
#301
|
|
Senior Member  Group: Members Posts: 1,564 Joined: 8-February 05 From: WNY Member No.: 3,574 Region Association: North East States |
I've been cutting and grinding away all the rusty metal in preparation to install the new panels. Floor pan to engine fire wall are done. I have a small section of inner fender to remove from the rear trunk then I'll be done. I'm debating on if I should blast some sections of the chassis now while things are all apart. I'd have to wait for the weather to cooperate if I do that. Meantime, there's a lot of other small jobs that need to be tackled.
Attached image(s) 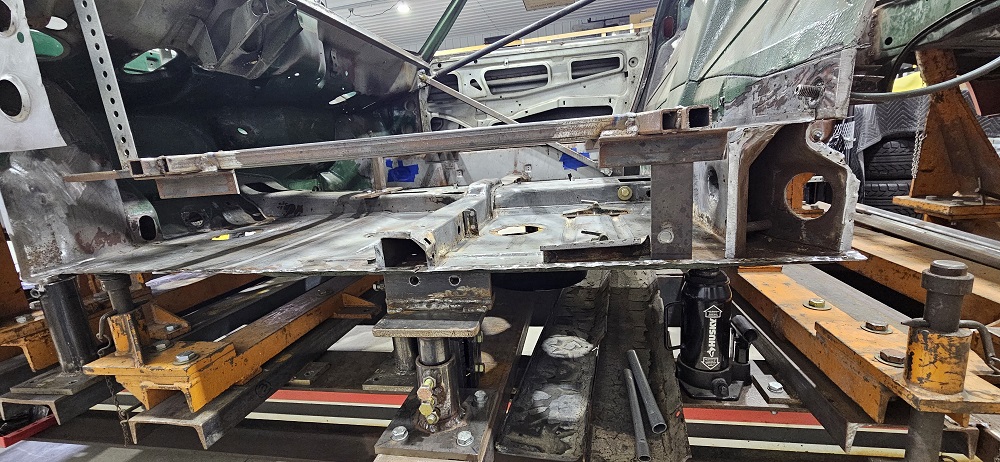 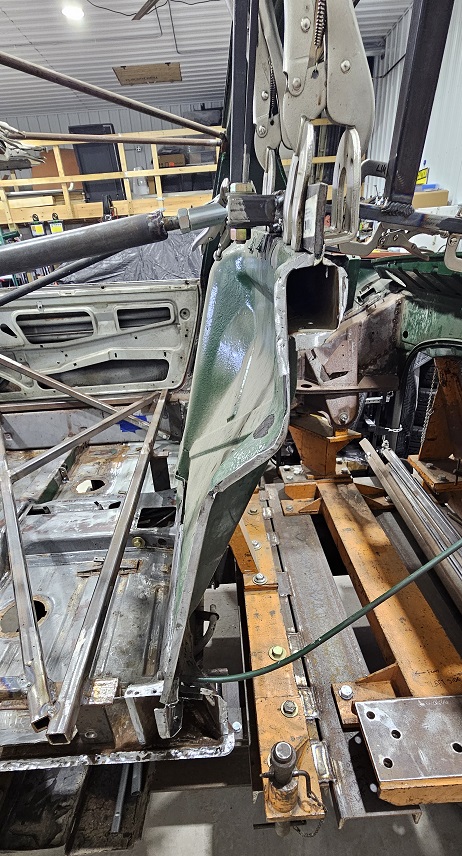 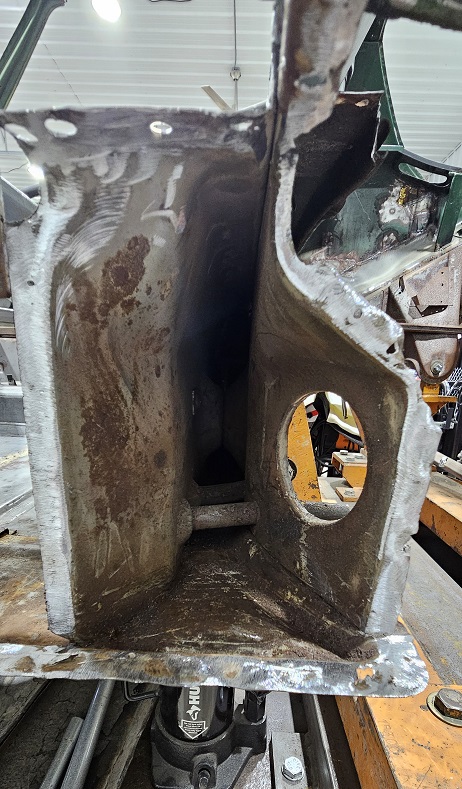 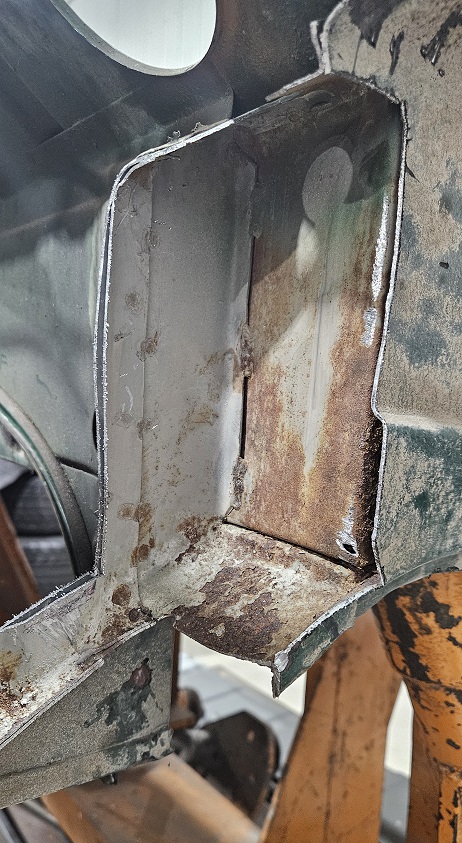
|
   |

 
|
| Cairo94507 |
Mar 19 2026, 05:50 AM
Post
#302
|
|
Michael Group: Members Posts: 10,725 Joined: 1-November 08 From: Auburn, CA Member No.: 9,712 Region Association: Northern California |
Hi Luke @Luke M - Sorry it took me a minute to get some pictures of my sail panel; we did not replace the foam. Blasted, epoxy primed, undercoated, painted. Man, my car is a little dirty from driving.
Your work is amazing; I am reliving my restoration while looking at your pictures. (IMG:style_emoticons/default/beerchug.gif) 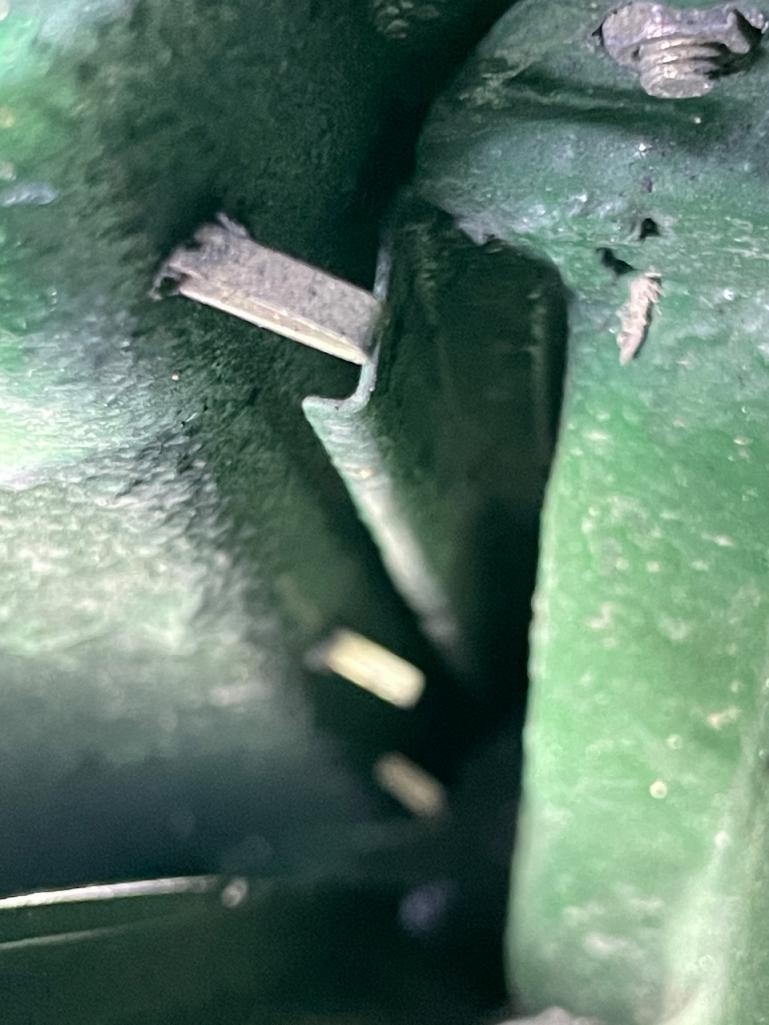 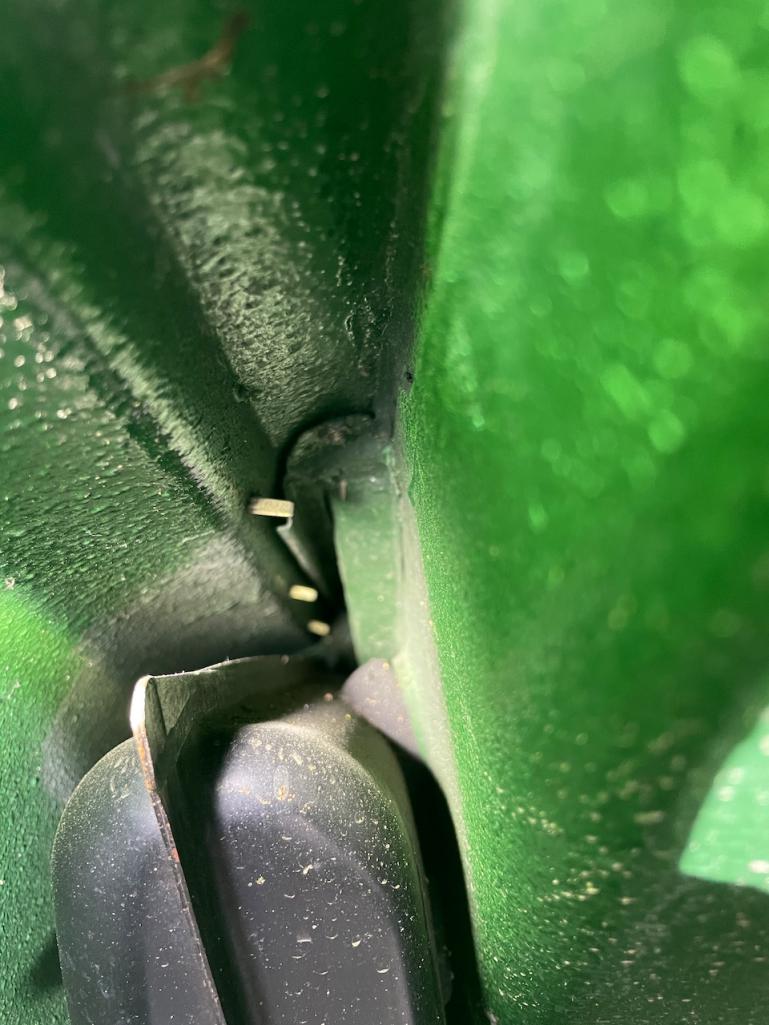 |
|
|
|
| Luke M |
Mar 19 2026, 06:24 AM
Post
#303
|
|
Senior Member Group: Members Posts: 1,564 Joined: 8-February 05 From: WNY Member No.: 3,574 Region Association: North East States |
QUOTE(Cairo94507 @ Mar 19 2026, 04:50 AM)  Hi Luke @Luke M - Sorry it took me a minute to get some pictures of my sail panel; we did not replace the foam. Blasted, epoxy primed, undercoated, painted. Man, my car is a little dirty from driving. Your work is amazing; I am reliving my restoration while looking at your pictures. (IMG:style_emoticons/default/beerchug.gif) Hi Michael, Thank you, I appreciate you getting back to me on this. Looks like there's no seal at all along that seam. I don't plan on driving my 6 in any bad weather or go off road so I should be good without a seal too. |
|
|
|
| Lilchopshop |
Mar 19 2026, 08:57 AM
Post
#304
|
|
Member Group: Members Posts: 116 Joined: 17-February 20 From: New York Member No.: 23,932 Region Association: North East States |
@Luke M
First off, your work is amazing! All the discussion about road grime getting up in the fenders made me remember what @bkrantz did in his epic build thread. Check out what he did with fender liners starting at this point in his thread. http://www.914world.com/bbs2/index.php?sho...93&st=3380# more info on fender liners here too: http://www.914world.com/bbs2/index.php?sho...mp;hl=raynekat# -Aaron |
|
|
|
| Luke M |
Mar 19 2026, 05:41 PM
Post
#305
|
|
Senior Member Group: Members Posts: 1,564 Joined: 8-February 05 From: WNY Member No.: 3,574 Region Association: North East States |
Finally got all of the spot welds drilled out, and surfaces ground flat. What a pain the rear section of the inner fender was. Just look at the mount of spot welds. (IMG:style_emoticons/default/wacko.gif)
Then did a quick test fit of the new inner fender. I forgot to trim the targa side so it's off a little otherwise fits well. I'll see if I can get the long test fitted on Friday. Attached image(s) 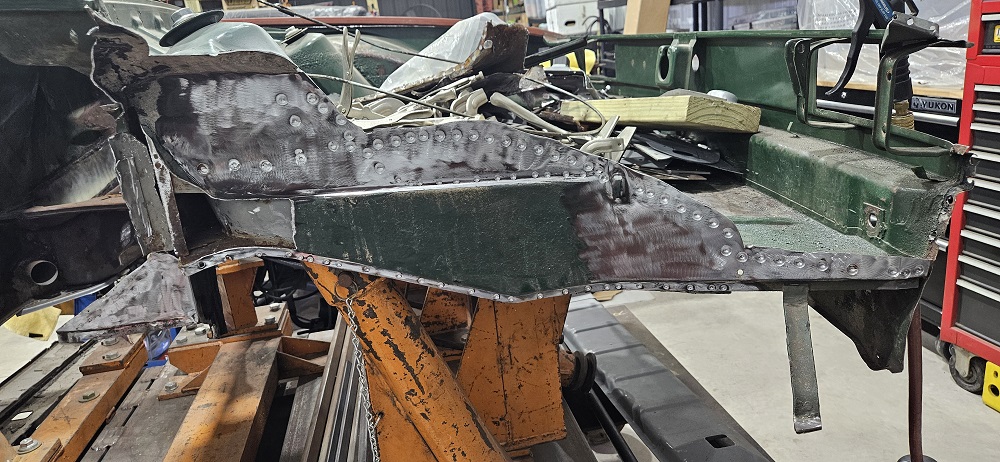 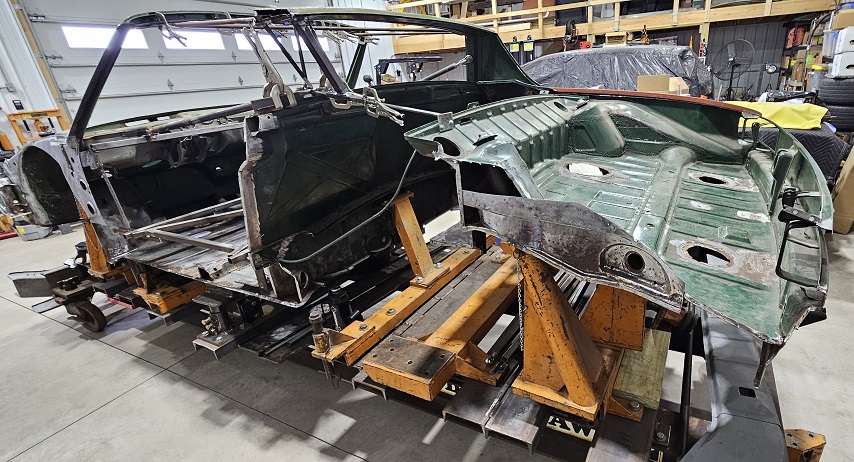 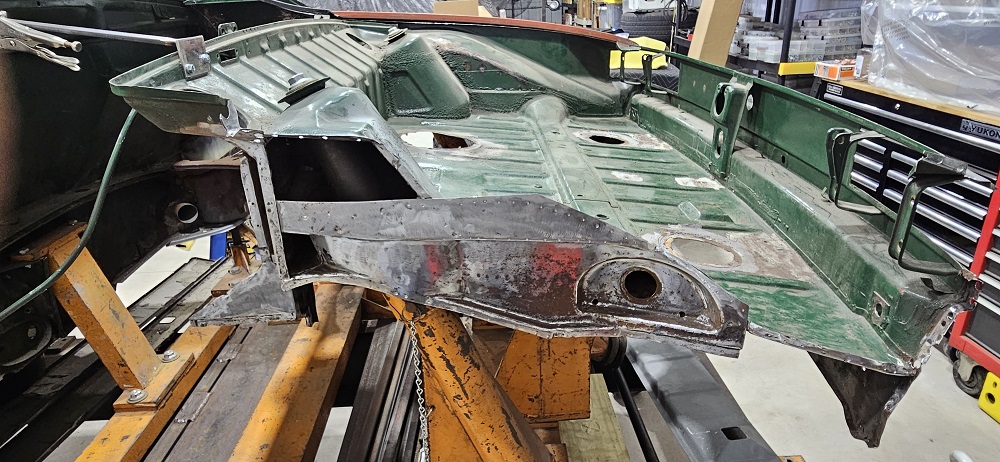 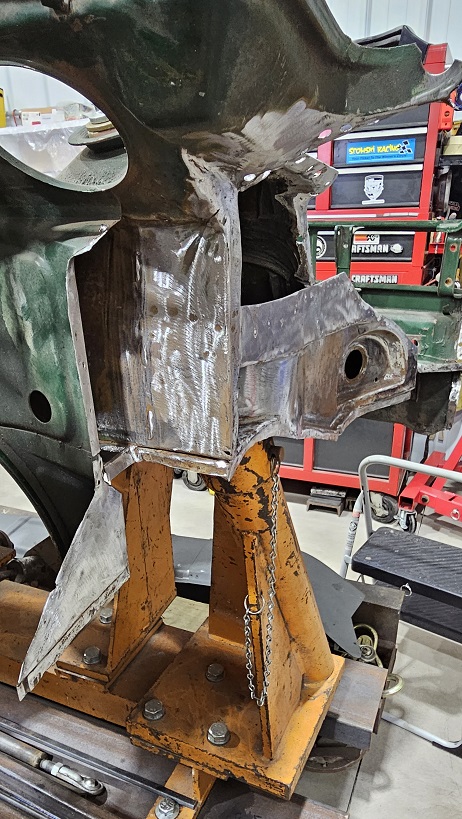 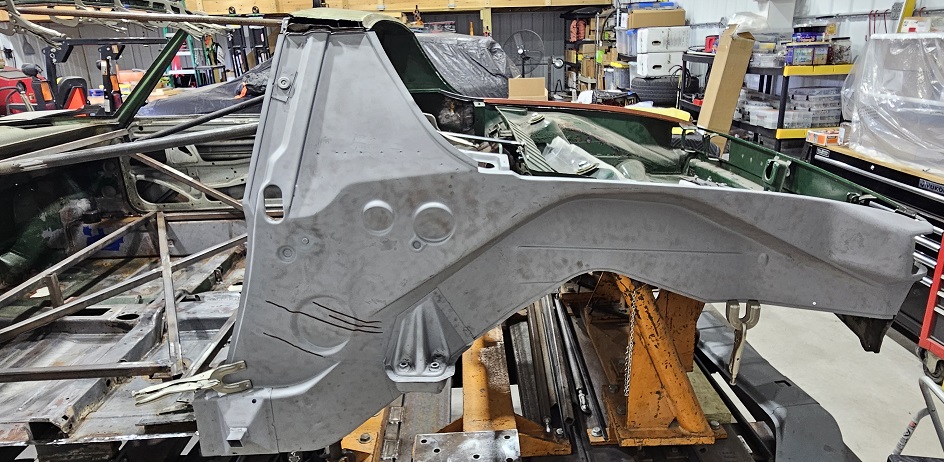 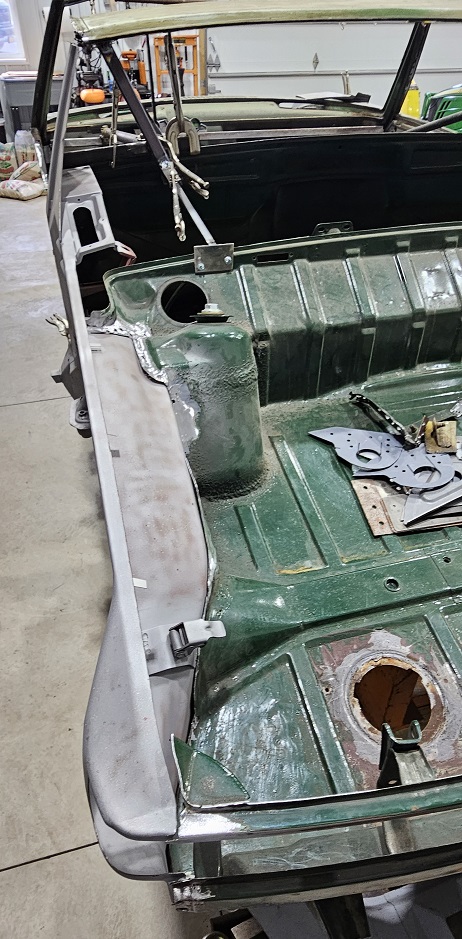 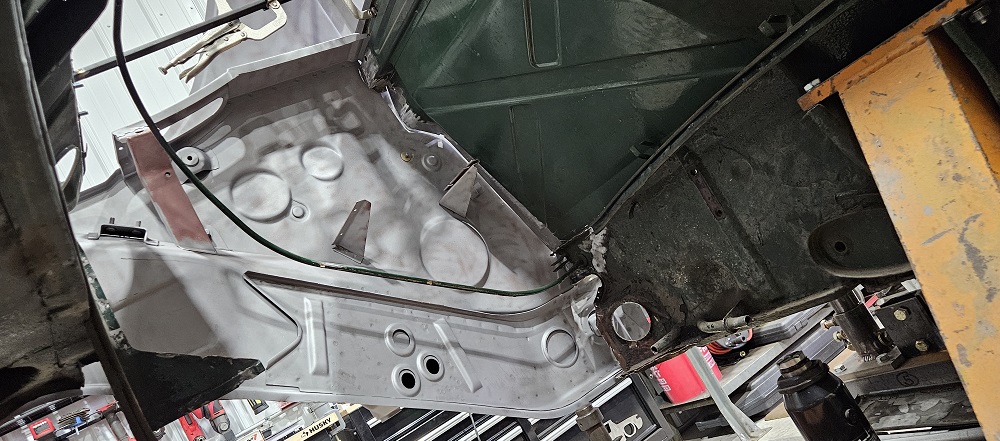
|
|
|
|
| Montreal914 |
Mar 19 2026, 06:19 PM
Post
#306
|
|
Advanced Member Group: Members Posts: 2,179 Joined: 8-August 10 From: Claremont, CA Member No.: 12,023 Region Association: Southern California |
Great progress! (IMG:style_emoticons/default/wacko.gif)
It is so nice to see all of the details of the structure. This rebuild is not only amazing, but a great documentation ressource on how the body comes together. Following with great interest! (IMG:style_emoticons/default/smilie_pokal.gif) |
 |
|
| 930cabman |
Mar 20 2026, 04:57 AM
Post
#307
|
|
Advanced Member Group: Members Posts: 4,773 Joined: 12-November 20 From: Buffalo Member No.: 24,877 Region Association: North East States |
Isn't it crazy the lengths we go to on these machines ( I am a victim too)
Great progress, driving this once completed will be a major milestone |
|
|
|
| rick 918-S |
Mar 20 2026, 05:53 AM
Post
#308
|
|
Hey nice rack! -Celette Group: Members Posts: 21,314 Joined: 30-December 02 From: Now in Superior WI Member No.: 43 Region Association: Northstar Region |
QUOTE(mepstein @ Mar 17 2026, 07:40 AM) QUOTE(Luke M @ Mar 17 2026, 08:15 AM) QUOTE(930cabman @ Mar 17 2026, 04:02 AM) I did one of these repairs a couple years ago, looking back I might consider sealing this area with silicone. Leaving it open could cause issues with crap collecting up there from debris thrown up from the rear tires Approx dimension of this area? 14" x 1 1/2" Hi John, That's why I'm asking. Even though my factory panel was sealed a bunch of dirt and road grime got all up inside that area. When I removed my Q-panel I found it was loaded with all kinds of crap. I just want to prevent things from getting up between the inner panel and Q-panel. I plan to seam seal that area well but not like the factory did. I want to be able to get a water hose up in there and flush out whatever road grime gets there. There's road grime inside my targa cross panel as well. I'm not even sure how that happened but I know it wasn't from me. There's a few people that I'm going to reach out to see what Kent did on their cars. Would it be reasonable to leave it open and instead of flushing with water, hit it with high pressure air from a compressor every once in a while. It might not get it squeaky clean but get it clean enough. I used urethane seam sealer. Leaving it open would not be good. The dirt will get up there and sit on the the lip. The tin worm will take up residence in the damp dirty space. (IMG:style_emoticons/default/dry.gif) |
|
|
|
| Cairo94507 |
Mar 20 2026, 07:07 AM
Post
#309
|
|
Michael Group: Members Posts: 10,725 Joined: 1-November 08 From: Auburn, CA Member No.: 9,712 Region Association: Northern California |
When I clean the underside of my car, I put it up on the lift, pull the wheels and use compressed air and a long handled soft brush to get in to tight spots and get rid of dust and debris. Then I go at it with detail spray and a microfiber towel. Seems to do a pretty good job.
Though I do not drive my car in the rain, I have been caught in light rain a few times. Also, I do not "wash" my car old school; I always use detail spray and microfiber towels. Been 8+ years since it was painted and it still looks good thanks to Kent Simmons extensive and detailed craftsmanship and expertise. (IMG:style_emoticons/default/beerchug.gif) |
|
|
|
| Luke M |
Mar 20 2026, 03:18 PM
Post
#310
|
|
Senior Member Group: Members Posts: 1,564 Joined: 8-February 05 From: WNY Member No.: 3,574 Region Association: North East States |
Another productive day. I got the left long and inner fender in. At this point it's just test fitting things and making any adjustments that's needed before final welding. I'll get these new panels painted in epoxy/chassis paint before installing them. I'll have to wait on a few new metal pieces. I believe that I should have them in hand within two weeks.
Meantime I have a few other small jobs to get done. Attached image(s) 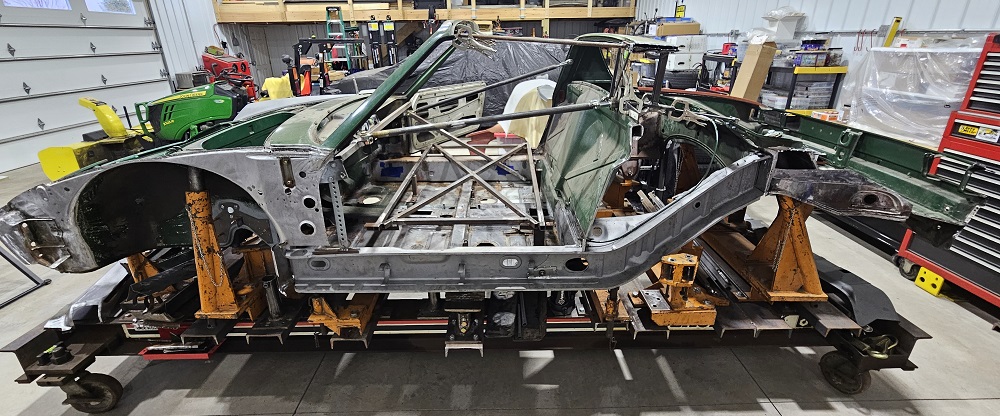  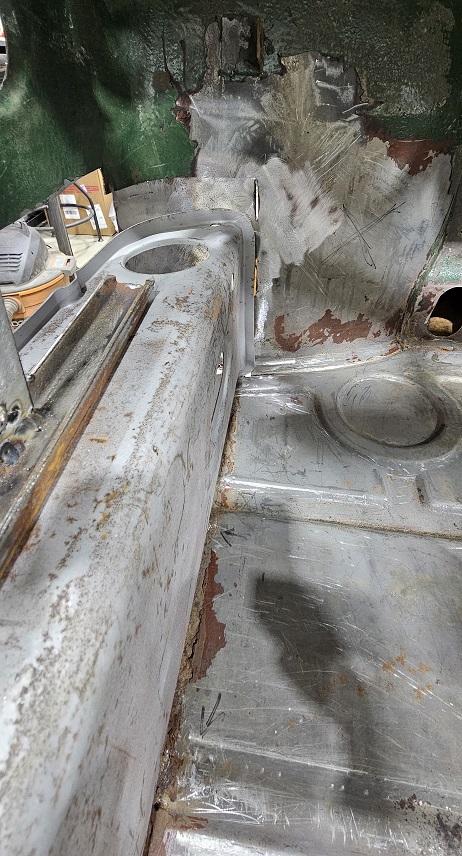  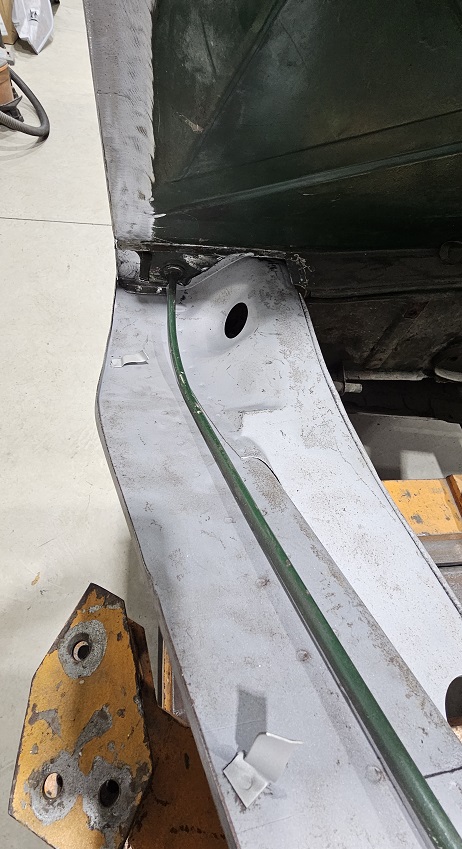 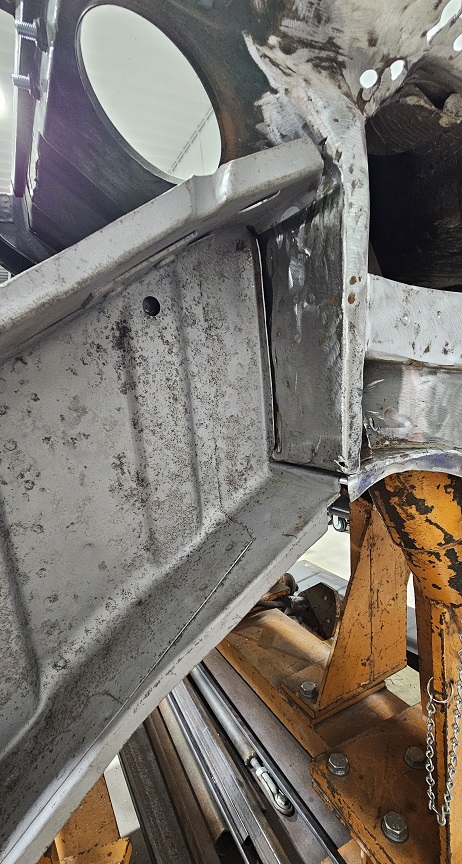 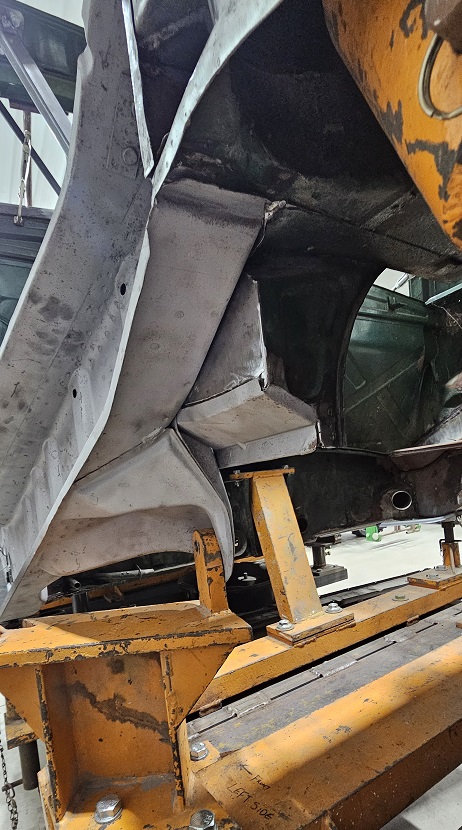 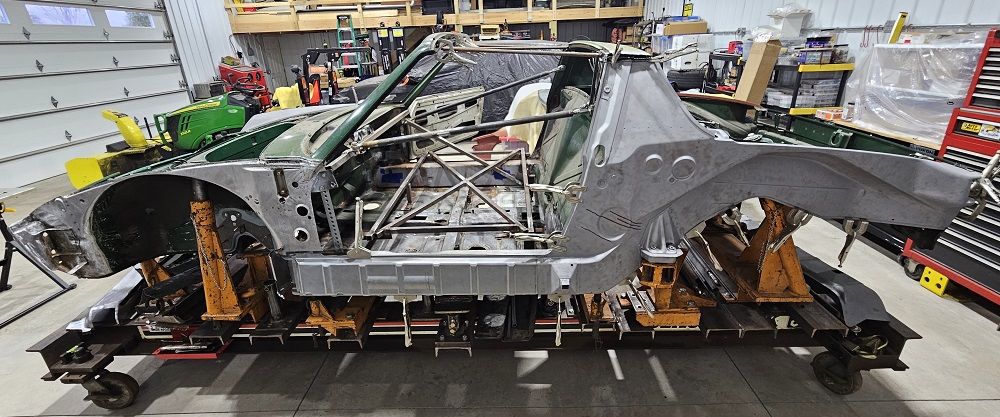
|
|
|
|
| Luke M |
Mar 21 2026, 07:14 AM
Post
#311
|
|
Senior Member Group: Members Posts: 1,564 Joined: 8-February 05 From: WNY Member No.: 3,574 Region Association: North East States |
QUOTE(rick 918-S @ Mar 20 2026, 04:53 AM) QUOTE(mepstein @ Mar 17 2026, 07:40 AM) QUOTE(Luke M @ Mar 17 2026, 08:15 AM) QUOTE(930cabman @ Mar 17 2026, 04:02 AM) I did one of these repairs a couple years ago, looking back I might consider sealing this area with silicone. Leaving it open could cause issues with crap collecting up there from debris thrown up from the rear tires Approx dimension of this area? 14" x 1 1/2" Hi John, That's why I'm asking. Even though my factory panel was sealed a bunch of dirt and road grime got all up inside that area. When I removed my Q-panel I found it was loaded with all kinds of crap. I just want to prevent things from getting up between the inner panel and Q-panel. I plan to seam seal that area well but not like the factory did. I want to be able to get a water hose up in there and flush out whatever road grime gets there. There's road grime inside my targa cross panel as well. I'm not even sure how that happened but I know it wasn't from me. There's a few people that I'm going to reach out to see what Kent did on their cars. Would it be reasonable to leave it open and instead of flushing with water, hit it with high pressure air from a compressor every once in a while. It might not get it squeaky clean but get it clean enough. I used urethane seam sealer. Leaving it open would not be good. The dirt will get up there and sit on the the lip. The tin worm will take up residence in the damp dirty space. (IMG:style_emoticons/default/dry.gif) Hi Rick, I'm thinking that I'll do just what you state here. I'll seal it up once it's ready for paint. I need to put it on my list to get done so I don't forget. Another question is what would you recommend applying to the seams that will get spot welded together? I was planning on a weld through primer along both edges. I also plan to stitch weld the rear trunk panels and inside the engine bay. I believe the GT cars got this done as well? |
|
|
|
| rick 918-S |
Mar 21 2026, 08:14 AM
Post
#312
|
|
Hey nice rack! -Celette Group: Members Posts: 21,314 Joined: 30-December 02 From: Now in Superior WI Member No.: 43 Region Association: Northstar Region |
QUOTE(Luke M @ Mar 21 2026, 08:14 AM) QUOTE(rick 918-S @ Mar 20 2026, 04:53 AM) QUOTE(mepstein @ Mar 17 2026, 07:40 AM) QUOTE(Luke M @ Mar 17 2026, 08:15 AM) QUOTE(930cabman @ Mar 17 2026, 04:02 AM) I did one of these repairs a couple years ago, looking back I might consider sealing this area with silicone. Leaving it open could cause issues with crap collecting up there from debris thrown up from the rear tires Approx dimension of this area? 14" x 1 1/2" Hi John, That's why I'm asking. Even though my factory panel was sealed a bunch of dirt and road grime got all up inside that area. When I removed my Q-panel I found it was loaded with all kinds of crap. I just want to prevent things from getting up between the inner panel and Q-panel. I plan to seam seal that area well but not like the factory did. I want to be able to get a water hose up in there and flush out whatever road grime gets there. There's road grime inside my targa cross panel as well. I'm not even sure how that happened but I know it wasn't from me. There's a few people that I'm going to reach out to see what Kent did on their cars. Would it be reasonable to leave it open and instead of flushing with water, hit it with high pressure air from a compressor every once in a while. It might not get it squeaky clean but get it clean enough. I used urethane seam sealer. Leaving it open would not be good. The dirt will get up there and sit on the the lip. The tin worm will take up residence in the damp dirty space. (IMG:style_emoticons/default/dry.gif) Hi Rick, I'm thinking that I'll do just what you state here. I'll seal it up once it's ready for paint. I need to put it on my list to get done so I don't forget. Another question is what would you recommend applying to the seams that will get spot welded together? I was planning on a weld through primer along both edges. I also plan to stitch weld the rear trunk panels and inside the engine bay. I believe the GT cars got this done as well? Another thing I do, once the welding has been completed is drill a small hole in the quarter panel on the back edge of the sail panel that ends up hidden behind the sails trim. I like to spray Eastwood encapulator or anything similar. This will help seal the back side of any welding that caused some burning off of any weld through primer if you use it, of if you don't, it is extra insurance against rusting of burnt metal that will rust just from humility. |
|
|
|
| 930cabman |
Mar 21 2026, 10:18 AM
Post
#313
|
|
Advanced Member Group: Members Posts: 4,773 Joined: 12-November 20 From: Buffalo Member No.: 24,877 Region Association: North East States |
QUOTE(rick 918-S @ Mar 20 2026, 05:53 AM) QUOTE(mepstein @ Mar 17 2026, 07:40 AM) QUOTE(Luke M @ Mar 17 2026, 08:15 AM) QUOTE(930cabman @ Mar 17 2026, 04:02 AM) I did one of these repairs a couple years ago, looking back I might consider sealing this area with silicone. Leaving it open could cause issues with crap collecting up there from debris thrown up from the rear tires Approx dimension of this area? 14" x 1 1/2" Hi John, That's why I'm asking. Even though my factory panel was sealed a bunch of dirt and road grime got all up inside that area. When I removed my Q-panel I found it was loaded with all kinds of crap. I just want to prevent things from getting up between the inner panel and Q-panel. I plan to seam seal that area well but not like the factory did. I want to be able to get a water hose up in there and flush out whatever road grime gets there. There's road grime inside my targa cross panel as well. I'm not even sure how that happened but I know it wasn't from me. There's a few people that I'm going to reach out to see what Kent did on their cars. Would it be reasonable to leave it open and instead of flushing with water, hit it with high pressure air from a compressor every once in a while. It might not get it squeaky clean but get it clean enough. I used urethane seam sealer. Leaving it open would not be good. The dirt will get up there and sit on the the lip. The tin worm will take up residence in the damp dirty space. (IMG:style_emoticons/default/dry.gif) Sealing this void is important, but AFAIK it's about 3/4" - 1" wide. A bit much for seam sealer maybe I prefer Dow Corning silicone for this application with foam backer rod. |
|
|
|
| rick 918-S |
Mar 22 2026, 11:39 AM
Post
#314
|
|
Hey nice rack! -Celette Group: Members Posts: 21,314 Joined: 30-December 02 From: Now in Superior WI Member No.: 43 Region Association: Northstar Region |
QUOTE(930cabman @ Mar 21 2026, 11:18 AM) QUOTE(rick 918-S @ Mar 20 2026, 05:53 AM) QUOTE(mepstein @ Mar 17 2026, 07:40 AM) QUOTE(Luke M @ Mar 17 2026, 08:15 AM) QUOTE(930cabman @ Mar 17 2026, 04:02 AM) I did one of these repairs a couple years ago, looking back I might consider sealing this area with silicone. Leaving it open could cause issues with crap collecting up there from debris thrown up from the rear tires Approx dimension of this area? 14" x 1 1/2" Hi John, That's why I'm asking. Even though my factory panel was sealed a bunch of dirt and road grime got all up inside that area. When I removed my Q-panel I found it was loaded with all kinds of crap. I just want to prevent things from getting up between the inner panel and Q-panel. I plan to seam seal that area well but not like the factory did. I want to be able to get a water hose up in there and flush out whatever road grime gets there. There's road grime inside my targa cross panel as well. I'm not even sure how that happened but I know it wasn't from me. There's a few people that I'm going to reach out to see what Kent did on their cars. Would it be reasonable to leave it open and instead of flushing with water, hit it with high pressure air from a compressor every once in a while. It might not get it squeaky clean but get it clean enough. I used urethane seam sealer. Leaving it open would not be good. The dirt will get up there and sit on the the lip. The tin worm will take up residence in the damp dirty space. (IMG:style_emoticons/default/dry.gif) Sealing this void is important, but AFAIK it's about 3/4" - 1" wide. A bit much for seam sealer maybe I prefer Dow Corning silicone for this application with foam backer rod. You may have been missing the spot welded flange. Besides silicone is not historically a paint friendly product. Silicone was not allowed in my shop. All it would take is someone to be cleaning something in the area where silicone was present and.toch the car.somplace else. There goes a 15k paint job. |
|
|
|
| 930cabman |
Mar 22 2026, 12:53 PM
Post
#315
|
|
Advanced Member Group: Members Posts: 4,773 Joined: 12-November 20 From: Buffalo Member No.: 24,877 Region Association: North East States |
QUOTE(rick 918-S @ Mar 22 2026, 11:39 AM) QUOTE(930cabman @ Mar 21 2026, 11:18 AM) QUOTE(rick 918-S @ Mar 20 2026, 05:53 AM) QUOTE(mepstein @ Mar 17 2026, 07:40 AM) QUOTE(Luke M @ Mar 17 2026, 08:15 AM) QUOTE(930cabman @ Mar 17 2026, 04:02 AM) I did one of these repairs a couple years ago, looking back I might consider sealing this area with silicone. Leaving it open could cause issues with crap collecting up there from debris thrown up from the rear tires Approx dimension of this area? 14" x 1 1/2" Hi John, That's why I'm asking. Even though my factory panel was sealed a bunch of dirt and road grime got all up inside that area. When I removed my Q-panel I found it was loaded with all kinds of crap. I just want to prevent things from getting up between the inner panel and Q-panel. I plan to seam seal that area well but not like the factory did. I want to be able to get a water hose up in there and flush out whatever road grime gets there. There's road grime inside my targa cross panel as well. I'm not even sure how that happened but I know it wasn't from me. There's a few people that I'm going to reach out to see what Kent did on their cars. Would it be reasonable to leave it open and instead of flushing with water, hit it with high pressure air from a compressor every once in a while. It might not get it squeaky clean but get it clean enough. I used urethane seam sealer. Leaving it open would not be good. The dirt will get up there and sit on the the lip. The tin worm will take up residence in the damp dirty space. (IMG:style_emoticons/default/dry.gif) Sealing this void is important, but AFAIK it's about 3/4" - 1" wide. A bit much for seam sealer maybe I prefer Dow Corning silicone for this application with foam backer rod. You may have been missing the spot welded flange. Besides silicone is not historically a paint friendly product. Silicone was not allowed in my shop. All it would take is someone to be cleaning something in the area where silicone was present and.toch the car.somplace else. There goes a 15k paint job. We have been using Dow Corning 756 for many years, the only paintable silicone sealant I know of. In this application it would be applied after paint |
|
|
|
| DennisV |
Mar 22 2026, 03:18 PM
Post
#316
|
|
Senior Member Group: Members Posts: 987 Joined: 8-August 20 From: Santa Rosa, CA Member No.: 24,575 Region Association: Northern California |
QUOTE(Luke M @ Mar 21 2026, 06:14 AM) Another question is what would you recommend applying to the seams that will get spot welded together? I was planning on a weld through primer along both edges. I also plan to stitch weld the rear trunk panels and inside the engine bay. I believe the GT cars got this done as well? If it's really a seam to seal (not a BIG gap), why not Wurth Brushable Seam Sealer. Best I can tell, this is the closest modern day thing for what was found on various parts of the car (e.g. floorboard, frunk, trunk). It's paintable. I think most of the Porsche parts vendors carry it if you don't have a Wurth account. |
|
|
|
| Luke M |
Mar 24 2026, 04:56 AM
Post
#317
|
|
Senior Member Group: Members Posts: 1,564 Joined: 8-February 05 From: WNY Member No.: 3,574 Region Association: North East States |
QUOTE(DennisV @ Mar 22 2026, 02:18 PM) QUOTE(Luke M @ Mar 21 2026, 06:14 AM) Another question is what would you recommend applying to the seams that will get spot welded together? I was planning on a weld through primer along both edges. I also plan to stitch weld the rear trunk panels and inside the engine bay. I believe the GT cars got this done as well? If it's really a seam to seal (not a BIG gap), why not Wurth Brushable Seam Sealer. Best I can tell, this is the closest modern day thing for what was found on various parts of the car (e.g. floorboard, frunk, trunk). It's paintable. I think most of the Porsche parts vendors carry it if you don't have a Wurth account. I plan on using seam sealer in the areas that need it. What I was referring to is the joint that gets welded together. So between the firewall and rear inner fender sections or any other sections that get spot welded together. See pic with the circled area is what I'm talking about. I believe the factory just left it in primer and spot welded the panels together. I'd like to prevent rust forming in these welded sections. I'm thinking weld through primer but wanted some opinions on what others have used. Attached image(s) 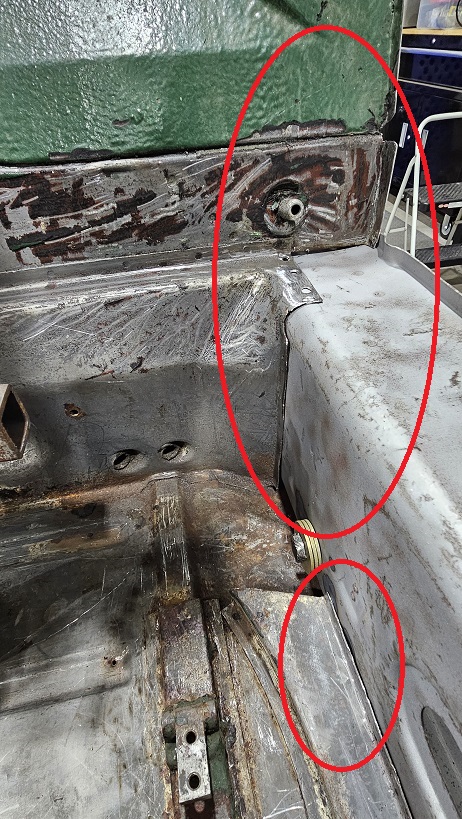
|
|
|
|
| DennisV |
Mar 24 2026, 07:58 AM
Post
#318
|
|
Senior Member Group: Members Posts: 987 Joined: 8-August 20 From: Santa Rosa, CA Member No.: 24,575 Region Association: Northern California |
QUOTE(Luke M @ Mar 24 2026, 03:56 AM) I'd like to prevent rust forming in these welded sections. I'm thinking weld through primer but wanted some opinions on what others have used. I am far from an expert, so take it for what it's worth. The rustoration shops I am following use weld-through primer on the mating surfaces before welding, then epoxy prime over it after welding. This is not in service of originality but protection. |
|
|
|
| Luke M |
Mar 25 2026, 03:25 PM
Post
#319
|
|
Senior Member Group: Members Posts: 1,564 Joined: 8-February 05 From: WNY Member No.: 3,574 Region Association: North East States |
The targa reinforcement showed up today. Made it here safe all the way from Germany.
I've been busy prepping metal and dealing with a sand blaster that I now am going to modify to work properly.. (IMG:style_emoticons/default/smash.gif) Attached image(s) 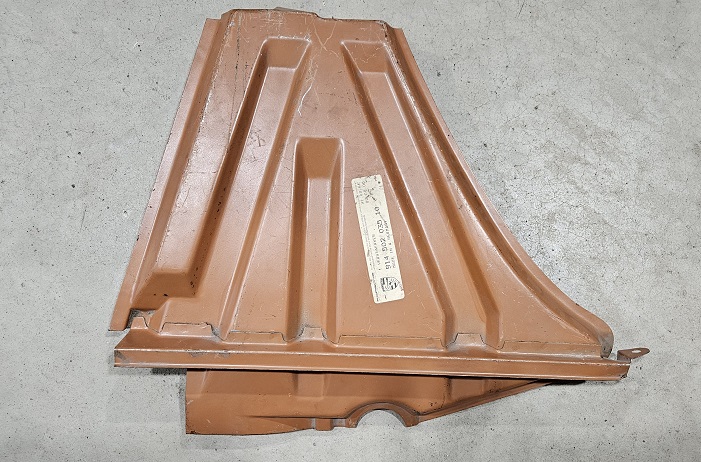 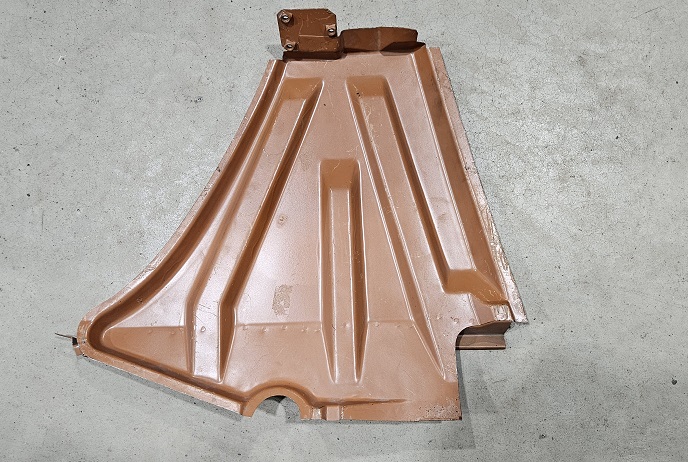 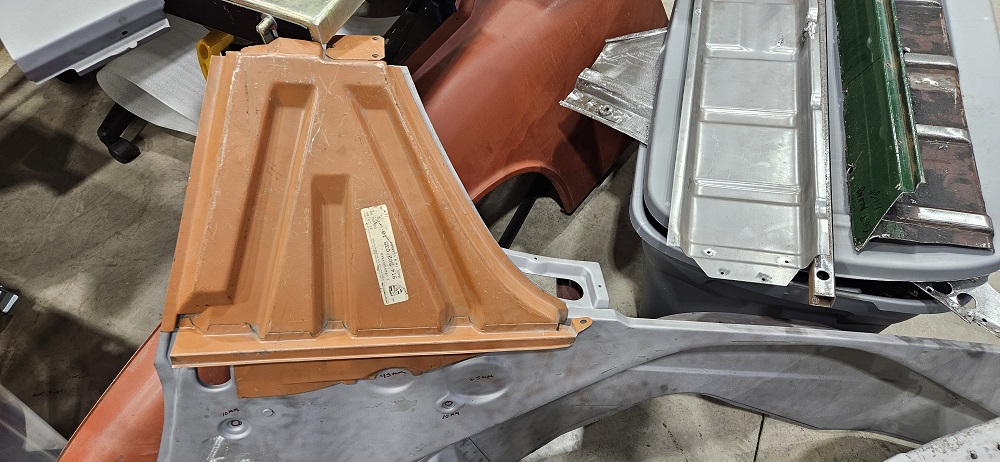
|
|
|
|
| 930cabman |
Mar 25 2026, 04:34 PM
Post
#320
|
|
Advanced Member Group: Members Posts: 4,773 Joined: 12-November 20 From: Buffalo Member No.: 24,877 Region Association: North East States |
|
|
|
|
|
1 User(s) are reading this topic (1 Guests and 0 Anonymous Users)
0 Members:

|
Lo-Fi Version | Time is now: 31st July 2026 - 06:55 PM |
Invision Power Board
v9.1.4 © 2026 IPS, Inc.