|
|
|
Porsche, and the Porsche crest are registered trademarks of Dr. Ing. h.c. F. Porsche AG.
This site is not affiliated with Porsche in any way. Its only purpose is to provide an online forum for car enthusiasts. All other trademarks are property of their respective owners. |
|
|

  |

| IronHillRestorations |
 Nov 22 2019, 08:35 AM Nov 22 2019, 08:35 AM
Post
#41
|
|
I. I. R. C.  Group: Members Posts: 6,946 Joined: 18-March 03 From: West TN Member No.: 439 Region Association: None |
|
   |

 
|
| Luke M |
Nov 22 2019, 12:51 PM
Post
#42
|
|
Senior Member Group: Members Posts: 1,544 Joined: 8-February 05 From: WNY Member No.: 3,574 Region Association: North East States |
QUOTE(rgalla9146 @ Nov 21 2019, 03:45 PM)  Holy Cow ! I think this car will be very straight. Great work Luke. Hi Rory, You know how I am. I went back and forth on how to do the right long replacement for sometime. When Perry posted the bench for sale I had to jump on it. Thanks again Perry for making it an easy transaction. It's the only way to do this job right and not worry if things are out of alignment. With the bench I have control of the repair and I can take my time to make sure everything is correct. Once I have the current fixtures attached I will work on making some for the front end. Then the spot drilling and cutting will start. Stay tuned... (IMG:style_emoticons/default/beerchug.gif) |
|
|
|
| Jamie |
Nov 22 2019, 02:36 PM
Post
#43
|
|
Senior Member Group: Members Posts: 1,211 Joined: 13-October 04 From: Georgetown,KY Member No.: 2,939 Region Association: South East States |
It never ceases to amaze me seeing the skills and desire that some teeners show doing these rustorations. (IMG:style_emoticons/default/piratenanner.gif)
|
|
|
|
| Tdskip |
Nov 24 2019, 08:00 AM
Post
#44
|
|
Advanced Member Group: Members Posts: 3,783 Joined: 1-December 17 From: soCal Member No.: 21,666 Region Association: None |
Fantastic - thanks for all of the updates.
|
|
|
|
| Superhawk996 |
Nov 24 2019, 09:46 AM
Post
#45
|
|
914 Guru Group: Members Posts: 7,901 Joined: 25-August 18 From: Woods of N. Idaho Member No.: 22,428 Region Association: Galt's Gulch |
QUOTE(mb911 @ Jul 16 2018, 04:23 PM) I will have to tackle this shortly. I am not sure what it should be but I have never seen a 914 with consistent gaps.. (IMG:style_emoticons/default/agree.gif) @Luke M @MB911 5-6mm gaps (and inconsitent) were not at all uncommon in any 1970's era cars domestic or imported. I could write a dissertation on how body dies used to be cut in the Pre-CNC era. Basically, it was done by a Keller Tracing Mill that basically carved metal by tracing a cutting path on a 3-D master which was usually a Kirksite (Zinc based alloy that cuts sort of like Aluminum) prototype die that would only be suitable for low volume use. As the path was traced on the Kirksite die, a production die was simultaneously being cut out of cast iron. Think of a pantograph but cutting cast iron instead of tracing a drawing on paper. Needless to say, accuracy wasn't what it is today. Don't kill yourself trying to get a consistent 3-4 mm gap that you would expect today. It isn't going to happen without welding door edges. |
 |
|
| mb911 |
Nov 24 2019, 10:18 AM
Post
#46
|
|
914 Guru Group: Members Posts: 7,786 Joined: 2-January 09 From: Burlington wi Member No.: 9,892 Region Association: Upper MidWest |
I have seen allot of cars with welded edges..
|
|
|
|
| Luke M |
Dec 5 2019, 12:43 PM
Post
#47
|
|
Senior Member Group: Members Posts: 1,544 Joined: 8-February 05 From: WNY Member No.: 3,574 Region Association: North East States |
Got all the fixtures attached between the chassis and bench. The right side inner suspension console required some minor adjustment to fit into the fixture. I kinda figured it was going to be an issue seeing how all of the rust damage is around that area.
Otherwise other fixtures bolted right up. I need to level out the bench as it's off just a touch but need to go buy a huge wrench first. Attached image(s) 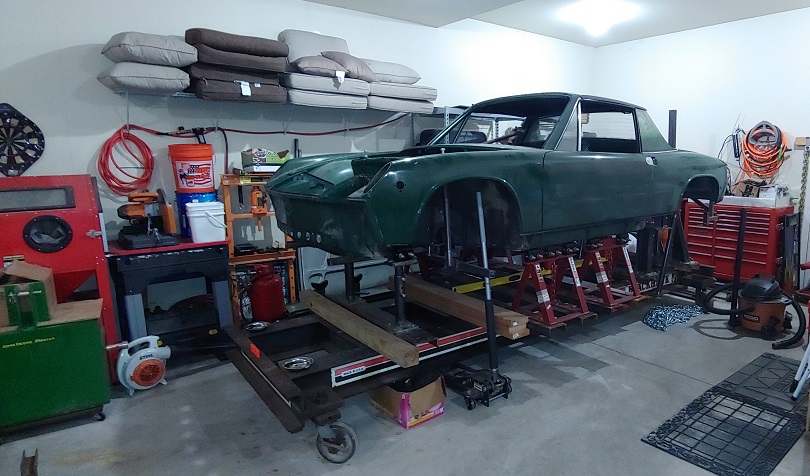 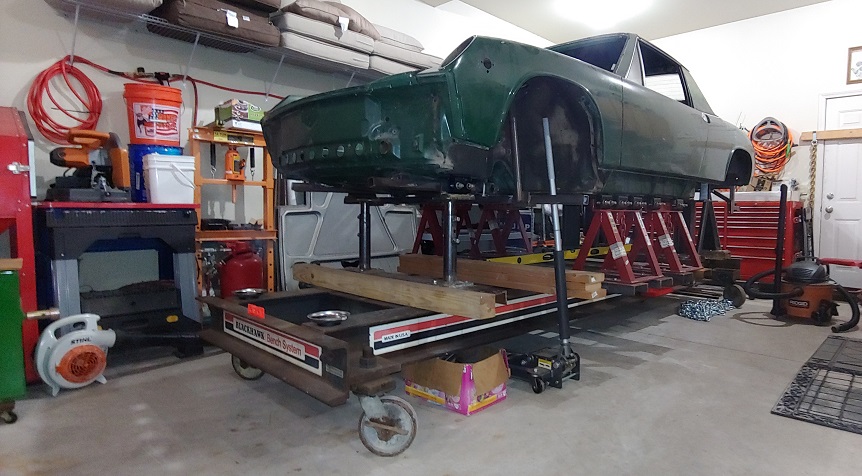 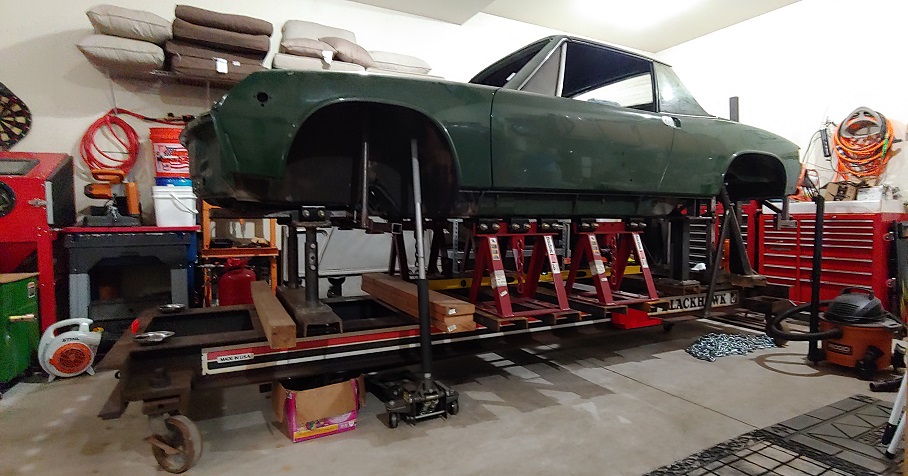 
|
|
|
|
| Cairo94507 |
Dec 5 2019, 02:07 PM
Post
#48
|
|
Michael Group: Members Posts: 10,675 Joined: 1-November 08 From: Auburn, CA Member No.: 9,712 Region Association: Northern California |
That, in and of itself, is impressive. (IMG:style_emoticons/default/beerchug.gif)
|
|
|
|
| Luke M |
Apr 26 2020, 04:22 PM
Post
#49
|
|
Senior Member Group: Members Posts: 1,544 Joined: 8-February 05 From: WNY Member No.: 3,574 Region Association: North East States |
With this covid thing going around it has set my project back. I had plans to have the chassis blasted and epoxy primed before I started cutting into it. The blaster emailed me and said per rules under the NY PAUSE act that my project is not essential and he couldn't do it until the state relaxed the rules. So now it's a waiting game there. I can do a few other things on the chassis before it goes. Got the new to me 3.2 in and started working on that. Apart she comes. Going with a 3.4 Mahle MS p/c's while doing the rebuild. Also in the works is a late model 3.2 915 with a Bott 916 shift kit. Stay tuned kids as I'll be working away when I can.
Be safe out there... (IMG:style_emoticons/default/beerchug.gif) Attached image(s) 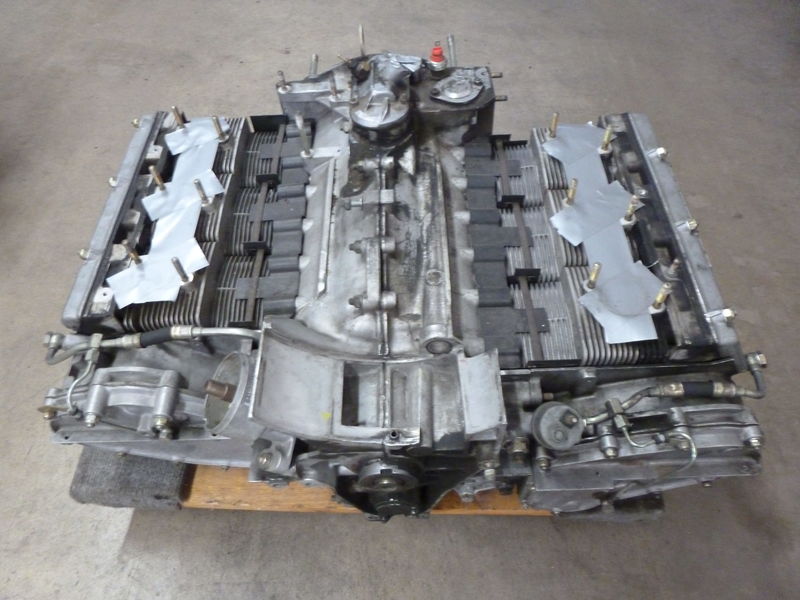 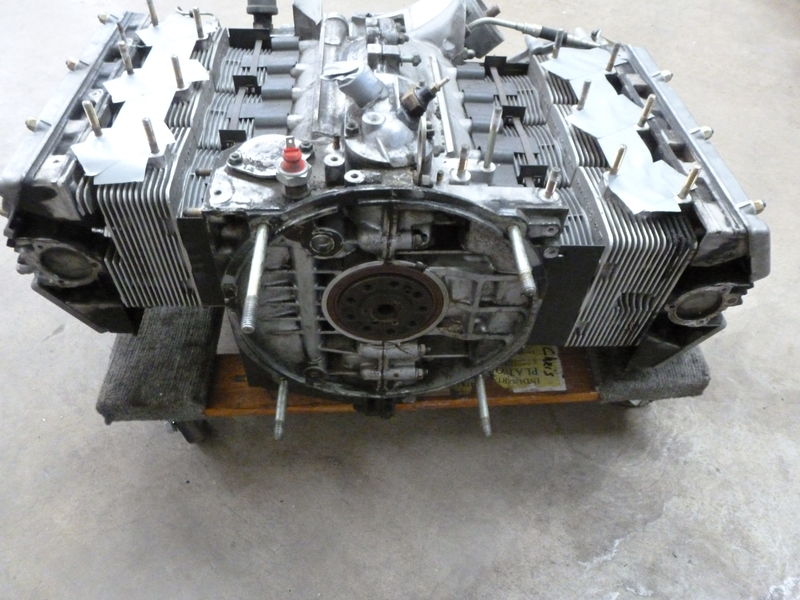 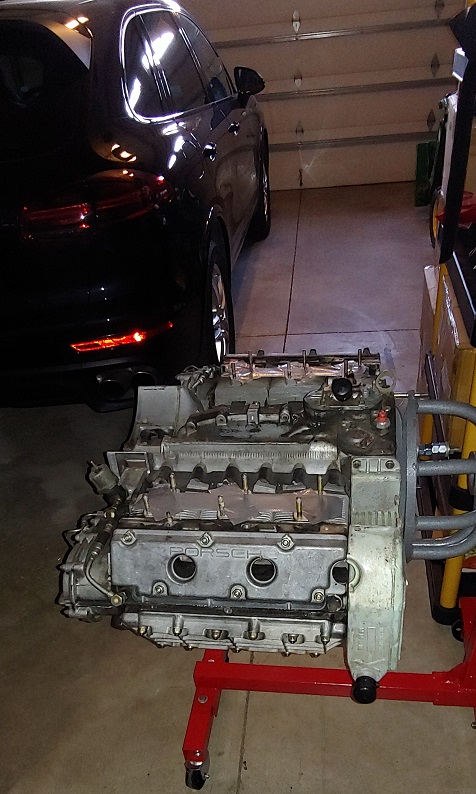
|
|
|
|
| porschetub |
Apr 26 2020, 05:04 PM
Post
#50
|
|
914 Guru Group: Members Posts: 5,124 Joined: 25-July 15 From: New Zealand Member No.: 18,995 Region Association: None |
Top overhaul or full build ?,will be a quick car with those plans (IMG:style_emoticons/default/beer.gif)
|
|
|
|
| Luke M |
Apr 26 2020, 05:45 PM
Post
#51
|
|
Senior Member Group: Members Posts: 1,544 Joined: 8-February 05 From: WNY Member No.: 3,574 Region Association: North East States |
QUOTE(porschetub @ Apr 26 2020, 04:04 PM) Top overhaul or full build ?,will be a quick car with those plans (IMG:style_emoticons/default/beer.gif) Going all in.. Bottom to top end. |
|
|
|
| Luke M |
May 1 2020, 09:16 AM
Post
#52
|
|
Senior Member Group: Members Posts: 1,544 Joined: 8-February 05 From: WNY Member No.: 3,574 Region Association: North East States |
Started the tear down on the 3.2. I'm gonna remove the head studs then split the case.
Supertech head studs are going in so these need to be removed. I hope none of them snap like my brothers 3.0. 3.4 MMS p/c's and a bunch of other parts are on order. It should all be here next week.. Attached image(s) 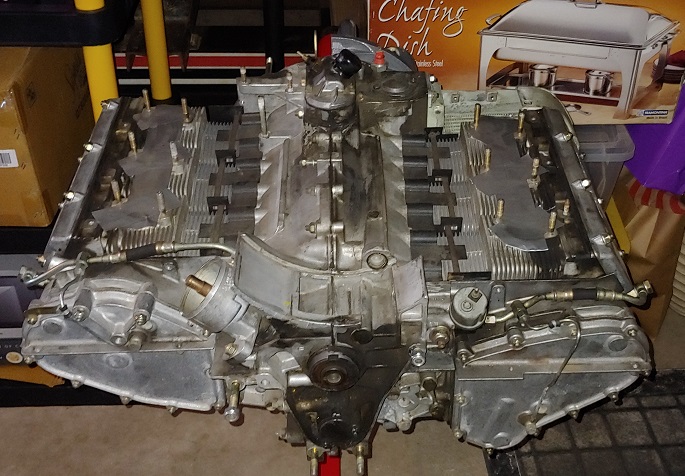  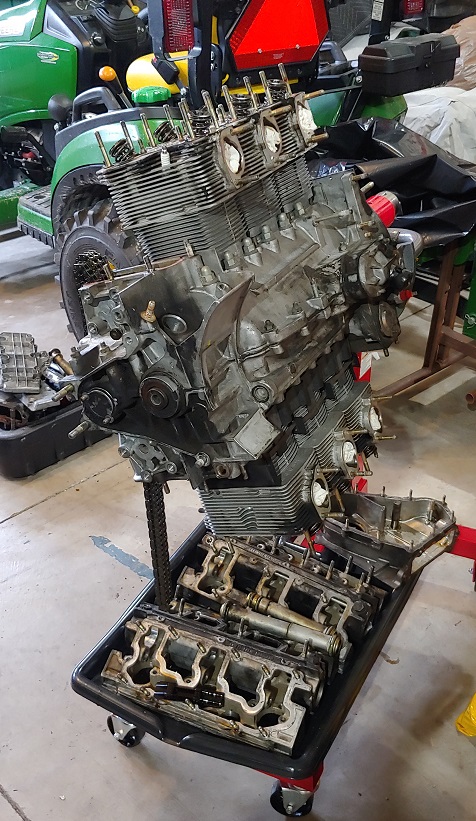 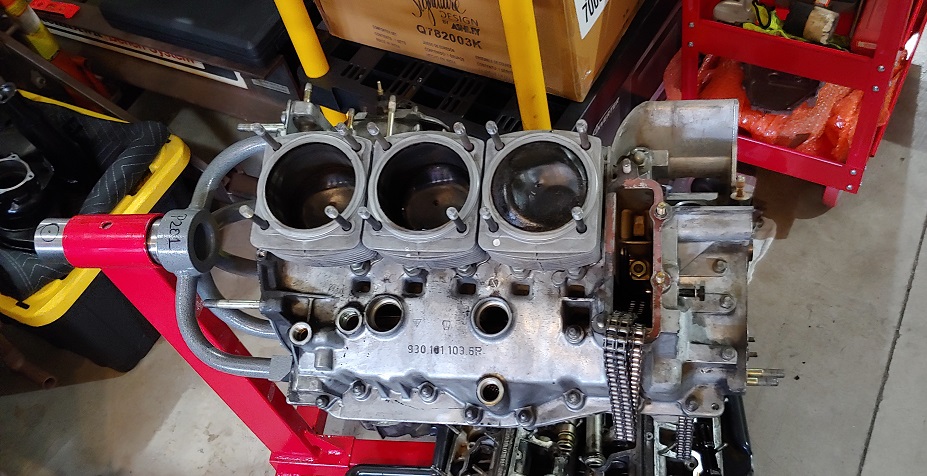 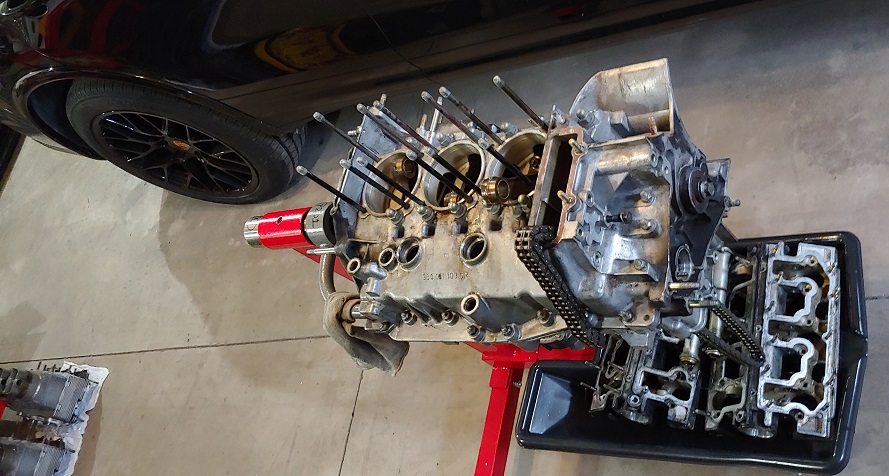
|
|
|
|
| Mark Henry |
May 1 2020, 10:49 AM
Post
#53
|
|
that's what I do! Group: Members Posts: 20,065 Joined: 27-December 02 From: Port Hope, Ontario Member No.: 26 Region Association: Canada |
For the Supertec head studs you'll need a thread reformer tap. Don't use a regular tap as it will cut too much of the threads.
I had to do this on my 3.0 or the studs wouldn't go in far enough. |
|
|
|
| mepstein |
May 1 2020, 11:31 AM
Post
#54
|
|
914-6 GT in waiting Group: Members Posts: 20,775 Joined: 19-September 09 From: Landenberg, PA/Wilmington, DE Member No.: 10,825 Region Association: MidAtlantic Region |
I removed studs from about 25 engine cases when I worked at the shop. If you have 2 people, one heats up the case right at the register where the stud descends into the case. The other is removing pre heated studs from the case. I always hit it with map gas for 2-3 minutes before twisting the stud. My feeling is it not only helped to keep the stud from breaking but it was easier on the aluminum and especially magnesium threads in the case. If the stud wasn't easy to turn after a couple minutes of heat, it got another minute or 2 and would always come out easily.
Divlar studs are strange. I watched someone reuse them because they looked perfect and the next morning we came in to a couple broken studs on the floor. While we were standing there, we heard a ping, watched a broken stud with the nut on top, jump out of the head and fall to the ground. The engine got all new studs... |
|
|
|
| Luke M |
May 2 2020, 02:47 PM
Post
#55
|
|
Senior Member Group: Members Posts: 1,544 Joined: 8-February 05 From: WNY Member No.: 3,574 Region Association: North East States |
Got the head studs all off without any issues..
Gonna split the case on Sunday. I did get an update from PMS on the 915/Bott 916 trans. The tech was wrapping it up on Friday so it should be shipped out this coming week. Attached thumbnail(s) 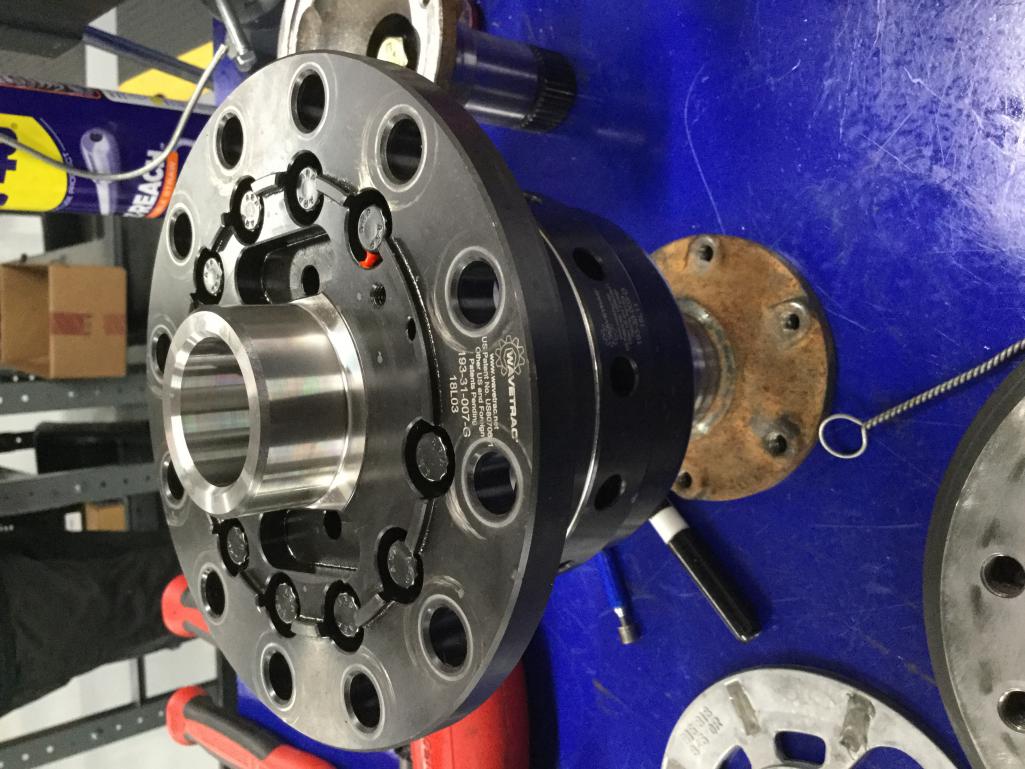 Attached image(s) 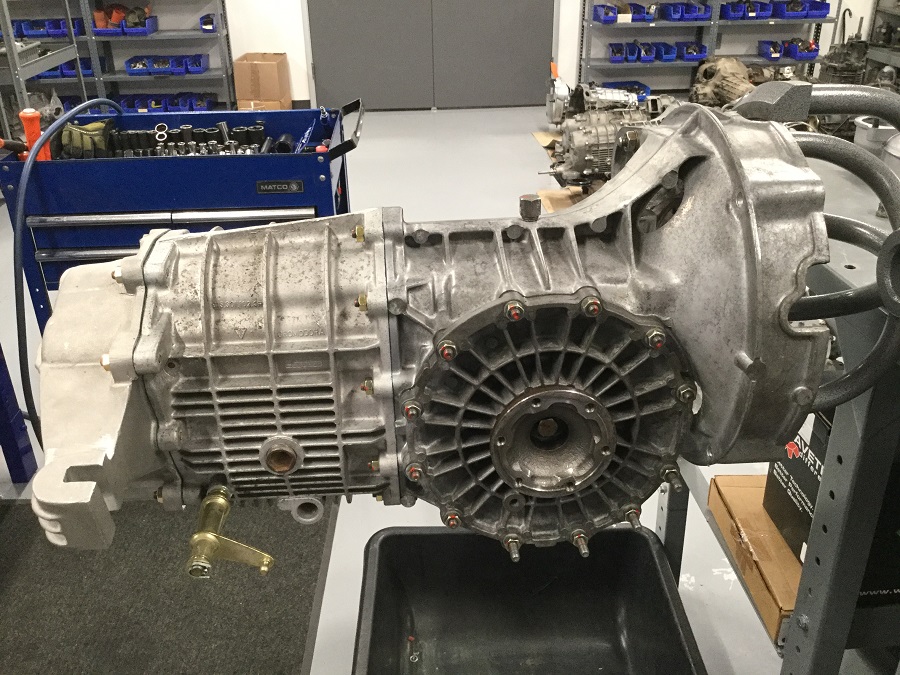 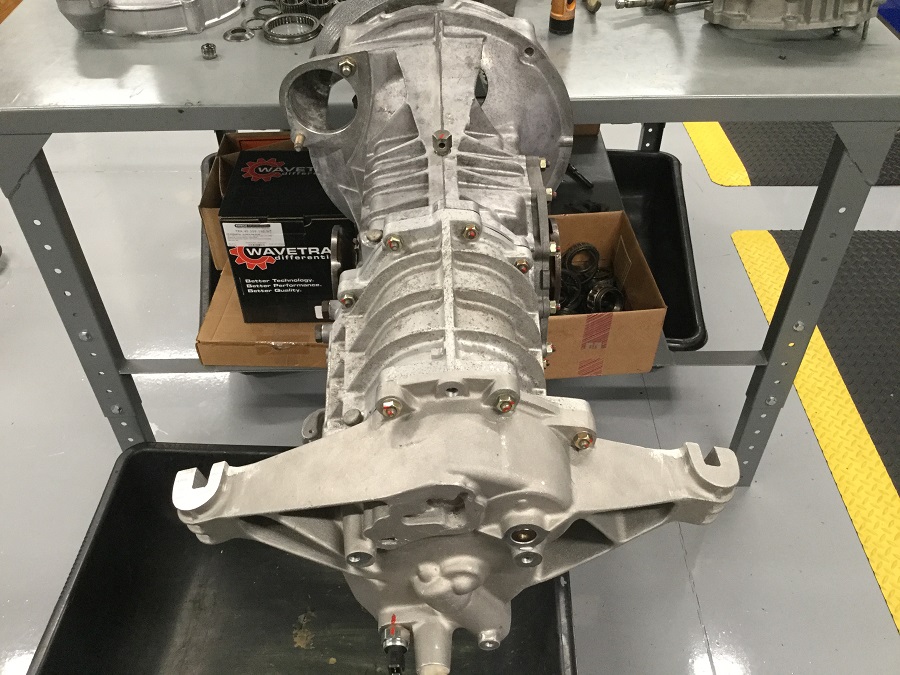 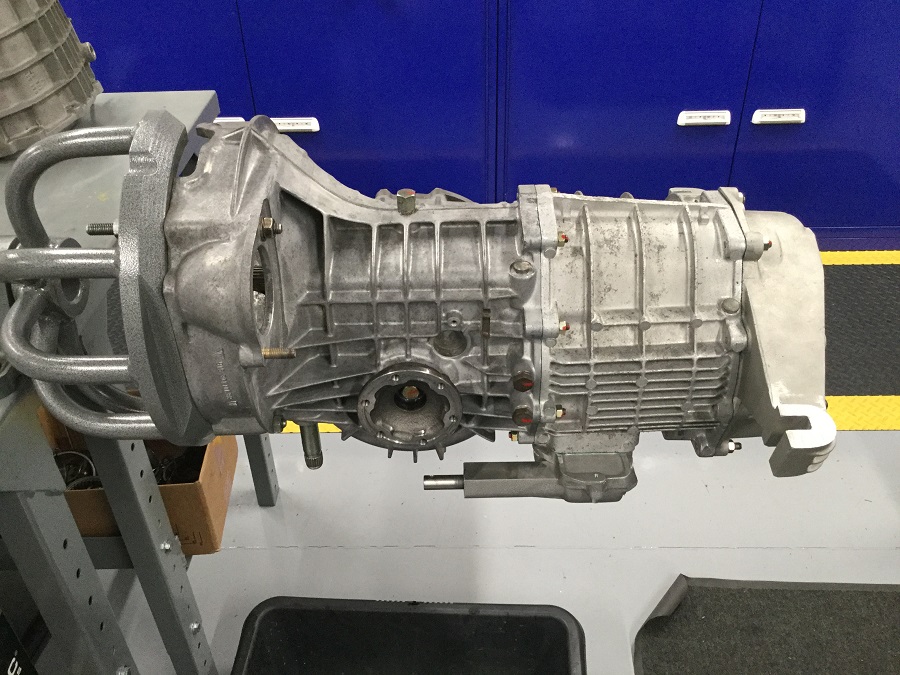 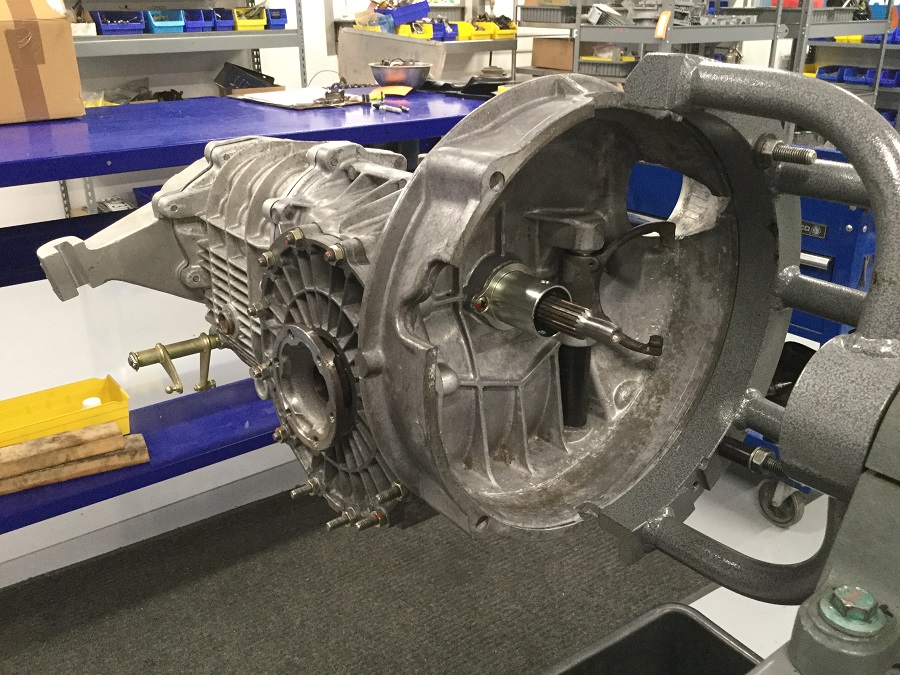 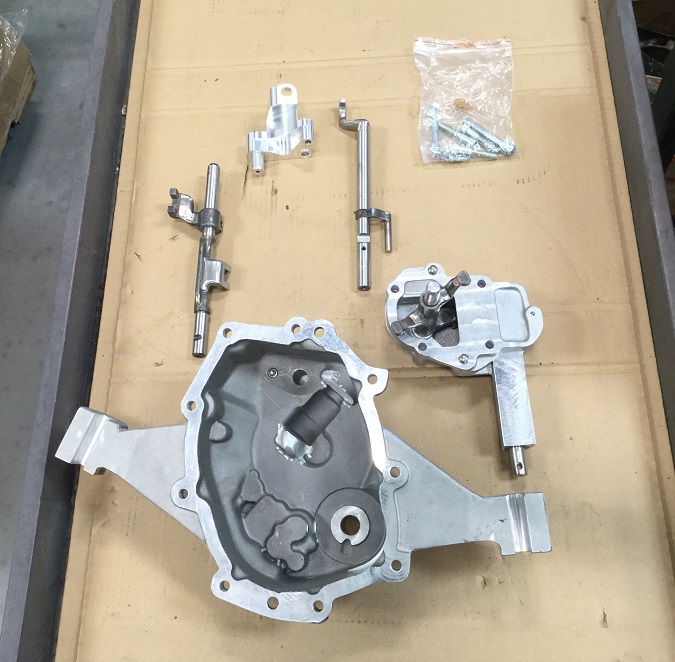
|
|
|
|
| Cairo94507 |
May 2 2020, 04:26 PM
Post
#56
|
|
Michael Group: Members Posts: 10,675 Joined: 1-November 08 From: Auburn, CA Member No.: 9,712 Region Association: Northern California |
Luke - I am loving that transaxle (IMG:style_emoticons/default/wub.gif)
|
|
|
|
| rgalla9146 |
May 2 2020, 06:58 PM
Post
#57
|
|
Advanced Member Group: Members Posts: 4,972 Joined: 23-November 05 From: Paramus NJ Member No.: 5,176 Region Association: None |
Looking good Luke
Make hay while the sun shines ! |
|
|
|
| Luke M |
May 3 2020, 01:19 PM
Post
#58
|
|
Senior Member Group: Members Posts: 1,544 Joined: 8-February 05 From: WNY Member No.: 3,574 Region Association: North East States |
I split the case today.. Main bearings looked good but the lay shaft bearings are showing wear. I need to get the rods removed from the crank then all parts off to the machine shop.
Attached image(s) 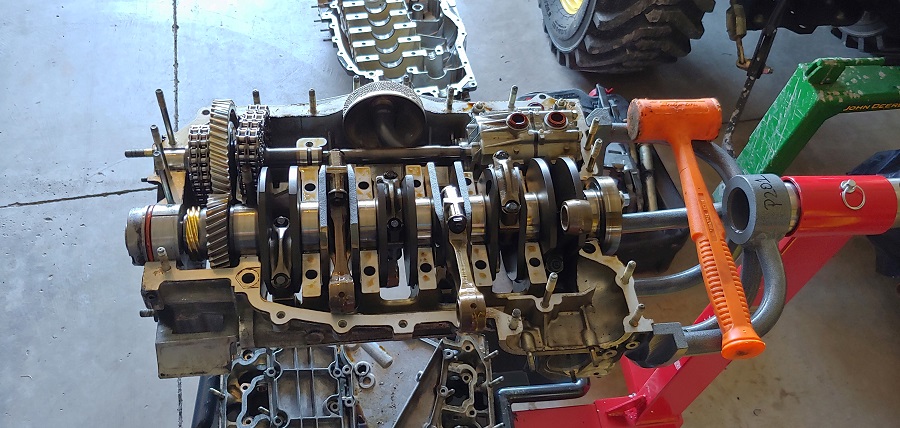 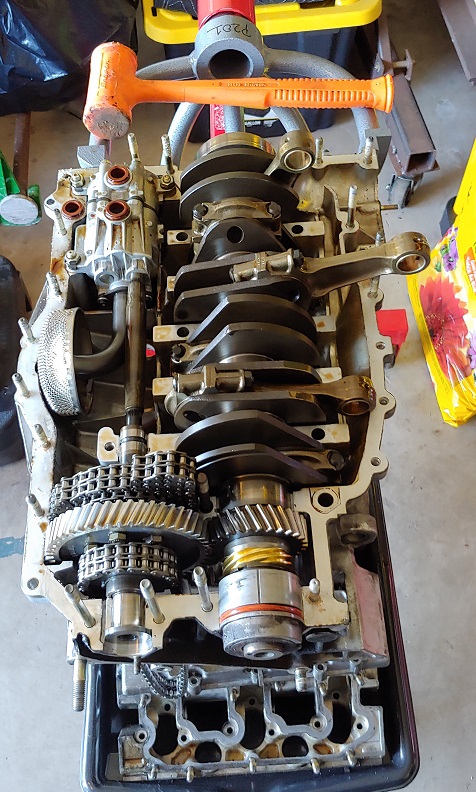 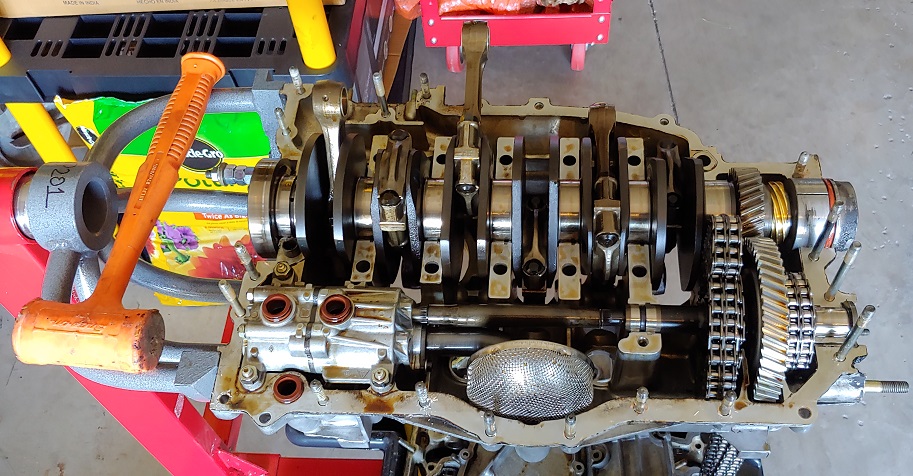 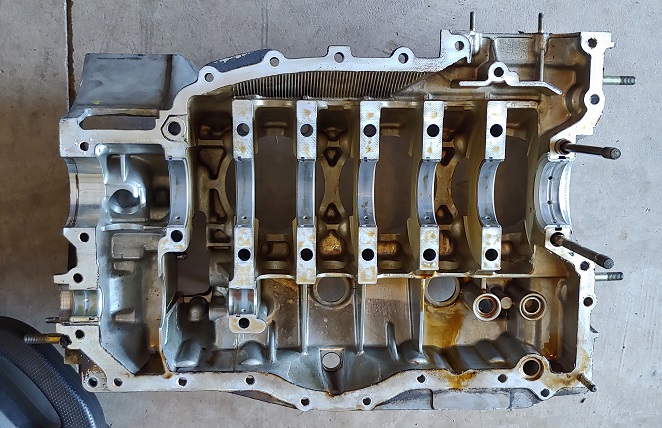
|
|
|
|
| Luke M |
May 19 2020, 01:35 PM
Post
#59
|
|
Senior Member Group: Members Posts: 1,544 Joined: 8-February 05 From: WNY Member No.: 3,574 Region Association: North East States |
I received my converted 915/916 Bott trans back from PMS today.
I also purchased the PMS shift linkage kit to work with the new setup. (IMG:style_emoticons/default/piratenanner.gif) Attached image(s) 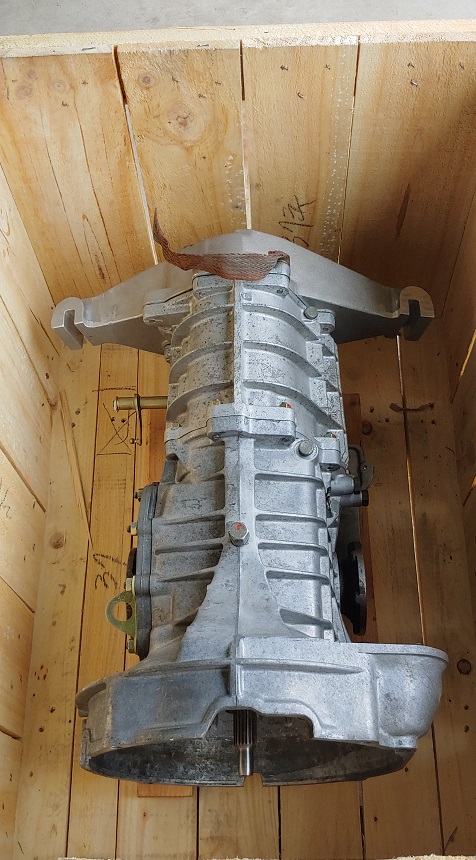 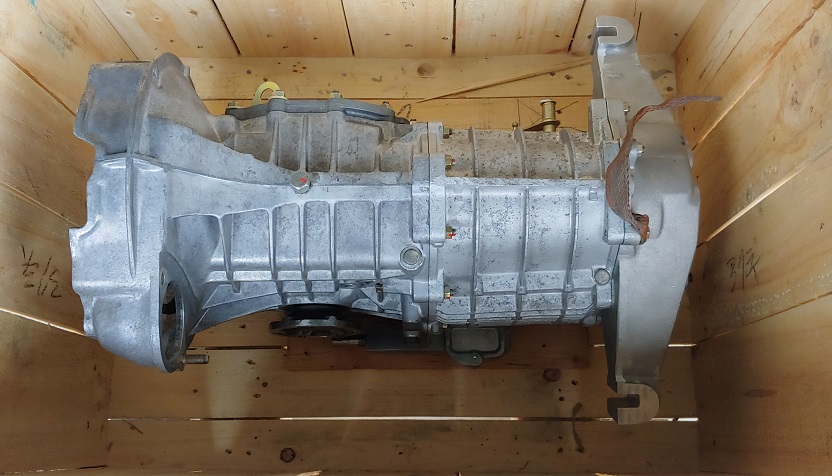 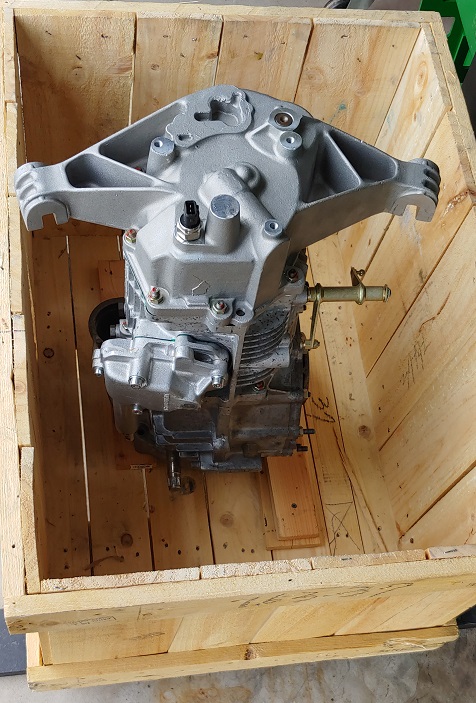 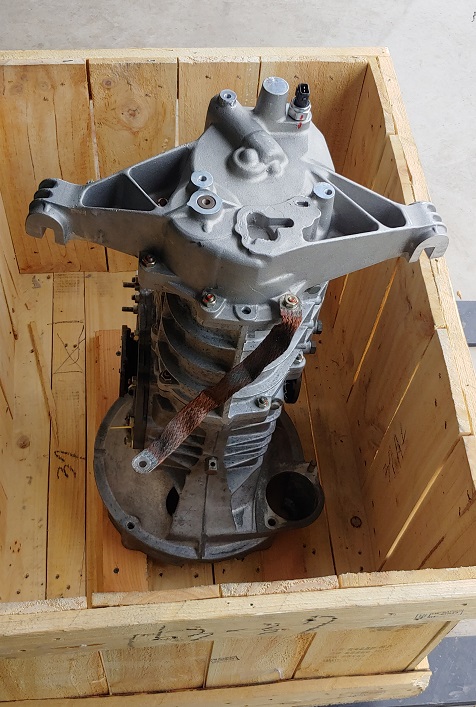 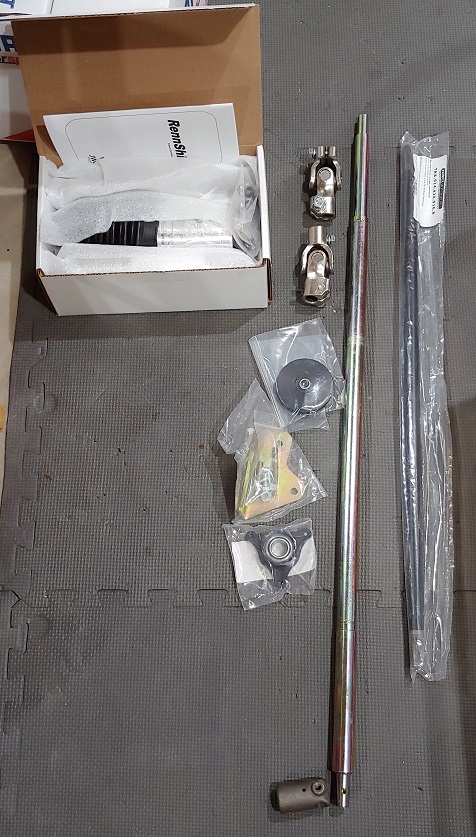
|
|
|
|
| gms |
May 19 2020, 01:58 PM
Post
#60
|
|
Advanced Member Group: Members Posts: 2,750 Joined: 12-March 04 From: Chicagoland Member No.: 1,785 Region Association: Upper MidWest |
Nice addition to the build
(IMG:style_emoticons/default/smilie_pokal.gif) |
|
|
|
|
2 User(s) are reading this topic (2 Guests and 0 Anonymous Users)
0 Members:

|
Lo-Fi Version | Time is now: 18th June 2026 - 02:46 PM |
Invision Power Board
v9.1.4 © 2026 IPS, Inc.