|
|
|
Porsche, and the Porsche crest are registered trademarks of Dr. Ing. h.c. F. Porsche AG.
This site is not affiliated with Porsche in any way. Its only purpose is to provide an online forum for car enthusiasts. All other trademarks are property of their respective owners. |
|
|


| Rob-O |
 Nov 20 2015, 10:30 AM Nov 20 2015, 10:30 AM
Post
#1
|
|
Senior Member  Group: Members Posts: 1,252 Joined: 5-December 03 From: Mansfield, TX Member No.: 1,419 Region Association: Southwest Region |
I'm finally doing the install of the Camp trunk shock kit. I've got it all complete except for removing the tension on the factory springs and hooking up the Camp shocks. I know the trick for moving the spring enough to get a new roller in the hinge using a modified adjustable wrench (recent thread around here actually).. But once I move the spring, I'm having a hard time moving it off of the roller with the 10mm socket method. And if I am able to move it, it doesn't look like I'll have enough room to release the tension by bringing it down against the body/sheet metal area under the hinge.
Camp's instructions just say there is a nice write up on how to do it in the Haynes manual. But I haven't had (thanks to 914World) a Haynes Manual in decades. I think the last time I removed one of the factory torsion springs it was by just removing the nuts holding the springs down. That was in the 80's and I still remember that it was a dangerous endeavor. Any ideas??? |
   |

 
|
  |
Replies(1 - 14)
| GeorgeRud |
Nov 20 2015, 10:51 AM
Post
#2
|
|
Advanced Member Group: Members Posts: 3,725 Joined: 27-July 05 From: Chicagoland Member No.: 4,482 Region Association: Upper MidWest |
I seem to remember you open the trunk and remove the trunk rollers to take the tension off the torsion rods, but I think it still was a chore.
However, you'll love the trunk shocks when it's done. |
|
|
|
| Mike D. |
Nov 20 2015, 11:07 AM
Post
#3
|
|
OK, It runs now, and pretty good too! Group: Members Posts: 1,445 Joined: 3-January 03 From: Santa Clarita, Ca Member No.: 85 Region Association: None |
Use a cut off wheel and cut them in the center. Removes the tension! (IMG:style_emoticons/default/sawzall-smiley.gif)
|
|
|
|
| Rob-O |
Nov 20 2015, 02:54 PM
Post
#4
|
|
Senior Member Group: Members Posts: 1,252 Joined: 5-December 03 From: Mansfield, TX Member No.: 1,419 Region Association: Southwest Region |
Brilliant Mike! Getting cut tonight!
|
|
|
|
| EdwardBlume |
Nov 20 2015, 02:56 PM
Post
#5
|
|
914 Wizard Group: Members Posts: 12,338 Joined: 2-January 03 From: SLO Member No.: 81 Region Association: Central California |
Yikes! Lots of tension. Be careful!
|
|
|
|
| r_towle |
Nov 20 2015, 03:04 PM
Post
#6
|
|
Custom Member Group: Members Posts: 24,574 Joined: 9-January 03 From: Taxachusetts Member No.: 124 Region Association: North East States |
It's a whole lot simpler and easier to take a 10mm deep socket and put it on a 6 inch extension.
Slip that over the end of the spring at the roller, push it down and take it off the roller and gently let it go toward the back. When done, release the two 10mm claps and you are done. |
|
|
|
| pilothyer |
Nov 20 2015, 05:31 PM
Post
#7
|
|
Member Group: Members Posts: 838 Joined: 21-May 08 From: N. Alabama Member No.: 9,080 Region Association: South East States |
QUOTE(Mike D. @ Nov 20 2015, 11:07 AM)  Use a cut off wheel and cut them in the center. Removes the tension! (IMG:style_emoticons/default/sawzall-smiley.gif) Why does this remind me of close range taunting of a coiled rattlesnake? (IMG:style_emoticons/default/biggrin.gif) |
|
|
|
| Kansas 914 |
Nov 20 2015, 06:27 PM
Post
#8
|
|
Advanced Member Group: Members Posts: 2,999 Joined: 1-March 03 From: Durango, Colorado Member No.: 373 Region Association: Rocky Mountains |
QUOTE(r_towle @ Nov 20 2015, 02:04 PM) It's a whole lot simpler and easier to take a 10mm deep socket and put it on a 6 inch extension. Slip that over the end of the spring at the roller, push it down and take it off the roller and gently let it go toward the back. When done, release the two 10mm claps and you are done. (IMG:style_emoticons/default/agree.gif) |
|
|
|
| dangrouche |
Nov 20 2015, 06:45 PM
Post
#9
|
|
dangrouche Group: Members Posts: 550 Joined: 1-May 04 From: San Francisco Bay Area Member No.: 2,012 Region Association: None |
i used that 10mm deep socket technique. For SAFTEY's sake, wear thick welder type gloves and safety glasses.
|
|
|
|
| Rob-O |
Nov 20 2015, 09:06 PM
Post
#10
|
|
Senior Member Group: Members Posts: 1,252 Joined: 5-December 03 From: Mansfield, TX Member No.: 1,419 Region Association: Southwest Region |
Worked perfectly! Still a little scary when that spring lets go though!
|
|
|
|
| Dave_Darling |
Nov 20 2015, 09:13 PM
Post
#11
|
|
914 Idiot Group: Members Posts: 14,986 Joined: 9-January 03 From: Silicon Valley / Kailua-Kona Member No.: 121 Region Association: Northern California |
QUOTE(pilothyer @ Nov 20 2015, 03:31 PM) QUOTE(Mike D. @ Nov 20 2015, 11:07 AM) Use a cut off wheel and cut them in the center. Removes the tension! (IMG:style_emoticons/default/sawzall-smiley.gif) Why does this remind me of close range taunting of a coiled rattlesnake? (IMG:style_emoticons/default/biggrin.gif) Because you have too much imagination? It makes a noise when it lets go, but the torsion rod doesn't go anywhere. There's even a metal loop that the rods go through to keep them from flying off! If you're going with the pressure struts, cut the torsion rods and be done with it. --DD |
|
|
|
| Rob-O |
Nov 20 2015, 10:21 PM
Post
#12
|
|
Senior Member Group: Members Posts: 1,252 Joined: 5-December 03 From: Mansfield, TX Member No.: 1,419 Region Association: Southwest Region |
I cut the rods. As DD said, there is a loop, so they can't go anywhere. I did wear safety glasses and heavy gloves, just in case. The "POW" when the rods finally snap in two is a little loud. I did have a some fitment issues though. The end of the rod that attaches to the hinge was touching the side of the seal and preventing from closing. I had to trim that a little more than I'd like. Now that seal just runs straight across the back edge of the trunk. I had to cut off the pieces that curved around the shock towers.
|
|
|
|
| Rob-O |
Nov 21 2015, 05:32 PM
Post
#13
|
|
Senior Member Group: Members Posts: 1,252 Joined: 5-December 03 From: Mansfield, TX Member No.: 1,419 Region Association: Southwest Region |
Finished product. By the way, those are the new 914Rubber latch cups and trunk mat, great products and inexpensive for some trunk bling.
Attached thumbnail(s) 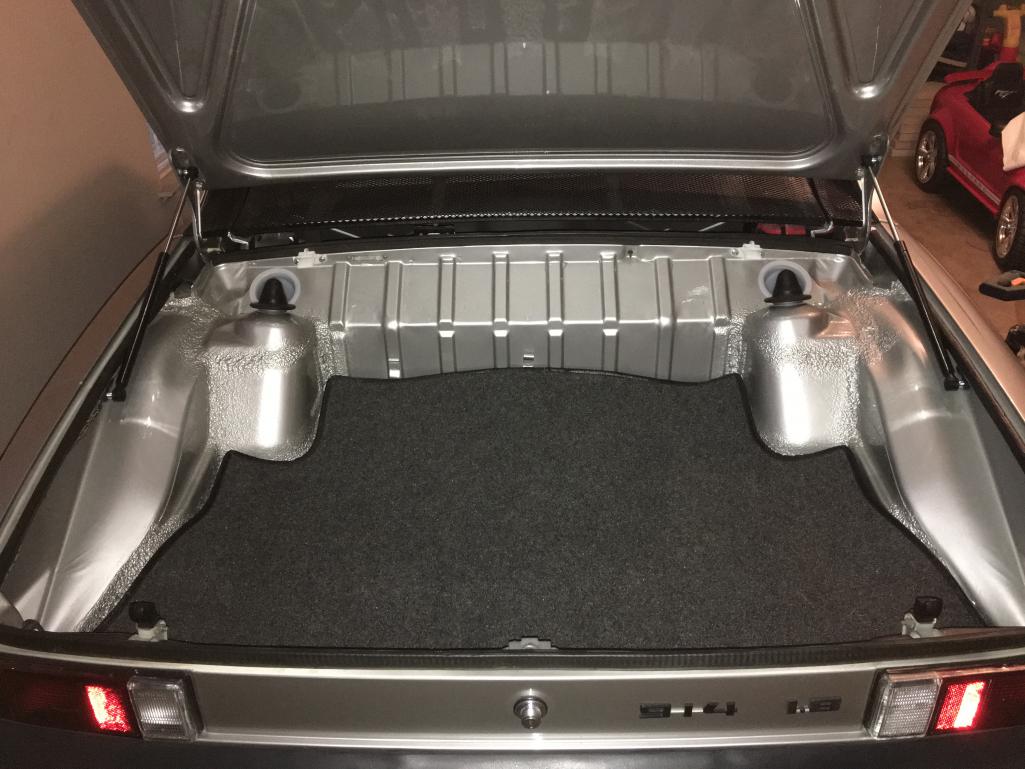
|
|
|
|
| North Coast Jim |
Dec 19 2015, 09:27 AM
Post
#14
|
|
Member Group: Members Posts: 323 Joined: 11-December 15 From: Northern Ohio Member No.: 19,450 Region Association: MidAtlantic Region |
QUOTE(Rob-O @ Nov 20 2015, 11:30 AM) I'm finally doing the install of the Camp trunk shock kit. I've got it all complete except for removing the tension on the factory springs and hooking up the Camp shocks. I know the trick for moving the spring enough to get a new roller in the hinge using a modified adjustable wrench (recent thread around here actually).. But once I move the spring, I'm having a hard time moving it off of the roller with the 10mm socket method. And if I am able to move it, it doesn't look like I'll have enough room to release the tension by bringing it down against the body/sheet metal area under the hinge. Camp's instructions just say there is a nice write up on how to do it in the Haynes manual. But I haven't had (thanks to 914World) a Haynes Manual in decades. I think the last time I removed one of the factory torsion springs it was by just removing the nuts holding the springs down. That was in the 80's and I still remember that it was a dangerous endeavor. Any ideas??? I wanted to use the original torsion bar springs and mine were already unloaded. Had to get them back onto the post and install the rollers. I made the tool attached below and it worked easily and SAFELY. Tried the socket with extension and almost took out my forehead. Not safe. I made my tool, the ENABLER, out of Stainless. Attached thumbnail(s) 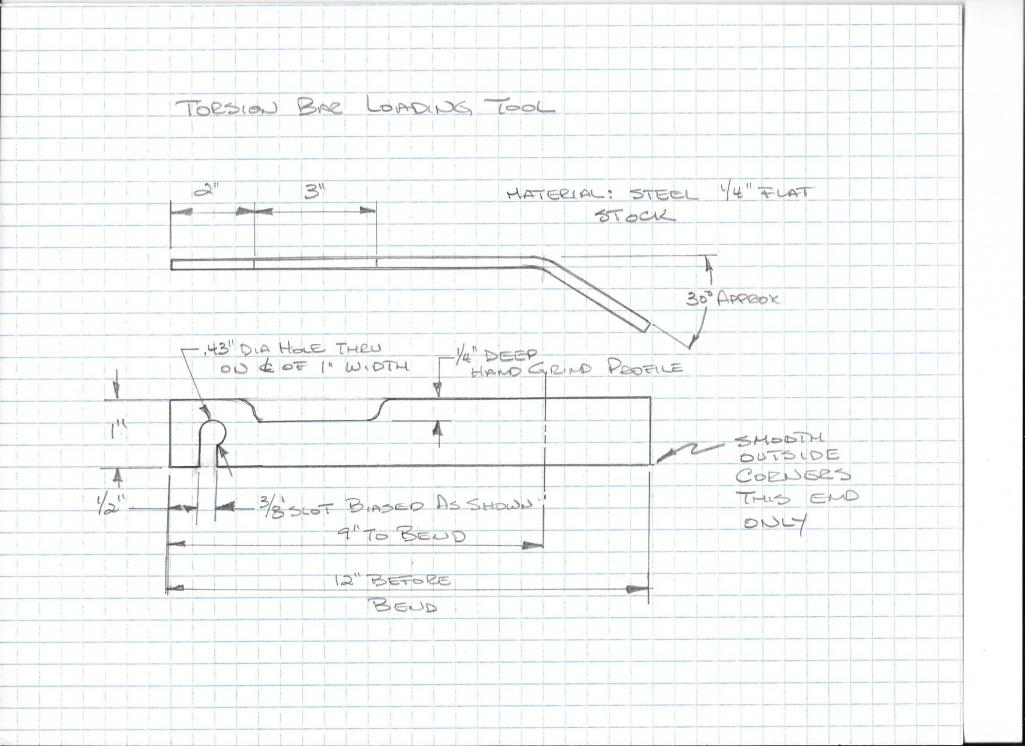
|
|
|
|
| Rob-O |
Dec 19 2015, 10:01 AM
Post
#15
|
|
Senior Member Group: Members Posts: 1,252 Joined: 5-December 03 From: Mansfield, TX Member No.: 1,419 Region Association: Southwest Region |
Nice!
|
|
|
|
|
1 User(s) are reading this topic (1 Guests and 0 Anonymous Users)
0 Members:

|
Lo-Fi Version | Time is now: 19th May 2024 - 10:53 AM |
Invision Power Board
v9.1.4 © 2024 IPS, Inc.