|
|
|
Porsche, and the Porsche crest are registered trademarks of Dr. Ing. h.c. F. Porsche AG.
This site is not affiliated with Porsche in any way. Its only purpose is to provide an online forum for car enthusiasts. All other trademarks are property of their respective owners. |
|
|


| rhcb914 |
 Mar 12 2005, 06:27 PM Mar 12 2005, 06:27 PM
Post
#1
|
|
member  Group: Members Posts: 360 Joined: 3-February 04 From: Boston, MA Member No.: 1,626 |
So back in December just before the first (of many) snow storms I put away the car and decided to pull off the outter rockers and clean the years of road debris. Beneath the 30+ years of dirt there was some considerable rust through. (IMG:http://www.914world.com/bbs2/html/emoticons/ohmy.gif) My first 914 (a typical new england swiss cheese car) died a terrible deat from the dreaded red plague. I was determined not to let the same happen to this one! After reading about everyone elses repair project (by the way this club rocks!) (IMG:http://www.914world.com/bbs2/html/emoticons/aktion035.gif) I figured that it's time for me to jump in, after all how hard can it be, right? Since the winter is about 6 months long around here, I'll have plenty of time to cut and weld with no distractions (one of the few pluses of being a car guy in the NE).
(IMG:http://www.914world.com/bbs2/html/emoticons/sawzall-smiley.gif) (IMG:http://www.914world.com/bbs2/html/emoticons/welder.gif) I decided to start with the passenger side. Here is what I started with. Attached image(s) 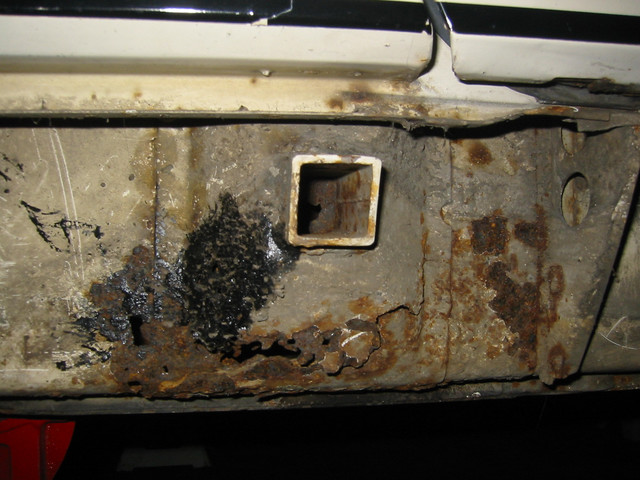
|
   |

 
|
Posts in this topic
 rhcb914 Jack Post Repair Mar 12 2005, 06:27 PM
 rhcb914 The more I cut the more rust I found...
This is w... Mar 12 2005, 06:30 PM rhcb914 I took out part of the door jam and threshold off ... Mar 12 2005, 06:33 PM rhcb914 While I was in there I figured I'd repair the ... Mar 12 2005, 06:38 PM rhcb914 At least the hell hole looks good. How many people... Mar 12 2005, 06:43 PM rhcb914 Got in there and cleaned as best I could then got ... Mar 12 2005, 06:44 PM rhcb914 adsfsa Mar 12 2005, 06:46 PM rhcb914 Now that everything was cleaned up I was ready to ... Mar 12 2005, 06:54 PM rhcb914 adsfdsf Mar 12 2005, 06:55 PM MecGen Thumbs up dude
You wil have a rust free car in no ... Mar 12 2005, 06:57 PM rhcb914 Here's the rocker patch I made. Mar 12 2005, 06:58 PM rhcb914 Here's the floor patch and the rocker patch we... Mar 12 2005, 06:59 PM rhcb914 The floor section completed. Still have to grind a... Mar 12 2005, 07:01 PM rhcb914 Thanks for the words of encouragement Joe! <... Mar 12 2005, 07:10 PM riverman Nice work! Kind of fun isn't it?
Check m... Mar 13 2005, 09:42 AM rhcb914 It's been a while since I last updated this th... Apr 13 2005, 09:04 AM rhcb914 Here is the passenger side support prior to being ... Apr 13 2005, 09:06 AM rhcb914 Here it is welded on with seam sealer and a quick ... Apr 13 2005, 09:09 AM tat2dphreak kick ass dude!! looking great!
rhcb914 The more I cut the more rust I found...
This is w... Mar 12 2005, 06:30 PM rhcb914 I took out part of the door jam and threshold off ... Mar 12 2005, 06:33 PM rhcb914 While I was in there I figured I'd repair the ... Mar 12 2005, 06:38 PM rhcb914 At least the hell hole looks good. How many people... Mar 12 2005, 06:43 PM rhcb914 Got in there and cleaned as best I could then got ... Mar 12 2005, 06:44 PM rhcb914 adsfsa Mar 12 2005, 06:46 PM rhcb914 Now that everything was cleaned up I was ready to ... Mar 12 2005, 06:54 PM rhcb914 adsfdsf Mar 12 2005, 06:55 PM MecGen Thumbs up dude
You wil have a rust free car in no ... Mar 12 2005, 06:57 PM rhcb914 Here's the rocker patch I made. Mar 12 2005, 06:58 PM rhcb914 Here's the floor patch and the rocker patch we... Mar 12 2005, 06:59 PM rhcb914 The floor section completed. Still have to grind a... Mar 12 2005, 07:01 PM rhcb914 Thanks for the words of encouragement Joe! <... Mar 12 2005, 07:10 PM riverman Nice work! Kind of fun isn't it?
Check m... Mar 13 2005, 09:42 AM rhcb914 It's been a while since I last updated this th... Apr 13 2005, 09:04 AM rhcb914 Here is the passenger side support prior to being ... Apr 13 2005, 09:06 AM rhcb914 Here it is welded on with seam sealer and a quick ... Apr 13 2005, 09:09 AM tat2dphreak kick ass dude!! looking great!   |
1 User(s) are reading this topic (1 Guests and 0 Anonymous Users)
0 Members:

|
Lo-Fi Version | Time is now: 2nd April 2026 - 11:04 AM |
Invision Power Board
v9.1.4 © 2026 IPS, Inc.
| All rights reserved 914World.com © since 2002 |
|
914World.com is the fastest growing online 914 community! We have it all, classifieds, events, forums, vendors, parts, autocross, racing, technical articles, events calendar, newsletter, restoration, gallery, archives, history and more for your Porsche 914 ... |