|
|

|
Porsche, and the Porsche crest are registered trademarks of Dr. Ing. h.c. F. Porsche AG.
This site is not affiliated with Porsche in any way. Its only purpose is to provide an online forum for car enthusiasts. All other trademarks are property of their respective owners. |
|
|
  |
| 7TPorsh |
 Jan 20 2016, 01:45 PM Jan 20 2016, 01:45 PM
Post
#1
|
|
7T Porsh     Group: Members Posts: 2,691 Joined: 27-March 06 From: Glendale Ca Member No.: 5,782 Region Association: Southern California 
|
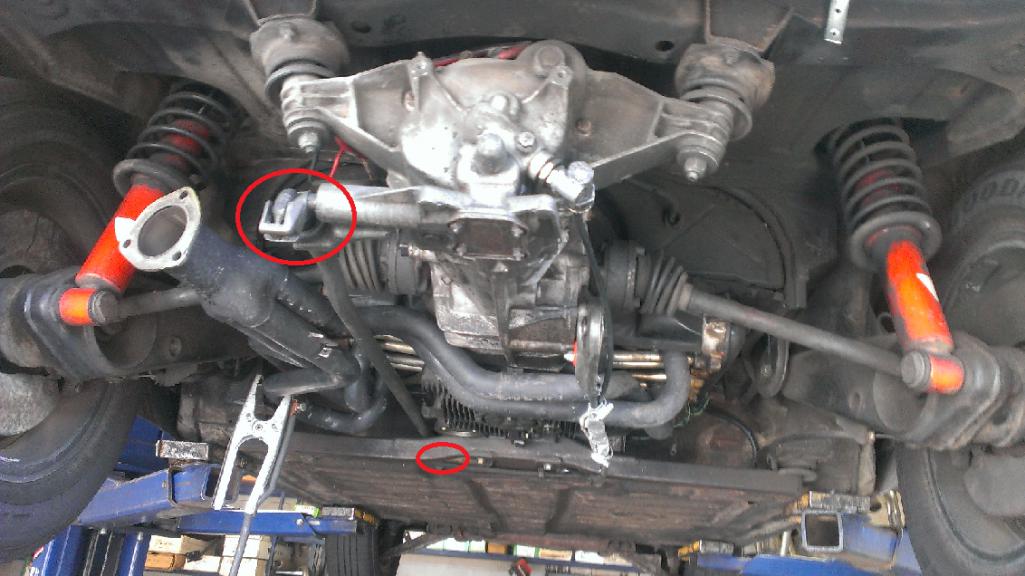
I had a hell of a time getting the header in with this shift rod in place. I have an exhaust leak on #1 and want to fix it easily. Rather than fuss with limited clearance and space, I want to remove the shift rod so I can just unbolt all four ports and re-install in one piece rather than one tube at a time.
How can I remove the rod; hopefully with simple tools.  |
| Series9 |
 Jan 20 2016, 03:49 PM Jan 20 2016, 03:49 PM
Post
#2
|
|
Lesbians taste like chicken.      Group: Members Posts: 5,446 Joined: 22-August 04 From: DeLand, FL Member No.: 2,602 Region Association: South East States |
I had a hell of a time getting the header in with this shift rod in place. I have an exhaust leak on #1 and want to fix it easily. Rather than fuss with limited clearance and space, I want to remove the shift rod so I can just unbolt all four ports and re-install in one piece rather than one tube at a time. How can I remove the rod; hopefully with simple tools.  Undo the "ball socket" at the firewall (the ball fitting unscrews from the firewall) and undo the two bolts holding the bracket for the bushing at the rear. You should then be able to maneuver the rod out of the bay. Damn, it's been a long time since I've seen a /4 tail-shift.... |
| stugray |
 Jan 20 2016, 06:13 PM Jan 20 2016, 06:13 PM
Post
#3
|
|
Advanced Member     Group: Members Posts: 3,825 Joined: 17-September 09 From: Longmont, CO Member No.: 10,819 Region Association: None |
I had a hell of a time getting the header in with this shift rod in place. I have an exhaust leak on #1 and want to fix it easily. Rather than fuss with limited clearance and space, I want to remove the shift rod so I can just unbolt all four ports and re-install in one piece rather than one tube at a time. How can I remove the rod; hopefully with simple tools.  Undo the "ball socket" at the firewall (the ball fitting unscrews from the firewall) and undo the two bolts holding the bracket for the bushing at the rear. You should then be able to maneuver the rod out of the bay. Damn, it's been a long time since I've seen a /4 tail-shift.... You have it right. The bracket in the rear bolts to the transaxle with 2X 10mm nuts that hold the bracket onto 2 studs in the trans case. Slide that bracket forward and lift the rear finger out of the shift lever. |
| 7TPorsh |
 Jan 21 2016, 11:12 AM Jan 21 2016, 11:12 AM
Post
#4
|
|
7T Porsh     Group: Members Posts: 2,691 Joined: 27-March 06 From: Glendale Ca Member No.: 5,782 Region Association: Southern California 
|
Thanks guys, going to try it this weekend!
|
| 7TPorsh |
 Jan 21 2016, 04:50 PM Jan 21 2016, 04:50 PM
Post
#5
|
|
7T Porsh     Group: Members Posts: 2,691 Joined: 27-March 06 From: Glendale Ca Member No.: 5,782 Region Association: Southern California 
|
Is there any bushing or sleeve/washer that I should replace since "I'm going in there anyways"?
|
| 7TPorsh |
 Jan 21 2016, 04:51 PM Jan 21 2016, 04:51 PM
Post
#6
|
|
7T Porsh     Group: Members Posts: 2,691 Joined: 27-March 06 From: Glendale Ca Member No.: 5,782 Region Association: Southern California 
|
Is there any bushing or sleeve/washer that I should replace since "I'm going in there anyways"?
|
| 7TPorsh |
 Jan 31 2016, 05:06 PM Jan 31 2016, 05:06 PM
Post
#7
|
|
7T Porsh     Group: Members Posts: 2,691 Joined: 27-March 06 From: Glendale Ca Member No.: 5,782 Region Association: Southern California 
|
I've got the rear linkage undone so the rod is hanging and moving around.
At the firewall....there is no connection. The rod elbows into the ball socket and the socket piece disappears into the firewall. I need some more direction here. thx |
| rhodyguy |
 Jan 31 2016, 06:46 PM Jan 31 2016, 06:46 PM
Post
#8
|
|
Chimp Sanctuary NW. Check it out.                Group: Members Posts: 22,252 Joined: 2-March 03 From: Orion's Bell. The BELL! Member No.: 378 Region Association: Galt's Gulch |
The pivot ball stem unscrews from the firewall. Like joe said. Replace the rear carrier bushing and examine the pivot ball on the stem. If you uncouple any of the rods index your current settings with a fine tip sharpie at the connection points. Look at the linkage illustrations in your Haynes.
|
| 7TPorsh |
 Jan 31 2016, 07:29 PM Jan 31 2016, 07:29 PM
Post
#9
|
|
7T Porsh     Group: Members Posts: 2,691 Joined: 27-March 06 From: Glendale Ca Member No.: 5,782 Region Association: Southern California 
|
|
| rhodyguy |
 Jan 31 2016, 09:03 PM Jan 31 2016, 09:03 PM
Post
#10
|
|
Chimp Sanctuary NW. Check it out.                Group: Members Posts: 22,252 Joined: 2-March 03 From: Orion's Bell. The BELL! Member No.: 378 Region Association: Galt's Gulch |
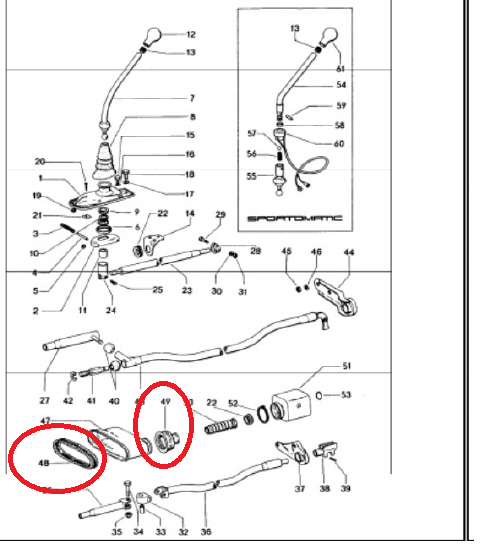
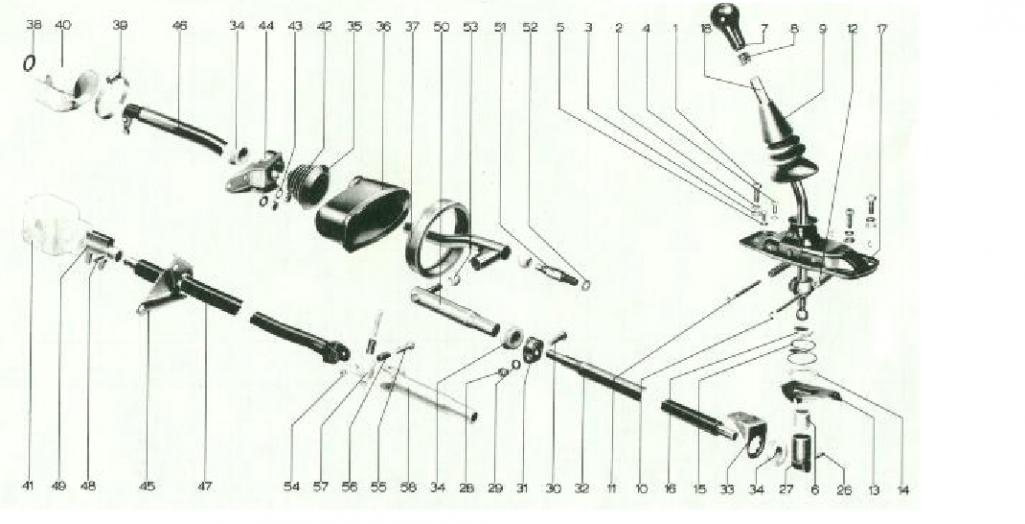
#51 IS the stem. The stem is threaded on the firewall side and it screws in. A plastic ball is pressed on it. That stem ball has no # in the diagram. It is the same item as #53. there are 2 of them. To do it right you will also need #6, #34x3 and inspect your shifter assem off the car. 3 bolts and it lifts out. You have to do this for #6 anyway. #13 is key and is worth the minor cost if yours is worn. It can make a HUGE improvement with regards to 1&R. examine the shift lever at the point #13 contacts the lever for wear/cutting. Clean all the gunk off of the inside of the shifter base. Do it ALL! Really. Spare yourself major frustration. Doing it piece meal and you're taking stuff apart newmerous times. It gets old. Quickly. Go to our favorite part retailers and see what they offer. If a 'complete' kit is offered get one.
|
| 7TPorsh |
 Feb 16 2016, 11:59 AM Feb 16 2016, 11:59 AM
Post
#11
|
|
7T Porsh     Group: Members Posts: 2,691 Joined: 27-March 06 From: Glendale Ca Member No.: 5,782 Region Association: Southern California 
|
Managed to get the rod off and the header out. Gather parts before the install. Looking for these two parts. i think 914Rubber has #48 one but I need #49 ??
 |
| stugray |
 Feb 16 2016, 01:11 PM Feb 16 2016, 01:11 PM
Post
#12
|
|
Advanced Member     Group: Members Posts: 3,825 Joined: 17-September 09 From: Longmont, CO Member No.: 10,819 Region Association: None |
|
| 7TPorsh |
 Feb 16 2016, 05:06 PM Feb 16 2016, 05:06 PM
Post
#13
|
|
7T Porsh     Group: Members Posts: 2,691 Joined: 27-March 06 From: Glendale Ca Member No.: 5,782 Region Association: Southern California 
|
Managed to get the rod off and the header out. Gather parts before the install. Looking for these two parts. i think 914Rubber has #48 one but I need #49 ??  I have extras of those parts if you cant find them. I don't need them as I converted to side shift. PM sent. (IMG:style_emoticons/default/smile.gif) |
  |
1 User(s) are reading this topic (1 Guests and 0 Anonymous Users)
0 Members:

|
Lo-Fi Version | Time is now: 27th December 2025 - 02:59 PM |
Invision Power Board
v9.1.4 © 2025 IPS, Inc.


