|
|
|
Porsche, and the Porsche crest are registered trademarks of Dr. Ing. h.c. F. Porsche AG.
This site is not affiliated with Porsche in any way. Its only purpose is to provide an online forum for car enthusiasts. All other trademarks are property of their respective owners. |
|
|


| Matty900 |
 Feb 4 2016, 03:05 PM Feb 4 2016, 03:05 PM
Post
#161
|
|
Senior Member  Group: Members Posts: 1,305 Joined: 21-February 15 From: Oregon Member No.: 18,454 Region Association: Pacific Northwest |
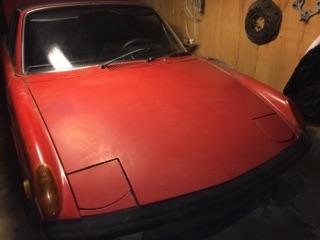
Looking forward to working on this project so I can drive my own car to WCR 2016
 |
   |

 
|
Posts in this topic
Matty900 BUILD-OFF CHALLENGE: Barn find with 50k original miles Feb 4 2016, 03:05 PM CatDaddy60 Good on ya, send more pictures!!! Feb 4 2016, 03:23 PM Matty900 Here's the important picture. Seems to be a li... Feb 4 2016, 08:19 PM Matty900 Fuchs wheels including the spare wheel and the ori... Feb 4 2016, 08:21 PM Matty900 Needs some interior help. Luckily I know where to ... Feb 4 2016, 08:24 PM Matty900 Little bit of surface rust in trunk Feb 4 2016, 08:26 PM Matty900 Not too bad Feb 4 2016, 08:28 PM Matty900 Needs a new master cylinder or rebuild Feb 4 2016, 08:30 PM euro911 I'd just get a NEW M/C ... rebuild kits aren... Feb 4 2016, 08:31 PM
 Matty900
I'd just get a NEW M/C ... rebuild kits aren... Feb 4 2016, 08:39 PM euro911 I'd just get a NEW M/C ... rebuild kits aren... Feb 4 2016, 11:18 PM 914Sixer Inside storage SAVED the car! Feb 4 2016, 08:45 PM iwanta914-6 I'll never understand how people find these ca... Feb 4 2016, 09:37 PM hot_shoe914
I'll never understand how people find these c... Mar 9 2016, 08:57 PM Hank914
I'll never understand how people find these ... Mar 9 2016, 10:34 PM Larmo63 Your picture is not a picture of the master cylind... Feb 4 2016, 10:02 PM Matty900
Your picture is not a picture of the master cylin... Feb 4 2016, 10:38 PM Matty900
Your picture is not a picture of the master cyli... Feb 4 2016, 10:54 PM whitetwinturbo :Qarl: :wttc: :Qarl: Feb 4 2016, 10:53 PM Matty900
:Qarl: :wttc: :Qarl:
Thanks for the interesti... Feb 4 2016, 11:12 PM Mr.Nobody
:Qarl: :wttc: :Qarl:
My car came off the lin... Mar 26 2016, 09:25 PM Larmo63 A somewhat early '72, nice vintage. When do we... Feb 4 2016, 10:54 PM Matty900
A somewhat early '72, nice vintage. When do w... Feb 6 2016, 02:15 AM mgp4591 Wild looking wide body- any other pictures of that... Feb 4 2016, 11:32 PM Matty900
Wild looking wide body- any other pictures of tha... Feb 5 2016, 01:18 AM pete000 Nice find ! Feb 4 2016, 11:44 PM cwpeden You have 2 now? Whats wrong with the wide body? Feb 5 2016, 01:56 AM Matty900
You have 2 now? Whats wrong with the wide body?
... Feb 5 2016, 03:11 AM veekry9 :wttc:
Fun with 14's.
Nice catch,a '7... Feb 5 2016, 07:40 AM Matty900 veekry9
Thanks for the links. There is a lot of co... Feb 6 2016, 01:36 AM Matty900
:wttc:
Fun with 14's.
Nice catch,a ... Feb 10 2016, 02:49 AM veekry9
Seems a guy has made it happen,and I'm sure... Feb 6 2016, 02:10 AM veekry9 All of the suspension rubber is likely beat and de... Feb 6 2016, 02:40 AM Matty900
All of the suspension rubber is likely beat and d... Feb 6 2016, 04:09 AM euro911 Just info, you mentioned the engine was built to a... Feb 6 2016, 10:27 AM Matty900
Just info, you mentioned the engine was built to ... Feb 6 2016, 01:58 PM euro911 It all depends on which route the builder took. St... Feb 7 2016, 01:06 AM Dave_Darling The case would not need to be cut, just the heads.... Feb 7 2016, 12:13 PM Matty900
The case would not need to be cut, just the heads... Feb 7 2016, 02:14 PM Dave_Darling So I need to expect that at some point I will need... Feb 10 2016, 06:13 PM euro911 Dave is correct, the heads wouldn't require ma... Feb 7 2016, 03:13 PM Matty900 No rust just dirt Feb 9 2016, 10:46 PM Matty900 I have a Restoration Design battery tray and suppo... Feb 9 2016, 10:51 PM Matty900 Looking good. Feb 9 2016, 10:53 PM veekry9
[url=https://www.youtube.com/watch?v=3O-Ol2OmZx... Feb 10 2016, 04:25 AM Mikey914 Told him to try cleaning with simple green 1st. Th... Feb 10 2016, 09:32 AM Matty900 I was able to get a better look at the car today. ... Feb 11 2016, 01:44 AM Matty900 I am not sure what rust issues I may have inside t... Feb 11 2016, 01:48 AM Matty900 Took off the rocker pannels and there was lots of ... Feb 11 2016, 01:51 AM Matty900 What is the best way to take care of this level of... Feb 11 2016, 10:14 PM Matty900 Decided to go ahead and fix the damaged fender and... Feb 18 2016, 12:57 AM Matty900 Everything is coming apart nicely. Feb 18 2016, 01:01 AM Matty900 Getting ready to steam clean everything. Feb 18 2016, 01:08 AM Matty900 Very nice red breaks. I guess there was some lefto... Feb 18 2016, 01:17 AM Matty900 Steam cleaning today Feb 18 2016, 04:51 PM Matty900 Few more photos from today Feb 18 2016, 10:47 PM Krieger Nice find! Add the Vin to our data base. Feb 19 2016, 12:04 AM Matty900 :Qarl: Hell hole fixed! Mar 8 2016, 08:41 PM Mikey914
:Qarl: Hell hole fixed!
Get some paint shot ... Mar 10 2016, 01:20 AM cwpeden Nice progress, looks like you have a mix of long ... Mar 8 2016, 10:26 PM Matty900 Coming and going. Got the 72 home to complete the ... Mar 26 2016, 07:15 PM Matty900 Have not had much time lately to post progress on ... Apr 14 2016, 12:33 AM Matty900 Driver's side fender had some issues after the... Apr 14 2016, 12:39 AM Matty900 Someone had drilled a few holes in behind the bump... Apr 14 2016, 12:45 AM Matty900 Dents are almost all pulled. Apr 14 2016, 01:14 AM Matty900 Put down some primer just to keep any rust from st... Apr 14 2016, 01:16 AM Jason74914 Just curious...what are the holes the rear trunk l... Apr 14 2016, 10:22 AM Matty900 Ok this car has been stalled too long. I have enli... Jan 31 2017, 07:41 PM Matty900 A few more of Kent's progress on my car Jan 31 2017, 07:44 PM pete000 Nice find !
Nice save ! Jan 31 2017, 11:04 PM Matty900
Nice find !
Nice save !
Thank you,
It i... Feb 1 2017, 08:06 PM Matty900 Haven't posted progress on here for a little b... Mar 14 2017, 11:19 PM Matty900 Next was laying color down in the trunks Mar 14 2017, 11:25 PM Matty900 Finally Color Mar 15 2017, 12:04 AM Matty900 More photos Mar 15 2017, 12:07 AM Matty900 Engine bay is all good to go. Mar 15 2017, 12:10 AM Matty900 and lots and lots of cutting and buffing (over 25 ... Mar 15 2017, 12:15 AM Matty900 :shades2: Mar 15 2017, 12:16 AM Matty900 :Qarl: Mar 15 2017, 12:18 AM Matty900 Raptor floor boards (14 hours) Mar 15 2017, 12:21 AM Matty900 Undercoated the complete car with rubberized under... Mar 15 2017, 12:24 AM Matty900 My rear valance was a little too far gone. PO took... Mar 15 2017, 01:05 AM Matty900 Cary Kutter freshened up some of the suspension fo... Mar 15 2017, 01:20 AM Cairo94507 Very cool and exciting. :beer2: Mar 15 2017, 06:37 AM RobW Great color! Keep up the good work! :head... Mar 15 2017, 12:13 PM cary What was the black stuff they sprayed in the trunk... Mar 15 2017, 10:05 PM Matty900
What was the black stuff they sprayed in the trun... Mar 16 2017, 12:56 AM cary
What was the black stuff they sprayed in the tru... Mar 16 2017, 08:04 AM Matty900 Tank looks like new. Now I just need to coordinate... Mar 16 2017, 12:59 AM Matty900 Some updates
Cary Kutter cam out to the body shop ... Mar 24 2017, 12:59 AM Matty900 Rebuilding the peddle cluster and replacing everyt... Mar 24 2017, 01:06 AM Matty900 A few nights a week to get work done, but a lift, ... Mar 24 2017, 01:09 AM Matty900 The car is in great shape and all of the nuts and ... Mar 24 2017, 01:14 AM Matty900 Pulled the factory fuel lines to replace them with... Mar 24 2017, 01:23 AM Matty900 Engine bay ready for some love. Rubberized underco... Mar 24 2017, 01:29 AM Matty900 Haven't updated for a little while so here... Apr 18 2017, 06:40 PM Matty900 With the suspension out. We will freshen everythin... Apr 18 2017, 06:51 PM Matty900 Some cleaning needed Apr 18 2017, 06:55 PM Matty900 Blasting work Apr 18 2017, 07:08 PM Matty900 Some parts ready for powder coating Apr 18 2017, 07:11 PM
Matty900
I'd just get a NEW M/C ... rebuild kits aren... Feb 4 2016, 08:39 PM euro911 I'd just get a NEW M/C ... rebuild kits aren... Feb 4 2016, 11:18 PM 914Sixer Inside storage SAVED the car! Feb 4 2016, 08:45 PM iwanta914-6 I'll never understand how people find these ca... Feb 4 2016, 09:37 PM hot_shoe914
I'll never understand how people find these c... Mar 9 2016, 08:57 PM Hank914
I'll never understand how people find these ... Mar 9 2016, 10:34 PM Larmo63 Your picture is not a picture of the master cylind... Feb 4 2016, 10:02 PM Matty900
Your picture is not a picture of the master cylin... Feb 4 2016, 10:38 PM Matty900
Your picture is not a picture of the master cyli... Feb 4 2016, 10:54 PM whitetwinturbo :Qarl: :wttc: :Qarl: Feb 4 2016, 10:53 PM Matty900
:Qarl: :wttc: :Qarl:
Thanks for the interesti... Feb 4 2016, 11:12 PM Mr.Nobody
:Qarl: :wttc: :Qarl:
My car came off the lin... Mar 26 2016, 09:25 PM Larmo63 A somewhat early '72, nice vintage. When do we... Feb 4 2016, 10:54 PM Matty900
A somewhat early '72, nice vintage. When do w... Feb 6 2016, 02:15 AM mgp4591 Wild looking wide body- any other pictures of that... Feb 4 2016, 11:32 PM Matty900
Wild looking wide body- any other pictures of tha... Feb 5 2016, 01:18 AM pete000 Nice find ! Feb 4 2016, 11:44 PM cwpeden You have 2 now? Whats wrong with the wide body? Feb 5 2016, 01:56 AM Matty900
You have 2 now? Whats wrong with the wide body?
... Feb 5 2016, 03:11 AM veekry9 :wttc:
Fun with 14's.
Nice catch,a '7... Feb 5 2016, 07:40 AM Matty900 veekry9
Thanks for the links. There is a lot of co... Feb 6 2016, 01:36 AM Matty900
:wttc:
Fun with 14's.
Nice catch,a ... Feb 10 2016, 02:49 AM veekry9
Seems a guy has made it happen,and I'm sure... Feb 6 2016, 02:10 AM veekry9 All of the suspension rubber is likely beat and de... Feb 6 2016, 02:40 AM Matty900
All of the suspension rubber is likely beat and d... Feb 6 2016, 04:09 AM euro911 Just info, you mentioned the engine was built to a... Feb 6 2016, 10:27 AM Matty900
Just info, you mentioned the engine was built to ... Feb 6 2016, 01:58 PM euro911 It all depends on which route the builder took. St... Feb 7 2016, 01:06 AM Dave_Darling The case would not need to be cut, just the heads.... Feb 7 2016, 12:13 PM Matty900
The case would not need to be cut, just the heads... Feb 7 2016, 02:14 PM Dave_Darling So I need to expect that at some point I will need... Feb 10 2016, 06:13 PM euro911 Dave is correct, the heads wouldn't require ma... Feb 7 2016, 03:13 PM Matty900 No rust just dirt Feb 9 2016, 10:46 PM Matty900 I have a Restoration Design battery tray and suppo... Feb 9 2016, 10:51 PM Matty900 Looking good. Feb 9 2016, 10:53 PM veekry9
[url=https://www.youtube.com/watch?v=3O-Ol2OmZx... Feb 10 2016, 04:25 AM Mikey914 Told him to try cleaning with simple green 1st. Th... Feb 10 2016, 09:32 AM Matty900 I was able to get a better look at the car today. ... Feb 11 2016, 01:44 AM Matty900 I am not sure what rust issues I may have inside t... Feb 11 2016, 01:48 AM Matty900 Took off the rocker pannels and there was lots of ... Feb 11 2016, 01:51 AM Matty900 What is the best way to take care of this level of... Feb 11 2016, 10:14 PM Matty900 Decided to go ahead and fix the damaged fender and... Feb 18 2016, 12:57 AM Matty900 Everything is coming apart nicely. Feb 18 2016, 01:01 AM Matty900 Getting ready to steam clean everything. Feb 18 2016, 01:08 AM Matty900 Very nice red breaks. I guess there was some lefto... Feb 18 2016, 01:17 AM Matty900 Steam cleaning today Feb 18 2016, 04:51 PM Matty900 Few more photos from today Feb 18 2016, 10:47 PM Krieger Nice find! Add the Vin to our data base. Feb 19 2016, 12:04 AM Matty900 :Qarl: Hell hole fixed! Mar 8 2016, 08:41 PM Mikey914
:Qarl: Hell hole fixed!
Get some paint shot ... Mar 10 2016, 01:20 AM cwpeden Nice progress, looks like you have a mix of long ... Mar 8 2016, 10:26 PM Matty900 Coming and going. Got the 72 home to complete the ... Mar 26 2016, 07:15 PM Matty900 Have not had much time lately to post progress on ... Apr 14 2016, 12:33 AM Matty900 Driver's side fender had some issues after the... Apr 14 2016, 12:39 AM Matty900 Someone had drilled a few holes in behind the bump... Apr 14 2016, 12:45 AM Matty900 Dents are almost all pulled. Apr 14 2016, 01:14 AM Matty900 Put down some primer just to keep any rust from st... Apr 14 2016, 01:16 AM Jason74914 Just curious...what are the holes the rear trunk l... Apr 14 2016, 10:22 AM Matty900 Ok this car has been stalled too long. I have enli... Jan 31 2017, 07:41 PM Matty900 A few more of Kent's progress on my car Jan 31 2017, 07:44 PM pete000 Nice find !
Nice save ! Jan 31 2017, 11:04 PM Matty900
Nice find !
Nice save !
Thank you,
It i... Feb 1 2017, 08:06 PM Matty900 Haven't posted progress on here for a little b... Mar 14 2017, 11:19 PM Matty900 Next was laying color down in the trunks Mar 14 2017, 11:25 PM Matty900 Finally Color Mar 15 2017, 12:04 AM Matty900 More photos Mar 15 2017, 12:07 AM Matty900 Engine bay is all good to go. Mar 15 2017, 12:10 AM Matty900 and lots and lots of cutting and buffing (over 25 ... Mar 15 2017, 12:15 AM Matty900 :shades2: Mar 15 2017, 12:16 AM Matty900 :Qarl: Mar 15 2017, 12:18 AM Matty900 Raptor floor boards (14 hours) Mar 15 2017, 12:21 AM Matty900 Undercoated the complete car with rubberized under... Mar 15 2017, 12:24 AM Matty900 My rear valance was a little too far gone. PO took... Mar 15 2017, 01:05 AM Matty900 Cary Kutter freshened up some of the suspension fo... Mar 15 2017, 01:20 AM Cairo94507 Very cool and exciting. :beer2: Mar 15 2017, 06:37 AM RobW Great color! Keep up the good work! :head... Mar 15 2017, 12:13 PM cary What was the black stuff they sprayed in the trunk... Mar 15 2017, 10:05 PM Matty900
What was the black stuff they sprayed in the trun... Mar 16 2017, 12:56 AM cary
What was the black stuff they sprayed in the tru... Mar 16 2017, 08:04 AM Matty900 Tank looks like new. Now I just need to coordinate... Mar 16 2017, 12:59 AM Matty900 Some updates
Cary Kutter cam out to the body shop ... Mar 24 2017, 12:59 AM Matty900 Rebuilding the peddle cluster and replacing everyt... Mar 24 2017, 01:06 AM Matty900 A few nights a week to get work done, but a lift, ... Mar 24 2017, 01:09 AM Matty900 The car is in great shape and all of the nuts and ... Mar 24 2017, 01:14 AM Matty900 Pulled the factory fuel lines to replace them with... Mar 24 2017, 01:23 AM Matty900 Engine bay ready for some love. Rubberized underco... Mar 24 2017, 01:29 AM Matty900 Haven't updated for a little while so here... Apr 18 2017, 06:40 PM Matty900 With the suspension out. We will freshen everythin... Apr 18 2017, 06:51 PM Matty900 Some cleaning needed Apr 18 2017, 06:55 PM Matty900 Blasting work Apr 18 2017, 07:08 PM Matty900 Some parts ready for powder coating Apr 18 2017, 07:11 PM  |
2 User(s) are reading this topic (2 Guests and 0 Anonymous Users)
0 Members:

|
Lo-Fi Version | Time is now: 2nd June 2026 - 07:51 PM |
Invision Power Board
v9.1.4 © 2026 IPS, Inc.