|
|
|
Porsche, and the Porsche crest are registered trademarks of Dr. Ing. h.c. F. Porsche AG.
This site is not affiliated with Porsche in any way. Its only purpose is to provide an online forum for car enthusiasts. All other trademarks are property of their respective owners. |
|
|


| cary |
 Feb 24 2016, 01:57 AM Feb 24 2016, 01:57 AM
Post
#301
|
|
Advanced Member  Group: Members Posts: 3,900 Joined: 26-January 04 From: Sherwood Oregon Member No.: 1,608 Region Association: Pacific Northwest |
I've been asked by Mark to do some sheet metal/body work on his 75 2.0 Liter project car. The car arrived last Monday. But I needed to finish up a couple things on my project car and in my shop first. But I dove in this afternoon.
First task is to tidy things up after the paint stripping. Which included dropping the engine in order remove any residual media in the nooks and crannies. I was concerned with the rust prevention product that Dustless Blaster mixes with the glass media being left on and in the electrical connections. I'm a firm believer of an ounce of prevention is worth a pound of cure. I dribbled some OSPHO on a couple connectors in my white car. Not good. It ate the crap out the plating. Here's Super In Law working on loosening up the media in order to blow it off. It will need to be steam cleaned. 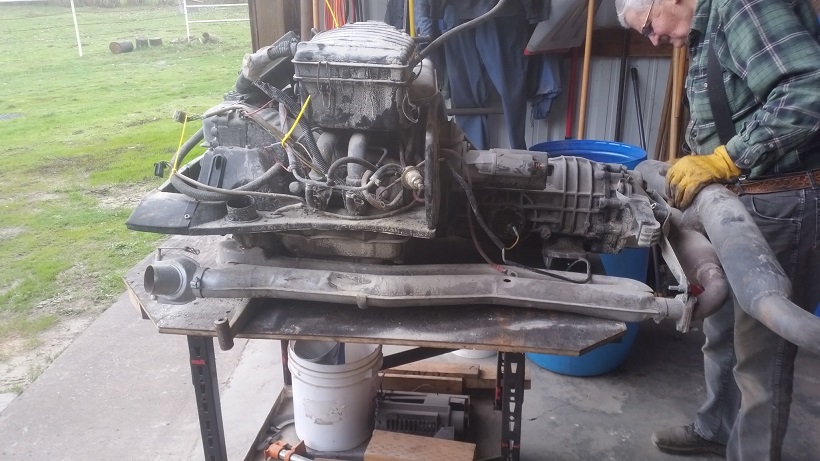 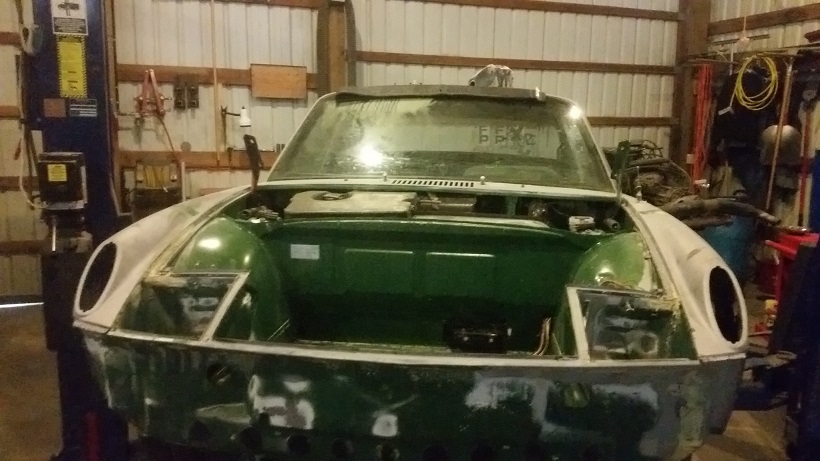 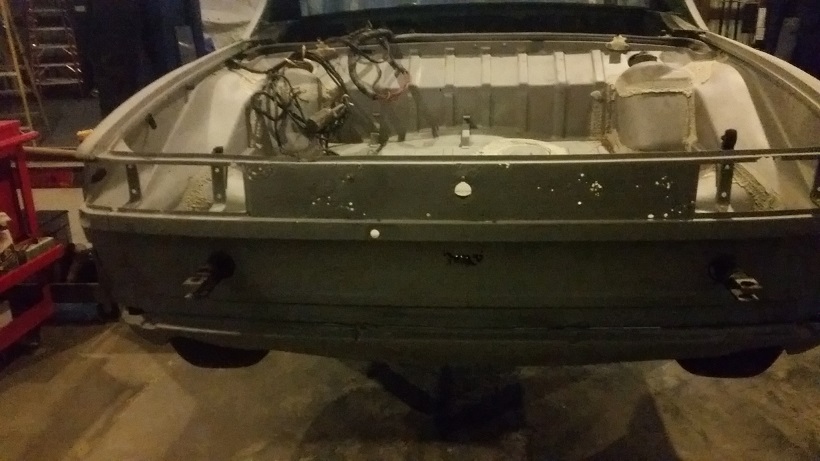 Project List : So Far Replace rear panel Replace rear trunk floor pan Replace back half of floor pan ............... Mark I'll send you pictures Misc. hammer and dolly work A few misc. patch panels R&R both jack points and posts This is like a new car compared to my project ............... Observations : Suspension Consoles look great and seem to be virgin. Same with the motor mounts Battery tray was changed at some time in its life Back engine tray is bent to hell .............pushed up Hell hole is filled with caked in blast media. Stopping at Sears on the way home for a new filter for my vacuum. I'll look closely for prior repairs. Both the lower longs look great at first glance Needing more research : A few rust pits on the upper right outer wheelhouse long 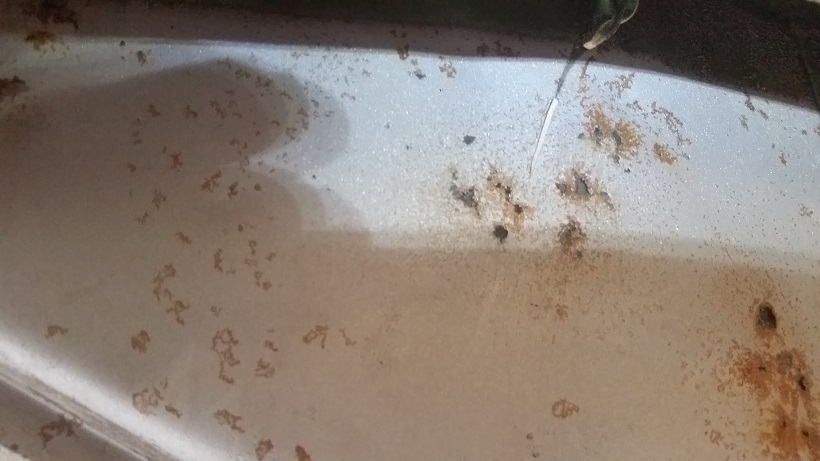 But we also a have fairly good sized rust spot a little further up the upper long. Right next to the suspension console. 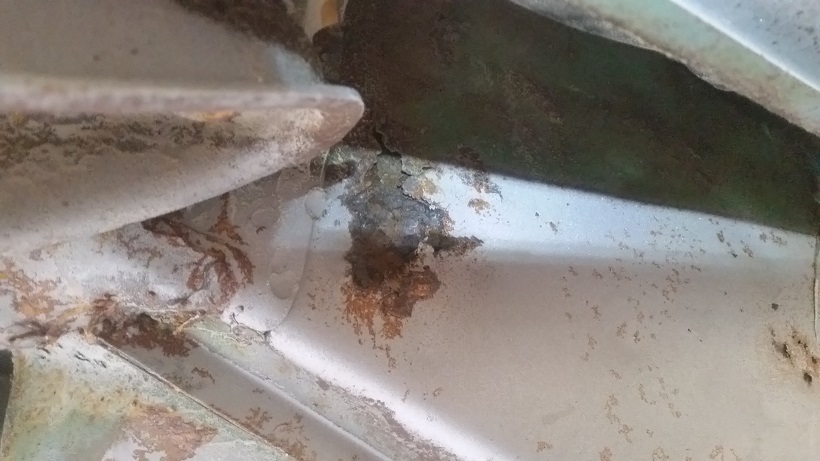 These are both in the double walled section of the upper long. |
   |

 
|
Posts in this topic
cary Mark's (914Rubber) Project Car Feb 24 2016, 01:57 AM RobW Good luck with your rust exploration! There al... Feb 24 2016, 07:22 AM RobW Not a bad idea to add CFRs dog ears. I added them ... Feb 24 2016, 07:22 AM sb914 I have a good source for the rubber! Feb 24 2016, 07:52 AM cary Got a late start, had to stop and set up an appoin... Feb 25 2016, 10:51 AM cary I'll add the hell hole, wheelhouse rust resear... Feb 25 2016, 10:53 AM Mikey914 Just let me know what you need Cary. I'm back ... Feb 25 2016, 10:23 PM cary Hell Hole research .............
Ok here's wha... Feb 25 2016, 10:49 PM cary Mark will need to make the call on the floor pan. ... Feb 25 2016, 11:04 PM cary I forgot one thing on the original list.
Right inn... Feb 25 2016, 11:08 PM cary Today the team was back together.
Super In Law we... Feb 25 2016, 11:33 PM cary I start the day digging thru my stash looking for ... Feb 26 2016, 12:00 AM cary Next I need to close up some of these holes on the... Feb 26 2016, 12:19 AM raynekat Dang Cary. You might just have to give up that gro... Feb 26 2016, 04:46 AM
RobW Good luck with your rust exploration! There al... Feb 24 2016, 07:22 AM RobW Not a bad idea to add CFRs dog ears. I added them ... Feb 24 2016, 07:22 AM sb914 I have a good source for the rubber! Feb 24 2016, 07:52 AM cary Got a late start, had to stop and set up an appoin... Feb 25 2016, 10:51 AM cary I'll add the hell hole, wheelhouse rust resear... Feb 25 2016, 10:53 AM Mikey914 Just let me know what you need Cary. I'm back ... Feb 25 2016, 10:23 PM cary Hell Hole research .............
Ok here's wha... Feb 25 2016, 10:49 PM cary Mark will need to make the call on the floor pan. ... Feb 25 2016, 11:04 PM cary I forgot one thing on the original list.
Right inn... Feb 25 2016, 11:08 PM cary Today the team was back together.
Super In Law we... Feb 25 2016, 11:33 PM cary I start the day digging thru my stash looking for ... Feb 26 2016, 12:00 AM cary Next I need to close up some of these holes on the... Feb 26 2016, 12:19 AM raynekat Dang Cary. You might just have to give up that gro... Feb 26 2016, 04:46 AM
 cary
Dang Cary. You might just have to give up that gr... Feb 28 2016, 11:00 AM cary We'll talk when you get back. I don't reme... Feb 26 2016, 11:57 PM raynekat
We'll talk when you get back. I don't rem... Feb 27 2016, 12:26 AM cary Short day. Had to drop off and pick up the A6 from... Feb 27 2016, 12:32 AM cary BEFORE :
[size=6]AFTER :
Here's wh... Feb 27 2016, 12:49 AM cary Snuck in a hour before Mark showed up on Saturday.... Feb 28 2016, 10:47 AM JRust Your moving right along Cary! You don't wa... Feb 28 2016, 11:17 AM cary
Your moving right along Cary! You don't w... Mar 1 2016, 07:35 AM Mikey914 Yes, He's making great progress. I have to get... Feb 28 2016, 11:19 AM cary Back to work ...............
Super In Law got the... Mar 1 2016, 07:48 AM cary After Mark's and Mike's visit we're go... Mar 1 2016, 07:58 AM cary Now on to the task at hand ............ continuing... Mar 1 2016, 08:34 AM BeatNavy
Rob (Beatnavy), I'm still on the same 3/8 Rot... Mar 2 2016, 04:41 AM cary Now on to those pesky qtr.panel / rear panel corne... Mar 1 2016, 08:48 AM 76-914 You are having entirely too much fun. :beer2: Mar 1 2016, 09:01 AM cary
You are having entirely too much fun. :beer2:
... Mar 1 2016, 09:14 PM cary Next, removing the seat hardware from the floor pa... Mar 1 2016, 09:08 AM cary Tuesday 3/1/16
Forgot to remove the e-brake cable... Mar 1 2016, 09:00 PM cary After a good nights sleep its time to go into rust... Mar 2 2016, 10:14 AM Mikey914 Thanks Cary,
Looks like you are going to town on t... Mar 2 2016, 10:57 AM mbseto
What you can't see is the HUGE mouse nest in... Mar 2 2016, 04:09 PM cary Battery tray and its support hit the floor first. ... Mar 2 2016, 08:28 PM cary
Opened up the wheelhouse so I could continue to... Mar 2 2016, 09:11 PM cary I make multiple measurements before I remove the d... Mar 2 2016, 09:15 PM cary Beings that I'll be doing some work to the whe... Mar 2 2016, 09:19 PM cary Things that make you go Hmmmmmmmmmmm.
Can I cut of... Mar 2 2016, 10:18 PM McMark
Why fill these? Rosette welds to the car. Mar 3 2016, 10:10 AM jmitro
Why fill these? Rosette welds to the car.
:... Mar 3 2016, 10:29 AM cary
[quote name='McMark' post='2310759' date='Mar 3 2... Mar 3 2016, 08:49 PM dangerranger01 I really like your work Cary and all the pictures/... Mar 3 2016, 09:32 PM cary
I really like your work Cary and all the pictures... Mar 3 2016, 11:29 PM dangerranger01
I'll take these projects on one at a time. Y... Mar 3 2016, 11:35 PM cary
[quote name='cary' post='2311075' date='Mar 3 201... Mar 4 2016, 10:01 AM dangerranger01
First I should say thank you for the compliments... Mar 4 2016, 11:06 AM cary
Good Luck. I couldn't find anyone on the Wes... Mar 4 2016, 08:03 PM raynekat
I really like your work Cary and all the picture... Mar 6 2016, 03:38 AM cary
I really like your work Cary and all the pictures... Mar 17 2016, 10:55 PM cary Start the day with primering the refurbished piece... Mar 3 2016, 11:54 PM cary Today's items sent to the refurbish workbench.... Mar 4 2016, 12:09 AM cary Here's a better shot of the wheelhouse with th... Mar 4 2016, 12:42 AM cary Here's another area that will get close scruti... Mar 4 2016, 12:51 AM cary Started the day installing the door braces.
I fo... Mar 4 2016, 08:40 PM cary Here's Super In Law's work on the right en... Mar 4 2016, 09:22 PM cary After lunch we went to Mike's (warpig) house t... Mar 4 2016, 10:03 PM bigkensteele
After lunch we went to Mike's (warpig) house ... Mar 5 2016, 02:06 PM cary Mark's staying with the 75-76 bumpers. So we s... Mar 5 2016, 04:51 PM cary
Mark's staying with the 75-76 bumpers. So we ... Mar 7 2016, 09:51 PM bigkensteele
Mark's staying with the 75-76 bumpers. So we ... Mar 18 2016, 07:38 PM cary
[quote name='cary' post='2311727' date='Mar 5 201... Mar 19 2016, 08:39 AM cary Now's it time to create a 75-76 rear panel fro... Mar 7 2016, 10:39 PM cary Super In Law finished up the engine shelf.
Mar 7 2016, 10:40 PM Mikey914 WOW Cary,
I was not around for a few days and you ... Mar 8 2016, 01:06 AM Mikey914 Looks like I'm in the market for some ss fuel ... Mar 8 2016, 01:11 AM cary Start the day with a break in the rain so I make a... Mar 8 2016, 11:26 PM cary Now on to filling the holes on the early rear pane... Mar 8 2016, 11:37 PM Mikey914 I'm not a big fan of the rear lenst due to the... Mar 9 2016, 12:11 AM Mikey914 One of the reasons it looked like this Mar 9 2016, 12:12 AM cary Work continues on the rear panel. Cut up the old t... Mar 10 2016, 08:47 AM cary Started the day with more liquid sunshine. :angry... Mar 14 2016, 10:07 PM cary The RD stuff ...............
I love new metal ....... Mar 15 2016, 10:32 PM cary Finally finished up creating the 75-76 rear panel ... Mar 15 2016, 10:42 PM cary Now that I have some new replacement panels we... Mar 15 2016, 11:13 PM cary I wish the replacement panel was just a bit longer... Mar 15 2016, 11:18 PM cary [b]Rear Taillight Panel Install
Ready to go ........ Mar 17 2016, 09:49 AM cary Ok, now back to documenting Wednesday's work.
... Mar 17 2016, 08:19 PM Cairo94507 Wow, that is some really nice work. :trophy: Mar 17 2016, 09:01 PM cary
Wow, that is some really nice work. :trophy:
... Mar 17 2016, 09:05 PM cary Now its time to fire up the electric glue gun ....... Mar 17 2016, 09:21 PM cary While welding I find another problem. The right si... Mar 17 2016, 09:32 PM cary Now on to fitting the rear trunk panel. Looks like... Mar 17 2016, 09:55 PM cary Before I head out the door I POR15 the transmissio... Mar 17 2016, 10:02 PM cary As I was doing my thing, Super In Law broke down M... Mar 17 2016, 10:15 PM raynekat Looking good Cary.
That rear end repair you are d... Mar 17 2016, 11:39 PM Mikey914 Thanks Cary,
I really appreciate your attention to... Mar 18 2016, 01:45 AM BeatNavy Awesome job, Cary. I love seeing the progress in ... Mar 18 2016, 03:53 AM sixnotfour Cary, Great job , I think the rear trunk floor is ... Mar 18 2016, 05:36 AM cary
Cary, Great job , I think the rear trunk floor is... Mar 18 2016, 07:44 AM 914werke BTDT on the R. trunk floor repair for the late BUB... Mar 18 2016, 07:31 AM sixnotfour Cary,your 73 should look like the RD panel..75-76 ... Mar 18 2016, 12:28 PM 914_teener Wow....that IS different.
Nice work Cary. Mar 18 2016, 01:33 PM cary You guys are making more work for me ... LOL
It ha... Mar 18 2016, 02:09 PM sixnotfour :stooges: :hissyfit: :headbang: :welder: :firs... Mar 18 2016, 02:35 PM cary Here's the shot I forgot last night.
Mar 18 2016, 06:40 PM cary [b]Modifying RD PP335 to replicate the 75-76 rear ... Mar 18 2016, 07:19 PM trojanhorsepower Great work Cary! Mar 19 2016, 07:38 PM cary
Great work Cary!
Thanks ..............
Ken... Mar 19 2016, 08:49 PM
cary
Dang Cary. You might just have to give up that gr... Feb 28 2016, 11:00 AM cary We'll talk when you get back. I don't reme... Feb 26 2016, 11:57 PM raynekat
We'll talk when you get back. I don't rem... Feb 27 2016, 12:26 AM cary Short day. Had to drop off and pick up the A6 from... Feb 27 2016, 12:32 AM cary BEFORE :
[size=6]AFTER :
Here's wh... Feb 27 2016, 12:49 AM cary Snuck in a hour before Mark showed up on Saturday.... Feb 28 2016, 10:47 AM JRust Your moving right along Cary! You don't wa... Feb 28 2016, 11:17 AM cary
Your moving right along Cary! You don't w... Mar 1 2016, 07:35 AM Mikey914 Yes, He's making great progress. I have to get... Feb 28 2016, 11:19 AM cary Back to work ...............
Super In Law got the... Mar 1 2016, 07:48 AM cary After Mark's and Mike's visit we're go... Mar 1 2016, 07:58 AM cary Now on to the task at hand ............ continuing... Mar 1 2016, 08:34 AM BeatNavy
Rob (Beatnavy), I'm still on the same 3/8 Rot... Mar 2 2016, 04:41 AM cary Now on to those pesky qtr.panel / rear panel corne... Mar 1 2016, 08:48 AM 76-914 You are having entirely too much fun. :beer2: Mar 1 2016, 09:01 AM cary
You are having entirely too much fun. :beer2:
... Mar 1 2016, 09:14 PM cary Next, removing the seat hardware from the floor pa... Mar 1 2016, 09:08 AM cary Tuesday 3/1/16
Forgot to remove the e-brake cable... Mar 1 2016, 09:00 PM cary After a good nights sleep its time to go into rust... Mar 2 2016, 10:14 AM Mikey914 Thanks Cary,
Looks like you are going to town on t... Mar 2 2016, 10:57 AM mbseto
What you can't see is the HUGE mouse nest in... Mar 2 2016, 04:09 PM cary Battery tray and its support hit the floor first. ... Mar 2 2016, 08:28 PM cary
Opened up the wheelhouse so I could continue to... Mar 2 2016, 09:11 PM cary I make multiple measurements before I remove the d... Mar 2 2016, 09:15 PM cary Beings that I'll be doing some work to the whe... Mar 2 2016, 09:19 PM cary Things that make you go Hmmmmmmmmmmm.
Can I cut of... Mar 2 2016, 10:18 PM McMark
Why fill these? Rosette welds to the car. Mar 3 2016, 10:10 AM jmitro
Why fill these? Rosette welds to the car.
:... Mar 3 2016, 10:29 AM cary
[quote name='McMark' post='2310759' date='Mar 3 2... Mar 3 2016, 08:49 PM dangerranger01 I really like your work Cary and all the pictures/... Mar 3 2016, 09:32 PM cary
I really like your work Cary and all the pictures... Mar 3 2016, 11:29 PM dangerranger01
I'll take these projects on one at a time. Y... Mar 3 2016, 11:35 PM cary
[quote name='cary' post='2311075' date='Mar 3 201... Mar 4 2016, 10:01 AM dangerranger01
First I should say thank you for the compliments... Mar 4 2016, 11:06 AM cary
Good Luck. I couldn't find anyone on the Wes... Mar 4 2016, 08:03 PM raynekat
I really like your work Cary and all the picture... Mar 6 2016, 03:38 AM cary
I really like your work Cary and all the pictures... Mar 17 2016, 10:55 PM cary Start the day with primering the refurbished piece... Mar 3 2016, 11:54 PM cary Today's items sent to the refurbish workbench.... Mar 4 2016, 12:09 AM cary Here's a better shot of the wheelhouse with th... Mar 4 2016, 12:42 AM cary Here's another area that will get close scruti... Mar 4 2016, 12:51 AM cary Started the day installing the door braces.
I fo... Mar 4 2016, 08:40 PM cary Here's Super In Law's work on the right en... Mar 4 2016, 09:22 PM cary After lunch we went to Mike's (warpig) house t... Mar 4 2016, 10:03 PM bigkensteele
After lunch we went to Mike's (warpig) house ... Mar 5 2016, 02:06 PM cary Mark's staying with the 75-76 bumpers. So we s... Mar 5 2016, 04:51 PM cary
Mark's staying with the 75-76 bumpers. So we ... Mar 7 2016, 09:51 PM bigkensteele
Mark's staying with the 75-76 bumpers. So we ... Mar 18 2016, 07:38 PM cary
[quote name='cary' post='2311727' date='Mar 5 201... Mar 19 2016, 08:39 AM cary Now's it time to create a 75-76 rear panel fro... Mar 7 2016, 10:39 PM cary Super In Law finished up the engine shelf.
Mar 7 2016, 10:40 PM Mikey914 WOW Cary,
I was not around for a few days and you ... Mar 8 2016, 01:06 AM Mikey914 Looks like I'm in the market for some ss fuel ... Mar 8 2016, 01:11 AM cary Start the day with a break in the rain so I make a... Mar 8 2016, 11:26 PM cary Now on to filling the holes on the early rear pane... Mar 8 2016, 11:37 PM Mikey914 I'm not a big fan of the rear lenst due to the... Mar 9 2016, 12:11 AM Mikey914 One of the reasons it looked like this Mar 9 2016, 12:12 AM cary Work continues on the rear panel. Cut up the old t... Mar 10 2016, 08:47 AM cary Started the day with more liquid sunshine. :angry... Mar 14 2016, 10:07 PM cary The RD stuff ...............
I love new metal ....... Mar 15 2016, 10:32 PM cary Finally finished up creating the 75-76 rear panel ... Mar 15 2016, 10:42 PM cary Now that I have some new replacement panels we... Mar 15 2016, 11:13 PM cary I wish the replacement panel was just a bit longer... Mar 15 2016, 11:18 PM cary [b]Rear Taillight Panel Install
Ready to go ........ Mar 17 2016, 09:49 AM cary Ok, now back to documenting Wednesday's work.
... Mar 17 2016, 08:19 PM Cairo94507 Wow, that is some really nice work. :trophy: Mar 17 2016, 09:01 PM cary
Wow, that is some really nice work. :trophy:
... Mar 17 2016, 09:05 PM cary Now its time to fire up the electric glue gun ....... Mar 17 2016, 09:21 PM cary While welding I find another problem. The right si... Mar 17 2016, 09:32 PM cary Now on to fitting the rear trunk panel. Looks like... Mar 17 2016, 09:55 PM cary Before I head out the door I POR15 the transmissio... Mar 17 2016, 10:02 PM cary As I was doing my thing, Super In Law broke down M... Mar 17 2016, 10:15 PM raynekat Looking good Cary.
That rear end repair you are d... Mar 17 2016, 11:39 PM Mikey914 Thanks Cary,
I really appreciate your attention to... Mar 18 2016, 01:45 AM BeatNavy Awesome job, Cary. I love seeing the progress in ... Mar 18 2016, 03:53 AM sixnotfour Cary, Great job , I think the rear trunk floor is ... Mar 18 2016, 05:36 AM cary
Cary, Great job , I think the rear trunk floor is... Mar 18 2016, 07:44 AM 914werke BTDT on the R. trunk floor repair for the late BUB... Mar 18 2016, 07:31 AM sixnotfour Cary,your 73 should look like the RD panel..75-76 ... Mar 18 2016, 12:28 PM 914_teener Wow....that IS different.
Nice work Cary. Mar 18 2016, 01:33 PM cary You guys are making more work for me ... LOL
It ha... Mar 18 2016, 02:09 PM sixnotfour :stooges: :hissyfit: :headbang: :welder: :firs... Mar 18 2016, 02:35 PM cary Here's the shot I forgot last night.
Mar 18 2016, 06:40 PM cary [b]Modifying RD PP335 to replicate the 75-76 rear ... Mar 18 2016, 07:19 PM trojanhorsepower Great work Cary! Mar 19 2016, 07:38 PM cary
Great work Cary!
Thanks ..............
Ken... Mar 19 2016, 08:49 PM  |
1 User(s) are reading this topic (1 Guests and 0 Anonymous Users)
0 Members:

|
Lo-Fi Version | Time is now: 23rd June 2026 - 10:41 PM |
Invision Power Board
v9.1.4 © 2026 IPS, Inc.