|
|
|
Porsche, and the Porsche crest are registered trademarks of Dr. Ing. h.c. F. Porsche AG.
This site is not affiliated with Porsche in any way. Its only purpose is to provide an online forum for car enthusiasts. All other trademarks are property of their respective owners. |
|
|

  |

| McMark |
 Mar 3 2016, 10:10 AM Mar 3 2016, 10:10 AM
Post
#41
|
|
914 Freak!  Group: Retired Admin Posts: 20,180 Joined: 13-March 03 From: Grand Rapids, MI Member No.: 419 Region Association: None |
QUOTE Super In Law (Jack) worked on filling the spot weld cutter holes in the seat reinforcements. Why fill these? Rosette welds to the car. |
   |

 
|
| jmitro |
Mar 3 2016, 10:29 AM
Post
#42
|
|
Senior Member Group: Members Posts: 713 Joined: 23-July 15 From: Oklahoma Member No.: 18,986 Region Association: None |
QUOTE(McMark @ Mar 3 2016, 10:10 AM)  QUOTE Super In Law (Jack) worked on filling the spot weld cutter holes in the seat reinforcements. Why fill these? Rosette welds to the car. (IMG:style_emoticons/default/agree.gif) way too much work spent filling those holes; only to drill new holes again??? |
|
|
|
| cary |
Mar 3 2016, 08:49 PM
Post
#43
|
|
Advanced Member Group: Members Posts: 3,900 Joined: 26-January 04 From: Sherwood Oregon Member No.: 1,608 Region Association: Pacific Northwest |
QUOTE(jmitro @ Mar 3 2016, 08:29 AM) QUOTE(McMark @ Mar 3 2016, 10:10 AM) QUOTE Super In Law (Jack) worked on filling the spot weld cutter holes in the seat reinforcements. Why fill these? Rosette welds to the car. (IMG:style_emoticons/default/agree.gif) way too much work spent filling those holes; only to drill new holes again??? Primarily filling the 3/8" cutter holes. They create a 1/2" rosette weld. (IMG:style_emoticons/default/sad.gif) Which would be almost impossible to remove in 40 years when the car is restored again. LOL. I have been told that I'm a little anal. And I think too far ahead. Plus I'm not keeping track of Super In Laws time. I figure we're ALL paying his wages. He was a 30 year federal employee. Which this year will be 31 years retired. So he's a bonus. |
|
|
|
| dangerranger01 |
Mar 3 2016, 09:32 PM
Post
#44
|
|
Member Group: Members Posts: 145 Joined: 12-August 05 From: Boring, Oregon U.S.A. Member No.: 4,578 Region Association: None |
I really like your work Cary and all the pictures/details you put in. Gonna really enjoy this thread.
Maybe when you're done with Mark's car you can do mine...and hey i've already bought a good amount from RD already, just need to cut and glue it into the car! haha |
|
|
|
| cary |
Mar 3 2016, 11:29 PM
Post
#45
|
|
Advanced Member Group: Members Posts: 3,900 Joined: 26-January 04 From: Sherwood Oregon Member No.: 1,608 Region Association: Pacific Northwest |
QUOTE(dangerranger01 @ Mar 3 2016, 07:32 PM) I really like your work Cary and all the pictures/details you put in. Gonna really enjoy this thread. Maybe when you're done with Mark's car you can do mine...and hey i've already bought a good amount from RD already, just need to cut and glue it into the car! haha I'll take these projects on one at a time. Your neighbor Doug has already asked to next in line, sorry. But I'd like to see where your at with your project. This one is turning out to be more than I expected. (IMG:style_emoticons/default/sawzall-smiley.gif) (IMG:style_emoticons/default/welder.gif) |
|
|
|
| dangerranger01 |
Mar 3 2016, 11:35 PM
Post
#46
|
|
Member Group: Members Posts: 145 Joined: 12-August 05 From: Boring, Oregon U.S.A. Member No.: 4,578 Region Association: None |
QUOTE(cary @ Mar 3 2016, 09:29 PM) I'll take these projects on one at a time. Your neighbor Doug has already asked to next in line, sorry. But I'd like to see where your at with your project. This one is turning out to be more than I expected. (IMG:style_emoticons/default/sawzall-smiley.gif) (IMG:style_emoticons/default/welder.gif) Yea that is what I picked up. Still haven't met up wiht Doug yet even though he lives about 1mi from. I work out of town so i'm only back every few weeks. We still need to plan the 'Boring Teeners Unite' meeting haha an exclusive club I dig into the car when i'm home. Haven't done anything major yet besides see where i'm at and discovering more work with each time (but that is to be expect!). Got my stainless fuel lines from Tangerine months ago, and just now got a slight leak, so I guess that means i'm doing the fuel lines when i'm home! I should probably stop and figure out how to address cleaning/sealing the tank so I am only diggin into the fuel system once. You ever have to do this before? Need to do more research. |
|
|
|
| cary |
Mar 3 2016, 11:54 PM
Post
#47
|
|
Advanced Member Group: Members Posts: 3,900 Joined: 26-January 04 From: Sherwood Oregon Member No.: 1,608 Region Association: Pacific Northwest |
Start the day with primering the refurbished pieces that were OSPHOed overnight.
 After that I'm back to the wheelhouse. Step #1, remove a portion of the door jam. Thick line is were I cut. Probably should have gone up a bit more. Couldn't get the spot weld drill in the right place to drill out the top of the jack point. 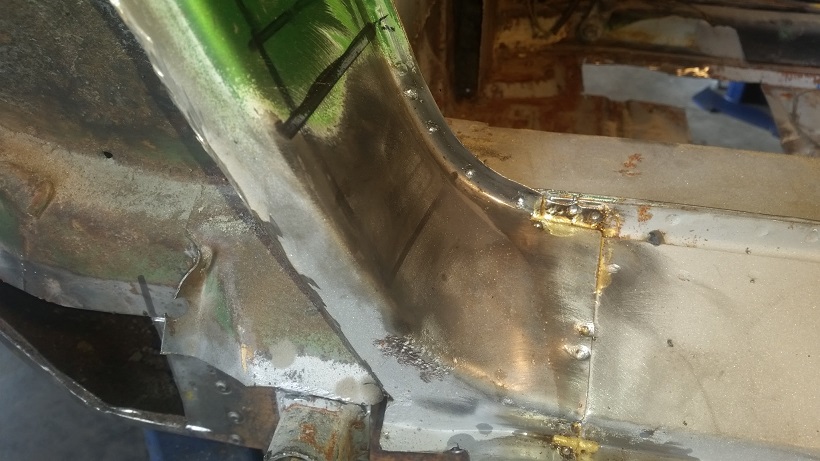 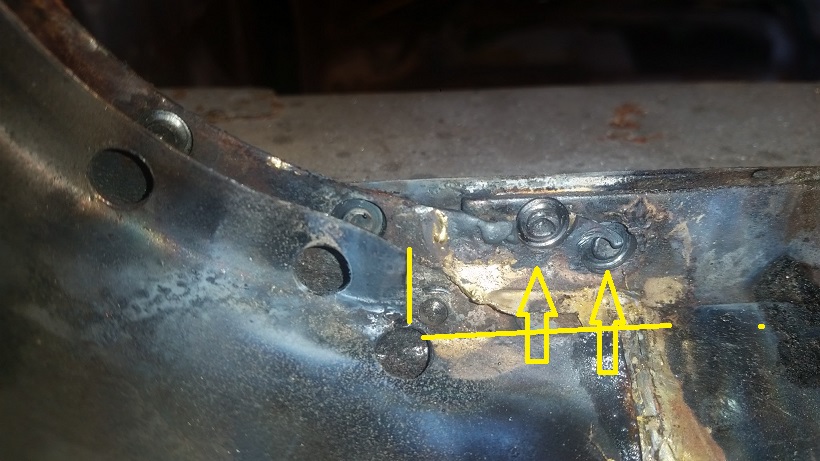 This shot is after the jam is detached. The yellow arrows are spot welds that don't need to be drilled out. The lines are where the brazing comes loose. Step #2 Here's a couple shots of the top of the jack point. 6 spot welds. The bent corners is my fibile attempt to pop off the jack point with a chisel yesterday. (IMG:style_emoticons/default/headbang.gif) Words of wisdom : A chisel is not something that you want use too much around 18 gauge metal, only directly on welds. 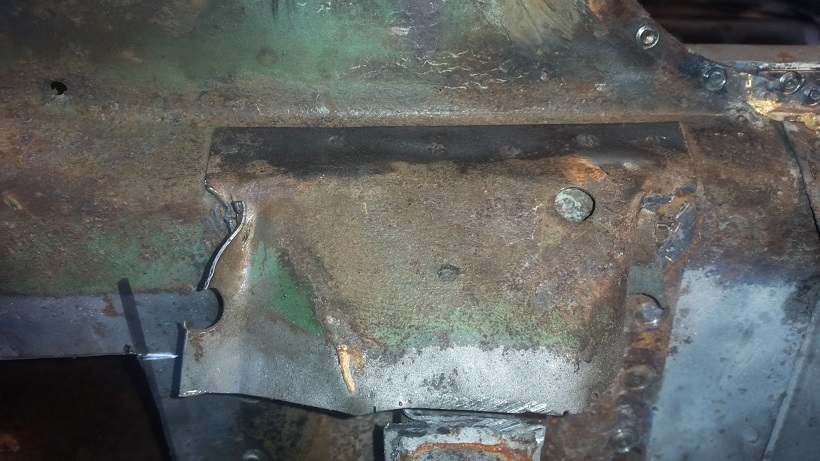 So I used the Rick grind and pop method to get the jack point off 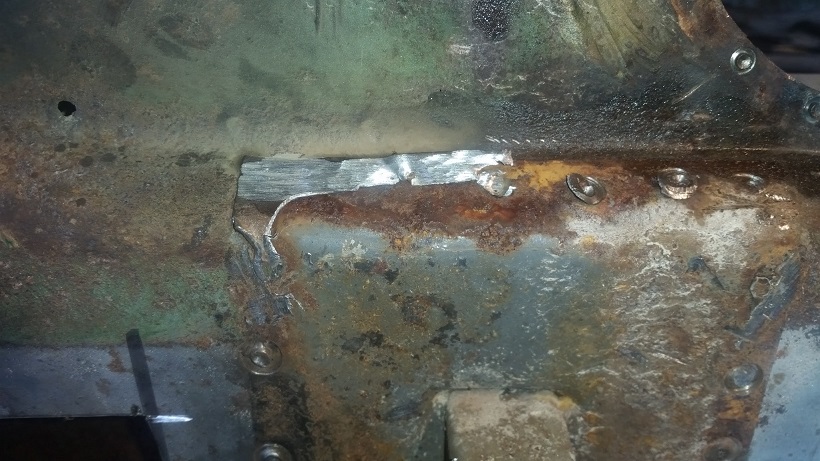 Step #3 Remove a portion of the sill so the wheelhouse to long joint can be drilled out. 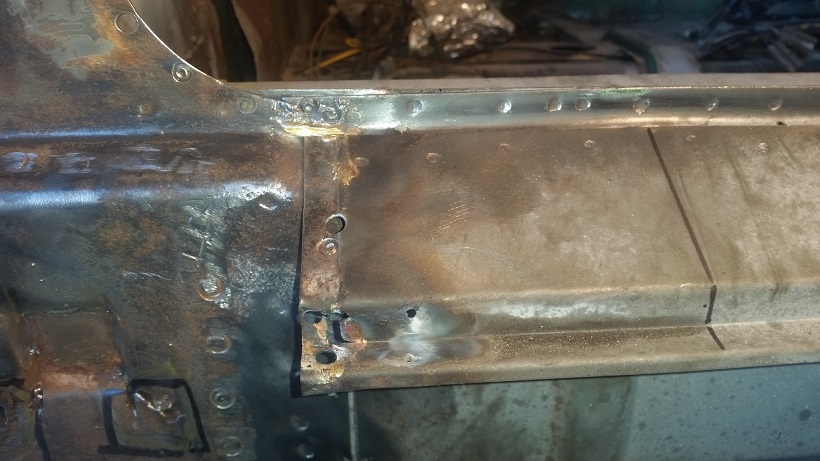 That corner will be sent to the Super In Law refurbish workbench. Brazed over the top of a spot weld. 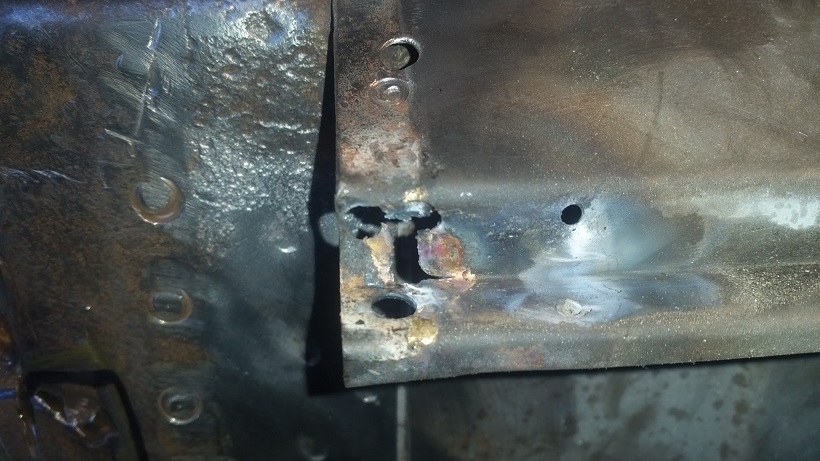 |
|
|
|
| cary |
Mar 4 2016, 12:09 AM
Post
#48
|
|
Advanced Member Group: Members Posts: 3,900 Joined: 26-January 04 From: Sherwood Oregon Member No.: 1,608 Region Association: Pacific Northwest |
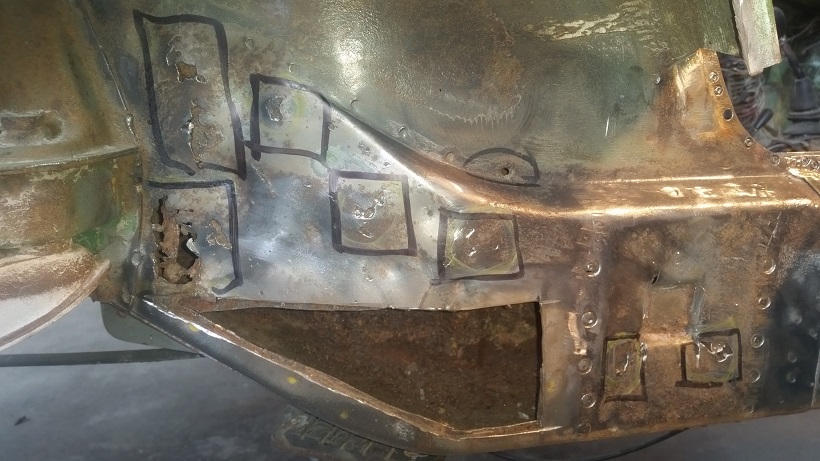
Today's items sent to the refurbish workbench.
Yellows circles are areas that will be refurbished. 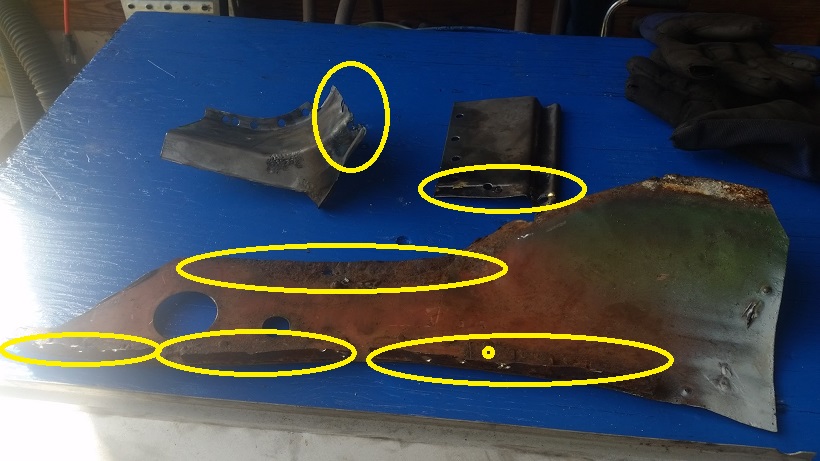 This is the bottom of the right engine shelf. The rusted portion is the flange that the molding channel gets welded to. I missed the bottom on my parts review before I sent the parts list to Mark. I caught taking off the molding channel. Oh well, saved Mark $180. We 'll cut and patch the shitty part. And recreate the flange. With Super In Laws high wage ($0) it will work out. If it was a regular shop deal. Recycle bin item. 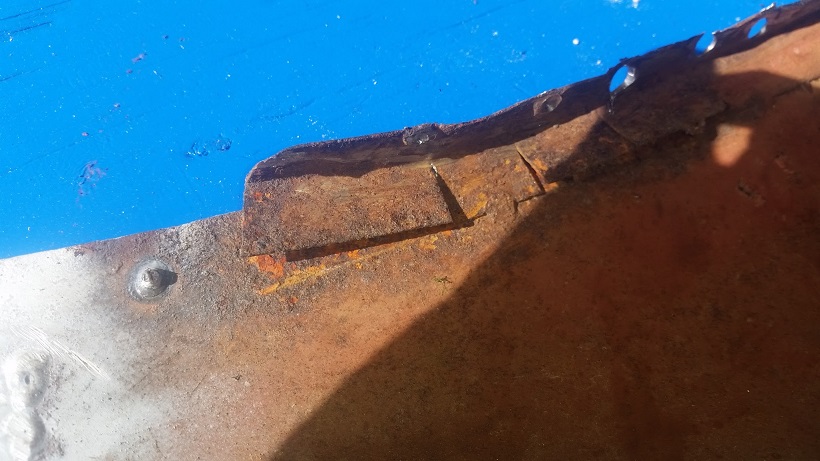 |
|
|
|
| cary |
Mar 4 2016, 12:42 AM
Post
#49
|
|
Advanced Member Group: Members Posts: 3,900 Joined: 26-January 04 From: Sherwood Oregon Member No.: 1,608 Region Association: Pacific Northwest |
Here's a better shot of the wheelhouse with the fender and door jam removed. Lined out areas are rusted thru.
 It' a shame this happened. Here's a shot of the wheel house above the suspension mount. Virgin. I still contend this was caused by the seam sealer on the top rail being removed and not replaced. (IMG:style_emoticons/default/mad.gif)  I'd still like to try sliding the inner layer behind the suspension mount. It would be some tricking welding. Might have to buy some special arc welding rod to tack it in. Would have to build some turnbuckle gadgets to push it up tight so it could be welded. But I like a challenge. That's how I roll. But the anal part of my brain says the weld will be too close and too big next to the suspension mount. So the mount and its dreaded tie will have to be removed so it can be patched correctly. (IMG:style_emoticons/default/sad.gif) Plus it we give a better view of the condition of the upper inner long. This will entail building a fixture for aligning the mount when we reinstall it. This as far as we go without having the new part in my hand for measurements ................ |
|
|
|
| cary |
Mar 4 2016, 12:51 AM
Post
#50
|
|
Advanced Member Group: Members Posts: 3,900 Joined: 26-January 04 From: Sherwood Oregon Member No.: 1,608 Region Association: Pacific Northwest |
Here's another area that will get close scrutiny after we remove the back half of the floor pan.
 Will probably cut it out of the parts car. 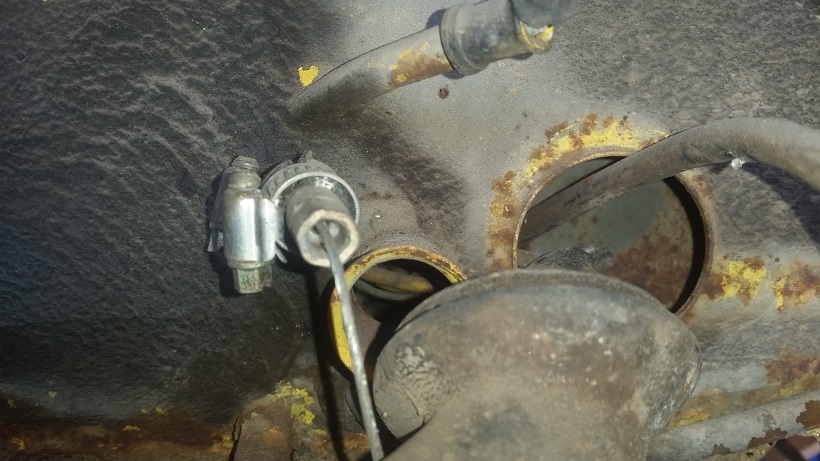 |
|
|
|
| cary |
Mar 4 2016, 10:01 AM
Post
#51
|
|
Advanced Member Group: Members Posts: 3,900 Joined: 26-January 04 From: Sherwood Oregon Member No.: 1,608 Region Association: Pacific Northwest |
QUOTE(dangerranger01 @ Mar 3 2016, 09:35 PM) QUOTE(cary @ Mar 3 2016, 09:29 PM) I'll take these projects on one at a time. Your neighbor Doug has already asked to next in line, sorry. But I'd like to see where your at with your project. This one is turning out to be more than I expected. (IMG:style_emoticons/default/sawzall-smiley.gif) (IMG:style_emoticons/default/welder.gif) Yea that is what I picked up. Still haven't met up wiht Doug yet even though he lives about 1mi from. I work out of town so i'm only back every few weeks. We still need to plan the 'Boring Teeners Unite' meeting haha an exclusive club I dig into the car when i'm home. Haven't done anything major yet besides see where i'm at and discovering more work with each time (but that is to be expect!). Got my stainless fuel lines from Tangerine months ago, and just now got a slight leak, so I guess that means i'm doing the fuel lines when i'm home! I should probably stop and figure out how to address cleaning/sealing the tank so I am only diggin into the fuel system once. You ever have to do this before? Need to do more research. First I should say thank you for the compliments ................... Feels like I'm about to be reeled in. LOL. Yes on the fuel lines. Did a set on my 911. A set on both the 914's. Look's like I'll be doing a set on Mark's car. http://www.914world.com/bbs2/index.php?sho...p;#entry2100898 Starts page #124 http://www.914world.com/bbs2/index.php?sho...p;#entry2096850 http://www.914world.com/bbs2/index.php?sho...mp;hl=fuel+tank Are you smelling fuel ? Is any hitting the ground ? |
|
|
|
| dangerranger01 |
Mar 4 2016, 11:06 AM
Post
#52
|
|
Member Group: Members Posts: 145 Joined: 12-August 05 From: Boring, Oregon U.S.A. Member No.: 4,578 Region Association: None |
QUOTE(cary @ Mar 4 2016, 08:01 AM) First I should say thank you for the compliments ................... Feels like I'm about to be reeled in. LOL. Yes on the fuel lines. Did a set on my 911. A set on both the 914's. Look's like I'll be doing a set on Mark's car. http://www.914world.com/bbs2/index.php?sho...p;#entry2100898 Starts page #124 http://www.914world.com/bbs2/index.php?sho...p;#entry2096850 http://www.914world.com/bbs2/index.php?sho...mp;hl=fuel+tank Are you smelling fuel ? Is any hitting the ground ? Thanks for the links. I'll read up more once i'm done running around this morning. And yes, i smell fuel and it's hitting the ground. Looks like where the lines come out of the tunnel and go up into the engine bay is a significant leak (plastic to rubber area)....not good. I think i'll pull the tank today and see what condition its in. Not sure if any shops local to me that clean/pressure test but I haven't searched... |
|
|
|
| cary |
Mar 4 2016, 08:03 PM
Post
#53
|
|
Advanced Member Group: Members Posts: 3,900 Joined: 26-January 04 From: Sherwood Oregon Member No.: 1,608 Region Association: Pacific Northwest |
QUOTE Thanks for the links. I'll read up more once i'm done running around this morning. And yes, i smell fuel and it's hitting the ground. Looks like where the lines come out of the tunnel and go up into the engine bay is a significant leak (plastic to rubber area)....not good. I think i'll pull the tank today and see what condition its in. Not sure if any shops local to me that clean/pressure test but I haven't searched... Good Luck. I couldn't find anyone on the West side. |
|
|
|
| cary |
Mar 4 2016, 08:40 PM
Post
#54
|
|
Advanced Member Group: Members Posts: 3,900 Joined: 26-January 04 From: Sherwood Oregon Member No.: 1,608 Region Association: Pacific Northwest |
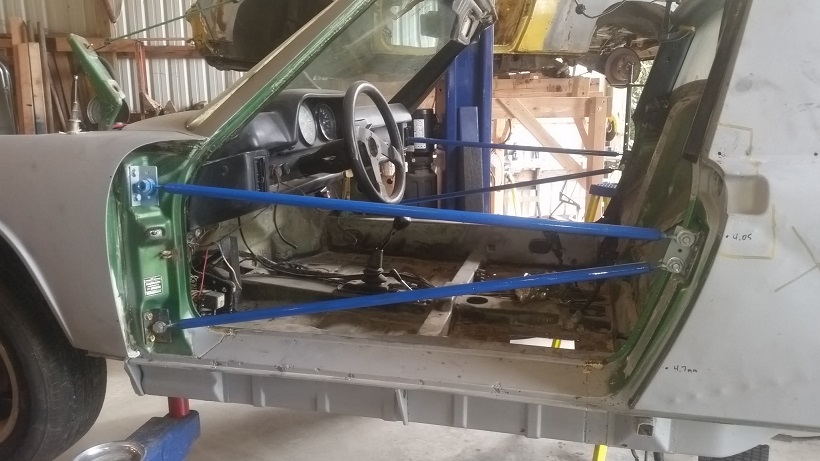
Started the day installing the door braces.
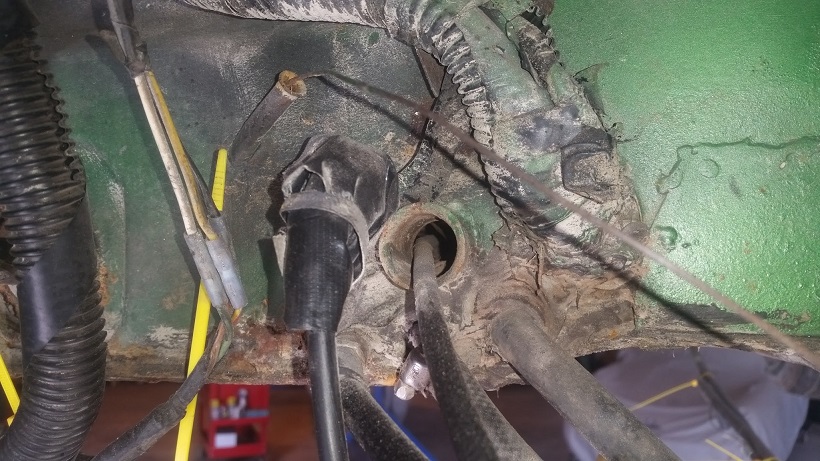
 I found another piece that will probably need to changed. Motor Mount. 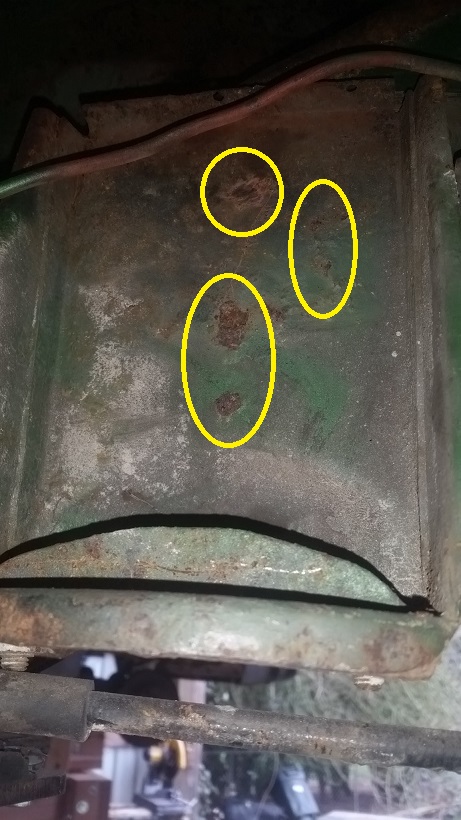 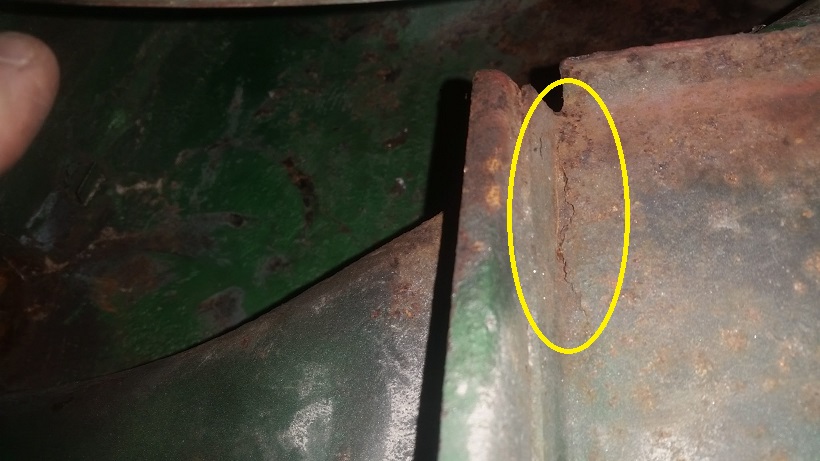 I think I have 2 or 3 in my stash. Plus the parts car has a couple good ones on it. In order to give the firewall a good examination I need to remove the fuel lines and cables. So out came the fuel tank. 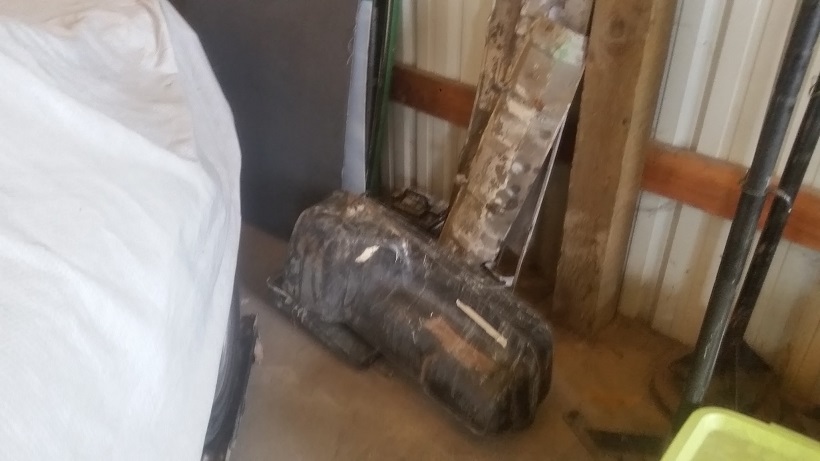 This is the scariest splice I've ever seen. This was inside the cockpit. (IMG:style_emoticons/default/sad.gif) This is why it had the hillbilly tared in mess. 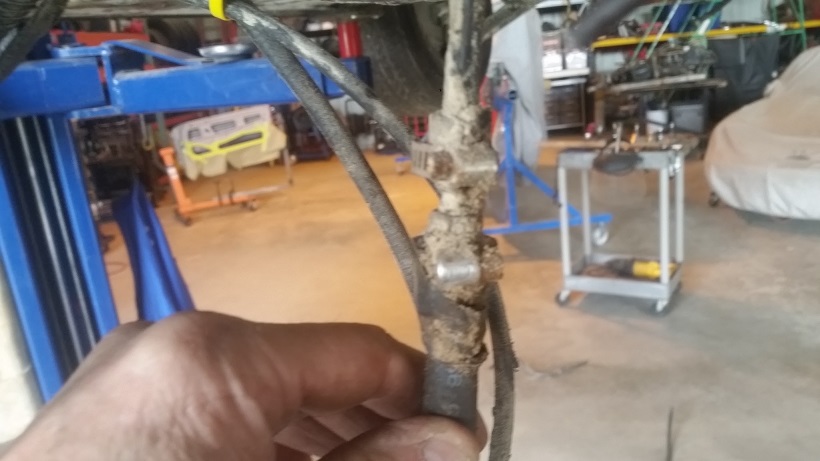 After everything is cleared out of the way. 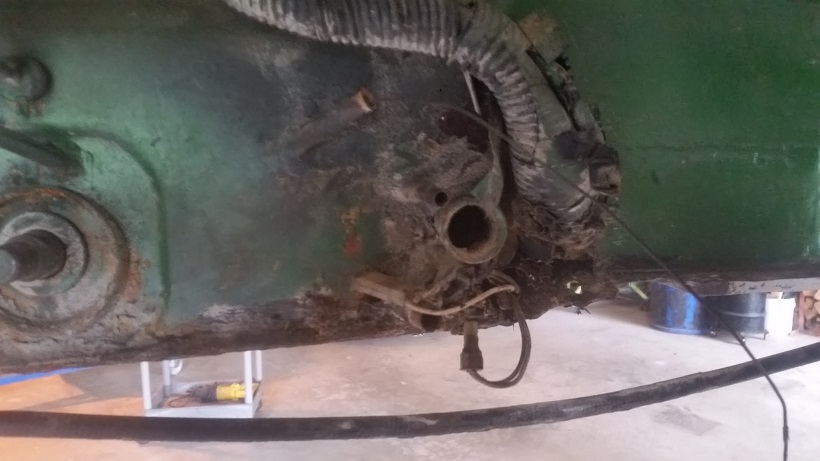 Aftermath ................ 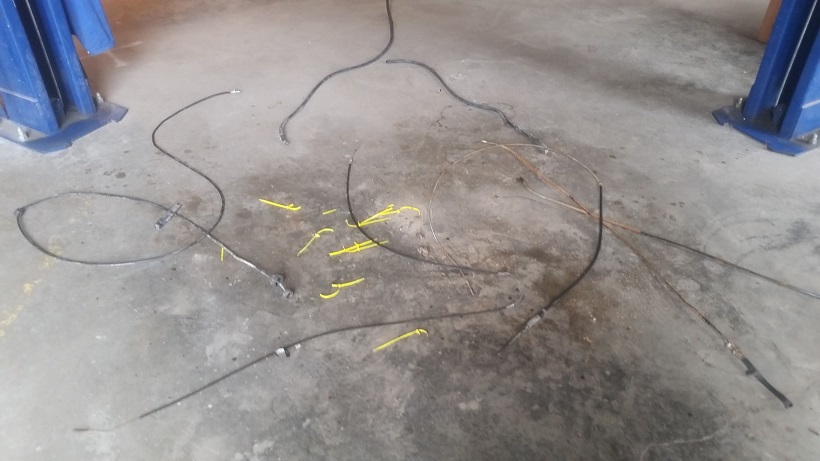 Speedometer cable looks good. Clutch cable looks good. Accelerator cable, not so much. Bowden tube separated. 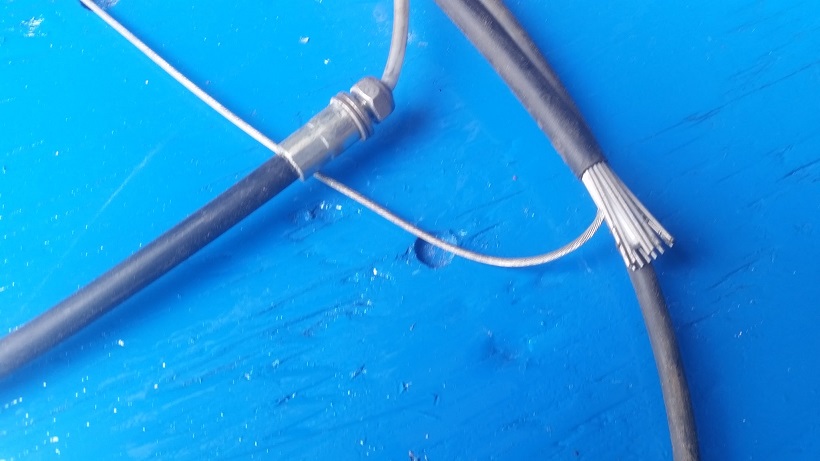 |
|
|
|
| cary |
Mar 4 2016, 09:22 PM
Post
#55
|
|
Advanced Member Group: Members Posts: 3,900 Joined: 26-January 04 From: Sherwood Oregon Member No.: 1,608 Region Association: Pacific Northwest |
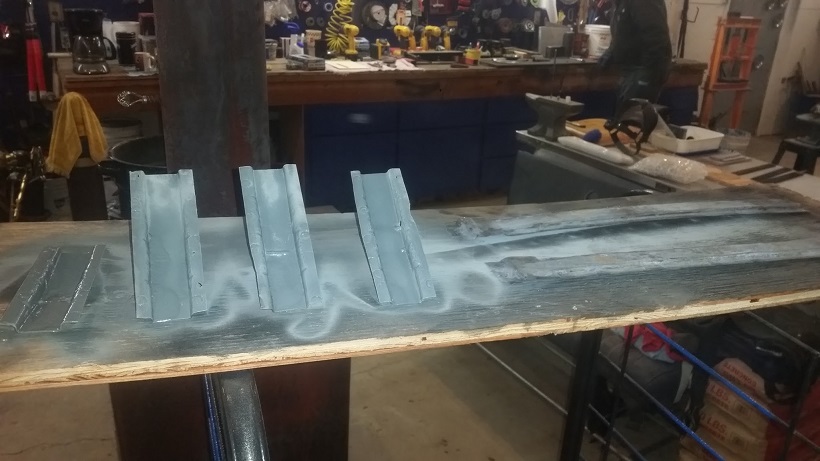
Here's Super In Law's work on the right engine shelf. He's created a new flange for the molding channel to be welded to.
 |
|
|
|
| cary |
Mar 4 2016, 10:03 PM
Post
#56
|
|
Advanced Member Group: Members Posts: 3,900 Joined: 26-January 04 From: Sherwood Oregon Member No.: 1,608 Region Association: Pacific Northwest |
After lunch we went to Mike's (warpig) house to cut the rear panel out of his parts car.
  Tomorrow is Annual AX Tech at Speedsports. Sunday is instructor at Tire Rack Street Survival |
|
|
|
| bigkensteele |
Mar 5 2016, 02:06 PM
Post
#57
|
|
Major Member Group: Members Posts: 2,200 Joined: 30-August 04 From: Cincinnati, OH Member No.: 2,660 Region Association: South East States |
QUOTE(cary @ Mar 4 2016, 08:03 PM) After lunch we went to Mike's (warpig) house to cut the rear panel out of his parts car. Tomorrow is Annual AX Tech at Speedsports. Sunday is instructor at Tire Rack Street Survival Is Mark going to stick with the late bumpers? If so, I might be in the market for the tow-hook parts that you will be removing. Fantastic work, BTW! Wish I had a Super In-Law! |
|
|
|
| cary |
Mar 5 2016, 04:51 PM
Post
#58
|
|
Advanced Member Group: Members Posts: 3,900 Joined: 26-January 04 From: Sherwood Oregon Member No.: 1,608 Region Association: Pacific Northwest |
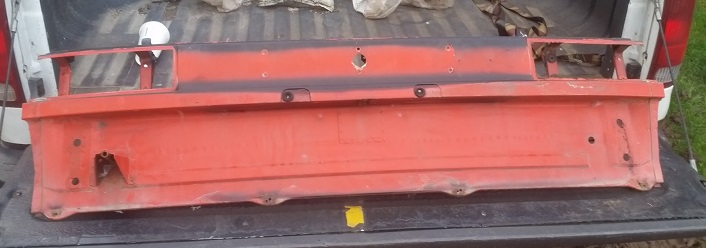
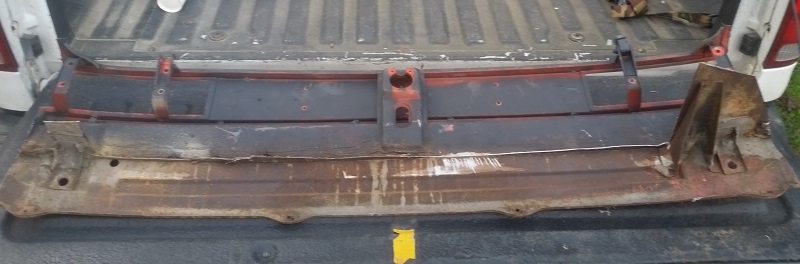
Mark's staying with the 75-76 bumpers. So we should be able to accommodate your request. If not this car, there should be one on my parts car.
The took hook receiver only ? Or do you need the braces too ? |
|
|
|
| raynekat |
Mar 6 2016, 03:38 AM
Post
#59
|
|
Advanced Member Group: Members Posts: 2,171 Joined: 30-December 14 From: Coeur d'Alene, Idaho Member No.: 18,263 Region Association: Pacific Northwest |
QUOTE(cary @ Mar 3 2016, 09:29 PM) QUOTE(dangerranger01 @ Mar 3 2016, 07:32 PM) I really like your work Cary and all the pictures/details you put in. Gonna really enjoy this thread. Maybe when you're done with Mark's car you can do mine...and hey i've already bought a good amount from RD already, just need to cut and glue it into the car! haha I'll take these projects on one at a time. Your neighbor Doug has already asked to next in line, sorry. But I'd like to see where your at with your project. This one is turning out to be more than I expected. (IMG:style_emoticons/default/sawzall-smiley.gif) (IMG:style_emoticons/default/welder.gif) I cede my position in line. Not sure when I'll have the funds and/or time to really dig into my project. Got a battle royal with my ex investment company planned for this summer. I'll definitely be dropping in occasionally to see what Cary's up to no doubt. |
|
|
|
| cary |
Mar 7 2016, 09:51 PM
Post
#60
|
|
Advanced Member Group: Members Posts: 3,900 Joined: 26-January 04 From: Sherwood Oregon Member No.: 1,608 Region Association: Pacific Northwest |
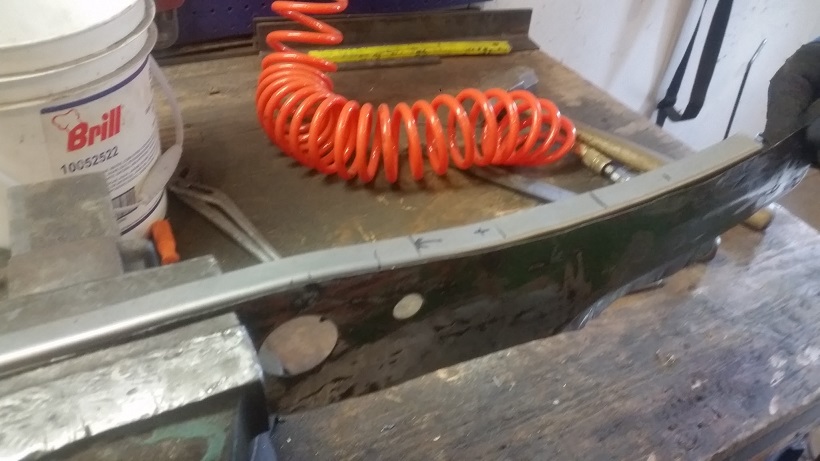
QUOTE(cary @ Mar 5 2016, 02:51 PM) Mark's staying with the 75-76 bumpers. So we should be able to accommodate your request. If not this car, there should be one on my parts car. The took hook receiver only ? Or do you need the braces too ? Ok. Tow hook is not meant to be removed and replaced. The tube had to be cut to get the tow hook off the pre 75 rear panel. You can't get the cutting wheel down into the locations were they welded in the tube. (IMG:style_emoticons/default/mad.gif) 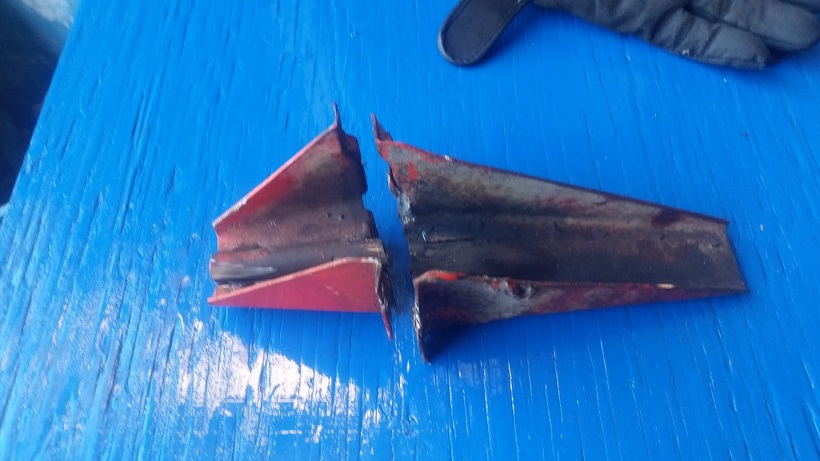 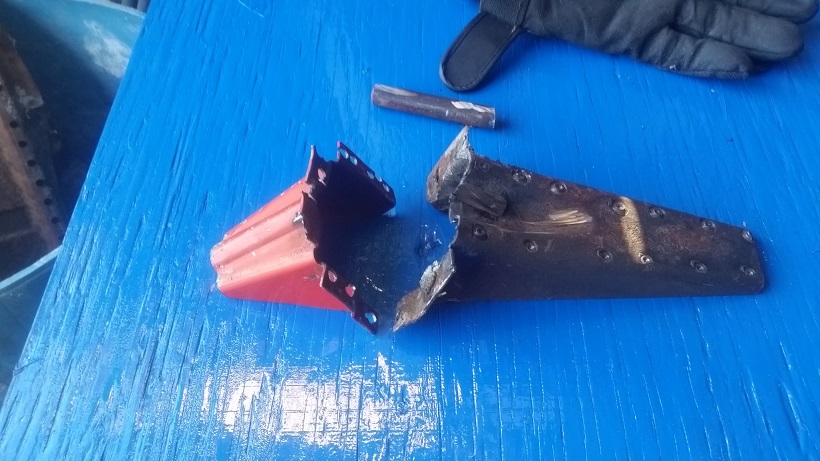 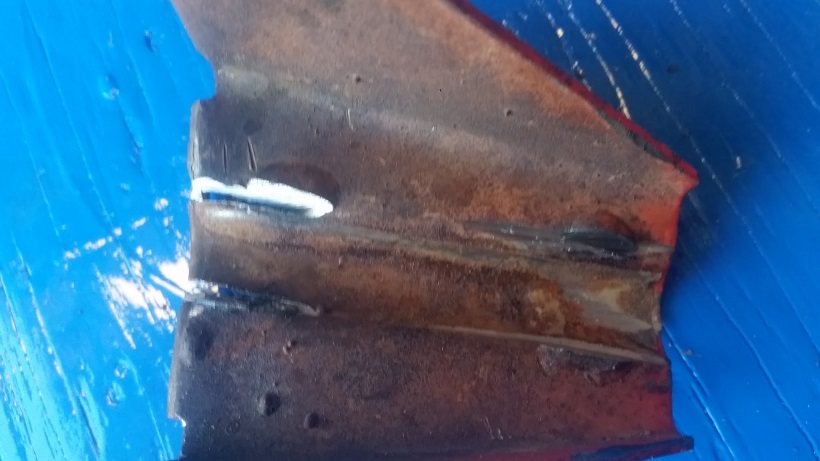 If you can come up with a tube with 10mm threads you could put the two halves to good use. I can refurbish the two halves if your still interested. Fill in spot cutter holes. bead blast and prime. |
|
|
|
|
1 User(s) are reading this topic (1 Guests and 0 Anonymous Users)
0 Members:

|
Lo-Fi Version | Time is now: 24th June 2026 - 12:12 AM |
Invision Power Board
v9.1.4 © 2026 IPS, Inc.