|
|
|
Porsche, and the Porsche crest are registered trademarks of Dr. Ing. h.c. F. Porsche AG.
This site is not affiliated with Porsche in any way. Its only purpose is to provide an online forum for car enthusiasts. All other trademarks are property of their respective owners. |
|
|

  |

| cary |
 Mar 17 2016, 09:55 PM Mar 17 2016, 09:55 PM
Post
#81
|
|
Advanced Member  Group: Members Posts: 3,900 Joined: 26-January 04 From: Sherwood Oregon Member No.: 1,608 Region Association: Pacific Northwest |
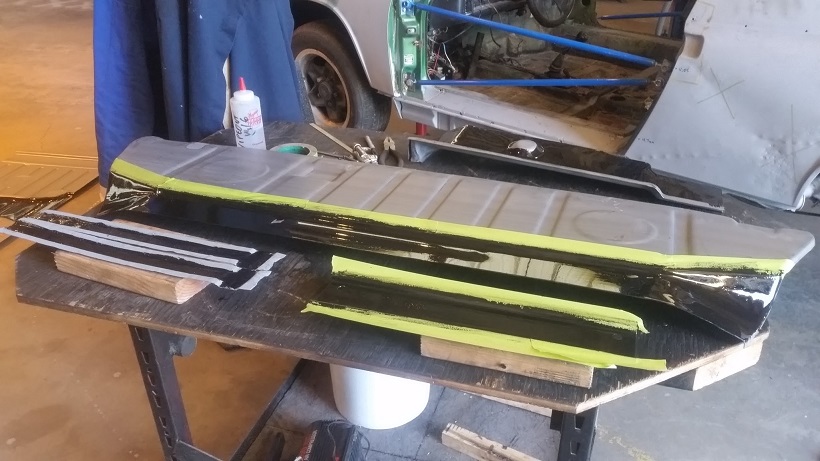
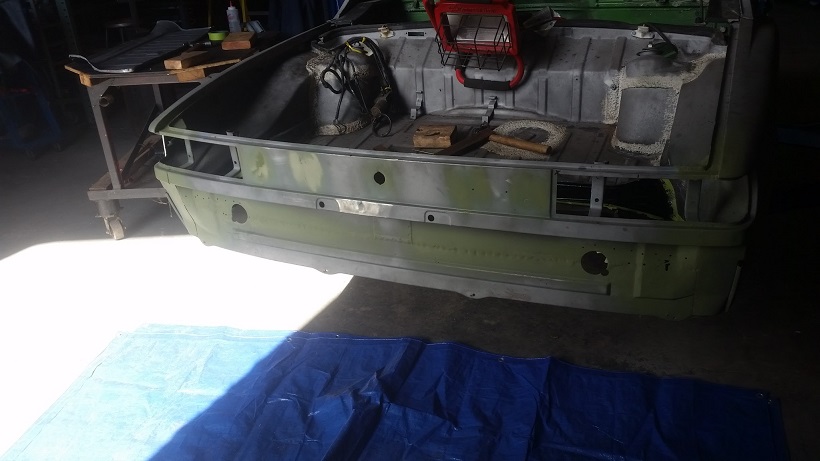
Now on to fitting the rear trunk panel. Looks like using the RD PP335 in a 75-76 will take some extensive fitting. I think that's how Adam from RD describes it.
First observation. With the impact bumper supports in play, the new trunk panel will be located quite a bit higher than either the pre 74 or the 75-76 position. 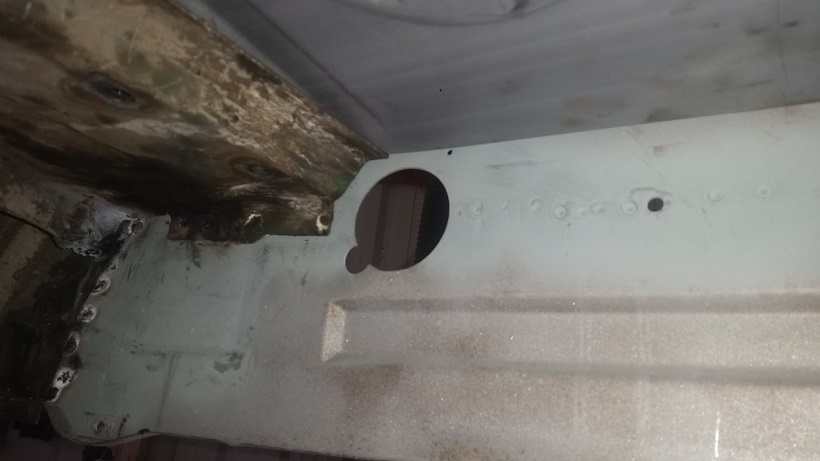 I'll needed to trim around the latch support and create a new flange. 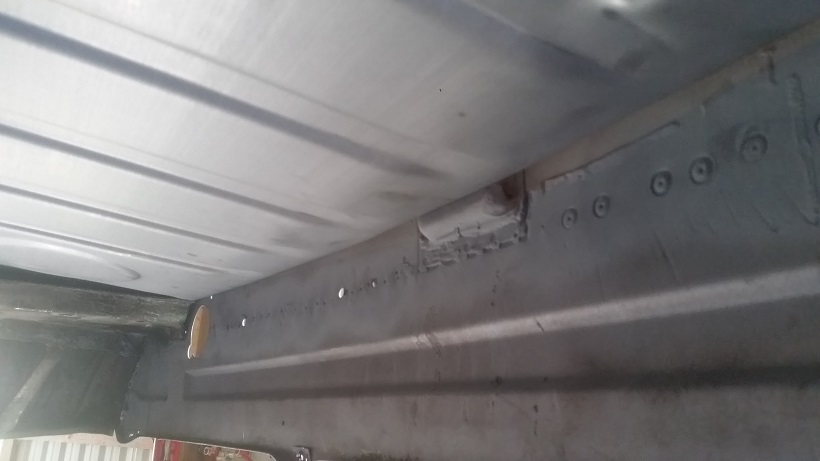 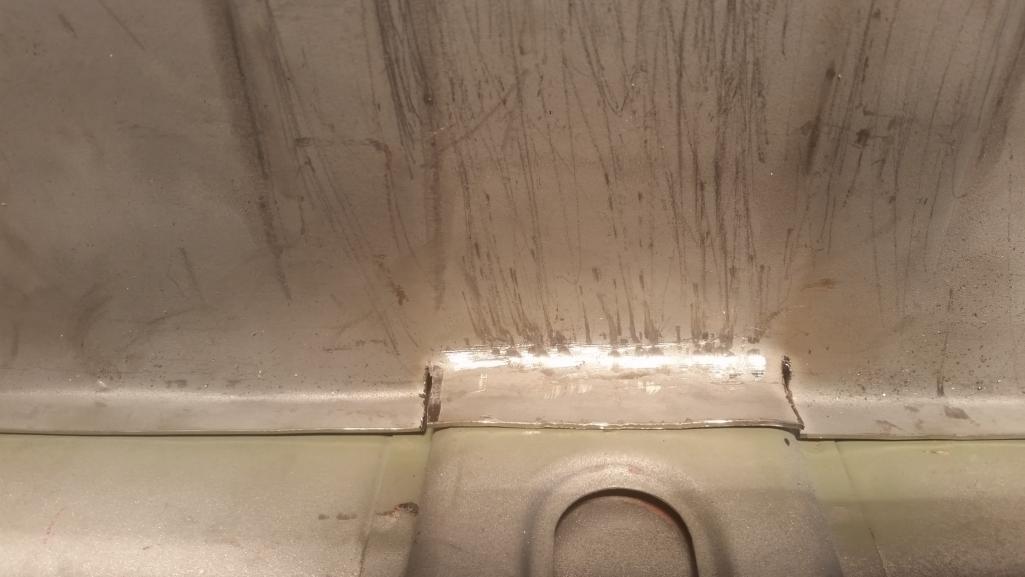 Shot from above. Back flange needs a little fitting. 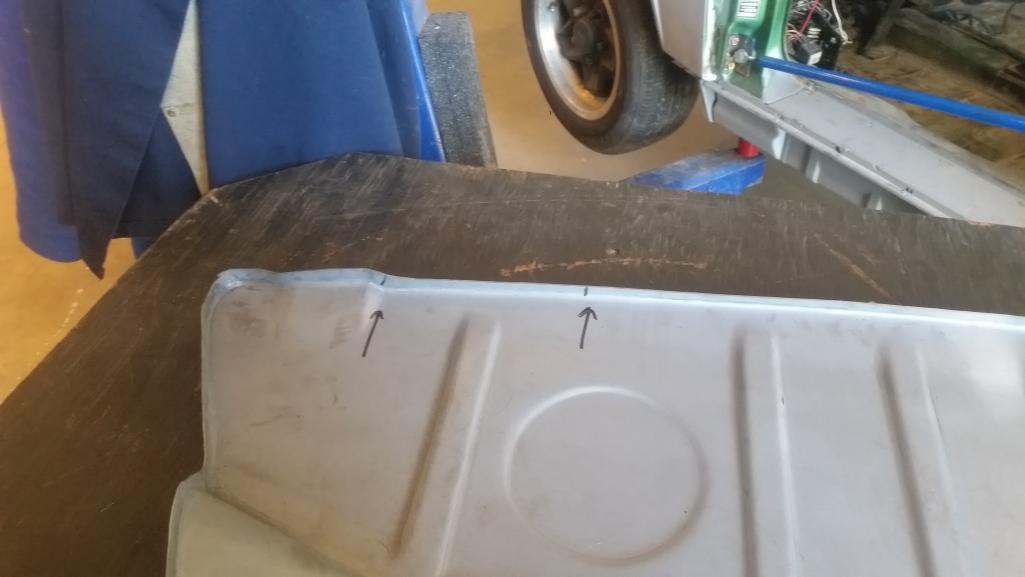 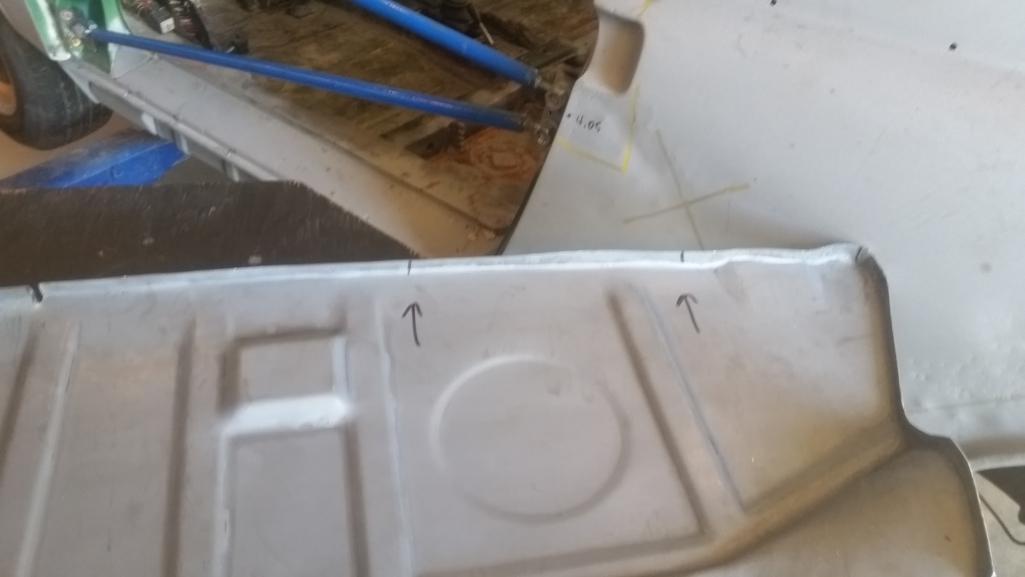 This is what I would call extensive. The question is can I fold down the flanges to fill the void. Or will I need create a couple of new corners. 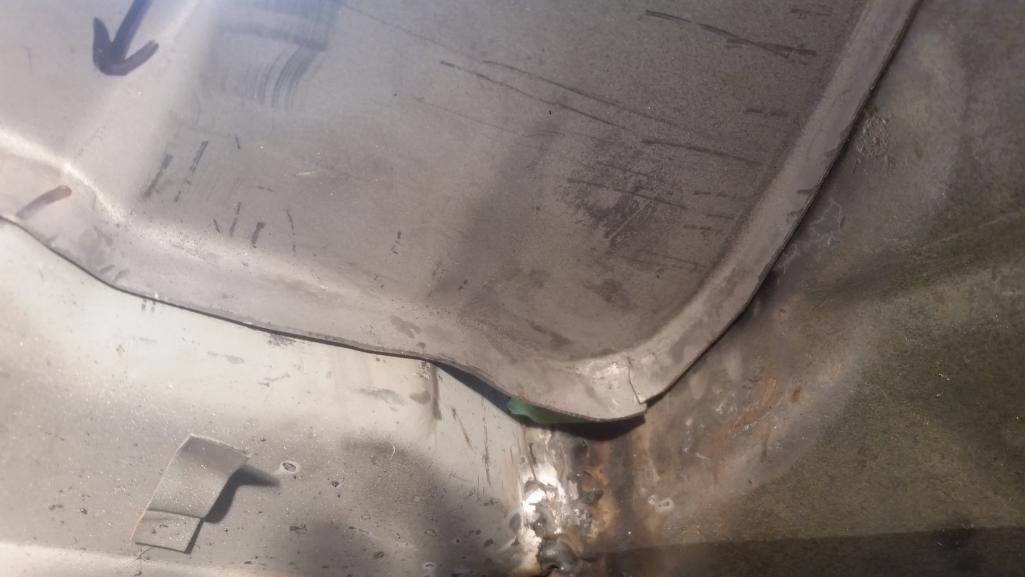 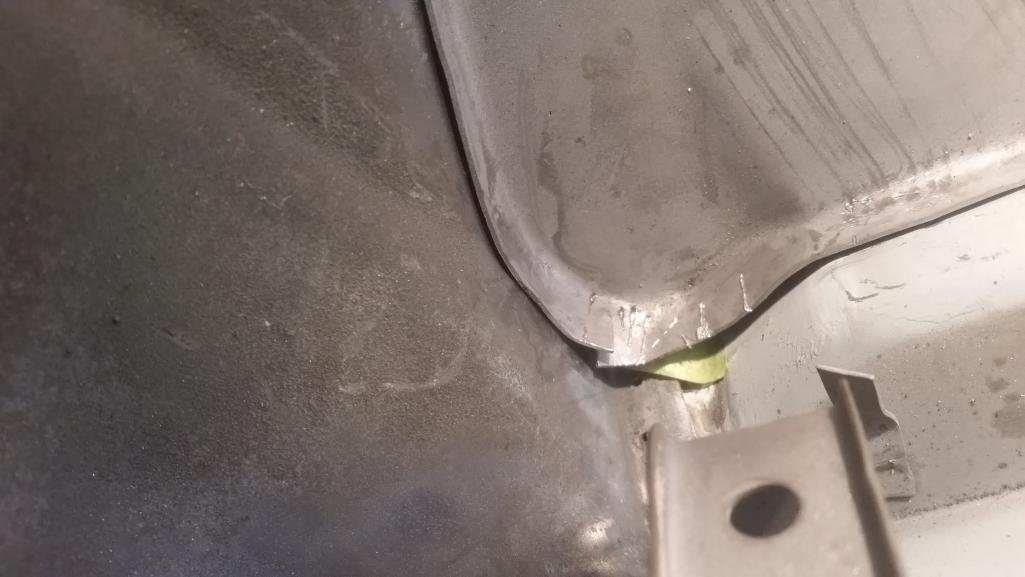 |
   |

 
|
| cary |
Mar 17 2016, 10:02 PM
Post
#82
|
|
Advanced Member Group: Members Posts: 3,900 Joined: 26-January 04 From: Sherwood Oregon Member No.: 1,608 Region Association: Pacific Northwest |
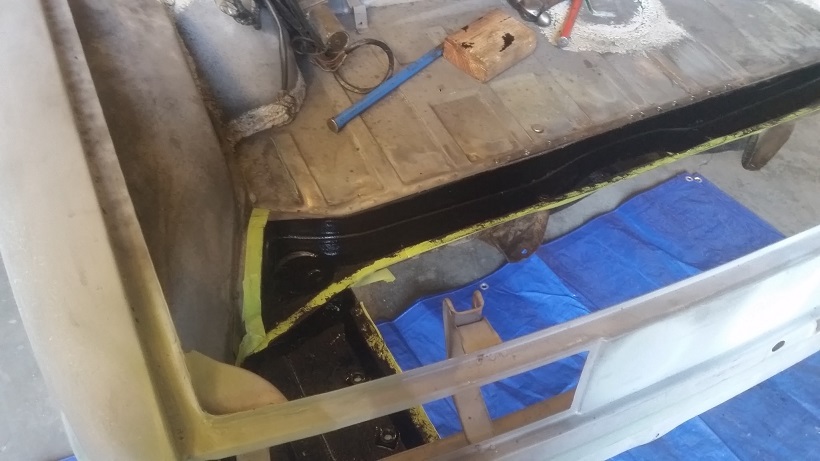
Before I head out the door I POR15 the transmission mount and impact bumper supports. As not to waste the POR15 I use the remaining POR15 to coat the inside of a few other pieces.
   |
|
|
|
| cary |
Mar 17 2016, 10:15 PM
Post
#83
|
|
Advanced Member Group: Members Posts: 3,900 Joined: 26-January 04 From: Sherwood Oregon Member No.: 1,608 Region Association: Pacific Northwest |
As I was doing my thing, Super In Law broke down Mark's drive train.
It will get steam cleaned and new fuel and vacuum lines before it is mounted back into the car. 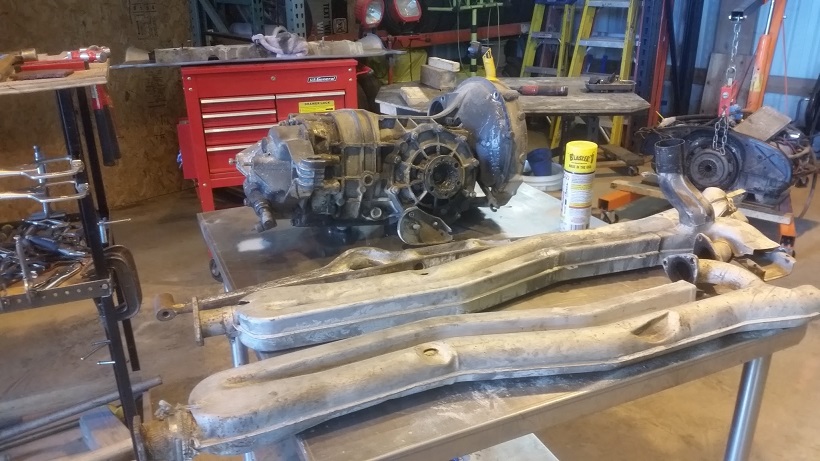 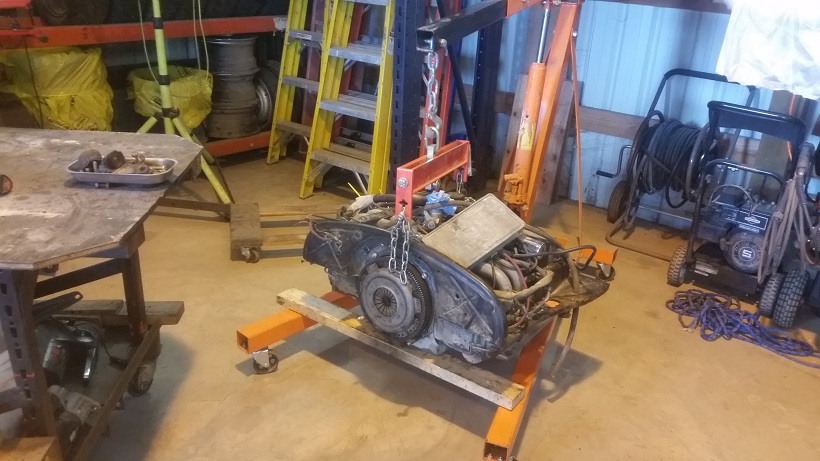 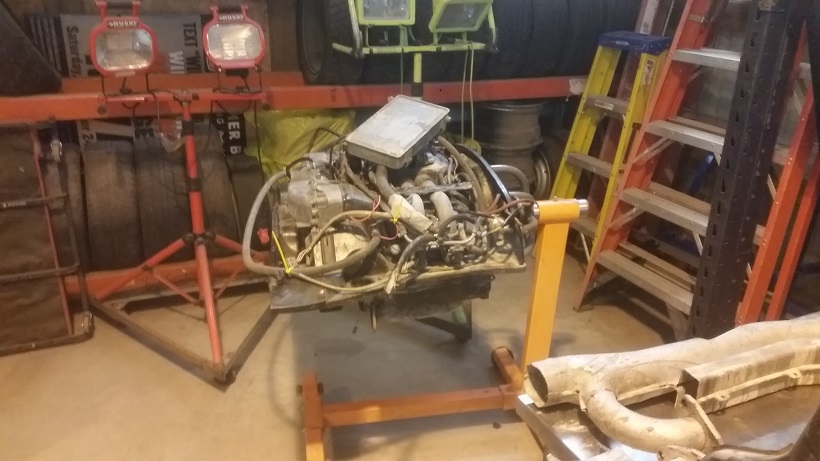 Mark I'll need a new pair of engine mounts. One was cooked, long stud spun inside the rubber mount. Other is looks original too. I'll start another thread to ask some questions about the 75-76 HE's. |
|
|
|
| cary |
Mar 17 2016, 10:55 PM
Post
#84
|
|
Advanced Member Group: Members Posts: 3,900 Joined: 26-January 04 From: Sherwood Oregon Member No.: 1,608 Region Association: Pacific Northwest |
QUOTE(dangerranger01 @ Mar 3 2016, 08:32 PM)  I really like your work Cary and all the pictures/details you put in. Gonna really enjoy this thread. Maybe when you're done with Mark's car you can do mine...and hey i've already bought a good amount from RD already, just need to cut and glue it into the car! haha PM Sent |
|
|
|
| raynekat |
Mar 17 2016, 11:39 PM
Post
#85
|
|
Advanced Member Group: Members Posts: 2,171 Joined: 30-December 14 From: Coeur d'Alene, Idaho Member No.: 18,263 Region Association: Pacific Northwest |
Looking good Cary.
That rear end repair you are doing on Mark's car is exactly what my car will be needing one day as well. Well done. Appears like a lot of painstaking work.... |
|
|
|
| Mikey914 |
Mar 18 2016, 01:45 AM
Post
#86
|
|
The rubber man Group: Members Posts: 12,782 Joined: 27-December 04 From: Hillsboro, OR Member No.: 3,348 Region Association: None |
Thanks Cary,
I really appreciate your attention to detail, and what other "shop" would be posting progressive pictures as the work is done. Just build the shopping list and I'll begetting you more stuff. Mark |
|
|
|
| BeatNavy |
Mar 18 2016, 03:53 AM
Post
#87
|
|
Certified Professional Scapegoat Group: Members Posts: 2,965 Joined: 26-February 14 From: Easton, MD Member No.: 17,042 Region Association: MidAtlantic Region |
Awesome job, Cary. I love seeing the progress in detail. I'm really hoping I don't have to tear into my trunk on my project car (or my DD for that matter) like you're doing, but if I do this helps a lot.
|
|
|
|
| sixnotfour |
Mar 18 2016, 05:36 AM
Post
#88
|
|
914 Wizard Group: Members Posts: 11,274 Joined: 12-September 04 Member No.: 2,744 Region Association: NineFourteenerVille |
Cary, Great job , I think the rear trunk floor is gonna be an aesthetic regret...
check the photo of the OG floor it has a transition down to the proper trunk floor height... If you make a cut front to back ( like you previously did ) and push down the floor then fab some filler pieces it will be like it should for a BUB 914... Carry On Attached image(s) 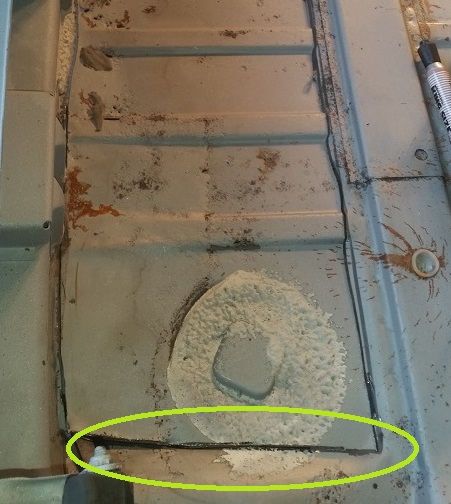
|
|
|
|
| 914work |
Mar 18 2016, 07:31 AM
Post
#89
|
|
Member Group: Members Posts: 291 Joined: 9-November 11 Member No.: 13,762 Region Association: None |
BTDT on the R. trunk floor repair for the late BUB equipped car.
After looking at how to alter a new repop panel intended for the early chassis determined it was PITA & punted. Found a good R. clip to scab instead. As the cars continue to go up in popularity (& value) perhaps the R trunk pan for the late car is another item Pete (RD) can consider reproducing |
|
|
|
| cary |
Mar 18 2016, 07:44 AM
Post
#90
|
|
Advanced Member Group: Members Posts: 3,900 Joined: 26-January 04 From: Sherwood Oregon Member No.: 1,608 Region Association: Pacific Northwest |
QUOTE(sixnotfour @ Mar 18 2016, 04:36 AM) Cary, Great job , I think the rear trunk floor is gonna be an aesthetic regret... check the photo of the OG floor it has a transition down to the proper trunk floor height... If you make a cut front to back ( like you previously did ) and push down the floor then fab some filler pieces it will be like it should for a BUB 914... Carry On Hmmmmm ................ I'll pull up the pad in my 73 and take a look. |
|
|
|
| sixnotfour |
Mar 18 2016, 12:28 PM
Post
#91
|
|
914 Wizard Group: Members Posts: 11,274 Joined: 12-September 04 Member No.: 2,744 Region Association: NineFourteenerVille |
Cary,your 73 should look like the RD panel..75-76 BUB 914's trunk panel is unique..
here is somepics ofa 76 trunk and the transition I mentioned (IMG:style_emoticons/default/welder.gif) drivers side Attached image(s) 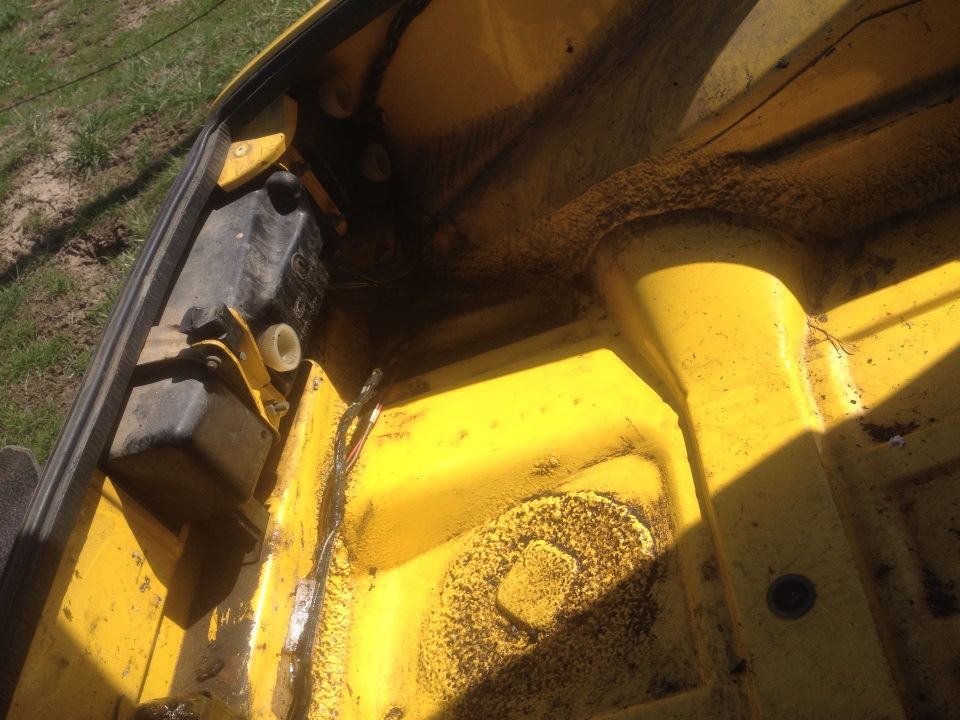 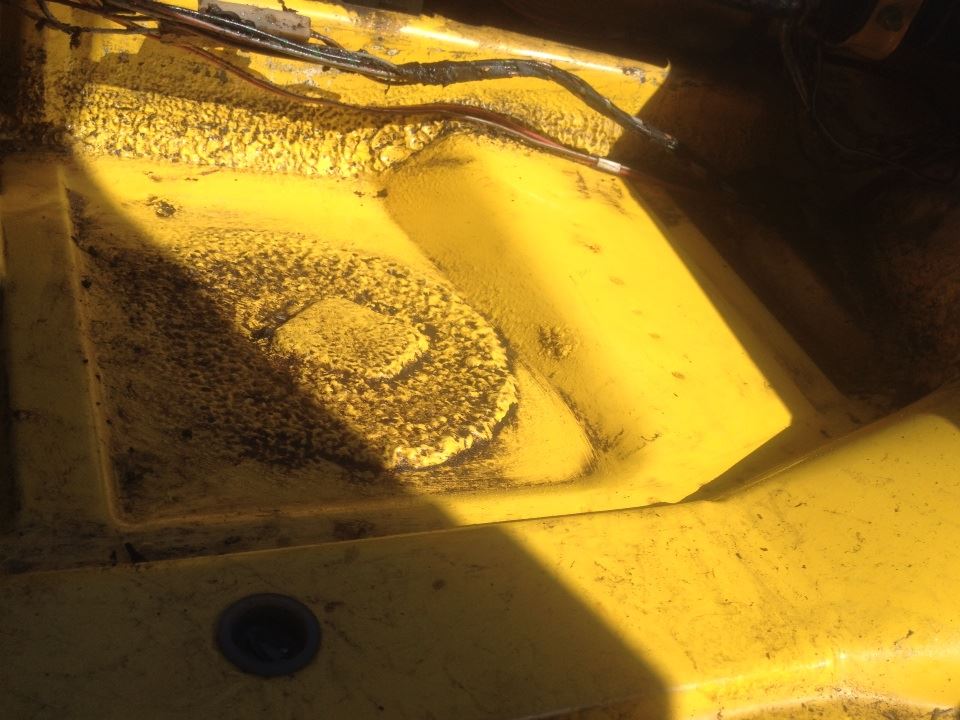
|
|
|
|
| 914_teener |
Mar 18 2016, 01:33 PM
Post
#92
|
|
914 Guru Group: Members Posts: 5,270 Joined: 31-August 08 From: So. Cal Member No.: 9,489 Region Association: Southern California |
Wow....that IS different.
Nice work Cary. |
|
|
|
| cary |
Mar 18 2016, 02:09 PM
Post
#93
|
|
Advanced Member Group: Members Posts: 3,900 Joined: 26-January 04 From: Sherwood Oregon Member No.: 1,608 Region Association: Pacific Northwest |
You guys are making more work for me ... LOL
It has to be modified. You'd have to cut around and flange the big bumper braces too. Today was supposed to be shop clean up and resupply day. But nooooooo I dug out the drop down pieces from the scrap barrel and I'm making up some sketchs. Once I locate the front and back points. It should be pretty simple. |
|
|
|
| sixnotfour |
Mar 18 2016, 02:35 PM
Post
#94
|
|
914 Wizard Group: Members Posts: 11,274 Joined: 12-September 04 Member No.: 2,744 Region Association: NineFourteenerVille |
(IMG:style_emoticons/default/slap.gif) (IMG:style_emoticons/default/hissyfit.gif) (IMG:style_emoticons/default/headbang.gif) (IMG:style_emoticons/default/welder.gif) (IMG:style_emoticons/default/first.gif)
You wouldn't Mark to send you a leaky rubber now would you ?? |
|
|
|
| cary |
Mar 18 2016, 06:40 PM
Post
#95
|
|
Advanced Member Group: Members Posts: 3,900 Joined: 26-January 04 From: Sherwood Oregon Member No.: 1,608 Region Association: Pacific Northwest |
Here's the shot I forgot last night.
 |
|
|
|
| cary |
Mar 18 2016, 07:19 PM
Post
#96
|
|
Advanced Member Group: Members Posts: 3,900 Joined: 26-January 04 From: Sherwood Oregon Member No.: 1,608 Region Association: Pacific Northwest |
Modifying RD PP335 to replicate the 75-76 rear trunk :
After this mornings input we have a plan to replicate the 75-76 trunk the best we can. Thanks, sixnotfour. I don't think it will be that tough. First issue is locating and welding in the 75-76 tail light panel braces. I forgot about them until I was scrolling thru my picture file this am. They were in the back of one of the trays on my parts rack. 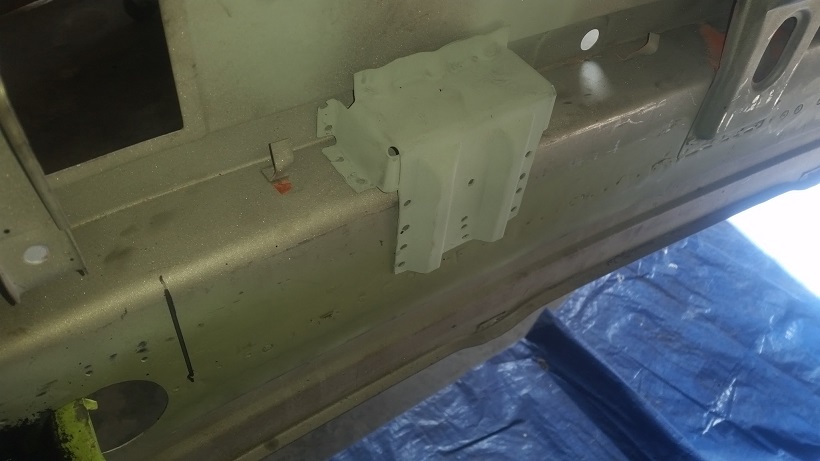 Now for creating the drop down portion of the trunk. I decided to clean up the 75-76 portions that I cut out during the cut out of the old trunk. I decided that anything I keep for patterns and fitting will be painted my signature Ford blue.  #1. I'll make a cut at the base of the rib. Not exactly the right location compared to the samples. But it will look real sanitary. Down the black line, plus thru the flange. 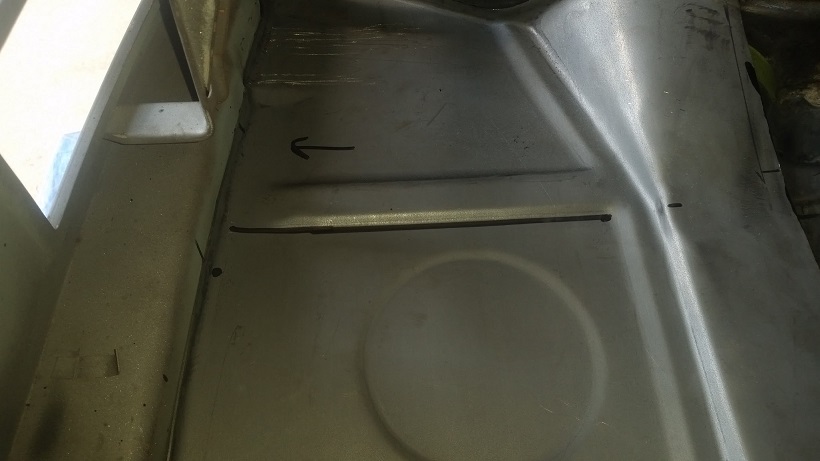 After making both these cuts I'll be able to bend the panel down into the correct location. There's about 100 (IMG:style_emoticons/default/biggrin.gif) spot welds to use as for alignment. #2. Once I have the panel in position I think I'll end up with the area in the triangle to cut out. This piece will be fabricated to replicate the 75-76 sloped area. 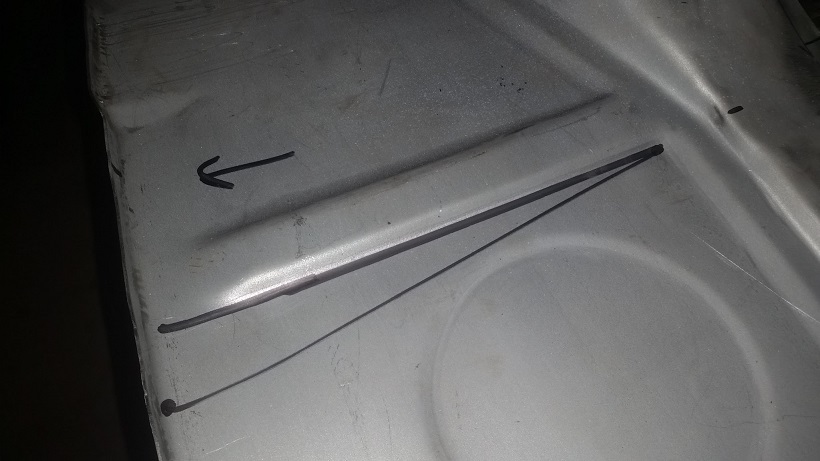 Looking at sixnotfour's picture I may run the other long line right against the hole plug area. |
|
|
|
| bigkensteele |
Mar 18 2016, 07:38 PM
Post
#97
|
|
Major Member Group: Members Posts: 2,200 Joined: 30-August 04 From: Cincinnati, OH Member No.: 2,660 Region Association: South East States |
QUOTE(cary @ Mar 5 2016, 02:51 PM) Mark's staying with the 75-76 bumpers. So we should be able to accommodate your request. If not this car, there should be one on my parts car. The took hook receiver only ? Or do you need the braces too ? Sorry - haven't been on in a while. I would probably need the braces as well to make it a functional tow-hook. I back-dated my '75. Could use the middle bumper brace as well if it is still intact. Thanks! QUOTE(cary @ Mar 7 2016, 07:51 PM) If you can come up with a tube with 10mm threads you could put the two halves to good use. I can refurbish the two halves if your still interested. Fill in spot cutter holes. bead blast and prime. Yes, I would be interested in having them refurbished, and I would gladly pay you to do so. However, I am in absolutely no hurry for these parts, and I would not want to take you off task. So, whenever you get around to it is fine. If you really don't think it is worth the effort, that is fine as well. QUOTE(Mikey914 @ Mar 7 2016, 11:06 PM) If Ken needs anything we are not using he can have it. Just let me know and I'll get it out next week for him. Thanks, Mark! |
|
|
|
| cary |
Mar 19 2016, 08:39 AM
Post
#98
|
|
Advanced Member Group: Members Posts: 3,900 Joined: 26-January 04 From: Sherwood Oregon Member No.: 1,608 Region Association: Pacific Northwest |
QUOTE(bigkensteele @ Mar 18 2016, 06:38 PM) QUOTE(cary @ Mar 5 2016, 02:51 PM) Mark's staying with the 75-76 bumpers. So we should be able to accommodate your request. If not this car, there should be one on my parts car. The took hook receiver only ? Or do you need the braces too ? Sorry - haven't been on in a while. I would probably need the braces as well to make it a functional tow-hook. I back-dated my '75. Could use the middle bumper brace as well if it is still intact. Thanks! QUOTE(cary @ Mar 7 2016, 07:51 PM) If you can come up with a tube with 10mm threads you could put the two halves to good use. I can refurbish the two halves if your still interested. Fill in spot cutter holes. bead blast and prime. Yes, I would be interested in having them refurbished, and I would gladly pay you to do so. However, I am in absolutely no hurry for these parts, and I would not want to take you off task. So, whenever you get around to it is fine. If you really don't think it is worth the effort, that is fine as well. QUOTE(Mikey914 @ Mar 7 2016, 11:06 PM) If Ken needs anything we are not using he can have it. Just let me know and I'll get it out next week for him. Thanks, Mark! I think the little centering support is at the bottom of the scrap can. But I'll look in one spot that I might have set it aside. I don't throw too much away. I'll do some digging into finding a tube with 10mm threads. Without the tube we can't create you the tow hook. |
|
|
|
| trojanhorsepower |
Mar 19 2016, 07:38 PM
Post
#99
|
|
Senior Member Group: Members Posts: 1,051 Joined: 21-September 03 From: Marion, NC Member No.: 1,179 Region Association: None |
Great work Cary!
|
|
|
|
| cary |
Mar 19 2016, 08:49 PM
Post
#100
|
|
Advanced Member Group: Members Posts: 3,900 Joined: 26-January 04 From: Sherwood Oregon Member No.: 1,608 Region Association: Pacific Northwest |
QUOTE(trojanhorsepower @ Mar 19 2016, 06:38 PM) Great work Cary! Thanks .............. Ken looks like we can create you a tow hook by using the back (with tube attached) from my parts car. And the front side from Mark's new tail light panel. I used the plasma cutter to cut it out of the parts car. It's your lucky day ............ the hanger tab was still under the 75-76 bumper that was hanging on the parts car. 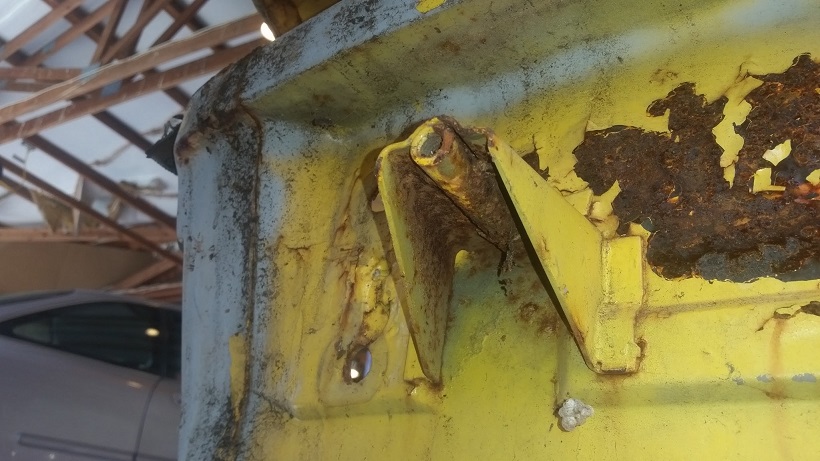 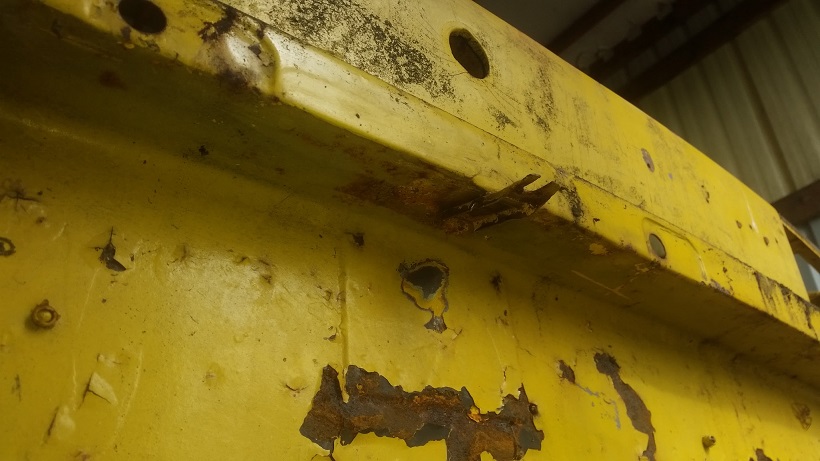 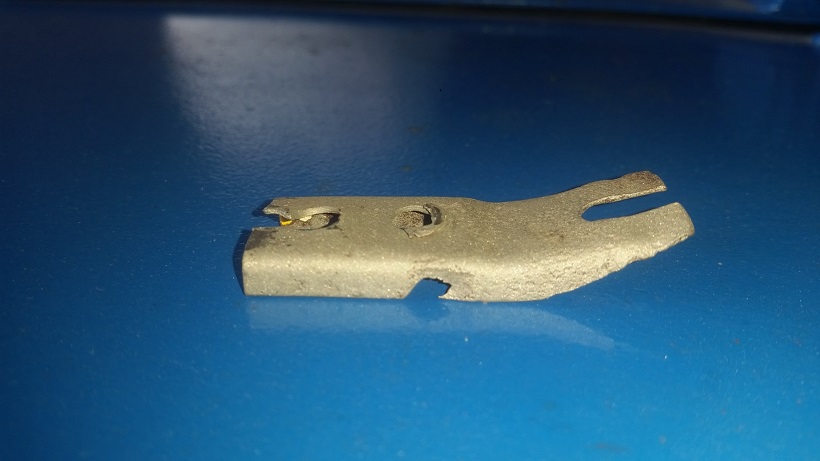 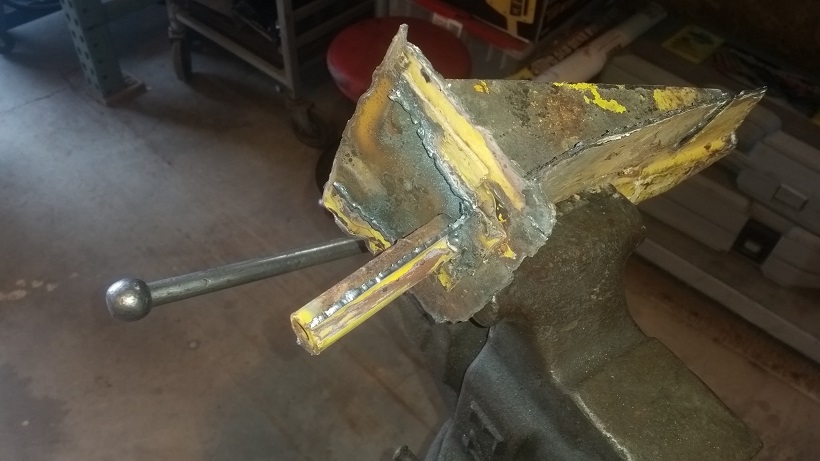 |
|
|
|
|
1 User(s) are reading this topic (1 Guests and 0 Anonymous Users)
0 Members:

|
Lo-Fi Version | Time is now: 24th June 2026 - 01:50 AM |
Invision Power Board
v9.1.4 © 2026 IPS, Inc.