|
|
|
Porsche, and the Porsche crest are registered trademarks of Dr. Ing. h.c. F. Porsche AG.
This site is not affiliated with Porsche in any way. Its only purpose is to provide an online forum for car enthusiasts. All other trademarks are property of their respective owners. |
|
|

  |

| Series9 |
 Mar 9 2016, 04:26 PM Mar 9 2016, 04:26 PM
Post
#1
|
|
Lesbians taste like chicken.  Group: Members Posts: 5,453 Joined: 22-August 04 From: DeLand, FL Member No.: 2,602 Region Association: South East States |
Comments are now welcome. If you find any errors, let me know.
(IMG:style_emoticons/default/beerchug.gif) To start, I want to say that I'm a huge fan of Mark and 914Rubber. He has done a huge amount for our community and ANY criticism you see is strictly constructive. (There are only a few). Next, this is a complicated task, but one that can be completed by a novice who is willing to pay attention to the details. However, any mistakes will be punished with a phone call to Oregon to order replacement vinyl. As a Porsche professional, I've become something of a "jack of all trades". Upholstery is no exception, but it's still not something I do here every day. I am a licensed parachute rigger, so my knowledge of fabrics and sewing may have contributed to my build. The reality: Having not done this before, it took me 17 hours. I built this for a customer who has paid me for a ground-up restore on a rust bucket (that is now beautiful), and it had to be right the first time. I created this thread because there was an absence of instructions for something that differed significantly from the factory version. The primary problem: you can't use a staple gun. Think about that for a moment. Go to any upholstery shop and take all the staple guns. What do you think those professionals will say to you? So, with those caveats in place, I present you with a very detailed guide to MY assembly of this back pad. The overwhelming theme here will concentrated around the fact that, since we are dealing with fiberglass and staples can't be used, we have to find alternative methods of attachment in areas that have: High stress or any "pull force". Imagine "pull force" as a 90* pull against tape placed on a table. We all know that tape is strong if it's wrapped around a corner (becomes shear force), but it's very easy to remove if you pull it back perpendicular to the mated surface. You can't use contact cement in a 90* "pull" arrangement. At least, you shouldn't if you want it to last. Okay. Congratulations, you completed the introduction. (IMG:style_emoticons/default/beerchug.gif) |
   |

 
|
| Series9 |
Mar 9 2016, 04:37 PM
Post
#2
|
|
Lesbians taste like chicken. Group: Members Posts: 5,453 Joined: 22-August 04 From: DeLand, FL Member No.: 2,602 Region Association: South East States |
In the beginning, you will be presented with three pieces of fiberglass and three pieces of sewn vinyl.
We all know the nightmares of fiberglass, but I will say that these fit very well. I only made two small mods to the center. You MUST have the foam from a donor back pad. Everything else can be fabricated, but without the foam, you are dead in the water. (Note the hole in the foam for the engine decklid pull and the notch in the fiberglass for the parking brake for right-hand-drive) Attached thumbnail(s)  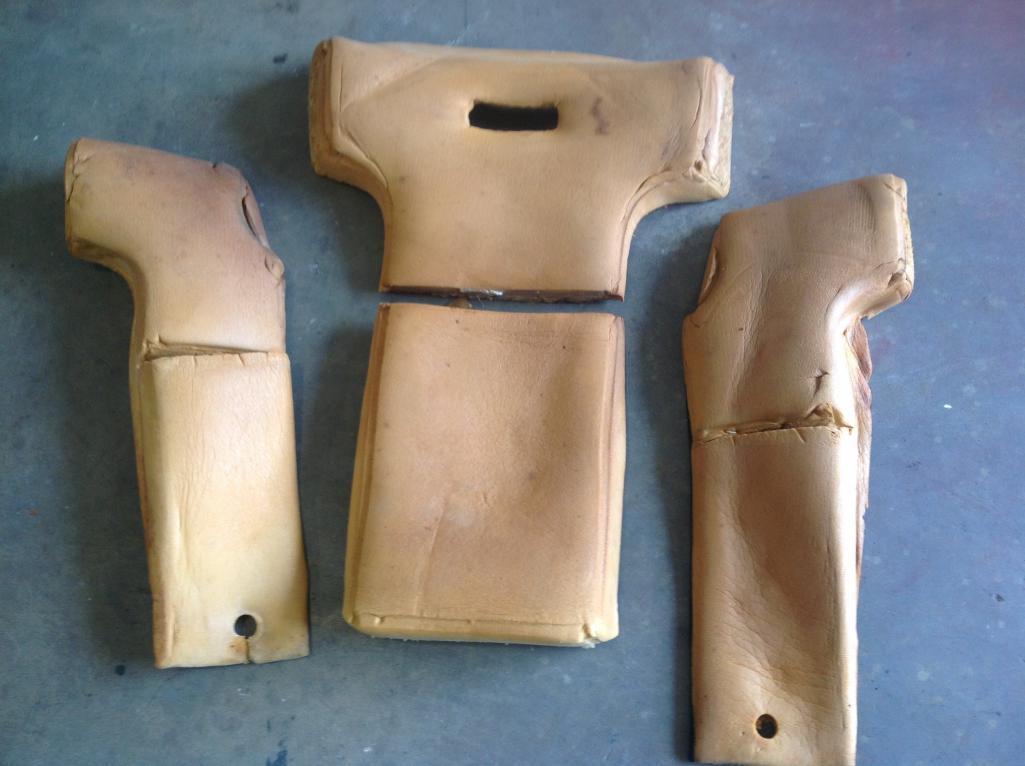 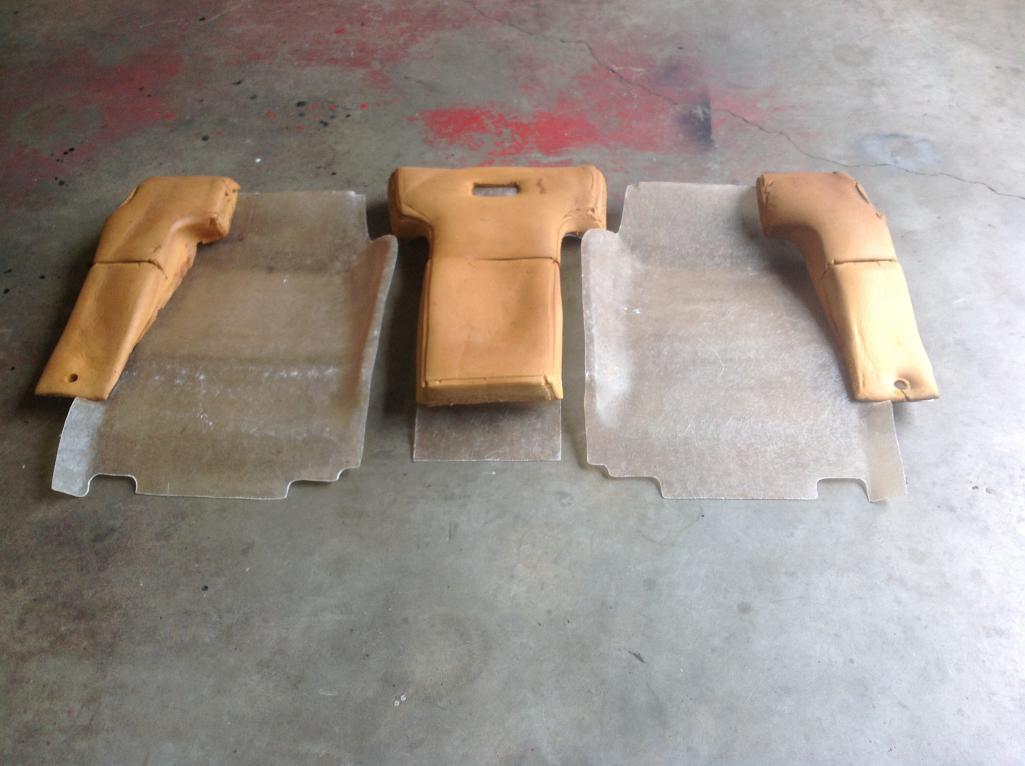
|
|
|
|
| Series9 |
Mar 9 2016, 04:47 PM
Post
#3
|
|
Lesbians taste like chicken. Group: Members Posts: 5,453 Joined: 22-August 04 From: DeLand, FL Member No.: 2,602 Region Association: South East States |
Next: You will need these Z tabs. If you have a full donor pad, no problem, but I didn't.
I made some out of stacked aluminum. You will find it very difficult to bend such a small double without a die. Then, you will have to scribe the correct location on the fiberglass. I had a back pad here, so I overlaid the panel and drew the location with a Sharpie. Attached thumbnail(s) 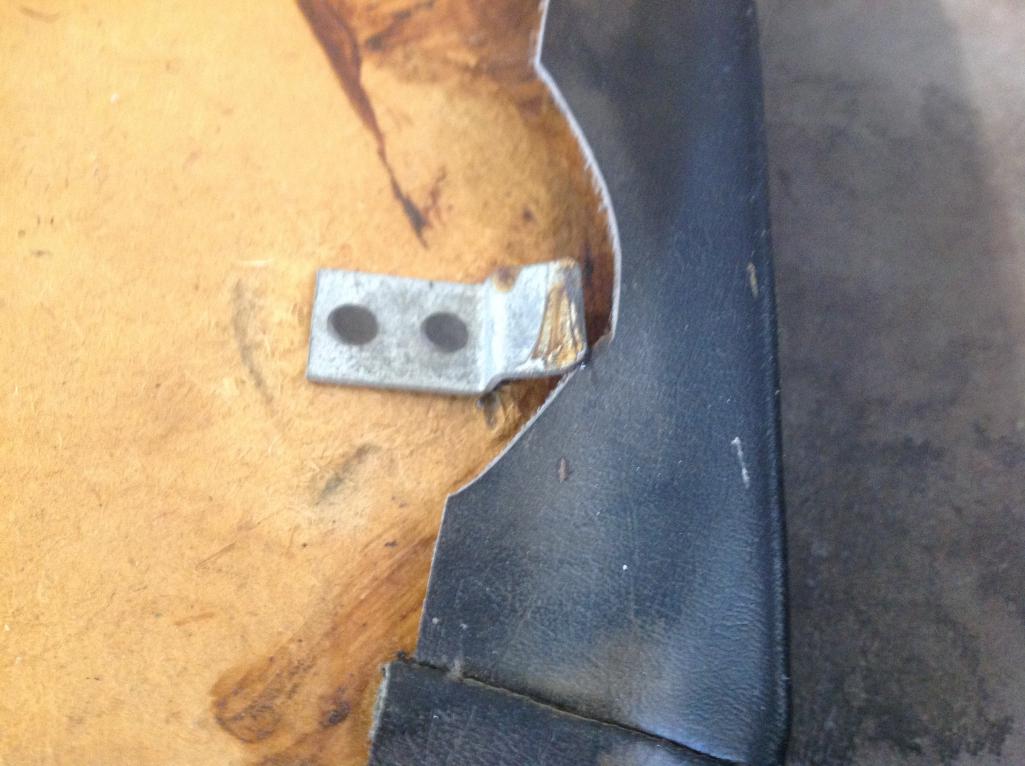 
|
|
|
|
| Series9 |
Mar 9 2016, 04:49 PM
Post
#4
|
|
Lesbians taste like chicken. Group: Members Posts: 5,453 Joined: 22-August 04 From: DeLand, FL Member No.: 2,602 Region Association: South East States |
More of the tabs:
Attached thumbnail(s) 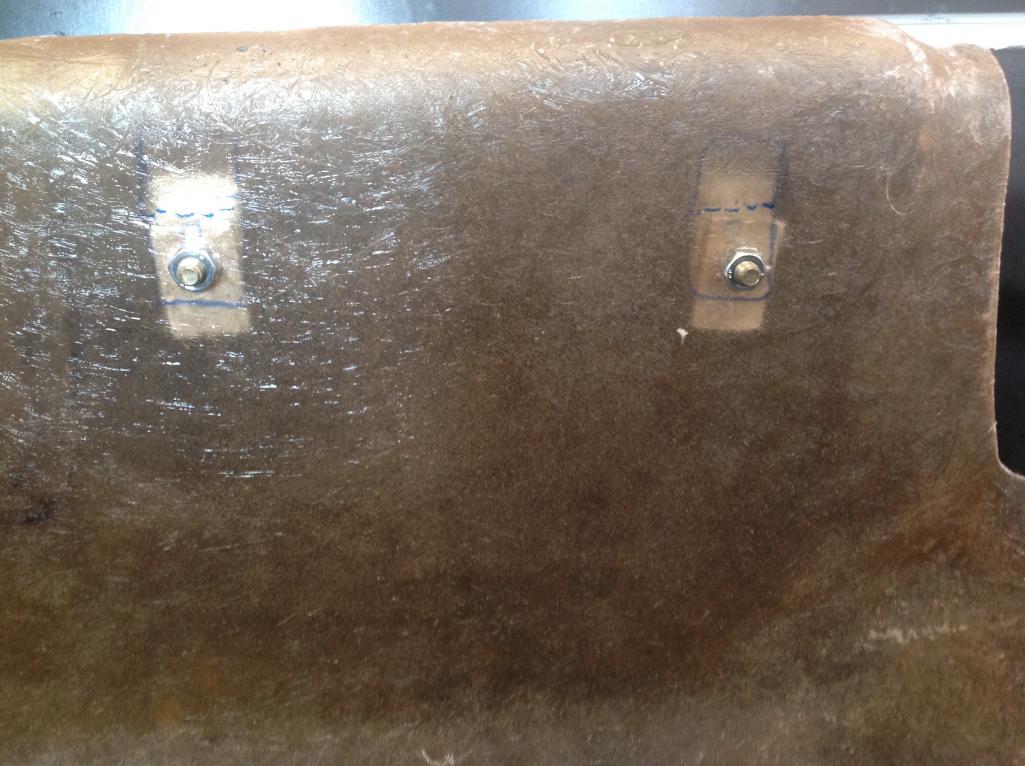 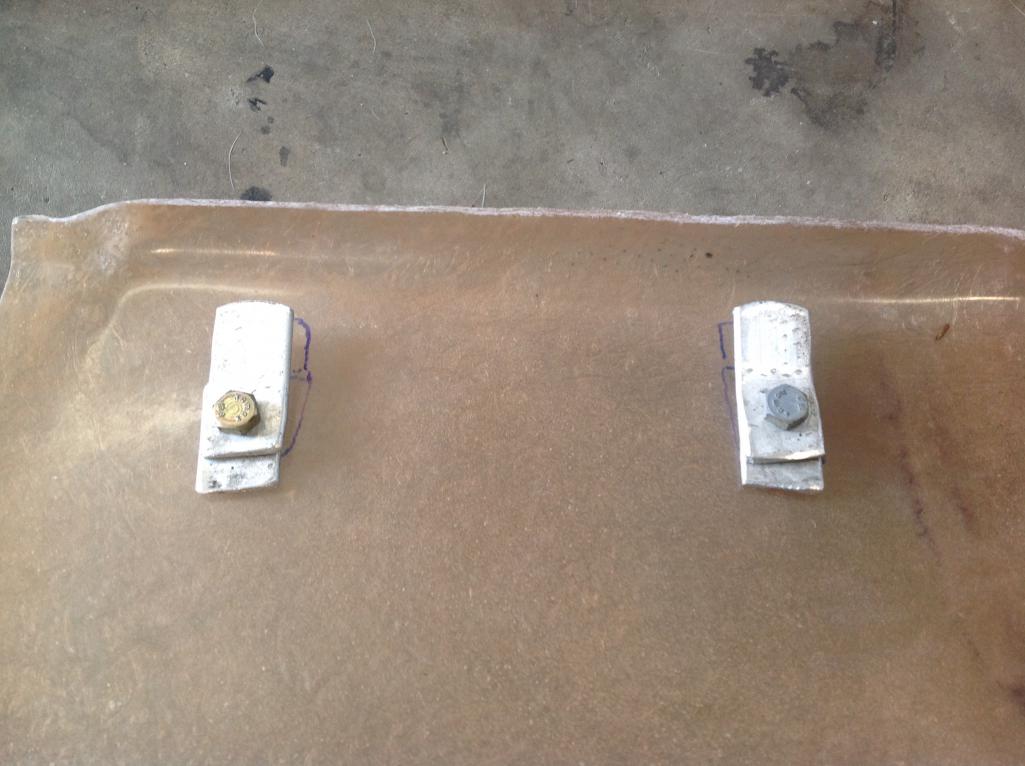
|
|
|
|
| Series9 |
Mar 9 2016, 04:54 PM
Post
#5
|
|
Lesbians taste like chicken. Group: Members Posts: 5,453 Joined: 22-August 04 From: DeLand, FL Member No.: 2,602 Region Association: South East States |
At this point, you should immediately realize that your fasteners for the tabs are going to create problems for the smooth application of vinyl on the interior side. So, grind down that side and do some body work. Epoxy to hold the nuts and Bondo to level the surface.
Attached thumbnail(s) 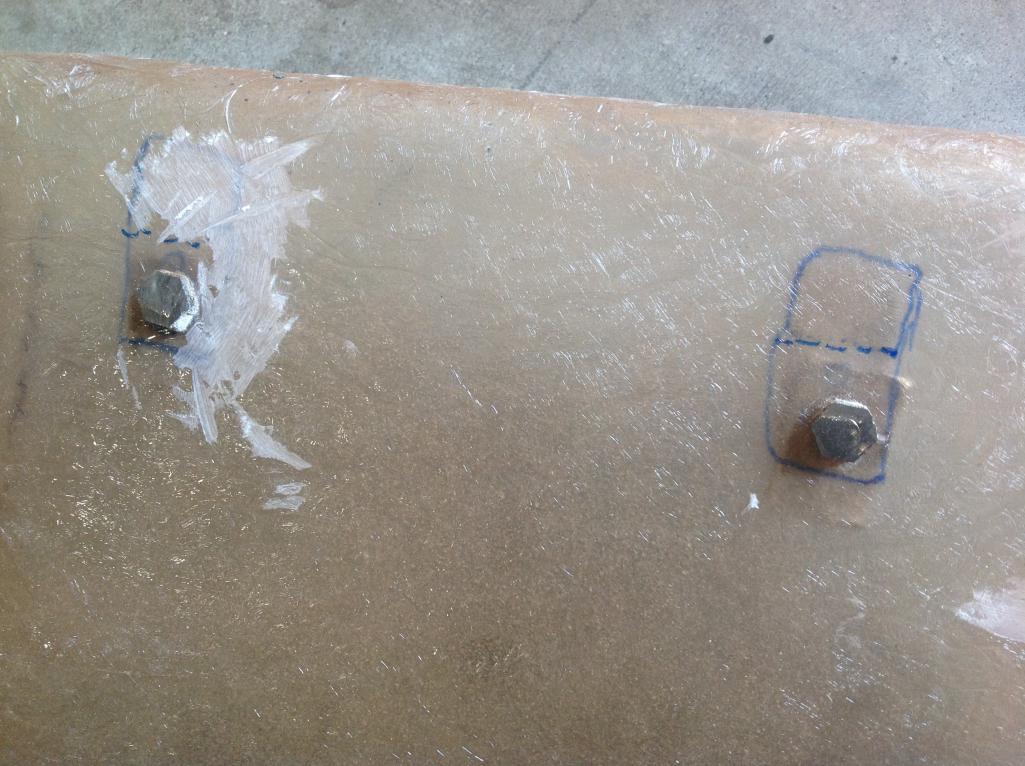 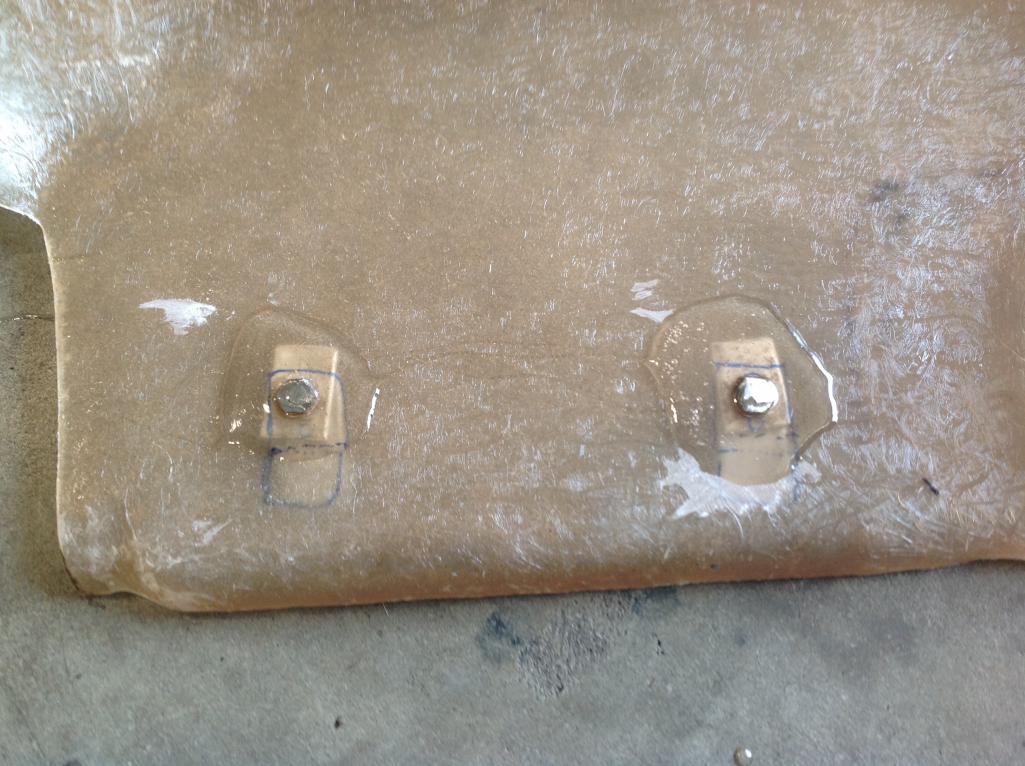
|
|
|
|
| Series9 |
Mar 9 2016, 04:55 PM
Post
#6
|
|
Lesbians taste like chicken. Group: Members Posts: 5,453 Joined: 22-August 04 From: DeLand, FL Member No.: 2,602 Region Association: South East States |
Bondo:
Attached thumbnail(s) 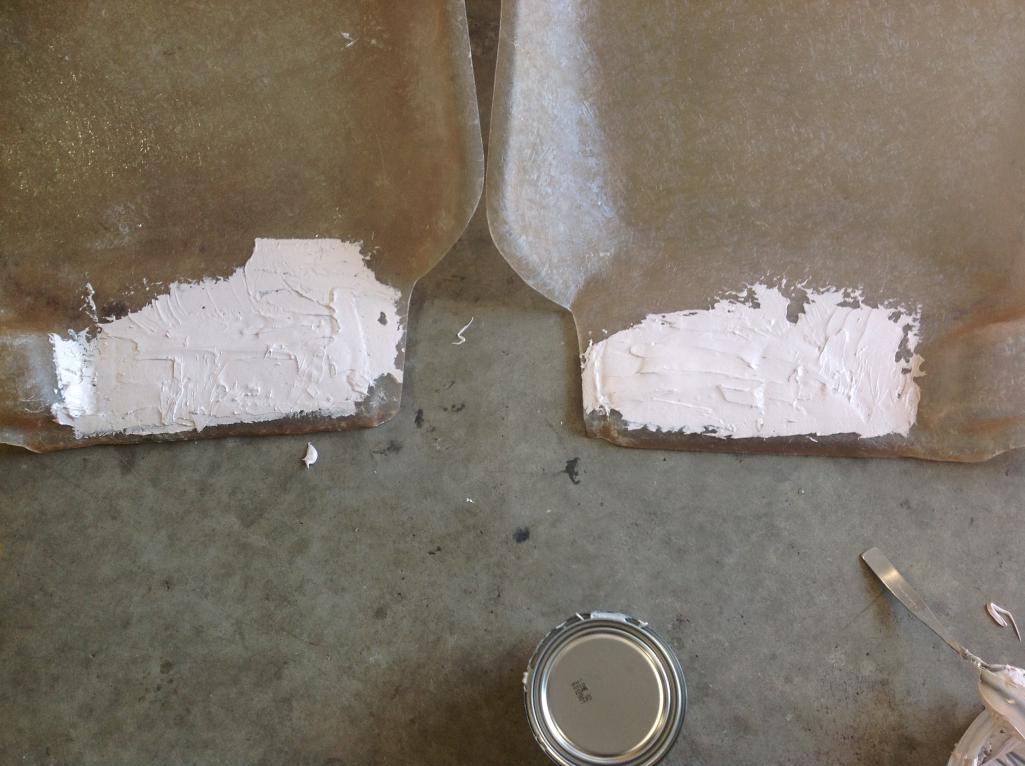
|
|
|
|
| Series9 |
Mar 9 2016, 04:59 PM
Post
#7
|
|
Lesbians taste like chicken. Group: Members Posts: 5,453 Joined: 22-August 04 From: DeLand, FL Member No.: 2,602 Region Association: South East States |
Test fit.
I put some shiny new screws in the correct location to help me find the correct location to drill the holes for the bottom screws. If they contrast, you can see them through the fiberglass. Attached thumbnail(s)  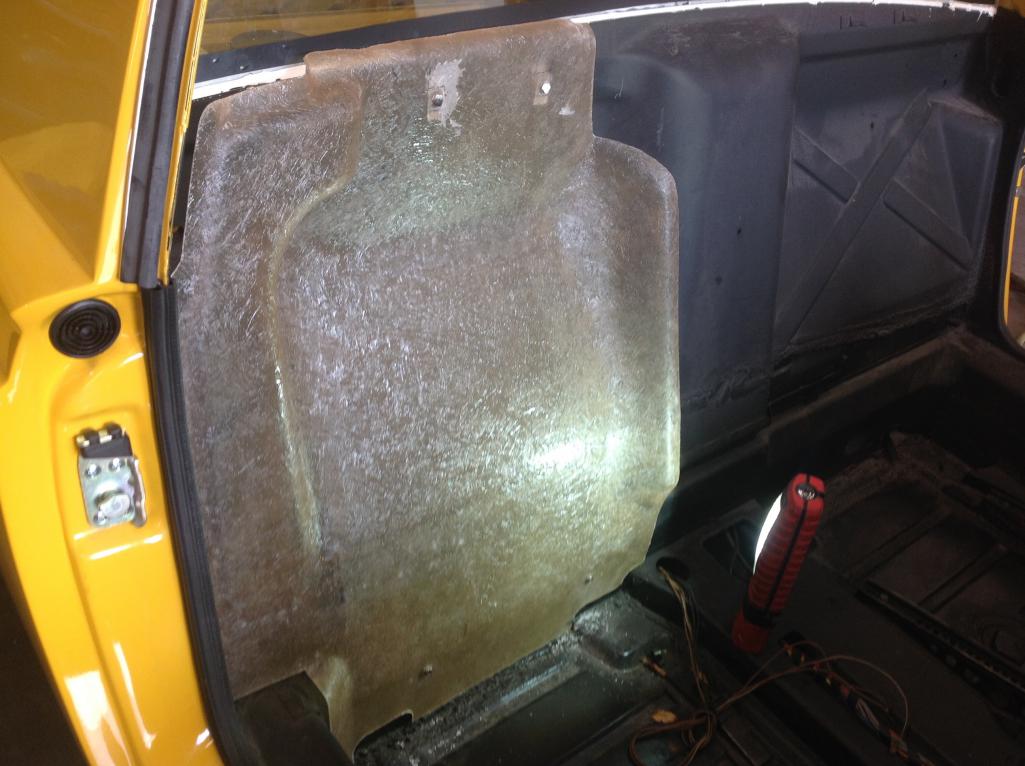
|
|
|
|
| Series9 |
Mar 9 2016, 05:06 PM
Post
#8
|
|
Lesbians taste like chicken. Group: Members Posts: 5,453 Joined: 22-August 04 From: DeLand, FL Member No.: 2,602 Region Association: South East States |
Do the same on both sides and mount them to the car individually.
Once each side is mounted to your satisfaction, put the center in place and see if you need any mods. For this one, I decided to take 3/8" off the bottom in order to get it to sit down correctly on the passenger side. I used self-tapping screws with my drill and a 1/4" socket to drive them in. Once you do this correctly, you should have a back pad base that is custom fit to your 914. Attached thumbnail(s) 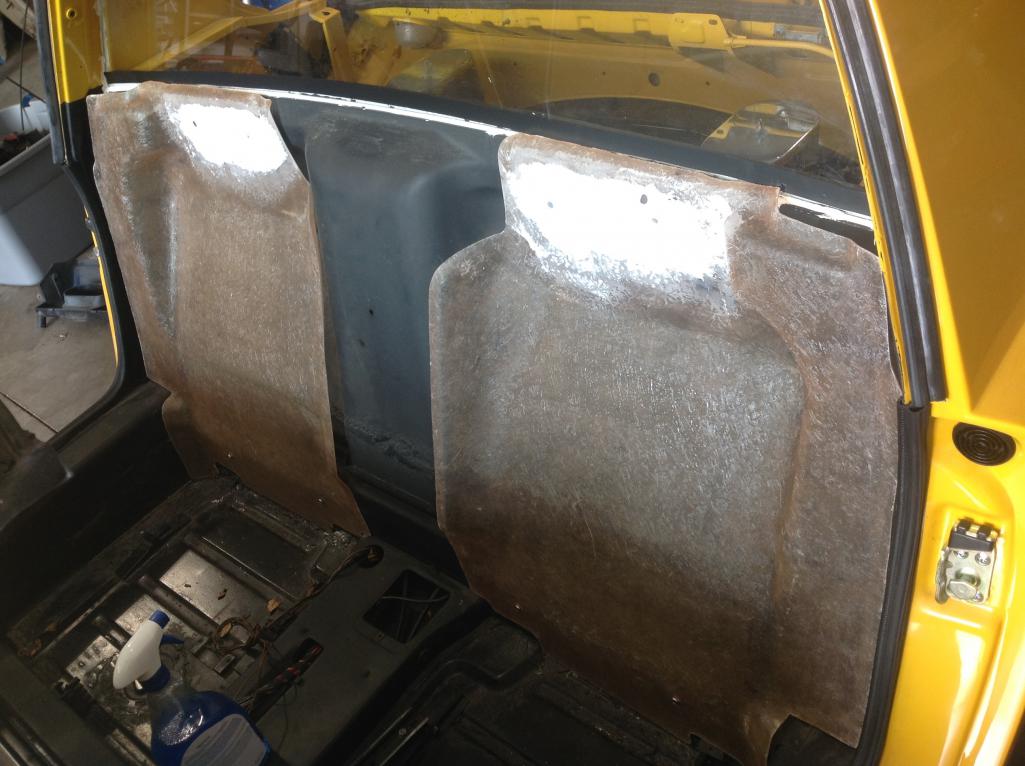 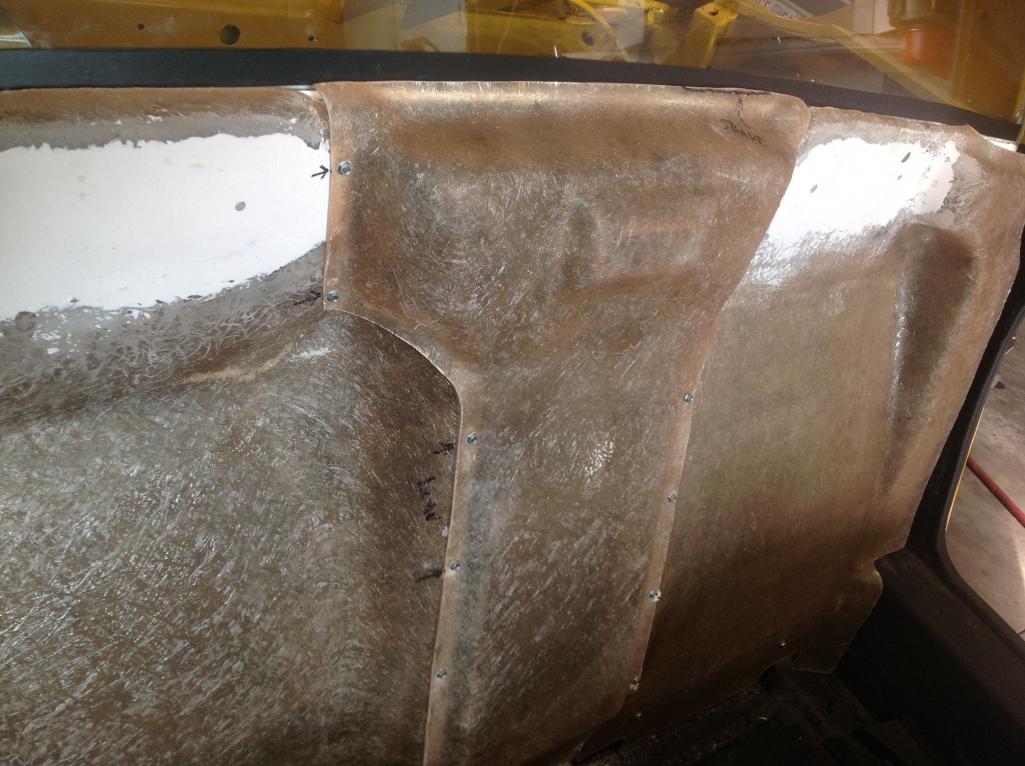
|
|
|
|
| Series9 |
Mar 9 2016, 05:12 PM
Post
#9
|
|
Lesbians taste like chicken. Group: Members Posts: 5,453 Joined: 22-August 04 From: DeLand, FL Member No.: 2,602 Region Association: South East States |
Next, test fit the foam and draw an outline on the fiberglass for the two outers:
Attached thumbnail(s) 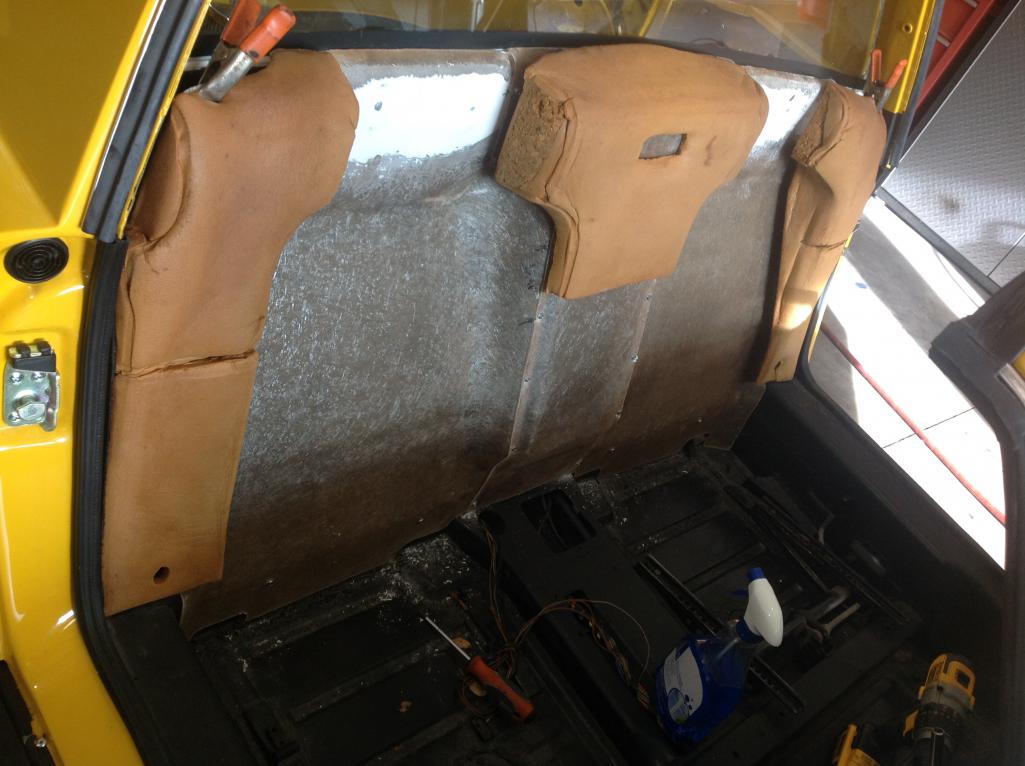 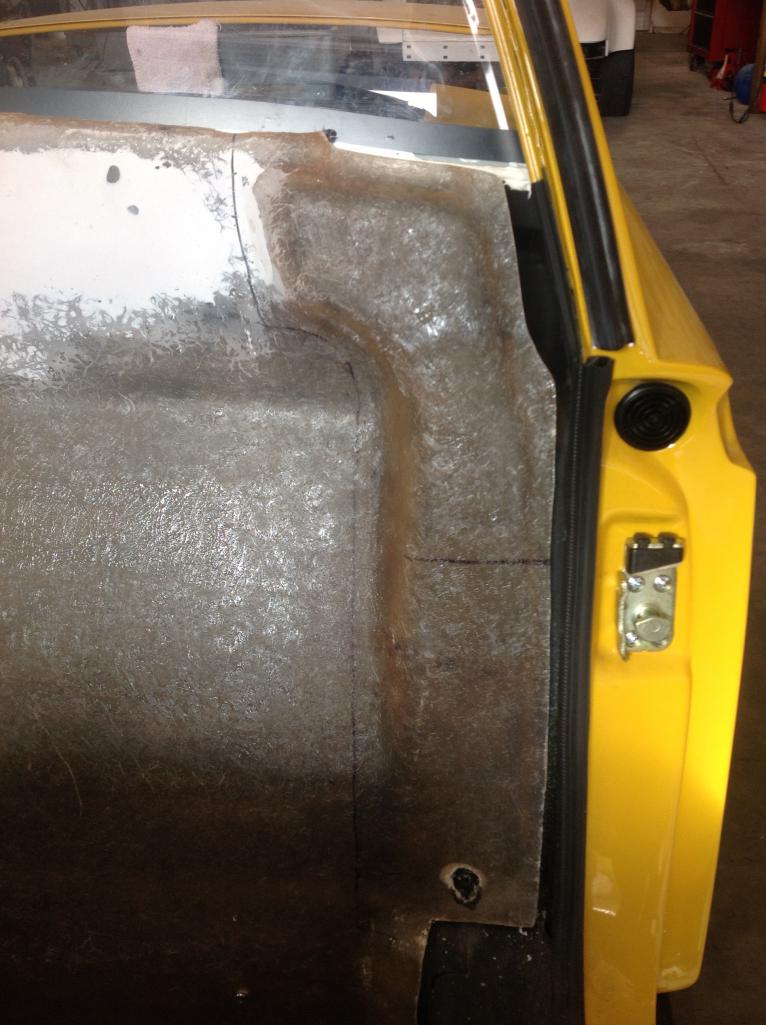 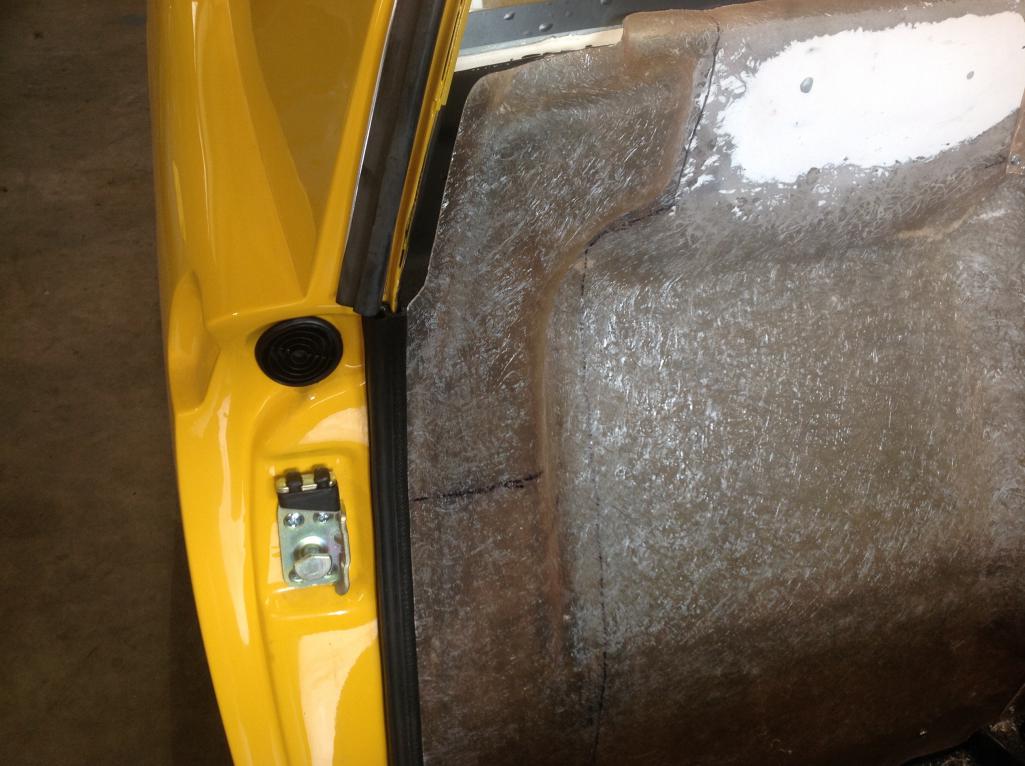
|
|
|
|
| Series9 |
Mar 9 2016, 05:19 PM
Post
#10
|
|
Lesbians taste like chicken. Group: Members Posts: 5,453 Joined: 22-August 04 From: DeLand, FL Member No.: 2,602 Region Association: South East States |
LISTEN CAREFULLY!
There are certain points that MUST MATCH between the vinyl and the fiberglass. To ignore these points will cause the failure of your project. Understand? Okay. Get your contact cement and glue down the contour of THIS SEAM first. You must start here and do this correctly. If you don't... Attached thumbnail(s) 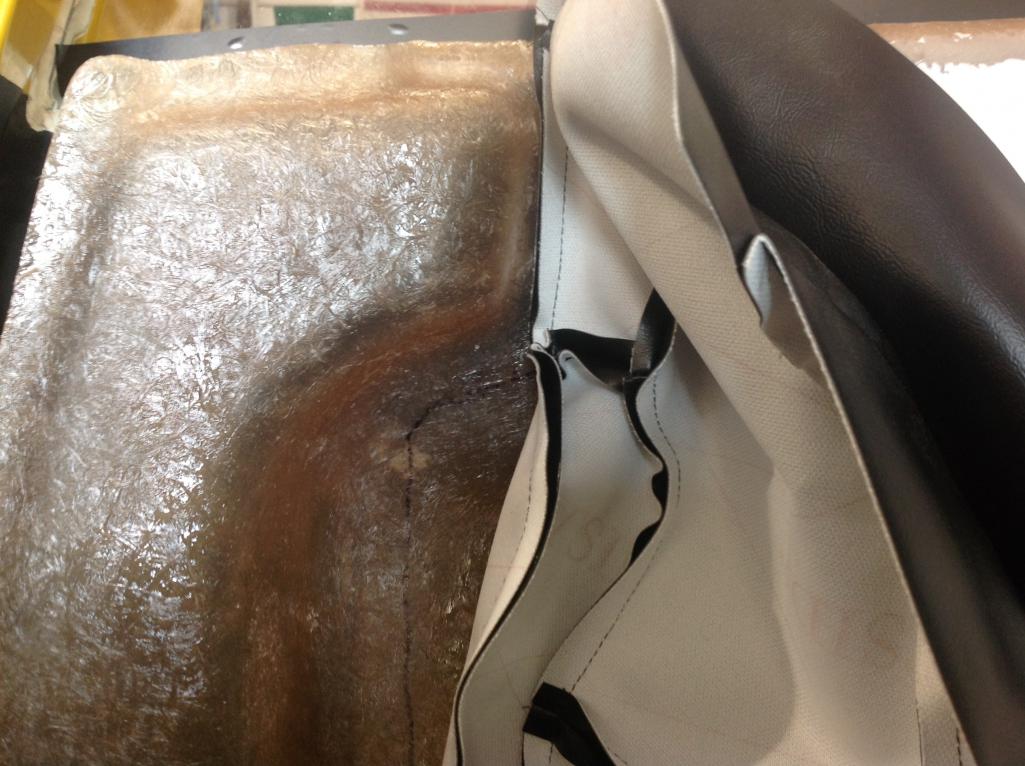 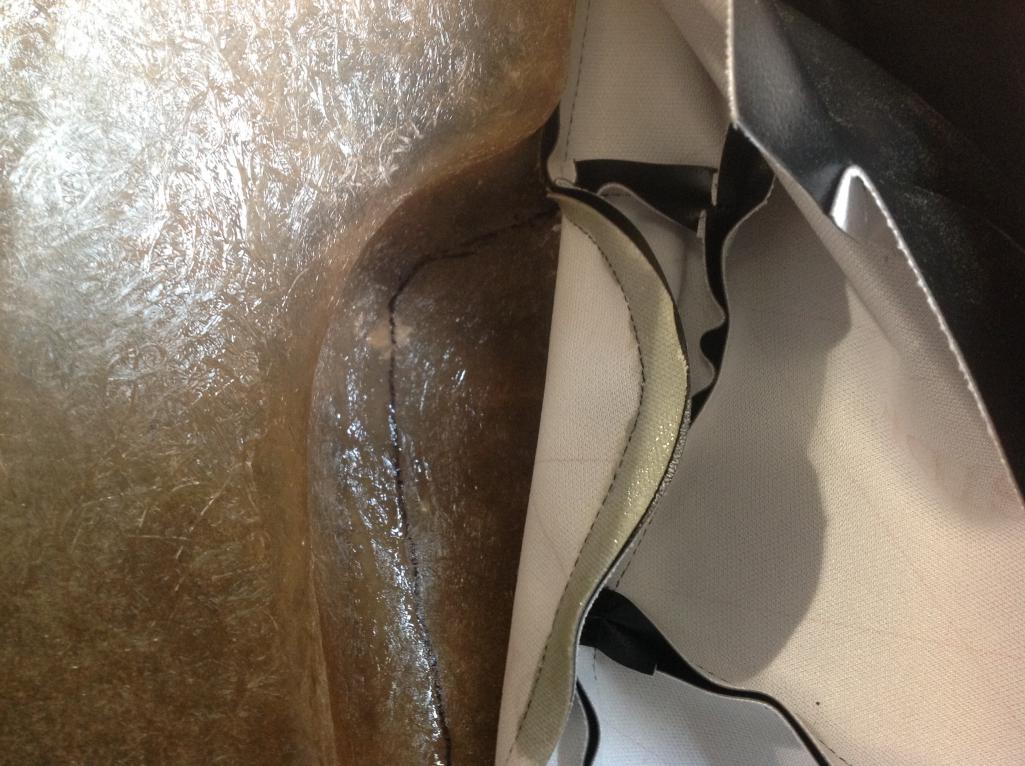
|
|
|
|
| Series9 |
Mar 9 2016, 05:21 PM
Post
#11
|
|
Lesbians taste like chicken. Group: Members Posts: 5,453 Joined: 22-August 04 From: DeLand, FL Member No.: 2,602 Region Association: South East States |
The bigger picture on that:
Attached thumbnail(s) 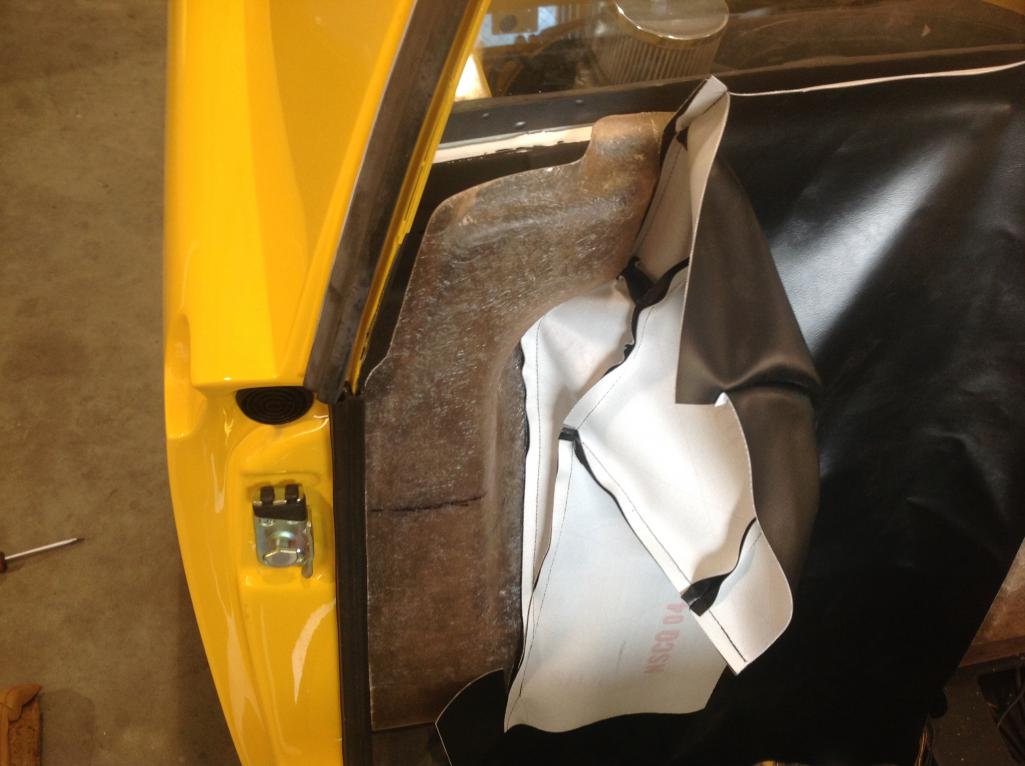
|
|
|
|
| Series9 |
Mar 9 2016, 05:27 PM
Post
#12
|
|
Lesbians taste like chicken. Group: Members Posts: 5,453 Joined: 22-August 04 From: DeLand, FL Member No.: 2,602 Region Association: South East States |
Now, remember when I said we can't use contact cement in a 90* pull?
The seam you just secured was only secured temporarily. It has to be strengthened, so we can pull (hard) on it later. Since we can't use staples, we have to figure out another way. The first picture is a remnant of the factory staple-based reinforcement. The next is an aluminum strip that I'm going to use to perform the same task, but much more strongly. I just put that 1/16"x1/2" strip in the drill press and punched a bunch of holes. Attached thumbnail(s) 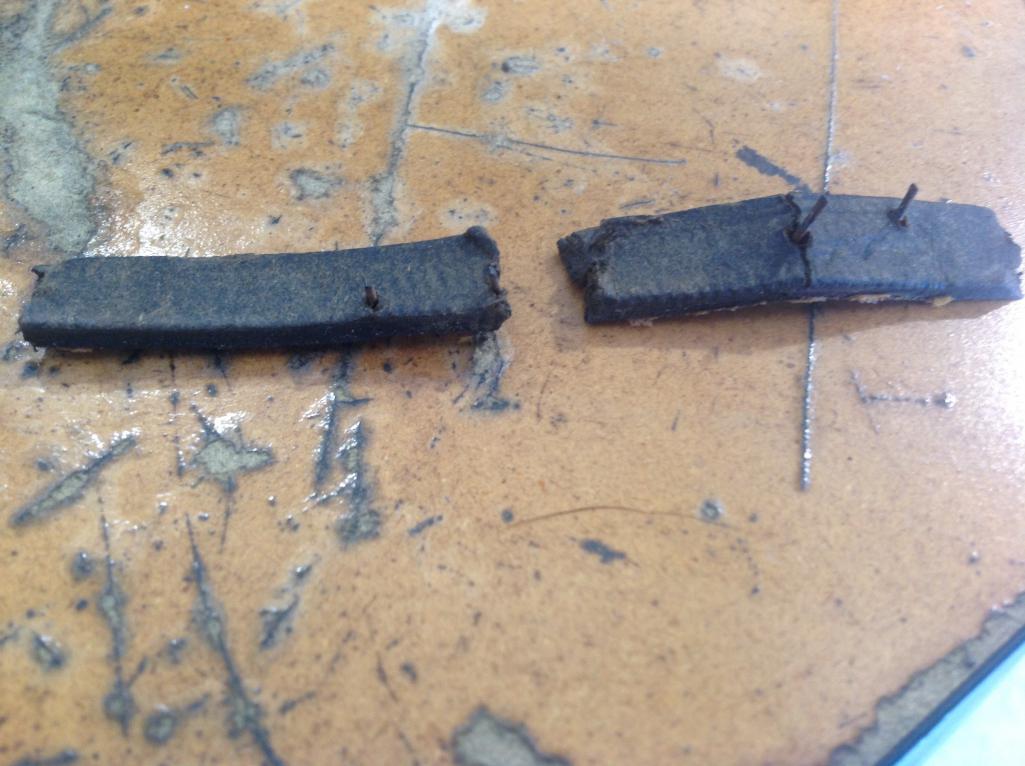 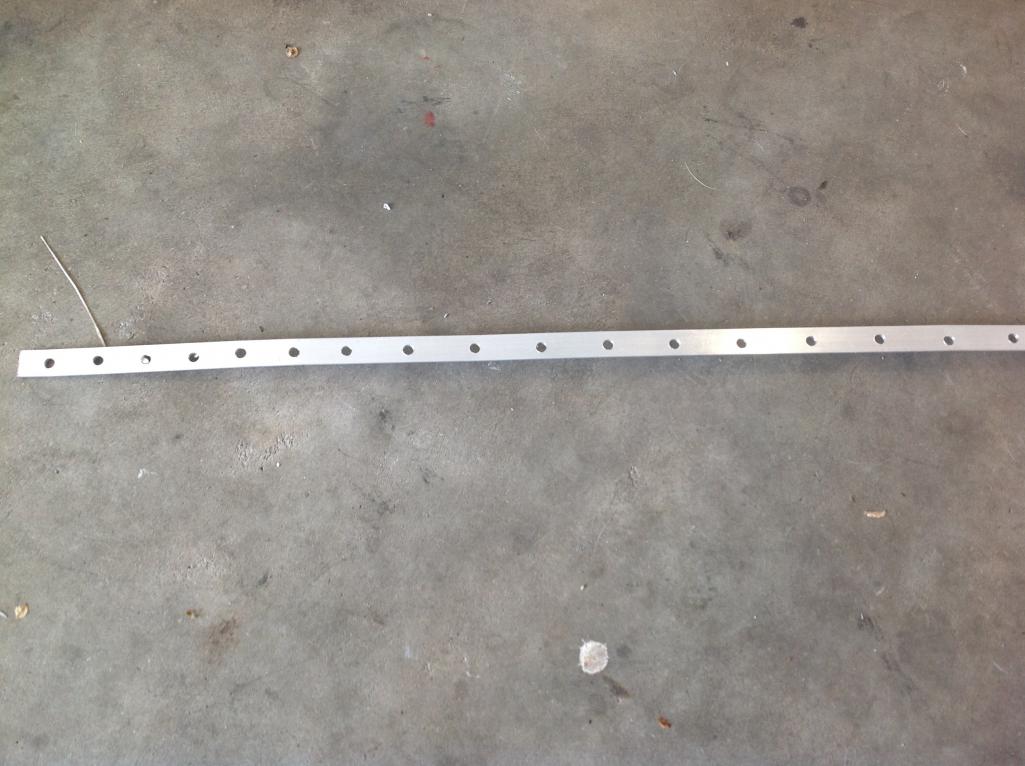
|
|
|
|
| Series9 |
Mar 9 2016, 05:33 PM
Post
#13
|
|
Lesbians taste like chicken. Group: Members Posts: 5,453 Joined: 22-August 04 From: DeLand, FL Member No.: 2,602 Region Association: South East States |
THIS REINFORCEMENT OF THE SEAM MUST BE ACCOMPLISHED, OR YOUR BUILD WILL EVENTUALLY FAIL.
Cut the aluminum and screw until you have that seam secured. Use a soldering iron, or similar, to make the holes in the vinyl before you put screws in. This will save you from having the fabric attempt to roll up around the screw. Attached thumbnail(s) 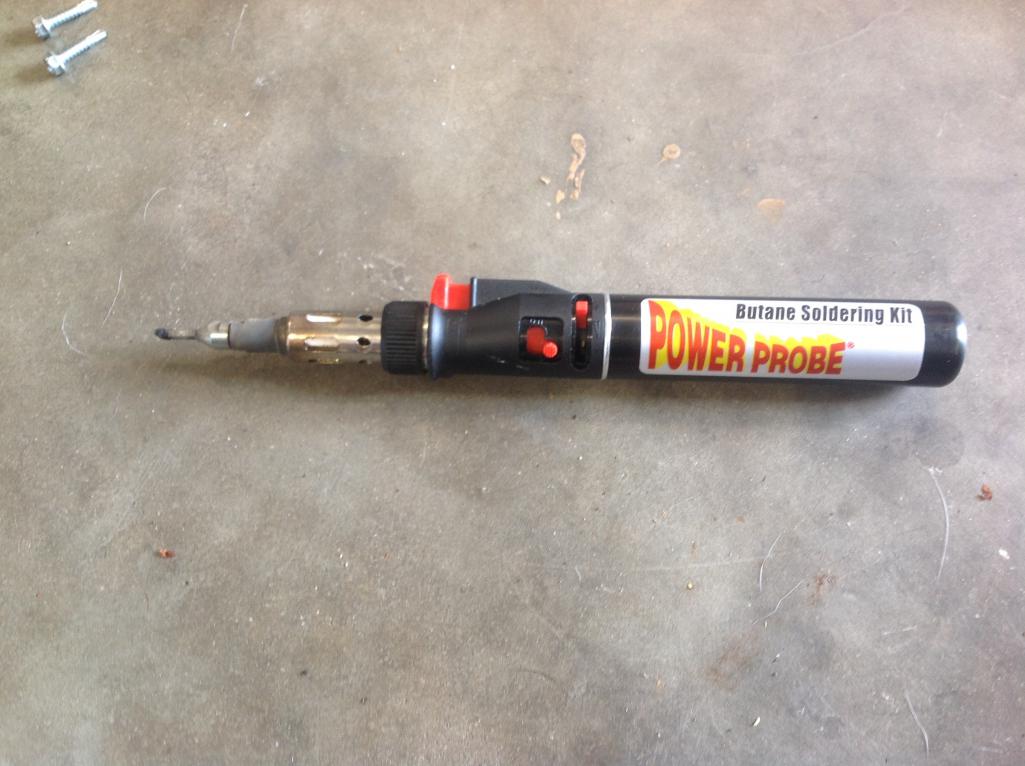 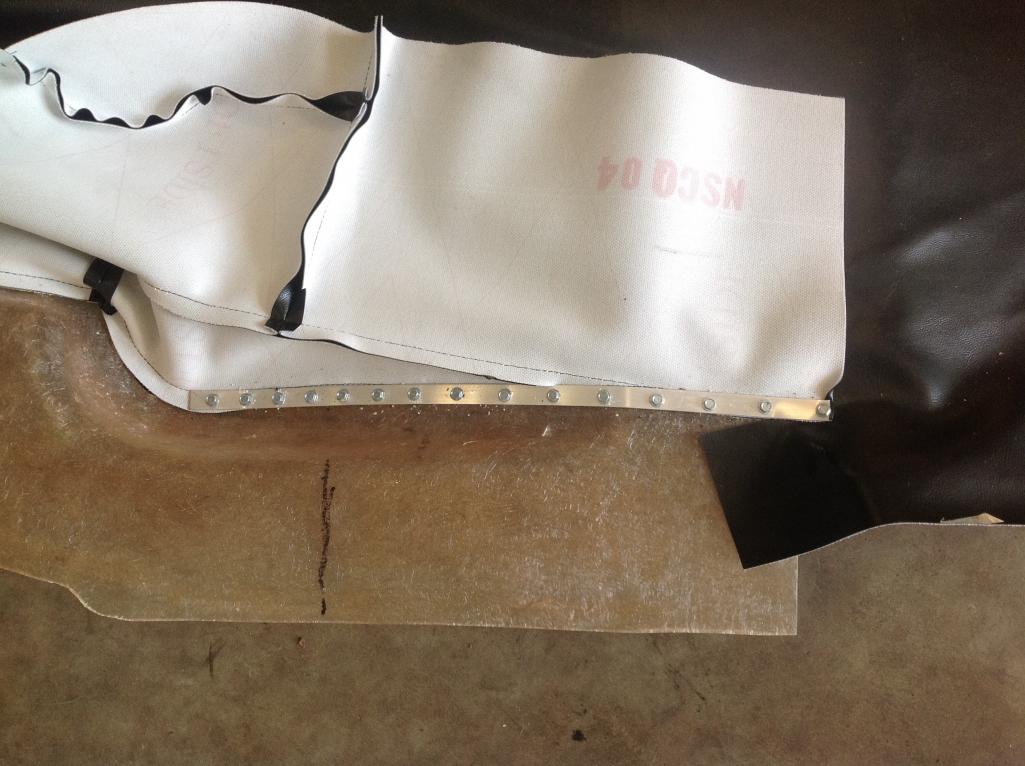
|
|
|
|
| Series9 |
Mar 9 2016, 05:34 PM
Post
#14
|
|
Lesbians taste like chicken. Group: Members Posts: 5,453 Joined: 22-August 04 From: DeLand, FL Member No.: 2,602 Region Association: South East States |
And:
Attached thumbnail(s) 
|
|
|
|
| Series9 |
Mar 9 2016, 05:42 PM
Post
#15
|
|
Lesbians taste like chicken. Group: Members Posts: 5,453 Joined: 22-August 04 From: DeLand, FL Member No.: 2,602 Region Association: South East States |
Okay. Now we shove the foam in there and have a test fit.
Note the location of the seam. That will come up in the next posts. Attached thumbnail(s) 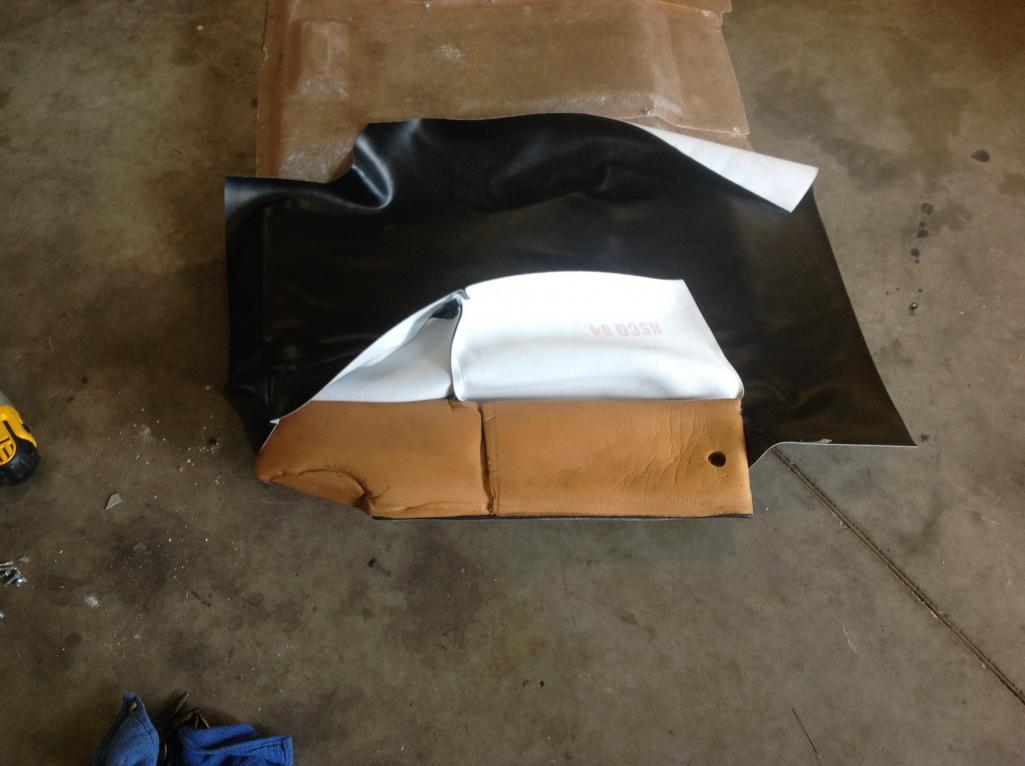 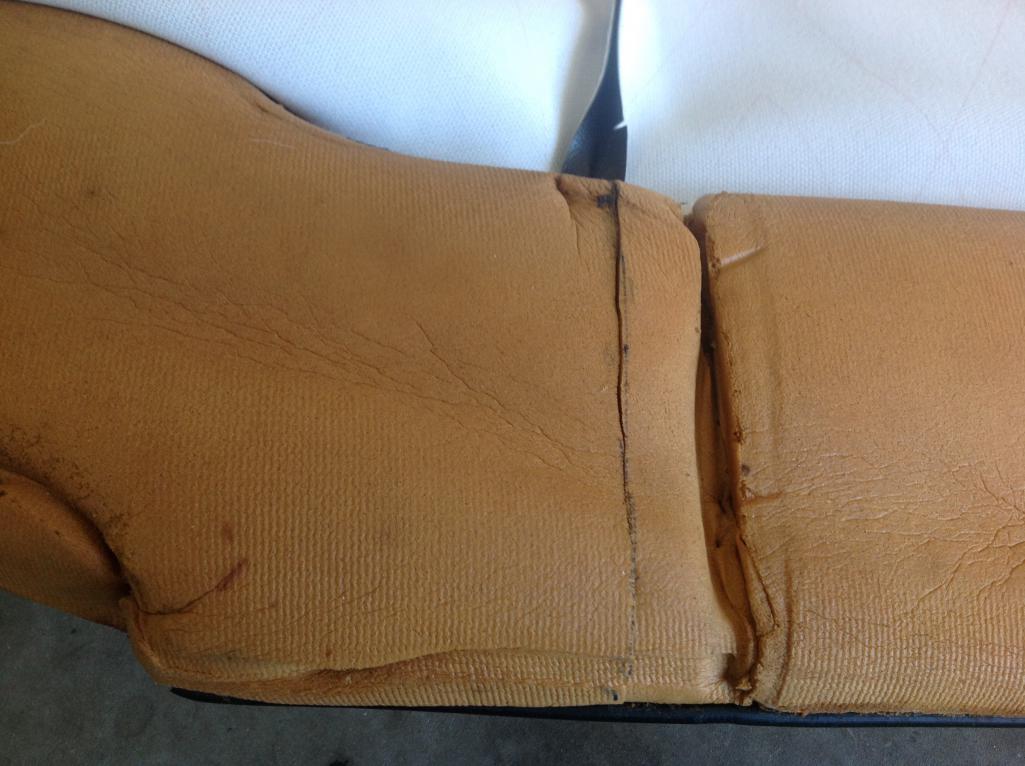 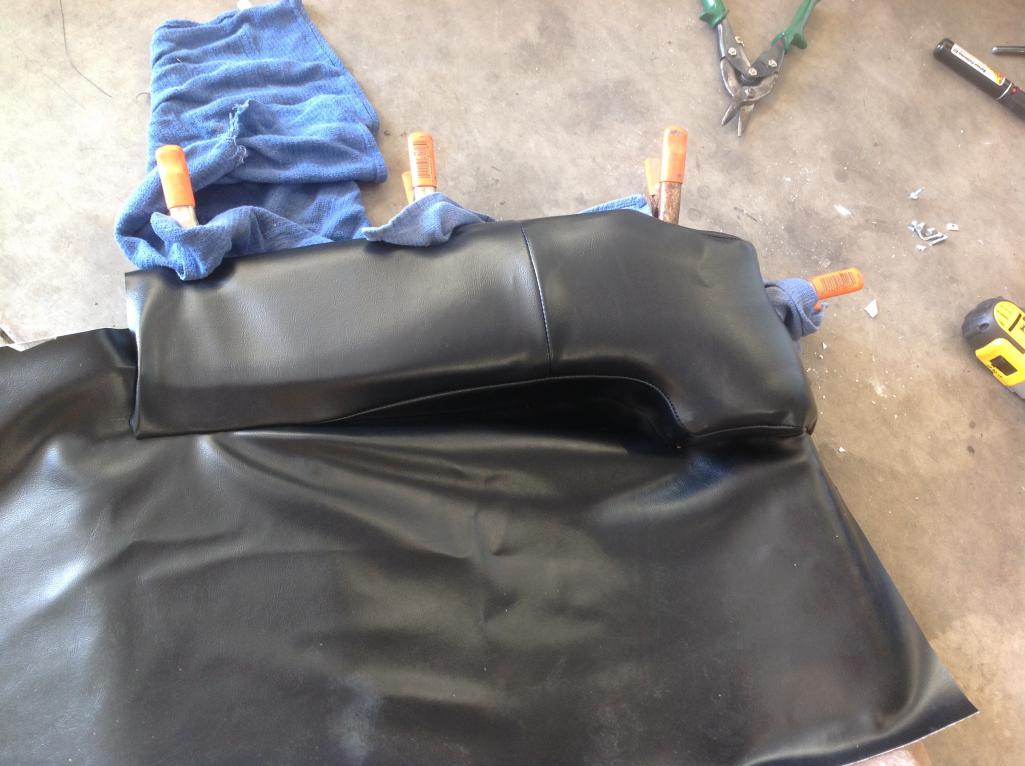
|
|
|
|
| Series9 |
Mar 9 2016, 05:53 PM
Post
#16
|
|
Lesbians taste like chicken. Group: Members Posts: 5,453 Joined: 22-August 04 From: DeLand, FL Member No.: 2,602 Region Association: South East States |
It gets a little complicated here.
The factory pulled back the median seam on the exterior bolsters and attached those pulls to the back pad on the back. I debated whether this was necessary, but decided to try. The first picture is a factory back pad. The next few are my attempt to do the same with stainless safety wire: Attached thumbnail(s) 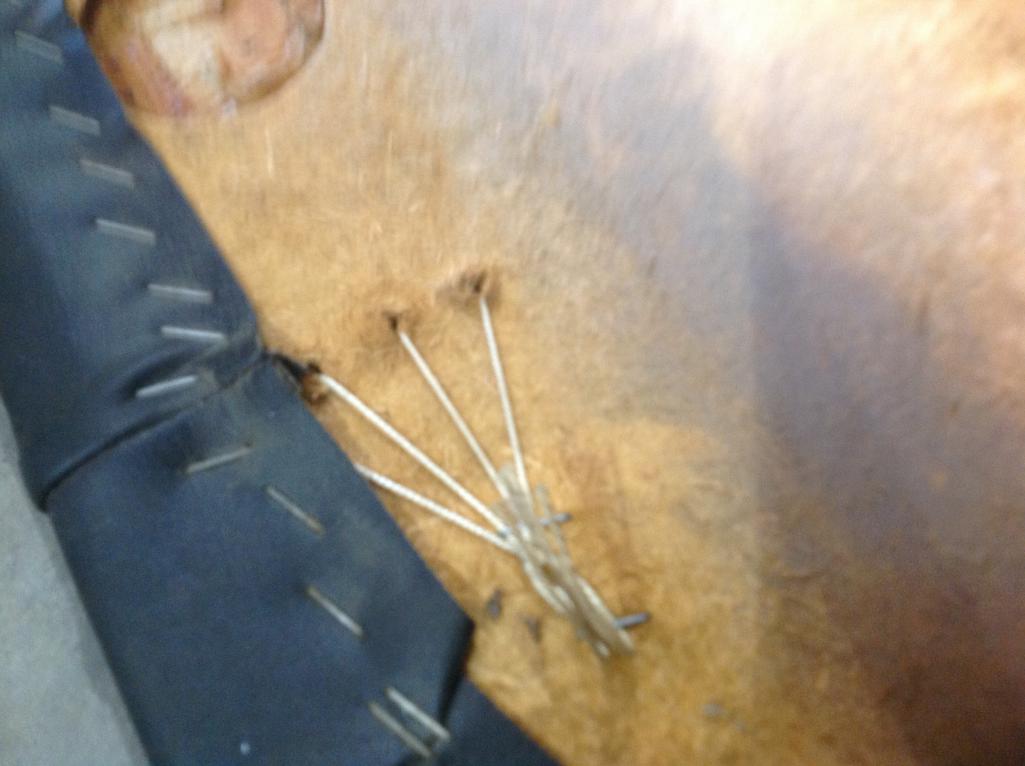 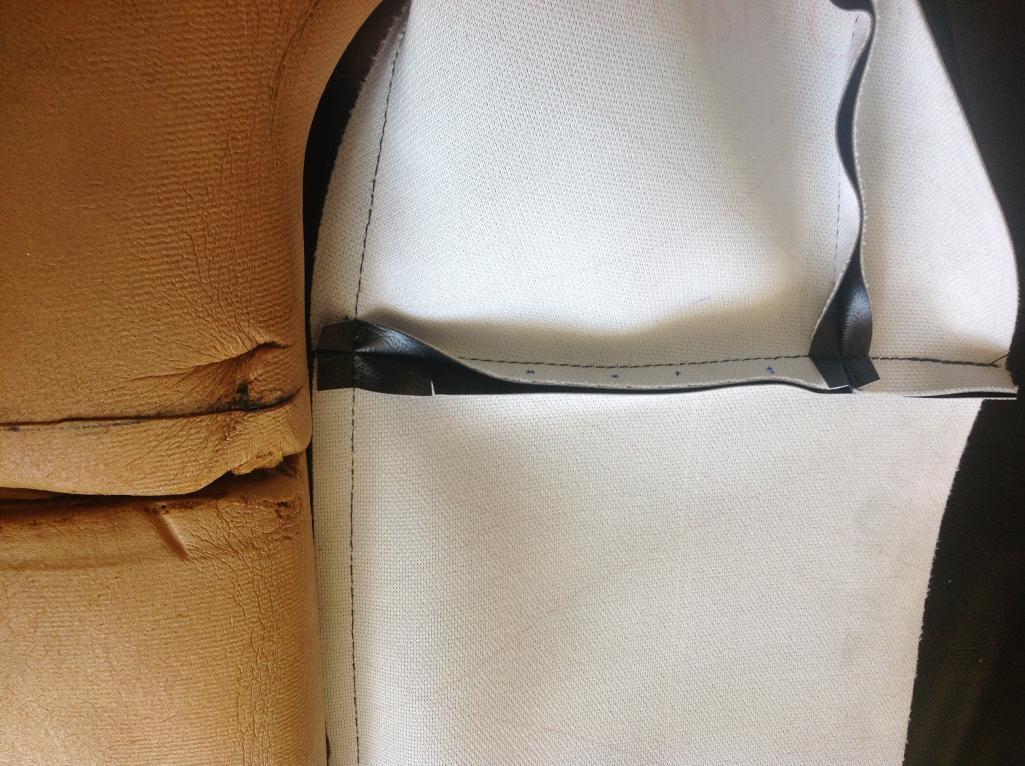
|
|
|
|
| Series9 |
Mar 9 2016, 05:54 PM
Post
#17
|
|
Lesbians taste like chicken. Group: Members Posts: 5,453 Joined: 22-August 04 From: DeLand, FL Member No.: 2,602 Region Association: South East States |
And:
Attached thumbnail(s) 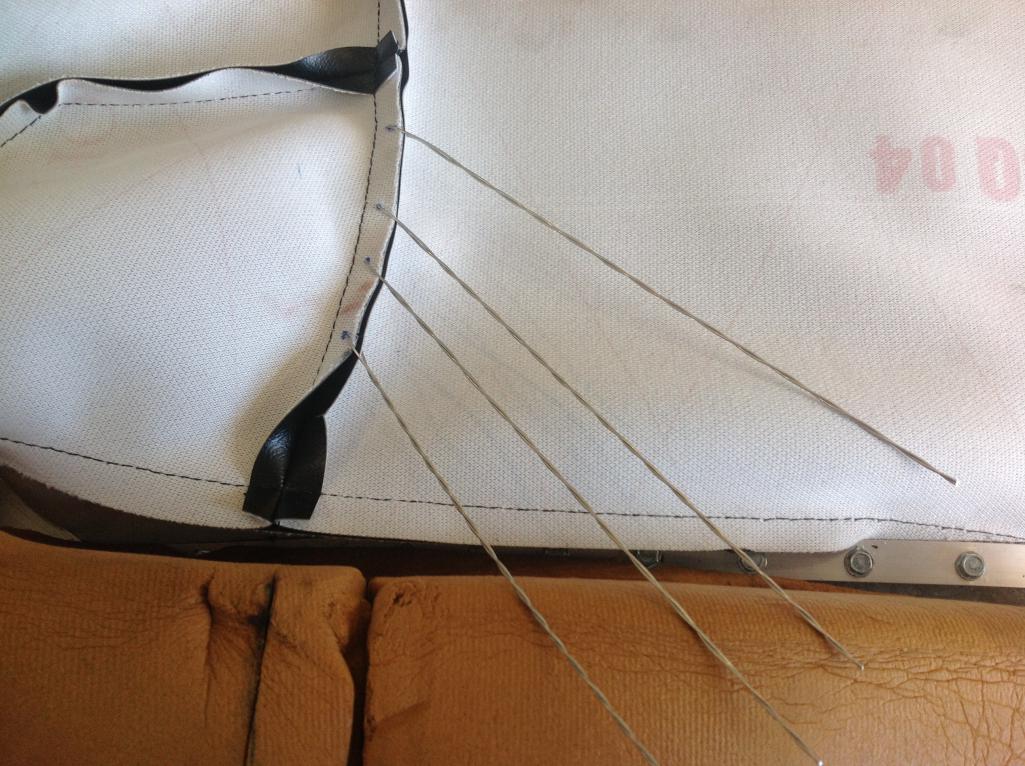
|
|
|
|
| Series9 |
Mar 9 2016, 05:58 PM
Post
#18
|
|
Lesbians taste like chicken. Group: Members Posts: 5,453 Joined: 22-August 04 From: DeLand, FL Member No.: 2,602 Region Association: South East States |
As you can clearly see, I had to cut a new slit in the foam. Don't put that on Mark or me. The foam relaxed and that's where the seam ended.
Turns out, once I pulled everything tight, it all had to move one space over, so now there are three: (again, note the engine pull hole on the passenger side foam) Attached thumbnail(s) 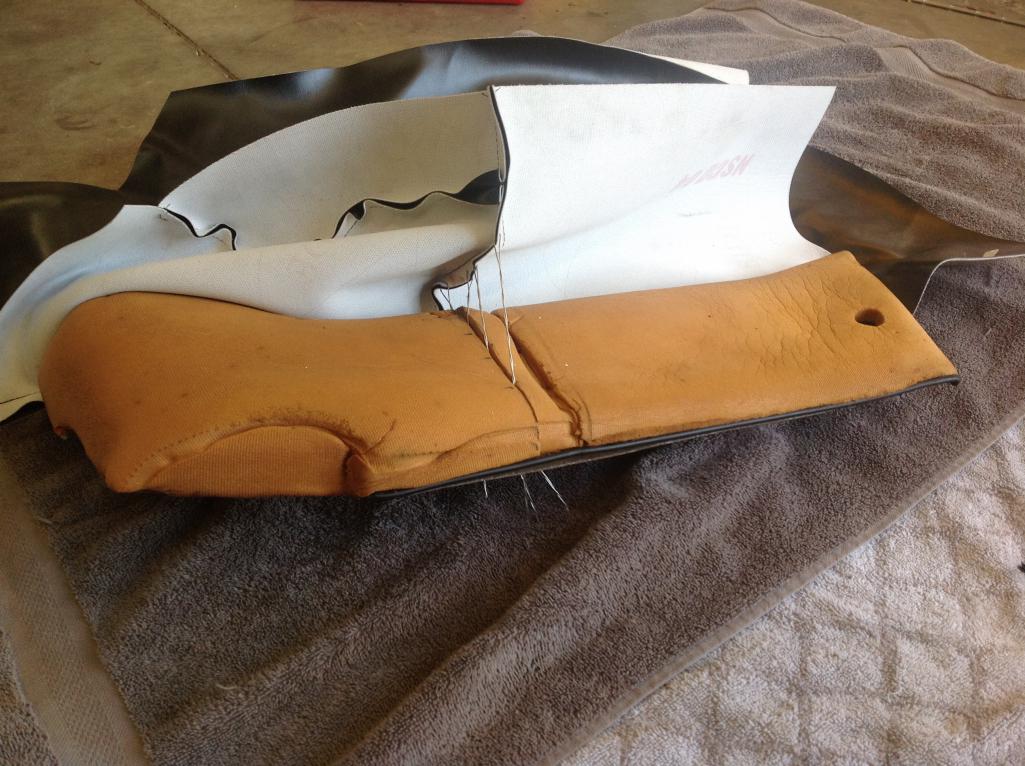
|
|
|
|
| Series9 |
Mar 9 2016, 06:04 PM
Post
#19
|
|
Lesbians taste like chicken. Group: Members Posts: 5,453 Joined: 22-August 04 From: DeLand, FL Member No.: 2,602 Region Association: South East States |
Here's the back and the front after a test tensioning:
Attached thumbnail(s) 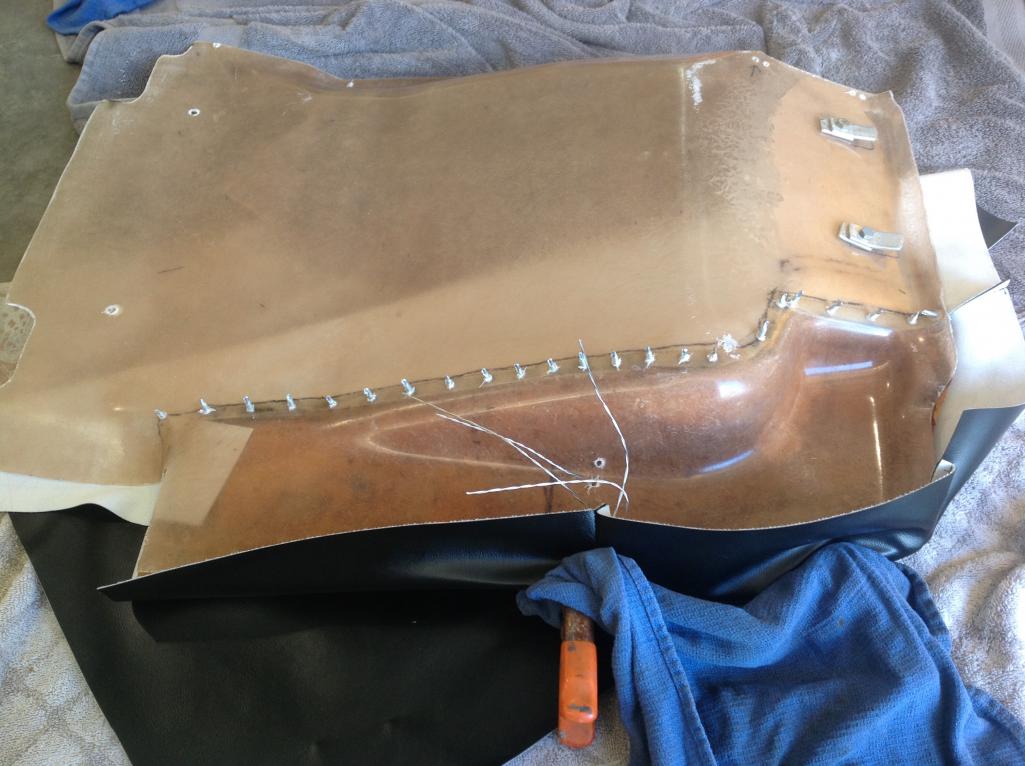 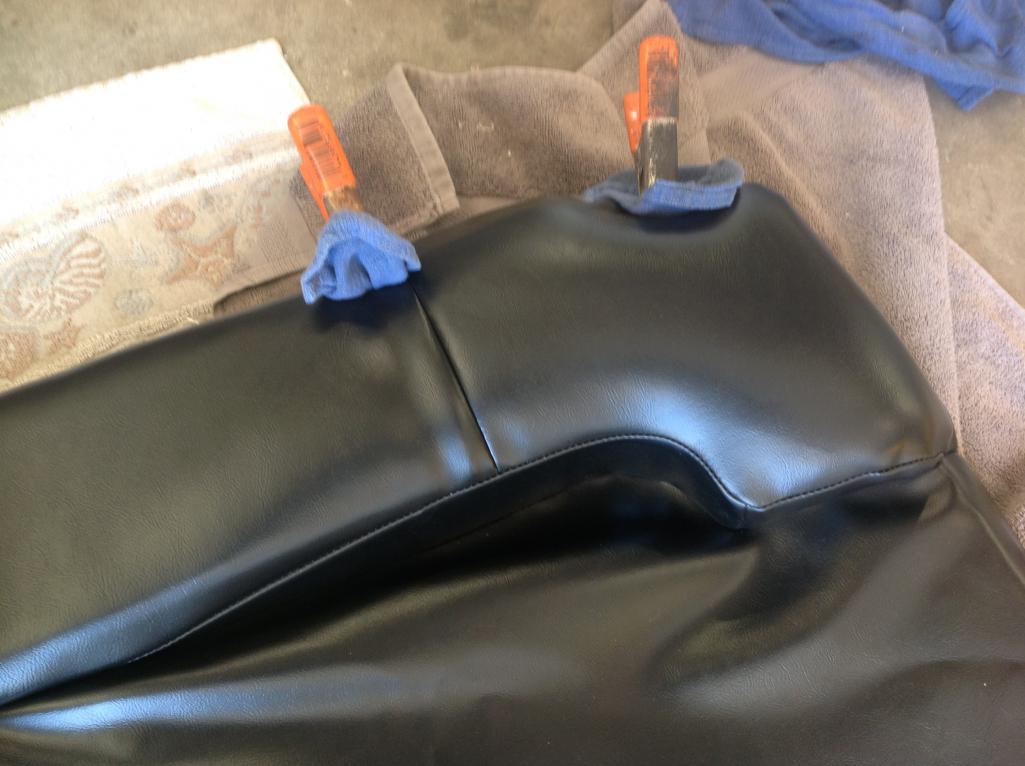
|
|
|
|
| Series9 |
Mar 9 2016, 06:10 PM
Post
#20
|
|
Lesbians taste like chicken. Group: Members Posts: 5,453 Joined: 22-August 04 From: DeLand, FL Member No.: 2,602 Region Association: South East States |
Then, tension the vinyl around the pad.
I chose to do it with safety wire poked through the vinyl and then wrapped around the (later to be cut off) screws from the tension seam. This way, I could adjust tension and leave it to sit for a couple of days. On the second picture, please note that I have folded the vinyl under the end of the "tension strip". That will come in to play later. Attached thumbnail(s) 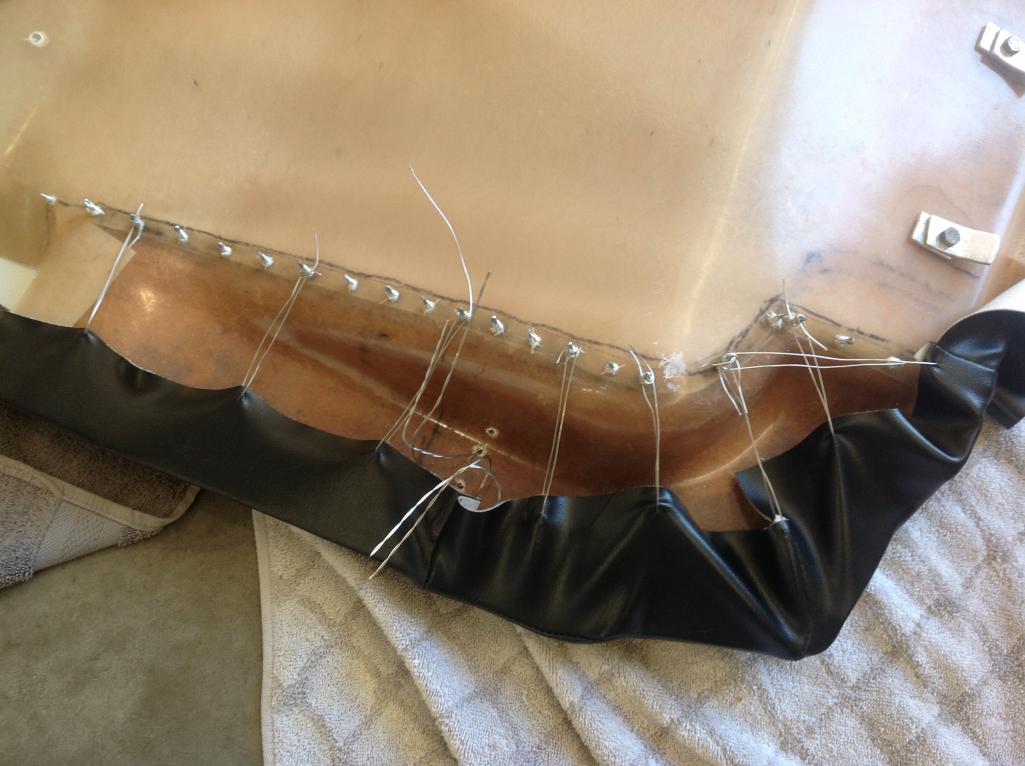 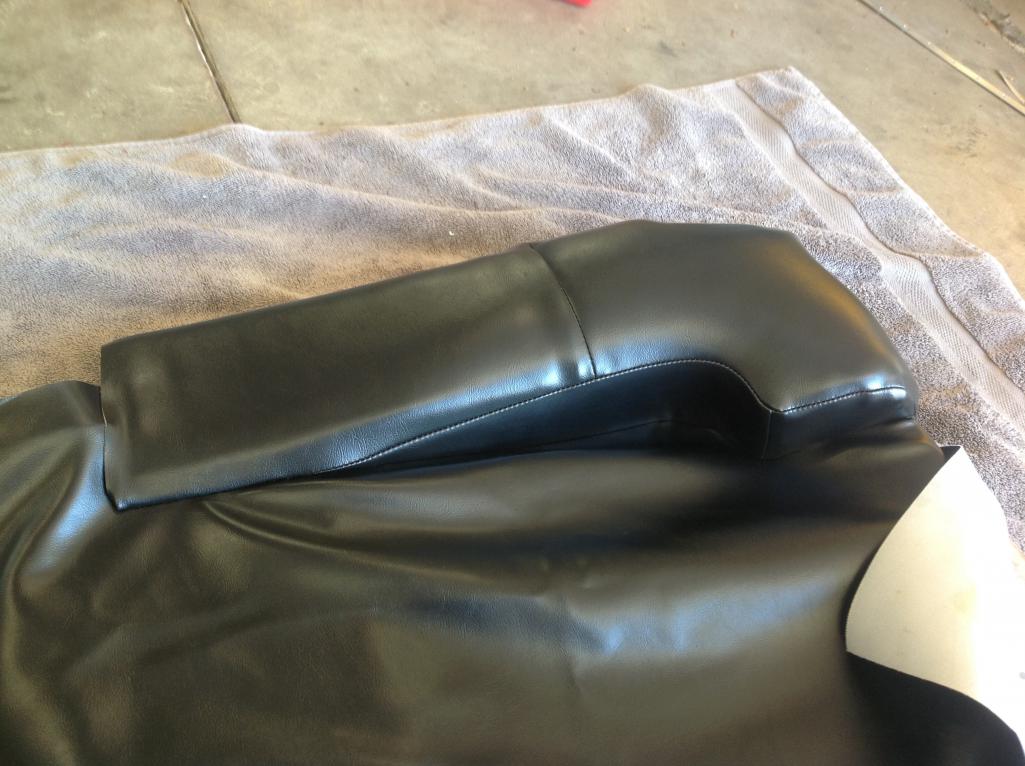 
|
|
|
|
|
1 User(s) are reading this topic (1 Guests and 0 Anonymous Users)
0 Members:

|
Lo-Fi Version | Time is now: 4th April 2026 - 10:22 PM |
Invision Power Board
v9.1.4 © 2026 IPS, Inc.