|
|
|
Porsche, and the Porsche crest are registered trademarks of Dr. Ing. h.c. F. Porsche AG.
This site is not affiliated with Porsche in any way. Its only purpose is to provide an online forum for car enthusiasts. All other trademarks are property of their respective owners. |
|
|

  |

| ClayPerrine |
 Oct 25 2019, 07:08 AM Oct 25 2019, 07:08 AM
Post
#281
|
|
Life's been good to me so far.....  Group: Admin Posts: 16,567 Joined: 11-September 03 From: Hurst, TX. Member No.: 1,143 Region Association: NineFourteenerVille |
QUOTE(Rob-O @ Oct 25 2019, 12:43 AM)  QUOTE(ClayPerrine @ Oct 24 2019, 01:48 PM) QUOTE(Rob-O @ Oct 24 2019, 03:41 PM) I’m officially calling first dibs on Elwood... You can't. The DAPO made it a condition of the sale that he has right of first refusal if we ever sell it. Dammit Rusty! And Betty would own Elwood if anything happens to me. Remember community property? |
   |

 
|
| Rob-O |
Oct 25 2019, 07:11 AM
Post
#282
|
|
Senior Member Group: Members Posts: 1,318 Joined: 5-December 03 From: Mansfield, TX Member No.: 1,419 Region Association: Southwest Region |
QUOTE(ClayPerrine @ Oct 25 2019, 05:08 AM) QUOTE(Rob-O @ Oct 25 2019, 12:43 AM) QUOTE(ClayPerrine @ Oct 24 2019, 01:48 PM) QUOTE(Rob-O @ Oct 24 2019, 03:41 PM) I’m officially calling first dibs on Elwood... You can't. The DAPO made it a condition of the sale that he has right of first refusal if we ever sell it. Dammit Rusty! And Betty would own Elwood if anything happens to me. Remember community property? In the highly unlikely event that Betty would want to sell a 914 I was hoping to be first in line...after Rusty. |
|
|
|
| petza914 |
Oct 25 2019, 08:02 AM
Post
#283
|
|
Newbie Group: Members Posts: 17 Joined: 27-July 04 From: Clemson, SC Member No.: 2,410 Region Association: South East States |
QUOTE(ClayPerrine @ Oct 11 2019, 06:44 AM) QUOTE(rick 918-S @ Oct 11 2019, 04:38 AM) Down to one tire manufacturer producing 255/50/16's (IMG:style_emoticons/default/dry.gif) My have to run race rubber to get tires next time. Rick, That's what you are running for rear tires? I may have to look into them. I assume they fit under the factory GT flares? I wonder how hard it would be to fit 911 PCCB brakes???? (IMG:style_emoticons/default/idea.gif) Edit: Nevermind... PCCBs are prone to cracking rotors and really expensive to replace. Maybe Cayenne calipers and rotors??? Clay, I can't believe I missed the debut of this beast at Okteenerfest this year - the first year in the past few I couldn't make it due to kid sports conflicts - bummed. Sounds like the car is amazing with plenty of bliss moments mixed in with the troubleshooting issues - you know how it goes. Anyway, I pulled the complete braking system from my widebody Cayenne Turbo S when I replaced it with a 958 PCCB setup. If you're looking for OEM Porsche brakes, these are some of the largest you can find - front rotors are 380x38mm. Everything is cleaned and boxed up - 4 rotors, 4 calipers, 4 lines, sets of pads, etc. Pulled them with 35,000 miles on them. Details and photos are in my ad here - https://rennlist.com/forums/market/1122935 Let me know if you're interested and super job on the car ! |
|
|
|
| ClayPerrine |
Apr 13 2020, 07:13 AM
Post
#284
|
|
Life's been good to me so far..... Group: Admin Posts: 16,567 Joined: 11-September 03 From: Hurst, TX. Member No.: 1,143 Region Association: NineFourteenerVille |
While we have this downtime, I am finally getting something done on my car. The oil system is pulled apart to add a thermostat, but I am stuck because I am waiting on, of all things, a drill bit. I need a 20.5mm bit to fix some fittings with messed up threads. Yes, I realize that is a 13/16 bit, but everything is closed on Easter Sunday.
So yesterday I started to tear into another issue. My LED front lights act weird. If you turn on the turn signal or flashers, the white LEDs flash. If you turn on the park lights, the yellow LEDs come on. If you turn on the park lights when the white LEDs are flashing, the yellow lights come on, and the white lights stop working. Considering how custom my wiring harness is, I figured it was something in the wiring causing it. I tore the knee pad off, dropped the fuse box, pulled the gauge cluster, and pulled both the light switch and the hazard switch out so I could get to the wires. No matter what I did, I could not find a reason for the problem. I finally broke down and pulled the LED board out of the right signal pod. I made a test rig to hook it to an old Radio Shack 110V AC to 12V DC converter. I get the exact same results when on the test rig. White lights on, hook Yellow lights to the 12v power and the white lights go out. Remove the power to the Yellow lights, and the white lights come back on. But there is a delay before the white lights come back on, about 2 to 3 seconds, kinda like a capacitor charging. The other thing I noticed is the jumper pads on the back of the board. There are three pads, labeled "US", "Euro" and "Blanking". Mine has the "Blanking" one soldered. I looked at Betty's 914, and the Six, both of which have the same LED boards. Bot of those have the jumper on "US" because they are US spec lights. Mine are Euro spec lenses, so I would assume they need to be on the "Euro" setting. Can anyone with Euro Spokeworks LED boards check and see if the pad should be on "Euro"?  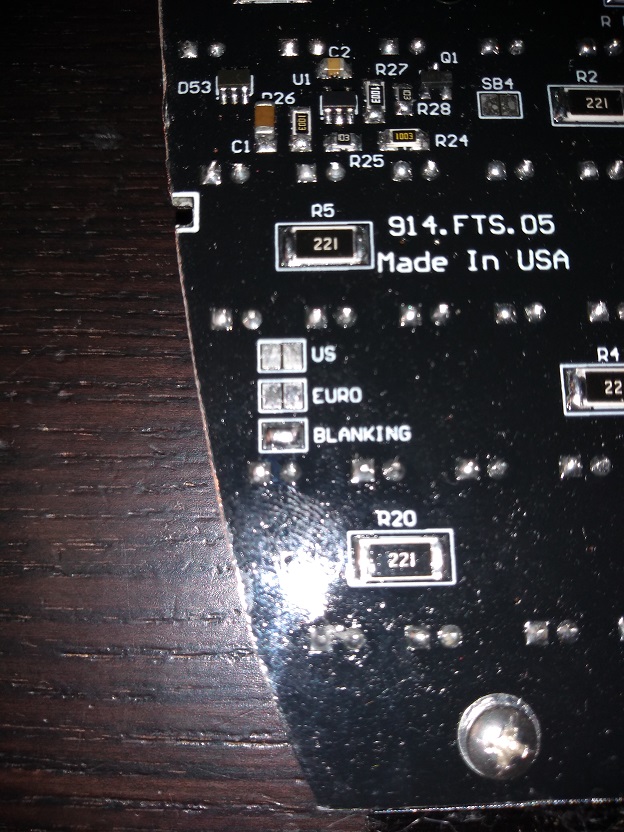 Thanks! |
|
|
|
| 76-914 |
Apr 13 2020, 08:54 AM
Post
#285
|
|
Repeat Offender & Resident Subaru Antagonist Group: Members Posts: 13,917 Joined: 23-January 09 From: Temecula, CA Member No.: 9,964 Region Association: Southern California |
Clay, just PM Jerry. He will get back with you quickly. Great over the phone customer service. He will walk you through any difficulties you might encounter. (IMG:style_emoticons/default/beerchug.gif)
|
 |
|
| petza914 |
Apr 13 2020, 09:23 AM
Post
#286
|
|
Newbie Group: Members Posts: 17 Joined: 27-July 04 From: Clemson, SC Member No.: 2,410 Region Association: South East States |
QUOTE(ClayPerrine @ Apr 13 2020, 05:13 AM) While we have this downtime, I am finally getting something done on my car. The oil system is pulled apart to add a thermostat, but I am stuck because I am waiting on, of all things, a drill bit. I need a 20.5mm bit to fix some fittings with messed up threads. Yes, I realize that is a 13/16 bit, but everything is closed on Easter Sunday. So yesterday I started to tear into another issue. My LED front lights act weird. If you turn on the turn signal or flashers, the white LEDs flash. If you turn on the park lights, the yellow LEDs come on. If you turn on the park lights when the white LEDs are flashing, the yellow lights come on, and the white lights stop working. Considering how custom my wiring harness is, I figured it was something in the wiring causing it. I tore the knee pad off, dropped the fuse box, pulled the gauge cluster, and pulled both the light switch and the hazard switch out so I could get to the wires. No matter what I did, I could not find a reason for the problem. I finally broke down and pulled the LED board out of the right signal pod. I made a test rig to hook it to an old Radio Shack 110V AC to 12V DC converter. I get the exact same results when on the test rig. White lights on, hook Yellow lights to the 12v power and the white lights go out. Remove the power to the Yellow lights, and the white lights come back on. But there is a delay before the white lights come back on, about 2 to 3 seconds, kinda like a capacitor charging. The other thing I noticed is the jumper pads on the back of the board. There are three pads, labeled "US", "Euro" and "Blanking". Mine has the "Blanking" one soldered. I looked at Betty's 914, and the Six, both of which have the same LED boards. Bot of those have the jumper on "US" because they are US spec lights. Mine are Euro spec lenses, so I would assume they need to be on the "Euro" setting. Can anyone with Euro Spokeworks LED boards check and see if the pad should be on "Euro"? Thanks! The flashing colors in your initial description sound weird that your white lights are flashing with your turn signals and the yellow lights working as the parking lights. Mine are the opposite. But in your second description, with the white lights turning off when the yellow lights are activated, that I believe is how they're supposed to be working. You'll notice in modern cars that have white DRLs in the front that when the turn signal is activated the white DRL light on that side turns off to not obscure the visibility of the flasher blinking. Since the yellow light you're connecting is the turn signal, it cuts off the white part of the light while it's activated and then returns power to the white part of the light when the turn signal is deactivated. I think it's cool that these LEDs have that updated and more modern functionality and yours work just like mine do. I never noticed the pairs of jumpers at the bottom to know if the functionality can be changed if desired by resoldering the board. See my post in the spokeworks led thread here - http://www.914world.com/bbs2/index.php?sho...8192&st=161 |
|
|
|
| ClayPerrine |
Apr 13 2020, 12:12 PM
Post
#287
|
|
Life's been good to me so far..... Group: Admin Posts: 16,567 Joined: 11-September 03 From: Hurst, TX. Member No.: 1,143 Region Association: NineFourteenerVille |
QUOTE(petza914 @ Apr 13 2020, 10:23 AM) The flashing colors in your initial description sound weird that your white lights are flashing with your turn signals and the yellow lights working as the parking lights. Mine are the opposite. But in your second description, with the white lights turning off when the yellow lights are activated, that I believe is how they're supposed to be working. You'll notice in modern cars that have white DRLs in the front that when the turn signal is activated the white DRL light on that side turns off to not obscure the visibility of the flasher blinking. Since the yellow light you're connecting is the turn signal, it cuts off the white part of the light while it's activated and then returns power to the white part of the light when the turn signal is deactivated. I think it's cool that these LEDs have that updated and more modern functionality and yours work just like mine do. I never noticed the pairs of jumpers at the bottom to know if the functionality can be changed if desired by resoldering the board. See my post in the spokeworks led thread here - http://www.914world.com/bbs2/index.php?sho...8192&st=161 On a Euro 914, the amber lights are the park lights, and the white lights are the front turn signals. The factory euro turn signal buckets I have (they are boxed and being sent to Spoke today) have split wiring for the lights. The small white section of the light at the bottom is wired as the turn signal, and the larger, amber upper section is wired to be the park light. Other than the ground wire, they are completely separate. I verified the wiring is correct, I matched the numbers on the connectors to the correct circuits. I am wondering if the jumper on the board needs to be on the "Euro" tab to get it to work like a factory original light setup. |
|
|
|
| Cairo94507 |
Oct 24 2020, 07:25 AM
Post
#288
|
|
Michael Group: Members Posts: 10,718 Joined: 1-November 08 From: Auburn, CA Member No.: 9,712 Region Association: Northern California |
Man, I just re-read this thread and Clay your car and skills are just amazing. (IMG:style_emoticons/default/beerchug.gif)
|
|
|
|
| horizontally-opposed |
Oct 24 2020, 07:34 AM
Post
#289
|
|
Advanced Member Group: Members Posts: 3,456 Joined: 12-May 04 From: San Francisco Member No.: 2,058 Region Association: None |
QUOTE(mepstein @ Oct 24 2019, 01:53 PM) It would make it miserable to drive on any road but a straight line. What Clay really needs is the GT3R Hybrid front-axle powertrain. Flywheel will make the car a one-seater (or, at least…deeply uncomfortable for a passenger), but he'll be able to put the power down. What could possibly go wrong? (IMG:style_emoticons/default/welder.gif) |
|
|
|
| ClayPerrine |
Oct 24 2020, 03:05 PM
Post
#290
|
|
Life's been good to me so far..... Group: Admin Posts: 16,567 Joined: 11-September 03 From: Hurst, TX. Member No.: 1,143 Region Association: NineFourteenerVille |
QUOTE(horizontally-opposed @ Oct 24 2020, 08:34 AM) QUOTE(mepstein @ Oct 24 2019, 01:53 PM) It would make it miserable to drive on any road but a straight line. What Clay really needs is the GT3R Hybrid front-axle powertrain. Flywheel will make the car a one-seater (or, at least…deeply uncomfortable for a passenger), but he'll be able to put the power down. What could possibly go wrong? (IMG:style_emoticons/default/welder.gif) Geeze... quit putting I would love to have a Vonnen Hybrid conversion done, but it not do it yourself, and it is VERY expensive. Vonned Shadow Drive. Out of curiosity I called them a while back. It is 70K installed. He was very interested, and he read this thread about my build. He said I wouldn't need the starter, their motor/generator will provide that function. |
|
|
|
| ClayPerrine |
Oct 24 2020, 03:06 PM
Post
#291
|
|
Life's been good to me so far..... Group: Admin Posts: 16,567 Joined: 11-September 03 From: Hurst, TX. Member No.: 1,143 Region Association: NineFourteenerVille |
QUOTE(Cairo94507 @ Oct 24 2020, 08:25 AM) Man, I just re-read this thread and Clay your car and skills are just amazing. (IMG:style_emoticons/default/beerchug.gif) If y'all would quit holding the West coast event way in the north, I might consider attending and bringing my car. |
|
|
|
| horizontally-opposed |
Oct 24 2020, 03:12 PM
Post
#292
|
|
Advanced Member Group: Members Posts: 3,456 Joined: 12-May 04 From: San Francisco Member No.: 2,058 Region Association: None |
QUOTE(ClayPerrine @ Oct 24 2020, 02:05 PM) Geeze... quit putting I would love to have a Vonnen Hybrid conversion done, but it not do it yourself, and it is VERY expensive. Vonned Shadow Drive. Out of curiosity I called them a while back. It is 70K installed. He was very interested, and he read this thread about my build. He said I wouldn't need the starter, their motor/generator will provide that function. (IMG:style_emoticons/default/biggrin.gif) The good news is you save on the starter. The bad news is you don't get AWD…and put even more weight towards the back of the car. QUOTE(Cairo94507 @ Oct 24 2020, 08:25 AM) Man, I just re-read this thread and Clay your car and skills are just amazing. (IMG:style_emoticons/default/beerchug.gif) +1 QUOTE(ClayPerrine @ Oct 24 2020, 02:06 PM) If y'all would quit holding the West coast event way in the north, I might consider attending and bringing my car. Looks like 20 hours from Hurst to LA, or 25 hours from Hurst to Petaluma. Most who know Petaluma will put you miles (and possibly hours) ahead on traffic and quality of the roads. The people are okay, too. Honest! (IMG:style_emoticons/default/smile.gif) (If still in doubt, I submit Tygaboy.) And, as for the roads: Add some days before or after the trip to head north—and to add a set of memories to your 4.0 you'll simply never forget. |
|
|
|
| ClayPerrine |
Nov 7 2020, 05:15 PM
Post
#293
|
|
Life's been good to me so far..... Group: Admin Posts: 16,567 Joined: 11-September 03 From: Hurst, TX. Member No.: 1,143 Region Association: NineFourteenerVille |
Today I got out and fixed the broken shifter.
I had continuous issues with the frankenstein shifter I built. Then I melted a shift cable on the header. So another $500.00 set of cables, and a new shifter setup. 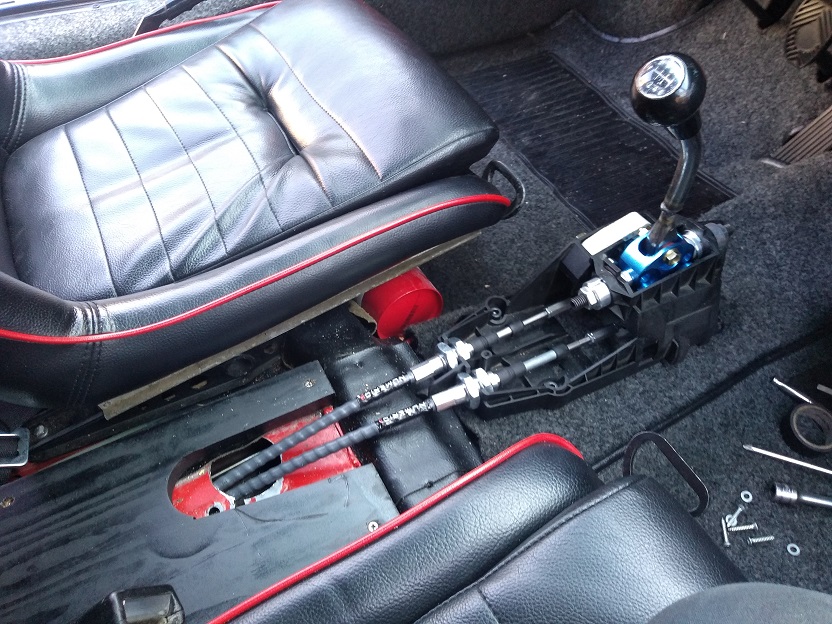 It is a Boxster shifter installed on an aluminum adapter plate. It has a short shifter kit with a 914 shift rod welded onto it. Still nice and tight shifting. Going to take some time getting used to it. Now I can't put in the deposit box because of the cable run. So I made up a wooden spacer with a notch to clear the cables. I fixed the hinge and got everything installed. 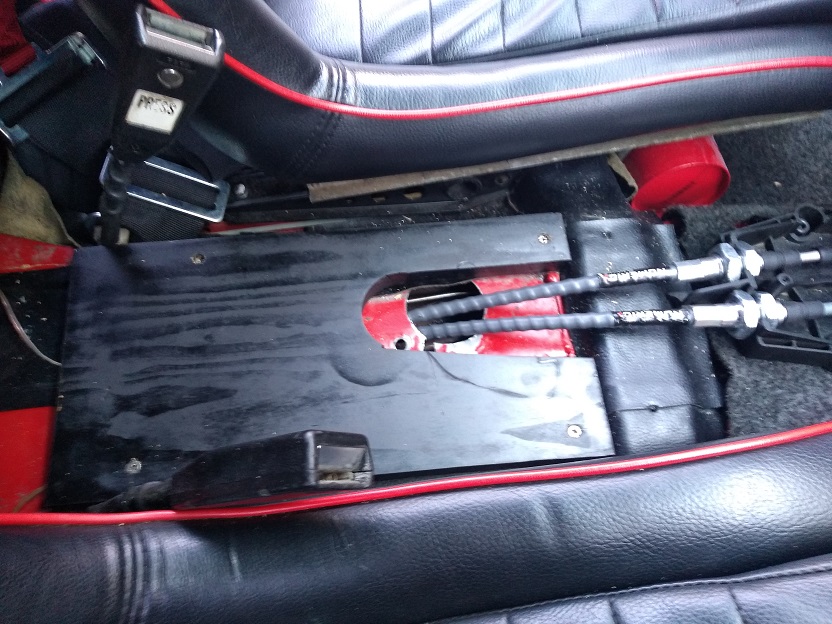 Next I will be building a console to go around the shifter. Going to add 12V plugs and a USB charging port for my phone. And a cup holder in front of the shifter. Tomorrow we go to the AX at lone star park, so Betty and I cleaned up the car. I also put the rear valence on. It looks much better with the valence. |
|
|
|
| ClayPerrine |
Nov 11 2020, 08:07 PM
Post
#294
|
|
Life's been good to me so far..... Group: Admin Posts: 16,567 Joined: 11-September 03 From: Hurst, TX. Member No.: 1,143 Region Association: NineFourteenerVille |
Got my speedo back from Zim's today. They fixed the odometer. I put it back in, and attempted to fix the volt meter. Now when I turn on the key, the gauge fuse blows.
Oh well. got to pull it back apart and try again. I also got new oil line bridge pieces for the cam oil feeds. The right hand one developed a bad leak, and there is an updated one used on the 993 that is supposed to fix that issue. Tomorrow I tackle the oil leak. |
|
|
|
| ClayPerrine |
Feb 23 2021, 07:16 AM
Post
#295
|
|
Life's been good to me so far..... Group: Admin Posts: 16,567 Joined: 11-September 03 From: Hurst, TX. Member No.: 1,143 Region Association: NineFourteenerVille |
Yesterday I sent of a 911 Carrera tach to North Hollywood Speedometer to get the upshift light converted to be a check engine light for the DME. Right now I have an annoying red light in the dash. But I need that space for the AC compressor switch.
I also spent some time reworking the oil lines. I have popped multiple oil coolers on the right when the weather was cold. So I wanted to add a thermostat. Doing that requires a complete re-plumbing of the oil cooler system. I got the partially assembled lines from Zims, and started trying to fit them. In the process, I found this:  Seems the crossover hose is crimping when I tighten it up, causing a restriction. That would account for the right hand oil cooler doing it's best imitation of a child's balloon. I am going to replace that line with the green striped stuff seen the pictures. That green striped hose is really stiff and doesn't kink. Here are some more shots of the oil system being laid out. I had a 911 oil line that goes under the transmission bell housing shortened, and put a 90 on the end of it to go up to the thermostat. It also has the line back to the tank from the thermostat. 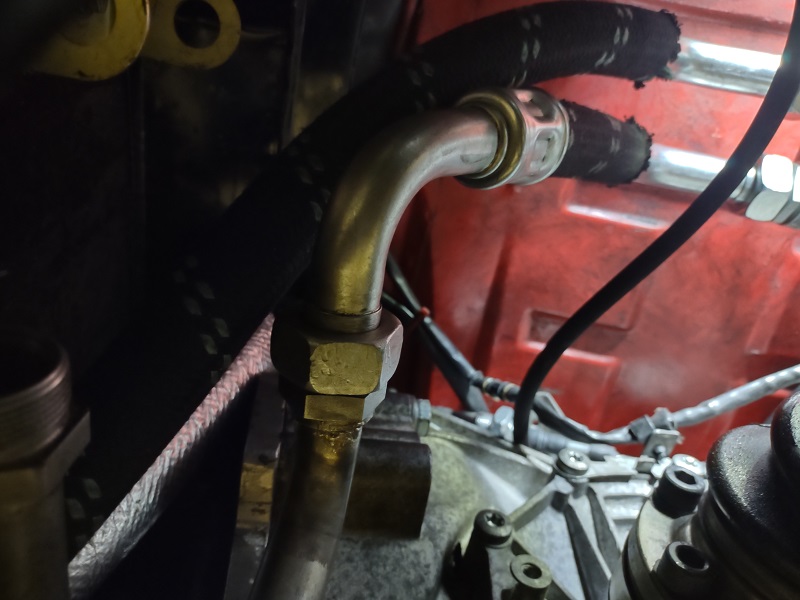 Shot of the thermostat and left cooler. I need two 90 degree fittings to make this connection. Yes, I know the thermostat is hanging out in space. I am going to get the lines fitted, then put int he mount for the thermostat. 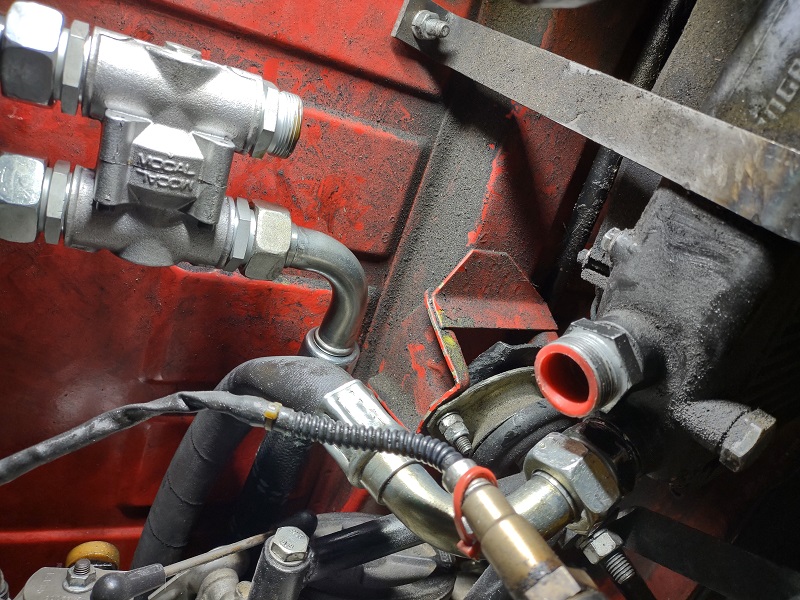 Another angle of the lines coming up to the thermostat. 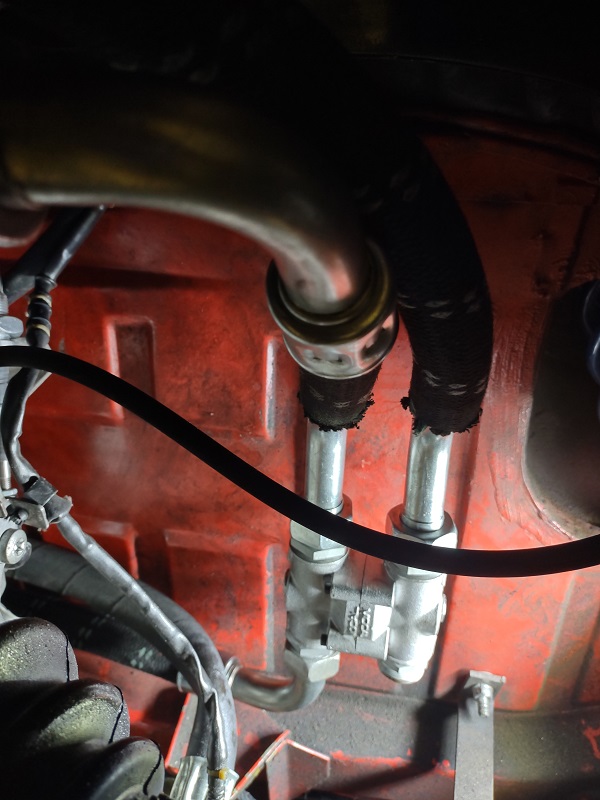 I sent off an email to Aaron@Zims.com ( @partsguy22 ). He has to order more of the 90 degree fittings. Maybe I will make the AX on Sunday, but I doubt it at this point. Clay |
|
|
|
| ClayPerrine |
Mar 24 2021, 11:39 AM
Post
#296
|
|
Life's been good to me so far..... Group: Admin Posts: 16,567 Joined: 11-September 03 From: Hurst, TX. Member No.: 1,143 Region Association: NineFourteenerVille |
The oil cooler plumbing is done. And I found the flat spot I had when trying to accelerate. I replaced the barn door air flow meter, and it went away.
|
|
|
|
| ClayPerrine |
Mar 24 2021, 12:13 PM
Post
#297
|
|
Life's been good to me so far..... Group: Admin Posts: 16,567 Joined: 11-September 03 From: Hurst, TX. Member No.: 1,143 Region Association: NineFourteenerVille |
On to the "AC Evaporator Build"
I wanted AC in my car, but I didn't want an underdash unit. Larry Hubby's AC build inspired me to copy his evaporator, but with some changes specific to my car. You can see Larry's AC build here - http://www.914world.com/bbs2/index.php?sho...;p=2530141& So first, I ordered the evaporator and the fans like Larry used. 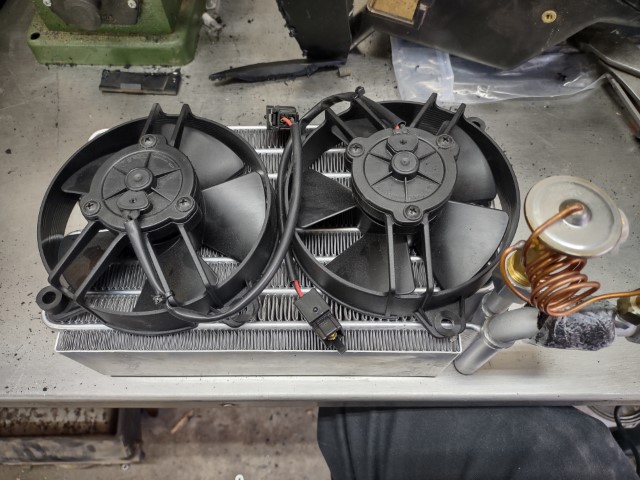 Then I started on the "shorty" air box to fit the cowl. I cut down the factory air box and carefully removed the rain shield inside of it. 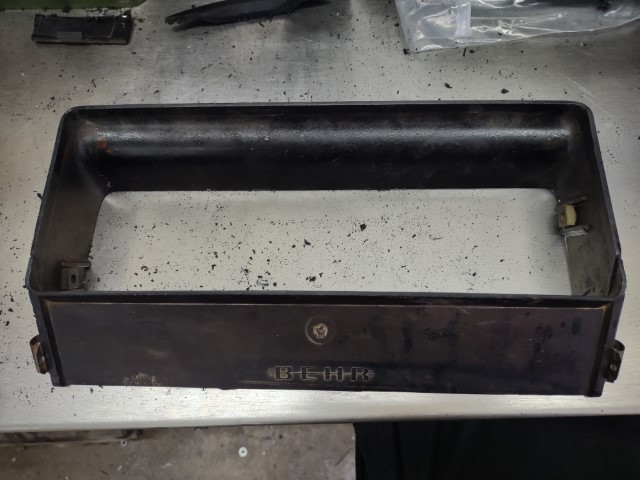 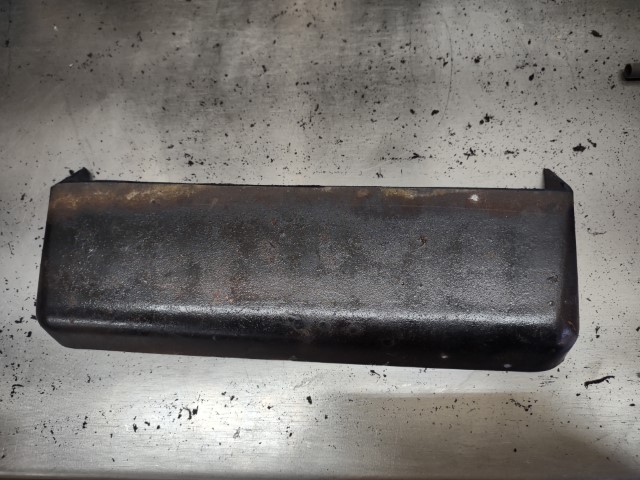 In the third picture, I show where the rain shield was cut loose. 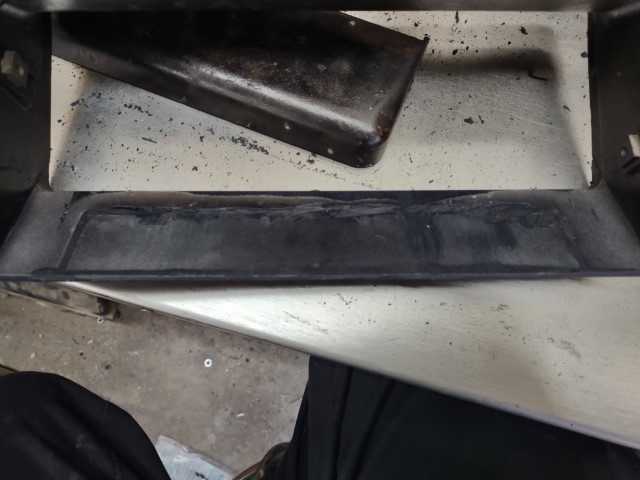 One of the things I noticed when I was reading Larry's thread, his opening for the outside air door was really small. So I removed the oval intake from the factory fresh air blower, and attached it to a sheet of ABS. Then I created a door and an actuator rod. 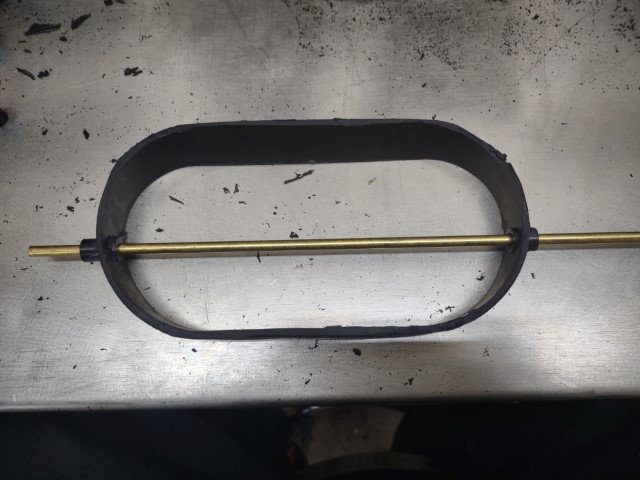 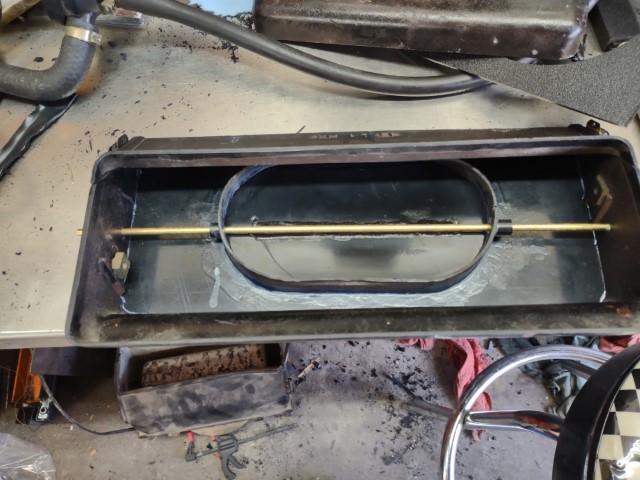 I left the rain shield off for now. I will reattach it later. That way I can see how much the door opens when it is moved. By now I ran out of super glue, so I had to order more. Yes, it is assembled with super glue. My father designed AC units for VW for years, and they used super glue extensively. The whole Vanagon AC unit was assembled with it. I got the glue and the accelerator spray. Just put the glue on one part, and spray the other. 5 seconds after contact, it is bonded. Next, I start making the bottom box to house the evaporator. 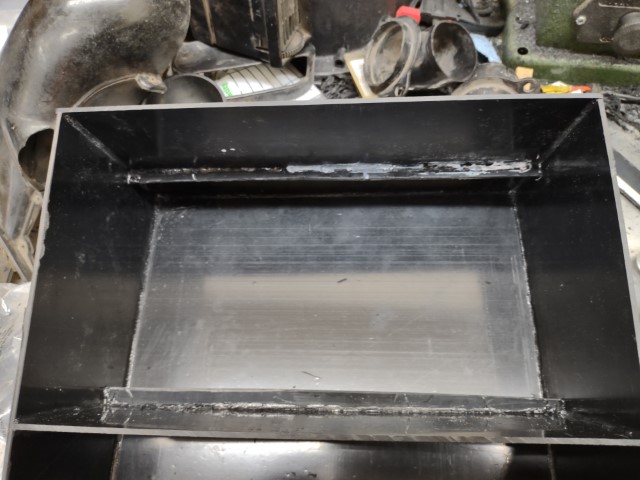 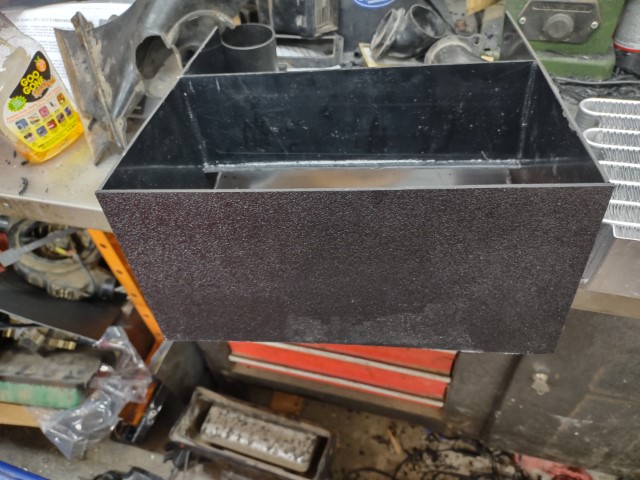 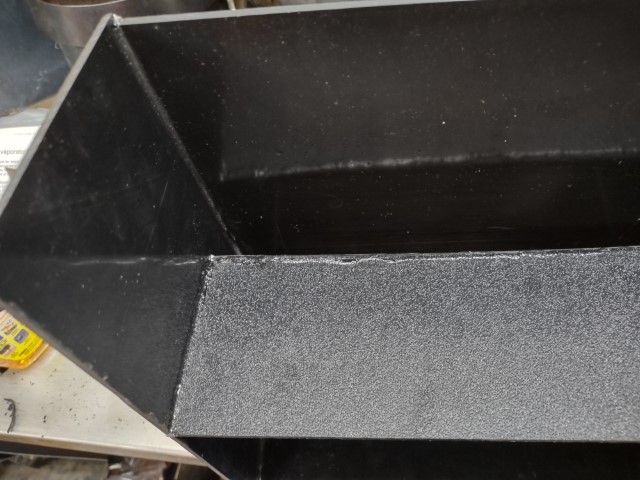 The box has a sloping floor that will carry condensation to the drains at the front (that I have not installed yet). I also put in a couple of pieces of ABS to act as a shelf to hold the evaporator up off the bottom. 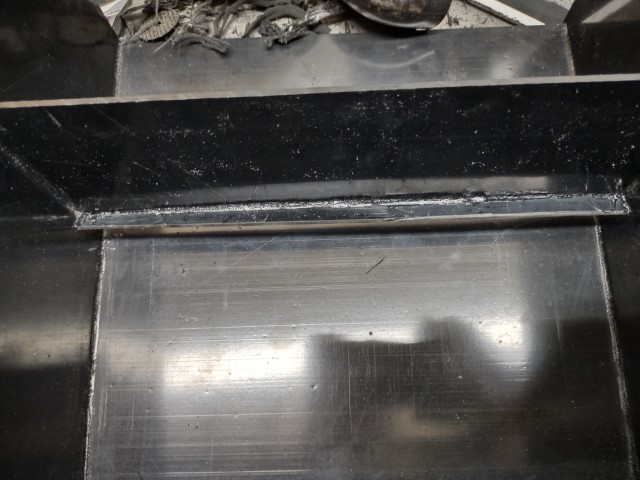 I test fit the evaporator core, and everything looked good. 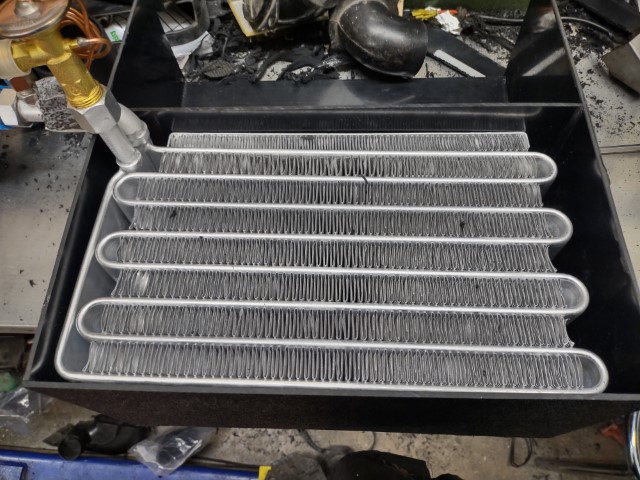 Next I created a ABS plate to hold the fans. I used a dremel with a circle cutter to make the holes for the fans. I had to slightly enlarge the holes to get the fans to clip in. I notched the corner to clear the evaporator lines. It sits right on the core, so I didn't have to glue anything. 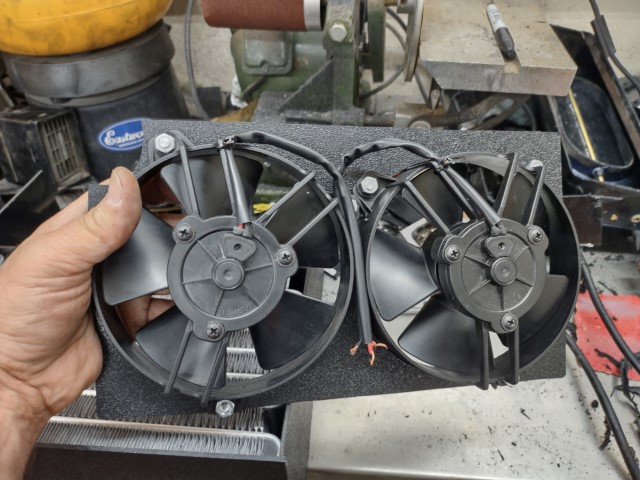 After that, I created the air distributor that goes on the back of the unit. I am going to route AC to the defroster ducts to push dry air over the windshield to defog it. I am going to feed the two outside vents in the dash, and to a 911 center vent in my Geddy design dash. So I setup the air distributor to be able to switch between the defroster vents and the center vent. The elbows at the back feed the defrost ducts, and the big outlet in the middle feeds the dash vent.  This is a picture of the door on the inside of the box. 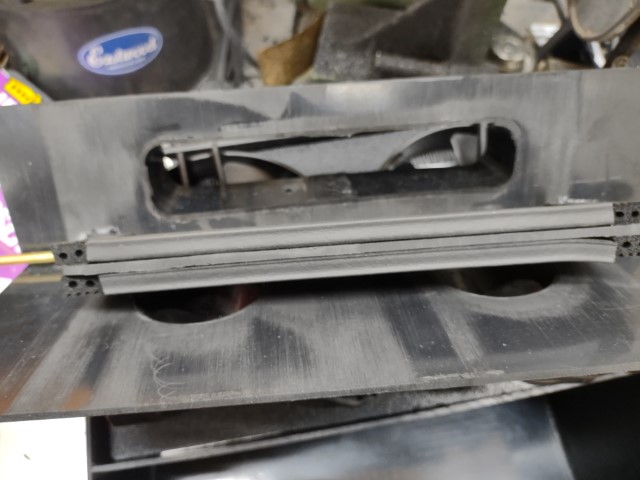 I hooked up the fans to 12v, and checked the airflow. It moves a lot of air through the evaporator core! I still need to add the fittings to hook up the vents in the end of the dash. There are no doors for them. They already have doors in the vents. I started creating the connection between the shorty air box and the top of the evaporator core. 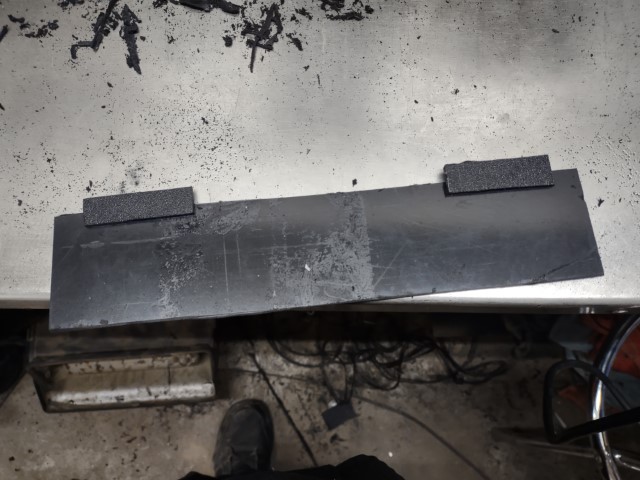 The tabs on this are to align it with the bottom box. I may need to add some small screws to hold the box together when it is in the car. But I will only put them on the side where they are not visible. Here is the top box installed on the bottom evaporator box. 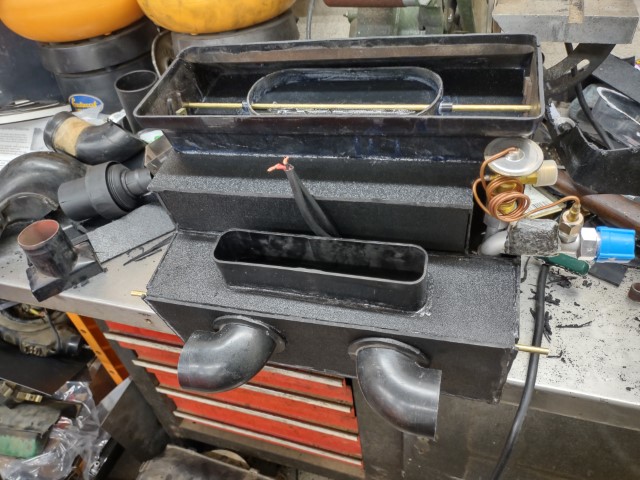 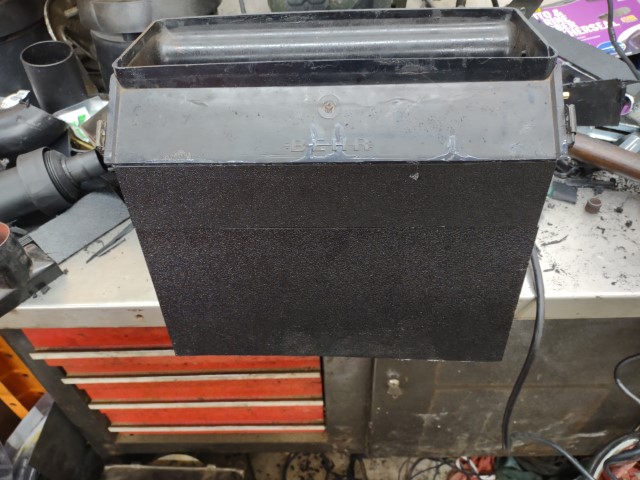 I again ran out of super glue. Gotta go to Ace hardware and get some more. Next steps are to put in the fittings for the side vents, and the fittings for the recirculation connections. I am going to connect the intake to the inboard connections on the factory air control boxes on either side. I will wire them open to the foot well so they always pull inside air. Closing the flap in the top of the evaporator will force all the air to come from inside. I set it next to the factory fresh air box. They are only a few millimeters in height difference. I need to pull the gas tank to check the fit in the dash. More updates to come as I add more to it. Clay |
|
|
|
| Root_Werks |
Mar 24 2021, 12:35 PM
Post
#298
|
|
Village Idiot Group: Members Posts: 9,028 Joined: 25-May 04 From: About 15NM from Canada Member No.: 2,105 Region Association: Pacific Northwest |
Some seriously mad fab skills, love it!
|
|
|
|
| Shivers |
Mar 24 2021, 02:05 PM
Post
#299
|
|
Senior Member Group: Members Posts: 3,488 Joined: 19-October 20 From: La Quinta, CA Member No.: 24,781 Region Association: Southern California |
When we first met Clay, I wanted your Cousin. Now I want your car. I must be getting old. Wow man, what an incredible journey. I was away from the site for a while so I had to catch up. It must really be something behind the wheel. Be safe
|
|
|
|
| ClayPerrine |
Mar 24 2021, 02:09 PM
Post
#300
|
|
Life's been good to me so far..... Group: Admin Posts: 16,567 Joined: 11-September 03 From: Hurst, TX. Member No.: 1,143 Region Association: NineFourteenerVille |
QUOTE(Shivers @ Mar 24 2021, 03:05 PM) When we first met Clay, I wanted your Cousin. Now I want your car. I must be getting old. Wow man, what an incredible journey. I was away from the site for a while so I had to catch up. It must really be something behind the wheel. Be safe My cousin? What are you talking about?????? Clay |
|
|
|
|
1 User(s) are reading this topic (1 Guests and 0 Anonymous Users)
0 Members:

|
Lo-Fi Version | Time is now: 21st July 2026 - 02:25 PM |
Invision Power Board
v9.1.4 © 2026 IPS, Inc.