|
|
|
Porsche, and the Porsche crest are registered trademarks of Dr. Ing. h.c. F. Porsche AG.
This site is not affiliated with Porsche in any way. Its only purpose is to provide an online forum for car enthusiasts. All other trademarks are property of their respective owners. |
|
|


| toolguy |
 Apr 4 2016, 03:56 PM Apr 4 2016, 03:56 PM
Post
#1
|
|
Senior Member  Group: Members Posts: 1,268 Joined: 2-April 11 From: San Diego / El Cajon Member No.: 12,889 Region Association: Southern California |
I just went thru a long process of figuring out how to paint my Mag / Gasburner rims. . Initially I was going to powder paint them as my nephew has a powder business and it would be no cost to me. . . After some in depth research, we found some potentially big issues with baking / powdering mag rims. .
1st issue was excessive gassing during the baking period. . seems magnesium has a lot of porosity and can produce bubbling in the powder even if they are pre-heated and powdered hot. . 2nd issue was about metal deterioration from high baking temps. . that turned out to be less of an issue if you bake them under 400 degrees but there is lots of internet chat about the metal losing its strength with higher temps. . 3rd issue was what to do if I needed to remove the powder in the future. . powder is very hard to remove with blasting, the usually shop practice my nephews business uses to remove powder is to bake at 600 and burn it off which would destroy the magnesium. . or dip them in a chemical stripper, which I didn't think would be any too positive either. . 4th issue. . Apparently magnesium absorbs and reacts badly to humidity and the atmosphere. . that is what causes it to turn blackish and produce a whitish corrosion on the surface. . This can end up lifting any powder or paint applied over a contaminated surface. . therefore it needs to be painted or somehow have the surface sealed directly after blasting. . The end of the story was that I bead blasted the factory finish completely off, which had some very hard and durable primer coats. . The base coat was a yellow coat and then a blue secondary coat over that. . took about an hour a wheel to get all the multiple nooks and crevices stripped bare of the factory coating. . Then each wheel was promptly primed in PPG DP40 metal etching primer. Let these dry overnight. The next morning I shot them with color correct silver single stage Urethane with flattener to achieve the semi gloss surface, Three full coats with 30 minutes between coats. Total investment for the PPG paint and primer, with catalyst, reducer and flatener came to $320, plus the 5 hours to strip the rims and another half day to paint them. Probably the hardest part was coming up with a silver paint that didn't have a 'metallic' sparkling appearance. Ended up having one mixed with the smallest flakes available. I had gone to a good quality paint and body shop before all this when i was in the planning stage and asked for an estimate for them to blast and paint. . Their 'Friend' discount price was $1500 total, priced at $100 per rim to blast and $200 a rim to paint for a set of 5 with center caps. . If nothing else it's a good sense of accomplishment and the saved money was the bonus. . Attached image(s) 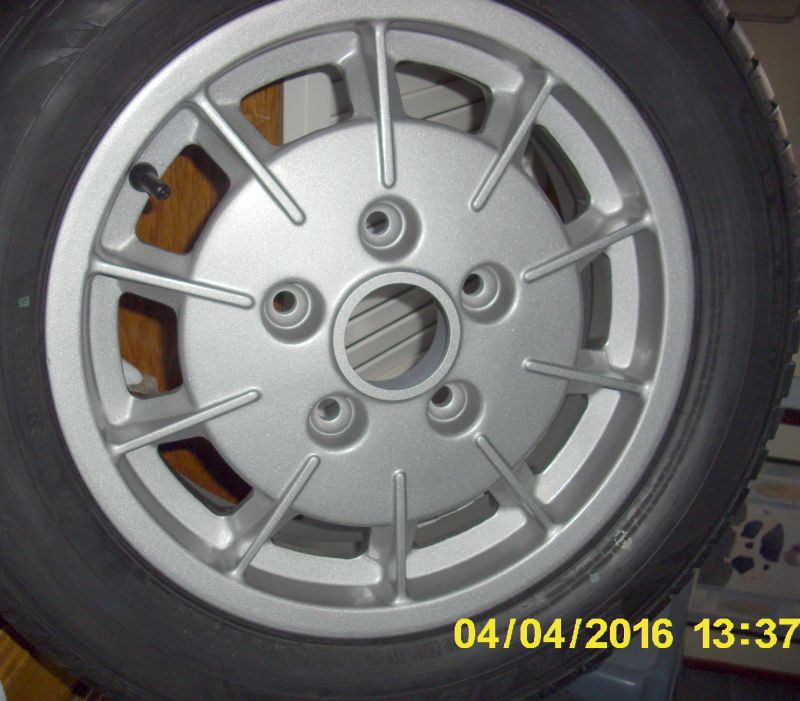
|
   |

 
|
Posts in this topic
 toolguy Painting Magnesium Rims. . My adventure Apr 4 2016, 03:56 PM
 sb914 They look great! Nice job Apr 4 2016, 04:02 PM ConeDodger The 5th issue is they are Gas Burners! They... Apr 4 2016, 04:03 PM somd914 Nice job :beer2: Apr 4 2016, 04:12 PM veekry9 Do you have a pix of the backs?I assume they were ... Apr 4 2016, 04:34 PM Cairo94507 Wow- those look terrific. And, I really appreciat... Apr 4 2016, 04:36 PM 76-914 :thumbsup: Apr 4 2016, 04:39 PM Mueller Looks great...years ago I had a set of modular Ron... Apr 4 2016, 04:40 PM DCJosh How do you know they are magnesium and not aluminu... Apr 4 2016, 08:33 PM
 mepstein
How do you know they are magnesium and not alumin... Apr 4 2016, 08:44 PM Johny Blackstain My favorite factory 914 rim by far. They look gre... Apr 4 2016, 08:43 PM porschetub
My favorite factory 914 rim by far. They look gr... Apr 5 2016, 03:17 AM Johny Blackstain
:agree: ,they have the look and nothing comes cl... Apr 5 2016, 07:15 AM DCJosh
My favorite factory 914 rim by far. They look gr... Apr 4 2016, 08:55 PM
mepstein
How do you know they are magnesium and not alumin... Apr 4 2016, 08:44 PM Johny Blackstain My favorite factory 914 rim by far. They look gre... Apr 4 2016, 08:43 PM porschetub
My favorite factory 914 rim by far. They look gr... Apr 5 2016, 03:17 AM Johny Blackstain
:agree: ,they have the look and nothing comes cl... Apr 5 2016, 07:15 AM DCJosh
My favorite factory 914 rim by far. They look gr... Apr 4 2016, 08:55 PM  |
1 User(s) are reading this topic (1 Guests and 0 Anonymous Users)
0 Members:

|
Lo-Fi Version | Time is now: 18th May 2024 - 02:30 AM |
Invision Power Board
v9.1.4 © 2024 IPS, Inc.