|
|
|
Porsche, and the Porsche crest are registered trademarks of Dr. Ing. h.c. F. Porsche AG.
This site is not affiliated with Porsche in any way. Its only purpose is to provide an online forum for car enthusiasts. All other trademarks are property of their respective owners. |
|
|


| 914Gelb |
 May 18 2016, 04:55 AM May 18 2016, 04:55 AM
Post
#1
|
|
Member  Group: Members Posts: 107 Joined: 7-July 11 From: Vienna Member No.: 13,288 Region Association: Austria |
Hello Guys,
since many years I'm working on my 914-6 restoration project. Now I have finished most of the jobs like engine and transmission rebuild, electric harness, suspension ..., now it's time for the body work. Normally before I start I try to collect es much information to get a perfect result. My body was repaired in the past by unexperienced (IMG:style_emoticons/default/welder.gif) and now I have to fix this badly bodywork. See the pictures and look at the door clearence than you understand. The question is how can I fix this and if you had the same topic how was it fixed by you. Attached thumbnail(s) 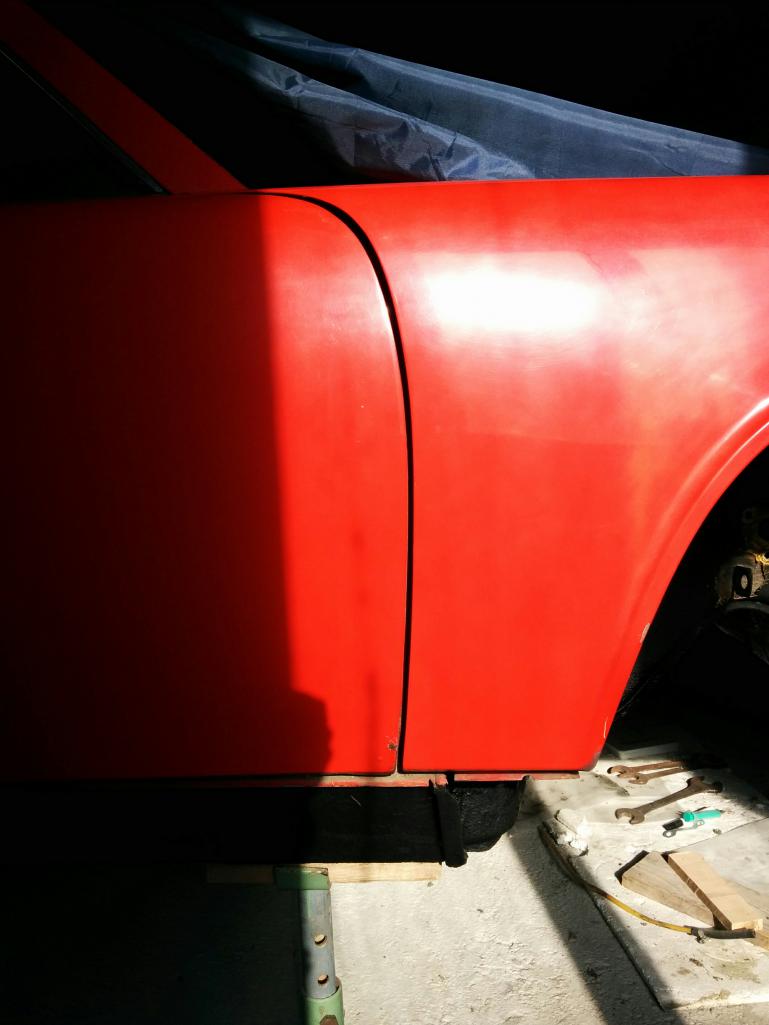 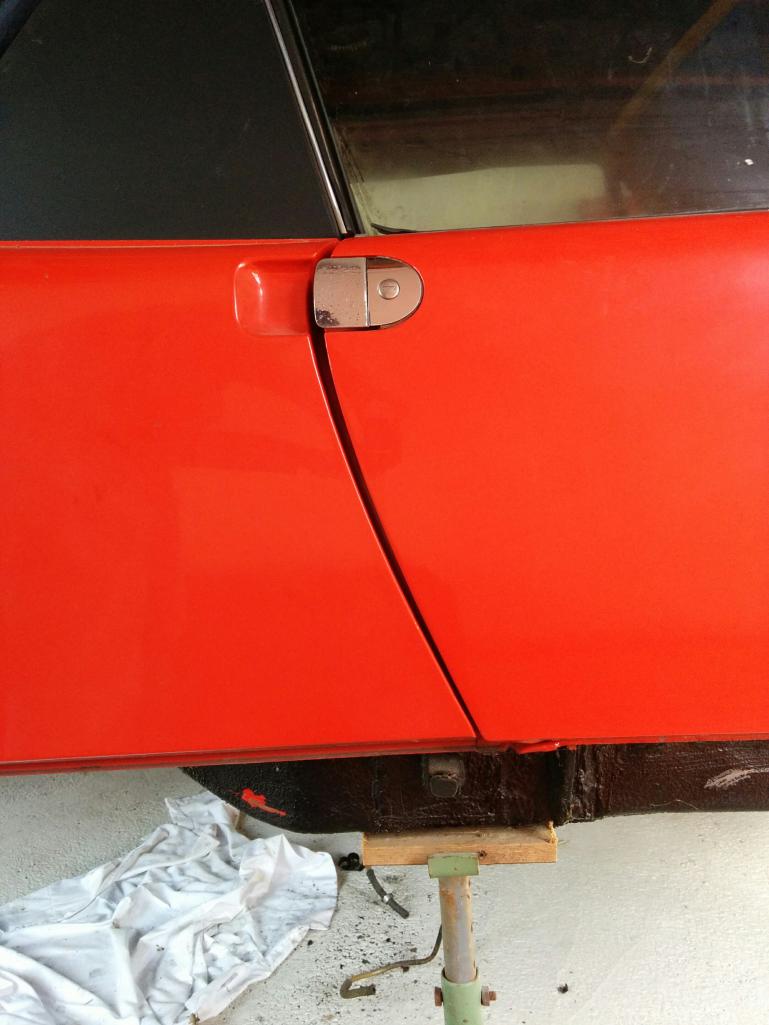
|
   |

 
|
Posts in this topic
914Gelb Any idea how to solve bad door clearence May 18 2016, 04:55 AM 914Gelb More pictures May 18 2016, 04:58 AM 914Gelb one more May 18 2016, 04:59 AM
 tomrev I think you will need to cut out the past patching... May 18 2016, 06:14 AM dlee6204 Unfortunately the only way to properly fix it is t... May 18 2016, 06:19 AM rgalla9146 It might not be as bad as you think.
I'd ... May 18 2016, 08:21 AM 914Gelb To roll the car and check the clearance is somethi... May 18 2016, 10:24 AM mbseto My longs look a lot like that. Previous owner wel... May 18 2016, 02:13 PM Cairo94507 If you feel the previous repairs were done poorly,... May 18 2016, 03:33 PM OU812 Allais, another sunflower yellow car covered in Re... May 18 2016, 06:31 PM cary Is a 914-6 conversion or the real deal? Makes a bi... May 18 2016, 08:08 PM rick 918-S Start by studying these dimensions.
http://www.91... May 18 2016, 09:01 PM 914Gelb Hello Cary, The car is a real 914-6, I never would... May 18 2016, 11:44 PM 914Gelb and more pictures May 18 2016, 11:47 PM 914Gelb my hand made cellete May 18 2016, 11:53 PM 914Gelb front trunk May 18 2016, 11:57 PM cary Nice, good luck on your project.
Your in good han... May 19 2016, 12:01 AM 914Gelb rear trunk May 19 2016, 12:03 AM 914Gelb right outer side May 19 2016, 12:06 AM 914Gelb again right side May 19 2016, 12:07 AM 914Gelb engine May 19 2016, 12:16 AM 914Gelb transmission, rebuild by my own, bought tools to a... May 19 2016, 12:20 AM 914Gelb pinion May 19 2016, 12:26 AM 914Gelb Before the rebuild, I'm sitting in the 914-6 May 19 2016, 12:36 AM sixnotfour looks like a pretty decent six, other than needing... May 19 2016, 05:54 AM Luke M
looks like a pretty decent six, other than needin... May 19 2016, 04:41 PM 914Gelb
[quote name='sixnotfour' post='2347054' date='May... May 20 2016, 12:13 AM 914Gelb Yes it was yellow, and after restoration it will b... May 19 2016, 06:19 AM rick 918-S After viewing the photos that car is not bad just ... May 19 2016, 06:48 AM Cairo94507 Yeah, that Six does not look bad at all. But unti... May 19 2016, 07:01 AM 914Gelb For the undercoating and Paint removal I decided t... May 19 2016, 08:56 AM worn
Nice tool but it is still a dirty long process.... May 24 2016, 10:22 AM 914Gelb
Nice tool but it is still a dirty long process... May 25 2016, 02:53 AM SixerJ Another cool 914-6 thread. Subscribed and looking ... May 19 2016, 12:44 PM sixnotfour
I know , But in the Long run it will be worth it... May 19 2016, 02:15 PM rick 918-S Wow! Those parts are Awesome!
May 20 2016, 07:01 AM cary I'm on my phone at WCR?
Is that product from M... May 20 2016, 08:10 AM sixnotfour
I'm on my phone at WCR?
Is that product from ... May 20 2016, 10:07 AM jd74914
For the undercoating and Paint removal I decided ... May 20 2016, 08:18 AM rick 918-S We need Pete to get a shipment from Mittlemotor so... May 20 2016, 08:45 AM sixnotfour
We need Pete to get a shipment from Mittlemotor s... May 20 2016, 09:49 AM 914Gelb
We need Pete to get a shipment from Mittlemotor s... May 20 2016, 09:53 AM sixnotfour
We need Pete to get a shipment from Mittlemotor ... May 20 2016, 10:10 AM cary Another $$$ factor to consider is f... May 20 2016, 10:10 AM 914Gelb
Another $$$ factor to consider is ... May 20 2016, 10:20 AM Luke M
Another $$$ factor to consider is... May 21 2016, 05:37 AM SixerJ Patrik at http://www.914er-teile.de carries those ... May 20 2016, 11:49 AM Luke M Ok, so I've called Mittlemotors and all I get ... May 24 2016, 07:55 AM 914Gelb
Ok, so I've called Mittlemotors and all I get... May 25 2016, 02:21 AM Luke M
[quote name='Luke M' post='2349656' date='May 24 ... May 25 2016, 06:46 AM 914Gelb After many months I can continue working on my 914... Jun 21 2017, 04:42 AM 914Gelb RE: Any idea how to solve bad door clearence Jun 21 2017, 04:45 AM 914Gelb Started removing rubber Jun 21 2017, 04:48 AM 914Gelb Here I found a small kink in the metal, 1st I was ... Jun 21 2017, 04:59 AM Cairo94507 I am glad to see this project moving along. :bee... Jun 21 2017, 06:10 AM Luke M Keep up the work and post lots of pics of the repa... Jun 21 2017, 06:36 AM 914Gelb no this is not the demage I mean see the picture I... Jun 21 2017, 06:49 AM bretth Maybe a previous owner was trying to improve tire ... Jun 21 2017, 07:46 AM cary Do you have some door braces ? Jun 21 2017, 08:17 AM 914Gelb Door braces are not installed, bevore I start well... Jun 21 2017, 11:14 PM flyer86d Looks like a nice car. You know, all of those prev... Jun 22 2017, 05:47 AM 914Gelb
Looks like a nice car. You know, all of those pre... Jun 22 2017, 06:08 AM 914Gelb I continued working on my 914-6. The next step was... Sep 19 2017, 11:28 PM 914Gelb RE: Any idea how to solve bad door clearence Sep 19 2017, 11:29 PM 914Gelb RE: Any idea how to solve bad door clearence Sep 19 2017, 11:30 PM 914Gelb RE: Any idea how to solve bad door clearence Sep 19 2017, 11:31 PM 914Gelb RE: Any idea how to solve bad door clearence Sep 19 2017, 11:33 PM 914Gelb :cheer:
It looks like the body of my car is now r... Sep 27 2023, 07:03 AM 914Gelb RE: Any idea how to solve bad door clearence Sep 27 2023, 07:05 AM 914Gelb RE: Any idea how to solve bad door clearence Sep 27 2023, 07:05 AM mepstein :trophy: Sep 27 2023, 07:06 AM 914Gelb RE: Any idea how to solve bad door clearence Sep 27 2023, 07:06 AM 914Gelb RE: Any idea how to solve bad door clearence Sep 27 2023, 07:07 AM 914Gelb RE: Any idea how to solve bad door clearence Sep 27 2023, 07:09 AM 914Gelb RE: Any idea how to solve bad door clearence Sep 27 2023, 07:11 AM 914Gelb RE: Any idea how to solve bad door clearence Sep 27 2023, 07:14 AM burton73
You are doing a super job on your 6 but I woul... Sep 27 2023, 03:52 PM rhodyguy WOW! Sep 27 2023, 07:18 AM 914Gelb RE: Any idea how to solve bad door clearence Sep 27 2023, 07:19 AM 914Gelb RE: Any idea how to solve bad door clearence Sep 27 2023, 07:19 AM mlindner Wow, that is a great job. will be fun to see it al... Sep 27 2023, 07:24 AM 914Gelb All the pain job you see I made by my own, covers ... Sep 27 2023, 07:29 AM Cairo94507 Very nice work indeed; congratulations on getting ... Sep 27 2023, 08:43 AM porschetub Wow nice work ,it is a real milestone to have in p... Sep 28 2023, 01:15 PM 930cabman Great save, many guys would have bailed, you must ... Sep 28 2023, 01:50 PM 914Gelb Slowly I proceed with the rebuild of my car, there... Sep 24 2024, 11:29 PM 914Gelb
The paint is single stage from glasuit, look at... Sep 24 2024, 11:32 PM 914Gelb RE: Any idea how to solve bad door clearence Sep 24 2024, 11:34 PM 914Gelb RE: Any idea how to solve bad door clearence Sep 24 2024, 11:35 PM 914Gelb RE: Any idea how to solve bad door clearence Sep 24 2024, 11:37 PM 914Gelb RE: Any idea how to solve bad door clearence Sep 24 2024, 11:38 PM 914Gelb RE: Any idea how to solve bad door clearence Sep 24 2024, 11:40 PM 914Gelb RE: Any idea how to solve bad door clearence Sep 24 2024, 11:41 PM 914Gelb RE: Any idea how to solve bad door clearence Sep 24 2024, 11:43 PM 914Gelb RE: Any idea how to solve bad door clearence Sep 24 2024, 11:45 PM 914Gelb RE: Any idea how to solve bad door clearence Sep 24 2024, 11:46 PM rick 918-S Very nice result. Your persistence paid off. :firs... Sep 25 2024, 05:59 AM 930cabman
Very nice result. Your persistence paid off. :fir... Sep 25 2024, 02:08 PM Cairo94507 :popcorn: :beer2: Sep 25 2024, 07:49 AM Root_Werks Wow, this project has come a long way! Lookin... Sep 25 2024, 03:54 PM
tomrev I think you will need to cut out the past patching... May 18 2016, 06:14 AM dlee6204 Unfortunately the only way to properly fix it is t... May 18 2016, 06:19 AM rgalla9146 It might not be as bad as you think.
I'd ... May 18 2016, 08:21 AM 914Gelb To roll the car and check the clearance is somethi... May 18 2016, 10:24 AM mbseto My longs look a lot like that. Previous owner wel... May 18 2016, 02:13 PM Cairo94507 If you feel the previous repairs were done poorly,... May 18 2016, 03:33 PM OU812 Allais, another sunflower yellow car covered in Re... May 18 2016, 06:31 PM cary Is a 914-6 conversion or the real deal? Makes a bi... May 18 2016, 08:08 PM rick 918-S Start by studying these dimensions.
http://www.91... May 18 2016, 09:01 PM 914Gelb Hello Cary, The car is a real 914-6, I never would... May 18 2016, 11:44 PM 914Gelb and more pictures May 18 2016, 11:47 PM 914Gelb my hand made cellete May 18 2016, 11:53 PM 914Gelb front trunk May 18 2016, 11:57 PM cary Nice, good luck on your project.
Your in good han... May 19 2016, 12:01 AM 914Gelb rear trunk May 19 2016, 12:03 AM 914Gelb right outer side May 19 2016, 12:06 AM 914Gelb again right side May 19 2016, 12:07 AM 914Gelb engine May 19 2016, 12:16 AM 914Gelb transmission, rebuild by my own, bought tools to a... May 19 2016, 12:20 AM 914Gelb pinion May 19 2016, 12:26 AM 914Gelb Before the rebuild, I'm sitting in the 914-6 May 19 2016, 12:36 AM sixnotfour looks like a pretty decent six, other than needing... May 19 2016, 05:54 AM Luke M
looks like a pretty decent six, other than needin... May 19 2016, 04:41 PM 914Gelb
[quote name='sixnotfour' post='2347054' date='May... May 20 2016, 12:13 AM 914Gelb Yes it was yellow, and after restoration it will b... May 19 2016, 06:19 AM rick 918-S After viewing the photos that car is not bad just ... May 19 2016, 06:48 AM Cairo94507 Yeah, that Six does not look bad at all. But unti... May 19 2016, 07:01 AM 914Gelb For the undercoating and Paint removal I decided t... May 19 2016, 08:56 AM worn
Nice tool but it is still a dirty long process.... May 24 2016, 10:22 AM 914Gelb
Nice tool but it is still a dirty long process... May 25 2016, 02:53 AM SixerJ Another cool 914-6 thread. Subscribed and looking ... May 19 2016, 12:44 PM sixnotfour
I know , But in the Long run it will be worth it... May 19 2016, 02:15 PM rick 918-S Wow! Those parts are Awesome!
May 20 2016, 07:01 AM cary I'm on my phone at WCR?
Is that product from M... May 20 2016, 08:10 AM sixnotfour
I'm on my phone at WCR?
Is that product from ... May 20 2016, 10:07 AM jd74914
For the undercoating and Paint removal I decided ... May 20 2016, 08:18 AM rick 918-S We need Pete to get a shipment from Mittlemotor so... May 20 2016, 08:45 AM sixnotfour
We need Pete to get a shipment from Mittlemotor s... May 20 2016, 09:49 AM 914Gelb
We need Pete to get a shipment from Mittlemotor s... May 20 2016, 09:53 AM sixnotfour
We need Pete to get a shipment from Mittlemotor ... May 20 2016, 10:10 AM cary Another $$$ factor to consider is f... May 20 2016, 10:10 AM 914Gelb
Another $$$ factor to consider is ... May 20 2016, 10:20 AM Luke M
Another $$$ factor to consider is... May 21 2016, 05:37 AM SixerJ Patrik at http://www.914er-teile.de carries those ... May 20 2016, 11:49 AM Luke M Ok, so I've called Mittlemotors and all I get ... May 24 2016, 07:55 AM 914Gelb
Ok, so I've called Mittlemotors and all I get... May 25 2016, 02:21 AM Luke M
[quote name='Luke M' post='2349656' date='May 24 ... May 25 2016, 06:46 AM 914Gelb After many months I can continue working on my 914... Jun 21 2017, 04:42 AM 914Gelb RE: Any idea how to solve bad door clearence Jun 21 2017, 04:45 AM 914Gelb Started removing rubber Jun 21 2017, 04:48 AM 914Gelb Here I found a small kink in the metal, 1st I was ... Jun 21 2017, 04:59 AM Cairo94507 I am glad to see this project moving along. :bee... Jun 21 2017, 06:10 AM Luke M Keep up the work and post lots of pics of the repa... Jun 21 2017, 06:36 AM 914Gelb no this is not the demage I mean see the picture I... Jun 21 2017, 06:49 AM bretth Maybe a previous owner was trying to improve tire ... Jun 21 2017, 07:46 AM cary Do you have some door braces ? Jun 21 2017, 08:17 AM 914Gelb Door braces are not installed, bevore I start well... Jun 21 2017, 11:14 PM flyer86d Looks like a nice car. You know, all of those prev... Jun 22 2017, 05:47 AM 914Gelb
Looks like a nice car. You know, all of those pre... Jun 22 2017, 06:08 AM 914Gelb I continued working on my 914-6. The next step was... Sep 19 2017, 11:28 PM 914Gelb RE: Any idea how to solve bad door clearence Sep 19 2017, 11:29 PM 914Gelb RE: Any idea how to solve bad door clearence Sep 19 2017, 11:30 PM 914Gelb RE: Any idea how to solve bad door clearence Sep 19 2017, 11:31 PM 914Gelb RE: Any idea how to solve bad door clearence Sep 19 2017, 11:33 PM 914Gelb :cheer:
It looks like the body of my car is now r... Sep 27 2023, 07:03 AM 914Gelb RE: Any idea how to solve bad door clearence Sep 27 2023, 07:05 AM 914Gelb RE: Any idea how to solve bad door clearence Sep 27 2023, 07:05 AM mepstein :trophy: Sep 27 2023, 07:06 AM 914Gelb RE: Any idea how to solve bad door clearence Sep 27 2023, 07:06 AM 914Gelb RE: Any idea how to solve bad door clearence Sep 27 2023, 07:07 AM 914Gelb RE: Any idea how to solve bad door clearence Sep 27 2023, 07:09 AM 914Gelb RE: Any idea how to solve bad door clearence Sep 27 2023, 07:11 AM 914Gelb RE: Any idea how to solve bad door clearence Sep 27 2023, 07:14 AM burton73
You are doing a super job on your 6 but I woul... Sep 27 2023, 03:52 PM rhodyguy WOW! Sep 27 2023, 07:18 AM 914Gelb RE: Any idea how to solve bad door clearence Sep 27 2023, 07:19 AM 914Gelb RE: Any idea how to solve bad door clearence Sep 27 2023, 07:19 AM mlindner Wow, that is a great job. will be fun to see it al... Sep 27 2023, 07:24 AM 914Gelb All the pain job you see I made by my own, covers ... Sep 27 2023, 07:29 AM Cairo94507 Very nice work indeed; congratulations on getting ... Sep 27 2023, 08:43 AM porschetub Wow nice work ,it is a real milestone to have in p... Sep 28 2023, 01:15 PM 930cabman Great save, many guys would have bailed, you must ... Sep 28 2023, 01:50 PM 914Gelb Slowly I proceed with the rebuild of my car, there... Sep 24 2024, 11:29 PM 914Gelb
The paint is single stage from glasuit, look at... Sep 24 2024, 11:32 PM 914Gelb RE: Any idea how to solve bad door clearence Sep 24 2024, 11:34 PM 914Gelb RE: Any idea how to solve bad door clearence Sep 24 2024, 11:35 PM 914Gelb RE: Any idea how to solve bad door clearence Sep 24 2024, 11:37 PM 914Gelb RE: Any idea how to solve bad door clearence Sep 24 2024, 11:38 PM 914Gelb RE: Any idea how to solve bad door clearence Sep 24 2024, 11:40 PM 914Gelb RE: Any idea how to solve bad door clearence Sep 24 2024, 11:41 PM 914Gelb RE: Any idea how to solve bad door clearence Sep 24 2024, 11:43 PM 914Gelb RE: Any idea how to solve bad door clearence Sep 24 2024, 11:45 PM 914Gelb RE: Any idea how to solve bad door clearence Sep 24 2024, 11:46 PM rick 918-S Very nice result. Your persistence paid off. :firs... Sep 25 2024, 05:59 AM 930cabman
Very nice result. Your persistence paid off. :fir... Sep 25 2024, 02:08 PM Cairo94507 :popcorn: :beer2: Sep 25 2024, 07:49 AM Root_Werks Wow, this project has come a long way! Lookin... Sep 25 2024, 03:54 PM  |
3 User(s) are reading this topic (3 Guests and 0 Anonymous Users)
0 Members:

|
Lo-Fi Version | Time is now: 14th July 2026 - 08:01 AM |
Invision Power Board
v9.1.4 © 2026 IPS, Inc.