|
|
|
Porsche, and the Porsche crest are registered trademarks of Dr. Ing. h.c. F. Porsche AG.
This site is not affiliated with Porsche in any way. Its only purpose is to provide an online forum for car enthusiasts. All other trademarks are property of their respective owners. |
|
|

  |

| doug_b_928 |
 Sep 18 2016, 10:31 AM Sep 18 2016, 10:31 AM
Post
#41
|
|
Senior Member  Group: Members Posts: 689 Joined: 17-January 13 From: Winnipeg Member No.: 15,382 Region Association: Canada |
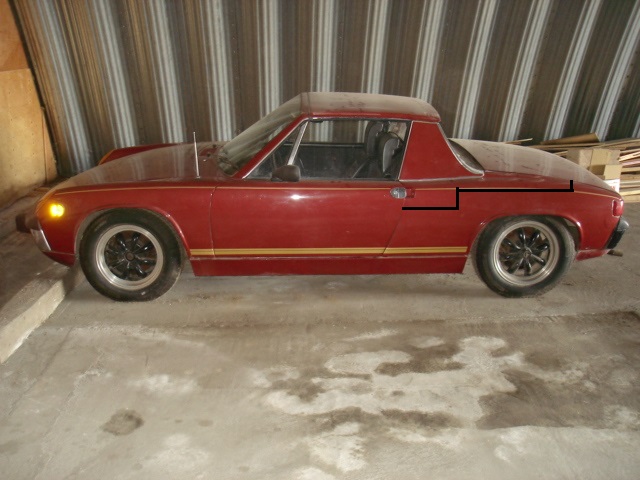
Here's what I'm thinking (see pic below). Given that I don't yet have replacement fenders and so don't know what I'll be working with, would it be wise to cut on the line indicated in the pic in case I end up having to graft in new fenders rather than a full replacement? Is there a better place to cut?
 |
   |

 
|
| doug_b_928 |
Oct 23 2016, 12:23 PM
Post
#42
|
|
Senior Member Group: Members Posts: 689 Joined: 17-January 13 From: Winnipeg Member No.: 15,382 Region Association: Canada |
Yesterday I spent the day at the farm removing the rear quarters and tail section as per Jeff's advice. I'm still puzzled as to whether the left side is low, or the right side is high, or both. Here are the data:
The bench is true, so I've added rectangles relative to the bench to show where the car is out of whack. As shown in the pic below, the only place where it is out is at the last foot of the inner fenders. Either the left side is pushed down or the right side is pushed up. But this does not extend very far into the chassis. The pinch welds on the bottom of the rails are the same height from the bench side-to-side. 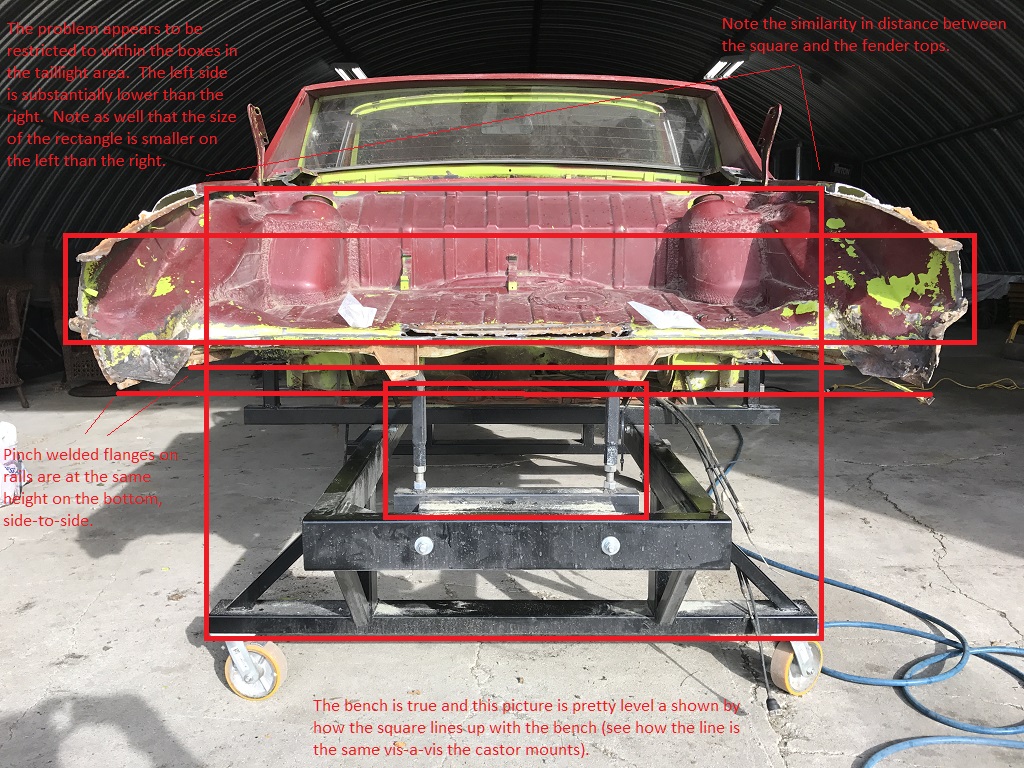 The tail was welded in crooked due to the difference in height side to side. It was also not equa-distant in its placement side to side. On the left side it appeared to be but welded to the fender and was to the right of the inner fender, so I was able to simply cut vertically to free the fender from it without damaging the tail panel. This could suggest that the left quarter is pushed out but I think the trunk opening was only 1cm narrow at the back. I supposed it could also be that the right quarter is pushed put as well. 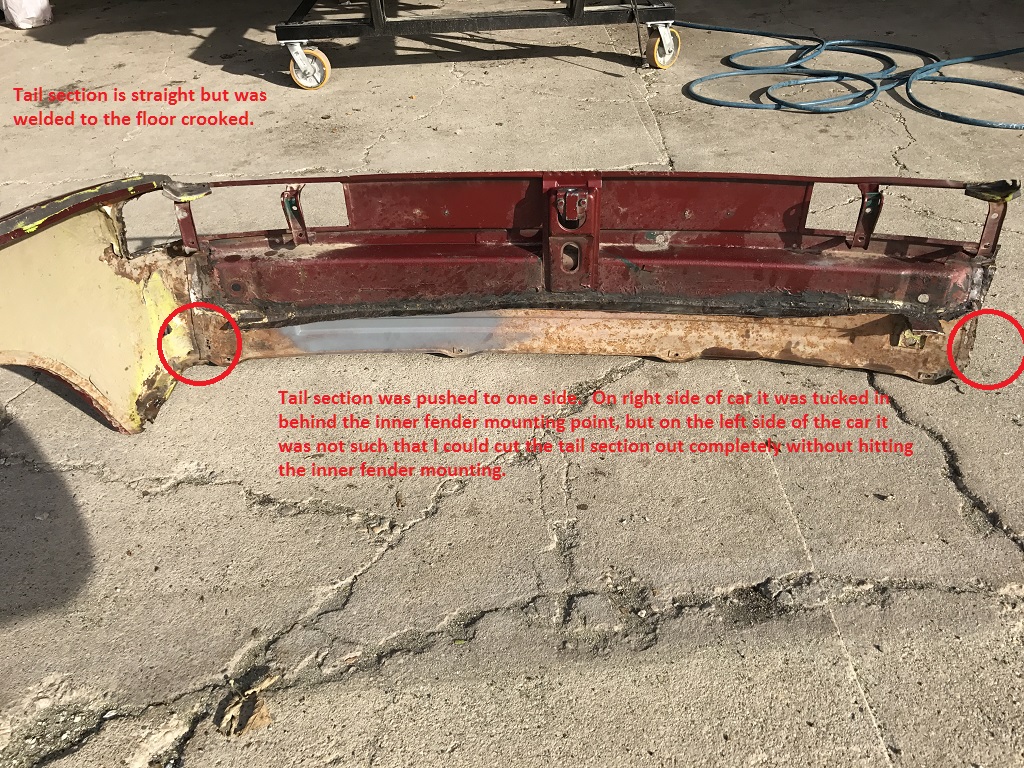 The right inner quarter seems less damaged than the left, though there is a piece missing from it (when compared to the left side; not referring to the gaping rust holes but rather the pice where the tail section welds to just below the taillight area). Again, the point indicated in the pic below is the same height from the bench on both sides. 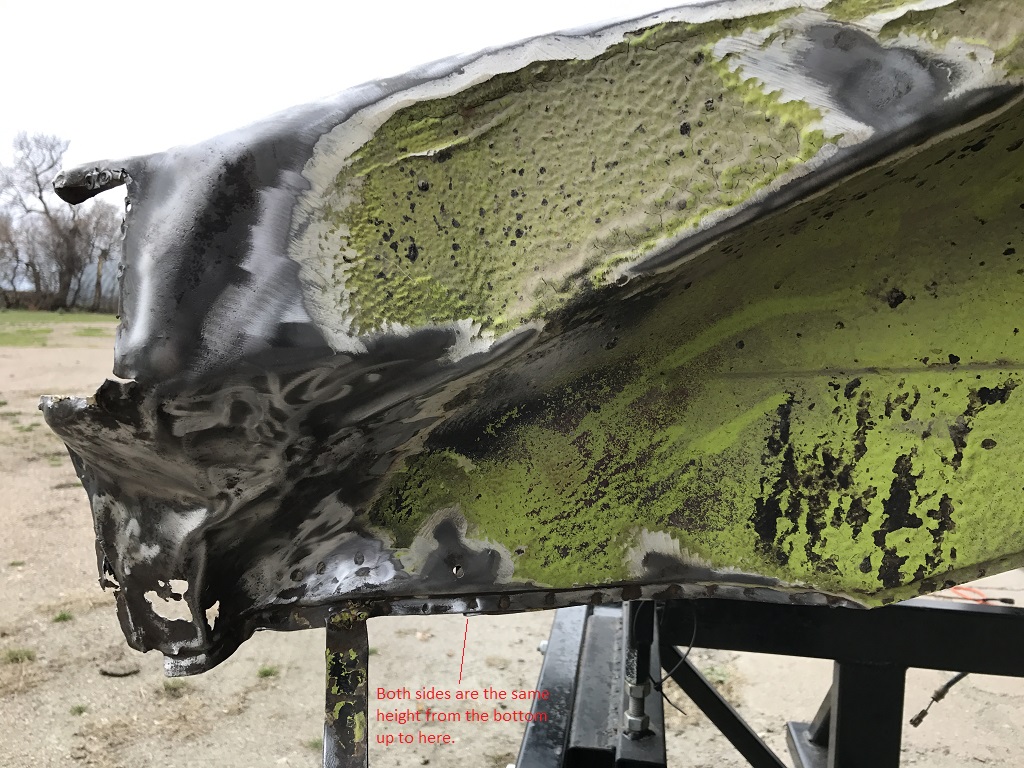 The left inner fender has more damage. It is pushed in and there is a bigger bulge in the pinch weld compared to the right side. 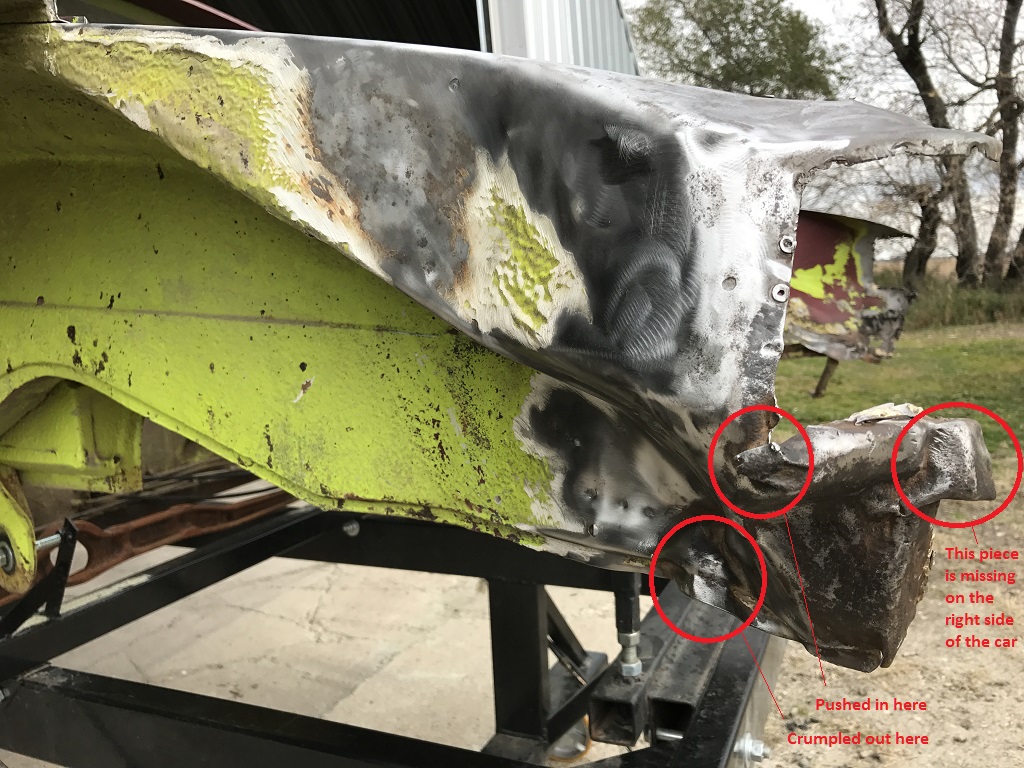 Aside from the damage, the overall shape of the rails/pinch weld areas looks similar side-to-side. 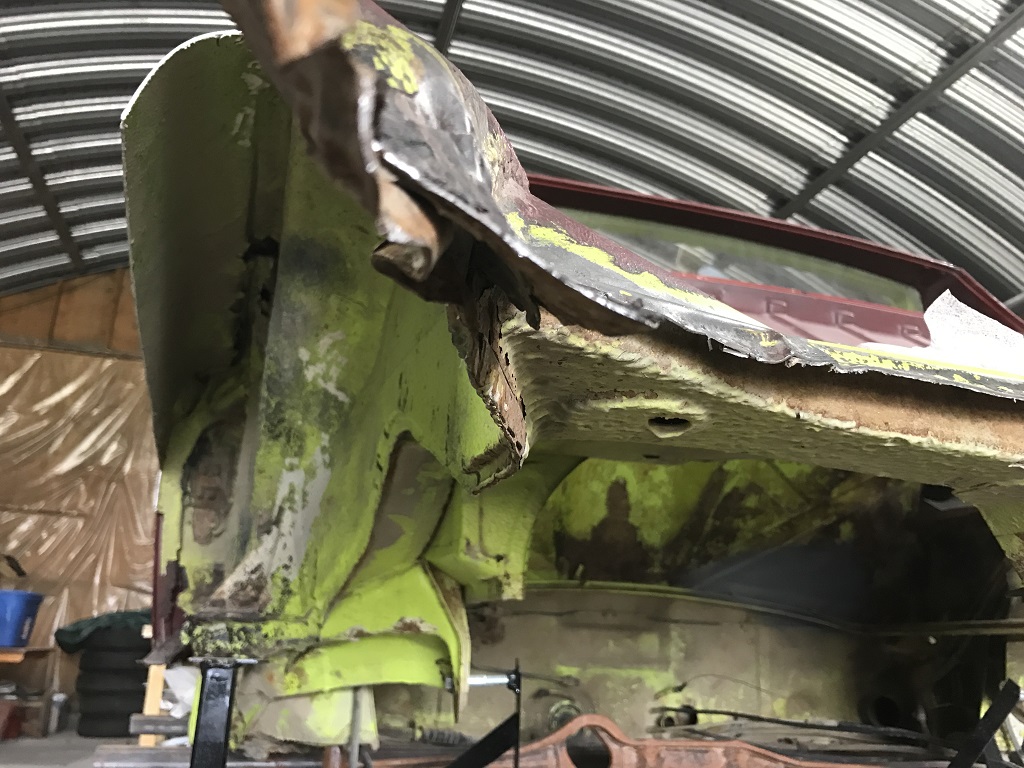 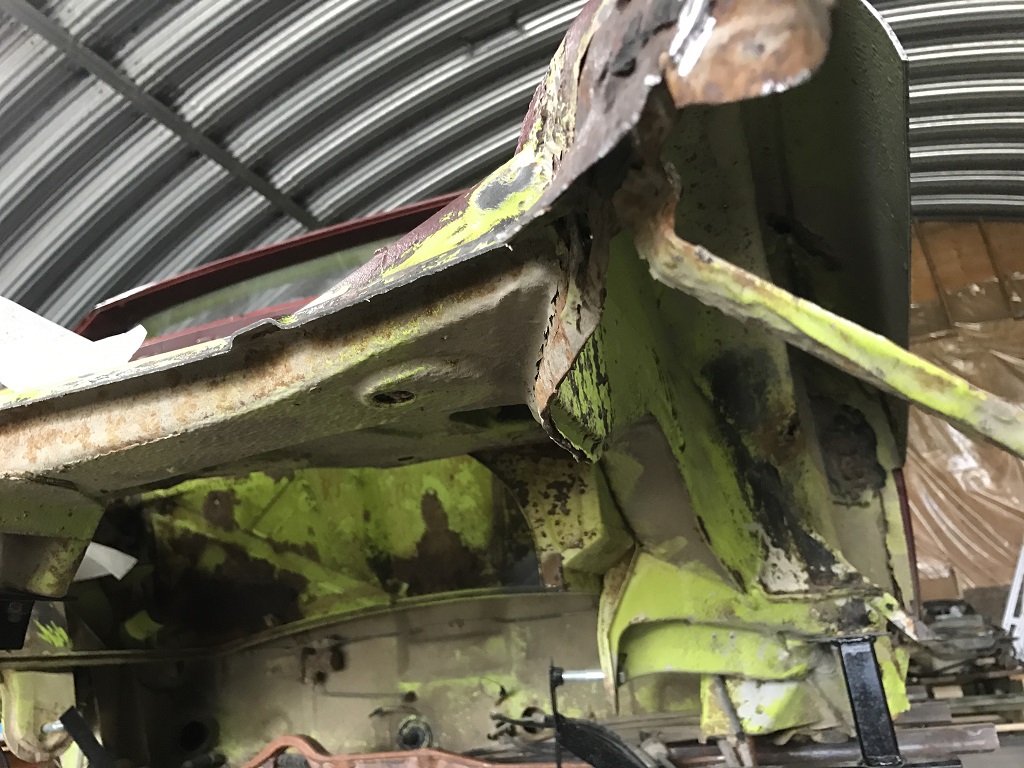 So, with that background, the question becomes, how do I figure out what needs to be adjusted? Should I mock up with new quarters as well as new trunk lid, and the tail section and just move stuff until it all fits straight? |
|
|
|
| rick 918-S |
Oct 24 2016, 08:09 AM
Post
#43
|
|
Hey nice rack! -Celette Group: Members Posts: 20,403 Joined: 30-December 02 From: Now in Superior WI Member No.: 43 Region Association: Northstar Region |
I agree those out panels had to go. Here's a thought. Give me the height of your stanchions at the transaxle mount. I have my 6 on the Celette. I can give you the height of the rear bumper bolt holes. You can build an extension use the rear panel to guide the reinstallation of the rear floor and inner panels.
Also I just purchased a car from Camp that is the perfect donor for a rear clip for you. Let me know if you need it and we can work something out. The car is actually too nice to cut up. looks like it just needs a rear floor and lower bulkhead. But hey I bought it for the front clip. |
|
|
|
| doug_b_928 |
Oct 24 2016, 09:35 AM
Post
#44
|
|
Senior Member Group: Members Posts: 689 Joined: 17-January 13 From: Winnipeg Member No.: 15,382 Region Association: Canada |
Hi Rick. Thanks for chiming in. Great idea and terrific you have a rear clip. I'm very interested! Just at work but will email later today.
|
|
|
|
| Cairo94507 |
Oct 25 2016, 08:12 AM
Post
#45
|
|
Michael Group: Members Posts: 9,703 Joined: 1-November 08 From: Auburn, CA Member No.: 9,712 Region Association: Northern California |
This is turning into a terrific thread. I like the rear clip idea as that is going to likely be the easiest way to get this 'teener straight and right for the OP. Rick 918-S is just a great guy to step up and offer his expertise, wisdom and oversight.
|
 |
|
| altitude411 |
Oct 25 2016, 08:16 AM
Post
#46
|
|
I drove my 6 into a tree Group: Members Posts: 1,306 Joined: 21-September 14 From: montana Member No.: 17,932 Region Association: Rocky Mountains |
Yeah Rick (IMG:style_emoticons/default/first.gif)
Another of the long list of selfless, helpful, wonderful people that make this place so fantastic! (IMG:style_emoticons/default/aktion035.gif) |
|
|
|
| doug_b_928 |
Oct 25 2016, 08:44 AM
Post
#47
|
|
Senior Member Group: Members Posts: 689 Joined: 17-January 13 From: Winnipeg Member No.: 15,382 Region Association: Canada |
^^^^ +914
|
|
|
|
| mbseto |
Oct 25 2016, 12:11 PM
Post
#48
|
|
Senior Member Group: Members Posts: 1,253 Joined: 6-August 14 From: Cincy Member No.: 17,743 Region Association: North East States |
This thread is quite the clinic.
|
|
|
|
| Jamie |
Oct 25 2016, 12:19 PM
Post
#49
|
|
Senior Member Group: Members Posts: 1,025 Joined: 13-October 04 From: Georgetown,KY Member No.: 2,939 Region Association: South East States |
I continue to be amazed at the testicular fortitude and skills of members who can seemingly cut these rusty rollers apart and put them back together! (IMG:style_emoticons/default/welder.gif)
|
|
|
|
| doug_b_928 |
Oct 25 2016, 01:39 PM
Post
#50
|
|
Senior Member Group: Members Posts: 689 Joined: 17-January 13 From: Winnipeg Member No.: 15,382 Region Association: Canada |
Well...I can handle the cutting part, but putting back together remains to be seen. Rick's idea of taking measurements and building a bracket to line up the dog bone holes in the tail piece as a guide is genius. I'm trying to ply him (with free accommodations, my mom's delicious home cooking, and, of course, payment) to come up in the Spring with the rear clip and spend a couple of days helping me do the straightening.
|
|
|
|
| doug_b_928 |
May 23 2017, 09:06 PM
Post
#51
|
|
Senior Member Group: Members Posts: 689 Joined: 17-January 13 From: Winnipeg Member No.: 15,382 Region Association: Canada |
I've finally had some time to work on this (IMG:style_emoticons/default/sawzall-smiley.gif) (It took a lot of planning and thinking; even waking up in the middle of the night designing tools to do the job). I think I have the car straight. I'll know better once I get the donor quarters and tail section from the shell I'm getting from Rick.
I made a jig out of threaded rod and couplers. I made it so that I can bolt it to, or remove it from, the bench attachment that supports the rear of the car. Once I had it made, I unbolted the attachment that supports the rear of the car and bolted it to the trans mounts of the another shell that a fellow 914World member has in the city (Many thanks to 914World member Krank!). Then I set the jig per the shell. Then re-installed the jig on my bench. 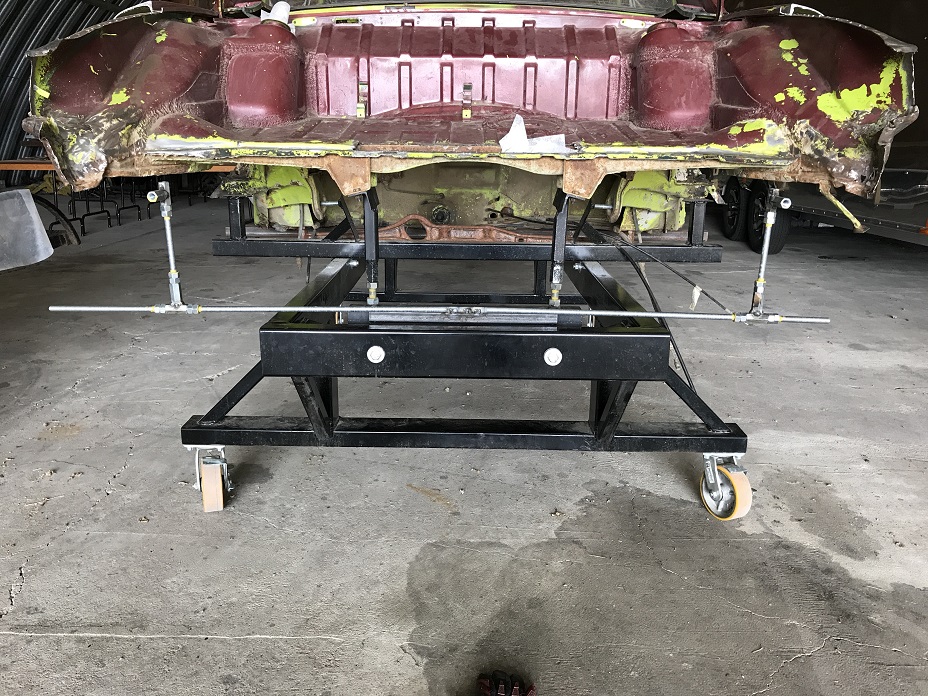 I should have used 5/8' threaded rod so it would be much less flexible and more precise, but it served the purpose for me to show me where my car was off. As you can see by looking at the tail section, which is set by the jig and suspended by a rack that I made (I'll also use it for hanging parts to prime and paint), the right side is correct and the left side was low (see how the tail light area is 1.25" low on the left; also note how the tail section is straight relative to the inside of the trunk). 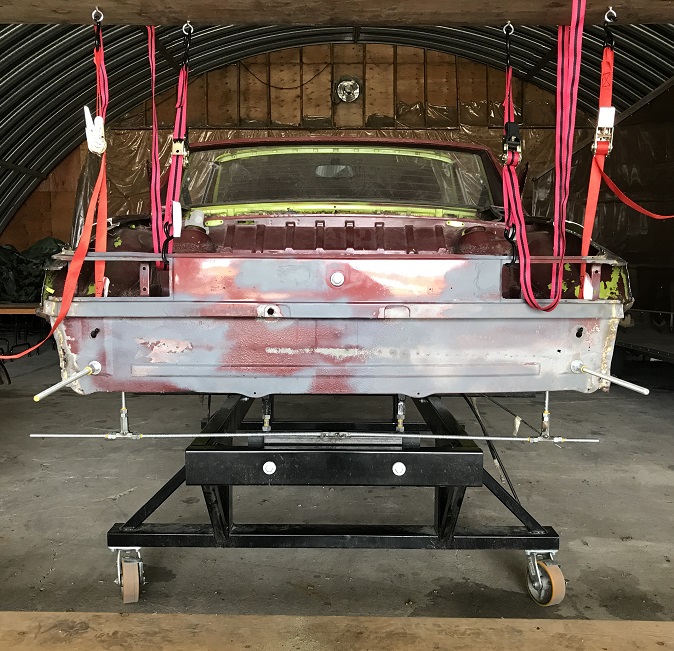 So, time to do some bending. I had to make a hold down to counter the force of pushing up the left rear. I used vise-grip pliers, with the adapter from my slide hammer, and made a receiver for the chain hook out of a large bolt with the correct fine threads that the slide hammer has and two washers welded to the bolt and to each other. Then chained and anchored to an existing anchor in the floor. It worked perfectly. I marked measurements on the tops of the inner fenders based on distance from the trunk seal flange at the front of the trunk where it meets the inner fender on each side. I then used a straight piece of metal with a plum bob hanging off of each end, set the piece of metal on a given measurement on both sides, and measured from the piece of metal down to a straight bar resting on the bench. That way I could check the measurement of each side relative to the true bench. 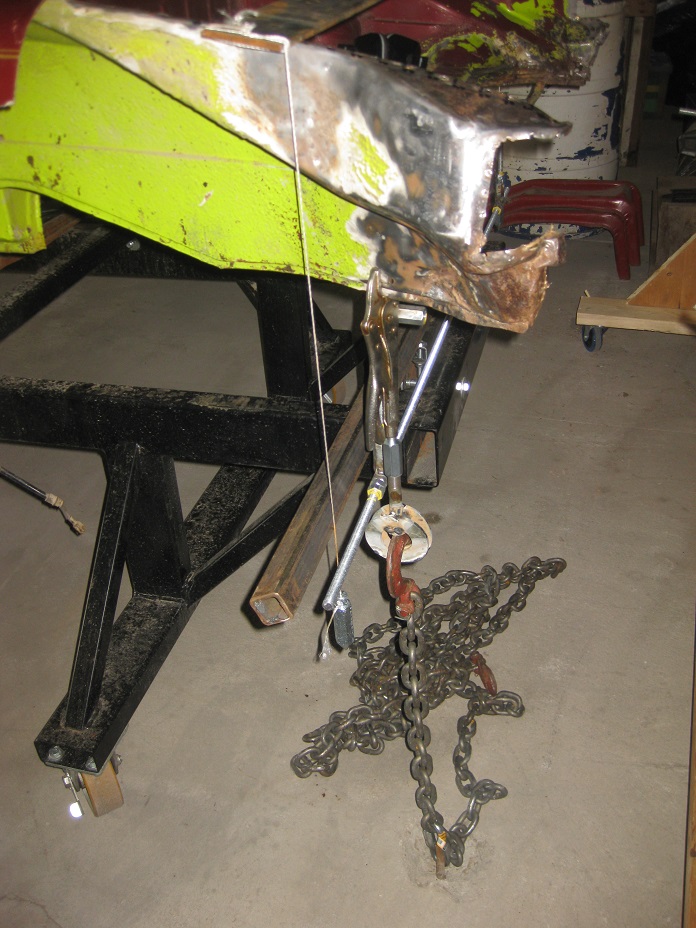 Then came the porta power. 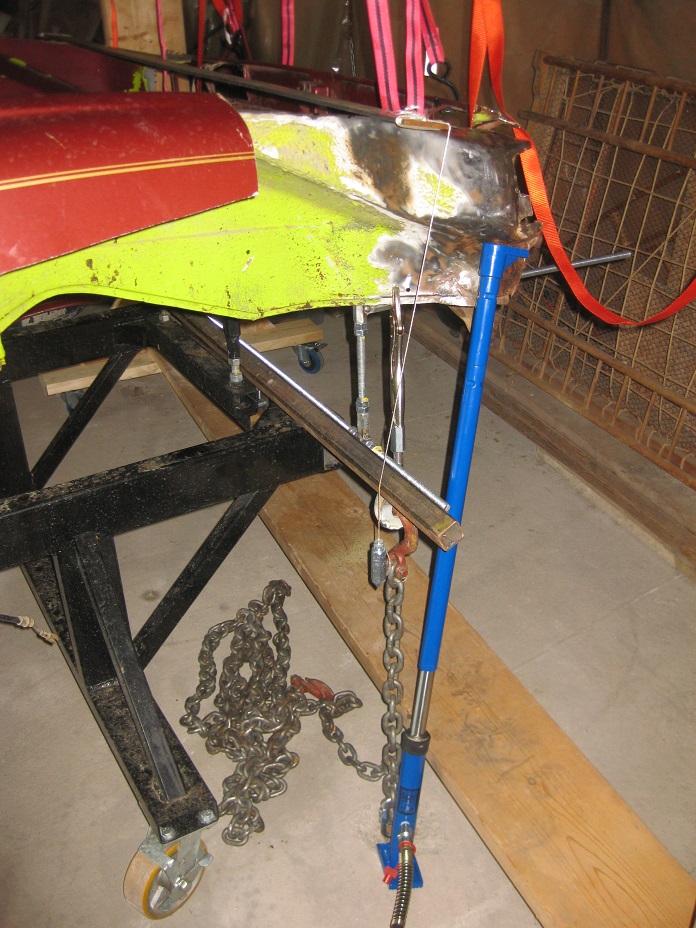 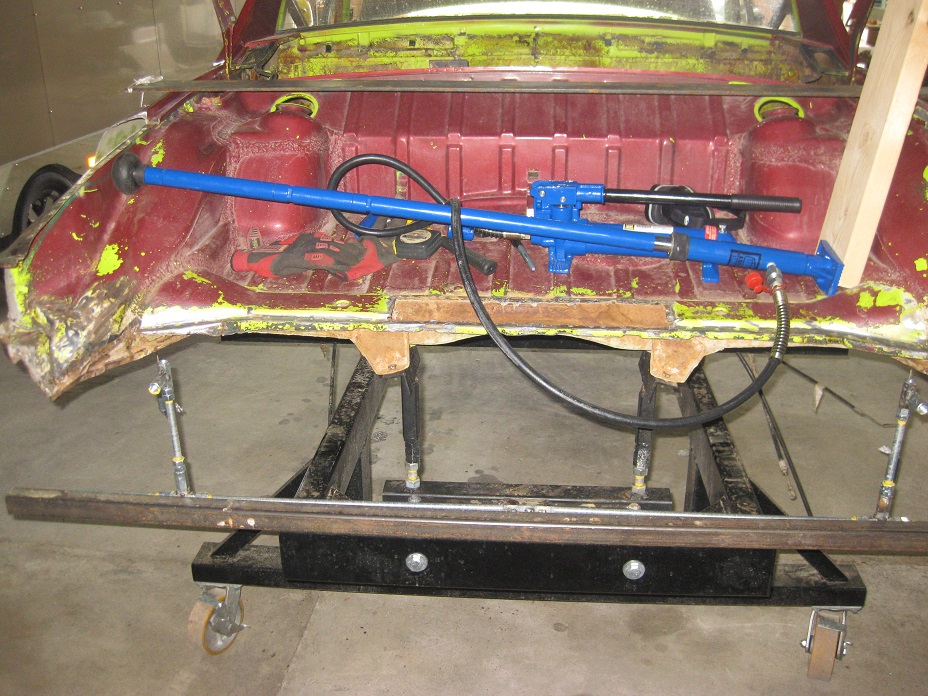 The car is now straight. I put some tape on it to assist with seeing some of the lines, but the tape is sagging. This pic is not perfectly square, but it's pretty close. As you can see, everything looks pretty good relative to the bench. 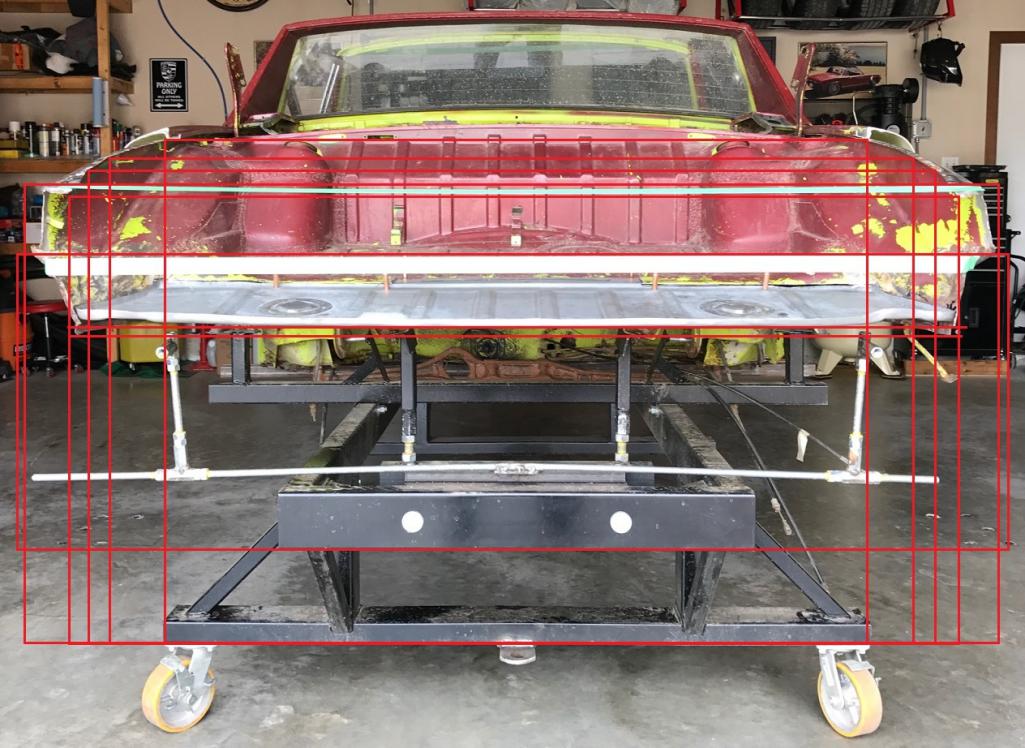 Finished off with some hammer and dolly work to smooth out the crash damage. Before straightening 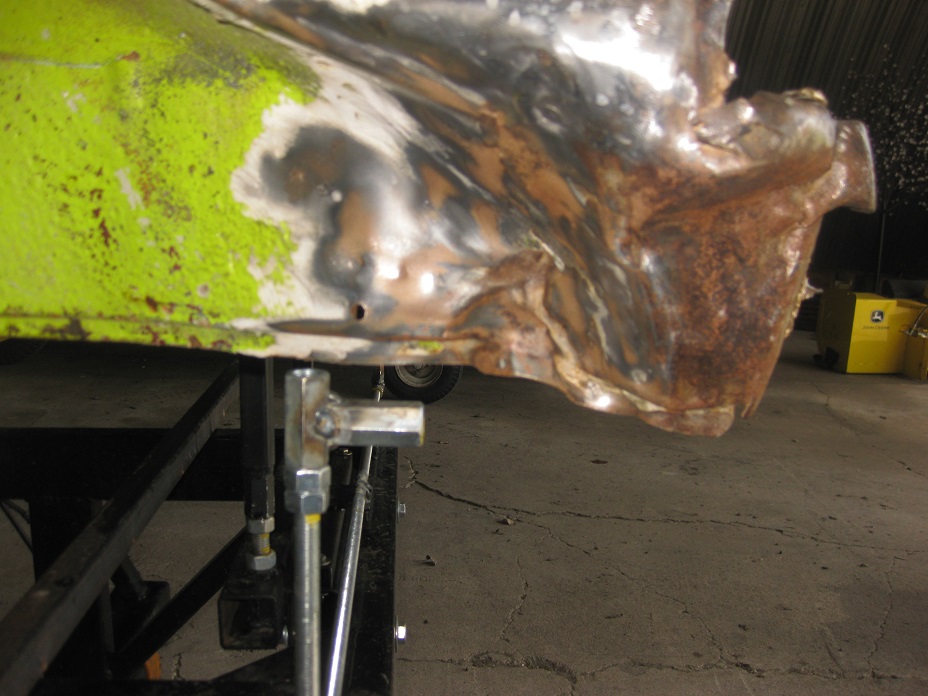 After 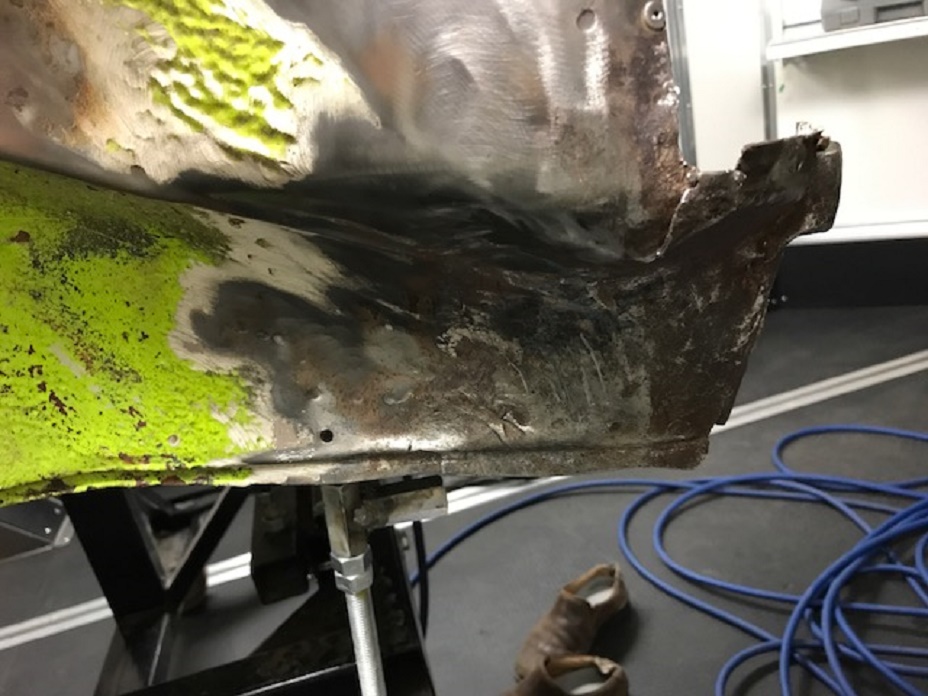 I'm not going to weld the crack etc. because there will undoubtedly be some adjustment needed once I get the new quarters (I just hope I don't need to make any major adjustments again). Overall, for my first attempt at doing something like this I'm pleased with the result. Now that this is done I have to undo some of the poorly done repairs from more than 33 years ago before I can start the undoubtedly long process of making my own rust repairs. |
|
|
|
| 76-914 |
May 24 2017, 07:47 AM
Post
#52
|
|
Repeat Offender & Resident Subaru Antagonist Group: Members Posts: 13,483 Joined: 23-January 09 From: Temecula, CA Member No.: 9,964 Region Association: Southern California |
(IMG:style_emoticons/default/thumb3d.gif) This turned out to be quite the project. Nice job! (IMG:style_emoticons/default/beerchug.gif)
|
|
|
|
| doug_b_928 |
May 24 2017, 09:38 AM
Post
#53
|
|
Senior Member Group: Members Posts: 689 Joined: 17-January 13 From: Winnipeg Member No.: 15,382 Region Association: Canada |
Thanks very much (IMG:style_emoticons/default/beer3.gif)
|
|
|
|
| rick 918-S |
May 26 2017, 03:54 AM
Post
#54
|
|
Hey nice rack! -Celette Group: Members Posts: 20,403 Joined: 30-December 02 From: Now in Superior WI Member No.: 43 Region Association: Northstar Region |
Looks like your on track.
|
|
|
|
| doug_b_928 |
May 26 2017, 04:46 AM
Post
#55
|
|
Senior Member Group: Members Posts: 689 Joined: 17-January 13 From: Winnipeg Member No.: 15,382 Region Association: Canada |
Thanks very much, Rick. Your sage advice has been important to getting this far. Your idea to locate the tail section with the bumper mount holes was brilliant!
|
|
|
|
| defianty |
May 26 2017, 05:31 AM
Post
#56
|
|
Senior Member Group: Members Posts: 659 Joined: 9-August 06 From: Essex, UK Member No.: 6,621 Region Association: None |
Well done! Great work.
|
|
|
|
| doug_b_928 |
Jun 24 2019, 03:12 PM
Post
#57
|
|
Senior Member Group: Members Posts: 689 Joined: 17-January 13 From: Winnipeg Member No.: 15,382 Region Association: Canada |
I spent the weekend at the farm and finally had a chance to cut the portions of the quarters and tail section from the parts car and do an initial fit onto my car. Here is the parts car before cutting the quarters:
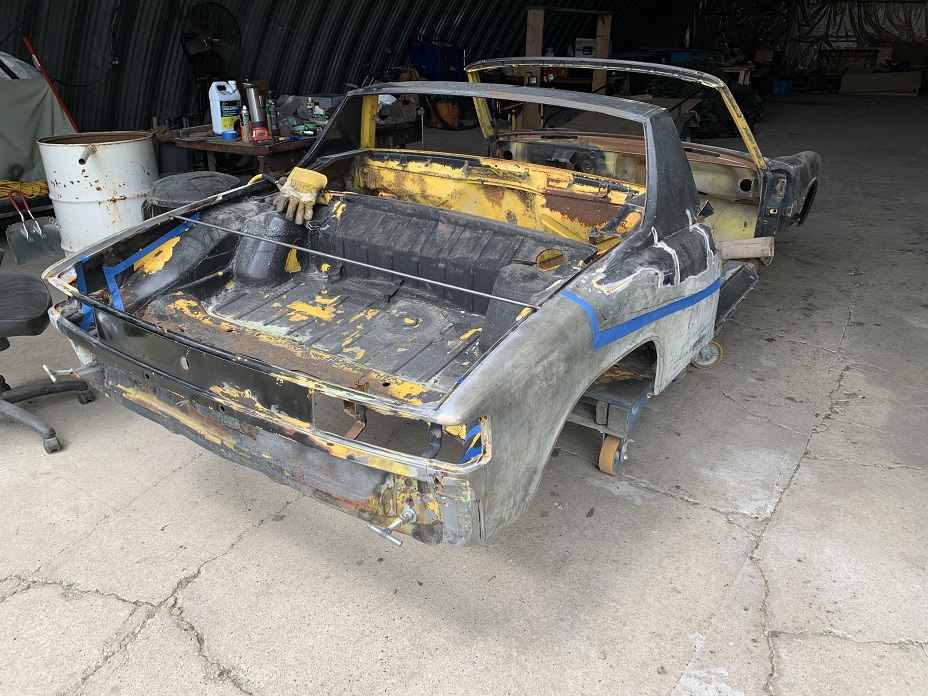 And after removal: 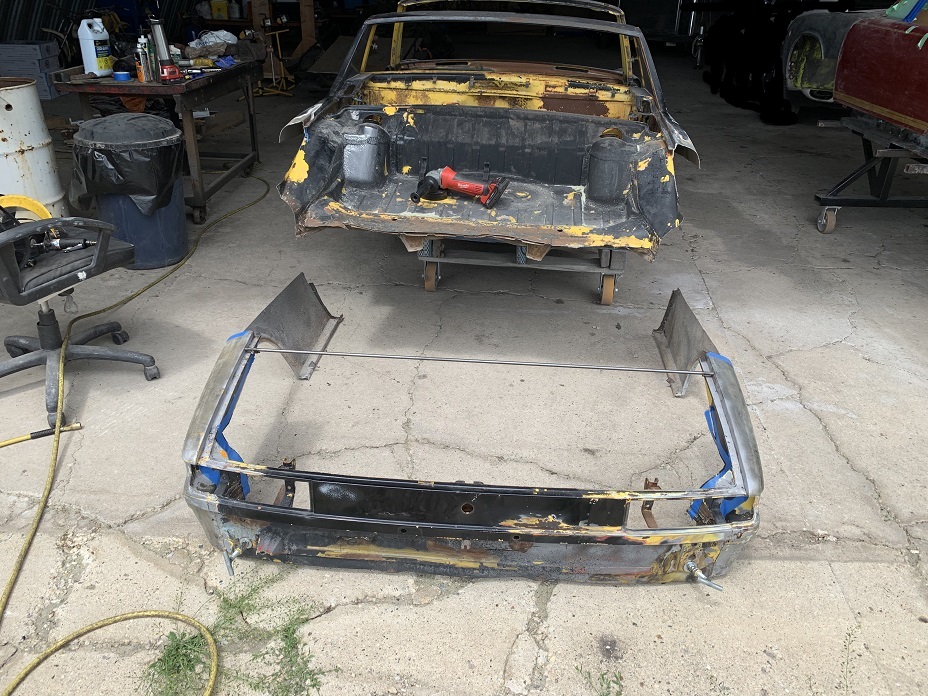 It will take A LOT of work to make these pieces acceptable, including making new where they mate to the door jam, but the end result will be far better than what I had to begin with. I'm also going to need to tweak the fitment, but not bad for simply 'cutting and pasting' (after a lot of measuring back and forth): 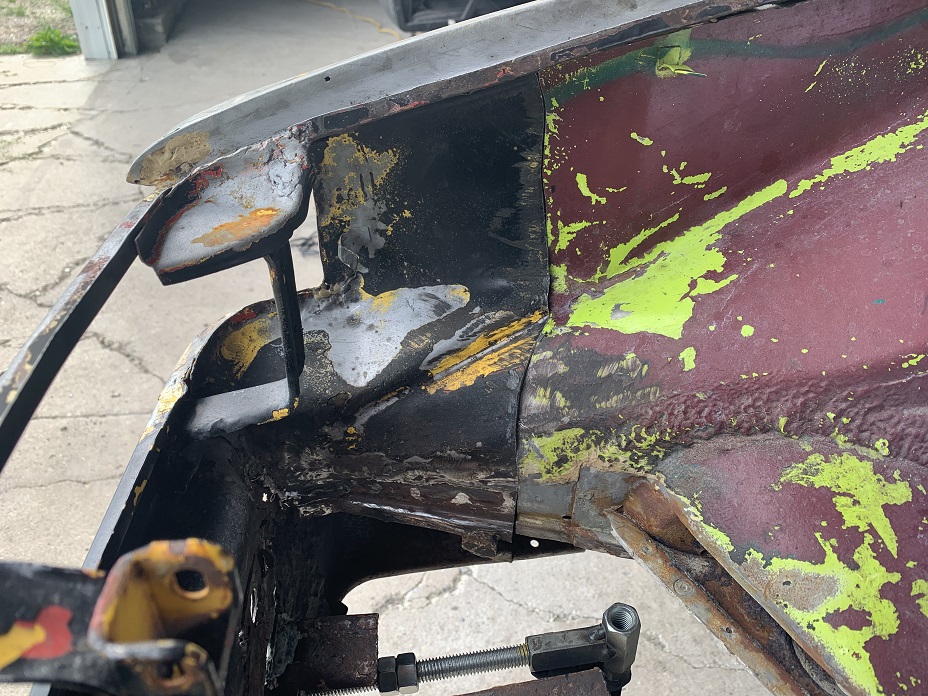 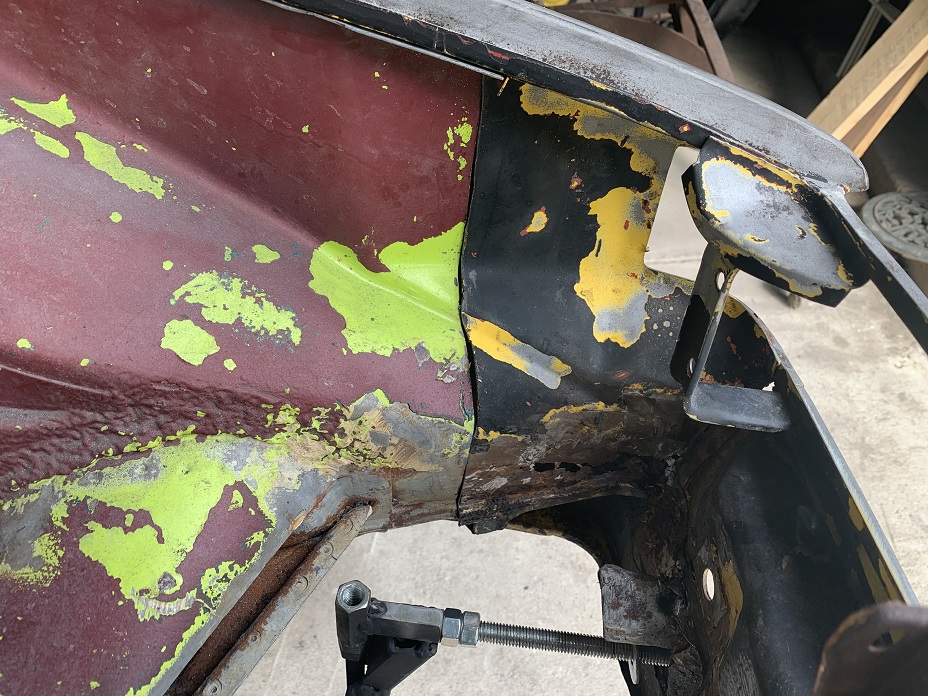 And, it appears to me that the straightening, on which I reported earlier in this thread, was effective since the tail section appears to be pretty straight! Here is the update pic. 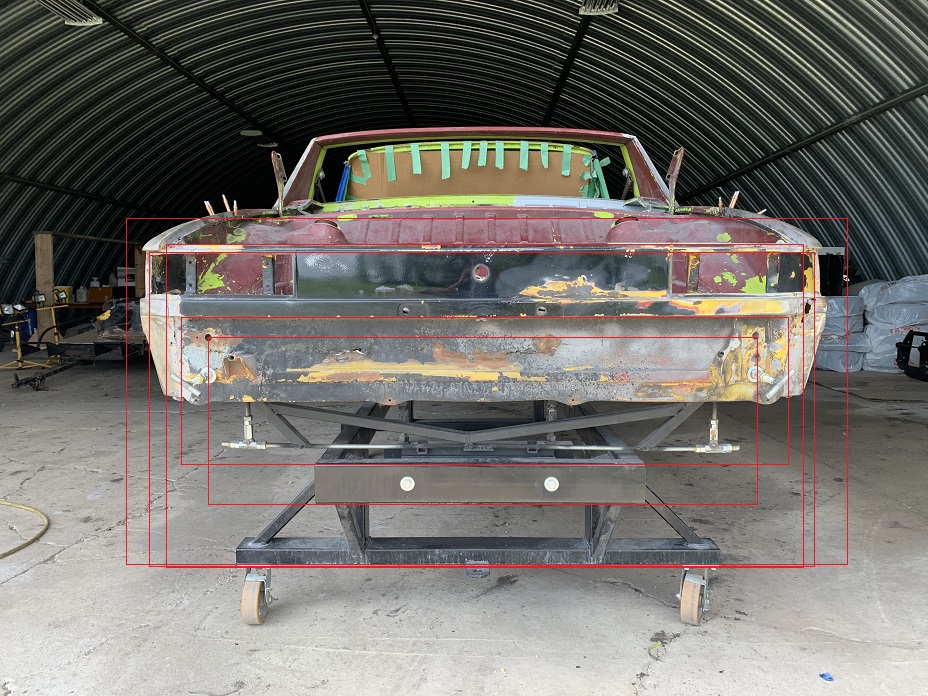 There is a lot of work to do before I'll be able to weld these parts to the car, but I'm relieved that it looks like I'll be able to make them work. Attached image(s) 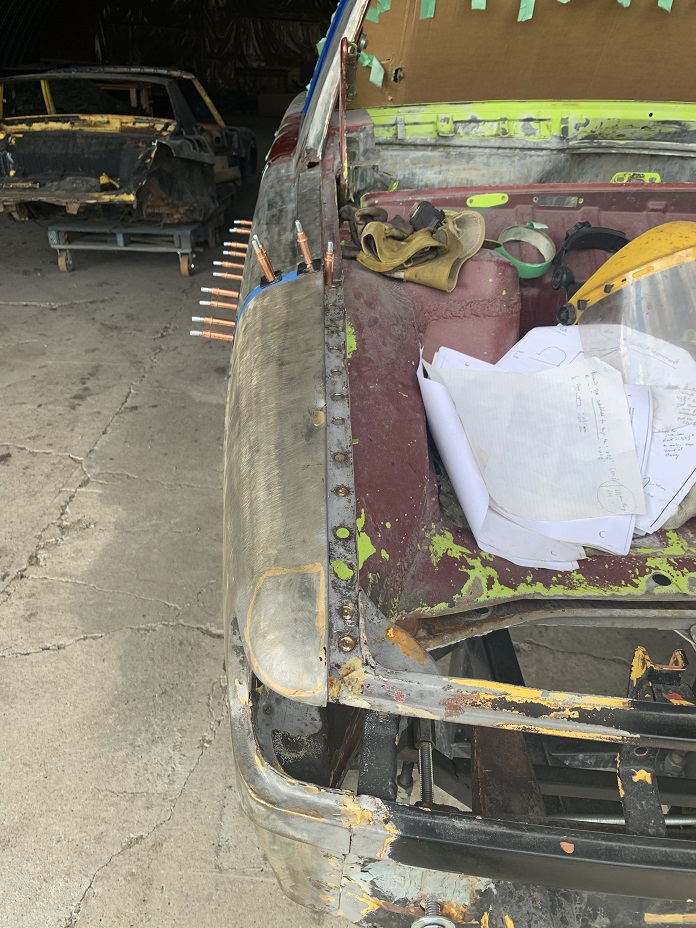 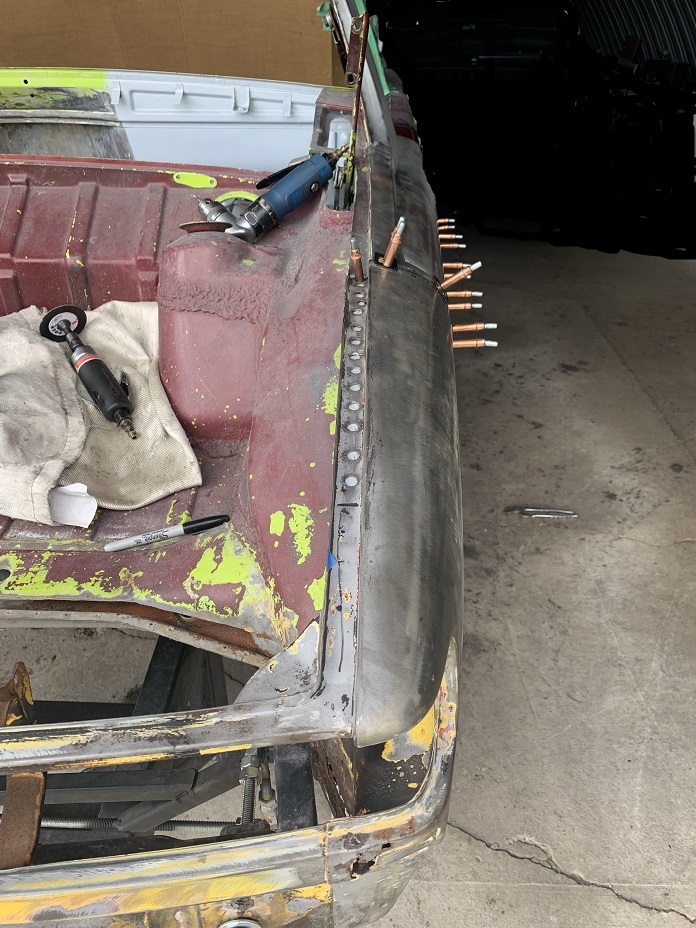
|
|
|
|
| bbrock |
Jun 24 2019, 03:50 PM
Post
#58
|
|
914 Guru Group: Members Posts: 5,269 Joined: 17-February 17 From: Montana Member No.: 20,845 Region Association: Rocky Mountains |
Holy smoke Doug! How have I missed this thread all this time? I guess I was too busy up to my eyeballs patching rust on my car. Just read the whole thread. Fantastic work! I don't think I could have pulled that off. (IMG:style_emoticons/default/pray.gif)
|
|
|
|
| doug_b_928 |
Jun 24 2019, 05:46 PM
Post
#59
|
|
Senior Member Group: Members Posts: 689 Joined: 17-January 13 From: Winnipeg Member No.: 15,382 Region Association: Canada |
QUOTE(bbrock @ Jun 24 2019, 04:50 PM)  Holy smoke Doug! How have I missed this thread all this time? I guess I was too busy up to my eyeballs patching rust on my car. Just read the whole thread. Fantastic work! I don't think I could have pulled that off. (IMG:style_emoticons/default/pray.gif) Oh yes you could. And your result would undoubtedly be better than mine! |
|
|
|
|
1 User(s) are reading this topic (1 Guests and 0 Anonymous Users)
0 Members:

|
Lo-Fi Version | Time is now: 18th April 2024 - 09:15 PM |
Invision Power Board
v9.1.4 © 2024 IPS, Inc.